


1、fastapi +gradio

from fastapi import FastAPI
from fastapi.responses import HTMLResponse
import gradio as gr

app = FastAPI()

HELLO_ROUTE = "/hello"
GOODBYE_ROUTE = "/goodbye"
iframe_dimensions = "height=300px width=1000px"

index_html = f'''
<h1>Put header here</h1>

<h3>
You can mount multiple gradio apps on a single FastAPI object for a multi-page app.
However if you mount a gradio app downstream of another gradio app, the downstream
apps will be stuck loading.
</h3>

<h3>
So in particular if you mount a gradio app at the index route "/", then all your
other mounted gradio apps will be stuck loading. But don't worry, you can still embed
your downstream gradio apps into the index route using iframes like I do here. In fact,
you probably want to do this anyway since its your index page, which you want to detail
more fully with a jinja template.
For a full example, you can see my <a href=https://yfu.one/>generative avatar webapp</a>
</h3>

<div>
<iframe src={HELLO_ROUTE} {iframe_dimensions}></iframe>
</div>

<div>
<iframe src={GOODBYE_ROUTE} {iframe_dimensions}></iframe>
</div>

'''

@app.get("/", response_class=HTMLResponse)
def index():
    return index_html


hello_app = gr.Interface(lambda x: "Hello, " + x + "!", "textbox", "textbox")
goodbye_app = gr.Interface(lambda x: "Goodbye, " + x + "!", "textbox", "textbox")


app = gr.mount_gradio_app(app, hello_app, path=HELLO_ROUTE)
app = gr.mount_gradio_app(app, goodbye_app, path=GOODBYE_ROUTE)

if __name__ == "__main__":
    import uvicorn
    uvicorn.run(app, host="127.0.0.1", port=8001)
2、隐藏下面的图标
import gradio as gr

def greet(name):
    return "Hello " + name + "!"

demo = gr.Interface(
    fn=greet,
    inputs="text",
    outputs="text",
    css="footer {visibility: hidden}"
)

demo.launch()
3、竖向多个页面
参考链接:https://github.com/gradio-app/gradio/issues/2654#issuecomment-2212506888
import gradio as gr
session_states = {}
#
# 页面可以放在外部文件中
#
def get_not_found_page(local_state):
with gr.Column() as result:
gr.Markdown("## 404 - 页面未找到")
gr.Label(f"404 页面 {type(local_state)}: {local_state.get('page')}")
return result
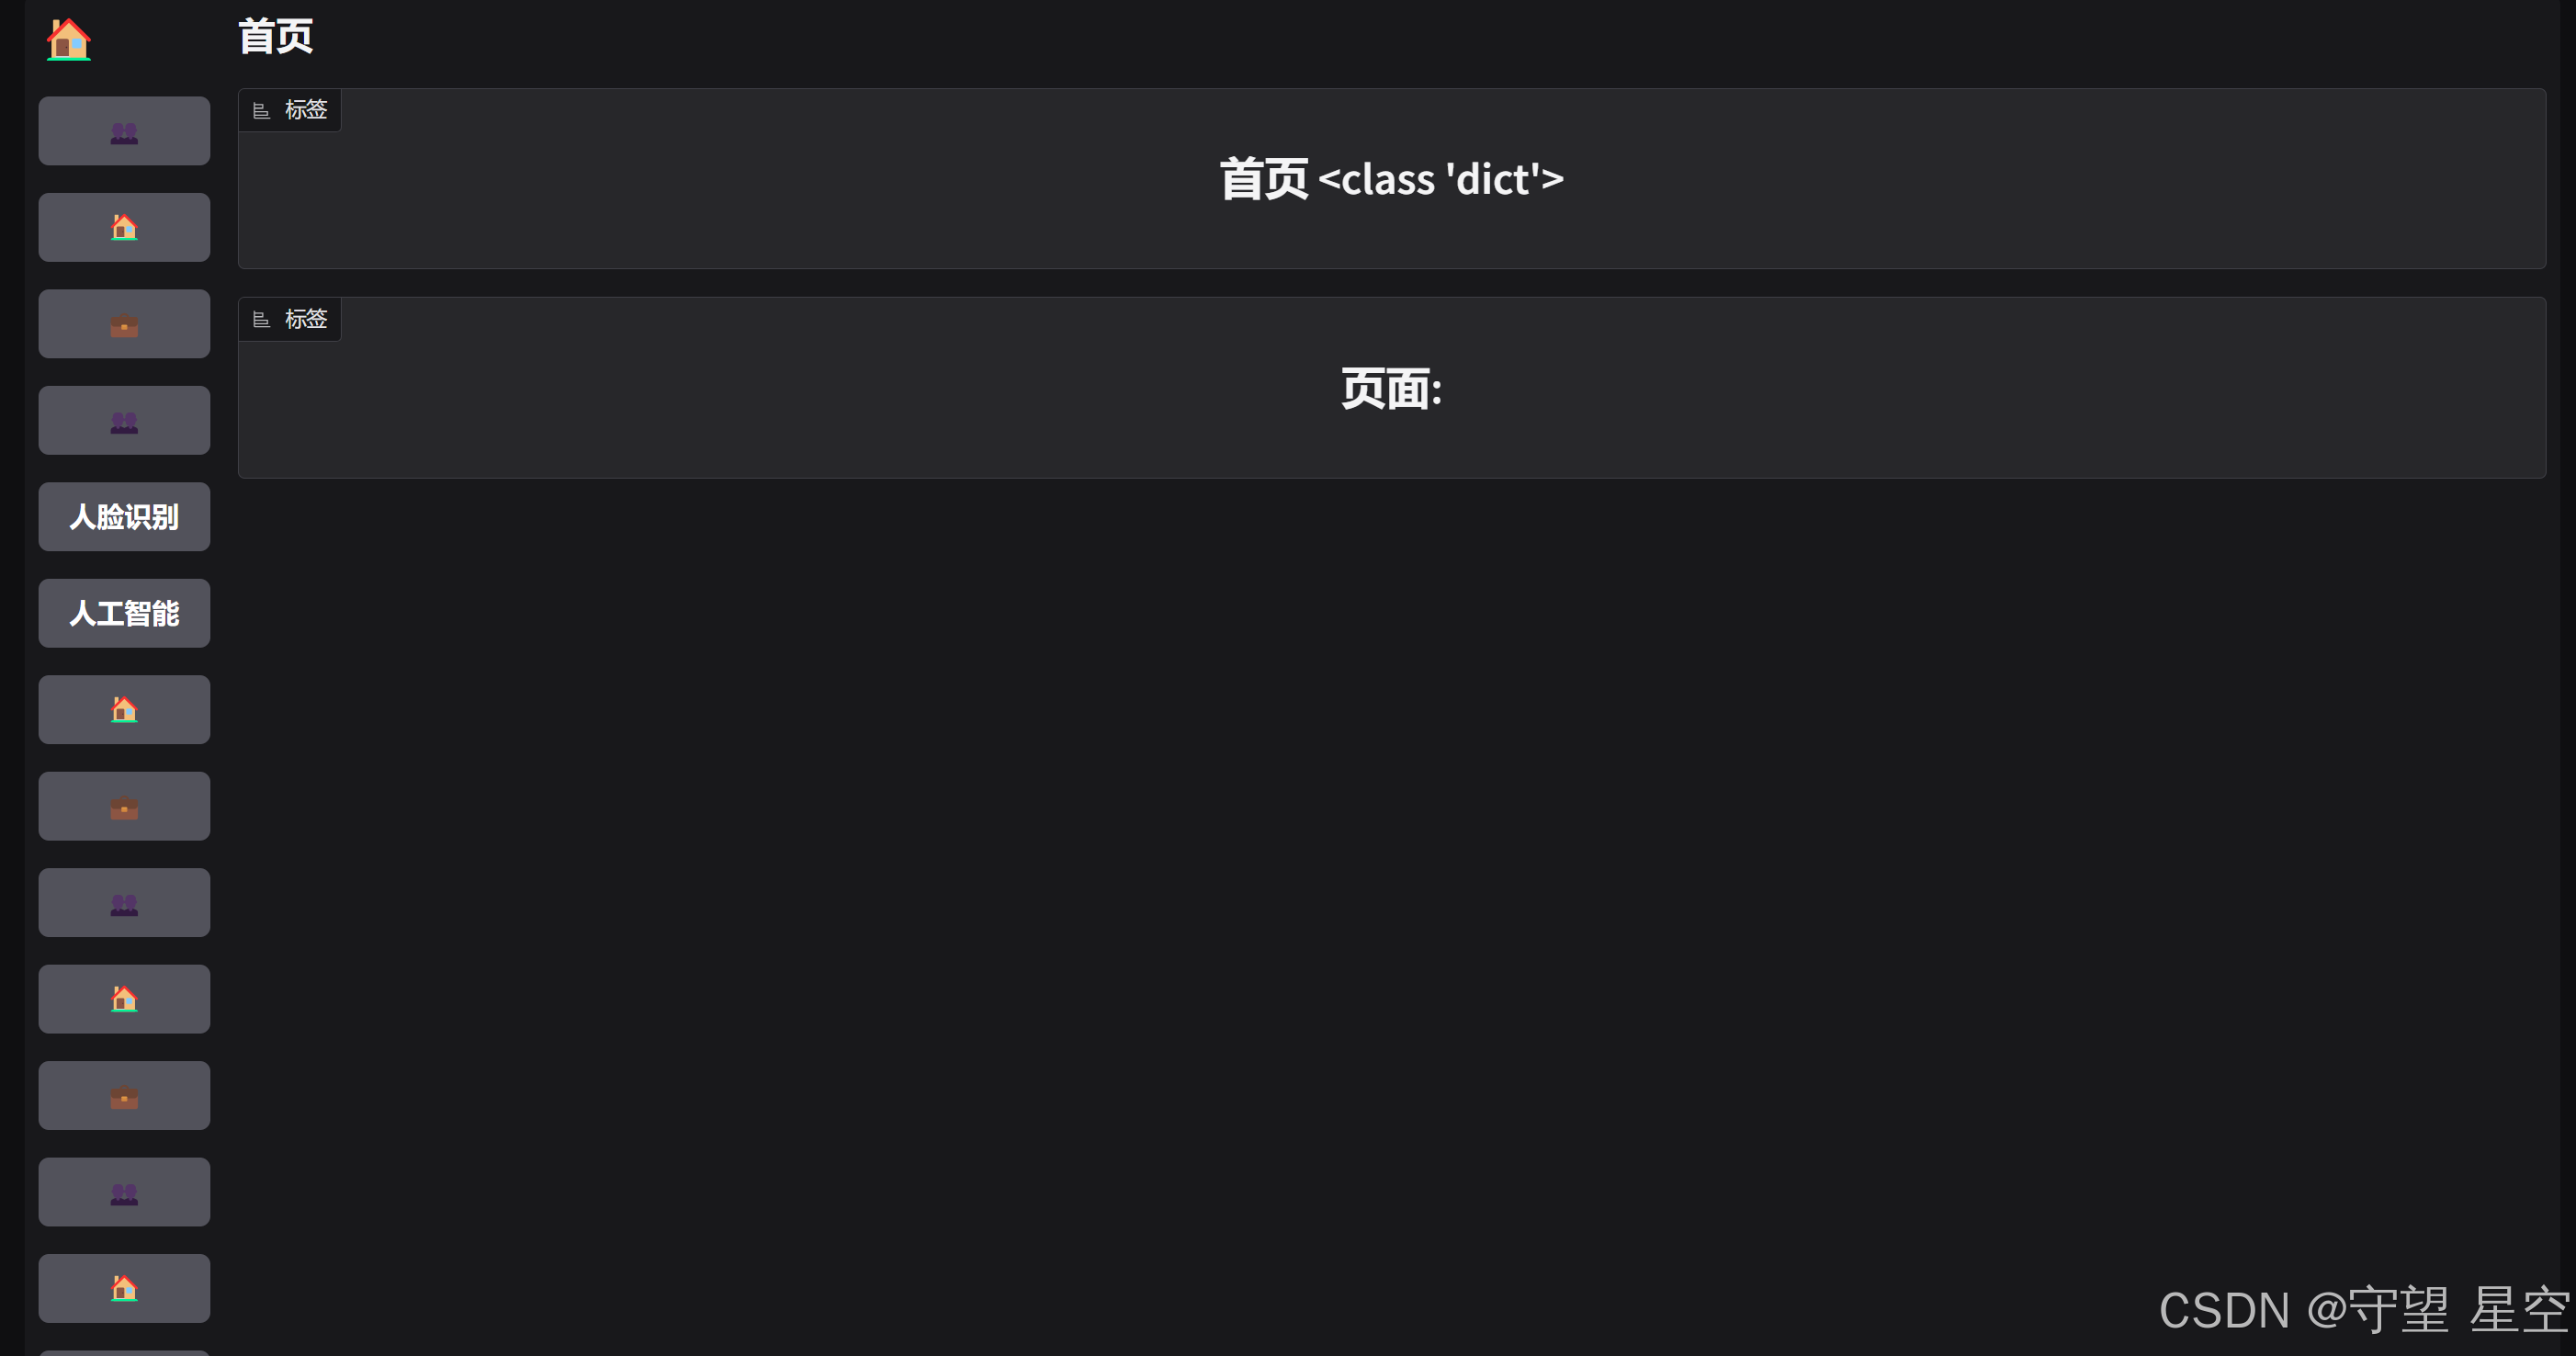
def get_landing_page(local_state):
with gr.Column() as result:
gr.Markdown("## 首页")
if local_state:
gr.Label(f"首页 {type(local_state)}")
gr.Label(f"页面: {local_state.get('page')}")
return result
def get_home_page(local_state):
with gr.Column() as result:
gr.Markdown("## 首页")
gr.Label(f"首页 {type(local_state)}")
gr.Label(f"页面: {local_state.get('page')}")
return result
def get_faq_page(local_state):
with gr.Column() as result:
gr.Markdown("## 常见问题")
gr.Label(f"常见问题页面 {type(local_state)}")
gr.Label(f"页面: {local_state.get('page')}")
return result
#
# 应用外壳 - 用于多个页面
#
with gr.Blocks() as demo:
def init_state(request: gr.Request):
# 获取 session_id
session_id = request.cookies.get("session", "")
# 如果 session_id 为空,则使用一个默认的 session_id
if not session_id:
session_id = "default_session_id" # 使用默认值避免空字符串
print(f"** 生成默认 session_id: {session_id}")
# 如果 session_id 不在 session_states 中,初始化该 session
if session_id not in session_states:
session_states[session_id] = {
"user": "jdoe123",
"session_id": session_id,
"tasks": [],
"page": "",
}
result = session_states[session_id]
# 获取 URL 参数
result["page"] = request.query_params.get("page", "") # 如果没有 page 参数,默认为空
return result # 返回填充后的状态
state = gr.State()
#
# 用请求数据填充用户的 "state"
#
demo.load(
fn=init_state,
inputs=None,
outputs=state,
queue=True,
show_progress=False,
)
content = gr.HTML("...")
@gr.render(inputs=[state], triggers=[state.change])
def page_content(local_state):
# 使用 gr.Row 创建一个横向的布局
with gr.Row(variant="panel") as result:
# 创建一个包含图标的列,设置最小宽度为50,比例为0
with gr.Column(scale=0, min_width=100):
# 在该列中添加一个HTML组件,显示🏠图标
anchor = gr.HTML("<h1>🏠</h1>")
#
# 页面导航按钮
#
# 在新的 gr.Column 中放置多个按钮,用于页面跳转
with gr.Row() as result:
# with gr.Column() as result:
# 创建一个按钮,点击后跳转到首页("/")
gr.Button("👥", link="/")
# 创建一个按钮,点击后跳转到主页(/?page=home)
gr.Button("🏠", link="/?page=home")
gr.Button("💼", link="/?page=faq")
gr.Button("👥", link="/")
gr.Button("人脸识别", link="/?page=home")
gr.Button("人工智能", link="/?page=faq")
gr.Button("🏠", link="/?page=home")
gr.Button("💼", link="/?page=faq")
gr.Button("👥", link="/")
gr.Button("🏠", link="/?page=home")
gr.Button("💼", link="/?page=faq")
gr.Button("👥", link="/")
# 创建一个按钮,点击后跳转到主页(/?page=home)
gr.Button("🏠", link="/?page=home")
gr.Button("💼", link="/?page=faq")
gr.Button("👥", link="/")
gr.Button("人脸识别", link="/?page=home")
gr.Button("人工智能", link="/?page=faq")
gr.Button("🏠", link="/?page=home")
gr.Button("💼", link="/?page=faq")
gr.Button("👥", link="/")
gr.Button("🏠", link="/?page=home")
gr.Button("💼", link="/?page=faq")
gr.Button("🏠", link="/?page=home")
gr.Button("💼", link="/?page=faq")
gr.Button("👥", link="/")
# 创建一个按钮,点击后跳转到主页(/?page=home)
gr.Button("🏠", link="/?page=home")
gr.Button("💼", link="/?page=faq")
gr.Button("👥", link="/")
gr.Button("人脸识别", link="/?page=home")
gr.Button("人工智能", link="/?page=faq")
gr.Button("🏠", link="/?page=home")
gr.Button("💼", link="/?page=faq")
gr.Button("👥", link="/")
gr.Button("🏠", link="/?page=home")
gr.Button("💼", link="/?page=faq")
with gr.Column(scale=12):
#
# 页面路由处理
#
if (
local_state is None
or local_state.get("page") is None
or len(local_state["page"]) < 1
):
return get_landing_page(local_state), local_state
elif local_state["page"] == "home":
return get_home_page(local_state), local_state
elif local_state["page"] == "faq":
return get_faq_page(local_state), local_state
else:
return (
get_not_found_page(local_state),
local_state,
)
#
# 临时解决方案:最好延迟渲染直到 state 被填充
#
def page_content_update(local_state):
return gr.HTML("...", visible=False)
state.change(fn=page_content_update, inputs=state, outputs=content)
demo.launch()
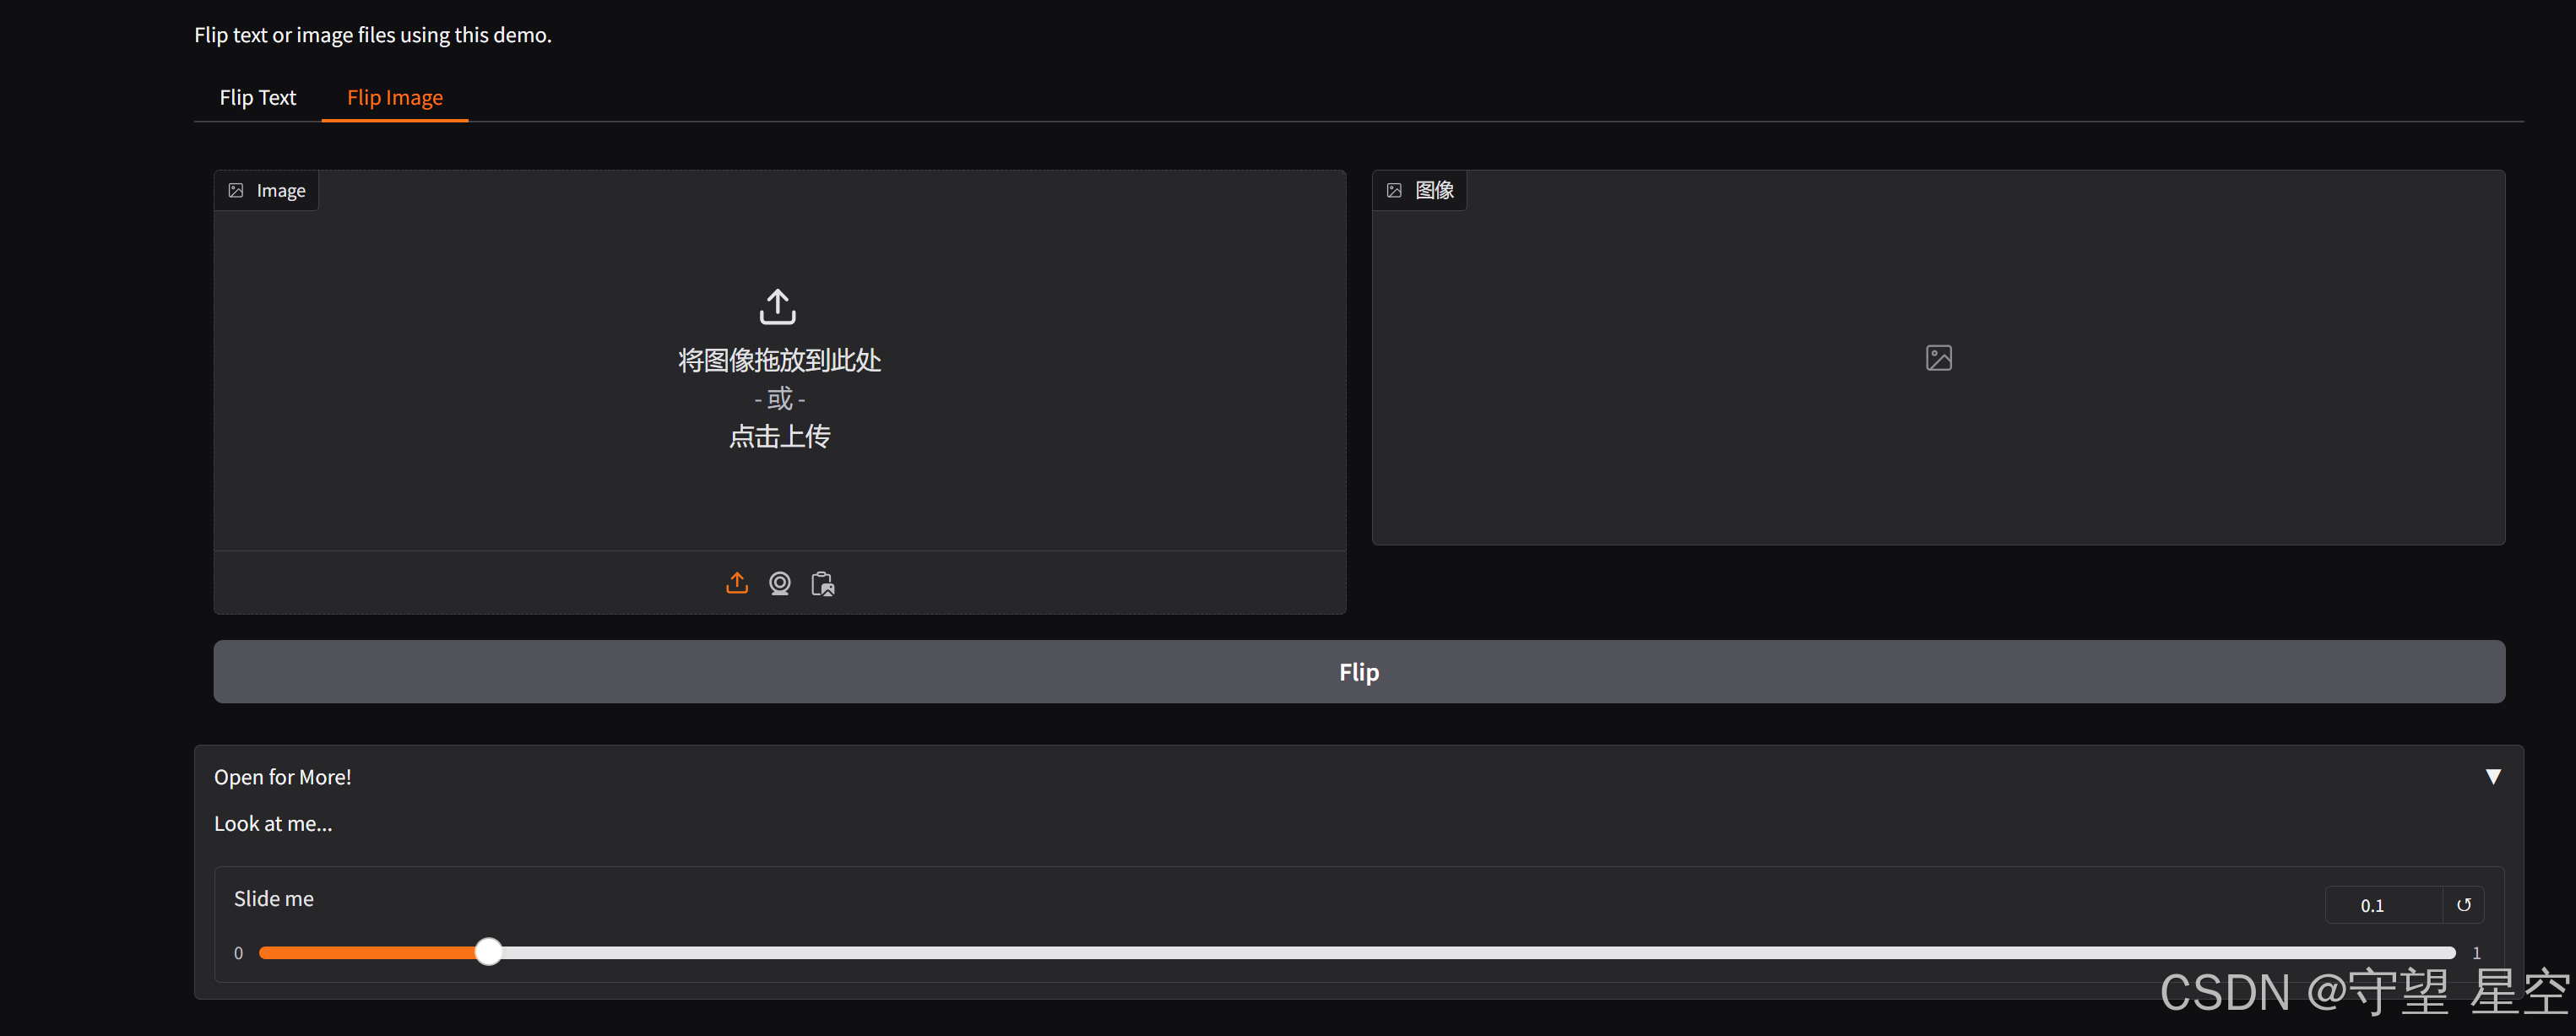
3、横向多个页面
参考链接:https://www.gradio.app/guides/controlling-layout
import numpy as np
import gradio as gr

def flip_text(x):
    return x[::-1]

def flip_image(x):
    return np.fliplr(x)

with gr.Blocks() as demo:
    gr.Markdown("Flip text or image files using this demo.")
    with gr.Tab("Flip Text"):
        text_input = gr.Textbox()
        text_output = gr.Textbox()
        text_button = gr.Button("Flip")
    with gr.Tab("Flip Image"):
        with gr.Row():
            image_input = gr.Image()
            image_output = gr.Image()
        image_button = gr.Button("Flip")

    with gr.Accordion("Open for More!", open=False):
        gr.Markdown("Look at me...")
        temp_slider = gr.Slider(
            0, 1,
            value=0.1,
            step=0.1,
            interactive=True,
            label="Slide me",
        )

    text_button.click(flip_text, inputs=text_input, outputs=text_output)
    image_button.click(flip_image, inputs=image_input, outputs=image_output)

demo.launch()
5、修改ip和端口号
demo.launch(server_name=“192.168.192.67”,server_port=8909)
访问方法:http://192.168.192.67:8909


 2149
2149

 被折叠的 条评论
为什么被折叠?
被折叠的 条评论
为什么被折叠?
 到【灌水乐园】发言


