


本文代码来自于github(https://github.com/1297rohit/RCNN),可以去给原作者点个🌟,源代码使用了kears,现在主要使用pytorch实现了一遍。
首先看RCNN需要做什么
如上图所示,R-CNN这个物体检查系统可以大致分为四步进行:
- 获取输入图像
- 提取约2000个候选区域
- 将候选区域分别输入CNN网络(这里需要将候选图片进行缩放)
- 将CNN的输出输入SVM中进行类别的判定
- 如果IOU后,候选框保留,在图片上标注
本文语言使用pytorch
1.输入和输出
输入为一张图片

输出为csv文件

输出为包含了目标框的(x,y,w,h)的csv文件
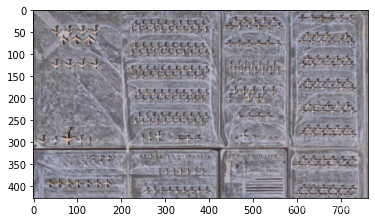
代码读取图片并展示目标标注框
# 导入库
import os
import cv2
import pandas as pd
import matplotlib.pyplot as plt
import numpy as np
#图片文件夹和csv的文件夹
path = "Images"
annot = "Airplanes_Annotations"
for e,i in enumerate(os.listdir(annot)):
    if e < 10:
#         图片名称
        filename = i.split(".")[0]+".jpg"
        print(filename)
#         读入图片
        img = cv2.imread(os.path.join(path,filename))
#       读入目标框的信息
        df = pd.read_csv(os.path.join(annot,i))
#         展示原图
        plt.imshow(img)
        for row in df.iterrows():
            x1 = int(row[1][0].split(" ")[0])
            y1 = int(row[1][0].split(" ")[1])
            x2 = int(row[1][0].split(" ")[2])
            y2 = int(row[1][0].split(" ")[3])
#             在图上标注框
            cv2.rectangle(img,(x1,y1),(x2,y2),(255,0,0), 2)
        plt.figure()
        plt.imshow(img)
        break
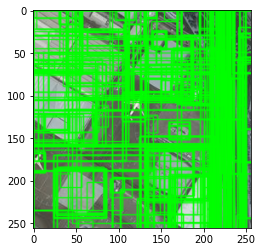
2.产生候选框
opencv实现了选择性搜索算法,可以给出上千个根据有物体的可能性降序排列的候选区域。
下图是画出了前面200250个候选区域的效果。一般来说。10001200个候选区域基本能胜任物体检测的任务了
主要实现是靠createSelectiveSearchSegmentation这个函数
# v2.useOptimized()函数可以查看当前优化是否开启
# cv2.setUseOptimized()可以设置是否开启优化
cv2.setUseOptimized(True);
# 如果报错,检查是否安装的是opencv,如果安装的opencv(简版不包含一些函数),卸载安装opencv-contrib-python
ss = cv2.ximgproc.segmentation.createSelectiveSearchSegmentation()
#读入图片
im = cv2.imread(os.path.join(path,"42850.jpg"))
ss.setBaseImage(im)
ss.switchToSelectiveSearchFast()
#提取的候选框
rects = ss.process()
imOut = im.copy()
print(rects.shape)
# plt.imshow(im)
for i, rect in (enumerate(rects)):
    x, y, w, h = rect
#     print(x,y,w,h)
#     imOut = imOut[x:x+w,y:y+h]
    cv2.rectangle(imOut, (x, y), (x+w, y+h), (0, 255, 0), 1, cv2.LINE_AA)
# plt.figure()
plt.imshow(imOut)
(445, 4)
3. 整合前两步
train_images=[]#x
train_labels=[]#y
#定义bb1和bb2的iou
def get_iou(bb1, bb2):
    assert bb1['x1'] < bb1['x2']
    assert bb1['y1'] < bb1['y2']
    assert bb2['x1'] < bb2['x2']
    assert bb2['y1'] < bb2['y2']

    x_left = max(bb1['x1'], bb2['x1'])
    y_top = max(bb1['y1'], bb2['y1'])
    x_right = min(bb1['x2'], bb2['x2'])
    y_bottom = min(bb1['y2'], bb2['y2'])

    if x_right < x_left or y_bottom < y_top:
        return 0.0

    intersection_area = (x_right - x_left) * (y_bottom - y_top)

    bb1_area = (bb1['x2'] - bb1['x1']) * (bb1['y2'] - bb1['y1'])
    bb2_area = (bb2['x2'] - bb2['x1']) * (bb2['y2'] - bb2['y1'])

    iou = intersection_area / float(bb1_area + bb2_area - intersection_area)
    assert iou >= 0.0
    assert iou <= 1.0
    return iou
ss = cv2.ximgproc.segmentation.createSelectiveSearchSegmentation()
for e,i in enumerate(os.listdir(annot)):
#.  e==100是因为我觉得太慢了,就搞了100个
    if(e==100):
        break
    try:
        if i.startswith("airplane"):
            filename = i.split(".")[0]+".jpg"
            print(e,filename)
#             读入图片
            image = cv2.imread(os.path.join(path,filename))
#            读入目标框的位置信息
            df = pd.read_csv(os.path.join(annot,i))
            gtvalues=[]
#           将框加入到gtvalues,将目标框保存下来
            for row in df.iterrows():
                x1 = int(row[1][0].split(" ")[0])
                y1 = int(row[1][0].split(" ")[1])
                x2 = int(row[1][0].split(" ")[2])
                y2 = int(row[1][0].split(" ")[3])
                gtvalues.append({"x1":x1,"x2":x2,"y1":y1,"y2":y2})
#         将这张图片进行选择性搜索,得到候选框
            ss.setBaseImage(image)
            ss.switchToSelectiveSearchFast()
            ssresults = ss.process()
            imout = image.copy()
            counter = 0
            falsecounter = 0
            flag = 0
            fflag = 0
            bflag = 0
#             遍历这张图片所有的候选框
            for e,result in enumerate(ssresults):
                print('e,result:',e,result)
#             因为约2k个候选框,多余不要^_^
                if e < 2000 and flag == 0:
#                     遍历目标物体框
                    for gtval in gtvalues:
                        x,y,w,h = result
#                       得到候选框和目标框的iou
                        iou = get_iou(gtval,{"x1":x,"x2":x+w,"y1":y,"y2":y+h})
#                       一处物体只要30个
                        if counter < 30:
#                             候选框和目标框重合度高,认为ok
#                             加入训练集的图片
                            if iou > 0.70:
                                timage = imout[y:y+h,x:x+w]
#                               interpolation插值方法
                                resized = cv2.resize(timage, (224,224), interpolation = cv2.INTER_AREA)
                                train_images.append(resized)
                                #这个框的图片是飞机
                                train_labels.append(1)
                                counter += 1
                        else :
                            fflag =1
                        if falsecounter <30:
                            if iou < 0.3:
                                timage = imout[y:y+h,x:x+w]
                                resized = cv2.resize(timage, (224,224), interpolation = cv2.INTER_AREA)
                                train_images.append(resized)
                                #这个框的图片不是飞机
                                train_labels.append(0)
                                falsecounter += 1
                        else :
                            bflag = 1
                    if fflag == 1 and bflag == 1:
                        print("inside")
                        flag = 1
    except Exception as e:
        print(e)
        print("error in "+filename)
        continue
#得到x和y
X_new = np.array(train_images)
y_new = np.array(train_labels)
4.CNN识别
将候选框送入CNN,提取出特征向量送入SVM识别,这里为了简单直接使用CNN识别,原文使用了AlexNet,这里使用了vgg16,vgg16的输入图片大小为224x224
import torch
X_new=torch.from_numpy(X_new)
y_new=torch.from_numpy(y_new)
print(X_new.shape,y_new.shape)
# 只检测图片中是否有飞机
#因为torch接受(b,c,w,h),所以更改维度
X_new=X_new.transpose(3,1)
import torch
from torch import nn
from torchvision.models import vgg16
vgg=vgg16(pretrained=True)
#冻结参数进行训练
for p in vgg.parameters():
    p.requires_grad=False

# vgg16的输入为224x224
class Mynet(nn.Module):
    def __init__(self):
        super(Mynet, self).__init__()
        self.vgg=vgg
        #下面都是线性分类层
        self.fc1=nn.Linear(1000,512)
        self.fc2=nn.Linear(512,256)
        self.fc3=nn.Linear(256,256)
        self.fc4=nn.Linear(256,10)
        self.fc5=nn.Linear(10,2)
        self.relu=nn.ReLU()
        self.softmax=nn.Softmax(dim=1)
    def forward(self,x):
        x=vgg(x)
        x=self.relu(self.fc1(x))
        x = self.relu(self.fc2(x))
        x = self.relu(self.fc3(x))
        x = self.relu(self.fc4(x))
        x = self.softmax(self.fc5(x))
        return x
from torch.utils.data import TensorDataset,DataLoader
dataset=TensorDataset(X_new,y_new)
dataloader=DataLoader(dataset=dataset,
                      batch_size=64,
                      shuffle=True,
                      num_workers=0)
net=Mynet()
optimizer=torch.optim.Adam(net.parameters(),lr=0.0005)
criterion=nn.CrossEntropyLoss()
#进行训练
for i,(x,y) in enumerate(dataloader):
    pred=net(x.to(torch.float32))
    #pred=net(x)
    loss1 = criterion(pred,y)  # 计算损失值
    print(i,loss1.item())
    optimizer.zero_grad()
    loss1.backward()                    # loss反向传播
    optimizer.step()                   # 反向传播后参数更新
    #print(x.shape,y.shape,pred.shape)
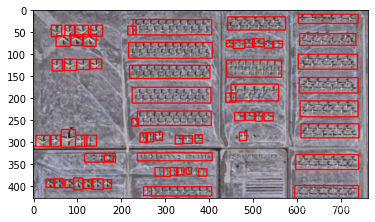
5.预测
使用vgg16为骨架预测,但是误差好像并不如人意
z=0
for e1,i in enumerate(os.listdir(path)):
#.  z==1为了早点结束
    if(z==1):
        break
    if i.startswith("428483"):
        z += 1
        img = cv2.imread(os.path.join(path,i))
        ss.setBaseImage(img)
        ss.switchToSelectiveSearchFast()
        ssresults = ss.process()
        imout = img.copy()
        for e,result in enumerate(ssresults):
        #.  同样e==50为了早点结束
            if(e==50):
                break
            if e < 2000:
                x,y,w,h = result
                timage = imout[y:y+h,x:x+w]
                resized = cv2.resize(timage, (224,224), interpolation = cv2.INTER_AREA)
                img = np.expand_dims(resized, axis=0)
                img=torch.from_numpy(img)
                img=img.transpose(3,1)
                print(e,img.shape)
                out= net(img.to(torch.float32))
                if out[0][0] > 0.65:
                    cv2.rectangle(imout, (x, y), (x+w, y+h), (0, 255, 0), 1, cv2.LINE_AA)
        plt.figure()
        plt.imshow(imout)


 1万+
1万+

 被折叠的 条评论
为什么被折叠?
被折叠的 条评论
为什么被折叠?
 到【灌水乐园】发言


