


C++ 和 Python 案例:比较与见解。
概述
本文通过代码生成实验来说明人类与人工智能协作的重要性,强调了当人类专业知识增强人工智能效果时所实现的协同效应。通过提供针对性的知识和背景信息,可以更好地引导模型的输出朝向实际解决方案。这种协作动态展示了人类直觉与人工智能辅助如何有效互补。
文章的核心是从Python和C++代码生成实验中得出的关键见解,反映了人类专业知识的整合如何显著提升人工智能驱动的任务。
实验
我最近阅读了Andrew Regan(等人)2016年的论文,讨论了一种“情感分析工具,用于提取读者感知的书面故事的情感内容”。巧合的是,我刚刚写了一篇短篇小说,并且想测试他的某些算法。这个实验也是评估ChatGPT代码生成能力的绝佳机会,该能力已显著提高。我定期评估大型语言模型,以跟踪它们的进展,而这些实验提供了有用的见解。
这也是分享一些经验教训的机会。在最近的一篇Substack文章中,我讨论了如何通过协作的多提示方法,成功生成了一个简单情感分析工具的有效Python代码。与其让ChatGPT在单一提示中处理所有事情,通常更有效的做法是迭代——逐步审查其输出,提供反馈并完善响应——反复进行。您可以在下面的链接中找到有关该实验的更多细节。
关于ChatGPT o1-preview代码生成的思考 (substack.com)
我最近用C++进行了类似的实验,请ChatGPT o1-preview根据我早期Python实验的见解生成一个情感分析工具。本文提供了两个实验的轶事比较及获得的见解。
虽然两个实验都取得了成功,但细节有所不同。Python代码生成过程无需调试,仅需最小的代码清理,尽管我确实需要指导其算法和API选择。相比之下,C++代码生成过程需要更多的参与——不仅要指导代码生成,还要在之后进行调试和清理代码。
这种差异并不令人惊讶——大量的Python代码可供大型语言模型进行训练。与机器学习任务相关的Python代码也受益于大量开源模块的可用性。例如,ChatGPT通常更倾向于使用NLTK进行Python中的文本标记化,并且在OpenAI API集成方面对LangChain非常熟练。
- 自然语言工具包(NLTK) — 维基百科
- LangChain — 维基百科
ChatGPT生成的C++版本并未依赖于外部标记器;相反,它实现了自己的标记器。然而,ChatGPT使用了外部C++集成包与OpenAI API进行交互。最终,我引导ChatGPT朝着更适合我评估的解决方案前进。我要求它调整应用程序架构,以最小化我需要集成的外部C++包的数量。
在这两种情况下,与模型进行逐步对话有助于完善需求、澄清模糊之处,并逐步改进代码。
讨论部分将比较Python和C++代码生成实验的见解。
Python 实验
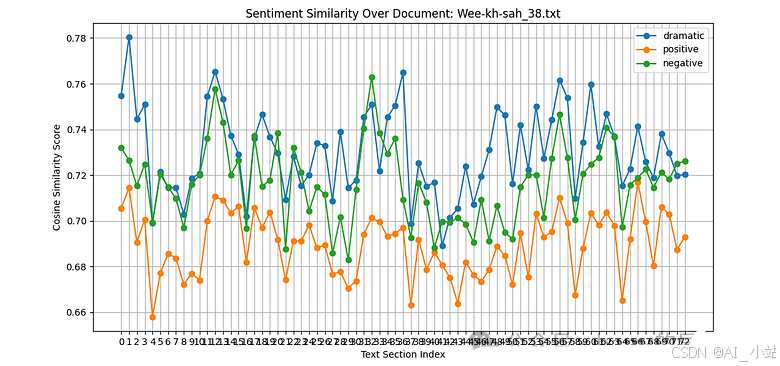
图 1 展示了我这篇 11,000 字的科幻短篇小说中情感的变化。根据工具的分析,整体“情绪”或情感影响更倾向于“消极”而非“积极”。
消极、积极和戏剧强度水平是基于文本窗口与预定义“情感锚点”嵌入的语义相似性。使用了以下情感锚点:
- ‘dramatic’ : “我感到戏剧性、兴奋和肾上腺素激增。”
- ‘positive’: “我今天感到非常快乐和愉悦!”
- ‘neutral’: “天气一般,没什么特别的事情发生。”
- ‘negative’: “我今天感到非常悲伤和沮丧。”
情感或情绪是通过 ChatGPT o1-preview 生成的 Python 脚本计算得出的(附录 A)。我不需要调试代码。然而,在代码生成过程中,ChatGPT 和我在算法和设计上进行了广泛的迭代(附录 B)。
两个实验中的文本相似性是基于文本窗口与情感锚点之间的 余弦相似性。
在 Python 实验中,计算这些情感或情绪的工具是 ChatGPT (o1-preview) 生成的 Python 脚本,如附录 A 所示。尽管我不需要调试代码,但 ChatGPT 和我进行了迭代,以完善算法和代码设计,详细内容见附录 B。
C++ 实验
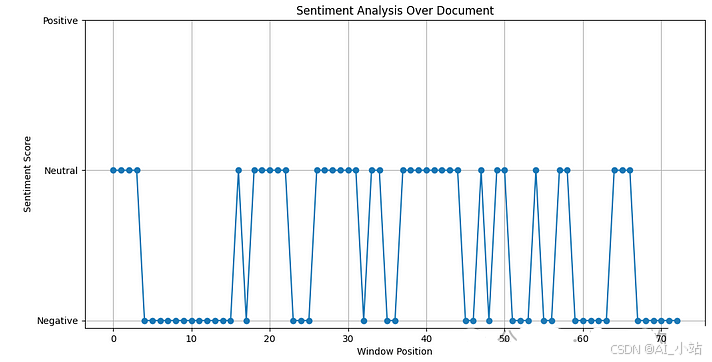
图 2 展示了 C++ 程序的输出。我并没有要求它绘制与图 1 相同的细节,但结果是一样的。然而,显著的区别在于应用的架构;它不是一个单一的应用程序或可执行文件。前端的 C++ 情感分析部分与一个单独的 Python 进程进行通信(使用 REST 交互)。
- REST — 维基百科(表现性状态转移)
我最初要求 ChatGPT 生成 C++ 代码,使用的提示汇总了我们之前交流中得出的许多结论,当时我们创建了 Python 工具。提示中包含的许多元素在附录 B 中列出。
我给 ChatGPT 生成 C++ 情感工具的初始提示如下。
Propose a sentiment analysis C++ program based on using OpenAI embeddings and a sliding text window applied over text documents.

For example, it may want to obtain the embeddings for the documents in the following manner:

    embeddings_model = OpenAIEmbeddings(openai_api_key=openai_api_key)
    texts = [doc.page_content for doc in documents]
    embeddings = embeddings_model.embed_documents(texts)


You should use the distance between the embeddings of the input text and predefined embeddings that represent key sentiments (e.g., positive, neutral, and negative). This approach leverages semantic similarity to classify sentiment based on how close the input text's embedding is to these predefined "sentiment anchor" embeddings.


The building block algorithm steps are, per document:

Tokenize text in the document.
Create sliding windows.
Generate embeddings for each window using LLM.
Classify sentiment for each window.
Optional smoothing of sentiments across windows.
Visualize the sentiments as a graph representing the entire document.


Design Guidelines:

The program should be written in C++.
The program should call a REST Python service that uses Python modules to implement the tokenizer and to obtain the OpenAI embedding model.

Constraints:

Do not use libcurl.
Do not use Boost and Boost.Asio
请注意,附录 B 中的提示不包括最后两个部分“设计指南”和“约束”。这些是新的添加内容。我特别要求 ChatGPT 集成 OpenAI API,使用通过 HTTP/REST 连接到 C++ 客户端的 Python 服务,而不是尝试从 C++ 客户端直接与 libcurl 或 Boost 进行集成。
在之前的实验中,ChatGPT 通常使用 libcurl 或 Boost.Asio 生成 C++ 代码来进行 HTTP(S) 请求,除非明确指示其他方式。设置 libcurl 或 Boost 比使用 Python 的特性和模块更复杂。例如,libcurl 需要其库专门为 Windows 构建。为了简化这个实验,我选择让 C++ 客户端通过 Python 服务依赖于 OpenAI API。
- cURL/ libcurl — 维基百科
- Boost (C++ libraries) — 维基百科
图 3 描述了 ChatGPT 生成的架构,用于实现 C++ 情感分析工具。情感分析程序(客户端)通过 HTTP/REST 与 Python 服务进行通信,以获取大型语言模型的嵌入。Python RESTful 服务通过 Python 网络资源与 OpenAI 进行通信以获取模型嵌入。C++ 客户端将结果输出到 CSV 文件。ChatGPT 生成了一个 Python 脚本来以图形格式可视化这些结果。ChatGPT 提供了使用 Qt 进行 C++ 可视化(如果我坚持的话,可能还有其他选项),但为了保持这个实验的简单性,我选择了 Python 脚本。
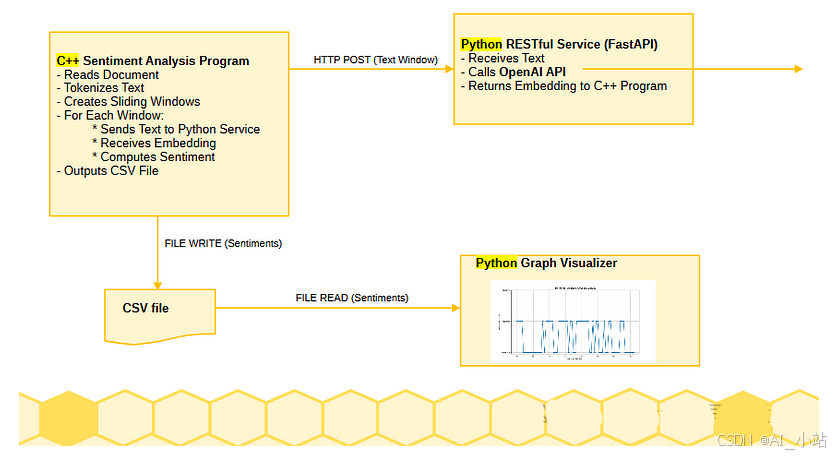
C++ 客户端是在 Microsoft Visual Studio Community 2022 版本 17.11.5 中构建和执行的。Python 服务是在 PyCharm 2024.1(社区版)的虚拟环境中本地运行的。
- Visual Studio — 维基百科
- PyCharm — 维基百科
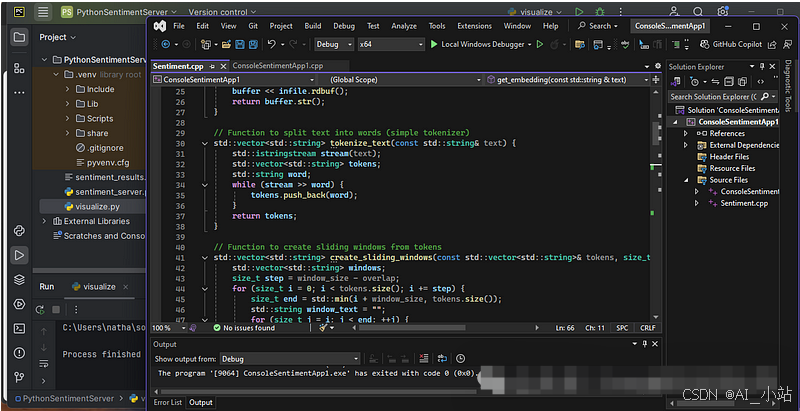
如前所述,ChatGPT 生成的 C++ 代码在我能够编译、链接和执行之前需要进行“代码工程”。我遇到的主要问题是—
- 不同版本的 C++ 之间的代码不兼容。本实验中的代码是使用 ISO C++20 标准编译的。
- 不兼容性源于模板实现和版本之间的差异、我实验的特定外部模块的相互作用、我使用的生成代码以及所使用的 C++ 编译器的版本。
轻松一点,ChatGPT o1-preview 可能会表现出同情心。请注意以下摘录来自它的一个响应!
我很抱歉听到 您仍然遇到与 stdext::checked_array_iterator 相关的弃用警告……
讨论
这些实验展示了在与AI进行代码生成时,迭代的多提示方法的重要性。这种方法允许对算法进行精炼,识别模糊之处,并整体改善生成的代码。
一个关键的见解是,交互式的迭代方法在生成可用代码方面比依赖单一详细提示更有效。在Python示例中,我通过多个迭代步骤引导ChatGPT,生成满足我特定需求的算法。这种逐步精炼使代码与我的目标之间的对齐更加良好。
同样,在C++示例中,迭代对于解决代码错误和集成问题至关重要。这些发现表明,与模型的持续互动,而不是期待从一开始就得到完整解决方案,能够生成实用且功能性的代码。
另一个重要的见解是,您在开始时了解的越多或在过程中发现的越多——无论是来自经验还是其他来源——您就能更快地精炼提示,以引导大型语言模型朝着良好的解决方案前进。在Python情感工具示例中,我对相关算法和API的熟悉程度使我能够帮助ChatGPT迅速收敛到一个干净而有效的实现。
在C++版本中,我能够引导ChatGPT远离我发现耗时的外部模块,并提出一个更合适的应用架构。ChatGPT利用了我的指导,最终交付了一个Python REST服务,以弥合C++复杂性与Python API集成简便性之间的差距。这是人机协同的一个实际例证。通过引导AI朝着更高效的架构发展,避免了不必要的复杂性,从而达成了一个更简单但令人满意的解决方案。
参考文献
Reagan, A.J., Mitchell, L., Kiley, D. et al. 故事的情感弧线主要由六种基本形状主导。 EPJ Data Sci. 5, 31 (2016). https://doi.org/10.1140/epjds/s13688-016-0093-1
附录 A
由 ChatGPT 生成的用于简单情感分析的 Python 代码。
import os
import numpy as np
import matplotlib.pyplot as plt
from sklearn.metrics.pairwise import cosine_similarity
import nltk

# Import necessary classes from langchain
from langchain.embeddings import OpenAIEmbeddings
from langchain.document_loaders import TextLoader
from langchain.text_splitter import NLTKTextSplitter

# Download NLTK data files (only need to run once)
nltk.download('punkt')


# Set up OpenAI API key
openai_api_key = ""

# Specify the paths to your text files
file_paths = [
    "./data/cyclops_storm.txt",
    "./data/Wee-kh-sah_38.txt"
]

# Define the function to read and split the text files
def do_read_text_files(file_paths):
    documents = []
    for file_path in file_paths:
        loader = TextLoader(file_path, encoding='utf-8')
        raw_documents = loader.load()
        for document in raw_documents:
            content = document.page_content
            metadata = document.metadata
            print(f'File: {file_path}, length of page_content={len(content)}')

        text_splitter = NLTKTextSplitter(chunk_size=1000, chunk_overlap=100)
        text_content = " ".join([doc.page_content for doc in raw_documents])
        text_sections = text_splitter.split_text(text_content)
        print(f'File: {file_path}, number of text sections chunked={len(text_sections)}')

        documents.append({
            'file_path': file_path,
            'text_sections': text_sections
        })
    return documents

# Define the function to generate embeddings
def generate_embeddings(texts, openai_api_key):
    embeddings_model = OpenAIEmbeddings(openai_api_key=openai_api_key)
    embeddings = embeddings_model.embed_documents(texts)
    return embeddings

# Read and split the text files into sections
documents = do_read_text_files(file_paths)

# Define the extended sentiment anchor texts and get their embeddings
sentiment_texts = {
    'dramatic': "I am feeling dramatic, excited and on an adrenaline rush.",
    # 'non-dramatic': "I am feeling bored, lack-luster, without energy.",
    # 'cormac': "In the style of Cormac McCarthy.",
    # 'margaret': "In the style of Margaret Atwood.",
    # 'king': "In the style of Stephen King.",
    'positive': "I am feeling very happy and joyful today!",
    # 'neutral': "The weather is average, and nothing special is happening.",
    'negative': "I am feeling very sad and depressed today."
}

# Generate embeddings for sentiment anchors
sentiment_embeddings = {}
for sentiment, text in sentiment_texts.items():
    embedding = generate_embeddings([text], openai_api_key)[0]
    sentiment_embeddings[sentiment] = embedding

# Process each document individually
for doc in documents:
    file_path = doc['file_path']
    text_sections = doc['text_sections']

    # Generate embeddings for each text section
    window_embeddings = generate_embeddings(text_sections, openai_api_key)

    # Compute similarities for each sentiment for each text section
    similarity_scores = {sentiment: [] for sentiment in sentiment_embeddings.keys()}

    for embedding in window_embeddings:
        for sentiment, sentiment_embedding in sentiment_embeddings.items():
            similarity = cosine_similarity([embedding], [sentiment_embedding])[0][0]
            similarity_scores[sentiment].append(similarity)

    # Visualize the similarities as a graph representing the entire document
    plt.figure(figsize=(12, 6))
    for sentiment, scores in similarity_scores.items():
        plt.plot(scores, marker='o', linestyle='-', label=sentiment)
    plt.title(f'Sentiment Similarity Over Document: {os.path.basename(file_path)}')
    plt.xlabel('Text Section Index')
    plt.ylabel('Cosine Similarity Score')
    plt.xticks(range(len(text_sections)))
    plt.legend()
    plt.grid(True)
    plt.show()
附录 B
本附录列出了我用来指导 ChatGPT o1-preview 生成情感分析工具的提示。它突出了高层概念提示和关于代码、API 及算法的具体反馈的结合。
Propose a sentiment analysis algorithm based on LLM embeddings and sliding text windows.

===

Propose a simple sentiment classification layer implementation.

===

Instead of labeled sentiment data and a feed-forward classification layer, can you compute the distance of the embedding from embeddings for key sentiments?


====
Propose a sentiment analysis Python program based on using OpenAI embeddings and a sliding text window applied over text documents.

For example, it may want to obtain the embeddings for the documents in the following manner:

    embeddings_model = OpenAIEmbeddings(openai_api_key=openai_api_key)
    texts = [doc.page_content for doc in documents]
    embeddings = embeddings_model.embed_documents(texts)


You should use the distance between the embeddings of the input text and predefined embeddings that represent key sentiments (e.g., positive, neutral, and negative). This approach leverages semantic similarity to classify sentiment based on how close the input text's embedding is to these predefined "sentiment anchor" embeddings.


The building block algorithm steps are, per document:

Tokenize text in the document.
Create sliding windows.
Generate embeddings for each window using LLM.
Classify sentiment for each window.
Optional smoothing of sentiments across windows.
Visualize the sentiments as a graph representing the entire document.

====

Can you update the code to use the openai 1.0.0 api, example below. def generate_embeddings(documents, openai_api_key):
    embeddings_model = OpenAIEmbeddings(openai_api_key=openai_api_key)
    texts = [doc.page_content for doc in documents]
    embeddings = embeddings_model.embed_documents(texts)

    for i, document in enumerate(documents):
        document.metadata['embedding'] = embeddings[i]

    return documents

====

Can you rework the code so it uses this text reader?  def do_read_text_file(file_path):
    loader = TextLoader(file_path, encoding='utf-8')
    raw_documents = loader.load()
    for document in raw_documents:
        content = document.page_content
        metadata = document.metadata
        print(f'length of page_content={len(content)}')

    text_splitter = NLTKTextSplitter(chunk_size=1000, chunk_overlap=100)
    text_content = " ".join([doc.page_content for doc in raw_documents])
    text_sections = text_splitter.split_text(text_content)
    print(f'number of text sections chunked={len(text_sections)}')
    return text_sections

====

can you update this code to read and plot output for multiple documents (multiple file paths).

====

If I want to extend the sentiments to include more than the three currently in place include some that are overlapping, how might you display it?  Consider this example list. sentiment_texts = {
    'dramatic' : "I am feeling dramatic, excited and on an adrenaline rush.",
    'non-dramatic' : "I am feeling bored, lack-luster, without energy.",
    'cormac' : "In the style of Cormac McCarthy",
    'margaret' : "In the style of Margaret Atwood",
    'king' : "In the style of Stephen King",
    'positive': "I am feeling very happy and joyful today!",
    'neutral': "The weather is average, and nothing special is happening.",
    'negative': "I am feeling very sad and depressed today."
}
附录 C
ChatGPT 生成的用于简单情感分析的 C++ 客户端代码。与附录 A 中的 Python 脚本不同,C++ 客户端依赖于一个单独的 Python 服务来获取其嵌入(见附录 D)。有关应用程序架构,请参见图 3。
// main.cpp


#include <iostream>
#include <fstream>
#include <sstream>
#include <vector>
#include <string>
#include <algorithm>
#include <cmath>
#include <thread>
#include <mutex>
#include <httplib.h>
#include <nlohmann/json.hpp>

using json = nlohmann::json;

// Function to read the entire text file into a string
std::string read_text_file(const std::string& filename) {
    std::ifstream infile(filename);
    if (!infile.is_open()) {
        throw std::runtime_error("Cannot open the file: " + filename);
    }
    std::stringstream buffer;
    buffer << infile.rdbuf();
    return buffer.str();
}

// Function to split text into words (simple tokenizer)
std::vector<std::string> tokenize_text(const std::string& text) {
    std::istringstream stream(text);
    std::vector<std::string> tokens;
    std::string word;
    while (stream >> word) {
        tokens.push_back(word);
    }
    return tokens;
}

// Function to create sliding windows from tokens
std::vector<std::string> create_sliding_windows(const std::vector<std::string>& tokens, size_t window_size, size_t overlap) {
    std::vector<std::string> windows;
    size_t step = window_size - overlap;
    for (size_t i = 0; i < tokens.size(); i += step) {
        size_t end = std::min(i + window_size, tokens.size());
        std::string window_text = "";
        for (size_t j = i; j < end; ++j) {
            window_text += tokens[j] + " ";
        }
        windows.push_back(window_text);
        if (end == tokens.size()) break;
    }
    return windows;
}

// Function to get embedding from RESTful service
std::vector<float> get_embedding(const std::string& text) {
    httplib::Client cli("localhost", 8000); // Adjust host and port if needed
    json request_json = { {"text", text} };
    auto res = cli.Post("/embed", request_json.dump(), "application/json");

    if (res && res->status == 200) {
        json response_json = json::parse(res->body);
        return response_json["embedding"].get<std::vector<float>>();
    }
    else {
        // Handle error
        std::cerr << "HTTP Status: " << res->status << "\n";
        std::cerr << "Response Body: " << res->body << "\n";
        throw std::runtime_error("Failed to get embedding from REST service");
    }
}

// Function to compute cosine similarity
float cosine_similarity(const std::vector<float>& A, const std::vector<float>& B) {
    float dot_product = 0.0f;
    float norm_a = 0.0f;
    float norm_b = 0.0f;

    for (size_t i = 0; i < A.size(); ++i) {
        dot_product += A[i] * B[i];
        norm_a += A[i] * A[i];
        norm_b += B[i] * B[i];
    }

    return dot_product / (std::sqrt(norm_a) * std::sqrt(norm_b) + 1e-8); // Add small value to prevent division by zero
}

// Function to assign sentiment based on similarity scores
std::string assign_sentiment(const std::vector<float>& embedding,
    const std::vector<float>& positive_anchor,
    const std::vector<float>& neutral_anchor,
    const std::vector<float>& negative_anchor) {
    float sim_positive = cosine_similarity(embedding, positive_anchor);
    float sim_neutral = cosine_similarity(embedding, neutral_anchor);
    float sim_negative = cosine_similarity(embedding, negative_anchor);

    if (sim_positive >= sim_neutral && sim_positive >= sim_negative) {
        return "Positive";
    }
    else if (sim_negative >= sim_positive && sim_negative >= sim_neutral) {
        return "Negative";
    }
    else {
        return "Neutral";
    }
}

int sentiment_main() {
    try {
        // Step 1: Read the document
        std::string filename = "C:/Users/natha/source/repos/data/Wee-kh-sah_38.txt"; // Replace with your filename
        std::string text = read_text_file(filename);

        // Step 2: Tokenize text
        auto tokens = tokenize_text(text);

        // Step 3: Create sliding windows
        size_t window_size = 200; // Adjust window size
        size_t overlap = 50;      // Adjust overlap size
        auto windows = create_sliding_windows(tokens, window_size, overlap);

        // Step 4: Get embeddings for sentiment anchors
        std::vector<float> positive_anchor = get_embedding("I am happy");
        std::vector<float> neutral_anchor = get_embedding("It is a day");
        std::vector<float> negative_anchor = get_embedding("I am sad");

        // Mutex for thread-safe access to shared data
        std::mutex mtx;

        // Vectors to store results
        std::vector<std::string> sentiments(windows.size());
        std::vector<float> positions(windows.size());

        // Step 5: Process each window (with multithreading)
        std::vector<std::thread> threads;

        for (size_t idx = 0; idx < windows.size(); ++idx) {
            threads.emplace_back([&, idx]() {
                // Get embedding for the window
                auto embedding = get_embedding(windows[idx]);

                // Assign sentiment
                auto sentiment = assign_sentiment(embedding, positive_anchor, neutral_anchor, negative_anchor);

                // Store results
                std::lock_guard<std::mutex> lock(mtx);
                sentiments[idx] = sentiment;
                positions[idx] = static_cast<float>(idx);
                });
        }

        // Wait for all threads to complete
        for (auto& t : threads) {
            t.join();
        }

        // Optional Smoothing (Simple Moving Average)
        /*
        // Uncomment to enable smoothing
        for (size_t i = 1; i < sentiments.size() - 1; ++i) {
            if (sentiments[i - 1] == sentiments[i + 1]) {
                sentiments[i] = sentiments[i - 1];
            }
        }
        */

        // Step 6: Output results to CSV for visualization
        std::ofstream outfile("sentiment_results.csv");
        outfile << "Position,Sentiment\n";
        for (size_t i = 0; i < sentiments.size(); ++i) {
            outfile << positions[i] << "," << sentiments[i] << "\n";
        }
        outfile.close();

        std::cout << "Sentiment analysis completed. Results saved to 'sentiment_results.csv'.\n";

    }
    catch (const std::exception& ex) {
        std::cerr << "Error: " << ex.what() << "\n";
    }
    return 0;
}
附录 D
由 ChatGPT 生成的 C++ 客户端代码(见附录 C)依赖于 Python 服务来提供所需的嵌入。下面是 Python 服务的代码。有关应用程序架构,请参见图 3。
值得注意的是,该实现基于 FastAPI 而非 Flask。这篇文章提供了更多信息,并对这两个框架进行了对比。
# app.py
# uvicorn sentiment_server:app --host 0.0.0.0 --port 8000

from fastapi import FastAPI, HTTPException
from pydantic import BaseModel
from langchain.embeddings import OpenAIEmbeddings
import os

app = FastAPI()

# Set your OpenAI API key
openai_api_key = os.getenv("OPENAI_API_KEY")
# Alternatively, you can set the API key directly
openai_api_key =  "api-key"


# Initialize the embeddings model with specified model
try:
    embeddings_model = OpenAIEmbeddings(model="text-embedding-ada-002", openai_api_key=openai_api_key)
except Exception as e:
    print(f"Error initializing OpenAIEmbeddings: {e}")
    raise

class TextData(BaseModel):
    text: str

@app.post("/embed")
async def embed_text(data: TextData):
    try:
        # Use embed_query for a single text input
        embedding = embeddings_model.embed_query(data.text)
        return {"embedding": embedding}
    except Exception as e:
        print(f"Exception occurred during embedding: {e}")
        raise HTTPEx
附录 E
由 ChatGPT 生成的 C++ 客户端(见附录 C),用于简单的情感分析,输出一个包含故事情感的 CSV 文件。下面给出了可视化 CSV 文件的 Python 工具。其输出见图 2。应用程序架构见图 3。
# visualize.py

import pandas as pd
import matplotlib.pyplot as plt

# Read the CSV file
df = pd.read_csv('sentiment_results.csv')

# Map sentiments to numeric values for plotting
sentiment_map = {'Positive': 1, 'Neutral': 0, 'Negative': -1}
df['SentimentScore'] = df['Sentiment'].map(sentiment_map)

# Plot the sentiment scores
plt.figure(figsize=(12, 6))
plt.plot(df['Position'], df['SentimentScore'], marker='o')
plt.title('Sentiment Analysis Over Document')
plt.xlabel('Window Position')
plt.ylabel('Sentiment Score')
plt.yticks([-1, 0, 1], ['Negative', 'Neutral', 'Positive'])
plt.grid(True)
plt.show()
如何学习大模型
现在社会上大模型越来越普及了,已经有很多人都想往这里面扎,但是却找不到适合的方法去学习。
作为一名资深码农,初入大模型时也吃了很多亏,踩了无数坑。现在我想把我的经验和知识分享给你们,帮助你们学习AI大模型,能够解决你们学习中的困难。
下面这些都是我当初辛苦整理和花钱购买的资料,现在我已将重要的AI大模型资料包括市面上AI大模型各大白皮书、AGI大模型系统学习路线、AI大模型视频教程、实战学习,等录播视频免费分享出来,需要的小伙伴可以扫取。

一、AGI大模型系统学习路线
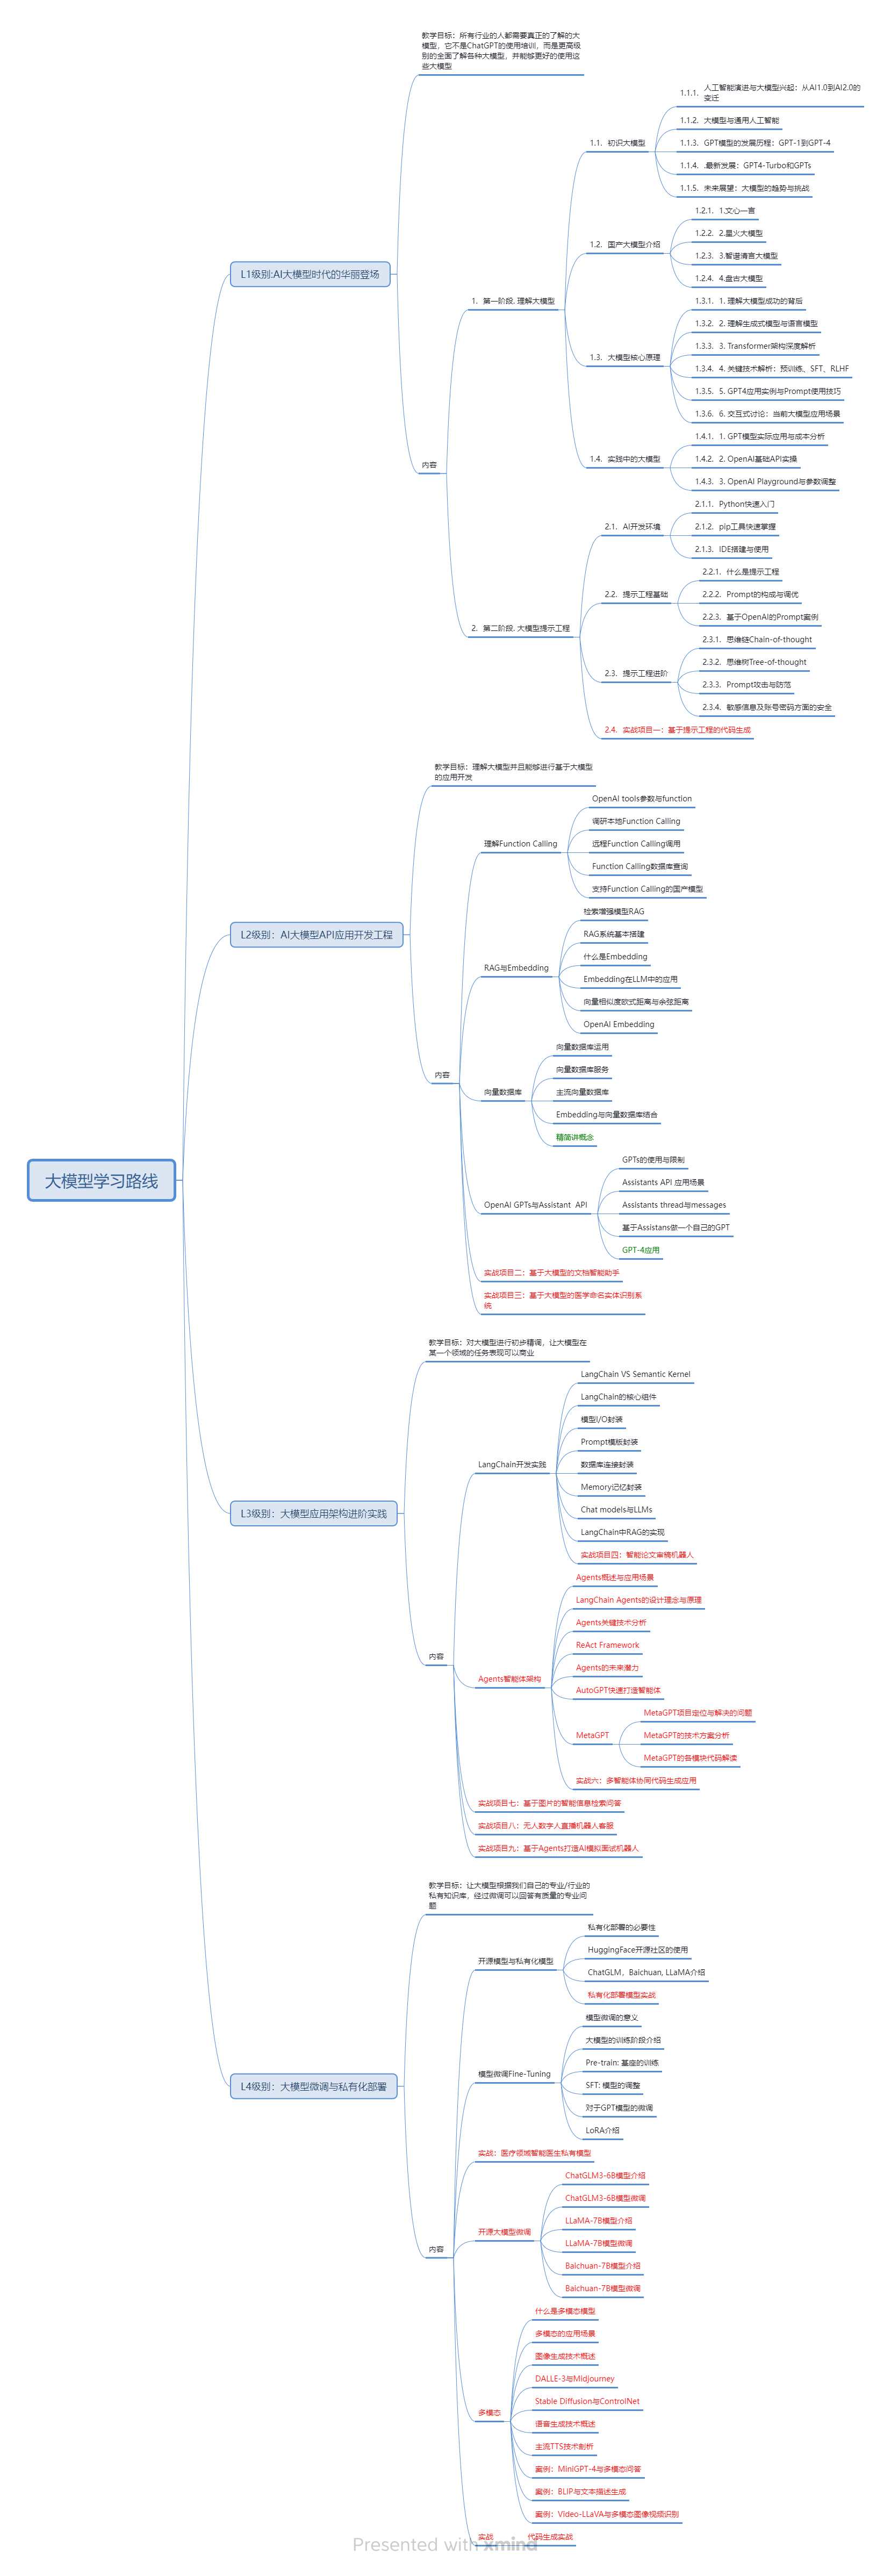
很多人学习大模型的时候没有方向,东学一点西学一点,像只无头苍蝇乱撞,我下面分享的这个学习路线希望能够帮助到你们学习AI大模型。
二、AI大模型视频教程

三、AI大模型各大学习书籍

四、AI大模型各大场景实战案例

五、结束语
学习AI大模型是当前科技发展的趋势,它不仅能够为我们提供更多的机会和挑战,还能够让我们更好地理解和应用人工智能技术。通过学习AI大模型,我们可以深入了解深度学习、神经网络等核心概念,并将其应用于自然语言处理、计算机视觉、语音识别等领域。同时,掌握AI大模型还能够为我们的职业发展增添竞争力,成为未来技术领域的领导者。
再者,学习AI大模型也能为我们自己创造更多的价值,提供更多的岗位以及副业创收,让自己的生活更上一层楼。
因此,学习AI大模型是一项有前景且值得投入的时间和精力的重要选择。


 1970
1970

 被折叠的 条评论
为什么被折叠?
被折叠的 条评论
为什么被折叠?
 到【灌水乐园】发言


