


from PIL import Image, ImageDraw, ImageFont

# 创建一个空白图像
def create_image(width, height, background_color):
    return Image.new('RGB', (width, height), background_color)

# 在图像上绘制文本
def draw_text(image, text, position, font, text_color):
    draw = ImageDraw.Draw(image)
    draw.text(position, text, font=font, fill=text_color)

# 生成春联图像
def generate_chunlian(chunlian_text, font_path, font_size, image_width, image_height, background_color, text_color):
    # 创建空白图像
    image = create_image(image_width, image_height, background_color)

    # 选择字体和字号
    font = ImageFont.truetype(font_path, font_size)

    # 获取文本的边界框 (bounding box)
    bbox = font.getbbox(chunlian_text)

    # bbox 是一个四元组 (x0, y0, x1, y1),计算宽高如下:
    text_width = bbox[2] - bbox[0]
    text_height = bbox[3] - bbox[1]

    # 计算文本位置
    position = ((image_width - text_width) // 2, (image_height - text_height) // 2)

    # 绘制文本
    draw_text(image, chunlian_text, position, font, text_color)

    return image

# 主程序
if __name__ == "__main__":
    # 春联内容
    chunlian_text = "新春佳节喜气临,家家户户乐融融。"

    # 字体路径(确保字体文件在当前目录或指定路径下)
    font_path = "path/to/your/font.ttf"  # 例如:'simhei.ttf'

    # 图像尺寸和颜色
    image_width = 800
    image_height = 400
    background_color = (255, 255, 255)  # 白色背景
    text_color = (0, 0, 0)  # 黑色文字

    # 生成春联图像
    chunlian_image = generate_chunlian(chunlian_text, font_path, 40, image_width, image_height, background_color, text_color)

    # 保存图像
    chunlian_image.save("chunlian.png")

    # 显示图像
    chunlian_image.show()
代码说明
-
create_image函数:创建一个指定尺寸和背景颜色的空白图像。 -
draw_text函数:在图像上绘制文本,指定文本内容、位置、字体和颜色。 -
generate_chunlian函数:生成春联图像。首先创建空白图像,然后选择字体和字号,使用font.getbbox()获取文本的边界框,计算文本的宽度和高度,计算文本位置,最后在图像上绘制文本。 -
主程序:定义春联内容、字体路径、图像尺寸和颜色,调用
generate_chunlian函数生成春联图像,保存并显示图像。
注意事项
-
字体路径:确保字体文件(如
simhei.ttf)在当前目录或指定路径下。你可以从系统字体目录中复制字体文件,或者使用在线字体资源。 -
图像尺寸:根据需要调整图像的宽度和高度。
-
文本内容:可以自定义春联的内容,支持多行文本。如果需要多行文本,可以使用换行符
\n分隔。
运行效果
运行上述代码后,会生成一个带有春联内容的图像文件chunlian.png,并显示该图像。你可以根据需要调整字体、颜色和图像尺寸,生成不同风格的春联图像。
from PIL import Image, ImageDraw, ImageFont
# 创建一个空白图像
def create_image(width, height, background_color):
return Image.new('RGB', (width, height), background_color)
# 在图像上绘制文本
def draw_text(image, text, position, font, text_color):
draw = ImageDraw.Draw(image)
draw.text(position, text, font=font, fill=text_color)
# 生成春联图像
def generate_chunlian(chunlian_text, font_path, font_size, image_width, image_height, background_color, text_color):
# 创建空白图像
image = create_image(image_width, image_height, background_color)
# 选择字体和字号
font = ImageFont.truetype(font_path, font_size)
# 获取文本的边界框 (bounding box)
bbox = font.getbbox(chunlian_text)
# bbox 是一个四元组 (x0, y0, x1, y1),计算宽高如下:
text_width = bbox[2] - bbox[0]
text_height = bbox[3] - bbox[1]
# 计算文本位置
position = ((image_width - text_width) // 2, (image_height - text_height) // 2)
# 绘制文本
draw_text(image, chunlian_text, position, font, text_color)
return image
# 主程序
if __name__ == "__main__":
# 春联内容
chunlian_text = "新春佳节喜气临,家家户户乐融融。"
# 字体路径(确保字体文件在当前目录或指定路径下)
font_path = "path/to/your/font.ttf" # 例如:'simhei.ttf'
# 图像尺寸和颜色
image_width = 800 # 图像宽度
image_height = 400 # 图像高度
background_color = (255, 255, 255) # 白色背景
text_color = (0, 0, 0) # 黑色文字
# 生成春联图像
chunlian_image = generate_chunlian(chunlian_text, font_path, 40, image_width, image_height, background_color, text_color)
# 保存图像
chunlian_image.save("chunlian.png")
# 显示图像
chunlian_image.show()
from PIL import Image, ImageDraw, ImageFont
import random
# 创建一个空白图像
def create_image(width, height, background_color):
return Image.new('RGB', (width, height), background_color)
# 在图像上绘制文本
def draw_text(image, text, position, font, text_color):
draw = ImageDraw.Draw(image)
draw.text(position, text, font=font, fill=text_color)
# 生成“福”字图像
def generate_fu_chars(text, font_paths, font_sizes, image_width, image_height, background_color, text_colors):
# 创建空白图像
image = create_image(image_width, image_height, background_color)
# 生成多个“福”字
for font_path, font_size, text_color in zip(font_paths, font_sizes, text_colors):
# 选择字体和字号
font = ImageFont.truetype(font_path, font_size)
# 获取文本的边界框 (bounding box)
bbox = font.getbbox(text)
# bbox 是一个四元组 (x0, y0, x1, y1),计算宽高如下:
text_width = bbox[2] - bbox[0]
text_height = bbox[3] - bbox[1]
# 计算文本位置
position = (random.randint(0, image_width - text_width), random.randint(0, image_height - text_height))
# 绘制文本
draw_text(image, text, position, font, text_color)
return image
# 主程序
if __name__ == "__main__":
# 文本内容
text = "福"
# 字体路径列表(确保字体文件在当前目录或指定路径下)
font_paths = [
"simhei.ttf", # 例如:'simhei.ttf'
"simhei.ttf", # 例如:'kaiti.ttf'
"simhei.ttf", # 例如:'lishu.ttf'
"simhei.ttf", # 例如:'yahei.ttf'
"simhei.ttf", # 例如:'fangsong.ttf'
]
# 字体大小列表
font_sizes = [40, 50, 60, 70, 80]
# 图像尺寸和颜色
image_width = 800 # 图像宽度
image_height = 600 # 图像高度
background_color = (255, 255, 255) # 白色背景
# 文本颜色列表
text_colors = [
(255, 0, 0), # 红色
(0, 0, 255), # 蓝色
(0, 255, 0), # 绿色
(255, 255, 0), # 黄色
(255, 0, 255), # 紫色
]
# 生成“福”字图像
fu_image = generate_fu_chars(text, font_paths, font_sizes, image_width, image_height, background_color, text_colors)
# 保存图像
fu_image.save("fu_chars.png")
# 显示图像
fu_image.show()
from PIL import Image, ImageDraw, ImageFont
# 创建一个空白图像
def create_image(width, height, background_color):
return Image.new('RGB', (width, height), background_color)
# 在图像上绘制文本
def draw_text(image, text, position, font, text_color):
draw = ImageDraw.Draw(image)
draw.text(position, text, font=font, fill=text_color)
# 生成“福”字图像
def generate_fu_char(text, font_path, font_size, image_width, image_height, background_color, text_color):
# 创建空白图像
image = create_image(image_width, image_height, background_color)
# 选择字体和字号
font = ImageFont.truetype(font_path, font_size)
# 获取文本的边界框 (bounding box)
bbox = font.getbbox(text)
# bbox 是一个四元组 (x0, y0, x1, y1),计算宽高如下:
text_width = bbox[2] - bbox[0]
text_height = bbox[3] - bbox[1]
# 计算文本位置
position = ((image_width - text_width) // 2, (image_height - text_height) // 2)
# 绘制文本
draw_text(image, text, position, font, text_color)
return image
# 主程序
if __name__ == "__main__":
# 文本内容
text = "福"
# 字体路径(确保字体文件在当前目录或指定路径下)
font_path = "simhei.ttf" # 例如:'simhei.ttf'
# 图像尺寸和颜色
image_width = 400 # 图像宽度
image_height = 400 # 图像高度
background_color = (255, 255, 255) # 白色背景
text_color = (255, 0, 0) # 红色文字
# 生成“福”字图像
fu_image = generate_fu_char(text, font_path, 200, image_width, image_height, background_color, text_color)
# 保存图像
fu_image.save("fu.png")
# 显示图像
fu_image.show()
from PIL import Image, ImageDraw, ImageFont
# 创建一个空白图像
def create_image(width, height, background_color):
return Image.new('RGB', (width, height), background_color)
# 在图像上绘制文本
def draw_text(image, text, position, font, text_color):
draw = ImageDraw.Draw(image)
draw.text(position, text, font=font, fill=text_color)
# 生成春联图像
def generate_chunlian(chunlian_text, font_path, font_size, image_width, image_height, background_color, text_color):
# 创建空白图像
image = create_image(image_width, image_height, background_color)
# 选择字体和字号
font = ImageFont.truetype(font_path, font_size)
# 获取文本的边界框 (bounding box)
bbox = font.getbbox(chunlian_text)
# bbox 是一个四元组 (x0, y0, x1, y1),计算宽高如下:
text_width = bbox[2] - bbox[0]
text_height = bbox[3] - bbox[1]
# 计算文本位置
position = ((image_width - text_width) // 2, (image_height - text_height) // 2)
# 绘制文本
draw_text(image, chunlian_text, position, font, text_color)
return image
# 主程序
if __name__ == "__main__":
# 春联内容
chunlian_text = "新春佳节喜气临,家家户户乐融融。"
# 字体路径(确保字体文件在当前目录或指定路径下)
font_path = "simhei.ttf" # 例如:'simhei.ttf'
# 图像尺寸和颜色
image_width = 800
image_height = 400
background_color = (255, 255, 255) # 白色背景
text_color = (0, 0, 0) # 黑色文字
# 生成春联图像
chunlian_image = generate_chunlian(chunlian_text, font_path, 40, image_width, image_height, background_color, text_color)
# 保存图像
chunlian_image.save("chunlian.png")
# 显示图像
chunlian_image.show()
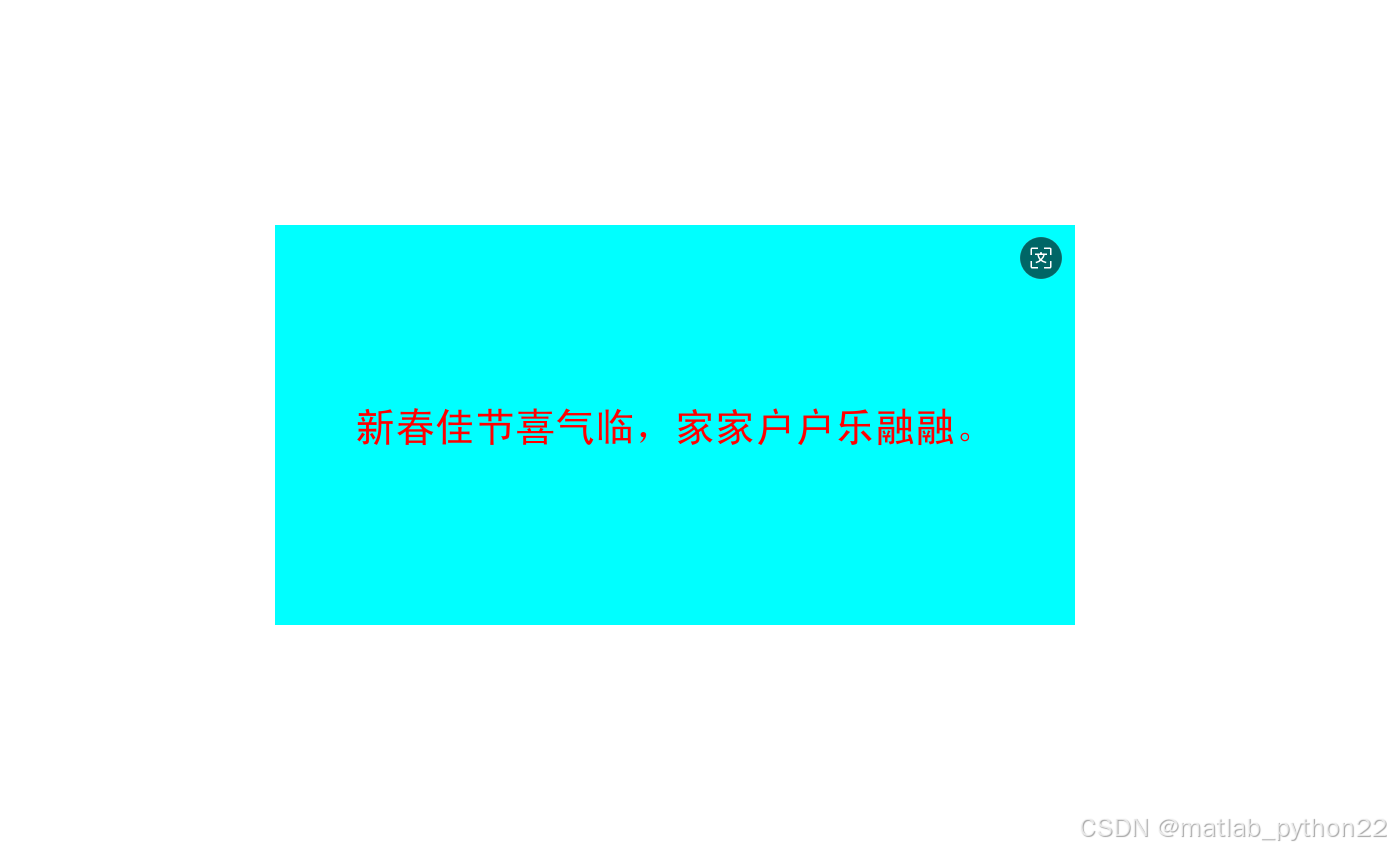
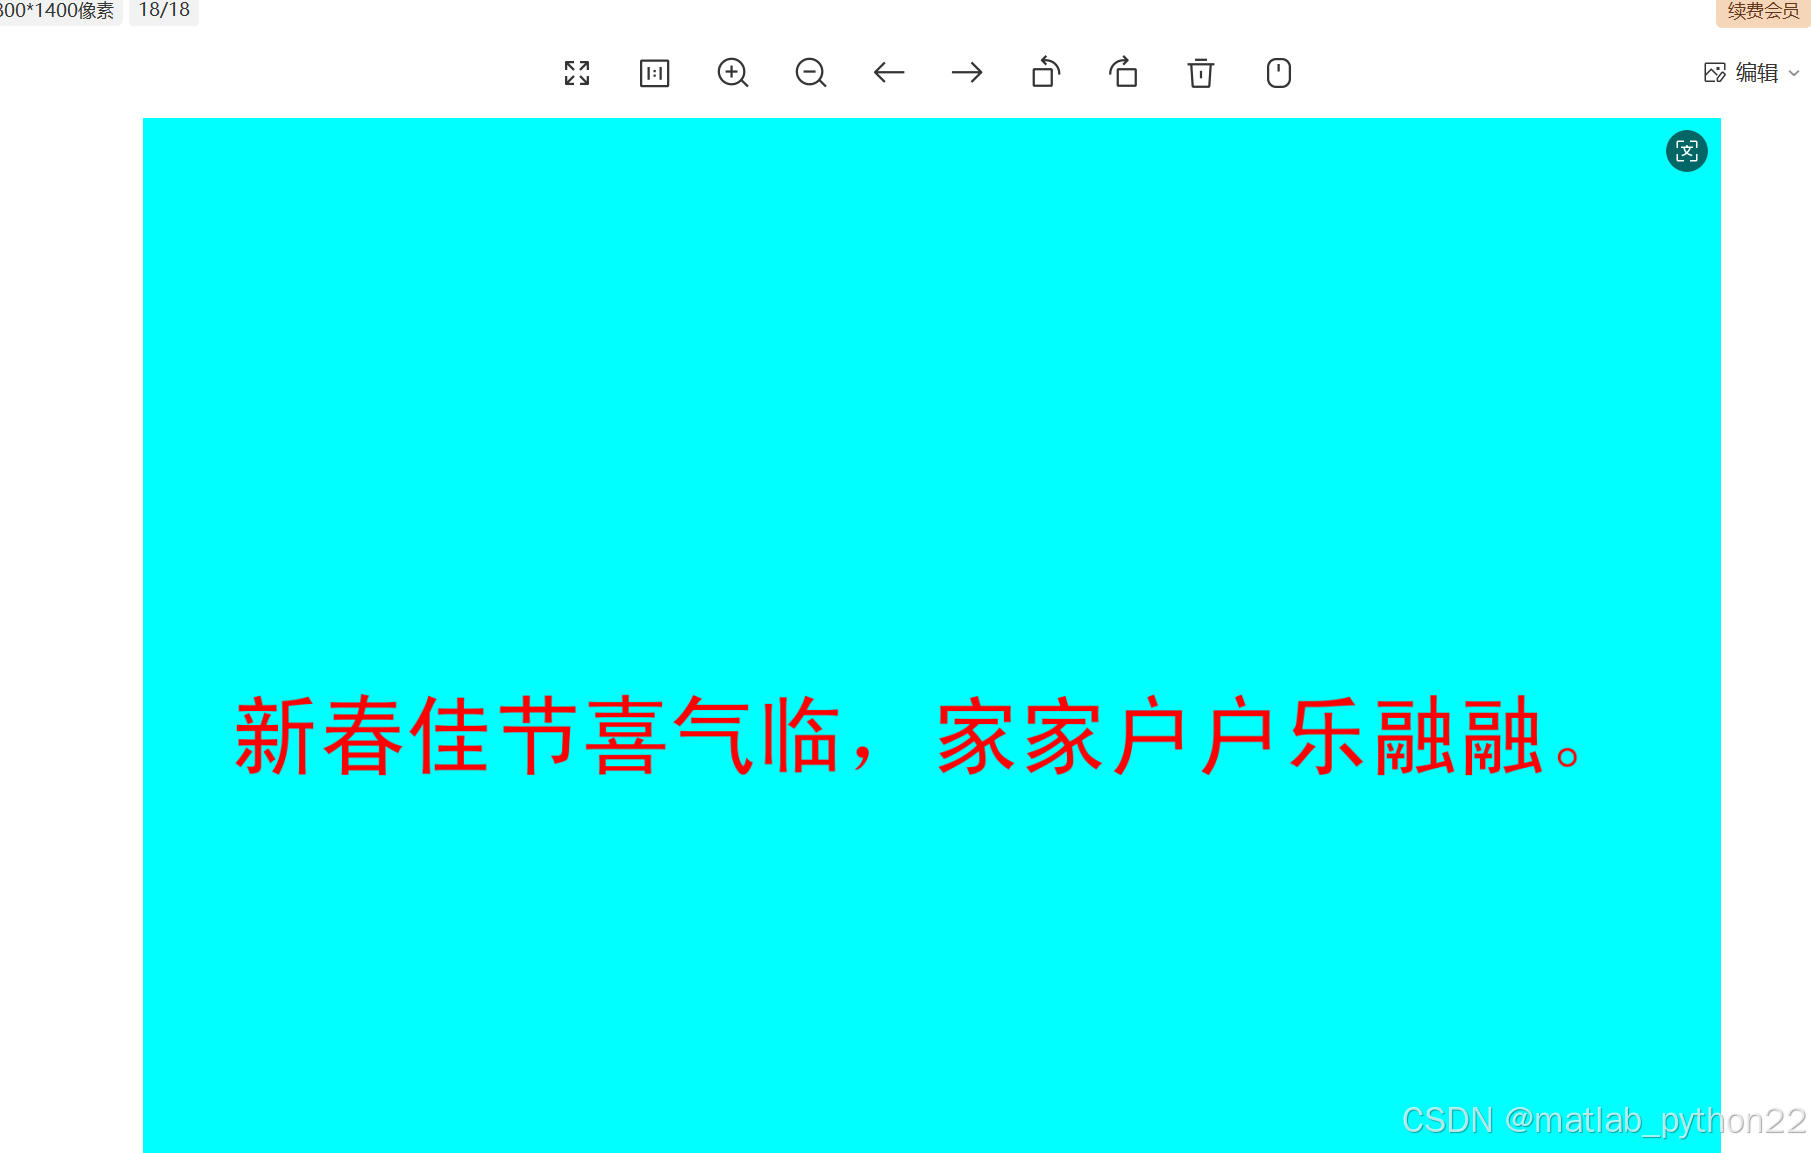
from PIL import Image, ImageDraw, ImageFont
# 创建一个空白图像
def create_image(width, height, background_color):
return Image.new('RGB', (width, height), background_color)
# 在图像上绘制文本
def draw_text(image, text, position, font, text_color):
draw = ImageDraw.Draw(image)
draw.text(position, text, font=font, fill=text_color)
# 生成春联图像
def generate_chunlian(chunlian_text, font_path, font_size, image_width, image_height, background_color, text_color):
# 创建空白图像
image = create_image(image_width, image_height, background_color)
# 选择字体和字号
font = ImageFont.truetype(font_path, font_size)
# 获取文本的边界框 (bounding box)
bbox = font.getbbox(chunlian_text)
# bbox 是一个四元组 (x0, y0, x1, y1),计算宽高如下:
text_width = bbox[2] - bbox[0]
text_height = bbox[3] - bbox[1]
# 计算文本位置
position = ((image_width - text_width) // 2, (image_height - text_height) // 2)
# 绘制文本
draw_text(image, chunlian_text, position, font, text_color)
return image
# 主程序
if __name__ == "__main__":
# 春联内容
chunlian_text = "新春佳节喜气临,家家户户乐融融。"
# 字体路径(确保字体文件在当前目录或指定路径下)
font_path = "simhei.ttf" # 例如:'simhei.ttf'
# 图像尺寸和颜色
image_width = 1800 # 图像宽度
image_height = 1400 # 图像高度
background_color = (0, 255, 255) # 白色背景
text_color = (255, 0, 0) # 黑色文字
# 生成春联图像
chunlian_image = generate_chunlian(chunlian_text, font_path, 100, image_width, image_height, background_color, text_color)
# 保存图像
chunlian_image.save("chunlian.png")
# 显示图像
chunlian_image.show()


 4898
4898

 被折叠的 条评论
为什么被折叠?
被折叠的 条评论
为什么被折叠?
 到【灌水乐园】发言


