


Bloom(泛光、辉光)是一种重要的后处理效果,能够显著提升 3D 场景的视觉质量和真实感。本教程将详细介绍如何在 mapvthree(JSAPIThree)中实现和使用 Bloom 效果。
什么是 Bloom 效果
Bloom 是一种后处理效果,用来模拟强光源在真实世界中的"溢出"现象。当场景中某些区域的亮度超过正常显示范围时,Bloom 会让这些区域产生柔和的光晕效果,从而:
- 增强视觉层次感
- 提升场景氛围
- 让高亮区域(如太阳、灯光、反光表面)看起来更真实
- 突出重要元素,增强视觉焦点
在 mapvthree 中启用 Bloom
在 mapvthree 引擎中,Bloom 效果通过 engine.rendering.features.bloom 属性进行控制。
初始化时启用
在创建引擎实例时,可以通过配置项启用 Bloom:
import * as mapvthree from '@baidu/mapv-three';

// 获取容器元素
const container = document.getElementById('container');

// 初始化引擎并启用 Bloom
const engine = new mapvthree.Engine(container, {
    map: {
        center: [116.414, 39.915],
        range: 500,
        heading: 225,
        pitch: 70,
    },
    rendering: {
        enableAnimationLoop: true,
        features: {
            bloom: {
                enabled: true,  // 启用 Bloom 效果
            },
        },
    },
});
运行时启用
也可以在引擎创建后动态启用或修改 Bloom 配置:
// 启用 Bloom
engine.rendering.features.bloom.enabled = true;
Bloom 参数配置
Bloom 效果提供了多个可调参数,用于精细控制泛光效果:
// 完整配置示例
engine.rendering.features.bloom.enabled = true;
engine.rendering.features.bloom.strength = 0.1;   // 泛光强度,默认 0.1
engine.rendering.features.bloom.threshold = 1;  // 泛光阈值,默认 1
engine.rendering.features.bloom.radius = 0;     // 泛光半径,默认 0
参数说明
strength - 泛光强度
- 类型:
number - 默认值:
0.1 - 说明: 控制泛光效果的强度。值越大,泛光效果越明显
- 建议范围:
0.1-2.0 - 使用场景:
- 较小值(0.1-0.5):适合微妙的泛光效果,如轻微的反光
- 较大值(0.5-2.0):适合强烈的光源效果,如太阳、霓虹灯
threshold - 泛光阈值
- 类型:
number - 默认值:
1 - 说明: 亮度阈值,只有亮度超过此值的区域才会产生泛光效果
- 建议范围:
0.5-2.0 - 使用场景:
- 较小值(0.5-1.0):更多区域会产生泛光,效果更广泛
- 较大值(1.0-2.0):只有非常亮的区域才会泛光,效果更集中
radius - 泛光半径
- 类型:
number - 默认值:
0 - 说明: 控制泛光扩散的范围
- 建议范围:
0-1.0 - 使用场景:
- 较小值(0-0.5):泛光范围较小,更集中
- 较大值(0.5-1.0):泛光范围较大,更柔和
如何产生 Bloom 效果
要让场景中的物体产生 Bloom 效果,需要让物体的颜色值超出正常的 RGB 范围(0-1)。mapvthree 支持两种方式:
方式一:直接使用超出 RGB 范围的颜色
对于不参与光照计算的材质(如 MeshBasicMaterial),可以直接设置超出 RGB 范围的颜色值:
import * as mapvthree from '@baidu/mapv-three';
import {Mesh, MeshBasicMaterial, IcosahedronGeometry, Color} from 'three';

// 获取容器元素
const container = document.getElementById('container');

// 初始化引擎
const engine = new mapvthree.Engine(container, {
    map: {
        provider: null,
        center: [0, 0],
        heading: 0,
        pitch: 85,
        range: 50,
    },
    rendering: {
        sky: null,
        enableAnimationLoop: true,
        features: {
            bloom: {
                enabled: true,
                strength: 0.5,
                threshold: 1,
            },
        },
    },
});

// 使用超出 RGB 范围的颜色,会产生泛光效果
const glowingBox = engine.add(new Mesh(
    new IcosahedronGeometry(5, 15),
    new MeshBasicMaterial({
        color: new Color(10, 0, 0), // 红色值超出 1,会产生泛光
    })
));
glowingBox.position.set(-10, 0, 0);

// 正常颜色,不会产生泛光
const normalBox = engine.add(new Mesh(
    new IcosahedronGeometry(5, 15),
    new MeshBasicMaterial({
        color: new Color(0.5, 0, 0), // 颜色在 RGB 范围内
    })
));
normalBox.position.set(0, 0, 0);
方式二:使用 PBR 材质配合光照
对于参与光照计算的材质(如 MeshStandardMaterial),即使颜色值在正常范围内,通过调整 PBR 属性(如 roughness、metalness),经过光照计算后颜色也会超出 RGB 范围,从而产生泛光效果:
import * as mapvthree from '@baidu/mapv-three';
import {Mesh, MeshStandardMaterial, IcosahedronGeometry, Color} from 'three';

// 获取容器元素
const container = document.getElementById('container');

// 初始化引擎
const engine = new mapvthree.Engine(container, {
    map: {
        provider: null,
        center: [0, 0],
        heading: 0,
        pitch: 85,
        range: 50,
    },
    rendering: {
        sky: null,
        enableAnimationLoop: true,
        features: {
            bloom: {
                enabled: true,
                strength: 0.5,
                threshold: 1,
            },
        },
    },
});

// 添加动态天空以提供光照
const sky = engine.add(new mapvthree.DynamicSky());

// 设置当前时间为上午 10 点
engine.clock.currentTime = new Date('2025-05-15 10:00:00');
// 设置时钟模式为循环模式,使时间自动流逝
engine.clock.tickMode = engine.clock.TICK_NORMAL;

// 使用 PBR 材质,通过光照计算产生泛光
const reflectiveBox = engine.add(new Mesh(
    new IcosahedronGeometry(5, 15),
    new MeshStandardMaterial({
        color: new Color(1, 0, 0), // 颜色在正常范围内
        roughness: 0,              // 低粗糙度,高反射
        metalness: 0.9,             // 高金属度
        // 经过光照计算后,反射光会超出 RGB 范围,产生泛光
    })
));
reflectiveBox.position.set(10, 0, 0);
方式三:使用 emissive(自发光)属性
对于支持 emissive 属性的材质,可以通过设置自发光颜色来产生 Bloom 效果:
import * as mapvthree from '@baidu/mapv-three';
import {Mesh, MeshStandardMaterial, SphereGeometry, Color} from 'three';

// 获取容器元素
const container = document.getElementById('container');

// 初始化引擎
const engine = new mapvthree.Engine(container, {
    map: {
        center: [116.414, 39.915],
        range: 500,
    },
    rendering: {
        enableAnimationLoop: true,
        features: {
            bloom: {
                enabled: true,
            },
        },
    },
});

// 使用自发光属性产生泛光
const emissiveSphere = engine.add(new Mesh(
    new SphereGeometry(10, 32, 32),
    new MeshStandardMaterial({
        color: new Color(0xffffff),
        emissive: new Color(0x00ffff), // 青色自发光
        emissiveIntensity: 1.5,       // 自发光强度,超过 1 会产生泛光
    })
));

const position = engine.map.projectArrayCoordinate([116.414, 39.915]);
emissiveSphere.position.set(position[0], position[1], 10);
完整示例
下面是一个完整的示例,展示不同材质和配置下的 Bloom 效果:
import * as mapvthree from '@baidu/mapv-three';
import {Mesh, MeshBasicMaterial, MeshStandardMaterial, IcosahedronGeometry, Color} from 'three';
// 获取容器元素
const container = document.getElementById('container');
// 初始化引擎
const engine = new mapvthree.Engine(container, {
map: {
provider: null,
center: [0, 0],
heading: 0,
pitch: 85,
range: 50,
},
rendering: {
sky: null,
enableAnimationLoop: true,
features: {
bloom: {
enabled: true,
strength: 0.1,
threshold: 1,
radius: 0,
},
},
},
});
// 添加动态天空提供光照
const sky = engine.add(new mapvthree.DynamicSky());
// 设置当前时间为上午 10 点
engine.clock.currentTime = new Date('2025-05-15 10:00:00');
// 设置时钟模式为循环模式,使时间自动流逝
engine.clock.tickMode = engine.clock.TICK_NORMAL;
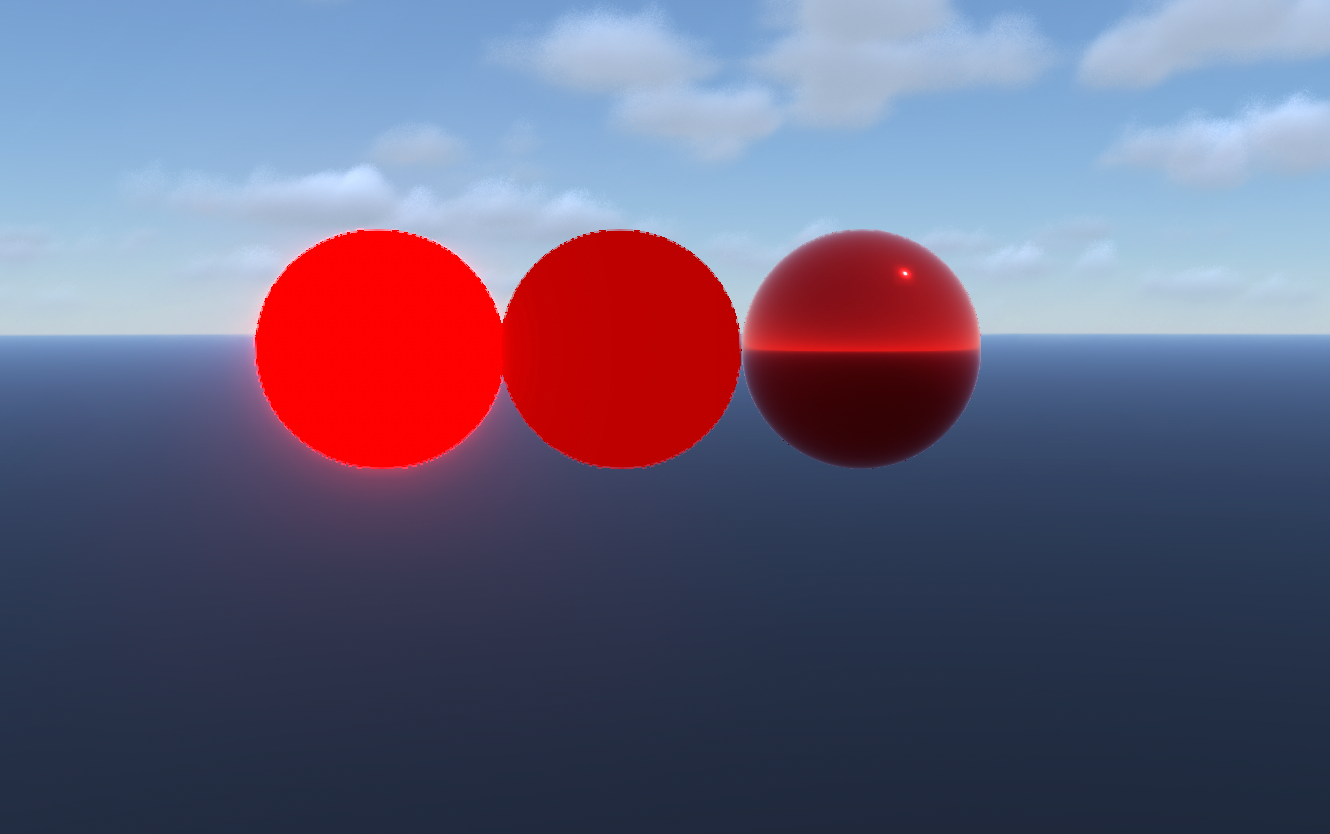
// 示例 1: MeshBasicMaterial + 超出 RGB 范围的颜色
const box1 = engine.add(new Mesh(
new IcosahedronGeometry(5, 15),
new MeshBasicMaterial({
color: new Color(10, 0, 0), // 超出 RGB 范围,产生泛光
})
));
box1.position.set(-10, 0, 0);
// 示例 2: MeshBasicMaterial + 正常颜色(不产生泛光)
const box2 = engine.add(new Mesh(
new IcosahedronGeometry(5, 15),
new MeshBasicMaterial({
color: new Color(0.5, 0, 0), // 正常颜色,不产生泛光
})
));
box2.position.set(0, 0, 0);
// 示例 3: MeshStandardMaterial + PBR 属性(通过光照产生泛光)
const box3 = engine.add(new Mesh(
new IcosahedronGeometry(5, 15),
new MeshStandardMaterial({
color: new Color(1, 0, 0),
roughness: 0, // 低粗糙度
metalness: 0.9, // 高金属度
// 经过光照计算后产生泛光
})
));
box3.position.set(10, 0, 0);
实际应用场景
1. 城市夜景场景
在城市夜景中,使用 Bloom 效果可以让灯光、霓虹灯等光源更加真实:
import {Mesh, SphereGeometry, MeshStandardMaterial, Color} from 'three';

// 城市灯光示例
const streetLight = engine.add(new Mesh(
    new SphereGeometry(2, 16, 16),
    new MeshStandardMaterial({
        color: new Color(0xffffaa),
        emissive: new Color(0xffffaa),
        emissiveIntensity: 2.0, // 高强度的自发光
    })
));
2. 科技感界面
在数据可视化场景中,使用 Bloom 可以突出重要数据点:
import {Mesh, SphereGeometry, MeshBasicMaterial, Color} from 'three';

// 高亮数据点
const dataPoint = engine.add(new Mesh(
    new SphereGeometry(5, 32, 32),
    new MeshBasicMaterial({
        color: new Color(5, 2, 0), // 强烈的橙红色泛光
    })
));
3. 镜面反射效果
对于需要表现镜面、玻璃等材质的场景:
import {Mesh, PlaneGeometry, MeshStandardMaterial, Color} from 'three';

// 镜面材质
const mirror = engine.add(new Mesh(
    new PlaneGeometry(20, 20),
    new MeshStandardMaterial({
        color: new Color(0.8, 0.8, 0.9),
        roughness: 0,      // 完全光滑
        metalness: 1.0,    // 完全金属
    })
));
性能注意事项
性能影响
开启 Bloom 后,引擎内部会采用更高精度的 HalfFloat 类型来存储颜色,这会产生额外的性能开销:
- 内存占用增加: 使用
HalfFloat类型会增加显存占用 - 渲染性能: 后处理效果会增加 GPU 计算负担
- 帧率影响: 在低端设备上可能影响帧率
优化建议
- 按需启用: 只在需要 Bloom 效果的场景中启用
- 合理配置参数: 使用较小的
strength和radius值可以降低性能开销 - 选择性应用: 不是所有物体都需要 Bloom,只对关键元素应用
- 性能监控: 使用
engine.rendering.stats监控渲染性能
常见问题
Q: 为什么设置了 Bloom 但没有效果?
A: 检查以下几点:
- 确认
engine.rendering.features.bloom.enabled = true - 确认物体的颜色值超出了 RGB 范围(> 1),或者使用了 PBR 材质配合光照
- 确认
threshold值设置合理,不会过滤掉所有泛光 - 对于
MeshBasicMaterial,必须直接设置超出 RGB 范围的颜色
Q: 如何调整 Bloom 的强度?
A: 通过 strength 参数控制:
engine.rendering.features.bloom.strength = 0.5; // 增加强度
Q: Bloom 效果太强/太弱怎么办?
A: 可以同时调整多个参数:
- 降低
strength可以减弱泛光强度 - 提高
threshold可以让只有更亮的区域产生泛光 - 调整
radius可以控制泛光扩散范围
Q: 可以在运行时动态调整 Bloom 参数吗?
A: 可以,所有参数都可以在运行时动态修改:
// 动态调整
engine.rendering.features.bloom.strength = 0.2;
engine.rendering.features.bloom.threshold = 0.8;
总结
Bloom 效果是提升 3D 场景视觉质量的重要工具。在 mapvthree 中:
- 启用方式: 通过
engine.rendering.features.bloom.enabled = true启用 - 参数控制: 使用
strength、threshold、radius精细调整效果 - 产生方式:
- 直接使用超出 RGB 范围的颜色
- 使用 PBR 材质配合光照
- 使用
emissive自发光属性
- 性能考虑: 注意性能开销,合理使用
通过合理配置和使用 Bloom 效果,可以让你的 3D 场景更加生动、真实,提升用户体验。


 1147
1147

 被折叠的 条评论
为什么被折叠?
被折叠的 条评论
为什么被折叠?
 到【灌水乐园】发言


