在HTML页面通过JavaScript访问Ollama本地部署的DeepSeek

前排提醒:

1. 操作系统为Windows11

2. 如果你还没有使用Ollama本地部署DeepSeek,可以参考Windows系统上使用Ollama本地部署DeepSeek

3. 顺便解决了 HTML 页面调用 Ollama 服务的跨域问题


通过JavaScript访问本地DeepSeek服务的方式比较简单,可以直接参照以下HTML代码。注意: 要把 MODEL_NAME 修改为自己部署的DeepSeek版本

<!DOCTYPE html>
<html lang="zh-CN">
<head>
    <meta charset="UTF-8">
    <meta name="viewport" content="width=device-width, initial-scale=1.0">
    <title>本地 DeepSeek 对话</title>
    <style>
        :root {
            --primary-color: #2c3e50;
            --hover-color: #34495e;
            --background-color: #f8f9fa;
            --border-color: #dfe3e8;
        }

        body {
            font-family: -apple-system, BlinkMacSystemFont, "Segoe UI", Roboto, sans-serif;
            line-height: 1.6;
            padding: 1rem;
            background-color: var(--background-color);
        }

        .chat-container {
            max-width: 800px;
            margin: 0 auto;
            background: white;
            border-radius: 8px;
            box-shadow: 0 2px 8px rgba(0, 0, 0, 0.1);
            padding: 1.5rem;
        }

        .input-group {
            margin-bottom: 1.5rem;
        }

        #input {
            width: 96%;
            padding: 0.8rem;
            border: 2px solid var(--border-color);
            border-radius: 6px;
            resize: vertical;
            min-height: 100px;
            margin-bottom: 1rem;
        }

        #input:focus {
            outline: none;
            border-color: var(--primary-color);
            box-shadow: 0 0 0 3px rgba(44, 62, 80, 0.1);
        }

        .btn {
            background: var(--primary-color);
            color: white;
            border: none;
            padding: 0.8rem 1.5rem;
            border-radius: 6px;
            cursor: pointer;
            transition: background 0.2s ease;
            font-size: 1rem;
        }

        .btn:hover {
            background: var(--hover-color);
        }

        #response {
            white-space: pre-wrap;
            padding: 1rem;
            margin-top: 1.5rem;
            border: 2px solid var(--border-color);
            border-radius: 6px;
            background: #f8fafc;
            min-height: 100px;
        }

        .loading {
            opacity: 0.6;
            position: relative;
        }

        .loading::after {
            content: "正在思考...";
            color: var(--primary-color);
        }

        @media (max-width: 768px) {
            .chat-container {
                margin: 0 1rem;
                padding: 1rem;
            }
        }
    </style>
</head>
<body>
    <div class="chat-container">
        <div class="input-group">
            <textarea 
                id="input" 
                rows="4"
                placeholder="请输入您的问题,例如:如何学习编程?"
            ></textarea>
            <button class="btn" onclick="sendToOllama()">发送问题</button>
        </div>
        <div id="response"></div>
    </div>

    <script>
        const API_ENDPOINT = 'http://127.0.0.1:11434/api/chat';
        const MODEL_NAME = 'deepseek-r1:1.5b';

        async function sendToOllama() {
            const inputEl = document.getElementById('input');
            const responseEl = document.getElementById('response');
            const btnEl = document.querySelector('.btn');
            
            const question = inputEl.value.trim();
            
            if (!question) {
                responseEl.textContent = '请输入有效的问题内容';
                return;
            }

            try {
                btnEl.disabled = true;
                responseEl.classList.add('loading');
                
                const response = await fetch(API_ENDPOINT, {
                    method: 'POST',
                    headers: { 
                        'Content-Type': 'application/json',
                    },
                    body: JSON.stringify({
                        model: MODEL_NAME,
                        messages: [{ 
                            role: "user", 
                            content: question 
                        }],
                        stream: false
                    })
                });

                if (!response.ok) {
                    throw new Error(`HTTP 错误! 状态码: ${response.status}`);
                }

                const data = await response.json();
                responseEl.innerHTML = `
                    <strong>回复:</strong>${data.message.content}
                `;
            } catch (error) {
                console.error('请求失败:', error);
                responseEl.textContent = `请求失败: ${error.message}`;
            } finally {
                btnEl.disabled = false;
                responseEl.classList.remove('loading');
            }
        }
    </script>
</body>
</html>

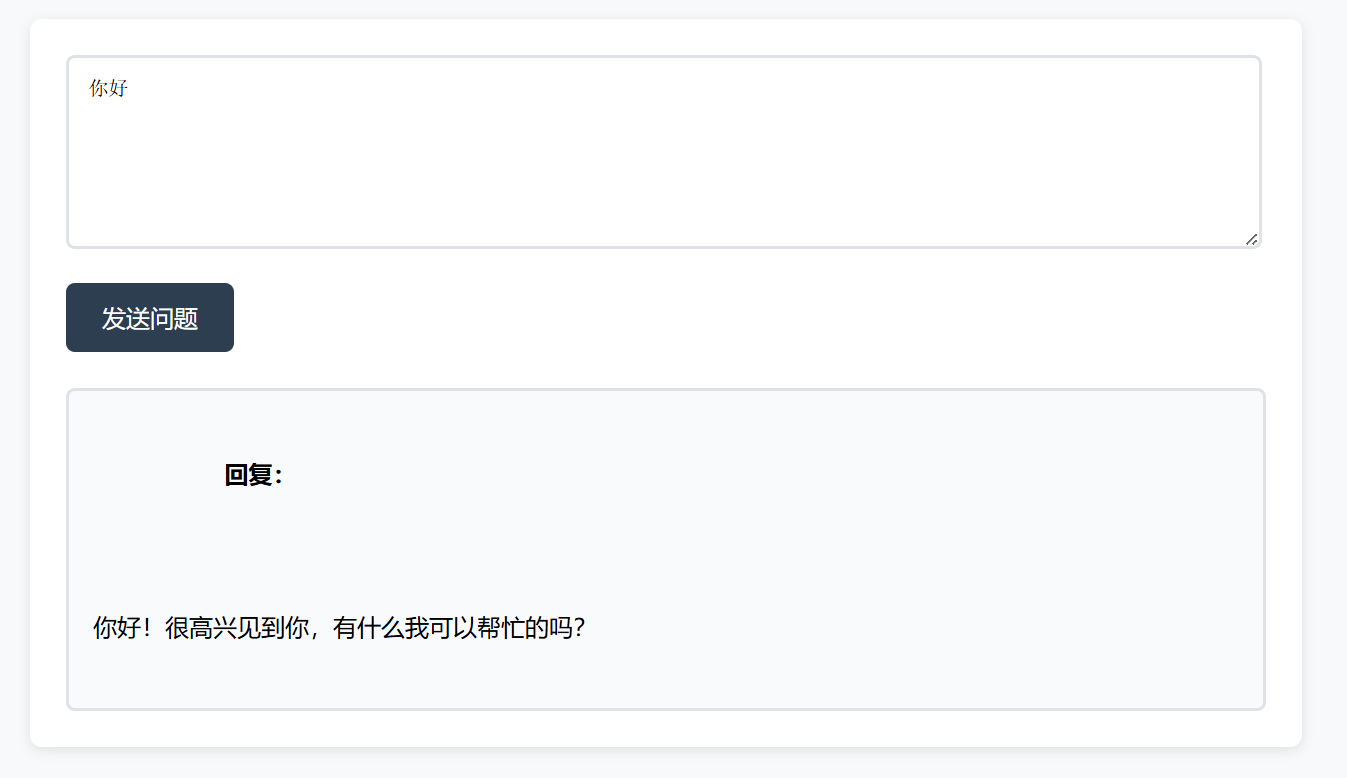
打开HTML页面后,可以进行对话,如下图所示。

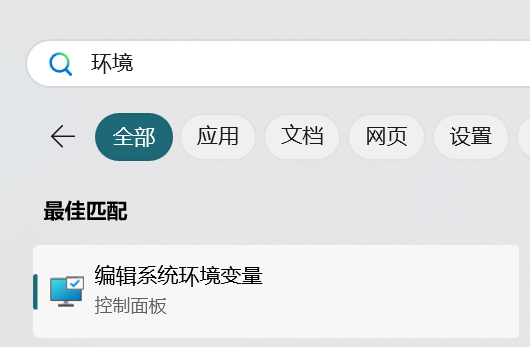
注意: 如果直接双击打开HTML页面,可能会出现跨域(CORS)错误,此时需要在Ollama服务端启用 CORS支持

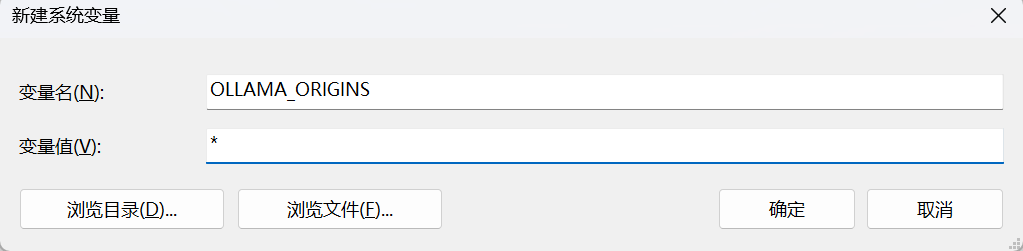
第一步: 使用 WIN + R,搜索 “环境”,打开 “编辑系统环境变量”

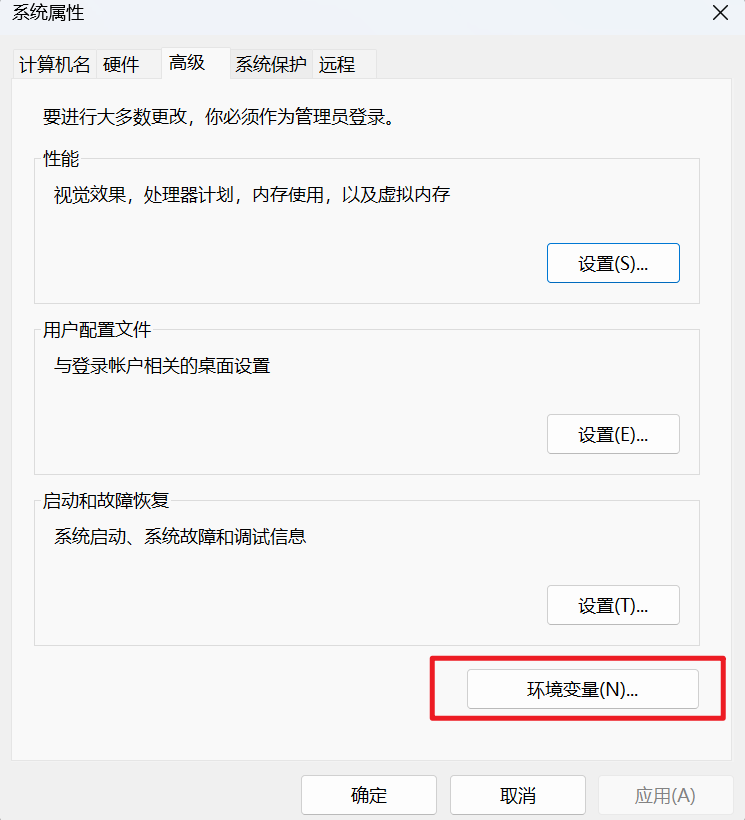
第二步: 点击 “环境变量” 进入环境变量设置界面

第三步: 在系统变量这里,点击 “新建”

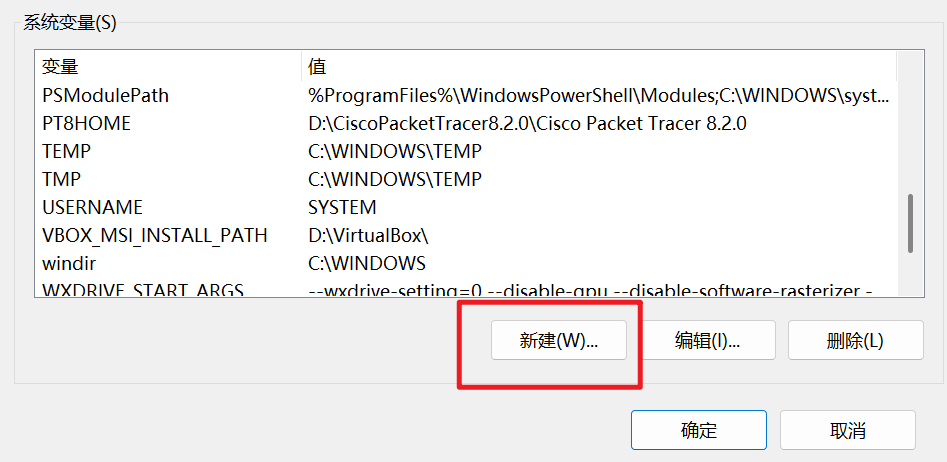
第四步: 变量名设置为 OLLAMA_ORIGINS,变量值设置为 *, 然后一直点击确定,保存环境变量设置

第五步: 重启Ollama服务,跨域(CORS)错误即可解决

### 在 Vue 2 CLI 中调用本地 Ollama 部署DeepSeek API 为了在 Vue 2 CLI 项目中成功调用Ollama 部署DeepSeek API,需遵循特定配置流程。假设已按照说明启动了 DeepSeek 服务 `ollama run deepseek-r1:7b`[^1]。 #### 创建 HTTP 请求函数 首先,在 Vue 组件或 Vuex store 文件内创建用于发送请求至 DeepSeek 的辅助方法: ```javascript // src/utils/deepSeekApi.js import axios from 'axios'; const DEEPSEEK_API_URL = "http://localhost:8000"; // 假设这是 DeepSeek 启动的服务地址 export const queryDeepSeek = async (inputData) => { try { let response = await axios.post(`${DEEPSEEK_API_URL}/api/query`, inputData); return Promise.resolve(response.data); } catch(error){ console.error('Error querying DeepSeek:', error); throw new Error(`Failed to reach the server or invalid input`); } }; ``` 此代码片段定义了一个名为 `queryDeepSeek` 函数来处理向 DeepSeek 发送 POST 请求的操作,并返回解析后的响应数据。 #### 使用 Axios 库管理网络通信 上述实现依赖于流行的 `axios` 客户端库来进行异步 HTTP 调用。如果尚未安装该库,则可以通过 npm 或 yarn 添加它到开发环境中: ```bash npm install axios --save # 或者使用yarn yarn add axios ``` #### 将其集成到组件逻辑里 接下来展示怎样把新建立的方法融入实际业务场景下工作流的一部分。这里给出一个简单的例子——当用户提交表单时触发查询操作并显示结果给前端页面上的某个区域。 ```vue <template> <div id="app"> <h1>Query Example</h1> <form @submit.prevent="handleSubmit()"> <!-- 表单项 --> <button type="submit">Submit Query</button> </form> <div v-if="result !== null">{{ result }}</div> </div> </template> <script> import { queryDeepSeek } from '@/utils/deepSeekApi'; export default { name: 'App', data() { return { result: null, }; }, methods: { handleSubmit(){ const userInput = {}; // 收集来自用户的输入作为参数对象填充此处 queryDeepSeek(userInput).then((res)=>{ this.result = res; }).catch(err=>{ alert("An error occurred while processing your request."); }); } } } </script> ``` 这段模板展示了如何监听表单提交事件并通过之前编写的工具函数发起请求;一旦获取到了服务器反馈的信息就更新视图状态使之呈现出来。
评论
添加红包

请填写红包祝福语或标题

红包个数最小为10个

红包金额最低5元

当前余额3.43前往充值 >
需支付:10.00
成就一亿技术人!
领取后你会自动成为博主和红包主的粉丝 规则
hope_wisdom
发出的红包
实付
使用余额支付
点击重新获取
扫码支付
钱包余额 0

抵扣说明:

1.余额是钱包充值的虚拟货币,按照1:1的比例进行支付金额的抵扣。
2.余额无法直接购买下载,可以购买VIP、付费专栏及课程。

余额充值