1、概 述
帧动画通过应用onFrame逐帧回调的方式,让开发者在应用侧的每一帧都可以设置属性值,从而实现设置了该属性值对应组件的动画效果。
相比于属性动画,开发者可感知动画的过程,实时修改UI侧的值,具有事件可实时响应、可暂停的优点,但性能上不如属性动画。在属性动画符合要求时更推荐使用属性动画的接口实现。
在鸿蒙开发中,帧动画通过 @ohos.animator 来实现,API介绍如下。
2、核心API介绍
2.1、模块导入
// 模块导入import { Animator as animator, AnimatorOptions,AnimatorResult } from '@kit.ArkUI';
2.2、create 创建一个Animator类
// 创建一个动画create(options: AnimatorOptions): AnimatorResult// 入参 AnimatorOptions结构定义如下:class AnimatorOptions {duration: number // 动画播放的时长,单位毫秒。默认值:0。/*动画插值曲线,仅支持以下可选值:"linear":动画线性变化。"ease":动画开始和结束时的速度较慢,cubic-bezier(0.25、0.1、0.25、1.0)。"ease-in":动画播放速度先慢后快,cubic-bezier(0.42, 0.0, 1.0, 1.0)。"ease-out":动画播放速度先快后慢,cubic-bezier(0.0, 0.0, 0.58, 1.0)。"ease-in-out":动画播放速度先加速后减速,cubic-bezier(0.42, 0.0, 0.58, 1.0)。"fast-out-slow-in":标准曲线,cubic-bezier(0.4,0.0,0.2,1.0)。"linear-out-slow-in":减速曲线,cubic-bezier(0.0,0.0,0.2,1.0)。"fast-out-linear-in":加速曲线,cubic-bezier(0.4, 0.0, 1.0, 1.0)。"friction":阻尼曲线,cubic-bezier(0.2, 0.0, 0.2, 1.0)。"extreme-deceleration":急缓曲线,cubic-bezier(0.0, 0.0, 0.0, 1.0)。"rhythm":节奏曲线,cubic-bezier(0.7, 0.0, 0.2, 1.0)。"sharp":锐利曲线,cubic-bezier(0.33, 0.0, 0.67, 1.0)。"smooth":平滑曲线,cubic-bezier(0.4, 0.0, 0.4, 1.0)。"cubic-bezier(x1,y1,x2,y2)":三次贝塞尔曲线,x1、x2的值必须处于0-1之间。例如"cubic-bezier(0.42,0.0,0.58,1.0)"。"steps(number,step-position)":阶梯曲线,number必须设置,为正整数,step-position参数可选,支持设置start或end,默认值为end。例如"steps(3,start)"。"interpolating-spring(velocity,mass,stiffness,damping)":插值弹簧曲线,从API version 11开始支持且仅在ArkTS中支持使用。velocity、mass、stiffness、damping都是数值类型,且mass、stiffness、damping参数均应该大于0,具体参数含义参考插值弹簧曲线。使用interpolating-spring时,duration不生效,由弹簧参数决定;fill、direction、iterations设置无效,fill固定设置为"forwards",direction固定设置为"normal",iterations固定设置为1,且对animator的reverse函数调用无效。即animator使用interpolating-spring时只能正向播放1次。默认值:"ease"。*/easing: string// 动画延时播放时长,单位毫秒,设置为0时,表示不延时。设置为负数时动画提前播放,如果提前播放的时长大于动画总时长,动画直接过渡到终点。默认值:0。delay: number// 动画执行后是否恢复到初始状态,动画执行后,动画结束时的状态(在最后一个关键帧中定义)将保留。fill: "none" | "forwards" | "backwards" | "both"// 动画播放模式。direction: "normal" | "reverse" | "alternate" | "alternate-reverse" 是iterations: number // 动画播放次数。设置为0时不播放,设置为-1时无限次播放。begin: number // 动画插值起点。默认值:0。end: number // 动画插值终点。默认值:1。}
使用create接口创建一个帧动画实例,代码示例如下:
import {Animator as animator, AnimatorOptions, AnimatorResult } from '@kit.ArkUI';import { BusinessError } from '@kit.BasicServicesKit';let options: AnimatorOptions = {duration: 1500,easing: "friction",delay: 0,fill: "forwards",direction: "normal",iterations: 3,begin: 200.0,end: 400.0};animator.create(options);// 建议使用 UIContext.creatAnimator()接口
帧动画创建成功后,后续对动画所有的操作都在AnimatorResult对象上完成。
2.3、AnimatorResult
AnimatorResult定义如下(请注意最后一个方法,可以设置帧率范围):
class AnimatorResult {//更新当前动画器。reset(options: AnimatorOptions): void// 启动动画。动画会保留上一次的播放状态,比如播放状态设置reverse后,再次播放会保留reverse的播放状态。play(): void// 结束动画finish(): void// 暂停动画pause(): void// 取消动画cancel(): void// 以相反的顺序播放动画。使用interpolating-spring曲线时此接口无效。reverse(): void// 接收到帧时回调。progress为动画当前的值onFrame: (progress: number) => void// 动画完成时的回调onFinish: () => void// 动画被取消时的回调onCancel: () => void// 动画重复时回调onRepeat: () => void//设置期望的帧率范围。setExpectedFrameRateRange(rateRange: ExpectedFrameRateRange): void}
3、案 例
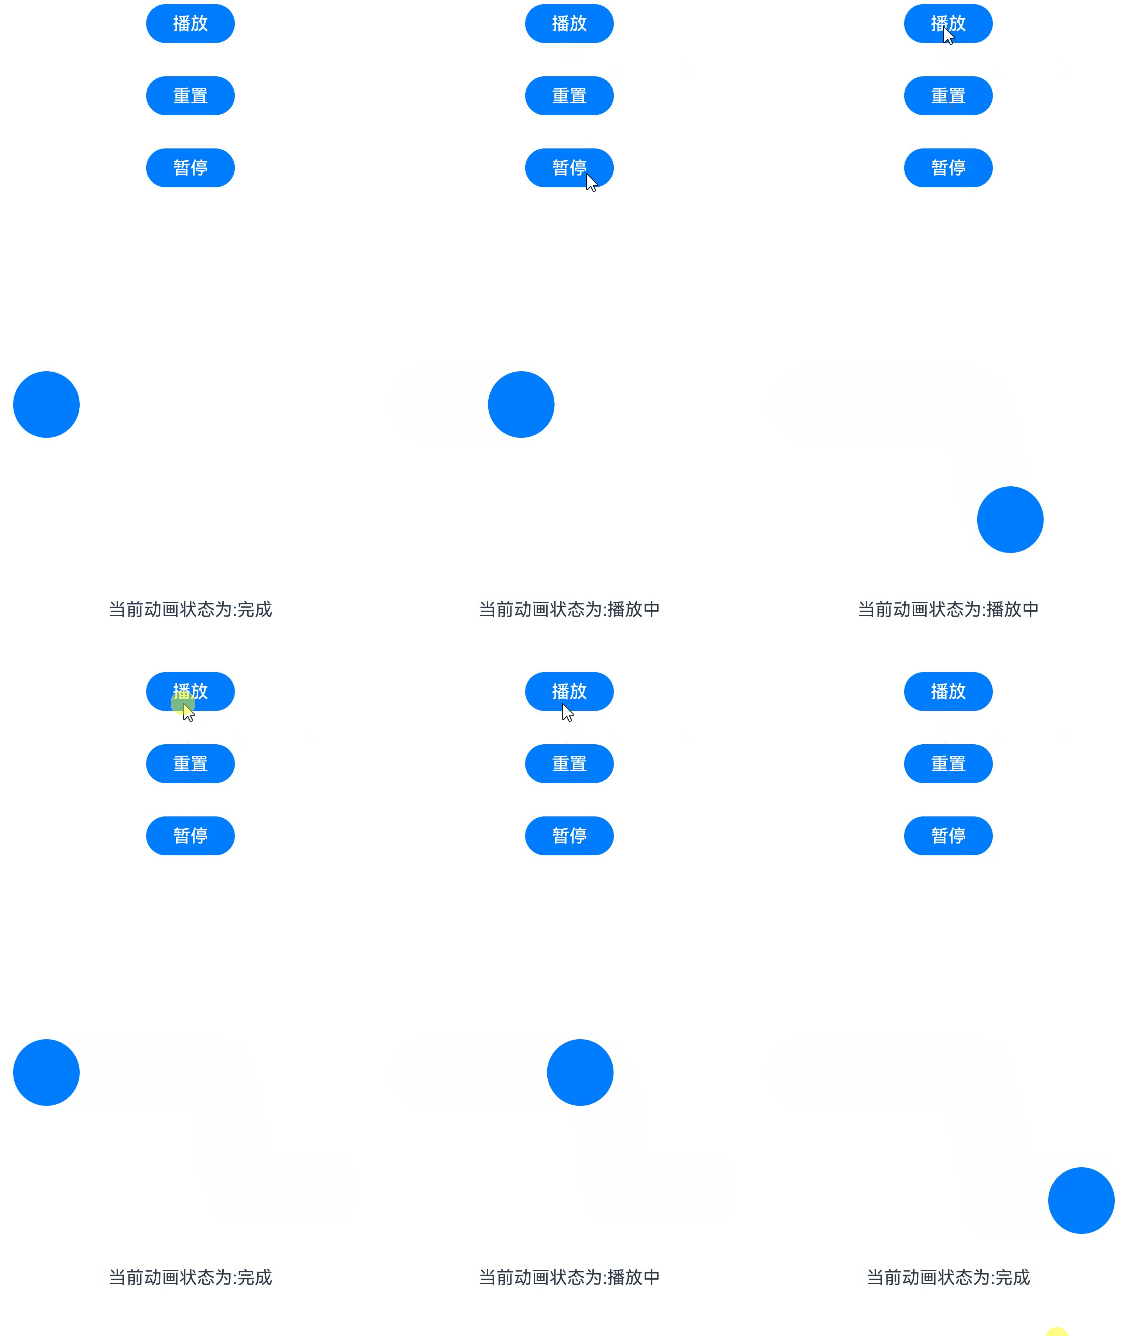
我们使用Animator实现小球抛物运动为例,效果如下:

开发步骤如下:
👉🏻 step1 :引入依赖与定义需要动画的组件
import { AnimatorOptions, AnimatorResult } from '@kit.ArkUI';// ...Button().width(60).height(60).translate({ x: this.translateX, y: this.translateY })
👉🏻 step2 :在onPageShow中创建AnimatorResult对象。
onPageShow(): void {//创建animatorResult对象this.animatorOptions = this.getUIContext().createAnimator(options);this.animatorOptions.onFrame = (progress: number) => {this.translateX = progress;if (progress > this.topWidth && this.translateY < this.bottomHeight) {this.translateY = Math.pow(progress - this.topWidth, 2) * this.g;}}//动画取消时执行方法this.animatorOptions.onCancel = () => {this.animatorStatus = '取消';}//动画完成时执行方法this.animatorOptions.onFinish = () => {this.animatorStatus = '完成';}//动画重复播放时执行动画this.animatorOptions.onRepeat = () => {console.log("动画重复播放");}}
👉🏻 step3 :定义动画播放,重置,暂停的按钮。
Button('播放').onClick(() => {this.animatorOptions?.play();this.animatorStatus = '播放中'}).width(80).height(35)Button("重置").onClick(() => {this.translateX = 0;this.translateY = 0;}).width(80).height(35)Button("暂停").onClick(() => {this.animatorOptions?.pause();this.animatorStatus = '暂停'}).width(80).height(35)
👉🏻 step4 :在页面结束生命周期回调中销毁动画。
onPageHide(): void {this.animatorOptions = undefined;}
完整的代码如下:
import { AnimatorOptions, AnimatorResult } from '@kit.ArkUI';@Entry@Componentstruct Index {@State animatorOptions: AnimatorResult | undefined = undefined;@State animatorStatus: string = '创建';begin: number = 0;end: number = 300topWidth: number = 150;bottomHeight: number = 100;g: number = 0.18animatorOption: AnimatorOptions = {duration: 4000,delay: 0,easing: 'linear',iterations: 1,fill: "forwards",direction: 'normal',begin: this.begin,end: this.end};@State translateX: number = 0;@State translateY: number = 0;onPageShow(): void {this.animatorOptions = this.getUIContext().createAnimator(this.animatorOption)this.animatorOptions.onFrame = (progress: number) => {this.translateX = progress;if (progress > this.topWidth && this.translateY < this.bottomHeight) {this.translateY = Math.pow(progress - this.topWidth, 2) * this.g;}}this.animatorOptions.onCancel = () => {this.animatorStatus = '取消';}this.animatorOptions.onFinish = () => {this.animatorStatus = '完成';}this.animatorOptions.onRepeat = () => {console.log("动画重复播放");}}onPageHide(): void {this.animatorOptions = undefined;}build() {Column() {Column({ space: 30 }) {Button('播放').onClick(() => {this.animatorOptions?.play();this.animatorStatus = '播放中';}).width(80).height(35)Button("重置").onClick(() => {this.translateX = 0;this.translateY = 0;}).width(80).height(35)Button("暂停").onClick(() => {this.animatorOptions?.pause();this.animatorStatus = '暂停';}).width(80).height(35)}.width("100%").height('25%')Stack() {Button().width(60).height(60).translate({ x: this.translateX, y: this.translateY })}.width("100%").height('45%').align(Alignment.Start)Text("当前动画状态为:" + this.animatorStatus)}.width("100%").height('100%')}}


 1090
1090

 被折叠的 条评论
为什么被折叠?


