


 本文介绍了如何使用Altek的AI Camera通过Azure IoT Edge进行物体识别。首先,从Altek官网下载驱动包并刷新firmware。然后,连接相机到Wi-Fi并配置为Azure IoT Edge设备。最后,通过相机识别物体,并概述了所需资源和设置步骤。
Github Community for Vision-AI-DevKit:
https://azure.github.io/Vision-AI-DevKit-Pages
step1. 驱动包下载:
https://store.altek.com.tw/qualcomm/downloads/Azure-IoT-Starter-Kit#tab-3,下载后的压缩包里有 pdf 的说明文档,简要记录下操作步骤和相关说明。
step2. 首次使用前刷新firmware
1.Install adb (Android Debug Bridge) and fastboot into your host (PC)
https://azure.github.io/Vision-AI-DevKit-Pages/docs/platform_tools/ (文档内容见附录1)
2.If you have no license to Qualcomm, you can use fastboot to reflash your device Please refer to “Reflash by fastboot”(附录2)
3. If you have license to Qualcomm, please get QFIL to reflash device from Qualcomm Please refer to “Reflash by QFIL”(附录3)
Do not use unofficial versions of QFIL that are available in internet
文本采取步骤2方式。使用fastboot刷新固件,按照附录2步骤,没有问题。
step3. 第一个应用:利用camera识别物体
What you will do
- Connect the Vision AI DevKit camera to Wi-Fi
- Create necessary Azure IoT resources (Resource Group, IoT Hub, IoT Edge device)
- Connect the Vision AI DevKit camera to a created IoT Edge Device
- See video output from the camera to a connected monitor or connected video streaming client
What you will need
- Active Azure account
- Vision AI DevKit camera hardware
- Monitor supporting HDMI input with an HDMI cable (do not use any cable adapters), or an RTSP supporting video player application
Setup your DevKit camera
These steps will configure your DevKit camera for Wi-Fi and connect the the camera to the IoT Edge device you created earlier in Azure IoT Hub.
Connect your PC to the camera’s Wi-Fi access point
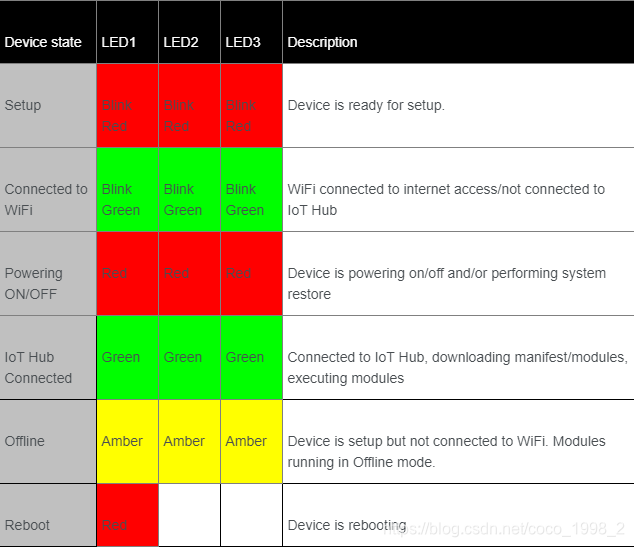
- Within 10 seconds of first power up, you should see three flashing RED LED lights. This indicates the device is in Wi-Fi access point mode. If your device is not flashing RED, press the power button for 5 seconds to turn on the DevKit hardware access point.
From your PC, connect to a Wi-Fi network named MSIOT_xxxxxx (xxxxxx is the last 6 characters of the device’s Wi-Fi MAC address, e.g. MSIOT_BD097D).
Notes
- The label at the bottom of the device will have the default Wi-Fi access point password. If there is no label, see
 最低0.47元/天 解锁文章


 1万+
1万+

 被折叠的 条评论
为什么被折叠?
被折叠的 条评论
为什么被折叠?
 到【灌水乐园】发言


