


 本文详细介绍了FastDeploy的C#部署教程,涉及C++SDK配置、C#项目创建、目标检测和语义分割示例,展示了如何使用FastDeploy在C#环境中进行AI推理和模型部署。
FastDeploy部署教程(CSharp版本)
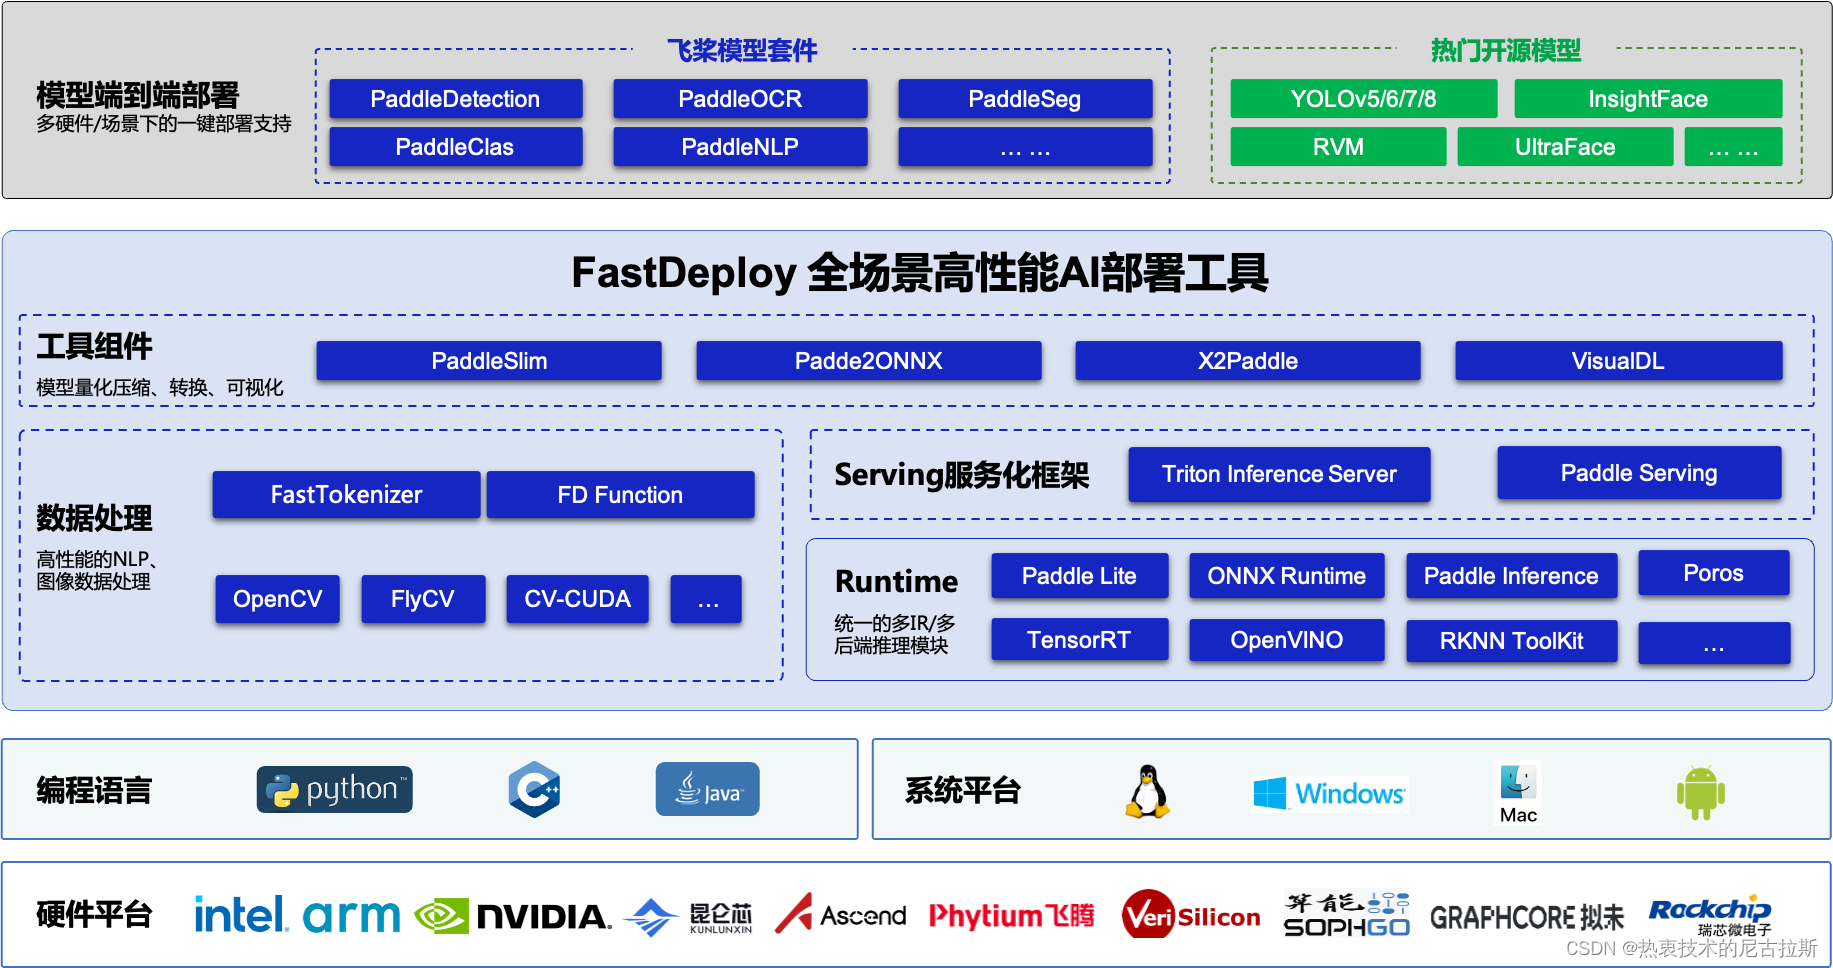
1. FastDeploy介绍
FastDeploy是一款全场景、易用灵活、极致高效的AI推理部署工具, 支持云边端部署。提供超过 🔥160+ Text,Vision, Speech和跨模态模型📦开箱即用的部署体验,并实现🔚端到端的推理性能优化。包括 物体检测、字符识别(OCR)、人脸、人像扣图、多目标跟踪系统、NLP、Stable Diffusion文图生成、TTS 等几十种任务场景,满足开发者多场景、多硬件、多平台的产业部署需求。
2. FastDeploy 部署(C++)
参考:
3. FastDeploy 部署(CSharp)
FastDeploy C# SDK的接口实现,为用户需要C# API的场景提供解决方案。
3.1 FastDeploy 源码编译
-
CMAKE_CONFIGURATION_TYPES属性设置为Release -
请不要勾选
WITH_GPU和ENABLE_TRT_BACKEND -
开启
ENABLE_ORT_BACKEND=ON ENABLE_PADDLE_BACKEND=ON ENABLE_OPENVINO_BACKEND=ON ENABLE_VISION=ON ENABLE_TEXT=ON WITH_CAPI=ON WITH_CSHARPAPI=ON -
指定
CMAKE_INSTALL_PREFIX安装路径 -
生成
fastdeploy.sln解决方案文件选择Release版本,生成编译,点击"INSTALL"->右键点击"生成"将编译好的SDK安装到先前指定的目录步骤⑤。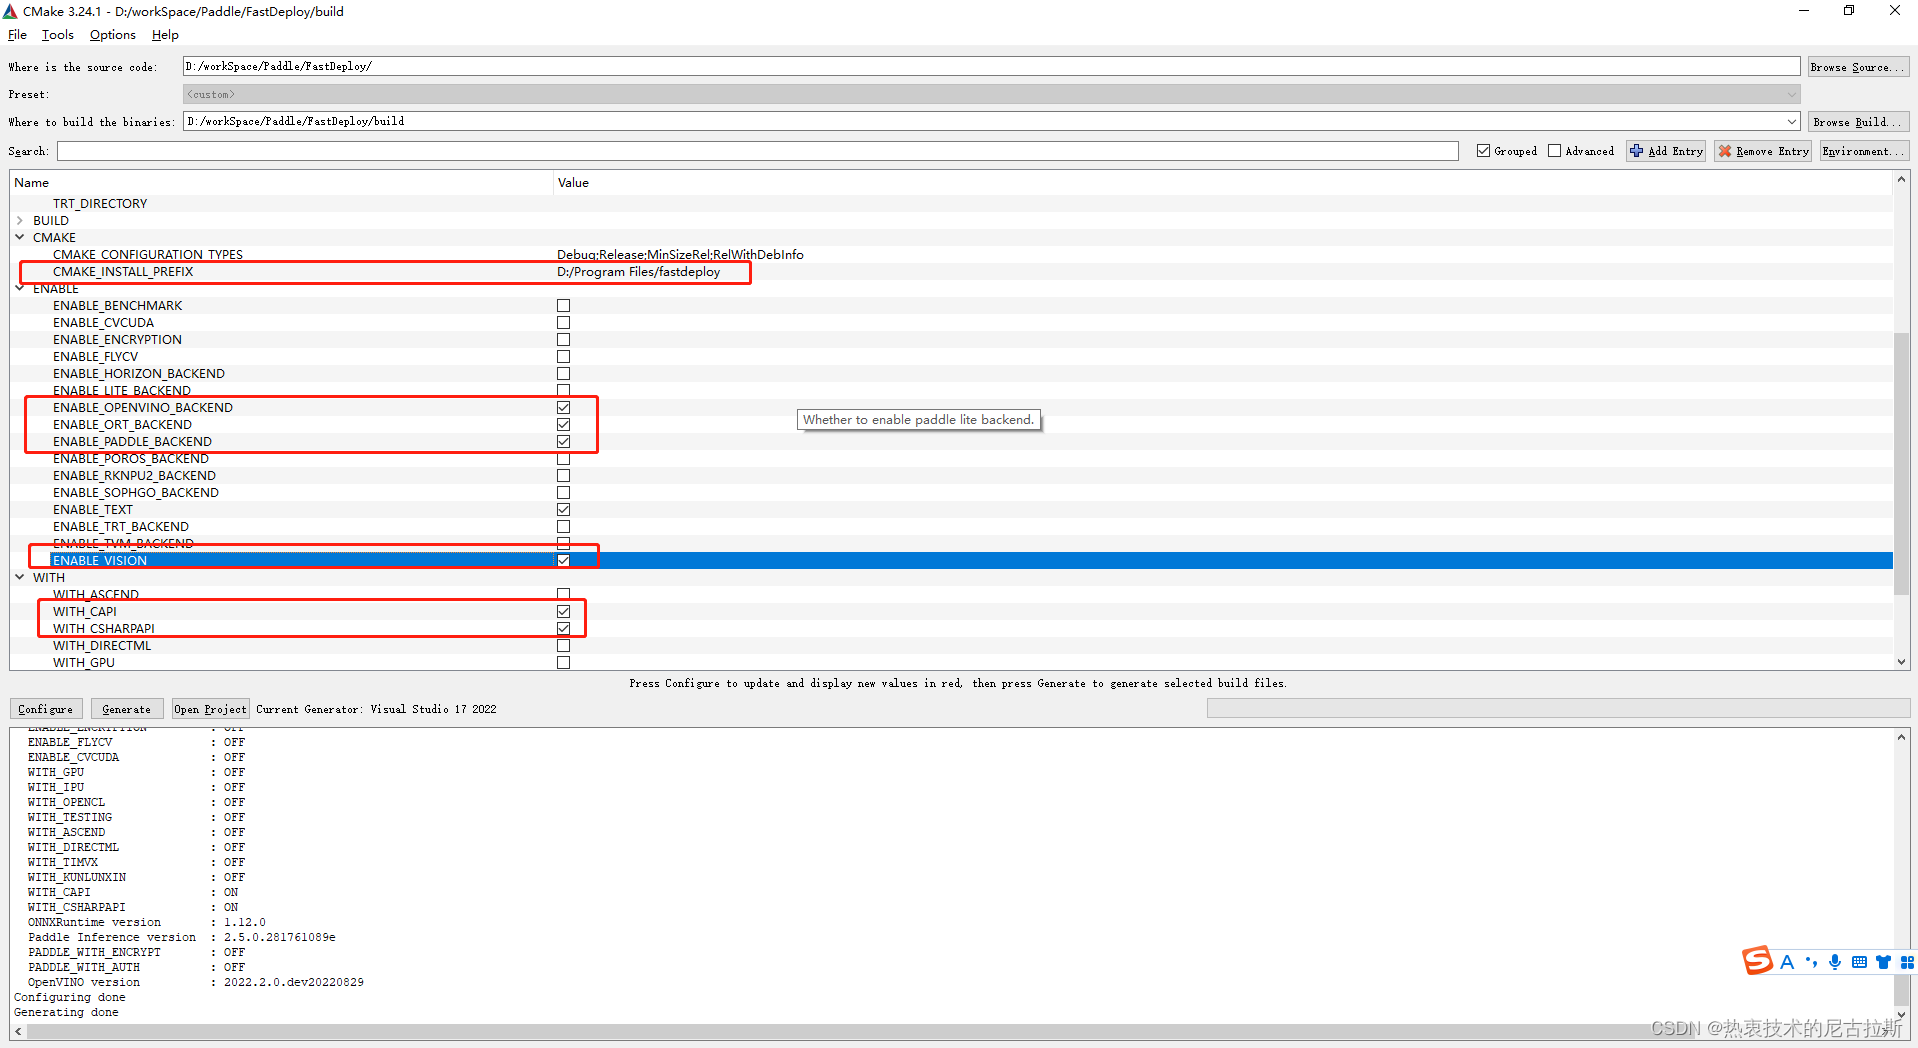
3.2 创建CSharp项目
-
在项目引用中添加–>fastdeploy_csharp;
-
nuget 包添加OpenCvSharp、OpenCvSharp.Extensions等包
-
在debug\relese项目文件夹中添加Fastdeploy的动态链接库;
fastdeploy_init.bat install %cd% D:\workSpace\Paddle\deploy\FastDeplyCsharp\FastDeplyCsharp\bin\x64\Debug
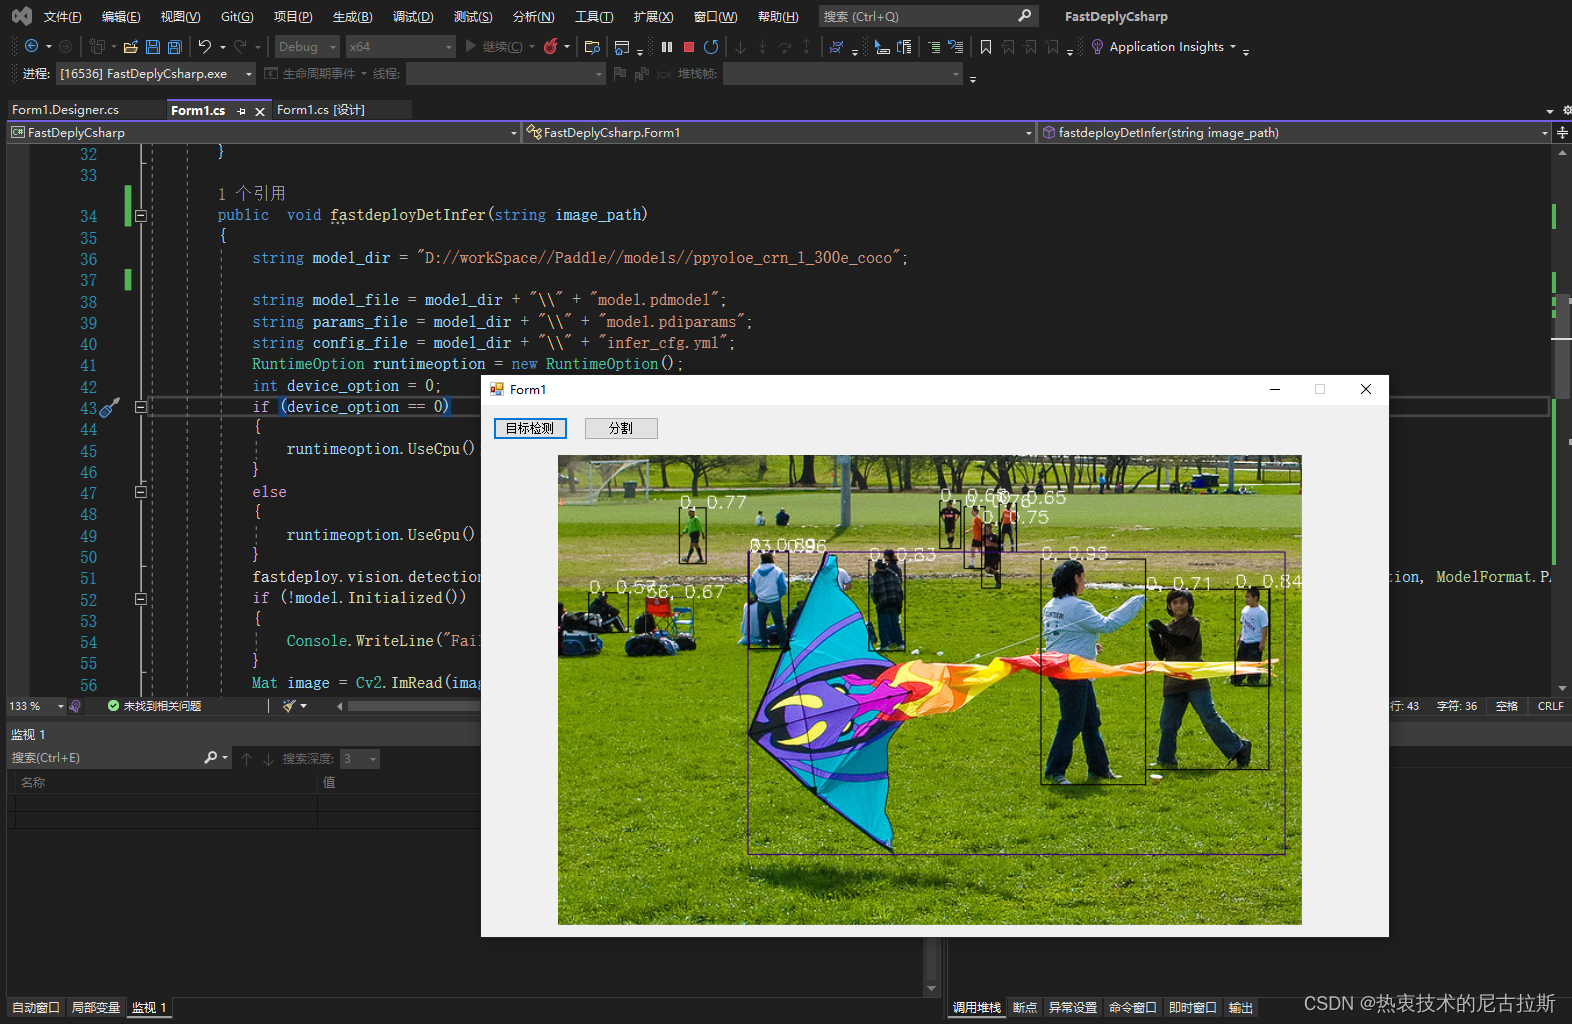
- 结果预览

3.3 源代码
//目标检测
public  void fastdeployDetInfer(string image_path)
{
    string model_dir = "D://workSpace//Paddle//models//ppyoloe_crn_l_300e_coco";

    string model_file = model_dir + "\\" + "model.pdmodel";
    string params_file = model_dir + "\\" + "model.pdiparams";
    string config_file = model_dir + "\\" + "infer_cfg.yml";
    RuntimeOption runtimeoption = new RuntimeOption();
    int device_option = 0;
    if (device_option == 0)
    {
        runtimeoption.UseCpu();
    }
    else
    {
        runtimeoption.UseGpu();
    }
    fastdeploy.vision.detection.PPYOLOE model = new fastdeploy.vision.detection.PPYOLOE(model_file, params_file, config_file, runtimeoption, ModelFormat.PADDLE);
    if (!model.Initialized())
    {
        Console.WriteLine("Failed to initialize.\n");
    }
    Mat image = Cv2.ImRead(image_path);
    fastdeploy.vision.DetectionResult res = model.Predict(image);
    //Console.WriteLine(res.ToString());
    Mat res_img = fastdeploy.vision.Visualize.VisDetection(image, res, 0.5f, 1, 0.5f);
    InferPictureBox.Image = res_img.ToBitmap();
}
// 语义分割
public void fastdeplySegInfer(string image_path)
{
    string model_dir = "D://workSpace//Paddle//models//PP_LiteSeg_B_STDC2_cityscapes_without_argmax_infer";

    string model_file = model_dir + "\\" + "model.pdmodel";
    string params_file = model_dir + "\\" + "model.pdiparams";
    string config_file = model_dir + "\\" + "deploy.yaml";
    RuntimeOption runtimeoption = new RuntimeOption();
    runtimeoption.UseCpu();


    fastdeploy.vision.segmentation.PaddleSegModel model = new fastdeploy.vision.segmentation.PaddleSegModel(model_file, params_file, config_file, runtimeoption, ModelFormat.PADDLE);

    if (!model.Initialized())
    {
        Console.WriteLine("Failed to initialize.\n");
    }
    Mat image = Cv2.ImRead(image_path);

    fastdeploy.vision.SegmentationResult res = model.Predict(image);


    Console.WriteLine(res.ToString());
    Mat res_img = fastdeploy.vision.Visualize.VisSegmentation(image, res, 0.5f);
    InferPictureBox.Image = res_img.ToBitmap();
}


 776
776


 到【灌水乐园】发言


