


 本文详细介绍了如何在路由器上配置OSPF进程,并通过实例演示了如何设置不同区域内的环回地址及网络,最后验证配置的有效性并通过命令检查邻居状态及路由表。
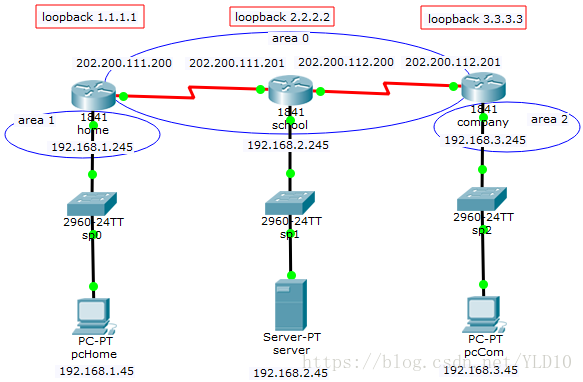
直接上拓扑图:
注意:
图中红线都是代表的是广域网,需要用 v.35 线配置DCE,封装 PPP,配置 pap 认证。
配置 ospf
home router
config>> int loop 0
config-if>> ip add 1.1.1.1 255.255.255.255  // 配置环回地址
config-if>> exit
config>> router ospf 1  // 进程号为1
config-router>> net 192.168.1.245 0.0.0.0 area 1  // 划分到区域1
config-router>> net 202.200.111.200 0.0.0.0 area 0  // 划分到区域0
school router
config>> int loop 0
config-if>> ip add 2.2.2.2 255.255.255.255  // 配置环回地址
config-if>> exit
config>> router ospf 1  // 进程号为1
config-router>> net 192.168.2.245 0.0.0.0 area 0  // 划分到区域0
config-router>> net 202.200.111.201 0.0.0.0 area 0  // 划分到区域0
config-router>> net 202.200.112.200 0.0.0.0 area 0  // 划分到区域0
company router
config>> int loop 0
config-if>> ip add 3.3.3.3 255.255.255.255  // 配置环回地址
config-if>> exit
config>> router ospf 1  // 进程号为1
config-router>> net 192.168.3.245 0.0.0.0 area 2  // 划分到区域2
config-router>> net 202.200.112.201 0.0.0.0 area 0  // 划分到区域0
配置验证
home# show ip ospf neighbor
school# show ip ospf neighbor
company# show ip ospf neighbor
查看路由表
home# sh ip rou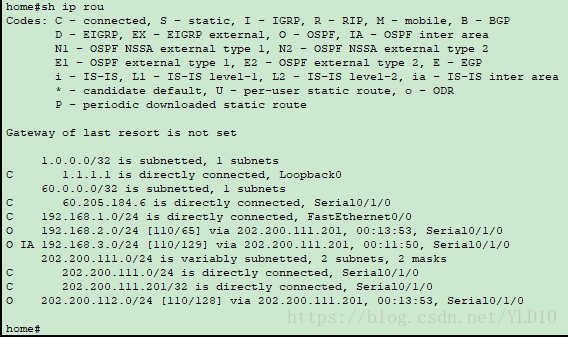
school# sh ip rou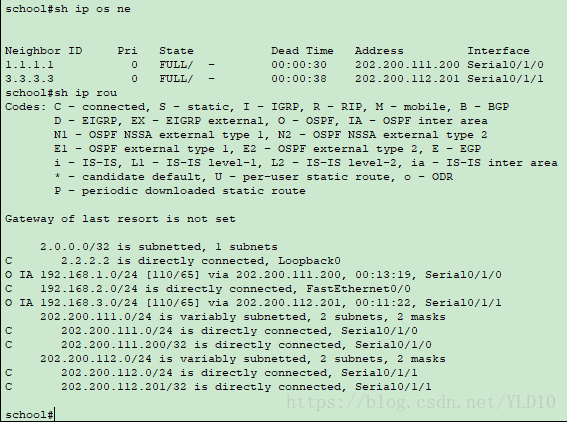
company# sh ip rou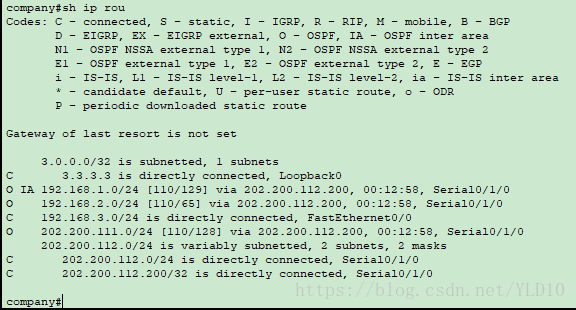
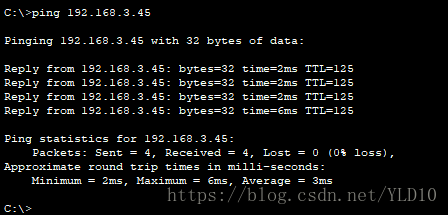
结果验证
192.168.1.45 ping 192.168.3.45
pkt 文件在我的 github 上:https://github.com/YLD10/Route


 1237
1237

 被折叠的 条评论
为什么被折叠?
被折叠的 条评论
为什么被折叠?
 到【灌水乐园】发言


