


如何在LlamaIndex中使用RAG

什么是 Llama-Index
LlamaIndex 是一个数据框架,用于帮助基于 LLM 的应用程序摄取、构建结构和访问私有或特定领域的数据。
如何使用 Llama-Index ?
基本用法是一个五步流程,将我们从原始、非结构化数据导向基于该数据生成内容的LLM。
-
- 加载文档
-
- 解析文档到 LlamaIndex 的 Node 节点中
-
- 构建索引
-
- 解析索引
-
- 解析响应
安装需要的依赖包
yaml

 !pip install llama-index -qU
 !pip install -q openai
 !pip install pypdf
 !pip install doc2txt
 !pip install -qU llama-cpp-python
 !pip install transformers
 !pip install accelerate
导入需要的依赖
python
import os
import openai
from getpass import getpass
#
import logging
import sys
from pprint import pprint
#
logging.basicConfig(stream=sys.stdout, level=logging.INFO)
logging.getLogger().addHandler(logging.StreamHandler(stream=sys.stdout))
#
from llama_index import(VectorStoreIndex,
SimpleDirectoryReader,
load_index_from_storage,
StorageContext,
ServiceContext,
Document)
from llama_index.llms import OpenAI,HuggingFaceLLM
from llama_index.prompts import PromptTemplate
from llama_index.text_splitter import SentenceSplitter
from llama_index.embeddings import OpenAIEmbedding,HuggingFaceEmbedding
from llama_index.schema import MetadataMode
from llama_index.postprocessor import MetadataReplacementPostProcessor
什么是 Document?
Document是一个容器,用来保存来自各种来源的数据,比如PDF、API 输出或从数据库中检索到的数据。
scss

 documents = SimpleDirectoryReader('./Data/').load_data()
 print(len(documents))
 pprint(documents)
加载完成后,这个 pdf 被转换为长度为 12 的数组.
sql
documents[0].get_content()
## Response
Face Recognition System Using Python
This article was published as a part of the Data Science Blogathon.
Introduction
Face recognition is different from face detection. In face detection, we had only detected the location of
human faces, and we recognized the identity of faces in the face recognition task.
In this article, we are going to build a face recognition system using python with the help of face
recognition library .
There are many algorithms available in the market for face recognition. This broad computer vision
challenge is detecting faces from videos and pictures. Many applications can be built on top of recognition
systems. Many big companies are adopting recognition systems for their security and authentication
purposes.
Use Cases of Recognition Systems
Face recognition systems are widely used in the modern era, and many new innovative systems are built on
top of recognition systems.
There are a few used cases :
Finding Missing Person
Identifying accounts on social media
Recognizing Drivers in Cars
School Attendance System
Several methods and algorithms implement facial recognition systems depending on the performance and
accuracy.
Traditional Face Recognition Algorithm
Traditional face recognition algorithms don’t meet modern-day’s facial recognition standards. They were
designed to recognize faces using old conventional algorithms.
OpenCV provides some traditional facial Recognition Algorithms.
Eigenfaces
Scale Invariant Feature Transform (SIFT)
Fisher faces
Local Binary Patterns Histograms (LBPH)
COMPUTER VISION
IMAGE ANALYSIS
INTERMEDIATE
PYTHON
documents[0].metadata
## 响应
{'file_path': 'Data/chinahistory.txt',
'file_name': 'chinahistory.txt',
'file_type': 'text/plain',
'file_size': 977274,
'creation_date': '2023-12-18',
'last_modified_date': '2023-12-05',
'last_accessed_date': '2023-12-18'}
设置 llm
ini

 from llama_index.llms import HuggingFaceLLM
 from llama_index.prompts import PromptTemplate
 llm = HuggingFaceLLM(
     model_name="HuggingFaceH4/zephyr-7b-beta",
     tokenizer_name="HuggingFaceH4/zephyr-7b-beta",
     #query_wrapper_prompt=PromptTemplate("<|system|>Please check if the following pieces of context has any mention of the keywords provided in the question.If not ten say that you do not know the answer.Please do not make up your own answer.</s>\n<|user|>\nQuestion:{query_str}</s>\n<|assistant|>\n"),
     # query_wrapper_prompt=PromptTemplate(template),
     context_window=4096,
     max_new_tokens=512,
     model_kwargs={'trust_remote_code':True},
     generate_kwargs={"temperature": 0.0},
     device_map="auto",)
配置 embedding Model
javascript

 from llama_index.embeddings import resolve_embed_model
 from llama_index.embeddings.huggingface import HuggingFaceEmbedding
 #embed_model = resolve_embed_model("local:BAAI/bge-large-en-v1.5")
 embed_model = HuggingFaceEmbedding(model_name="BAAI/bge-large-en-v1.5")
在LlamaIndex中 Node 是什么
LlamaIndex 中的 Node 对象表示源文档的“块”或部分。
这可能是一个文本块、一幅图像或其他类型的数据。类似于 Documents,Nodes 也包含与其他节点的元数据和关系信息。
在 LlamaIndex 中,Nodes 被认为是一等公民。
这意味着可以直接定义 Nodes 及其所有属性。
或者也可以使用 NodeParser 类将源Document解析为Node。默认情况下,从文档派生的每个节点都会继承相同的元数据。例如,文档中的file_name字段会传播到每个节点。
视特定的使用情况和数据结构,选择将整个 Document 对象发送到索引还是在索引之前将 Document 转换为 Node 对象取决于自己。
- 将整个
Document对象发送至索引:这种方法适用于将整个文档作为单个单位进行维护。当您的文档相对较短或不同部分之间的上下文重要时这可能会更好。 - 在索引之前将
Document转换为Node对象:当的文档很长且希望在索引之前将其拆分成较小块(或节点)时,这种方法很实用。当想要检索文档特定部分而非整个文档时这可能会更好。
节点解析和索引化(基于句子窗口方法)
SentenceWindowNodeParser 类旨在将文档解析为节点(句子),并为每个节点捕获周围句子的窗口。
这对于上下文感知的文本处理非常有用,通过理解句子周围的背景可以提供有价值的见解。
- Node:表示文本的单元,这里指一句话。
- Window:围绕特定句子的若干句组成的范围。例如,如果窗口大小为3,并且当前句是第5句,则该窗口会捕获第2至第8句。
- Metadata:与节点相关联的额外信息,如周围句子的窗口。
工作机制
当我们使用from_defaults方法创建一个SentenceWindowNodeParser实例时,使用了 custom_sentence_splitter(根据 "\n", "\n-", 或 "\n" 分隔文本)以及指定的参数(window_size=3, include_prev_next_rel=True, include_metadata=True),我们将设置一个解析器来按照以下方式处理文档:
- 每个文档的文本将使用自定义分隔符分为句子。
- 对于每个句子,生成一个节点。
- 该节点将包含捕获其两侧三个句子的元数据。
- 此外,每个节点还会引用其前后的句子。
- 使用一个文档列表调用
get_nodes_from_documents将返回一组这些节点,每个代表一个句子,丰富了指定的元数据和关系。
python
#create senetence window node parser with default settings
from llama_index.node_parser import SentenceWindowNodeParser,SimpleNodeParser
sentence_node_parser = SentenceWindowNodeParser.from_defaults(
window_size=3,
window_metadata_key="window",
original_text_metadata_key="original_text")
#base_node_parser = SentenceSplitter(llm=llm)
base_node_parser = SimpleNodeParser()
#
nodes = sentence_node_parser.get_nodes_from_documents(documents)
base_nodes = base_node_parser.get_nodes_from_documents(documents)
#
print(f"SENTENCE NODES :\n {nodes[10]}")
print(f"BASE NODES :\n {base_nodes[10]}")
SENTENCE NODES :
Node ID: 8418b939-dc08-42a6-8ee1-821e46f7a2a1
Text: Traditional Face Recognition Algorithm Traditional face
recognition algorithms don’t meet modern-day’s facial recognition
standards.
BASE NODES :
Node ID: 7a94495b-2f49-4cc4-8fd4-87f5fb0f645e
Text: Now let’s test the model prediction using text in different
languages. def predict(text): x = cv.transform([text]).toarray() #
converting text to bag of words model (Vector) lang = model.predict(x)
# predicting the language lang = le.inverse_transform(lang) # finding
the language corresponding the the predicted value print("The langauge
is in",l...
dict(nodes[10]) # 由于没有执行索引操作,因此embedding为 None。
####
{'id_': '8418b939-dc08-42a6-8ee1-821e46f7a2a1',
'embedding': None,
'metadata': {'window': 'Many big companies are adopting recognition systems for their security and authentication\npurposes.\n Use Cases of Recognition Systems\nFace recognition systems are widely used in the modern era, and many new innovative systems are built on\ntop of recognition systems.\n There are a few used cases :\nFinding Missing Person\nIdentifying accounts on social media\nRecognizing Drivers in Cars\nSchool Attendance System\nSeveral methods and algorithms implement facial recognition systems depending on the performance and\naccuracy.\n Traditional Face Recognition Algorithm\nTraditional face recognition algorithms don’t meet modern-day’s facial recognition standards. They were\ndesigned to recognize faces using old conventional algorithms.\n OpenCV provides some traditional facial Recognition Algorithms.\n',
'original_text': 'Traditional Face Recognition Algorithm\nTraditional face recognition algorithms don’t meet modern-day’s facial recognition standards. ',
'page_label': '1',
'file_name': 'face-recognition-system-using-python.pdf',
'file_path': 'Data/face-recognition-system-using-python.pdf',
'file_type': 'application/pdf',
'file_size': 465666,
'creation_date': '2023-12-21',
'last_modified_date': '2023-12-21',
'last_accessed_date': '2023-12-21'},
'excluded_embed_metadata_keys': ['file_name',
'file_type',
'file_size',
'creation_date',
'last_modified_date',
'last_accessed_date',
'window',
'original_text'],
'excluded_llm_metadata_keys': ['file_name',
'file_type',
'file_size',
'creation_date',
'last_modified_date',
'last_accessed_date',
'window',
'.......'
}
LlamaIndex 中的 IndexNode 是什么?
IndexNode 是在 LlamaIndex 中使用的节点对象。
它代表了存储在索引中的原始文档块。索引是一种数据结构,允许快速检索与用户查询相关的上下文,这对于“检索增强生成”(RAG)用例至关重要。
从根本上讲,“IndexNode”继承自“TextNode”的属性,意味着它主要代表文本内容。
IndexNode 的区别特征在于其 index_id 属性。这个 index_id 充当一个唯一标识符或对另一个对象的引用,使得节点能够指向系统内的其他实体。
这种引用功能在文本内容之上增加了一层连接性和关联信息。
例如,在递归检索和节点引用的背景下,较小的块(表示为IndexNode对象)可以指向更大的父块。在查询时会检索较小的块,但会跟踪对更大块的引用。 这样可以提供更多合成的背景信息。
LlamaIndex 中的 ServiceContext 是什么?
ServiceContext 是在 LlamaIndex 管道/应用程序的索引和查询阶段中经常使用的资源包。
ini

 ctx_sentence = ServiceContext.from_defaults(
     llm=llm,
     embed_model=embed_model,
     node_parser=nodes)
 # 以上内容已经包含了SentenceWindowNodeParser
 #
 ctx_base = ServiceContext.from_defaults(
     llm=llm,
     embed_model=embed_model,
     node_parser=base_nodes)
LlamaIndex 中的 VectorStoreIndex 是什么?
在 LlamaIndex 中,VectorStoreIndex 是一种索引类型,它使用文本的向量表示以实现有效检索相关上下文。
它构建在 VectorStore 之上,后者是一种存储向量并允许快速最近邻搜索的数据结构。
VectorStoreIndex 接收 IndexNode 对象,这些对象代表了原始文档的块。
它使用一个嵌入模型(在ServiceContext中指定)将这些节点的文本内容转换成向量表示。然后这些向量被存储在VectorStore中。
在查询时,VectorStoreIndex 可以快速检索出针对特定查询最相关的节点。 它通过使用相同的嵌入模型将查询转换为向量,然后在 VectorStore 中执行最近邻搜索来实现这一点。
ini

 sentence_index = VectorStoreIndex(
     nodes,
     service_context=ctx_sentence)
 base_index = VectorStoreIndex(
     base_nodes,
     service_context=ctx_base)
在LlamaIndex中,RetrieverQueryEngine是什么?
LlamaIndex 中的 RetrieverQueryEngine 是一种查询引擎,它使用一个检索器从索引中获取相关的上下文,给定用户查询。
它主要用于和检索器一起工作,比如从 VectorStoreIndex 创建的 VectorStoreRetriever。
RetrieverQueryEngine 接受一个检索器和一个响应合成器作为输入。 检索器负责从索引中获取相关的 IndexNode 对象,而响应合成器则根据检索到的节点和用户查询生成自然语言响应。
LlamaIndex中的 MetadataReplacementPostProcessor是什么?
MetadataReplacementPostProcessor 用于将节点内容替换为节点元数据中的字段。如果元数据中不存在该字段,则节点文本保持不变。与 SentenceWindowNodeParser 结合使用时效果最佳。
ini
from llama_index.indices.postprocessor import MetadataReplacementPostProcessor
sentence_query_engine = sentence_index.as_query_engine(
similarity_top_k=5,
verbose=True,
node_postprocessor=[
MetadataReplacementPostProcessor("window")
],
)
#
base_query_engine = base_index.as_query_engine(
similarity_top_k=5,
verbose=True,
node_postprocessor=[
MetadataReplacementPostProcessor("window")
],
)
运行查询以获取句子窗口解析器查询引擎
arduino

 query ="使用Python检测图像中的人脸的示例代码。"
 response = sentence_query_engine.query(query)
 from IPython.display import display,Markdown
 display(Markdown(f"<b>{response}</b>"))
生成的响应
这里是一个使用Python和OpenCV库来检测图像中人脸的示例代码:
ini

 import cv2
 import numpy as np
 # Load the pre-trained face detection model
 face_cascade = cv2.CascadeClassifier('haarcascade_frontalface_default.xml')# Load the image
 img = cv2.imread('image.jpg')# Convert the image to grayscale
 gray = cv2.cvtColor(img, cv2.COLOR_BGR2GRAY)# Detect faces in the grayscale image
 faces = face_cascade.detectMultiScale(gray, 1.2, 5)# Draw a rectangle around each face
 for (x, y, w, h) in faces:
     cv2.rectangle(img, (x, y), (x+w, y+h), (255, 0, 0), 2)# Display the image with the detected faces
 cv2.imshow('Face Detection', img)
 cv2.waitKey(0)
 cv2.destroyAllWindows()
在这段代码中,我们首先使用OpenCV的**CascadeClassifier函数加载预训练的人脸检测模型。然后加载图像,将其转换为灰度,并将其传递给人脸检测模型的detectMultiScale函数以检测人脸。然后使用OpenCV的rectangle函数在每张人脸周围绘制矩形。最后,我们使用OpenCV的imshow**函数显示带有检测到的人脸的图像。
请确保将haarcascade_frontalface_default.xml替换为您预训练的人脸检测模型的路径。
为基节点分析器运行查询查询引擎
css

 response = base_query_engine.query(query)
 #
 display(Markdown(f"<b>{response}</b>"))
回复
ini
import cv2
import numpy as np
img = cv2.imread('image.jpg')
gray = cv2.cvtColor(img, cv2.COLOR_BGR2GRAY)
face_cascade = cv2.CascadeClassifier('haarcascade_frontalface_default.xml')
faces = face_cascade.detectMultiScale(gray, 1.2, 5)
for (x, y, w, h) in faces:
cv2.rectangle(img, (x, y), (x+w, y+h), (255, 0, 0), 2)
cv2.imshow('img', img)
cv2.waitKey(0)
cv2.destroyAllWindows()
此代码使用Haar级联算法在图像中检测面部。haarcascade_frontalface_default.xml文件包含用于面部检测的训练分类器。detectMultiScale()函数用于以一定比例因子和最小邻域尺寸检测图像中的多个面部。然后,使用rectangle()函数在原始图像上将检测到的面部画成矩形。imshow()函数用于显示图像,而waitKey()函数则用于等待按键后关闭窗口。destroyAllWindows()函数可销毁程序执行期间创建的所有窗口。
保存和重新加载 VectorStore
javascript

 from google.colab import drive
 drive.mount('/content/drive')
保存至持久存储
ini

 sentence_index.storage_context.persist(persist_dir="location in Gdrive")
 base_index.storage_context.persist(persist_dir="location in Gdrive")
从存储中检索
ini

 # 重建存储
 SC_retrieved_sentence = StorageContext.from_defaults(persist_dir="location in Gdrive")
 SC_retrieved_base = StorageContext.from_defaults(persist_dir="location in Gdrive")
加载索引
ini

 retrieved_sentence_index = load_index_from_storage(
     SC_retrieved_sentence,
     service_context=ctx_sentence)
 retrieved_base_index = load_index_from_storage(
     SC_retrieved_base,
     service_context=ctx_base)
重建查询引擎
ini

 from llama_index.postprocessor import MetadataReplacementPostProcessor
 #
 sentence_query_engine = retrieved_sentence_index.as_query_engine(
   similarity_top_k=5,
   verbose=True,
   node_postprocessor=[MetadataReplacementPostProcessor("window")],
 )
 base_query_engine = retrieved_base_index.as_query_engine(
   similarity_top_k=5,
   verbose=True,
 )
提问问题并得到回应
css

 base_response = base_query_engine.query(query)
 #
 display(Markdown(f"<b>{base_response}</b>"))
如何系统的去学习AI大模型LLM ?
作为一名热心肠的互联网老兵,我意识到有很多经验和知识值得分享给大家,也可以通过我们的能力和经验解答大家在人工智能学习中的很多困惑,所以在工作繁忙的情况下还是坚持各种整理和分享。
但苦于知识传播途径有限,很多互联网行业朋友无法获得正确的资料得到学习提升,故此将并将重要的 AI大模型资料 包括AI大模型入门学习思维导图、精品AI大模型学习书籍手册、视频教程、实战学习等录播视频免费分享出来。
😝有需要的小伙伴,可以V扫描下方二维码免费领取🆓

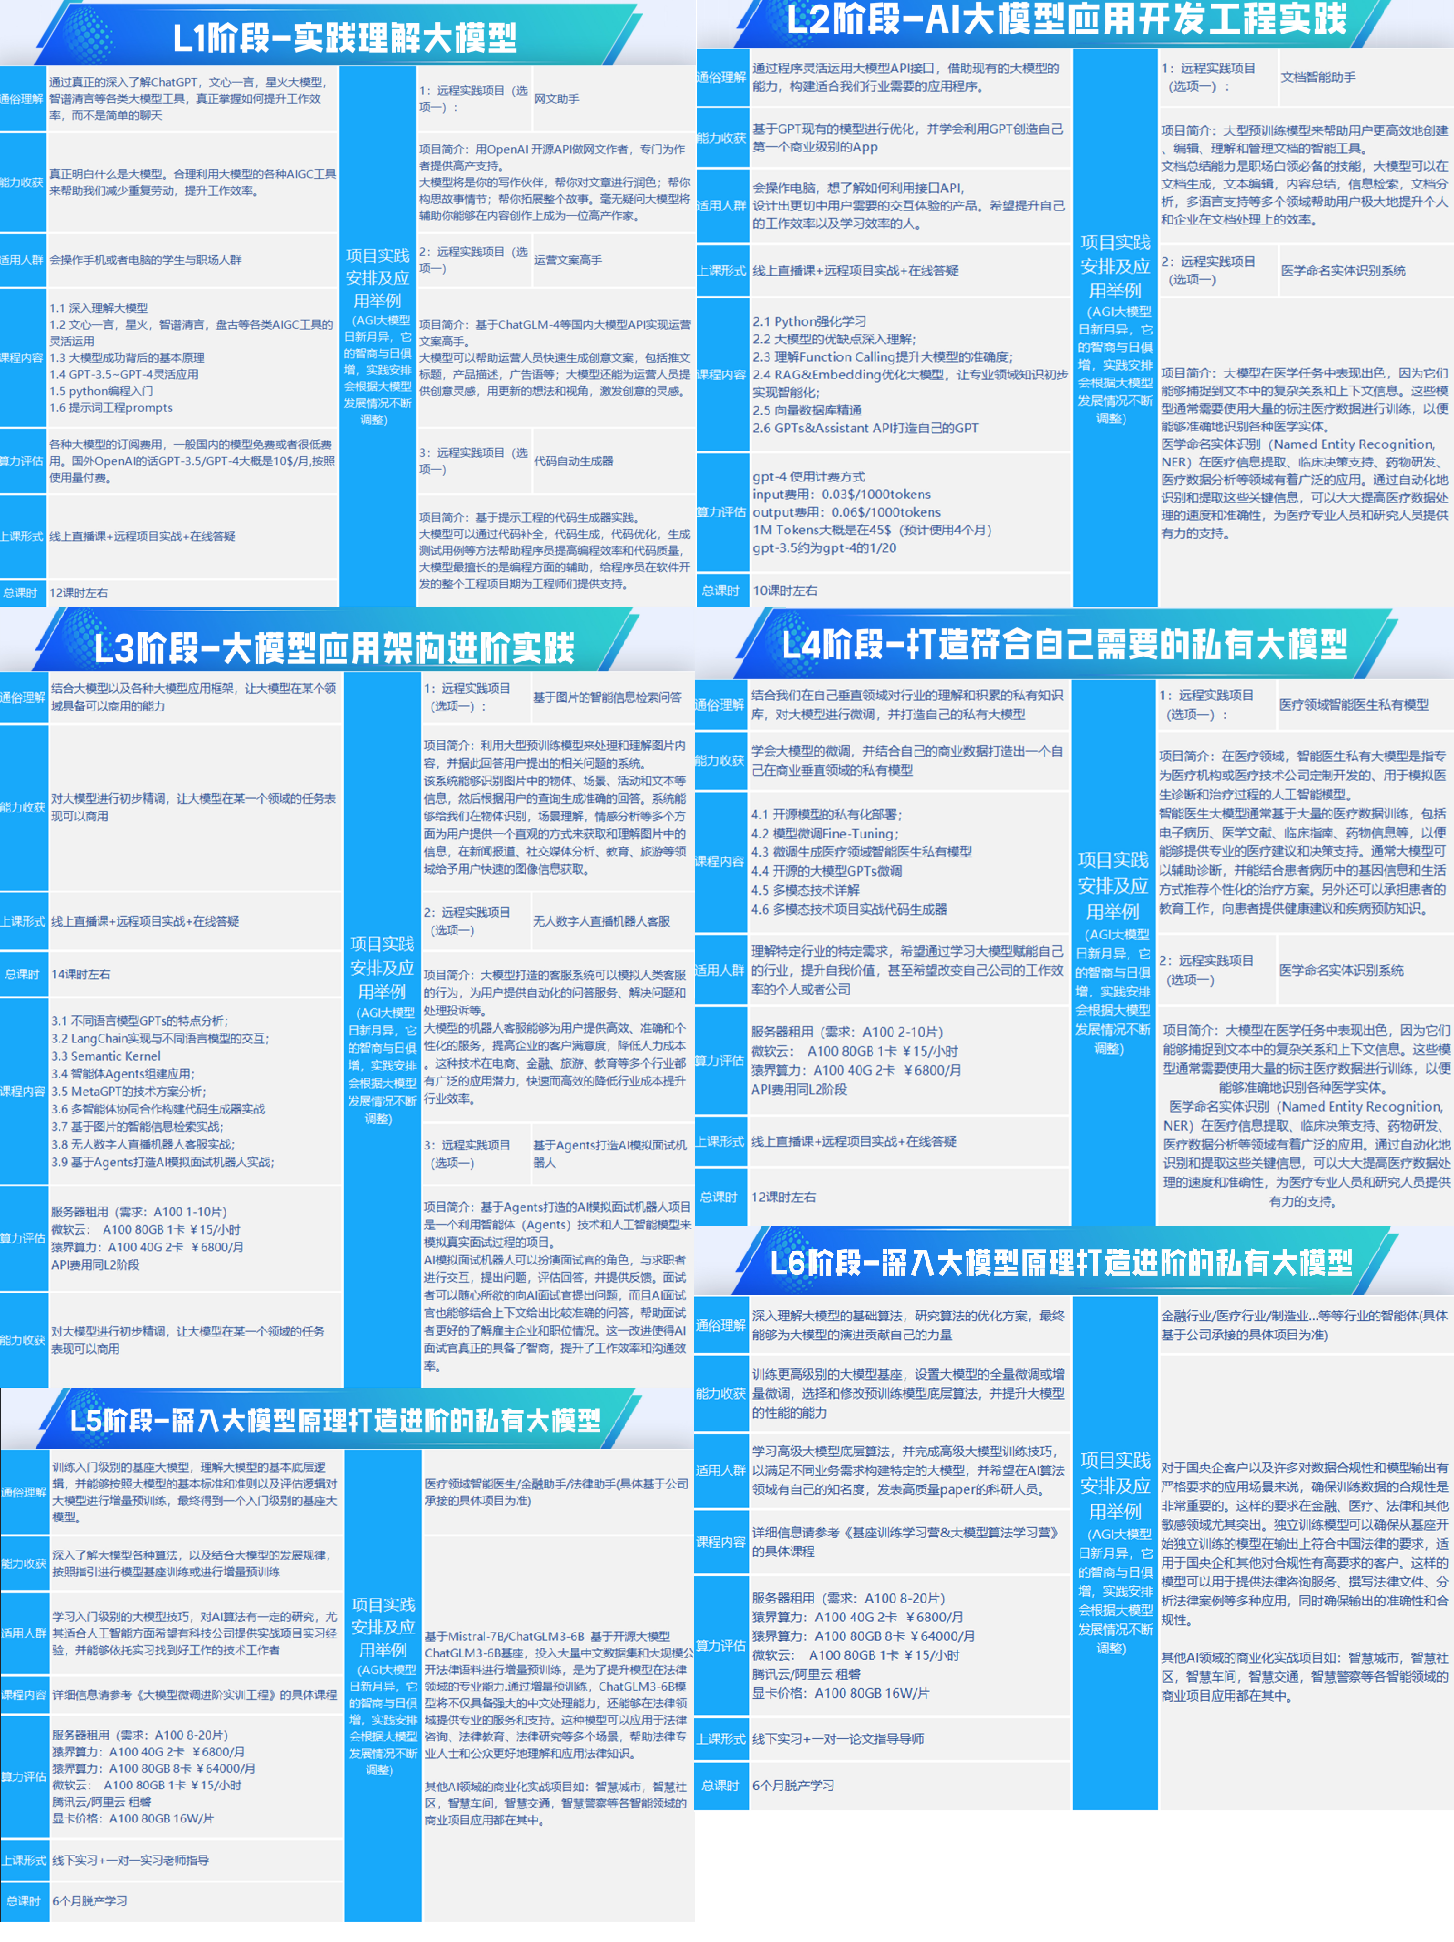
一、全套AGI大模型学习路线
AI大模型时代的学习之旅:从基础到前沿,掌握人工智能的核心技能!
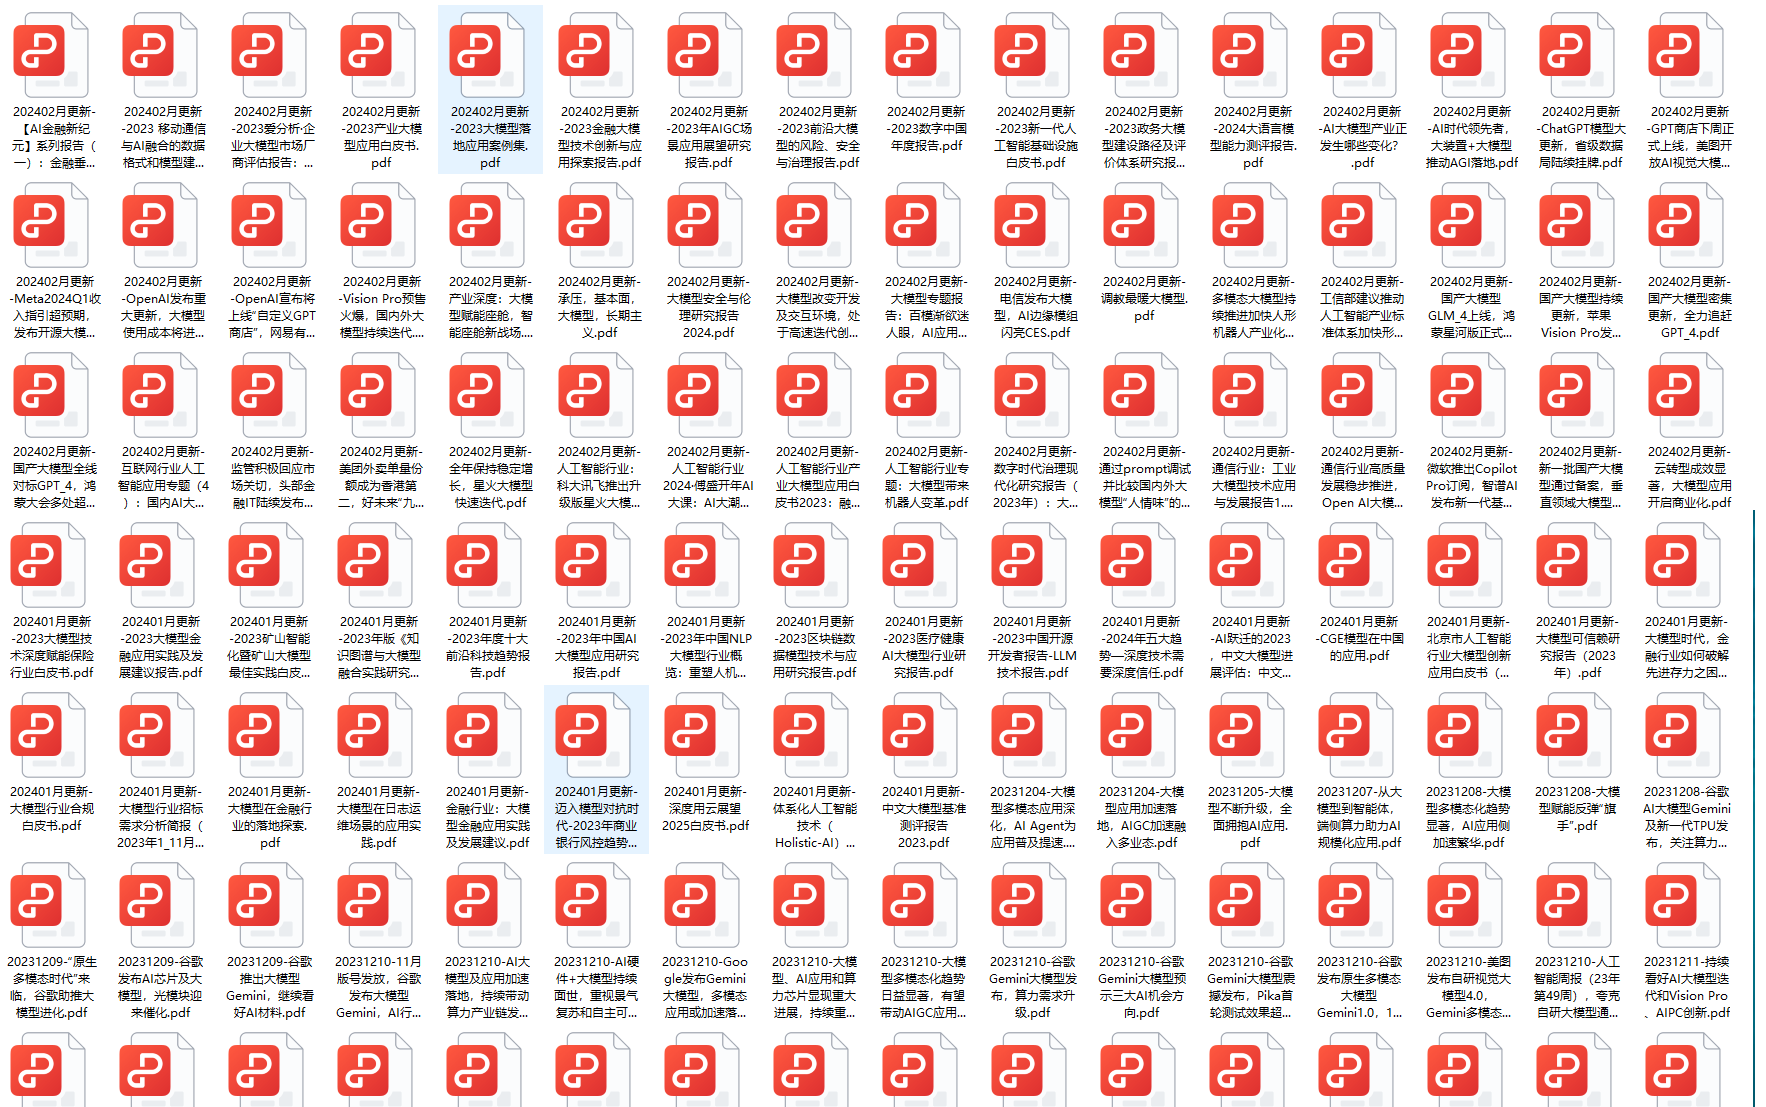
二、640套AI大模型报告合集
这套包含640份报告的合集,涵盖了AI大模型的理论研究、技术实现、行业应用等多个方面。无论您是科研人员、工程师,还是对AI大模型感兴趣的爱好者,这套报告合集都将为您提供宝贵的信息和启示。
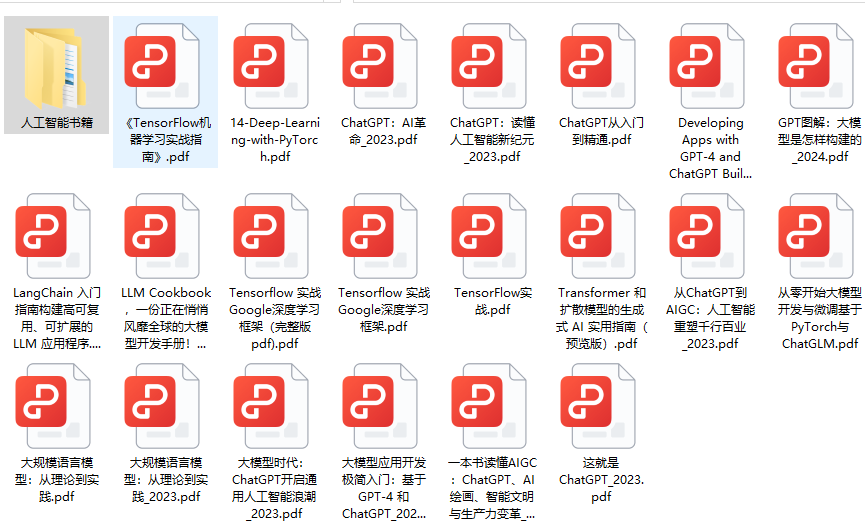
三、AI大模型经典PDF籍
随着人工智能技术的飞速发展,AI大模型已经成为了当今科技领域的一大热点。这些大型预训练模型,如GPT-3、BERT、XLNet等,以其强大的语言理解和生成能力,正在改变我们对人工智能的认识。 那以下这些PDF籍就是非常不错的学习资源。

四、AI大模型商业化落地方案
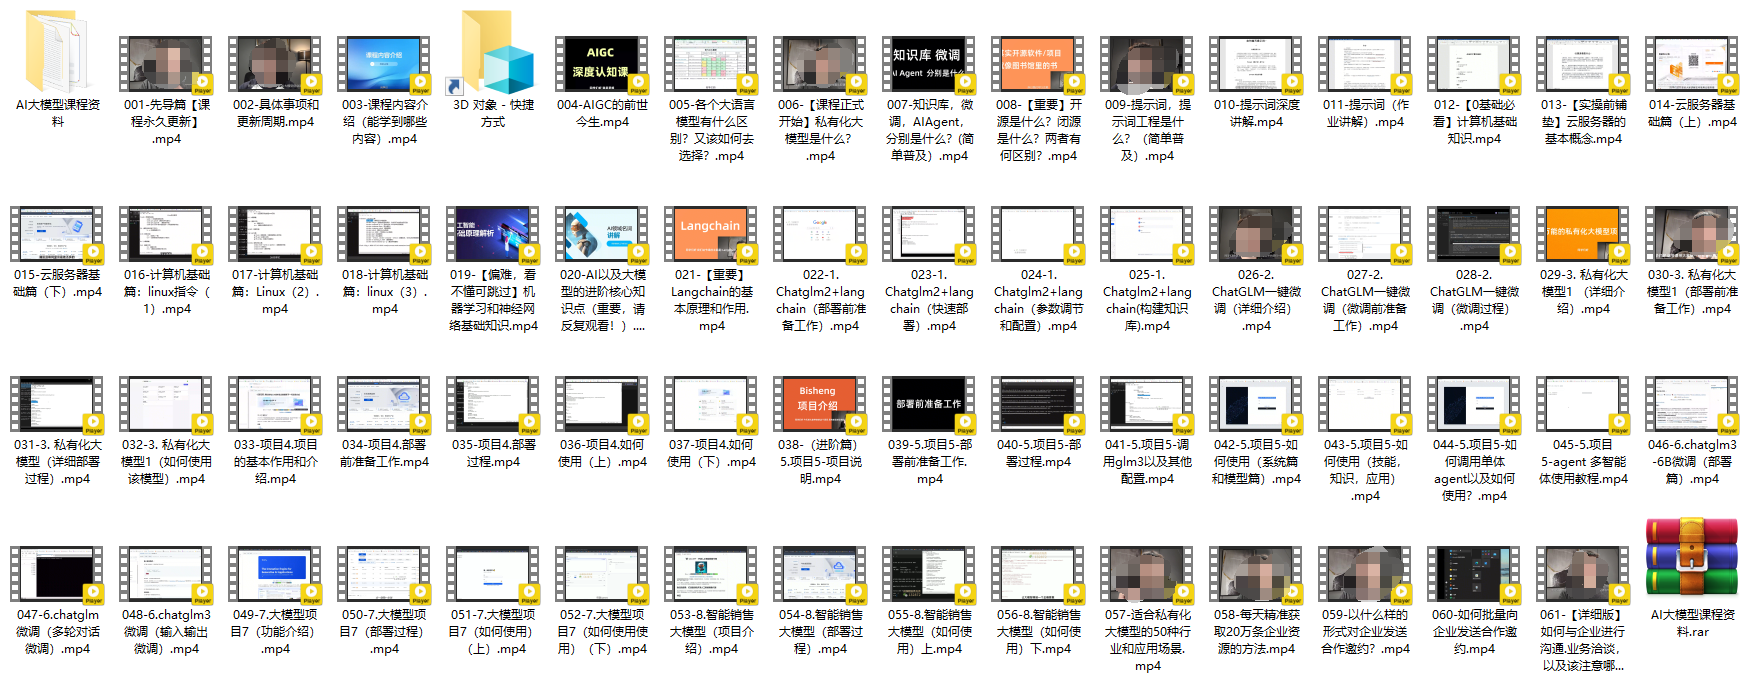
阶段1:AI大模型时代的基础理解
- 目标:了解AI大模型的基本概念、发展历程和核心原理。
- 内容:
- L1.1 人工智能简述与大模型起源
- L1.2 大模型与通用人工智能
- L1.3 GPT模型的发展历程
- L1.4 模型工程
- L1.4.1 知识大模型
- L1.4.2 生产大模型
- L1.4.3 模型工程方法论
- L1.4.4 模型工程实践 - L1.5 GPT应用案例
阶段2:AI大模型API应用开发工程
- 目标:掌握AI大模型API的使用和开发,以及相关的编程技能。
- 内容:
- L2.1 API接口
- L2.1.1 OpenAI API接口
- L2.1.2 Python接口接入
- L2.1.3 BOT工具类框架
- L2.1.4 代码示例 - L2.2 Prompt框架
- L2.2.1 什么是Prompt
- L2.2.2 Prompt框架应用现状
- L2.2.3 基于GPTAS的Prompt框架
- L2.2.4 Prompt框架与Thought
- L2.2.5 Prompt框架与提示词 - L2.3 流水线工程
- L2.3.1 流水线工程的概念
- L2.3.2 流水线工程的优点
- L2.3.3 流水线工程的应用 - L2.4 总结与展望
- L2.1 API接口
阶段3:AI大模型应用架构实践
- 目标:深入理解AI大模型的应用架构,并能够进行私有化部署。
- 内容:
- L3.1 Agent模型框架
- L3.1.1 Agent模型框架的设计理念
- L3.1.2 Agent模型框架的核心组件
- L3.1.3 Agent模型框架的实现细节 - L3.2 MetaGPT
- L3.2.1 MetaGPT的基本概念
- L3.2.2 MetaGPT的工作原理
- L3.2.3 MetaGPT的应用场景 - L3.3 ChatGLM
- L3.3.1 ChatGLM的特点
- L3.3.2 ChatGLM的开发环境
- L3.3.3 ChatGLM的使用示例 - L3.4 LLAMA
- L3.4.1 LLAMA的特点
- L3.4.2 LLAMA的开发环境
- L3.4.3 LLAMA的使用示例 - L3.5 其他大模型介绍
- L3.1 Agent模型框架
阶段4:AI大模型私有化部署
- 目标:掌握多种AI大模型的私有化部署,包括多模态和特定领域模型。
- 内容:
- L4.1 模型私有化部署概述
- L4.2 模型私有化部署的关键技术
- L4.3 模型私有化部署的实施步骤
- L4.4 模型私有化部署的应用场景
学习计划:
- 阶段1:1-2个月,建立AI大模型的基础知识体系。
- 阶段2:2-3个月,专注于API应用开发能力的提升。
- 阶段3:3-4个月,深入实践AI大模型的应用架构和私有化部署。
- 阶段4:4-5个月,专注于高级模型的应用和部署。
这份完整版的大模型 LLM 学习资料已经上传优快云,朋友们如果需要可以微信扫描下方优快云官方认证二维码免费领取【保证100%免费】
😝有需要的小伙伴,可以Vx扫描下方二维码免费领取🆓


 406
406

 被折叠的 条评论
为什么被折叠?
被折叠的 条评论
为什么被折叠?
 到【灌水乐园】发言


