这篇记录的目的,进一步从源码、流程的角度 梳理 UVC 开发流程,加速理解,快速迭代,迁移其它产品开发
文章目录
前言
假设已经对UVC了解,已经对能够写一个demo,或者用uvc 官方提供的demo 进行开发。但是遇到客户问题还是一知半解,那就还是有必要对 UVC Java层源码有一个了解,特别是流程上的,这样才能遇到问题针对性解决! 然后有自己的思考和一些想法。
一、参考资料
UVC for USBCamera in Android - 篇一
USB Camera open流程详解
Android中多USB摄像头解决方案——UVCCamera源码分析(一)
Android中多USB摄像头解决方案——UVCCamera源码分析(二)
Android中多USB摄像头解决方案——UVCCamera源码分析(三)
Android中多USB摄像头解决方案——UVCCamera源码分析(四)
Android中多USB摄像头解决方案——UVCCamera源码分析(五)
上面这些参考资料非常重要,都是在解析USBCamera 源码流程、分析,对着源码看 意义非常大。
USBCamera 本文源码对照分析
AndroidUSBCamera 方便快速集成的手机应用,这里提出来给出一种解决方案,适合自己的时候可以用一用。但是如再篇一中也讲过,有弊端,部分相机分辨率显示不出来 又无法更改,卡死,属于大佬封装的一个app , 仅供参考。
UVCCamera 最原始的UVCCamera Demo,方便二次封装。 太多的Demo 都是基于这个参考的。 里面的不同demo 对应不同使用场景,有借鉴的意义。
备注: 我们 本文源码流程参考的 就是 USBCamera 这个demo 基础上再进行二次封装 实现业务。 实际这个的基础也是 UVCCamera
二、核心关键类介绍
类 | 作用 |
---|---|
USBMonitor | 监听 USB 设备插拔,管理权限 |
UsbControlBlock | 底层 USB 通信(控制传输) |
OnDeviceConnectListener | USB 设备连接状态回调 |
UVCCameraHandler | 封装 UVCCamera 操作(预览、拍照、录像) |
CameraThread | 后台线程执行摄像头操作 |
这些类共同构成了 USBCamera 的核心框架,适用于 Android 上的 USB 摄像头开发。
USBMonitor(USB 设备监控与管理)
作用
-
负责 检测 USB 设备的插拔事件(如摄像头连接/断开)。
-
枚举已连接的 USB 设备,并检查是否有可用的摄像头设备。
-
申请 USB 设备权限(在 Android 上需要用户授权才能访问 USB 设备)。
-
管理 USB 设备的生命周期(如打开、关闭设备)。
关键方法
-
register() / unregister():注册/注销 USB 设备监听。
-
getDeviceList():获取当前连接的 USB 设备列表。
-
requestPermission(UsbDevice):请求用户授权访问 USB 设备。
-
openDevice(UsbDevice):打开 USB 设备,返回 UsbControlBlock。
UsbControlBlock(USB 设备控制块)
作用
- 代表一个 已打开的 USB 设备,用于 底层 USB 通信。
- 提供 USB 控制传输(Control Transfer) 功能,用于发送控制命令(如摄像头参数设置)。
- 管理 USB 接口(Interface) 和 端点(Endpoint)(用于数据传输)。
关键方法
- claimInterface(UsbInterface):声明 USB 接口(必须调用才能进行数据传输)。
- bulkTransfer(…):执行 USB 批量传输(Bulk Transfer)。
- close():关闭 USB 设备,释放资源。
OnDeviceConnectListener(USB 设备连接监听接口)
作用
- 定义 USB 设备连接/断开时的回调,用于处理设备状态变化。
- 通常由 USBMonitor 触发。
关键回调方法 - onAttach(UsbDevice):当 USB 设备插入时调用。
- onDetach(UsbDevice):当 USB 设备拔出时调用。
- onConnect(UsbDevice, UsbControlBlock, boolean):当 USB 设备成功连接并授权后调用。
- onDisconnect(UsbDevice, UsbControlBlock):当 USB 设备断开连接时调用。
示例
val usbMonitor = USBMonitor(context, object : OnDeviceConnectListener {
override fun onAttach(device: UsbDevice) {
Log.d("USB", "设备插入: ${device.deviceName}")
}
override fun onConnect(device: UsbDevice, ctrlBlock: UsbControlBlock, isNew: Boolean) {
Log.d("USB", "设备已连接: ${device.deviceName}")
// 可以在这里初始化摄像头
}
override fun onDisconnect(device: UsbDevice, ctrlBlock: UsbControlBlock) {
Log.d("USB", "设备已断开: ${device.deviceName}")
}
})
UVCCameraHandler(UVCCamera 控制与数据流处理)
作用
- 管理 UVCCamera 的预览、拍照、录像 等操作。
- 封装了 UVCCamera 的 API,提供更简单的调用方式。
- 通常运行在 CameraThread 中,避免阻塞 UI 线程。
关键方法 - startPreview(Surface):开始摄像头预览(传入 Surface 用于显示)。
- stopPreview():停止预览。
- captureStill(String):拍照并保存到指定路径。
- startRecording(String) / stopRecording():开始/停止录像。
示例
val cameraHandler = UVCCameraHandler.createHandler(
context,
UVCCamera.DEFAULT_PREVIEW_WIDTH,
UVCCamera.DEFAULT_PREVIEW_HEIGHT,
UVCCamera.FRAME_FORMAT_MJPEG
)
// 开始预览(传入 Surface,如 TextureView 的 Surface)
cameraHandler.startPreview(surface)
CameraThread(摄像头后台线程)
作用
- 用于 在后台线程执行摄像头操作(避免阻塞 UI 线程)。
- 通常由 UVCCameraHandler 内部使用,封装了 HandlerThread 的实现。
- 处理 USB 摄像头初始化、帧数据回调、录制存储 等耗时操作。
关键方法
-
run():线程运行逻辑(处理 UVCCamera 操作)。
-
queueEvent(Runnable):向线程发送任务(如 startPreview、captureStill)。
示例
// UVCCameraHandler 内部通常这样使用:
class UVCCameraHandler : HandlerThread("CameraThread") {
private val mWorkerHandler: Handler
init {
start()
mWorkerHandler = Handler(looper)
}
fun startPreview(surface: Surface) {
mWorkerHandler.post {
// 在后台线程执行摄像头初始化
mUVCCamera.startPreview(surface)
}
}
}
小结-完整流程示例
- USBMonitor 检测 USB 设备插入,并请求权限。
- OnDeviceConnectListener.onConnect 回调返回 UsbControlBlock。
- UVCCameraHandler 使用 UsbControlBlock 初始化 UVCCamera。
- CameraThread 在后台处理摄像头帧数据,并通过 Surface 显示预览。
- 用户操作(拍照、录像)通过 UVCCameraHandler 执行。
三、源码流程分析
open 打开USBCamera过程
上面我们了解了关键核心类,通过类的作用可以了解基本流程,这里总结的流程图如下,先有个大概了解
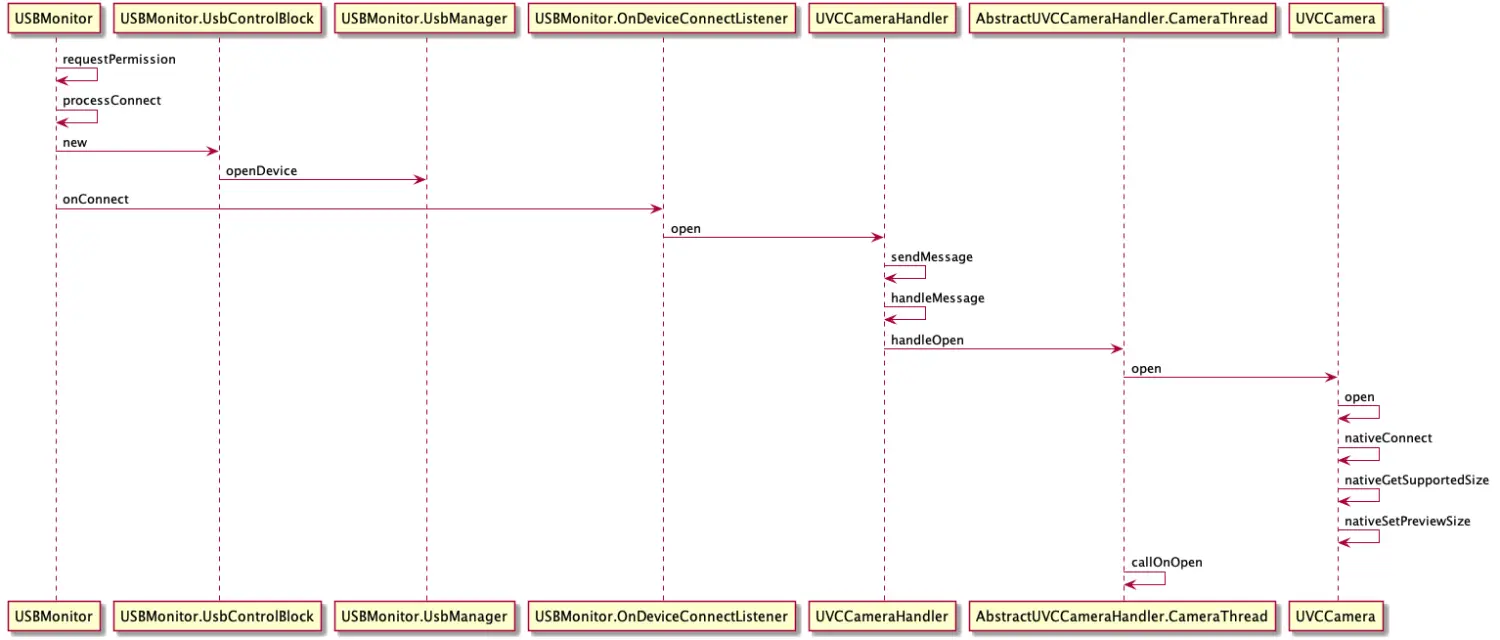
时序图是流程的总结,其实一就够了,对着源码一步一步分析即可,这里还是重点来分析下部分方法,代码。
USBMonitor - register 监听USB 事件
我们这么理解:当你插入USB的时候,系统是由USBEvent 事件的,作为应用你就必须知道由UsbDevice 插入了,所以应用端需要监听。 那么就是通过广播实现的,就是USBMonitor 监控器通过广播事件监听USB设备插入,UVCCamera 外设从硬件角度上来说就是一个USB 设备。
/**
* register BroadcastReceiver to monitor USB events
* @throws IllegalStateException
*/
public synchronized void register() throws IllegalStateException {
if (destroyed) throw new IllegalStateException("already destroyed");
Log.d(TAG," register");
if (mPermissionIntent == null) {
if (DEBUG) Log.i(TAG, "register:");
final Context context = mWeakContext.get();
if (context != null) {
//mPermissionIntent = PendingIntent.getBroadcast(context, 0, new Intent(ACTION_USB_PERMISSION), 0);
if (android.os.Build.VERSION.SDK_INT >= android.os.Build.VERSION_CODES.S) {
mPermissionIntent = PendingIntent.getBroadcast(context, 0, new Intent(ACTION_USB_PERMISSION), PendingIntent.FLAG_IMMUTABLE);
} else {
mPermissionIntent = PendingIntent.getBroadcast(context, 0, new Intent(ACTION_USB_PERMISSION), PendingIntent.FLAG_ONE_SHOT | PendingIntent.FLAG_IMMUTABLE);
}
final IntentFilter filter = new IntentFilter(ACTION_USB_PERMISSION);
// ACTION_USB_DEVICE_ATTACHED never comes on some devices so it should not be added here
filter.addAction(ACTION_USB_DEVICE_ATTACHED);
filter.addAction(UsbManager.ACTION_USB_DEVICE_DETACHED);
context.registerReceiver(mUsbReceiver, filter);
}
// start connection check
mDeviceCounts = 0;
mAsyncHandler.postDelayed(mDeviceCheckRunnable, 1000);
}
}
当 监听到USB插入事件,通过广播监听到后,如下: processAttach 方法 和 mOnDeviceConnectListener.onAttach(device); 回调
else if (UsbManager.ACTION_USB_DEVICE_ATTACHED.equals(action)) {
Log.d(TAG," ACTION_USB_DEVICE_ATTACHED");
final UsbDevice device = intent.getParcelableExtra(UsbManager.EXTRA_DEVICE);
updatePermission(device, hasPermission(device));
processAttach(device);
}
private final void processAttach(final UsbDevice device) {
if (destroyed) return;
if (DEBUG) Log.v(TAG, "processAttach: mOnDeviceConnectListener:"+mOnDeviceConnectListener);
if (mOnDeviceConnectListener != null) {
mAsyncHandler.post(new Runnable() {
@Override
public void run() {
Log.d(TAG," onAttach device");
mOnDeviceConnectListener.onAttach(device);
}
});
}
}
USBMonitor - onAttach 回调
mUSBMonitor = new USBMonitor(activity.getApplicationContext(), new USBMonitor.OnDeviceConnectListener() {
// called by checking usb device
// do request device permission
@Override
public void onAttach(UsbDevice device) {
Log.d(TAG," onAttach");
if (listener != null) {
listener.onAttachDev(device);
}
}
...........
}
private UVCCameraHelper.OnMyDevConnectListener listener = new UVCCameraHelper.OnMyDevConnectListener() {
@Override
public void onAttachDev(UsbDevice device) {
// request open permission
LogUtils.Logd(TAG, " onAttachDev device ");
if (!isRequest) {
LogUtils.Logd(TAG, " onAttachDev ... ");
isRequest = true;
if (mCameraHelper != null) {
int hubIndex = SPUtils.getInstance().getInt(KEY_USBHUB_INDEX, 0);
mCameraHelper.requestPermission(hubIndex);
}
}
LogUtils.Logd(TAG, "onAttachDev 设备连接上了 准备定时 ");
}
USBMonitor - requestPermission USB设备 请求授权
承接 上文 onAttachDev 监听到USB设备插入后,开始进行USB设备授权:mUSBMonitor.requestPermission。
public void requestPermission(int index) {
Log.d(TAG," requestPermission index:"+index);
List<UsbDevice> devList = getUsbDeviceList();
/*
deviceName:/dev/bus/usb/001/015 deviceId:1015 protocol:1 deviceIdaa:1015 manufaceName:USB FHD Camera versionName: 2.00 vendorId:4130
========================================================
deviceName:/dev/bus/usb/001/014 deviceId:1014 protocol:0 deviceIdaa:1014 manufaceName:leshan-tech versionName: 1.00 vendorId:65366
*/
int usbIndex=0;
for(int indexNum=0;indexNum<devList.size();indexNum++){
UsbDevice usbDevice=devList.get(indexNum);
Log.d(TAG," ========================================================");
int classData= usbDevice.getDeviceClass();
int subClassData= usbDevice.getDeviceSubclass();
int productId= usbDevice.getProductId();
int vendorId1Id= usbDevice.getVendorId();
Log.d(TAG," classData:"+classData+" subClassData:"+subClassData+" productId:"+productId+" vendorId1Id:"+vendorId1Id);
String deviceName= usbDevice.getDeviceName();
int deviceId= usbDevice.getDeviceId();
int protocol= usbDevice.getDeviceProtocol();
int deviceIdaa= usbDevice.getDeviceId();
String manufaceName= usbDevice.getManufacturerName();
String versionName= usbDevice.getVersion();
int vendorId= usbDevice.getVendorId();
Log.d(TAG," deviceName:"+deviceName+" deviceId:"+deviceId+" protocol:"+protocol+" deviceIdaa:"+deviceIdaa
+" manufaceName:"+manufaceName+" versionName: "+versionName+" vendorId:"+vendorId);
if(manufaceName==null){
manufaceName="";
}
if(protocol==1){
usbIndex= indexNum;
}
}
if (devList == null || devList.size() == 0 ) {
return;
}
if (mUSBMonitor != null) {
Log.d(TAG,"===>: getUsbDeviceList() size:"+getUsbDeviceList()+" index:"+usbIndex);
mUSBMonitor.requestPermission(devList.get(usbIndex));
}
}
USBMonitor.java -->requestPermission
/**
* request permission to access to USB device
* @param device
* @return true if fail to request permission
*/
public synchronized boolean requestPermission(final UsbDevice device) {
// if (DEBUG) Log.v(TAG, "requestPermission:device=" + device);
boolean result = false;
if (isRegistered()) {
if (device != null) {
if (mUsbManager.hasPermission(device)) {
// call onConnect if app already has permission
processConnect(device);
} else {
try {
// パーミッションがなければ要求する
mUsbManager.requestPermission(device, mPermissionIntent);
} catch (final Exception e) {
// Android5.1.xのGALAXY系でandroid.permission.sec.MDM_APP_MGMTという意味不明の例外生成するみたい
Log.w(TAG, e);
processCancel(device);
result = true;
}
}
} else {
processCancel(device);
result = true;
}
} else {
processCancel(device);
result = true;
}
return result;
}
UsbManager.java -->requestPermission
/**
* Returns true if the caller has permission to access the device.
* Permission might have been granted temporarily via
* {@link #requestPermission(UsbDevice, PendingIntent)} or
* by the user choosing the caller as the default application for the device.
* Permission for USB devices of class {@link UsbConstants#USB_CLASS_VIDEO} for clients that
* target SDK {@link android.os.Build.VERSION_CODES#P} and above can be granted only if they
* have additionally the {@link android.Manifest.permission#CAMERA} permission.
*
* @param device to check permissions for
* @return true if caller has permission
*/
@RequiresFeature(PackageManager.FEATURE_USB_HOST)
public boolean hasPermission(UsbDevice device) {
if (mService == null) {
return false;
}
try {
return mService.hasDevicePermission(device, mContext.getPackageName());
} catch (RemoteException e) {
throw e.rethrowFromSystemServer();
}
}
其实最终走到 UsbService 服务中的 hasDevicePermission 方法。
我自己开发过程中,特别是开始接触USB时候,总会想为什么要授权一次,最后我发现这不是一个问题,这是一个基本流程,Android机制决定。 你要用UsbDevice , 找到监听到Usb 设备后,首先要对这个USB 使用授权,接下来才能打开 等。
USBMonitor - processConnect 准备连接UsbDevice
如上 requestPermission 请求权限业务中,假使已经有了权限,那么就直接 准备连接了 processConnect
/**
* open specific USB device
* @param device
*/
private final void processConnect(final UsbDevice device) {
if (destroyed) return;
updatePermission(device, true);
mAsyncHandler.post(new Runnable() {
@Override
public void run() {
if (DEBUG) Log.v(TAG, "processConnect:device=" + device);
UsbControlBlock ctrlBlock;
final boolean createNew;
ctrlBlock = mCtrlBlocks.get(device);
if (ctrlBlock == null) {
ctrlBlock = new UsbControlBlock(USBMonitor.this, device);
mCtrlBlocks.put(device, ctrlBlock);
createNew = true;
} else {
createNew = false;
}
if (mOnDeviceConnectListener != null) {
mOnDeviceConnectListener.onConnect(device, ctrlBlock, createNew);
}
}
});
}
打开相机openCamera - 开始预览startPreview - UsbDebice 链接成功回调 onConnectDev
如上 在 准备连接 USB 设备过程中,创建了 UsbControlBlock ,然后 准备链接 UsbDevice了 onConnect。
准备 打开相机、预览操作了,并回调 onConnectDev 状态
// called by connect to usb camera
// do open camera,start previewing
@Override
public void onConnect(final UsbDevice device, USBMonitor.UsbControlBlock ctrlBlock, boolean createNew) {
Log.d(TAG, " onConnect===========:");
mCtrlBlock = ctrlBlock;
openCamera(ctrlBlock);
new Thread(new Runnable() {
@Override
public void run() {
// wait for camera created
try {
Thread.sleep(1000);
} catch (InterruptedException e) {
e.printStackTrace();
}
// start previewing
Log.d(TAG,"onConnect mCamView:"+mCamView);
startPreview(mCamView);
}
}).start();
if(listener != null) {
listener.onConnectDev(device,true);
}
}
小结
- 这里流程上面介绍了主要的过程
- USBCamera 摄像机场景,当打开USB 相机软件时候,首先就是regist 监听广播,如果当前有很多USBDevice,比如工控产品:屏幕、键盘、鼠标、各种USB 类型的soc 模块, 那么就需要过滤了。 如果多个USB 相机的情况下 切换相机过程中,更是需要过滤的。 建议网上查阅资料 自行解决即可。 USBMonitor - requestPermission 方法里面处理,如上是自己项目中的一种情况下,根据protol 来过滤。更多的是通过vid、pid 等来过滤,解释实际需求即可
- 流程性的特别是Android对USB开发过程中,必备的流程是系统决定,按照流程封装即可。
preview 预览 过程时序图
这里的 preview 预览流程偏向于Java层面,下面的 startPreview 过程偏向于整个大流程,涉及到C的过程。 在这里分析Java 上层的业务逻辑。
AbstractUVCCameraHandler - CameraThread - handleStartPreview
相机使用的整个流程大致可以分为“数据采集”+“渲染”,而startPreview就是这两个过程结合之处,我们可以看到startPreview需要传入一个类型为Object的surface,这个就是我们渲染所需要的纹理,相机采集到的每一帧数据都需要绘制到这块纹理上,后面实现拍照、视频录制甚至是图像编辑(裁剪、滤镜等)都需要与这块纹理打交道,我们将在后续讲到“渲染”流程的时候再详细介绍。这里我们只需要知道从外部传入一块纹理即可。在Android UI中对于纹理的封装就是SurfaceView或者TextureView,而在UVCCamera中就是UVCCameraTextureView,它继承自android.view.TextureView。
我们继续回到预览流程,可以看到AbstractUVCCameraHandler中拿到外部传入的surface之后,执行了与openCamera相同的流程——通过消息机制调度相机操作
预览最终调用的是 是 handleStartPreview 方法,我们看看具体源码:
public void handleStartPreview(final Object surface) {
if (DEBUG) Log.v(TAG_THREAD, "handleStartPreview:");
if ((mUVCCamera == null) || mIsPreviewing) return;
try {
mUVCCamera.setPreviewSize(mWidth, mHeight, 1, 31, mPreviewMode, mBandwidthFactor);
// 获取USB Camera预览数据,使用NV21颜色会失真
// 无论使用YUV还是MPEG,setFrameCallback的设置效果一致
// mUVCCamera.setFrameCallback(mIFrameCallback, UVCCamera.PIXEL_FORMAT_NV21);
mUVCCamera.setFrameCallback(mIFrameCallback, UVCCamera.PIXEL_FORMAT_YUV420SP);
} catch (final IllegalArgumentException e) {
try {
// fallback to YUV mode
mUVCCamera.setPreviewSize(mWidth, mHeight, 1, 31, UVCCamera.DEFAULT_PREVIEW_MODE, mBandwidthFactor);
} catch (final IllegalArgumentException e1) {
callOnError(e1);
return;
}
}
if (surface instanceof SurfaceHolder) {
mUVCCamera.setPreviewDisplay((SurfaceHolder) surface);
}
if (surface instanceof Surface) {
mUVCCamera.setPreviewDisplay((Surface) surface);
} else {
mUVCCamera.setPreviewTexture((SurfaceTexture) surface);
}
mUVCCamera.startPreview();
mUVCCamera.updateCameraParams();
synchronized (mSync) {
mIsPreviewing = true;
}
callOnStartPreview();
}
这里有几个核心方法:
- setPreviewSize 设置预览Size
- setFrameCallback 设置数据流回调
- setPreviewDisplay | setPreviewDisplay | setPreviewTexture 设置纹理
- startPreview 开始预览
- updateCameraParams 更新USBCamera 参数
- callOnStartPreview 开始预览回调消息通知
startPreview 整个流程图
拍照流程
直接上源码
String picPath = Environment.getExternalStoragePublicDirectory(Environment.DIRECTORY_DCIM).getAbsolutePath() + "/" + DIRECTORY_NAME + "/" + System.currentTimeMillis() + UVCCameraHelper.SUFFIX_JPEG;
mCameraHelper.capturePicture(picPath, new AbstractUVCCameraHandler.OnCaptureListener() {
@Override
public void onCaptureResult(String path) {
LogUtils.Logd(TAG, " onCaptureResult path:" + path);
if (TextUtils.isEmpty(path)) {
return;
}
ScanUtils.getInstance().scanMedia(MyApplication.mContext, path);
}
});
playSound();
UVCCameraHelper.java
public void capturePicture(String savePath,AbstractUVCCameraHandler.OnCaptureListener listener) {
if (mCameraHandler != null && mCameraHandler.isOpened()) {
File file = new File(savePath);
if(! Objects.requireNonNull(file.getParentFile()).exists()) {
file.getParentFile().mkdirs();
}
mCameraHandler.captureStill(savePath,listener);
}
}
UVCCameraHelper - capturePicture
传递一个路径 生成图片的路径过去 mCameraHandler.captureStill
@Override
public void captureStill(final String path,OnCaptureListener listener) {
super.captureStill(path,listener);
}
AbstractUVCCameraHandler- captureStill
public void captureStill(final String path, AbstractUVCCameraHandler.OnCaptureListener listener) {
AbstractUVCCameraHandler.mCaptureListener = listener;
checkReleased();
sendMessage(obtainMessage(MSG_CAPTURE_STILL, path));
isCaptureStill = true;
}
这里核心内容 发送消息后,设置isCaptureStill 字段为true,后面拍照逻辑会马上用到的。
AbstractUVCCameraHandler- 处理拍照消息-MSG_CAPTURE_STILL-handleStillPicture
接收拍照消息
case MSG_CAPTURE_STILL:
// thread.handleCaptureStill((String)msg.obj);
thread.handleStillPicture((String) msg.obj);
break;
接收拍照消息后传递一个路径
public void handleStillPicture(String picPath) {
this.picPath = picPath;
}
拍照-抓拍
在startPreview java 层最终调用的方法里面,设置了数据回调方法setFrameCallback 设置数据流回调 ,看看源码。
private final IFrameCallback mIFrameCallback = new IFrameCallback() {
@Override
public void onFrame(final ByteBuffer frame) {
int len = frame.capacity();
byte[] yuv = new byte[len];
frame.get(yuv);
yuv = NV21_mirror_center(yuv,mWidth,mHeight);
// yuv = rotateYUVDegree90(yuv,mWidth,mHeight);
// nv21 yuv data callback
if (mPreviewListener != null) {
mPreviewListener.onPreviewResult(yuv);
}
// picture
if (isCaptureStill && !TextUtils.isEmpty(picPath)) {
isCaptureStill = false;
/* new Thread(new Runnable() {
@Override
public void run() {
saveYuv2Jpeg(picPath, yuv);
}
}).start();*/
saveYuv2Jpeg(picPath, yuv);
}
// video
if (mH264Consumer != null) {
// overlay
if(isSupportOverlay) {
TxtOverlay.getInstance().overlay(yuv, new SimpleDateFormat("yyyy-MM-dd EEEE HH:mm:ss").format(new Date()));
}
mH264Consumer.setRawYuv(yuv, mWidth, mHeight);
}
}
};
数据不断回调回来,通过判断传递过来路径是否为空和是否拍照字段 isCaptureStill,中截取一帧 将yuv 数据转换成 jpg 保存下来
保存图片- saveYuv2Jpeg
private void saveYuv2Jpeg(String path, byte[] data) {
// byte nowData[]=rotateYUVDegree270(data,mWidth,mHeight);
YuvImage yuvImage = new YuvImage(data, ImageFormat.NV21, mWidth, mHeight, null);
// YuvImage yuvImage = new YuvImage(data, ImageFormat.NV21, mWidth, mHeight, null);
ByteArrayOutputStream bos = new ByteArrayOutputStream(data.length);
boolean result = yuvImage.compressToJpeg(new Rect(0, 0, mWidth, mHeight), 100, bos);
if (result) {
byte[] buffer = bos.toByteArray();
File file = new File(path);
FileOutputStream fos = null;
try {
fos = new FileOutputStream(file);
// fixing bm is null bug instead of using BitmapFactory.decodeByteArray
fos.write(buffer);
fos.close();
} catch (FileNotFoundException e) {
e.printStackTrace();
} catch (IOException e) {
e.printStackTrace();
}
if (mCaptureListener != null) {
mCaptureListener.onCaptureResult(path);
}
}
try {
bos.close();
} catch (IOException e) {
e.printStackTrace();
}
}
到这里整个拍照流程就走完了,主体逻辑还是比较清晰的,但这仅仅是最基础的拍照功能。此外还有诸如获取相机所支持的图片尺寸、自动对焦等逻辑UVCCamera也都是支持的。
录像流程
录像流程和拍照流程基本一致,只是最后通过数据流回调,传递到编码器,保存下来而已。
// video
if (mH264Consumer != null) {
// overlay
if(isSupportOverlay) {
TxtOverlay.getInstance().overlay(yuv, new SimpleDateFormat("yyyy-MM-dd EEEE HH:mm:ss").format(new Date()));
}
mH264Consumer.setRawYuv(yuv, mWidth, mHeight);
}
setRawYuv 方法:
public void setRawYuv(byte[] yuvData, int width, int height) {
if (!isEncoderStart)
return;
if (mWidth != width || mHeight != height) {
mWidth = width;
mHeight = height;
return;
}
try {
if (lastPush == 0) {
lastPush = System.currentTimeMillis();
}
long time = System.currentTimeMillis() - lastPush;
if (time >= 0) {
time = millisPerframe - time;
if (time > 0)
Thread.sleep(time / 2);
}
// 将数据写入编码器
feedMediaCodecData(nv12ToNV21(yuvData, mWidth, mHeight));
if (time > 0)
Thread.sleep(time / 2);
lastPush = System.currentTimeMillis();
} catch (InterruptedException ex) {
ex.printStackTrace();
}
}
将数据写入编码器 feedMediaCodecData
private void feedMediaCodecData(byte[] data) {
if (!isEncoderStart)
return;
int bufferIndex = -1;
try {
bufferIndex = mMediaCodec.dequeueInputBuffer(0);
} catch (IllegalStateException e) {
e.printStackTrace();
}
if (bufferIndex >= 0) {
ByteBuffer buffer;
if (Build.VERSION.SDK_INT >= Build.VERSION_CODES.LOLLIPOP) {
buffer = mMediaCodec.getInputBuffer(bufferIndex);
} else {
buffer = inputBuffers[bufferIndex];
}
buffer.clear();
buffer.put(data);
buffer.clear();
mMediaCodec.queueInputBuffer(bufferIndex, 0, data.length, System.nanoTime() / 1000, MediaCodec.BUFFER_FLAG_KEY_FRAME);
}
}
渲染页面
相机采集的数据究竟是如何绘制到屏幕上的,这里需要几个必要的知识点:OpenGL、Android的SurfaceTexture、TextureView。
之所以介绍这个知识点,本身也对应实际的需求,所以还是需要弄清楚渲染流程。
实际研发问题:
摄像头千千万,很多杂牌UsbCamera 相机不稳定,兼容性不强。导致相机老化过程中数据异常断开,没有数据了。 界面显示的就是花屏 ,如何解决花屏? 其中一个解决方案就是监听当前数据,如果没有数据了,执行业务逻辑,重新打开、重新设置一次分辨率等 来规避问题。
预览过程
在上面预览流程里面,我们看到最终调用了如下代码,设置纹理 ,具体用的是哪一种方式看自己布局文件使用的是哪一种纹理来渲染。
public void handleStartPreview(final Object surface) {
......
if (surface instanceof SurfaceHolder) {
mUVCCamera.setPreviewDisplay((SurfaceHolder) surface);
}
if (surface instanceof Surface) {
mUVCCamera.setPreviewDisplay((Surface) surface);
} else {
mUVCCamera.setPreviewTexture((SurfaceTexture) surface);
}
.....
}
布局文件
<com.serenegiant.usb.widget.UVCCameraTextureView
android:id="@+id/camera_view"
android:layout_width="match_parent"
android:layout_height="match_parent"
android:layout_gravity="center"/>
UVCCameraTextureView 是什么?
/**
* change the view size with keeping the specified aspect ratio.
* if you set this view with in a FrameLayout and set property "android:layout_gravity="center",
* you can show this view in the center of screen and keep the aspect ratio of content
* XXX it is better that can set the aspect ratio as xml property
*/
public class UVCCameraTextureView extends AspectRatioTextureView // API >= 14
implements TextureView.SurfaceTextureListener, CameraViewInterface {
AspectRatioTextureView 是什么?
public class AspectRatioTextureView extends TextureView // API >= 14
implements IAspectRatioView {
所以用到的 UVCCameraTextureView 是一个封装好的 TextureView 纹理。
UVCCameraTextureView - SurfaceTextureListener 纹理数据准备监听
- 实现 implements TextureView.SurfaceTextureListener 接口
UVCCameraTextureView extends AspectRatioTextureView // API >= 14
implements TextureView.SurfaceTextureListener
- 设置 SurfaceTextureListener 监听 - setSurfaceTextureListener
public UVCCameraTextureView(final Context context, final AttributeSet attrs, final int defStyle) {
super(context, attrs, defStyle);
setSurfaceTextureListener(this);
}
- 相机数据准备好了 - onSurfaceTextureAvailable 准备监听数据
@Override
public void onSurfaceTextureAvailable(final SurfaceTexture surface, final int width, final int height) {
if (DEBUG) Log.i(TAG, "onSurfaceTextureAvailable:" + surface);
if (mRenderHandler == null) {
mRenderHandler = RenderHandler.createHandler(mFpsCounter, surface, width, height);
} else {
mRenderHandler.resize(width, height);
}
mHasSurface = true;
if (mCallback != null) {
mCallback.onSurfaceCreated(this, getSurface());
}
}
UVCCameraTextureView-CameraViewInterface 接口
这里看一下纹理实现了一个接口 ,源码如下:
public interface CameraViewInterface extends IAspectRatioView {
public interface Callback {
public void onSurfaceCreated(CameraViewInterface view, Surface surface);
public void onSurfaceChanged(CameraViewInterface view, Surface surface, int width, int height);
public void onSurfaceDestroy(CameraViewInterface view, Surface surface);
}
public void onPause();
public void onResume();
public void setCallback(Callback callback);
public SurfaceTexture getSurfaceTexture();
public Surface getSurface();
public boolean hasSurface();
public void setVideoEncoder(final IVideoEncoder encoder);
public Bitmap captureStillImage(int width,int height);
}
这里有几个方法注意下:
- Callback 相关的:onSurfaceCreated-onSurfaceChanged-onSurfaceDestroy
- getSurfaceTexture : 获取Surface的方法
UVCCameraTextureView- RenderHandler 渲染Handler 通信
如类描述,内部类,渲染 帧数据在这个私有线程上。
UVCCameraTextureView- RenderHandler - RenderThread 渲染线程
在上面 SurfaceTextureListener 纹理数据准备监听 数据 onSurfaceTextureAvailable ,数据准备好了之后,开始开启渲染线程,消费数据了。
其它相关渲染涉及到的知识,暂不分析。如果有相关渲染要求,强烈建议看看 其它相关资料处理,补充基本常识和知识。
四、拓展知识
UVCCamera 最原始的UVCCamera Demo,方便二次封装。 太多的Demo 都是基于这个参考的。 里面的不同demo 对应不同使用场景,有借鉴的意义。
弊端:太老了,8年前,不适合当前开发 崩溃、库老、崩溃、兼容 等问题,如果确实有针对性的需求,可以借鉴部分代码。 网上大量的都是二次封装,但是基本思想和逻辑一样,所以对USBCamera 基本的流程必须熟悉。
现在有8个样例可供使用,如下:
案例 | 说明 |
---|---|
USBCameraTest0 | 这是最简单的项目,只显示如何使用SurfaceView来启动/停止预览。 |
USBCameraTest1 | 这是最简单的项目,只显示如何启动/停止预览。这与USBCameraTest0几乎相同,但是使用自定义的TextureView来显示相机图像而不是使用SurfaceView。 |
USBCameraTest2 | 这是一个示例项目,演示如何使用MediaCodec编码器将UVC相机(无音频)的视频记录为.MP4文件。此示例需要API> = 18,因为MediaMuxer仅支持API> = 18。 |
USBCameraTest3 | 这是一个示范项目,演示如何将音频(来自内部麦克风)的视频(来自UVC相机)录制为.MP4文件。这也显示了几种捕捉静止图像的方式。此示例可能最适用于您的定制应用程序的基础项目。 |
USBCameraTest4 | 本示例显示了访问UVC相机并将视频图像保存到后台服务的方式。这是最复杂的示例之一,因为这需要使用AIDL的IPC。 |
USBCameraTest5 | 这与USBCameraTest3几乎相同,但使用IFrameCallback接口保存视频图像,而不是使用来自MediaCodec编码器的输入Surface。 在大多数情况下,您不应使用IFrameCallback来保存图像,因为IFrameCallback比使用Surface要慢很多。但是,如果您想获取视频帧数据并自行处理它们或将它们作为字节缓冲区传递给其他外部库,则IFrameCallback将非常有用。 |
USBCameraTest6 | 这显示了如何将视频图像分割为多个Surface。你可以在这个应用程序中看到视频图像并排观看。这个例子还展示了如何使用EGL来渲染图像。如果您想在添加视觉效果/滤镜效果后显示视频图像,则此示例可能会对您有所帮助。 |
USBCameraTest7 | 这显示了如何使用两个摄像头并显示来自每个摄像头的视频图像。这仍然是实验性的,可能有一些问题。 |
USBCameraTest8 | 这显示了如何设置/获取uvc控件。目前这只支持亮度和对比度。 |
总结
- 实际开发中遇到各种问题,如果梳理清楚基本流程,上手和解决部分基本问题肯定没得说
- 如果涉及到渲染效果,就需要专业的基本图像处理知识处理,暂不研究
- USBCamera 开发源码,流程是固定的。 二次开发可参考。