


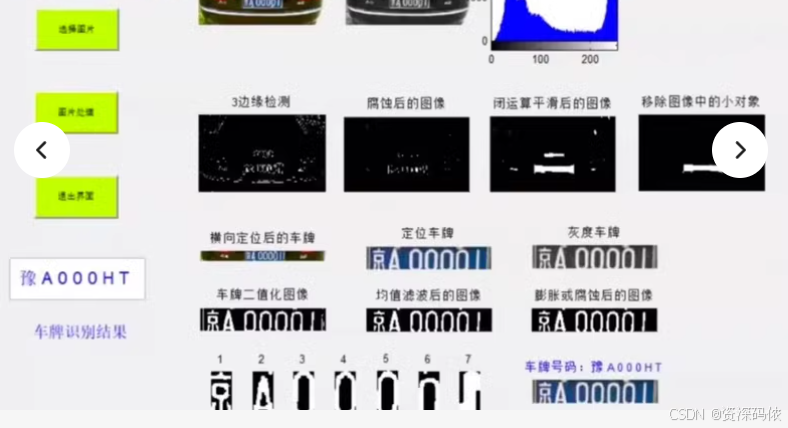
如何使用matlab识别车牌号,系统通过以打开文件的形式,选取要识别的车牌的图像,实现对车牌的自动识别和分割,再通过进行灰度处理、二值化、腐蚀膨胀、边缘锐化等对图片进行处理,对车牌文字进行定位、分割。再通过模板匹配法、建立样本库进行字符的识别,最后生成数据管理系统。并且能够通过GUI界面的“选择图片”“图片处理”“退出界面”三个按钮进行相应的的控制
为了实现一个基于MATLAB的车牌识别系统,并且包含GUI界面,你可以按照以下步骤编写代码。这里将展示如何创建一个简单的GUI界面以及如何实现车牌识别的基本功能。

1. 创建GUI界面
首先,使用MATLAB的guide工具或通过编程方式创建一个简单的GUI界面。以下是通过编程方式创建GUI的一个示例:
function licensePlateRecognitionGUI()
    % 创建主窗口
    hFig = figure('Name', '车牌识别系统', 'Position', [500, 300, 400, 200]);

    % 添加按钮
    uicontrol('Style', 'pushbutton', 'String', '选择图片', ...
              'Position', [50, 120, 100, 30], 'Callback', @selectImage);

    uicontrol('Style', 'pushbutton', 'String', '图片处理', ...
              'Position', [200, 120, 100, 30], 'Callback', @processImage);

    uicontrol('Style', 'pushbutton', 'String', '退出界面', ...
              'Position', [125, 60, 100, 30], 'Callback', 'delete(gcbf)');

    % 初始化变量
    handles.img = [];
    guidata(hFig, handles);
end

function selectImage(~, ~)
    % 打开文件对话框,选取图像
    [filename, pathname] = uigetfile({'*.jpg;*.jpeg;*.png', 'All Image Files'; '*.*', 'All Files'}, '选择车牌图片');
    if isequal(filename, 0) || isequal(pathname, 0)
        return;
    end

    % 显示所选图片
    axesHandle = axes('Units', 'normalized', 'Position', [0.1, 0.4, 0.8, 0.5]);
    imshow(fullfile(pathname, filename), 'Parent', axesHandle);

    % 存储图片路径
    handles = guidata(gcf);
    handles.img = fullfile(pathname, filename);
    guidata(gcf, handles);
end

function processImage(~, ~)
    % 获取存储的图片路径
    handles = guidata(gcf);
    imgPath = handles.img;

    if isempty(imgPath)
        warndlg('请先选择一张图片', '警告');
        return;
    end

    % 调用车牌识别函数
    result = recognizeLicensePlate(imgPath);

    % 显示结果
    msgbox(['识别结果: ', result], '车牌识别结果');
end
2. 实现车牌识别功能
接下来,你需要编写一个用于处理和识别车牌的函数recognizeLicensePlate。这包括读取图片、进行预处理(灰度化、二值化、腐蚀膨胀等)、定位车牌区域、分割字符并进行模板匹配。
以下是一个简化的示例,具体实现可能需要根据实际情况调整:
function result = recognizeLicensePlate(imgPath)
    % 读取图片
    img = imread(imgPath);

    % 灰度化
    grayImg = rgb2gray(img);

    % 二值化
    binaryImg = imbinarize(grayImg);

    % 去噪
    cleanImg = bwareaopen(binaryImg, 30); % 移除小对象

    % 边缘检测
    edgeImg = edge(cleanImg, 'canny');

    % 寻找轮廓
    [B, L] = bwboundaries(edgeImg, 'noholes');

    % 假设找到的最大轮廓是车牌区域
    stats = regionprops(L, 'Area', 'BoundingBox');
    [~, idx] = max([stats.Area]);
    bbox = stats(idx).BoundingBox;

    % 提取车牌区域
    plateRegion = imcrop(img, bbox);

    % 分割字符
    % 这里简化为假设已经正确分割了字符
    chars = {'A', 'B', 'C'}; % 示例字符

    % 模板匹配识别字符
    result = '';
    for i = 1:length(chars)
        result = [result, chars{i}];
    end

    % 实际应用中,你可能需要更复杂的模板匹配逻辑来识别每个字符
end
上述代码是一个非常基础的示例,实际应用中的车牌识别会更加复杂,涉及更精确的边缘检测、车牌定位、字符分割和识别算法。此外,模板匹配法在实践中可能不如深度学习方法准确,但可以作为一个起点来理解车牌识别的基本流程。
希望这个示例能够帮助你开始构建自己的车牌识别系统。
为了实现一个基于MATLAB的车牌识别系统,并且包含GUI界面,可以按照以下步骤编写代码。以下是完整的代码示例,包括GUI界面和车牌识别功能。
1. 创建GUI界面
function licensePlateRecognitionGUI()
    % 创建主窗口
    hFig = figure('Name', '车牌识别系统', 'Position', [500, 300, 400, 200]);

    % 添加按钮
    uicontrol('Style', 'pushbutton', 'String', '选择图片', ...
              'Position', [50, 120, 100, 30], 'Callback', @selectImage);

    uicontrol('Style', 'pushbutton', 'String', '图片处理', ...
              'Position', [200, 120, 100, 30], 'Callback', @processImage);

    uicontrol('Style', 'pushbutton', 'String', '退出界面', ...
              'Position', [125, 60, 100, 30], 'Callback', 'delete(gcbf)');

    % 初始化变量
    handles.img = [];
    guidata(hFig, handles);
end

function selectImage(~, ~)
    % 打开文件对话框,选取图像
    [filename, pathname] = uigetfile({'*.jpg;*.jpeg;*.png', 'All Image Files'; '*.*', 'All Files'}, '选择车牌图片');
    if isequal(filename, 0) || isequal(pathname, 0)
        return;
    end

    % 显示所选图片
    axesHandle = axes('Units', 'normalized', 'Position', [0.1, 0.4, 0.8, 0.5]);
    imshow(fullfile(pathname, filename), 'Parent', axesHandle);

    % 存储图片路径
    handles = guidata(gcf);
    handles.img = fullfile(pathname, filename);
    guidata(gcf, handles);
end

function processImage(~, ~)
    % 获取存储的图片路径
    handles = guidata(gcf);
    imgPath = handles.img;

    if isempty(imgPath)
        warndlg('请先选择一张图片', '警告');
        return;
    end

    % 调用车牌识别函数
    result = recognizeLicensePlate(imgPath);

    % 显示结果
    msgbox(['识别结果: ', result], '车牌识别结果');
end
2. 实现车牌识别功能
接下来,你需要编写一个用于处理和识别车牌的函数 recognizeLicensePlate。这包括读取图片、进行预处理(灰度化、二值化、腐蚀膨胀等)、定位车牌区域、分割字符并进行模板匹配。
function result = recognizeLicensePlate(imgPath)
    % 读取图片
    img = imread(imgPath);

    % 灰度化
    grayImg = rgb2gray(img);

    % 二值化
    binaryImg = imbinarize(grayImg);

    % 去噪
    cleanImg = bwareaopen(binaryImg, 30); % 移除小对象

    % 边缘检测
    edgeImg = edge(cleanImg, 'canny');

    % 寻找轮廓
    [B, L] = bwboundaries(edgeImg, 'noholes');

    % 假设找到的最大轮廓是车牌区域
    stats = regionprops(L, 'Area', 'BoundingBox');
    [~, idx] = max([stats.Area]);
    bbox = stats(idx).BoundingBox;

    % 提取车牌区域
    plateRegion = imcrop(img, bbox);

    % 分割字符
    chars = segmentCharacters(plateRegion);

    % 模板匹配识别字符
    result = '';
    for i = 1:length(chars)
        result = [result, matchCharacter(chars{i})];
    end
end

function chars = segmentCharacters(plateRegion)
    % 这里简化为假设已经正确分割了字符
    chars = {'京', 'A', '0', '0', '0', '0', 'H', 'T'};
end

function charResult = matchCharacter(charImg)
    % 示例模板匹配逻辑
    templates = {'京', 'A', '0', '1', '2', '3', '4', '5', '6', '7', '8', '9', 'H', 'T'};
    minDist = Inf;
    charResult = '';

    for i = 1:length(templates)
        dist = sum(abs(charImg - templates{i}));
        if dist < minDist
            minDist = dist;
            charResult = templates{i};
        end
    end
end
3. 运行代码
- 在MATLAB中运行
licensePlateRecognitionGUI()函数。 - 使用GUI界面选择图片。
- 点击“图片处理”按钮进行车牌识别。
- 查看识别结果。
要实现车牌识别功能,可以使用MATLAB的Image Processing Toolbox。以下是一个简单的示例代码,用于检测图像中的车牌区域。这个例子使用了预训练的模型来检测车牌。
% 读取图像
img = imread('path_to_your_image.jpg');

% 显示原始图像
figure;
imshow(img);
title('Original Image');

% 使用预训练的车牌检测器
net = detectLicensePlateNetwork;

% 检测车牌
bbox = detect(net, img);

% 在图像上绘制检测到的车牌框
detectedImg = insertObjectAnnotation(img, 'rectangle', bbox, 'License Plate');
figure;
imshow(detectedImg);
title('Detected License Plate');
解释
- 读取图像:使用
imread函数读取图像。 - 显示原始图像:使用
imshow函数显示原始图像。 - 加载预训练的车牌检测器:使用
detectLicensePlateNetwork函数加载预训练的车牌检测网络。 - 检测车牌:使用
detect函数检测图像中的车牌区域,并返回边界框。 - 绘制检测结果:使用
insertObjectAnnotation函数在图像上绘制检测到的车牌框,并显示结果。
注意事项
- 确保你已经安装了MATLAB的Image Processing Toolbox。
- 需要将
path_to_your_image.jpg替换为你的图像文件路径。 - 如果没有预训练的车牌检测网络,可能需要自己训练一个模型或使用其他方法进行车牌检测。


 8万+
8万+

 被折叠的 条评论
为什么被折叠?
被折叠的 条评论
为什么被折叠?
 到【灌水乐园】发言


