教程参考:
https://blog.csdn.net/qq_44442727/article/details/137677031
GroundingDino是用提示词自动标注目标框的模型,如果想要训练自己的模型,就要使用Open-GroundingDino,项目地址:
https://github.com/longzw1997/Open-GroundingDino?tab=readme-ov-file
在此之前最好先跑通GroundingDino的项目,二者环境可以用同一个。我的环境配置在:
https://blog.youkuaiyun.com/zhaixiaobai/article/details/151796275?spm=1001.2014.3001.5502
1.测试环境
测试环境可不可以用,跑一下demo,注意下载好预训练模型。下载地址:https://github.com/IDEA-Research/GroundingDINO/releases(放在了weights目录下):
 python tools/inference_on_a_image.py \
-c groundingdino/config/GroundingDINO_SwinT_OGC.py \
-p weights/groundingdino_swint_ogc.pth \
-i image_you_want_to_detect.jpg \
-o "dir you want to save the output" \
-t "chair"
-p是预训练模型路径、-i是待检测图像路径、-o为输出路径、-t是提示词。
能输出结果就是成功。
2.数据集制作
因为我有labelmg标注好的images和txt,所以这里我使用了脚本转换成coco和ODVG。
YOLO → COCO → ODVG(jsonl)
这样 Open-GroundingDINO 的 demo 与训练都可以直接读取。验证集的格式必须使用COCO格式,因为代码采用的是COCO数据集的计算方法,所以脚本中我们将txt转换成了两个文件:coco和ODVG。
import os
import json
import cv2
import argparse
import jsonlines
from tqdm import tqdm
from pycocotools.coco import COCO

# ----------------------------
# Step 1: YOLO → COCO
# ----------------------------
def yolo_to_coco(yolo_dir, img_dir, class_names, output_json):
    images = []
    annotations = []
    ann_id = 1
    img_id = 1

    for filename in tqdm(os.listdir(img_dir), desc="Converting YOLO to COCO"):
        if not filename.lower().endswith(('.jpg', '.jpeg', '.png')):
            continue

        img_path = os.path.join(img_dir, filename)
        txt_path = os.path.join(yolo_dir, os.path.splitext(filename)[0] + ".txt")

        if not os.path.exists(txt_path):
            continue

        img = cv2.imread(img_path)
        h, w = img.shape[:2]
        images.append({
            "id": img_id,
            "file_name": filename,
            "height": h,
            "width": w
        })

        with open(txt_path, "r") as f:
            for line in f:
                parts = line.strip().split()
                if len(parts) != 5:
                    continue
                cls, x_center, y_center, bw, bh = map(float, parts)
                cls = int(cls)
                x1 = (x_center - bw / 2) * w
                y1 = (y_center - bh / 2) * h
                bw_abs = bw * w
                bh_abs = bh * h

                annotations.append({
                    "id": ann_id,
                    "image_id": img_id,
                    "category_id": cls + 1,   # COCO类别从1开始
                    "bbox": [x1, y1, bw_abs, bh_abs],
                    "area": bw_abs * bh_abs,
                    "iscrowd": 0
                })
                ann_id += 1
        img_id += 1

    categories = [{"id": i + 1, "name": name} for i, name in enumerate(class_names)]

    coco_dict = {
        "images": images,
        "annotations": annotations,
        "categories": categories
    }

    with open(output_json, "w") as f:
        json.dump(coco_dict, f, indent=2)
    print(f"✅ COCO annotations saved to {output_json}")

# ----------------------------
# Step 2: COCO → ODVG (加上 grounding 字段)
# ----------------------------
def coco_to_odvg(input_json, output_jsonl):
    from pycocotools.coco import COCO
    coco = COCO(input_json)
    cats = coco.loadCats(coco.getCatIds())
    nms = {cat['id']: cat['name'] for cat in cats}

    metas = []
    for img_id, img_info in tqdm(coco.imgs.items(), desc="Converting COCO to ODVG"):
        ann_ids = coco.getAnnIds(imgIds=img_id)
        instance_list = []
        grounding_anns = []
        categories_in_image = []

        for ann_id in ann_ids:
            ann = coco.anns[ann_id]
            x, y, w, h = ann["bbox"]
            bbox_xyxy = [round(x, 2), round(y, 2), round(x + w, 2), round(y + h, 2)]
            label = ann["category_id"]
            category = nms[label]

            instance_list.append({
                "bbox": bbox_xyxy,
                "label": label - 1,
                "category": category
            })

            grounding_anns.append({
                "bbox": bbox_xyxy,
                "label": label - 1,
                "category": category,
                "phrase": category    # 用类别名作为短语
            })
            categories_in_image.append(category)

        # 生成一句简单的 caption(例如 "crop1, weed")
        caption = ", ".join(sorted(set(categories_in_image))) if categories_in_image else ""

        metas.append({
            "filename": img_info["file_name"],
            "height": img_info["height"],
            "width": img_info["width"],
            "detection": {"instances": instance_list},
            # === 新增 grounding 字段 ===
            "grounding": {
                "caption": caption,
                "regions": grounding_anns
            }
        })

    with jsonlines.open(output_jsonl, mode="w") as writer:
        writer.write_all(metas)
    print(f"✅ ODVG format (with grounding) saved to {output_jsonl}")

# ----------------------------
# Step 3: CLI入口
# ----------------------------
if __name__ == "__main__":
    parser = argparse.ArgumentParser("Convert YOLO labels to ODVG format for Open-GroundingDINO.")
    parser.add_argument("--img_dir", required=True, help="path to images folder")
    parser.add_argument("--label_dir", required=True, help="path to YOLO txt labels")
    parser.add_argument("--output_dir", required=True, help="output folder path")
    args = parser.parse_args()

    os.makedirs(args.output_dir, exist_ok=True)
    coco_json = os.path.join(args.output_dir, "dataset_coco.json")
    odvg_jsonl = os.path.join(args.output_dir, "dataset_odvg.jsonl")

    # 标签(改成你自己的类别):
    class_names = ["class1", "class2"]

    yolo_to_coco(args.label_dir, args.img_dir, class_names, coco_json)
    coco_to_odvg(coco_json, odvg_jsonl)
执行语句:
python yolo2odvg.py --img_dir /dataset/val/images --label_dir /dataset/labels --output_dir /dataset/output
其中yolo2odvg.py是脚本名称、–img_dir是图像文件夹路径、–label_dir是原来的txt格式的文件夹目录、output_dir是输出路径
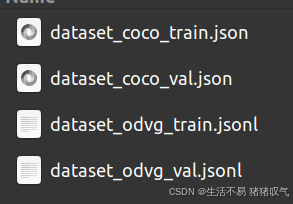
得到的是coco格式的json与ODVG格式的jsonl(图中是自己改过名称,加了train和val后缀)

3.修改配置文件
3.1 config/cfg_odvg.py
修改:
use_coco_eval = False   # 将True改为False
label_list=['dog', 'cat', 'person']  # 新增一个标签列表的字段,改为自己的label
3.2 config/datasets_mixed_odvg.json
这里是数据集的配置文件,其中train可以写多个(如下),如果只有一个训练集,就直接把第二个大括号删掉。
其中root为图像目录、train中的anno为coco格式的.json文件,val的anno为.jsonl文件、labelmap设为null、dataset_mode如图。
{
  "train": [
    {
      "root": "/home/images",
      "anno": "/home/Dataset/annotations/dataset_odvg_train.jsonl",
      "label_map": null,
      "dataset_mode": "odvg"
    }
  ],
  "val": [
    {
      "root": "/home/images",
      "anno": "/home/Dataset/annotations/dataset_coco_val.json",
      "label_map": null,
      "dataset_mode": "coco"
    }
  ]
}
4.训练
打开train_dist.sh文件,如果你是单卡,还需要修改最下方的一段,修改为:
python -m torch.distributed.launch  --nproc_per_node=1 main.py \
        --output_dir ./my_output \
        -c config/cfg_odvg.py \
        --datasets ./config/datasets_mixed_odvg.json  \
        --pretrain_model_path /path/to/groundingdino_swint_ogc.pth \
        --options text_encoder_type=/path/to/bert-base-uncased
其中output_dir为输出目录、–datasets为刚才修改的数据集配置文件路径、–pretrain_model_path为权重文件路径、options是bert-base-uncased的路径,这里我没有按照最上面教程中的去配置,只写了一句:text_encoder_type = “bert-base-uncased”,AI说这样transformers 会自动下载对应的 tokenizer 与模型权重。
执行语句:
sh train_dist.sh
训练参数之类可以在cfg_odvg.py修改。


 558
558


