


jest——一个轻量的前端测试框架,提供简单易用的javascript单元测试支持。
当我们由react native脚手架创建项目时,package.json中会自动配置scripts:{"test": "jest"},那么当我们运行npm test时,jest会如何执行呢?我们以此为切入点来看一下。
首先,会找到node_modules/.bin下的可执行文件jest,由于我用的是windows系统,那么就执行文件jest.cmd。这边可以看到会调用到node_modules/jest/bin/jest.js。
@IF EXIST "%~dp0\node.exe" (
  "%~dp0\node.exe"  "%~dp0\..\jest\bin\jest.js" %*
) ELSE (
  @SETLOCAL
  @SET PATHEXT=%PATHEXT:;.JS;=;%
  node  "%~dp0\..\jest\bin\jest.js" %*
)
然后这个文件再调用jest-cli/bin/jest
const importLocal = require('import-local');

if (!importLocal(__filename)) {
  require('jest-cli/bin/jest');
}
const importLocal = require('import-local');
if (!importLocal(__filename)) {
if (process.env.NODE_ENV == null) {
process.env.NODE_ENV = 'test';
}
require('..').run();
}这个文件可以看出来就是跑脚手架然后再读取结果退出。
async function run(maybeArgv, project) {
  try {
    // ...
    const {results, globalConfig} = await (0, _core().runCLI)(argv, projects);
    readResultsAndExit(results, globalConfig);
  }
}
这个结果就是通过调度器调度运行所有test得出的。
const results = await scheduler.scheduleTests(allTests, testWatcher);scheduleTests会一路调用到testFramework方法,这个方法其实最终对应到的就是jestAdapter。
jestAdapter
我们可以看到,调用jestAdapter其实就是执行_ref。
我们主要关注这个方法的三件事:
- 调用initialize并把返回值赋值给了globals
- 调用了requireModule,从名字可以猜出是去解析我们编写的测试文件了
- 调用runAndTransformResultsToJestFormat,这个是运行我们所编写的测试函数,并返回测试结果的。
var jestAdapter = function () {
  var _ref = (0, _asyncToGenerator2.default)(function* (globalConfig, config, environment, runtime, testPath, sendMessageToJest) {
    // ...
    var _yield$initialize = yield initialize({
        config: config,
        environment: environment,
        globalConfig: globalConfig,
        localRequire: runtime.requireModule.bind(runtime),
        parentProcess: process,
        sendMessageToJest: sendMessageToJest,
        setGlobalsForRuntime: runtime.setGlobalsForRuntime.bind(runtime),
        testPath: testPath
      }),
      globals = _yield$initialize.globals,
      snapshotState = _yield$initialize.snapshotState;
    // ...
    var esm = runtime.unstable_shouldLoadAsEsm(testPath);
    if (esm) {
      yield runtime.unstable_importModule(testPath);
    } else {
      runtime.requireModule(testPath);
    }
    var results = yield runAndTransformResultsToJestFormat({
      config: config,
      globalConfig: globalConfig,
      testPath: testPath
    });
    _addSnapshotData(results, snapshotState);
    return (0, _jestUtil.deepCyclicCopy)(results, {
      keepPrototype: false
    });
  });
  return function jestAdapter(_x, _x2, _x3, _x4, _x5, _x6) {
    return _ref.apply(this, arguments);
  };
}();
初始化全局变量
首先看initialize,这个方法将_.default的导出项进行了重命名。_引用的是jest-circus/build/index.js。
const initialize = async ({
  config,
  environment,
  globalConfig,
  localRequire,
  parentProcess,
  sendMessageToJest,
  setGlobalsForRuntime,
  testPath
}) => {
  // ...
  const globalsObject = {
    ..._.default,
    fdescribe: _.default.describe.only,
    fit: _.default.it.only,
    xdescribe: _.default.describe.skip,
    xit: _.default.it.skip,
    xtest: _.default.it.skip
  };
  // ...
  return {
    globals: globalsObject,
    snapshotState
  };
};
jest-circus/build/index.js这个文件里封装了很多全局使用的api定义。
从下面可以看出,test和it其实作用完全相同,我们在调用it时其实就是调用_addTest(testName, undefined, false, fn, test, timeout)。
const test = (() => {
  const test = (testName, fn, timeout) =>
    _addTest(testName, undefined, false, fn, test, timeout);
  // ...
  return test;
})();
exports.test = test;
const it = test;
exports.it = it;
var _default = {
  afterAll,
  afterEach,
  beforeAll,
  beforeEach,
  describe,
  it,
  test
};
exports.default = _default;
执行测试文件
接着requireModule在经过一系列调用后会进入我们编写的测试文件。
当初始化react native项目时,便会自动生成文件__tests__/App.test.tsx,我们以此作为切入点来学习一下jest源码。
import 'react-native';
import React from 'react';
import App from '../App';

// Note: import explicitly to use the types shipped with jest.
import {it} from '@jest/globals';

// Note: test renderer must be required after react-native.
import renderer from 'react-test-renderer';

it('renders correctly', () => {
  renderer.create(<App />);
});
可以看到其实主要就是涉及两个对象,一个是it,一个是renderer。
当调用it时,会执行
(testName, fn, timeout) => _addTest(testName, undefined, false, fn, test, timeout);然后调用_addTest,该方法会调用dispatchSync。
const _addTest = (
testName,
mode,
concurrent,
fn,
testFn,
timeout,
failing,
asyncError = new _jestUtil.ErrorWithStack(undefined, testFn)
) => {
// ...
return (0, _state.dispatchSync)({
asyncError,
concurrent,
failing: failing === undefined ? false : failing,
fn,
mode,
name: 'add_test',
testName,
timeout
});
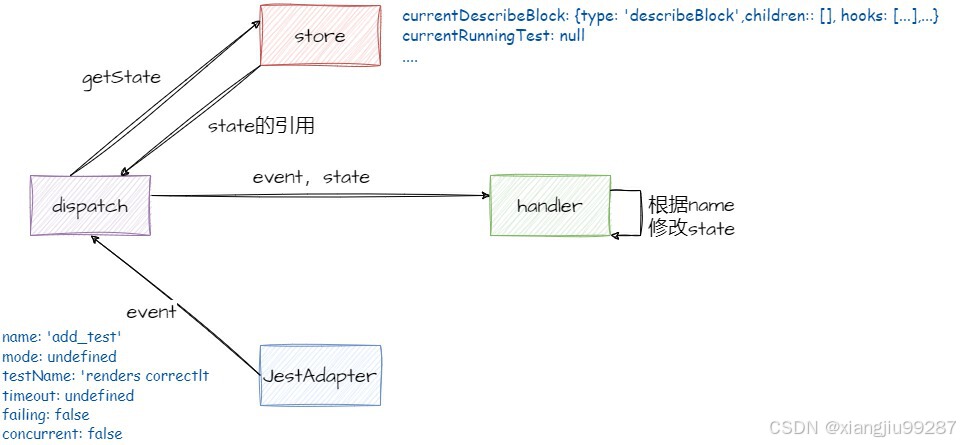
};dispatchSync可以说是jest架构的核心方法。
// 这里的global就是Window对象
const getState = () => global[_types.STATE_SYM];
const dispatchSync = event => {
  for (const handler of eventHandlers) {
    handler(event, getState());
  }
};
jest架构其实可以类比redux架构,也是在全局维护了一份state,然后通过handler对state进行相应的更改。JestAdapter会在合适的时候调用不同的event(类似于生命周期),不同event的name不同,无论是什么event,dispatch都会将eventHandlers中的所有handler执行一遍,然后由handler以event name为依据,执行不同的逻辑,修改state。
这种设计模式使得不同测试用例间state可以共享,生命周期为本次测试的生命周期,并且修改state的逻辑都会集中在handlers中,也可以实现逻辑复用。
没有报错的情况下在add_test阶段jest其实只执行了这一个handler内的逻辑,所做的就是创建了一个test节点,然后将他加入了currentDescibeBlock.children数组和tests数组中,后续我们从state.currentDescribeBlock.fn中就可以取到测试函数执行。
const eventHandler = (event, state) => {
  switch (event.name) {
    // ...
    case 'add_test': {
      const {currentDescribeBlock, currentlyRunningTest, hasStarted} = state;
      const {
        asyncError,
        fn,
        mode,
        testName: name,
        timeout,
        concurrent,
        failing
      } = event;
      // ...
      const test = (0, _utils.makeTest)(
        fn,
        mode,
        concurrent,
        name,
        currentDescribeBlock,
        timeout,
        asyncError,
        failing
      );
      if (currentDescribeBlock.mode !== 'skip' && test.mode === 'only') {
        state.hasFocusedTests = true;
      }
      currentDescribeBlock.children.push(test);
      currentDescribeBlock.tests.push(test);
      break;
    }
    // ...
  }
};
const makeTest = (
fn,
mode,
concurrent,
name,
parent,
timeout,
asyncError,
failing
) => ({
type: 'test',
// eslint-disable-next-line sort-keys
asyncError,
concurrent,
duration: null,
errors: [],
failing,
fn,
invocations: 0,
mode,
name: (0, _jestUtil.convertDescriptorToString)(name),
numPassingAsserts: 0,
parent,
retryReasons: [],
seenDone: false,
startedAt: null,
status: null,
timeout
});执行测试函数返回调用结果
执行完测试文件后,我们又回到了jestAdapter,继续执行runAndTransformResultsToJestFormat。
var jestAdapter = function () {
  var _ref = (0, _asyncToGenerator2.default)(function* (globalConfig, config, environment, runtime, testPath, sendMessageToJest) {
    // ...
    var results = yield runAndTransformResultsToJestFormat({
      config: config,
      globalConfig: globalConfig,
      testPath: testPath
    });
    _addSnapshotData(results, snapshotState);
    return (0, _jestUtil.deepCyclicCopy)(results, {
      keepPrototype: false
    });
  });
  return function jestAdapter(_x, _x2, _x3, _x4, _x5, _x6) {
    return _ref.apply(this, arguments);
  };
}();
这段代码的意思很清晰,就是执行_run.default方法得到结果,然后对结果进行一些计数及加工。
const runAndTransformResultsToJestFormat = async ({
  config,
  globalConfig,
  testPath
}) => {
  const runResult = await (0, _run.default)();
  let numFailingTests = 0;
  let numPassingTests = 0;
  let numPendingTests = 0;
  let numTodoTests = 0;
  const assertionResults = runResult.testResults.map(testResult => {
    let status;
    if (testResult.status === 'skip') {
      status = 'pending';
      numPendingTests += 1;
    } else if (testResult.status === 'todo') {
      status = 'todo';
      numTodoTests += 1;
    } else if (testResult.errors.length) {
      status = 'failed';
      numFailingTests += 1;
    } else {
      status = 'passed';
      numPassingTests += 1;
    }
    const ancestorTitles = testResult.testPath.filter(
      name => name !== _state.ROOT_DESCRIBE_BLOCK_NAME
    );
    const title = ancestorTitles.pop();
    return {
      ancestorTitles,
      duration: testResult.duration,
      failureDetails: testResult.errorsDetailed,
      failureMessages: testResult.errors,
      fullName: title
        ? ancestorTitles.concat(title).join(' ')
        : ancestorTitles.join(' '),
      invocations: testResult.invocations,
      location: testResult.location,
      numPassingAsserts: testResult.numPassingAsserts,
      retryReasons: testResult.retryReasons,
      status,
      title: testResult.testPath[testResult.testPath.length - 1]
    };
  });
  // ...
  return {
    ...(0, _testResult.createEmptyTestResult)(),
    console: undefined,
    displayName: config.displayName,
    failureMessage,
    numFailingTests,
    numPassingTests,
    numPendingTests,
    numTodoTests,
    testExecError,
    testFilePath: testPath,
    testResults: assertionResults
  };
};
那么run方法做了什么呢?其实就是调用_runTestsForDescribeBlock执行测试函数,然后调用_utils.makeRunResult汇总测试结果。
const run = async () => {
  const {rootDescribeBlock, seed, randomize} = (0, _state.getState)();
  // ...
  await _runTestsForDescribeBlock(rootDescribeBlock, rng, true);
  // ...
  return (0, _utils.makeRunResult)(
    (0, _state.getState)().rootDescribeBlock,
    (0, _state.getState)().unhandledErrors
  );
};
_runTestsForDescribeBlock方法在执行_runTest或_runTestsForDescribeBlock前后分别调用了beforeAll和afterAll,这也符合这两个api的定义。因为我们这次的测试用例type是test,所以我们来分析一下_runTest。
const _runTestsForDescribeBlock = async (
  describeBlock,
  rng,
  isRootBlock = false
) => {
  // ...
  const {beforeAll, afterAll} = (0, _utils.getAllHooksForDescribe)(
    describeBlock
  );
  const isSkipped = describeBlock.mode === 'skip';
  if (!isSkipped) {
    for (const hook of beforeAll) {
      await _callCircusHook({
        describeBlock,
        hook
      });
    }
  }
  // ...
  for (const child of describeBlock.children) {
    switch (child.type) {
      case 'describeBlock': {
        await _runTestsForDescribeBlock(child, rng);
        break;
      }
      case 'test': {
        const hasErrorsBeforeTestRun = child.errors.length > 0;
        await _runTest(child, isSkipped);
        if (
          hasErrorsBeforeTestRun === false &&
          retryTimes > 0 &&
          child.errors.length > 0
        ) {
          deferredRetryTests.push(child);
        }
        break;
      }
    }
  }
  // ...
  if (!isSkipped) {
    for (const hook of afterAll) {
      await _callCircusHook({
        describeBlock,
        hook
      });
    }
  }
  // ...
};
同样,_callCircusTest在执行前后也调用了beforeEach和afterEach。
const _runTest = async (test, parentSkipped) => {
  // ...
  const {afterEach, beforeEach} = (0, _utils.getEachHooksForTest)(test);
  for (const hook of beforeEach) {
    if (test.errors.length) {
      // If any of the before hooks failed already, we don't run any
      // hooks after that.
      break;
    }
    await _callCircusHook({
      hook,
      test,
      testContext
    });
  }
  await _callCircusTest(test, testContext);
  for (const hook of afterEach) {
    await _callCircusHook({
      hook,
      test,
      testContext
    });
  }
  // ...
};
const _callCircusTest = async (test, testContext) => {
// ...
try {
await (0, _utils.callAsyncCircusFn)(test, testContext, {
isHook: false,
timeout
});
// ...
} catch (error) {
// ...
}
};现在我们找到测试函数的调用点fn.call了。
const callAsyncCircusFn = (testOrHook, testContext, {isHook, timeout}) => {
  let timeoutID;
  let completed = false;
  const {fn, asyncError} = testOrHook;
  const doneCallback = takesDoneCallback(fn);
  return new Promise((resolve, reject) => {
    // ...
    if (isGeneratorFunction(fn)) {
      returnedValue = _co.default.wrap(fn).call({});
    } else {
      try {
        returnedValue = fn.call(testContext);
      } catch (error) {
        reject(error);
        return;
      }
    }
    if ((0, _jestUtil.isPromise)(returnedValue)) {
      returnedValue.then(() => resolve(), reject);
      return;
    }
    // ...
  })
    // ...
};
我们出栈到_runTest方法会触发一个test_done event,将Test对应的status修改为done,这也是为什么后续在结果汇总阶段读取到的状态是done。当然,jest会触发很多不同的event,这些event涉及了错误处理、重试等等机制,只是为了简洁未列出。
const _runTest = async (test, parentSkipped) => {
  // ...
  await (0, _state.dispatch)({
    name: 'test_done',
    test
  });
};
case 'test_done': {
event.test.duration = (0, _utils.getTestDuration)(event.test);
event.test.status = 'done';
state.currentlyRunningTest = null;
break;
}下面就是结果汇总的一些逻辑
const makeRunResult = (describeBlock, unhandledErrors) => ({
  testResults: makeTestResults(describeBlock),
  unhandledErrors: unhandledErrors.map(_getError).map(getErrorStack)
});
const makeTestResults = describeBlock => {
const testResults = [];
for (const child of describeBlock.children) {
switch (child.type) {
case 'describeBlock': {
testResults.push(...makeTestResults(child));
break;
}
case 'test': {
testResults.push(makeSingleTestResult(child));
break;
}
}
}
return testResults;
};const makeSingleTestResult = test => {
// ...
return {
duration: test.duration,
errors: errorsDetailed.map(getErrorStack),
errorsDetailed,
invocations: test.invocations,
location,
numPassingAsserts: test.numPassingAsserts,
retryReasons: test.retryReasons.map(_getError).map(getErrorStack),
status,
testPath: Array.from(testPath)
};
};render.create方法之后再行分析,大致原理和我上篇写的react源码解析大同小异。


 被折叠的 条评论
为什么被折叠?
被折叠的 条评论
为什么被折叠?
 到【灌水乐园】发言


