


一、 createRoot
在react中,我们调用createRoot创建根节点,调用render来展示组件,官网给出的示例如下。
import { createRoot } from 'react-dom/client';

const domNode = document.getElementById('root');
const root = createRoot(domNode);
root.render(<App />);
我们由此作为切入点来看一下渲染过程。
createRoot方法调用createContainer方法创建了root,然后调用ReactDOMRoot方法将其保存在内部变量中。
export function createRoot(
  container: Element | Document | DocumentFragment,
  options?: CreateRootOptions,
): RootType {
  // ...
  const root = createContainer(
    container,
    ConcurrentRoot,
    null,
    isStrictMode,
    concurrentUpdatesByDefaultOverride,
    identifierPrefix,
    onRecoverableError,
    transitionCallbacks,
  );
  // ...

  return new ReactDOMRoot(root);
}
先来看一下createContainer方法,这个方法把子节点初始化为空,然后调用了createFiberRoot方法。
export function createContainer(
containerInfo: Container,
tag: RootTag,
hydrationCallbacks: null | SuspenseHydrationCallbacks,
isStrictMode: boolean,
concurrentUpdatesByDefaultOverride: null | boolean,
identifierPrefix: string,
onRecoverableError: (error: mixed) => void,
transitionCallbacks: null | TransitionTracingCallbacks,
): OpaqueRoot {
const hydrate = false;
const initialChildren = null;
return createFiberRoot(
containerInfo,
tag,
hydrate,
initialChildren,
hydrationCallbacks,
isStrictMode,
concurrentUpdatesByDefaultOverride,
identifierPrefix,
onRecoverableError,
transitionCallbacks,
);
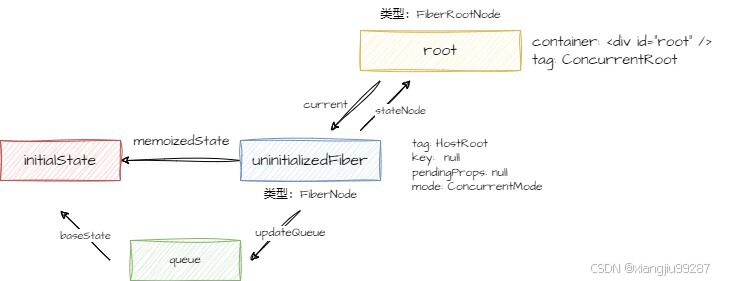
}createFiberRoot这个方法是重点。
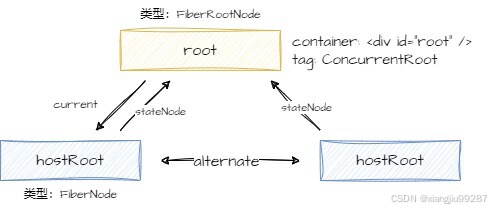
1. 首先他创建了root节点和unitializedFiber节点
2. 修改root节点的current指针指向unitializedFiber节点
3. 修改unitializedFiber节点的stateNode指针指向root
4. 初始化uninitiallizedFiber的memoizedState指针
5. 初始化更新队列
6. 返回root
export function createFiberRoot(
containerInfo: any,
tag: RootTag,
hydrate: boolean,
initialChildren: ReactNodeList,
hydrationCallbacks: null | SuspenseHydrationCallbacks,
isStrictMode: boolean,
onRecoverableError: null | ((error: mixed) => void),
transitionCallbacks: null | TransitionTracingCallbacks,
): FiberRoot {
const root: FiberRoot = (new FiberRootNode(
containerInfo,
tag,
hydrate,
identifierPrefix,
onRecoverableError,
): any);
// ...
const uninitializedFiber = createHostRootFiber(
tag,
isStrictMode,
concurrentUpdatesByDefaultOverride,
);
root.current = uninitializedFiber;
uninitializedFiber.stateNode = root;
// ...
const initialState: RootState = {
element: initialChildren,
isDehydrated: hydrate,
cache: (null: any), // not enabled yet
transitions: null,
pendingSuspenseBoundaries: null,
};
uninitializedFiber.memoizedState = initialState;
initializeUpdateQueue(uninitializedFiber);
return root;
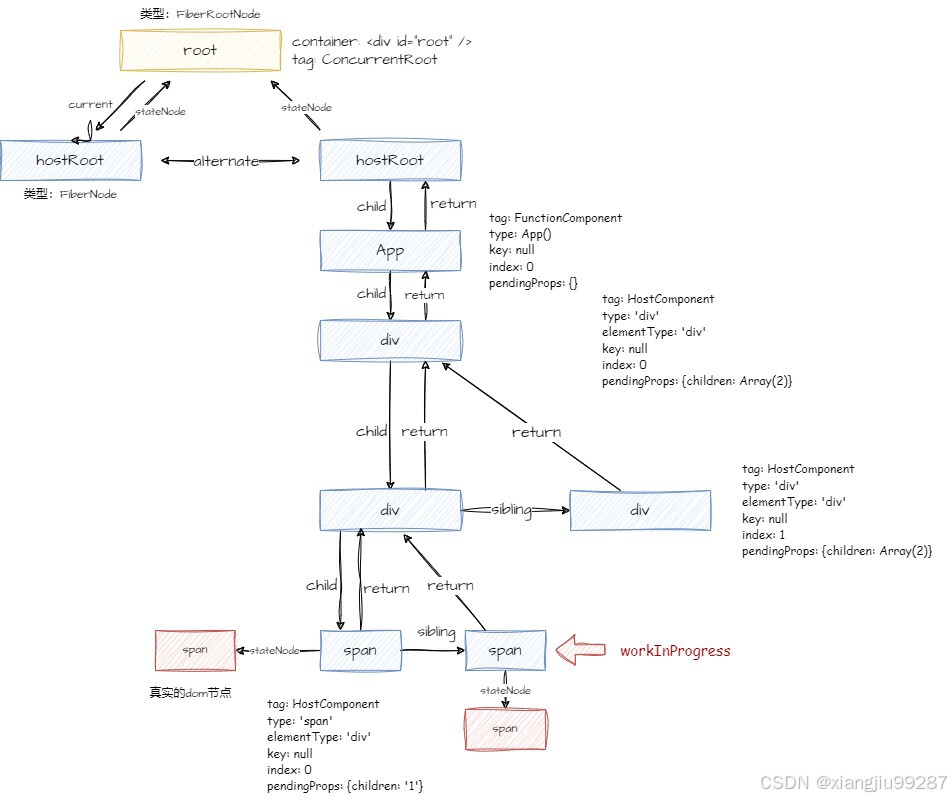
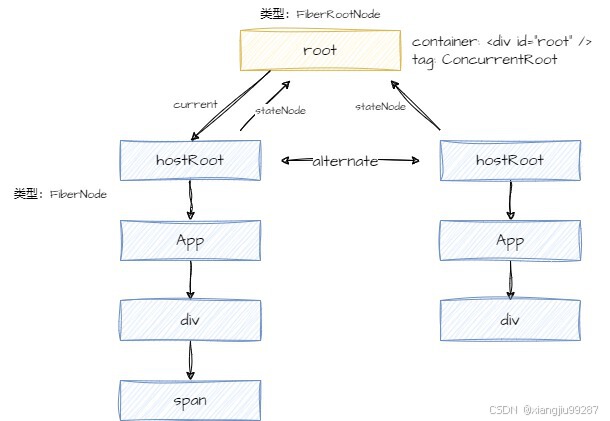
}拿图表示一下其实就是初始化了几个结构体与指针。
二、render
再来看一下render方法。通过render方法,我们会层层嵌套,最终调用到performConcurrentWorkOnRoot方法。以下是省略版的调用链,可以直接跳到performConcurrentWorkOnRoot方法接着看。
ReactDOMHydrationRoot.prototype.render = ReactDOMRoot.prototype.render = function(
  children: ReactNodeList,
): void {
  // 这里的root就对应上图画的root
  const root = this._internalRoot;
  // ...省略了一些配合调试的代码
  updateContainer(children, root, null, null);
};
export function updateContainer(
element: ReactNodeList,
container: OpaqueRoot,
parentComponent: ?React$Component<any, any>,
callback: ?Function,
): Lane {
// ...
scheduleUpdateOnFiber(root, current, lane, eventTime);
// ...
return lane;
}export function scheduleUpdateOnFiber(
root: FiberRoot,
fiber: Fiber,
lane: Lane,
eventTime: number,
) {
// ...
ensureRootIsScheduled(root, eventTime);
// ...
}function ensureRootIsScheduled(root: FiberRoot, currentTime: number) {
// ...
newCallbackNode = scheduleCallback(
schedulerPriorityLevel,
performConcurrentWorkOnRoot.bind(null, root),
);
// ...
}其实从scheduleCallback这个方法名我们已经可以猜出,就是根据优先级,在合适的时机调用callback,而这个callback就是我们之前传入的performConcurrentWorkOnRoot。
function scheduleCallback(priorityLevel, callback) {
  // ...
  return Scheduler_scheduleCallback(priorityLevel, callback);
}
performConcurrentWorkOnRoot
在学习这个方法前,有一些概念需要补充。
在react16及以后的架构中,有三个核心部件:调度器、协调器和渲染器。
调度器负责根据优先级调度任务,协调器负责根据diff算法计算更新,渲染器负责实际渲染。不同环境下的渲染器可能有所不同,但是协调器是通用的,而performConcurrentWorkOnRoot就是协调器的入口函数。
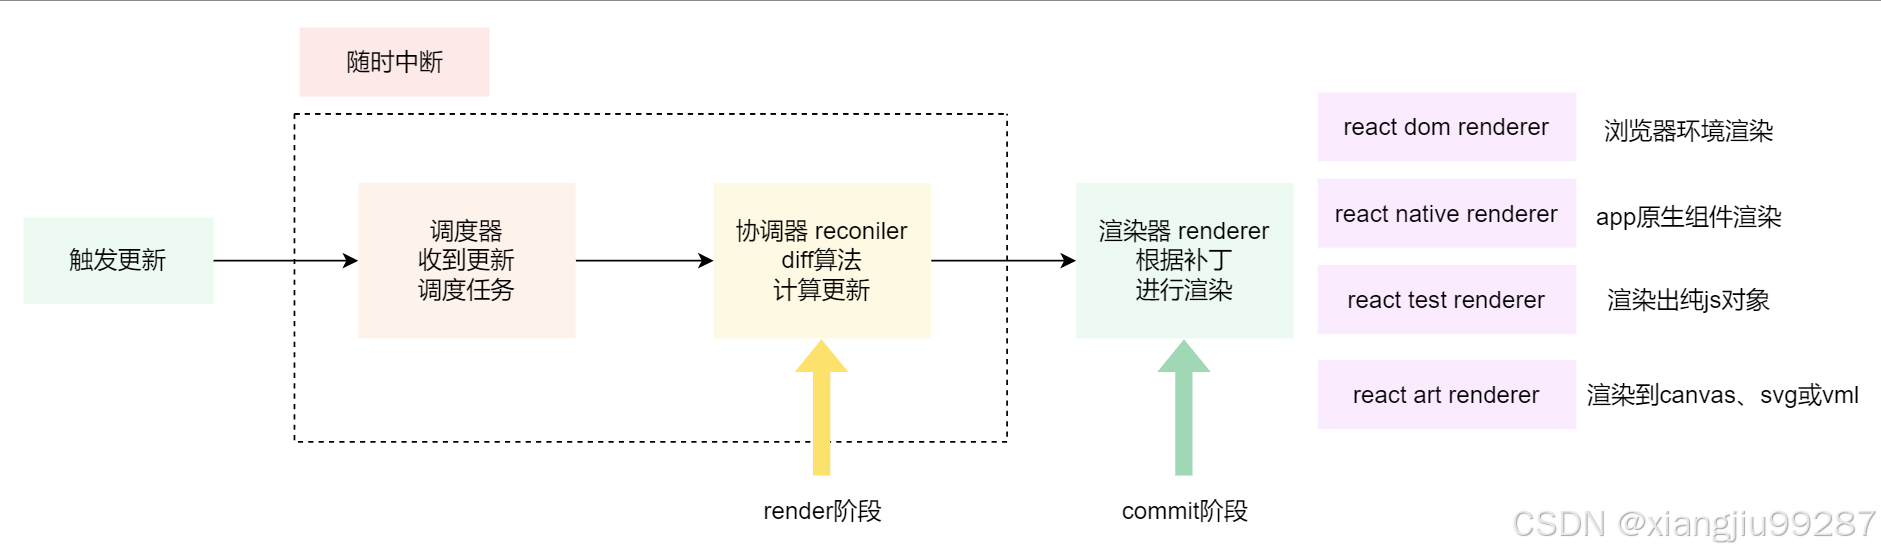
此外,调度器和协调器是可以被中断的,为了是其可以中断,react推出了fiber架构。我们之前画的root和unitializedFiber就是两个fiber节点。
fiber节点
我们知道,父组件更新会触发子组件的更新,所以我们需要储存组件之间的父子、兄弟信息,这也是fiber节点的第一部分存储内容。
// 指向父级Fiber节点
this.return = null;
// 指向子Fiber节点
this.child = null;
// 指向右边第一个兄弟Fiber节点
this.sibling = null;
其次,我们后续需要根据fiber进行diff算法,所以我们肯定需要存储组件相关信息,这样后续才能比对变更。
// Fiber对应组件的类型 Function/Class/Host...
this.tag = tag;
// key属性
this.key = key;
// 大部分情况同type,某些情况不同,比如FunctionComponent使用React.memo包裹
this.elementType = null;
// 对于 FunctionComponent,指函数本身,对于ClassComponent,指class,对于HostComponent,指DOM节点tagName
this.type = null;
// Fiber对应的真实DOM节点
this.stateNode = null;
然后,我们需要存储diff算法的相关结果,以便后续渲染器工作。
// 保存本次更新造成的状态改变相关信息
this.pendingProps = pendingProps;
this.memoizedProps = null;
this.updateQueue = null;
this.memoizedState = null;
this.dependencies = null;

this.mode = mode;

// 保存本次更新会造成的DOM操作
this.effectTag = NoEffect;
this.nextEffect = null;

this.firstEffect = null;
this.lastEffect = null;
最后,我们需要存储fiber相关的优先级信息。
// 调度优先级相关
this.lanes = NoLanes;
this.childLanes = NoLanes;
接下来可以看performConcurrentWorkOnRoot方法了。这个方法接受的第一个参数root就是我们在上图画的root,而didTimeout是跟优先级以及该方法的调用时间有关的,优先级越高,expirationTime比方法调用时间早的可能性越大,didTimeout为true的可能性也就越大。
如果didTimeout = true,则调用renderRootSync,否则调用renderRootConcurrent。
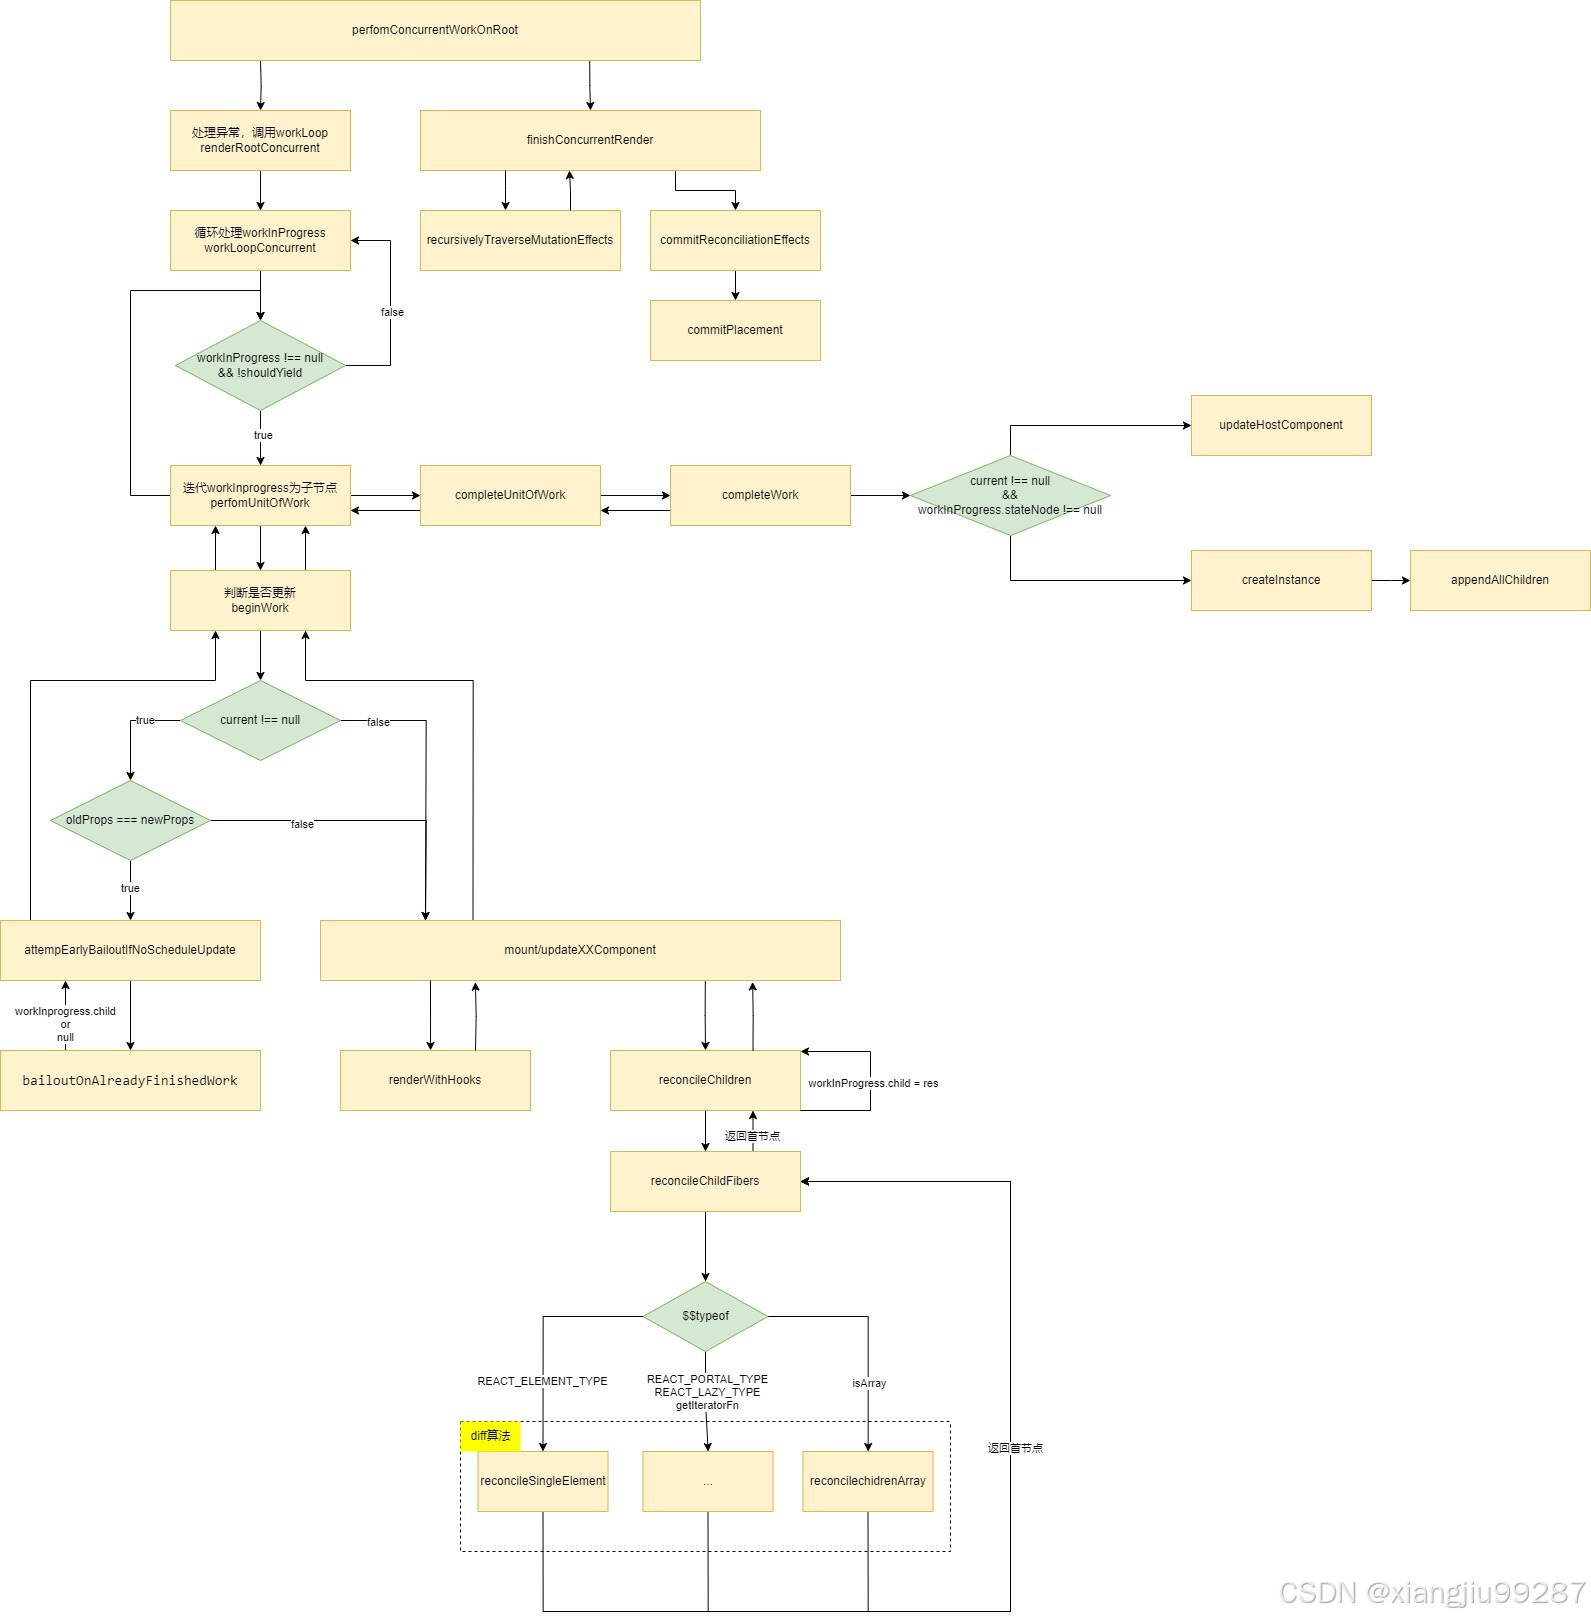
function performConcurrentWorkOnRoot(root, didTimeout) {
  // ...为了使关注点集中,省略掉所有跟优先级有关的逻辑
  // 进入render阶段
  let exitStatus = shouldTimeSlice
    ? renderRootConcurrent(root, lanes)
    : renderRootSync(root, lanes);
  // ...
  // 进入commit阶段
  finishConcurrentRender(root, exitStatus, lanes);
  // ...
}
先来看renderRootSync。这个方法其实关键就做了两件事,首先调用prepareFreshStack初始化了workInProgress,然后调用workLoopSync。
function renderRootSync(root: FiberRoot, lanes: Lanes) {
  // ...
  if (workInProgressRoot !== root || workInProgressRootRenderLanes !== lanes) {
    // ...
    prepareFreshStack(root, lanes);
  }
  // ...
  do {
    try {
      workLoopSync();
      break;
    } catch (thrownValue) {
      handleError(root, thrownValue);
    }
  } while (true);
  // ...
  return workInProgressRootExitStatus;
}
可以看一下初始化workInProgress的核心代码。
export function createWorkInProgress(current: Fiber, pendingProps: any): Fiber {
  let workInProgress = current.alternate;
  if (workInProgress === null) {
    workInProgress = createFiber(
      current.tag,
      pendingProps,
      current.key,
      current.mode,
    );
    workInProgress.elementType = current.elementType;
    workInProgress.type = current.type;
    workInProgress.stateNode = current.stateNode;
    workInProgress.alternate = current;
    current.alternate = workInProgress;
  }
  // ...
  return workInProgress;
}
或许你会疑惑,为什么需要再搞出一个workInProgress?其实这就是react所谓的双缓存技术。
双缓存技术
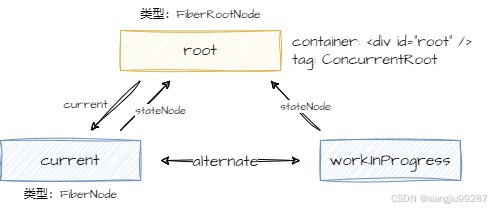
从代码中你可以发现,workInProgress被初始化成和current几乎完全一样的fiber节点,且存在双向指针alternate连接两者。唯一的区别就是root节点的current指针是指向current节点的,这也就意味着,只需要修改current指针的指向,就可以实现current树和workInProgress树的切换。
页面展现的是current树,而协调器在工作时,操纵的是workInProgress树,只有在完成后才会修改current指针的朝向,并交给渲染器处理,这也就保证了如果协调器被更高优先级的任务打断,不会出现渲染到一半的情况出现。
假设我们存在如下结构:
export default function App() {
return (
<div>
<span>1</span>
<span>2</span>
<div>
)
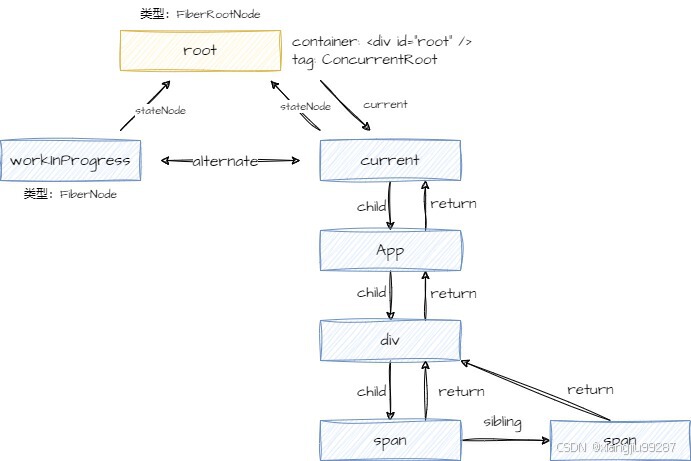
}那么在协调器完成工作后,应该展现如下结构

然后修改current指针朝向,使workInProgress树成为新的current树。
接下来看一下workLoopSync代码。
很简单,就是不断地调用performUnitWork方法,这个方法负责构建workInProgress的子fiber,并且更新workInProgress的指针值。
function workLoopSync() {
  // Already timed out, so perform work without checking if we need to yield.
  while (workInProgress !== null) {
    performUnitOfWork(workInProgress);
  }
}
顺便再看一下workLoopConcurrent方法,和workLoopSync唯一的区别就是它允许中断。
这其实也很好理解,当我们已经超时,那么肯定是优先渲染,防止饥饿现象发生;如果没超时,那么当时间片耗尽或者是有更高优先级的任务出现时,我们允许抢占。
function workLoopConcurrent() {
  // Perform work until Scheduler asks us to yield
  while (workInProgress !== null && !shouldYield()) {
    performUnitOfWork(workInProgress);
  }
}
render+commit过程概述
假设我们有如下结构。
function App() {
  return (
    <div>
      <div>
        <span>1</span>
        <span>2</span>
      </div>
      <div>
        <span>3</span>
        <span>4</span>
      </div>
    </div>
  );
}
那么App fiber的children对象应呈现如下结构。
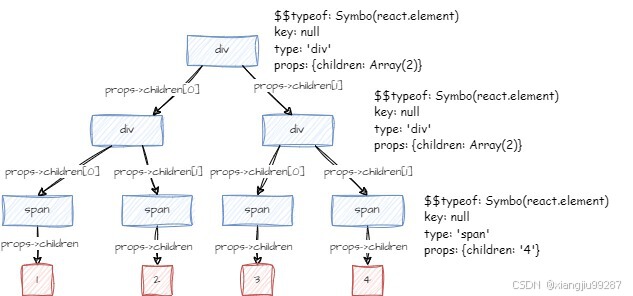
fiber树的构建过程用到了深度优先遍历算法,我们会不断构建子fiber直到不存在子节点,再构建其兄弟节点的子fiber,都不存在就回退到父节点。
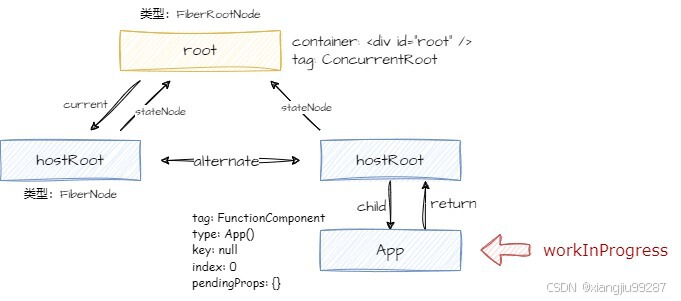
在执行performUnitWork前,fiber树的结构如下。

在执行完第一次performUnitWork后,fiber树的结构如下。
递:只要workInProgress的chidren对象不为空,那么performUnitWork就会不断地构建子节点,并且迭代workInProgress为首个子节点。
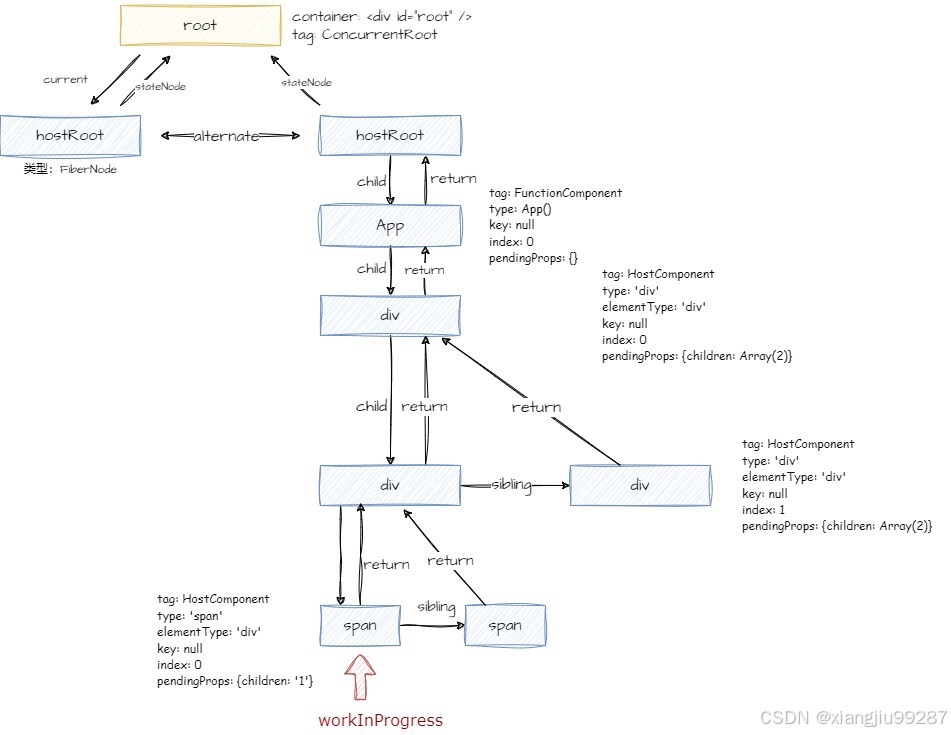
这时候,span内的chidren为1,react对其做了剪枝的特殊处理,不会再创建子fiber,而是开始构建对应的真实dom节点span,直接将其内容值设为1,fiber节点的stateNode指针指向对应的真实节点。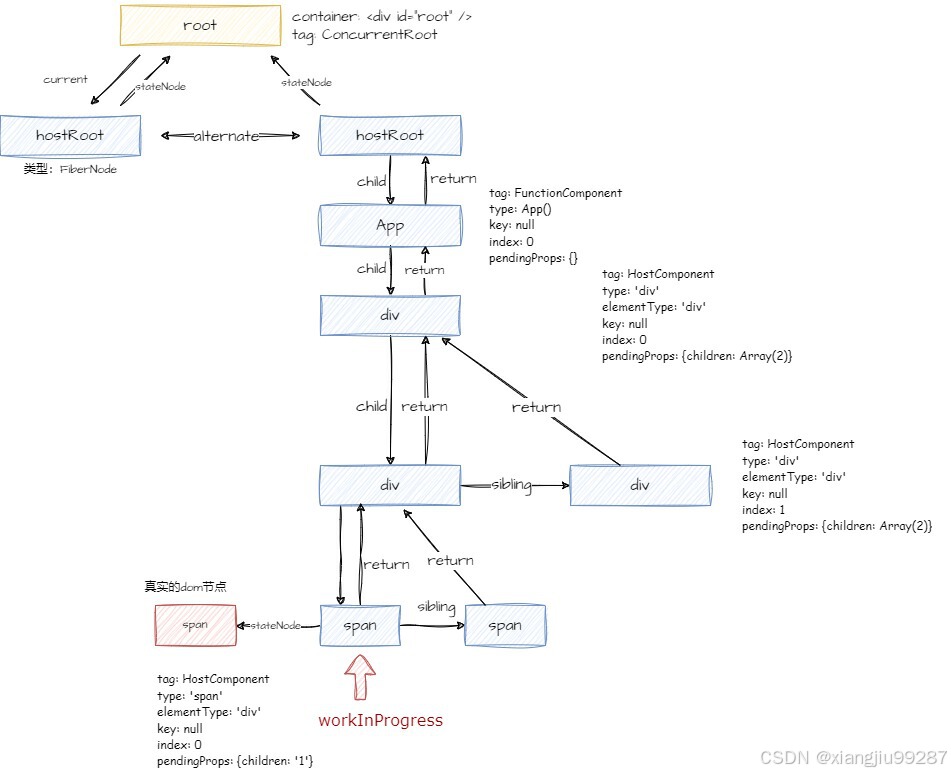
在这个时候,1号span已经不存在子节点,但是其兄弟节点2号span可能存在子节点,所以需要将workInProgress更新为2号span,继续执行performUnitWork。
但是2号span也不存在子节点,所以他也创建了对应的stateNode。
归:由于2号span不再存在右兄弟节点,所以我们将workInProgress回撤为其父节点1号div。
1号div已经创建过子节点,我们直接为其绑定stateNode节点即可。
需要注意的是,stateNode所指向的真实dom节点也需要构建出父子关系。
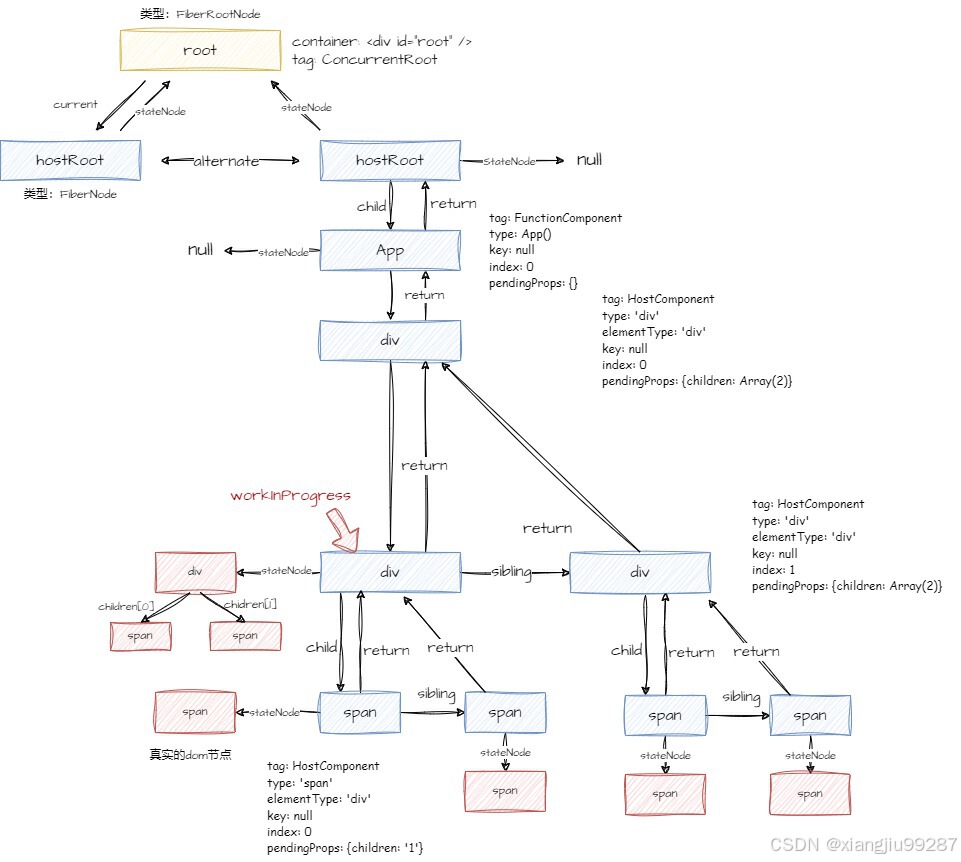
然后迭代workInProgress为2号div,再次执行performUnitWork。
最终构建出fiber树如下。

我们可以看到,首个div指向的stateNode其实就是我们要构建的dom树,所以我们只需要调用document.selectElementById('root).appendChild(firstStateNode)就可以把他挂载到页面上。
render具体实现
核心在于调用beginWork渲染子节点,调用compleUnitOfWork挂载真实节点。
如果子节点不为空,那就更新workInProgress为子节点;如果子节点为空,compleUnitOfWork会更新workInProgress为距离最近的右节点(意思是自己没有右节点,就更新为祖先元素的右节点)。
function performUnitOfWork(unitOfWork: Fiber): void {
  const current = unitOfWork.alternate;
  // ...
  next = beginWork(current, unitOfWork, subtreeRenderLanes);

  // ...
  unitOfWork.memoizedProps = unitOfWork.pendingProps;
  if (next === null) {
    // If this doesn't spawn new work, complete the current work.
    completeUnitOfWork(unitOfWork);
  } else {
    workInProgress = next;
  }

  ReactCurrentOwner.current = null;
}
beginWork方法首次调用时,调用updateHostRoot。
function beginWork(
  current: Fiber | null,
  workInProgress: Fiber,
  renderLanes: Lanes,
): Fiber | null {
  // ...
  // 如果current === null 证明是mount阶段,否则是update阶段
  if (current !== null) {
    const oldProps = current.memoizedProps;
    const newProps = workInProgress.pendingProps;
    // 对比新旧props和context判断是否需要更新
    if (
      oldProps !== newProps ||
      hasLegacyContextChanged() ||
      (__DEV__ ? workInProgress.type !== current.type : false)
    ) {
      didReceiveUpdate = true;
    } else {
      // ...省略了一些兜底的异常情况
      didReceiveUpdate = false;
      return attemptEarlyBailoutIfNoScheduledUpdate(
        current,
        workInProgress,
        renderLanes,
      );
    }
  } else {
    didReceiveUpdate = false;
    // ...省略了一些并发处理
  }

  // ...
  switch (workInProgress.tag) {
    // ...
    case IndeterminateComponent: {
      // 没有确定类型的走这个分支
      return mountIndeterminateComponent(
        current,
        workInProgress,
        workInProgress.type,
        renderLanes,
      );
    }
    case HostRoot:
      return updateHostRoot(current, workInProgress, renderLanes);
    case HostComponent:
      // div、span这种原生类型走这个分支
      return updateHostComponent(current, workInProgress, renderLanes);
  // ...
}
updateHostRoot调用reconcileChildren,传入的nextChidren即为app element。
function updateHostRoot(current, workInProgress, renderLanes) {
  // ...
  const nextState: RootState = workInProgress.memoizedState;
  // ...
  const nextChildren = nextState.element;
  // ...
  reconcileChildren(current, workInProgress, nextChildren, renderLanes);
  return workInProgress.child;
}
reconcileChildren调用reconcileChildFibers创建App fiber,然后将hostRoot和app连接起来。
至于怎么创建fiber,这个涉及到diff算法,稍后再讲。
export function reconcileChildren(
  current: Fiber | null,
  workInProgress: Fiber,
  nextChildren: any,
  renderLanes: Lanes,
) {
    workInProgress.child = reconcileChildFibers(
      workInProgress,
      current.child,
      nextChildren,
      renderLanes,
    );
}
然后我们一路回退到performUnitOfWork,修改workInProgress为子fiber(app fiber),再次调用performUnitOfWork。
function updateHostRoot(current, workInProgress, renderLanes) {
  // ...
  return workInProgress.child;
}
function beginWork(
  current: Fiber | null,
  workInProgress: Fiber,
  renderLanes: Lanes,
): Fiber | null {
  // ...
    return updateHostRoot(current, workInProgress, renderLanes);
  // ...
}
function performUnitOfWork(unitOfWork: Fiber): void {
  // ...
  next = beginWork(current, unitOfWork, subtreeRenderLanes);

  // ...
  workInProgress = next;
}
function workLoopSync() {
  while (workInProgress !== null) {
    performUnitOfWork(workInProgress);
  }
}
由于不知道app的组件类型,这次会调用mountIndeterminateComponent。
mountIndeterminateComponent主要做了三件事。
1. 调用renderWithHooks,如果是函数组件,那么返回的是element。如果是类组件,那么返回的就是类实例。
2. 根据value是否有render方法来判断是类组件还是函数组件。
3. 如果是类组件,那么调用finishClassComponent方法,该方法会调用render方法获取element,然后调用reconcileChildren;如果是函数组件,直接调用reconcileChildren。
function mountIndeterminateComponent(
  _current,
  workInProgress,
  Component,
  renderLanes,
) {
  value = renderWithHooks(
    null,
    workInProgress,
    Component,
    props,
    context,
    renderLanes,
  );
  if (
    typeof value === 'object' &&
    value !== null &&
    typeof value.render === 'function' &&
    value.$$typeof === undefined
  ) {
    workInProgress.tag = ClassComponent;
    return finishClassComponent(
      null,
      workInProgress,
      Component,
      true,
      hasContext,
      renderLanes,
    );
  } else {
    workInProgress.tag = FunctionComponent;
    reconcileChildren(null, workInProgress, value, renderLanes);
    return workInProgress.child;
  }
}
第三次调用performUnitOfWork,由于对应div节点,所以调用的是updateHostComponent方法。无论走哪个分支,只要不是调用bailoutOnAlreadyFinishedWork提前退出了本层的diff对比,都会调用到reconcileChildFibers。
diff算法
reconcileChildFibers决定采用什么diff算法。
function reconcileChildFibers(
  returnFiber: Fiber,
  currentFirstChild: Fiber | null,
  newChild: any,
  lanes: Lanes,
): Fiber | null {
  // 处理只有一个子节点,且该子节点是<>...</>的情况
  // 直接将<>..</>的子节点作为要处理的子节点
  const isUnkeyedTopLevelFragment =
    typeof newChild === 'object' &&
    newChild !== null &&
    newChild.type === REACT_FRAGMENT_TYPE &&
    newChild.key === null;
  if (isUnkeyedTopLevelFragment) {
    newChild = newChild.props.children;
  }

  // Handle object types
  if (typeof newChild === 'object' && newChild !== null) {
    switch (newChild.$$typeof) {
      // 如果是react元素
      case REACT_ELEMENT_TYPE:
        return placeSingleChild(
          reconcileSingleElement(
            returnFiber,
            currentFirstChild,
            newChild,
            lanes,
          ),
        );
      case REACT_PORTAL_TYPE:
        // ...
      case REACT_LAZY_TYPE:
        // ...
    }

    if (isArray(newChild)) {
      return reconcileChildrenArray(
        returnFiber,
        currentFirstChild,
        newChild,
        lanes,
      );
    }

    if (getIteratorFn(newChild)) {
      // ...
    }

    ...
  }

  // 特殊处理文本节点
  if (
    (typeof newChild === 'string' && newChild !== '') ||
    typeof newChild === 'number'
  ) {
    return placeSingleChild(
      reconcileSingleTextNode(
        returnFiber,
        currentFirstChild,
        '' + newChild,
        lanes,
      ),
    );
  }

  // 其他情况都视为空节点
}
单节点diff算法
1. 不存在旧节点,新建fiber
2. 存在旧节点,判断key是否相同
- key相同,判断type是否相同
- type不同,说明节点无法复用,删除旧节点及其所有兄弟节点(因为key是节点的唯一标识,如果key相同、type不同,则证明节点一定发生了改变)
- type相同,判断是否存在workInProgress fiber,存在就复用,否则删除
- key不同,删除旧节点,继续比对兄弟节点和新节点。
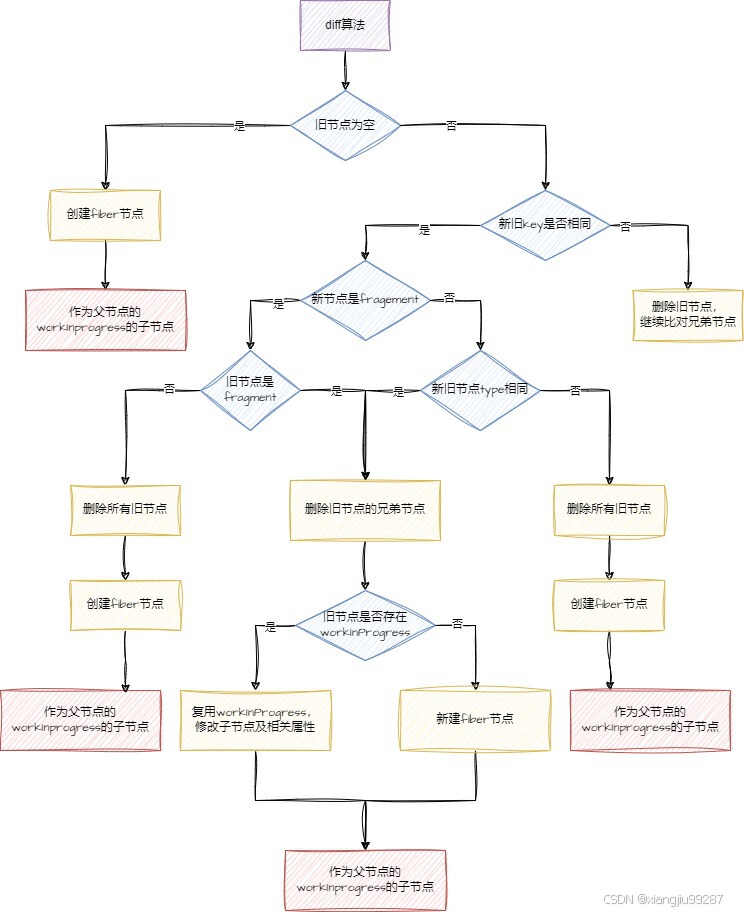
为什么旧节点存在的情况下还需要判断workInProgress是否存在呢?我们可以假设以下这种情况。
我们有如下结构
function App() {
  return (
    <div>
    </div>
  );
}
在组件挂载10s后,我们要给div内新增一个span元素。
function App() {
  return (
    <div>
      <span></span>
    </div>
  );
}
那么,在调用createRoot后fiber树应该如下:
在调用render方法后,fiber树变更为如下结构:

因为页面要重新渲染,所以这次需要对左边的fiber树进行变更。
我们需要明确一点,我们要进行完diff算法比较,才能去更新workInProgress,所以我们进行diff比较的新节点不可能是workInProgress,而是通过createElement构建出的element节点。
element的结构如下:
const element = {
  $$typeof: REACT_ELEMENT_TYPE,

  type: type,
  key: key,
  ref: ref,
  props: props,
  _owner: owner,
};
可以看出fiber节点时element节点的一个超集,会额外包含优先级、state等信息。
所以我们在对比新旧app时,对比的其实是旧的app fiber和新的app element,至于新的app fiber目前其实是不存在的,这也是为什么需要判断workInProgress是否存在的原因。
经过这次变更,fiber树改变如下。
假设我们20s后要删除span,这次再对比app节点时,新旧fiber就都存在了,也就可以实现fiber的复用。
具体实现代码如下。
function reconcileSingleElement(
  returnFiber: Fiber,
  currentFirstChild: Fiber | null,
  element: ReactElement,
  lanes: Lanes,
): Fiber {
  const key = element.key;
  let child = currentFirstChild;
  while (child !== null) {
    if (child.key === key) {
      const elementType = element.type;
      if (elementType === REACT_FRAGMENT_TYPE) {
        if (child.tag === Fragment) {
          deleteRemainingChildren(returnFiber, child.sibling);
          const existing = useFiber(child, element.props.children);
          existing.return = returnFiber;
          // ...
          return existing;
        }
      } else {
        if (
          child.elementType === elementType ||
          (typeof elementType === 'object' &&
            elementType !== null &&
            elementType.$$typeof === REACT_LAZY_TYPE &&
            resolveLazy(elementType) === child.type)
        ) {
          deleteRemainingChildren(returnFiber, child.sibling);
          const existing = useFiber(child, element.props);
          existing.ref = coerceRef(returnFiber, child, element);
          existing.return = returnFiber;
          // ...
          return existing;
        }
      }
      deleteRemainingChildren(returnFiber, child);
      break;
    } else {
      deleteChild(returnFiber, child);
    }
    child = child.sibling;
  }

  if (element.type === REACT_FRAGMENT_TYPE) {
    const created = createFiberFromFragment(
      element.props.children,
      returnFiber.mode,
      lanes,
      element.key,
    );
    created.return = returnFiber;
    return created;
  } else {
    const created = createFiberFromElement(element, returnFiber.mode, lanes);
    created.ref = coerceRef(returnFiber, currentFirstChild, element);
    created.return = returnFiber;
    return created;
  }
}
多节点diff算法
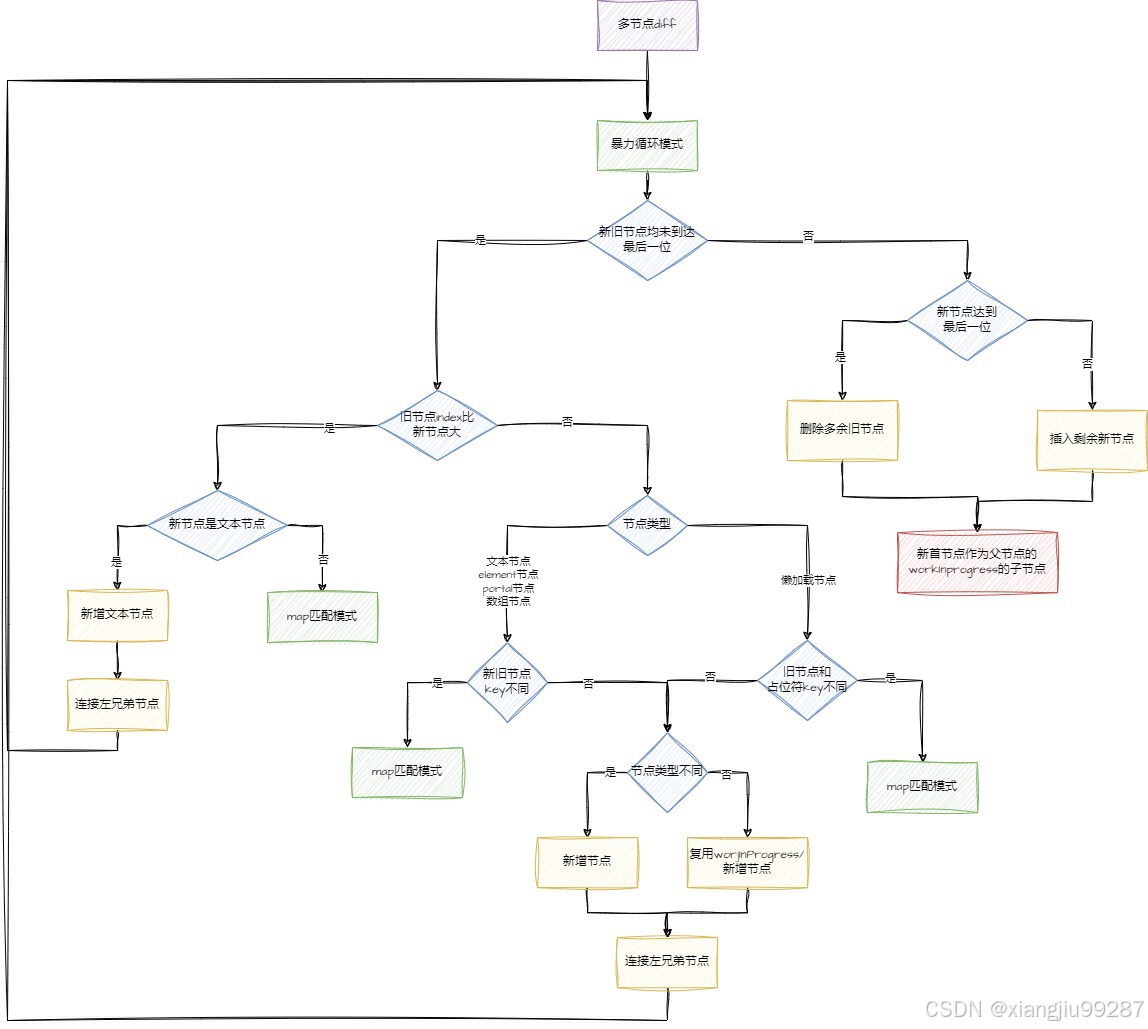
多节点diff算法可以分为更新、新增和删除三部分,而更新又分为暴力循环模式和map匹配模式。
由于fiber架构sibling指针是单向的,所以没有办法用双端搜索来优化,react团队在官方注解中表明,如果这个模型的效率不能达到预期,会增加双向指针与双端搜索。
react多节点diff算法其实是很学院派的模型,本质上是比对数组和链表,是其保证“一致”。
- 新节点是element数组,旧节点是fiber链表,所以当新旧节点均未到达最后一位时,就处于更新阶段。
- 如果旧节点达到最后一位(不存在右兄弟节点),那么剩下的新节点就是需要新增的。
- 如果新节点到达最后一位(index === children.length),那么剩下的节点就是需要删除的。
- 由于节点顺序可能改变,所以在暴力匹配的模式下,最坏的情况下我们需要遍历全部的旧节点才能找到与新节点相同的key,查找旧节点的时间复杂度是O(n),这样查找的效率是低下的,所以我们可以想到用map来加速查找,用map查找旧节点的时间复杂度是O(1)。但是构建map会引入空间复杂度,所以只有当我们同时遍历新旧节点(暴力循环),key无法匹配时,才会开启map匹配模式。
画图示意一下可能情况。
1. 更新
1)更新文本内容,节点顺序不变
这种情况较为简单,我们只需在每次比对完“下移指针”,直至新旧节点同时抵达最后节点。
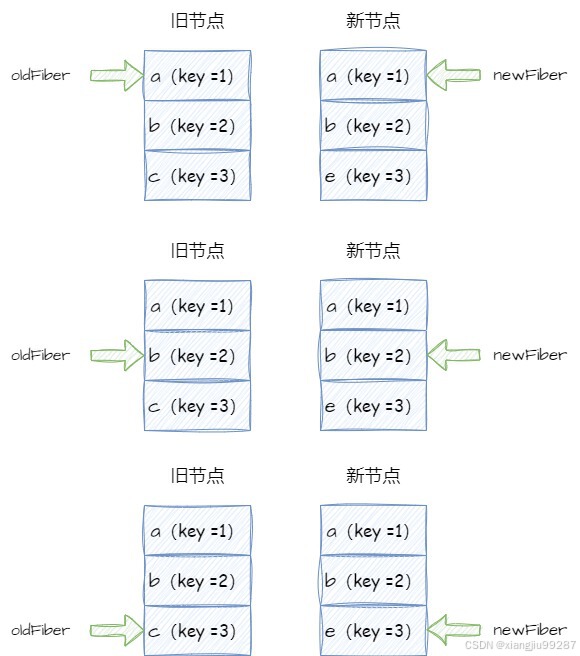
2)节点顺序改变
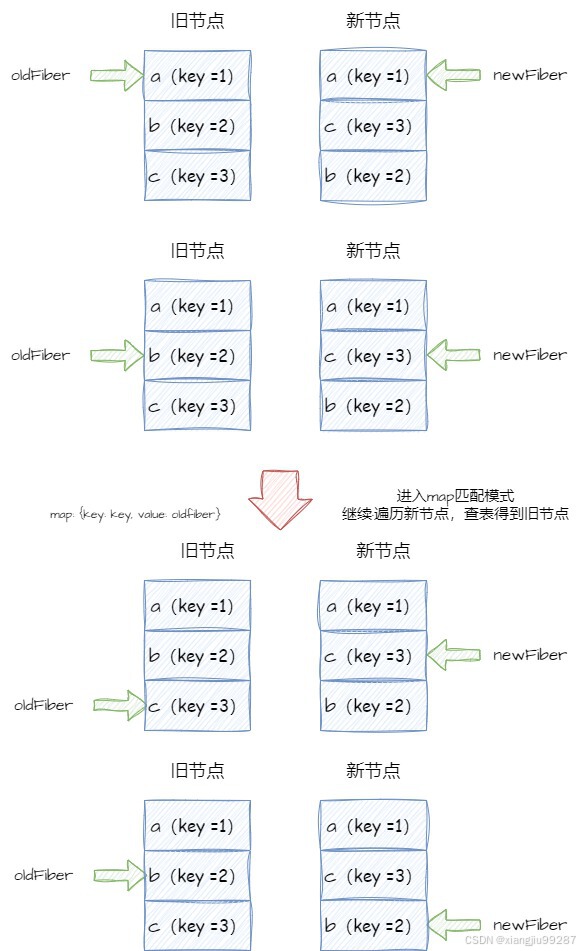
2. 插入

3. 删除
删除跟插入相当于是反向情况,就不画图表示了。
多节点diff的判断分支如下
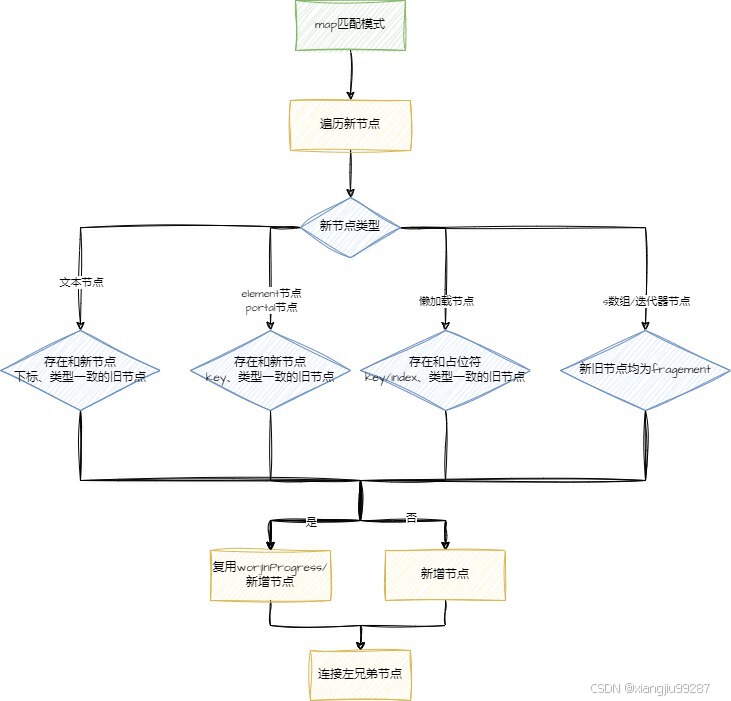
reconcileChildrenArray
function reconcileChildrenArray(
  returnFiber: Fiber,
  currentFirstChild: Fiber | null,
  newChildren: Array<*>,
  lanes: Lanes,
)
  let resultingFirstChild: Fiber | null = null;
  let previousNewFiber: Fiber | null = null;

  let oldFiber = currentFirstChild;
  let lastPlacedIndex = 0;
  let newIdx = 0;
  let nextOldFiber = null;
  for (; oldFiber !== null && newIdx < newChildren.length; newIdx++) {
    if (oldFiber.index > newIdx) {
      nextOldFiber = oldFiber;
      oldFiber = null;
    } else {
      nextOldFiber = oldFiber.sibling;
    }
    const newFiber = updateSlot(
      returnFiber,
      oldFiber,
      newChildren[newIdx],
      lanes,
    );
    if (newFiber === null) {
      // TODO: This breaks on empty slots like null children. That's
      // unfortunate because it triggers the slow path all the time. We need
      // a better way to communicate whether this was a miss or null,
      // boolean, undefined, etc.
      if (oldFiber === null) {
        oldFiber = nextOldFiber;
      }
      break;
    }
    // ...
    lastPlacedIndex = placeChild(newFiber, lastPlacedIndex, newIdx);
    if (previousNewFiber === null) {
      resultingFirstChild = newFiber;
    } else {
      previousNewFiber.sibling = newFiber;
    }
    previousNewFiber = newFiber;
    oldFiber = nextOldFiber;
  }

  if (newIdx === newChildren.length) {
    deleteRemainingChildren(returnFiber, oldFiber);
    if (getIsHydrating()) {
      const numberOfForks = newIdx;
      pushTreeFork(returnFiber, numberOfForks);
    }
    return resultingFirstChild;
  }

  if (oldFiber === null) {
    for (; newIdx < newChildren.length; newIdx++) {
      const newFiber = createChild(returnFiber, newChildren[newIdx], lanes);
      if (newFiber === null) {
        continue;
      }
      lastPlacedIndex = placeChild(newFiber, lastPlacedIndex, newIdx);
      if (previousNewFiber === null) {
        resultingFirstChild = newFiber;
      } else {
        previousNewFiber.sibling = newFiber;
      }
      previousNewFiber = newFiber;
    }
    if (getIsHydrating()) {
      const numberOfForks = newIdx;
      pushTreeFork(returnFiber, numberOfForks);
    }
    return resultingFirstChild;
  }

  // Add all children to a key map for quick lookups.
  const existingChildren = mapRemainingChildren(returnFiber, oldFiber);

  // Keep scanning and use the map to restore deleted items as moves.
  for (; newIdx < newChildren.length; newIdx++) {
    const newFiber = updateFromMap(
      existingChildren,
      returnFiber,
      newIdx,
      newChildren[newIdx],
      lanes,
    );
    if (newFiber !== null) {
      if (previousNewFiber === null) {
        resultingFirstChild = newFiber;
      } else {
        previousNewFiber.sibling = newFiber;
      }
      previousNewFiber = newFiber;
    }
  }

  return resultingFirstChild;
}你或许注意到代码实现里有这么两个方法,这两个方法给fiber.flag设置了不同的值,如果是插入新节点或者位置向后移,那么flag会被设置为Placement;如果是删除,那么flag会被设置为ChildDeletion。这个标记是用来指示我们在commit阶段如何操纵真实节点的,如果我们不做标记,那么即使我们更新了fiber树的结构,我们也不知道真实的dom节点应该如何变更,只能再进行一次新旧fiber的对比,或者直接按新fiber重新创建所有的dom节点,这样的设计效率无疑是低下的。
deleteRemainingChildren(returnFiber, oldFiber);
lastPlacedIndex = placeChild(newFiber, lastPlacedIndex, newIdx);
function placeChild(
newFiber: Fiber,
lastPlacedIndex: number,
newIndex: number,
): number {
newFiber.index = newIndex;
// ...
const current = newFiber.alternate;
if (current !== null) {
const oldIndex = current.index;
if (oldIndex < lastPlacedIndex) {
// This is a move.
newFiber.flags |= Placement;
return lastPlacedIndex;
} else {
// This item can stay in place.
return oldIndex;
}
} else {
// This is an insertion.
newFiber.flags |= Placement;
return lastPlacedIndex;
}
} // deleteRemainingChildren会调用这个方法
function deleteChild(returnFiber: Fiber, childToDelete: Fiber): void {
if (!shouldTrackSideEffects) {
// Noop.
return;
}
const deletions = returnFiber.deletions;
if (deletions === null) {
returnFiber.deletions = [childToDelete];
returnFiber.flags |= ChildDeletion;
} else {
deletions.push(childToDelete);
}
}那么在placeChild中比对oldIndex和lastPlacedIndex又是什么意思呢?我们画个图来理解一下。
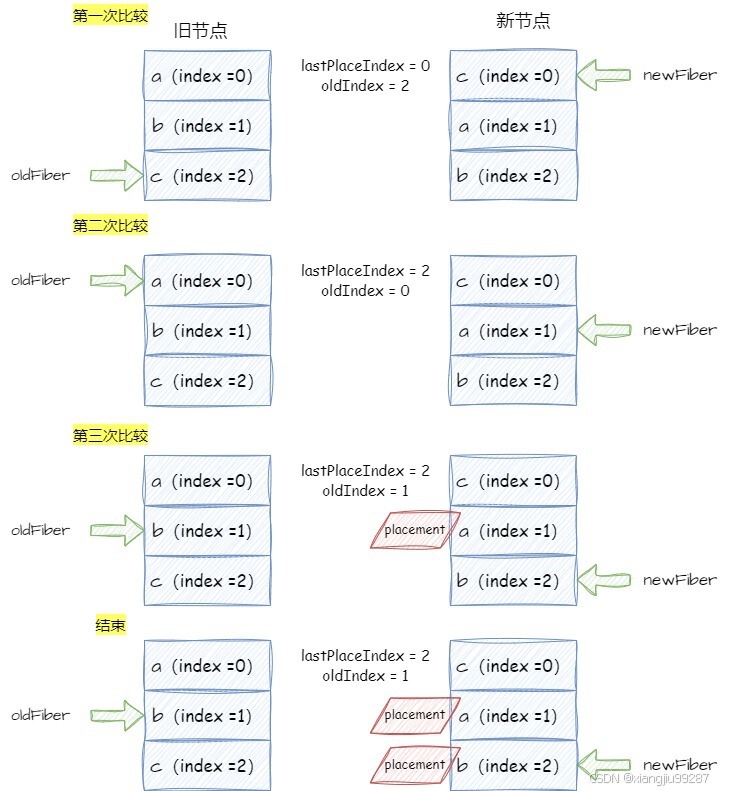
- 最开始,lastPlaceIndex被初始化为0,我们找到新节点c对应的旧节点的下标oldIndex = 2。
- 由于oldIndex > lastPlaceIndex,所以lastPlaceIndex被更新为2。
- 第二次比较,我们找到a对应的oldIndex = 0,由于oldIndex < lastPlaceIndex,所以a被标记为placement,lastPlaceIndex不变
- 第三次比较同理第二次。
原理其实就是我们要判断新旧节点的位置顺序是否发生改变,因为我们是按照新节点的位置顺序遍历的,如果先访问的旧节点比后访问的旧节点位置位置还靠后,就说明新旧节点的位置顺序发生了改变。
由于我们找的是从前往后挪了的节点,所以如果oldIndex < lastPlaceIndex,就代表位置后移,需要打上标记。
下面是绑定stateNode的过程。
compeleteUnitOfWork负责调用compeletedWork创建/更新真实的dom节点,然后将workInProgress设置为兄弟节点或者父节点。
function completeUnitOfWork(unitOfWork: Fiber): void {
  let completedWork = unitOfWork;
  do {
    next = completeWork(current, completedWork, subtreeRenderLanes);
    // 注意这里,这里会继续处理兄弟节点
    const siblingFiber = completedWork.sibling;
    if (siblingFiber !== null) {
      workInProgress = siblingFiber;
      return;
    }
    completedWork = returnFiber;
    workInProgress = completedWork;
  } while (completedWork !== null);

  // We've reached the root.
  if (workInProgressRootExitStatus === RootInProgress) {
    workInProgressRootExitStatus = RootCompleted;
  }
}
如果不存在旧dom节点,调用createInstance创建dom节点,如果有子节点的话,appendChildren会将真实的dom子节点挂载在Instance上。然后将instance保存在stateNode中。
function completeWork(
  current: Fiber | null,
  workInProgress: Fiber,
  renderLanes: Lanes,
): Fiber | null {
  const newProps = workInProgress.pendingProps;
  switch (workInProgress.tag) {
    // ...
    case HostComponent: {
      if (current !== null && workInProgress.stateNode != null) {
        updateHostComponent(
          current,
          workInProgress,
          type,
          newProps,
          rootContainerInstance,
        );
      } else {
        const instance = createInstance(
          type,
          newProps,
          rootContainerInstance,
          currentHostContext,
          workInProgress,
        );
        appendAllChildren(instance, workInProgress, false, false);
        workInProgress.stateNode = instance;
      }
      bubbleProperties(workInProgress);
      return null;
    }
    // ...
}
createInstance方法调用createElement,createElement通过rootContainerElement.ownerDocument获取到顶层的document对象,然后调用document.createElement新建出真实的dom节点。
export function createElement(
  type: string,
  props: Object,
  rootContainerElement: Element | Document | DocumentFragment,
  parentNamespace: string,
): Element {
  const ownerDocument: Document = getOwnerDocumentFromRootContainer(
    rootContainerElement,
  );
  // ...
  domElement = ownerDocument.createElement(type);
  // ...
  return domElement;
}
appendAllChildren本质上就是调用parent.appendChild(node.stateNode)
appendAllChildren = function(
  parent: Instance,
  workInProgress: Fiber,
  needsVisibilityToggle: boolean,
  isHidden: boolean,
) {
  let node = workInProgress.child;
  while (node !== null) {
    // ...
    appendInitialChild(parent, node.stateNode);
    // ...
    node = node.sibling;
  }
};
函数调用栈不断出栈,我们又会回到performUnitOfWork中。随着我们不断将workInProgress设为父节点,最终workInProgress会变成null,退出renderRootSync,回到performConcurrentWorkOnRoot,调用函数finishConcurrentRender,自此进入commit阶段。
function performConcurrentWorkOnRoot(root, didTimeout) {
  // ...
  finishConcurrentRender(root, exitStatus, lanes);
  // ...
}
commit阶段具体实现
这个函数会调用commitRoot方法,再调用到commitRootImpl。
function finishConcurrentRender(root, exitStatus, lanes) {
  commitRoot(
    root,
    workInProgressRootRecoverableErrors,
    workInProgressTransitions,
  );
}
commitRootImpl先调用commitMutationEffects,再修改root.current指针指向,至此,current fiber和workInProgressFiber实现了调换。
function commitRootImpl(
  root: FiberRoot,
  recoverableErrors: null | Array<CapturedValue<mixed>>,
  transitions: Array<Transition> | null,
  renderPriorityLevel: EventPriority,
) {
  // ...
  const finishedWork = root.finishedWork;
  commitMutationEffects(root, finishedWork, lanes);
  root.current = finishedWork;
  // ...
  return null;
}
可以看出commitMutationEffects一定做了什么,让构建出的真实dom节点被挂载在了页面上。
commitMutationEffects主要就是调用了commitMutationEffectsOnFiber,而commitMutationEffectsOnFiber调用recursivelyTraverseMutationEffects删除多余节点并找到了最小的更新树,调用commitReconciliationEffects完成了dom节点的更新。
function commitMutationEffectsOnFiber(
  finishedWork: Fiber,
  root: FiberRoot,
  lanes: Lanes,
) {
  const current = finishedWork.alternate;
  const flags = finishedWork.flags;
  switch (finishedWork.tag) {
    case FunctionComponent:
    case ForwardRef:
    case MemoComponent:
    case SimpleMemoComponent:=
    case HostRoot: {
      recursivelyTraverseMutationEffects(root, finishedWork, lanes);
      commitReconciliationEffects(finishedWork);
      // ...
    }
    // ...
}
function recursivelyTraverseMutationEffects(
root: FiberRoot,
parentFiber: Fiber,
lanes: Lanes,
) {
// 删除dom节点
const deletions = parentFiber.deletions;
if (deletions !== null) {
for (let i = 0; i < deletions.length; i++) {
const childToDelete = deletions[i];
commitDeletionEffects(root, parentFiber, childToDelete);
}
}
// 如果subTreeFlags大于0,说明这不是更新的最小子树
// 循环调用直到找到最小子树再调用
if (parentFiber.subtreeFlags & MutationMask) {
let child = parentFiber.child;
while (child !== null) {
commitMutationEffectsOnFiber(child, root, lanes);
child = child.sibling;
}
}
}function commitReconciliationEffects(finishedWork: Fiber) {
const flags = finishedWork.flags;
if (flags & Placement) {
commitPlacement(finishedWork);
// 更新完就可以把之前的标记删掉了
finishedWork.flags &= ~Placement;
}
}其实可以看出,无论是什么元素类型,核心操作都是通过getHostSibling找到要插入位置的后一位元素,如果插入位置本身就是最后一位,那就调用parent.appendChild方法,如果不是最后一位,就调用before.insertBefore方法。
function commitPlacement(finishedWork: Fiber): void {
  if (!supportsMutation) {
    return;
  }
  const parentFiber = getHostParentFiber(finishedWork);

  switch (parentFiber.tag) {
    case HostComponent: {
      const parent: Instance = parentFiber.stateNode;
      // ...
      const before = getHostSibling(finishedWork);
      insertOrAppendPlacementNode(finishedWork, before, parent);
      break;
    }
    case HostRoot:
    case HostPortal: {
      const parent: Container = parentFiber.stateNode.containerInfo;
      const before = getHostSibling(finishedWork);
      insertOrAppendPlacementNodeIntoContainer(finishedWork, before, parent);
      break;
    }
    // ...
  }
}
getHostSibling的逻辑简而言之就是找到右兄弟节点中第一个没有被标记为Placement的元素,如果兄弟节点没有那就往祖先节点找,如果组件节点是hostXXX或者找到root节点还没有的话就返回空值。如果返回值不为空就执行insertBefore,为空就执行appendChild。
function getHostSibling(fiber: Fiber): ?Instance {
  let node: Fiber = fiber;
  siblings: while (true) {
    while (node.sibling === null) {
      if (node.return === null || isHostParent(node.return)) {
        // If we pop out of the root or hit the parent the fiber we are the
        // last sibling.
        return null;
      }
      node = node.return;
    }
    node.sibling.return = node.return;
    node = node.sibling;
    // ...
    if (!(node.flags & Placement)) {
      return node.stateNode;
    }
  }
}
三、总结
总结来看,react渲染流程如下:
- createRoot创建root与current hostRoot
- 调用render从上往下构建出workInProgress fiber,从下往上挂载真实的dom节点
- 挂载完所有dom节点后,进入commit阶段,调用document.appendChild将workInHostRoot对应的stateNode挂载在页面中,修改root.current,时current树和workInProgress树交换
- 用户事件触发重新渲染,由diff算法更新fiber、打上标签,从下往上更新真实的dom节点
- 更新完所有dom节点后,进入commit阶段,在commit阶段会处理真实dom节点的顺序变更与删除。


 1026
1026

 被折叠的 条评论
为什么被折叠?
被折叠的 条评论
为什么被折叠?
 到【灌水乐园】发言


