


一、概述
vitrualList--虚拟列表,是前端性能优化的一个重要实现,其原理为动态渲染视口范围内的可见元素,视口范围外的元素以空白view作为占位符,以保证正确的高度。为了优化滚动体验,react-native会在视口范围外的上下预渲染一部分元素;为了使滚动到顶部有更好的性能,页首元素将始终保存在内存中。
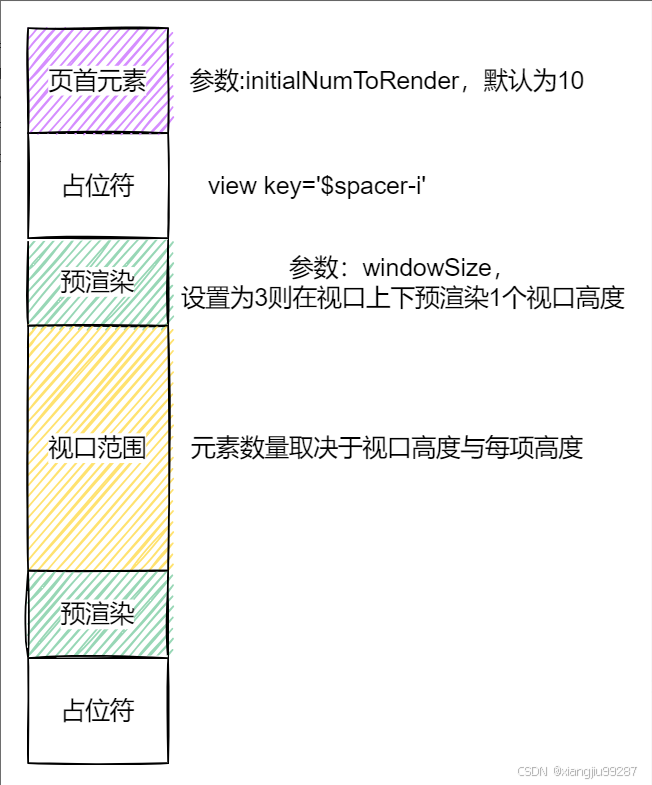
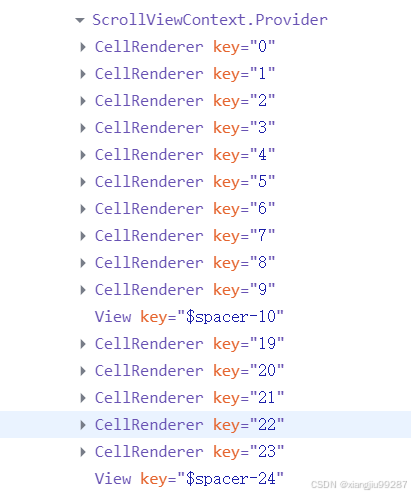
利用react-devtools验证,可以看到key0-key9是页首元素,key19-key23是预渲染+视口元素,view为占位符。
二、源码解析
为了了解元素是如何渲染的,我们需要查看VirtualizedList.js下render()函数的源码。
  render(): React.Node {
    ...
    // 1. Add cell for ListHeaderComponent
    ...
    // 2a. Add a cell for ListEmptyComponent if applicable
    ...

    // 2b. Add cells and spacers for each item
    if (itemCount > 0) {
      ...

      const renderRegions = this.state.renderMask.enumerateRegions();
      ...

      for (const section of renderRegions) {
        if (section.isSpacer) {
          ...
          cells.push(
            <View
              key={`$spacer-${section.first}`}
              style={{[spacerKey]: spacerSize}}
            />,
          );
        } else {
          this._pushCells(
            cells,
            stickyHeaderIndices,
            stickyIndicesFromProps,
            section.first,
            section.last,
            inversionStyle,
          );
        }
      }

      ...
    }

    // 3. Add cell for ListFooterComponent
    ...

    // 4. Render the ScrollView
    ...
    const innerRet = (
      <VirtualizedListContextProvider
      ...
      >
        {React.cloneElement(
          (
            this.props.renderScrollComponent ||
            this._defaultRenderScrollComponent
          )(scrollProps),
          {
            ref: this._captureScrollRef,
          },
          cells,
        )}
      </VirtualizedListContextProvider>
    );
    let ret: React.Node = innerRet;
    ...
    return ret;
  }
概括下来可以分为以下几步:
1. 添加列表头组件
2a. 添加列表为空的组件
2b. 添加列表不为空时的组件与占位符(重点关注)
3. 添加列表尾组件
4. 渲染ScrollView,传入了一系列方法,当触发相应事件时会重新计算、渲染元素。
可以看到,当列表不为空时,通过遍历renderRegions,根据其每一项的isSpacer属性来判断添加组件还是占位符。所以我们需要对于renderMask做进一步的研究。
1. 初始化
this.state在初始化时调用了静态方法_createRenderMask。
this.state = {
      ...
      renderMask: VirtualizedList._createRenderMask(props, initialRenderRegion),
      ...
  }
_createRenderMask方法核心就是创建了renderMask并且调用了addCells方法。
  static _createRenderMask(
    props: Props,
    cellsAroundViewport: {first: number, last: number},
    additionalRegions?: ?$ReadOnlyArray<{first: number, last: number}>,
  ): CellRenderMask {
    ...
    const renderMask = new CellRenderMask(itemCount);

    if (itemCount > 0) {
      const allRegions = [cellsAroundViewport, ...(additionalRegions ?? [])];
      for (const region of allRegions) {
        renderMask.addCells(region);
      }

      if (props.initialScrollIndex == null || props.initialScrollIndex <= 0) {
        const initialRegion = VirtualizedList._initialRenderRegion(props);
        renderMask.addCells(initialRegion);
      }

      ...
    }

    return renderMask;
  }
CellRenderMask()构造器初始化了regions数组,并把列表的每一项都初始化为占位符。
  constructor(numCells: number) {
    ...
    if (numCells === 0) {
      this._regions = [];
    } else {
      this._regions = [
        {
          first: 0,
          last: numCells - 1,
          isSpacer: true,
        },
      ];
    }
  }
addCells方法根据cells的首尾高度来更新regions。
  addCells(cells: {first: number, last: number}): void {
    ...
    // 二分查找cell所属region的首尾
    const [firstIntersect, firstIntersectIdx] = this._findRegion(cells.first);
    const [lastIntersect, lastIntersectIdx] = this._findRegion(cells.last);

    ...
    // 我们需要用1-3个region替换现有的region
    // 头部占位符
    const newLeadRegion: Array<CellRegion> = [];
    // 尾部占位符
    const newTailRegion: Array<CellRegion> = [];
    // 渲染组件
    const newMainRegion: CellRegion = {
      ...cells,
      isSpacer: false,
    };

    // 合并策略
    if (firstIntersect.first < newMainRegion.first) {
      if (firstIntersect.isSpacer) {
        newLeadRegion.push({
          first: firstIntersect.first,
          last: newMainRegion.first - 1,
          isSpacer: true,
        });
      } else {
        newMainRegion.first = firstIntersect.first;
      }
    }

    if (lastIntersect.last > newMainRegion.last) {
      if (lastIntersect.isSpacer) {
        newTailRegion.push({
          first: newMainRegion.last + 1,
          last: lastIntersect.last,
          isSpacer: true,
        });
      } else {
        newMainRegion.last = lastIntersect.last;
      }
    }

    const replacementRegions: Array<CellRegion> = [
      ...newLeadRegion,
      newMainRegion,
      ...newTailRegion,
    ];
    const numRegionsToDelete = lastIntersectIdx - firstIntersectIdx + 1;
    // 用新region替换旧region
    this._regions.splice(
      firstIntersectIdx,
      numRegionsToDelete,
      ...replacementRegions,
    );
  }
画个图理解一下,初始化时,整个列表被划为一个region,所以首次找到的firstIntersect和lastIntersect其实都指向整个列表。
由于合并策略是如果firstIntersect是占位符,就将其拆分为newMainRegion和newLeadRegion,否则直接用newMainRegion代替,尾部同理。
所以经过一次移动后,region的变化如下。
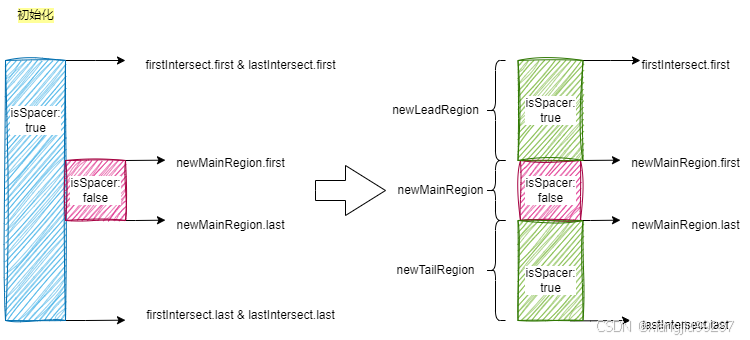
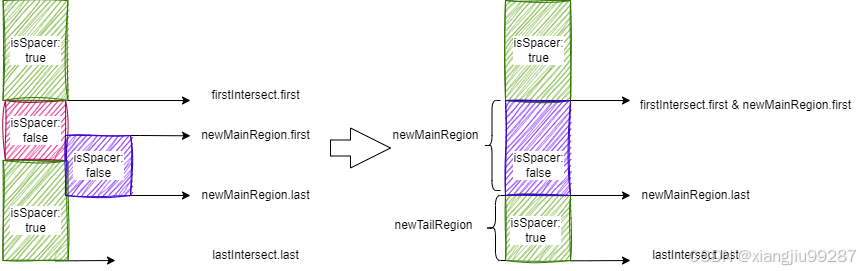
如果firstIntersect不是占位符,则更新结果如下
我们回退到_createRenderMask方法看一下addCell传入的newMainRegion都由哪些部分组成.
const allRegions = [cellsAroundViewport, ...(additionalRegions ?? [])];
for (const region of allRegions) {
   renderMask.addCells(region);
}

if (props.initialScrollIndex == null || props.initialScrollIndex <= 0) {
   const initialRegion = VirtualizedList._initialRenderRegion(props);
   renderMask.addCells(initialRegion);
}
可以发现是由cellsAroundViewport、additionalRegions和initialRegions组成。
this.state在初始化时只传入了initalRenderRegion作为cellsAroundViewPort的值,也就是说在初始化时newMainRegion只由initialRegions组成。
我们来看一下initialRenderRegion。
  const initialRenderRegion = VirtualizedList._initialRenderRegion(props);

  static _initialRenderRegion(props: Props): {first: number, last: number} {
    const itemCount = props.getItemCount(props.data);

    const firstCellIndex = Math.max(
      0,
      Math.min(itemCount - 1, Math.floor(props.initialScrollIndex ?? 0)),
    );

    const lastCellIndex =
      Math.min(
        itemCount,
        firstCellIndex + initialNumToRenderOrDefault(props.initialNumToRender),
      ) - 1;

    return {
      first: firstCellIndex,
      last: lastCellIndex,
    };
  }
可以看出,当设定了initialScrollIndex时,first为其和列表长度-1的较小值,否则为0。last为initialNumberToRender+first,initialNumberToRender默认为10。
所以在没有设置initialScrollIndex和initialNumberToRender时,其实就是默认渲染列表头十个元素。
2. 滚动
根据render方法,可以找到需要向ScrollView组件传入的scrollProps, scrollProps中onScroll事件的回调函数为this._onScroll。
  render(): React.Node {
    ...
    const scrollProps = {
      ...
      onScroll: this._onScroll,
      ...
    };
    const innerRet = (
      <VirtualizedListContextProvider
        ...
        >
        {React.cloneElement(
          (
            this.props.renderScrollComponent ||
            this._defaultRenderScrollComponent
          )(scrollProps),
          {
            ref: this._captureScrollRef,
          },
          cells,
        )}
      </VirtualizedListContextProvider>
    );
    ...
  }
_onScroll方法里有一些调用回调函数和触发子列表事件的逻辑,涉及到本列表的核心逻辑其实只有调用_scheduleCellsToRenderUpdate方法。
  _onScroll = (e: Object) => {
    ...
    this._scheduleCellsToRenderUpdate();
  };
再看_scheduleCellsToRenderUpdate,这个方法调用了_updateCellsToRender。
  _scheduleCellsToRenderUpdate() {
    if (
      ...
    ) {
      ...
      this._updateCellsToRender();
      return;
    }...
  }
在_updateCellsToRender中,更新了cellsAroundViewport和renderMask,先来看看cellsAroundViewport如何更新的。
  _updateCellsToRender = () => {
    ...
    this.setState((state, props) => {
      const cellsAroundViewport = this._adjustCellsAroundViewport(
        props,
        state.cellsAroundViewport,
        state.pendingScrollUpdateCount,
      );
      const renderMask = VirtualizedList._createRenderMask(
        props,
        cellsAroundViewport,
        this._getNonViewportRenderRegions(props),
      );
      ...
      return {cellsAroundViewport, renderMask};
    });
  };
在_adjustCellsAroundViewport中调用computeWindowedRenderLimits方法计算出新的viewport。
_adjustCellsAroundViewport(
props: Props,
cellsAroundViewport: {first: number, last: number},
pendingScrollUpdateCount: number,
): {first: number, last: number} {
...
newCellsAroundViewport = computeWindowedRenderLimits(
props,
maxToRenderPerBatchOrDefault(props.maxToRenderPerBatch),
windowSizeOrDefault(props.windowSize),
cellsAroundViewport,
this._listMetrics,
this._scrollMetrics,
);
...
return newCellsAroundViewport;
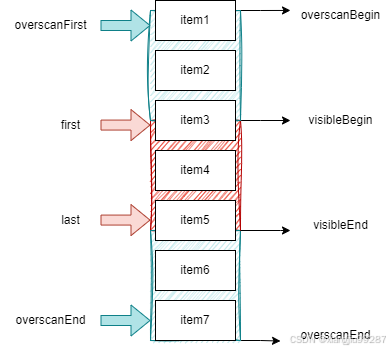
}computeWindowedRenderLimits是确定可视范围的核心。以maxToRenderPerBatch和windowSize作为约束条件,来确定可视区域的上下界,会以滚动方向作为偏好,来确定更多的扩展下方cell还是上方cell。
export function computeWindowedRenderLimits(
props: CellMetricProps,
maxToRenderPerBatch: number,
windowSize: number,
prev: {
first: number,
last: number,
},
listMetrics: ListMetricsAggregator,
scrollMetrics: {
dt: number,
offset: number,
velocity: number,
visibleLength: number,
zoomScale: number,
...
},
): {
first: number,
last: number,
} {
...
const {offset, velocity, visibleLength, zoomScale = 1} = scrollMetrics;
// 可见区域起始坐标
const visibleBegin = Math.max(0, offset);
// 可见区域结束坐标
const visibleEnd = visibleBegin + visibleLength;
// 预渲染长度
const overscanLength = (windowSize - 1) * visibleLength;
// 上下预渲染比例
const leadFactor = 0.5;
const fillPreference =
velocity > 1 ? 'after' : velocity < -1 ? 'before' : 'none';
// 预渲染区域起始坐标
const overscanBegin = Math.max(
0,
visibleBegin - (1 - leadFactor) * overscanLength,
);
// 预渲染区域结束坐标
const overscanEnd = Math.max(0, visibleEnd + leadFactor * overscanLength);
...
// 找到可见/预渲染起始坐标对应元素的起始下标,和可见/预渲染结束坐标对应元素的结束下标
let [overscanFirst, first, last, overscanLast] = elementsThatOverlapOffsets(
[overscanBegin, visibleBegin, visibleEnd, overscanEnd],
props,
listMetrics,
zoomScale,
);
...
const visible = {first, last};
// 改变的cell数目 = 新cell数目 - 新旧cell重合数目
let newCellCount = newRangeCount(prev, visible);
// 根据向前/向后滑动的倾向来向前/向后扩展cell直到达到上限
// 上限是可视区域与预渲染区域重合/改变cell数目达到批处理最大限制
while (true) {
// 当计算的可视区域与预渲染区域重叠时跳出循环
if (first <= overscanFirst && last >= overscanLast) {
break;
}
// 改变cell数目达到上限
const maxNewCells = newCellCount >= maxToRenderPerBatch;
// 起始下标改变更多
const firstWillAddMore = first <= prev.first || first > prev.last;
// 起始下标需要前移
const firstShouldIncrement =
first > overscanFirst && (!maxNewCells || !firstWillAddMore);
// 结束下标改变更多
const lastWillAddMore = last >= prev.last || last < prev.first;
// 结束下标需要后移
const lastShouldIncrement =
last < overscanLast && (!maxNewCells || !lastWillAddMore);
// 当改变的cell数目达到批处理上限时跳出循环
if (maxNewCells && !firstShouldIncrement && !lastShouldIncrement) {
break;
}
if (
firstShouldIncrement &&
!(fillPreference === 'after' && lastShouldIncrement && lastWillAddMore)
) {
if (firstWillAddMore) {
newCellCount++;
}
first--;
}
if (
lastShouldIncrement &&
!(fillPreference === 'before' && firstShouldIncrement && firstWillAddMore)
) {
if (lastWillAddMore) {
newCellCount++;
}
last++;
}
}
...
return {first, last};
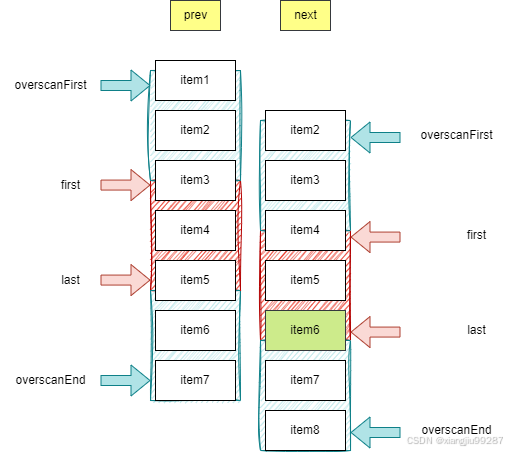
}画图理解一下:
elementsThatOverlapOffsets方法的目的是实现坐标->下标的转换。
newCellCount计算的是后一次新增的cell数目,如下情况只有Item6是新增cell,newCellCount = 1。
那么,最终返回的视口元素和直接由坐标转换而来的视口元素会有什么不同呢?什么情况下会调出循环?
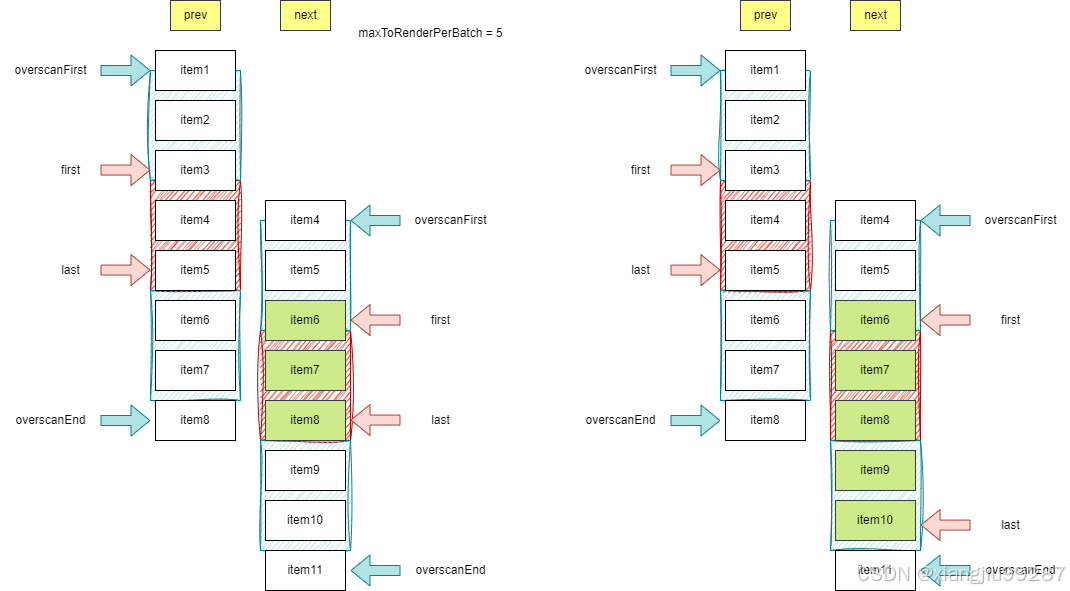
假设一次更新的最大数量maxPerBatch为5。
情况一(由于批处理元素达到上限跳出循环):
当前视口元素与之前视口元素完全不重合,改变的cell数目newCellCount = 3,所以maxNewCells = false。
由于first < prev.last,firstWillAddMore = true。
由于first > overscanFirst 且 maxNewCells = false,firstShouldIncrement = true。
由于last >= prev.last,lastWillAddMore = true。
由于lst < overscanLast 且 maxNewCells = false,lastShouldIncrement = true。
由于向下滑动,fillPreference === ‘after’,由此得出前三个if语句为false,后两个if语句为true,将会执行两次newCellCount++和last++。此后maxNewCells = true, firstShouldIncrement和lastShouldIncrement=false,跳出循环。
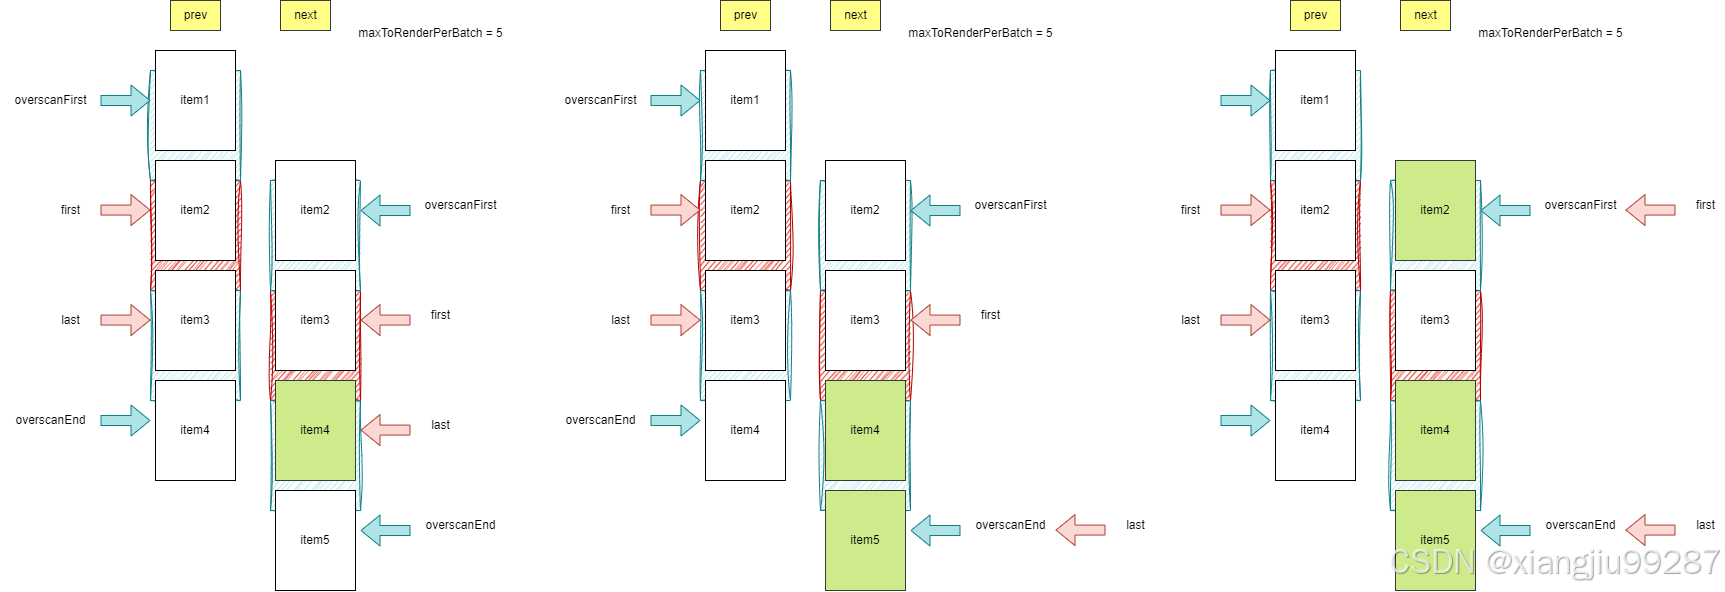
情况二(由于视口元素和预渲染元素重合跳出循环):
| 初始化 | 第二次 | 第三次 | |
| maxNewCells | false | false | false |
| firstWillAddMore | false | false | false |
| firstShouldIncrement | true | true | true |
| lastWillAddMore | true | true | true |
| lastShouldIncrement | true | false | false |
| fillPreference | after | after | after |
看完cellAroundViewport后,接下来看一下renderMask,这里需要关注一下_getNonViewportRenderRegions方法,他的返回值会作为additionalRegions的值,在列表中被渲染。
const renderMask = VirtualizedList._createRenderMask(
  props,
  cellsAroundViewport,
  this._getNonViewportRenderRegions(props),
);
_getNonViewportRenderRegions方法其实就是lastFocusCell上下各渲染1个viewport的元素,以支持随机导航,减少空白发生的情况。
  _getNonViewportRenderRegions = (
    props: CellMetricProps,
  ): $ReadOnlyArray<{
    first: number,
    last: number,
  }> => {
    // 在上次focus的元素上下各渲染1个viewport的元素,以支持随机导航
    ...

    const lastFocusedCellRenderer = this._cellRefs[this._lastFocusedCellKey];
    const focusedCellIndex = lastFocusedCellRenderer.props.index;
    const itemCount = props.getItemCount(props.data);

    ...

    let first = focusedCellIndex;
    let heightOfCellsBeforeFocused = 0;
    for (
      let i = first - 1;
      i >= 0 && heightOfCellsBeforeFocused < this._scrollMetrics.visibleLength;
      i--
    ) {
      first--;
      heightOfCellsBeforeFocused += this._listMetrics.getCellMetricsApprox(
        i,
        props,
      ).length;
    }

    let last = focusedCellIndex;
    let heightOfCellsAfterFocused = 0;
    for (
      let i = last + 1;
      i < itemCount &&
      heightOfCellsAfterFocused < this._scrollMetrics.visibleLength;
      i++
    ) {
      last++;
      heightOfCellsAfterFocused += this._listMetrics.getCellMetricsApprox(
        i,
        props,
      ).length;
    }

    return [{first, last}];
  };
由于在_createRenderMask方法中还会额外渲染initialRegion,所以滑动后会渲染的元素有:视口元素、上一次focus元素周围的元素、页首元素。
for (const region of allRegions) {
  renderMask.addCells(region);
}

if (props.initialScrollIndex == null || props.initialScrollIndex <= 0) {
  const initialRegion = VirtualizedList._initialRenderRegion(props);
  renderMask.addCells(initialRegion);
}
三、总结
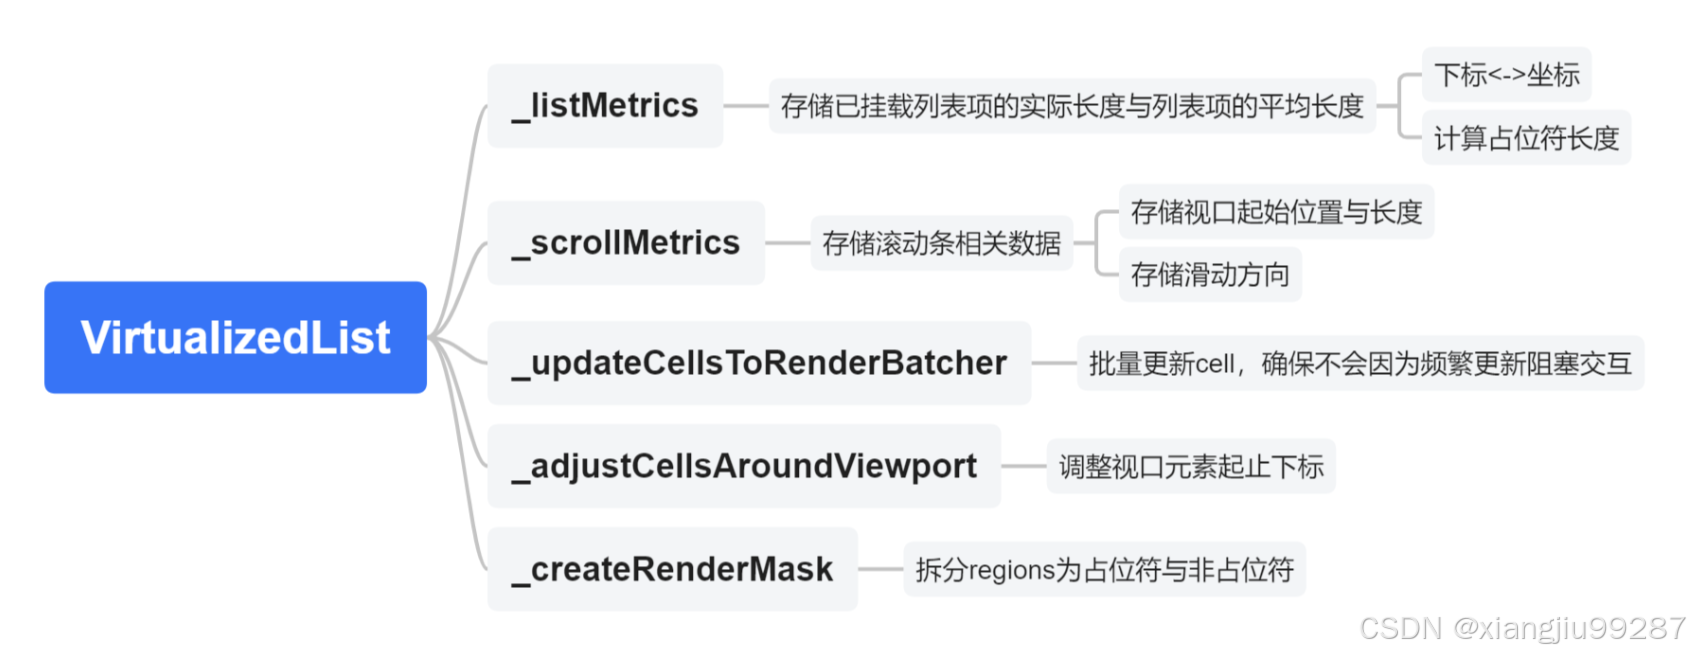
总结来看,虚拟列表的关键数据结构包含以下几个方面。
通过_scrollMetrics,得到视口的相关数据,计算出视口元素的起止下标并且更新。
根据视口元素的起止下标与页首的10个元素,拆分出占位符元素和非占位符元素。
占位符元素的长度由_listMetrics记录,对于曾挂载元素,以实际长度为准,未挂载元素以平均长度为准。
当存在高优先级render时,新增的render将会在交互完成后再执行,避免由于渲染阻塞交互。
以上就是本次探讨的全部内容,如有错漏,还请斧正。


 3061
3061

 被折叠的 条评论
为什么被折叠?
被折叠的 条评论
为什么被折叠?
 到【灌水乐园】发言


