


Title: 三维点云深度网络 PointNeXt 的安装配置与测试
文章目录
关联博文
[1] 三维点云深度网络 PointNeXt 的安装配置与测试 ⇐ \qquad \Leftarrow ⇐ 本篇
[2] 三维点云深度网络 PointNeXt 源码阅读 (I) —— 注册机制与参数解析
[3] 三维点云深度网络 PointNeXt 源码阅读 (II) —— 点云数据集构造与预处理
[4] 三维点云深度网络 PointNeXt 源码阅读 (III) —— 骨干网络模型
[5] 三维点云深度网络 PointNeXt 源码阅读 (IV) —— PointNeXt-B
前言
PointNet (2016年) 和 PointNet++ (2017年) 实现了三维点云的部件分割、目标分类、场景语义解析, 是深度神经网络应用于三维点云理解的开山之作.
PointNeXt (2022年, the neXt version PointNet) 是在前辈基础上的优化, 提出了训练策略的优化和网络结构的优化, 旨在进一步提升对三维点云理解的性能.
PoinrNet/PointNet++ 的 Pytorch 版本: https://github.com/yanx27/Pointnet_Pointnet2_pytorch
PointNeXt: https://github.com/guochengqian/PointNeXt
这篇博文仅简单记录一下 PointNeXt 安装配置中的踩坑过程.
I. 环境创建
1. 容器创建
先按照之前博客 “Docker 环境下 3D Guassian Splatting 的编译和配置” 中步骤建立 Docker 容器.
拉取 Ubuntu 20 镜像, 系统版本由后面安装的 Cuda 编译器版本决定.
docker pull ubuntu:focal
创建容器
docker run -it  -d -p 8889:8888 -p 6007:6006 -p 8023:22 \
			--gpus all --ipc=host --name pointnext \
			-v /home/robot/working_space/python/pytorch:/workspace \
			--workdir=/workspace -e DISPLAY=unix$DISPLAY \
			-v /tmp/.X11-unix:/tmp/.X11-unix:rw \
			-e NVIDIA_DRIVER_CAPABILITIES=all ubuntu:focal  /bin/bash
注意宿主机的端口不可以重复绑定, 要与其他容器 (如 gaussian_splatting) 中绑定端口号有区别. 容器名字 pointnext, 容器镜像 ubuntu:focal.
2. 容器中安装 CUDA Toolkit 11.3
PointNeXt 提示 “Cuda-11.3 is required”.
wget https://developer.download.nvidia.com/compute/cuda/11.3.0/local_installers/cuda_11.3.0_465.19.01_linux.run
sh cuda_11.3.0_465.19.01_linux.run
记得 “安装驱动 driver” 选项要取消, 因为宿主机中已安装 Nvidia 驱动程序了.
查看是否安装成功.
nvcc --version
CUDA 11.3 编译器在后面安装 torch_scatter 时会用到.
II. 安装过程
1. 安装 PointNeXt
按照 PointNeXt readme 指引操作.
git clone --recurse-submodules git@github.com:guochengqian/PointNeXt.git
cd PointNeXt
source update.sh
source install.sh
安装过程因为环境问题会遇到如下问题.
问题一. undefined symbol: iJIT_NotifyEvent
参考网友处理方法执行.
conda install mkl=2022.0
因为 PointNeXt 是 2022 年发表, 故试了该版本. 如选其他版本(如 2024、2020 等)安装提示都有问题.
2. 解决安装问题
试运行 PointNeXt:
CUDA_VISIBLE_DEVICES=0,1 python examples/segmentation/main.py \
					--cfg cfgs/s3dis/pointnext-s.yaml  mode=train
提示错误如下:
问题二.
Traceback (most recent call last):
File “examples/segmentation/main.py”, line 13, in
from torch_scatter import scatter
ModuleNotFoundError: No module named ‘torch_scatter’
解决方法:
pip install torch_scatter
安装 torch_scatter 前, 需已经安装正确版本的 mkl. 另外, conda 包管理器则不含 torch_scatter 安装包.
再次试运行 PointNeXt, 遇见新的错误.
问题三. ModuleNotFoundError: No module named ‘pointnet2_batch_cuda’
参考网友博文可知, 需要编译安装 pointnet2_batch_cuda.
切换到 openpoint 对应文件夹下, 运行安装命令.
cd openpoints/cpp/pointnet2_batch
python setup.py install
再次试运行 PointNeXt, 遇见新的错误.
问题四. ModuleNotFoundError: No module named ‘chamfer’
老办法安装一下.
pip install chamfer
持续下去, 直到不再遇见缺少模块安装的问题.
III. 数据准备
1. 数据准备的执行
直接下载网友搬运来的 S3DIS 数据库的压缩文件 Stanford3dDataset_v1.2_Aligned_Version.zip.
但是 S3DIS 看似缺少标注数据, 把注释/标注/标签数据蕴含在 Annotations 文件夹下的各个文件的文件名中了.
例如
Stanford3dDataset_v1.2_Aligned_Version/Area_1/conferenceRoom_1文件夹包含一个完整场景的点云数据及注释.该文件夹下包含的文件
conferenceRoom_1.txt包含这个场景全部点的坐标和颜色, 以 XYZRGB 一行行排列.该文件夹下包含的子文件夹 Annotations 的下面包含的一系列 .txt 文件就是注释/标注文件.
.txt 文件名以 “分类标签_序号.txt” 形式构造, .txt 文件内包含这对应于这个 “分类标签” 的点云数据.
其中
beam_1.txt中就包含了 conferenceRoom_1 这个完整场景中标注为 “beam” 这一类别的点云.其他文件以此类推, 相同的标注分类的不同点云用序号区别, 如
chair_1.txt、chair_2.txt、chair_3.txt等.
另外, PointNeXt 官方给出了适配的数据集的组织形式如下, 与下载的原始数据集完全不同.
data
 |--- S3DIS
        |--- s3disfull
                |--- raw
                      |--- Area_6_pantry_1.npy
                      |--- ...
                |--- processed
                      |--- s3dis_val_area5_0.040.pkl
这就要想到 PointNet/PointNet++ 的数据预处理方法了. 先下载
git clone https://github.com/yanx27/Pointnet_Pointnet2_pytorch.git
将 S3DIS 数据集 Stanford3dDataset_v1.2_Aligned_Version 保存到 Pointnet_Pointnet2_pytorch 的 data/s3dis/ 路径下, 并执行:
cd data_utils
python collect_indoor3d_data.py
预处理后数据保存在 data/stanford_indoor3d/. 这些预处理的数据就是训练 PointNeXt 所需要的.
2. 数据准备的原理
我们简单看一下数据预处理做了什么工作.
/Pointnet_Pointnet2_pytorch/data_utils/collect_indoor3d_data.py 的源代码及注释:
import os
import sys
from indoor3d_util import DATA_PATH, collect_point_label

BASE_DIR = os.path.dirname(os.path.abspath(__file__))  # __file__ 当前 .py 文件所在目录的路径
ROOT_DIR = os.path.dirname(BASE_DIR) # 上一级目录, 即 PointNet++ 文件夹路径
sys.path.append(BASE_DIR) # 加入模块扫描路径

anno_paths = [line.rstrip() for line in open(os.path.join(BASE_DIR, 'meta/anno_paths.txt'))]
# 按行读入 anno_paths.txt 中的标注/注释文件的目录路径, 删除行尾空格换行符号等, 形成列表
anno_paths = [os.path.join(DATA_PATH, p) for p in anno_paths]  # 数据集标注文件所在目录的绝对路径

output_folder = os.path.join(ROOT_DIR, 'data/stanford_indoor3d')
if not os.path.exists(output_folder):
    os.mkdir(output_folder)

# Note: there is an extra character in the v1.2 data in Area_5/hallway_6. It's fixed manually.
for anno_path in anno_paths: # 开始循环, 一次循环完成一个目录(一个完整点云文件)的处理
    print(anno_path)
    try:
        elements = anno_path.split('/')
        out_filename = elements[-3]+'_'+elements[-2]+'.npy' # Area_1_hallway_1.npy 构造输出文件的名称
        collect_point_label(anno_path, os.path.join(output_folder, out_filename), 'numpy')
        # 制造适合学习的数据集, 有数据也有标注. 格式是适合于 pytorch 读取和保存的 .npy 二进制格式
    except:
        print(anno_path, 'ERROR!!')
/Pointnet_Pointnet2_pytorch/data_utils/indoor3d_util.py 的部分源代码及注释:
import numpy as np
import glob
import os
import sys

BASE_DIR = os.path.dirname(os.path.abspath(__file__))
ROOT_DIR = os.path.dirname(BASE_DIR)
sys.path.append(BASE_DIR)

DATA_PATH = os.path.join(ROOT_DIR, 'data','s3dis', 'Stanford3dDataset_v1.2_Aligned_Version')
g_classes = [x.rstrip() for x in open(os.path.join(BASE_DIR, 'meta/class_names.txt'))]
# 标注/注释对应的类别
g_class2label = {cls: i for i,cls in enumerate(g_classes)}  # 注释对应的类别
g_class2color = {'ceiling':	[0,255,0],
                 'floor':	[0,0,255],
                 'wall':	[0,255,255],
                 'beam':        [255,255,0],
                 'column':      [255,0,255],
                 'window':      [100,100,255],
                 'door':        [200,200,100],
                 'table':       [170,120,200],
                 'chair':       [255,0,0],
                 'sofa':        [200,100,100],
                 'bookcase':    [10,200,100],
                 'board':       [200,200,200],
                 'clutter':     [50,50,50]}
g_easy_view_labels = [7,8,9,10,11,1]
g_label2color = {g_classes.index(cls): g_class2color[cls] for cls in g_classes}


# -----------------------------------------------------------------------------
# CONVERT ORIGINAL DATA TO OUR DATA_LABEL FILES
# -----------------------------------------------------------------------------

def collect_point_label(anno_path, out_filename, file_format='txt'):
    """ Convert original dataset files to data_label file (each line is XYZRGBL).
        We aggregated all the points from each instance in the room.

    Args:
        anno_path: path to annotations. e.g. Area_1/office_2/Annotations/
        out_filename: path to save collected points and labels (each line is XYZRGBL)
        file_format: txt or numpy, determines what file format to save.
    Returns:
        None
    Note:
        the points are shifted before save, the most negative point is now at origin.
    """
    points_list = []
    for f in glob.glob(os.path.join(anno_path, '*.txt')):
        # 返回 anno_path 目录下所有 .txt 文件列表, 逐个文件开始循环
        cls = os.path.basename(f).split('_')[0]
        # os.path.basename(f) 为 f 对应文件名, 文件名的第一部分就是注释(标注)信息
        print(f)
        if cls not in g_classes: # note: in some room there is 'staris' class..
            cls = 'clutter'

        points = np.loadtxt(f)
        labels = np.ones((points.shape[0],1)) * g_class2label[cls]
        # 生成每个点对应的标注 L (Label)
        points_list.append(np.concatenate([points, labels], 1)) # Nx7
        # np.concatenate([points, labels], 1) 实现每个点 XYZRGB 后面加上 L, 维度 Nx7
        # 每一个 .txt 生成一个 points_list 列表中的元素

    data_label = np.concatenate(points_list, 0)
    # 把所有 anno_path 目录下的 .txt 文件合并为 data_label 数组
    xyz_min = np.amin(data_label, axis=0)[0:3]
    # 点云分别在 XYZ 三轴上的最小值
    data_label[:, 0:3] -= xyz_min
    # 以最小值为原点, 进行平移

    if file_format=='txt':
        fout = open(out_filename, 'w')
        for i in range(data_label.shape[0]):
            fout.write('%f %f %f %d %d %d %d\n' % \
                          (data_label[i,0], data_label[i,1], data_label[i,2],
                           data_label[i,3], data_label[i,4], data_label[i,5],
                           data_label[i,6]))
        fout.close()
    elif file_format=='numpy':
        np.save(out_filename, data_label)
        # 把数组 data_label 保存到 .npy 二进制文件
    else:
        print('ERROR!! Unknown file format: %s, please use txt or numpy.' % \
            (file_format))
        exit()
IV. 运行测试
1. 显存溢出
以 pointnext-xl.yaml 作为配置文件, 运行
CUDA_VISIBLE_DEVICES=0,1 python examples/segmentation/main.py \
				--cfg cfgs/s3dis/pointnext-xl.yaml  mode=train
遇见内存溢出错误.
RuntimeError: CUDA out of memory. Tried to allocate 434.00 MiB (GPU 0; 23.66 GiB total capacity; 19.15 GiB already allocated; 442.75 MiB free; 19.32 GiB reserved in total by PyTorch) If reserved memory is >> allocated memory try setting max_split_size_mb to avoid fragmentation. See documentation for Memory Management and PYTORCH_CUDA_ALLOC_CONF
故更换其他配置文件测试.
2. 训练
以 pointnext-s.yaml 作为配置文件, 运行
CUDA_VISIBLE_DEVICES=0,1 python examples/segmentation/main.py \
				--cfg cfgs/s3dis/pointnext-s.yaml  mode=train
中间过程中得到训练后的最佳模型.
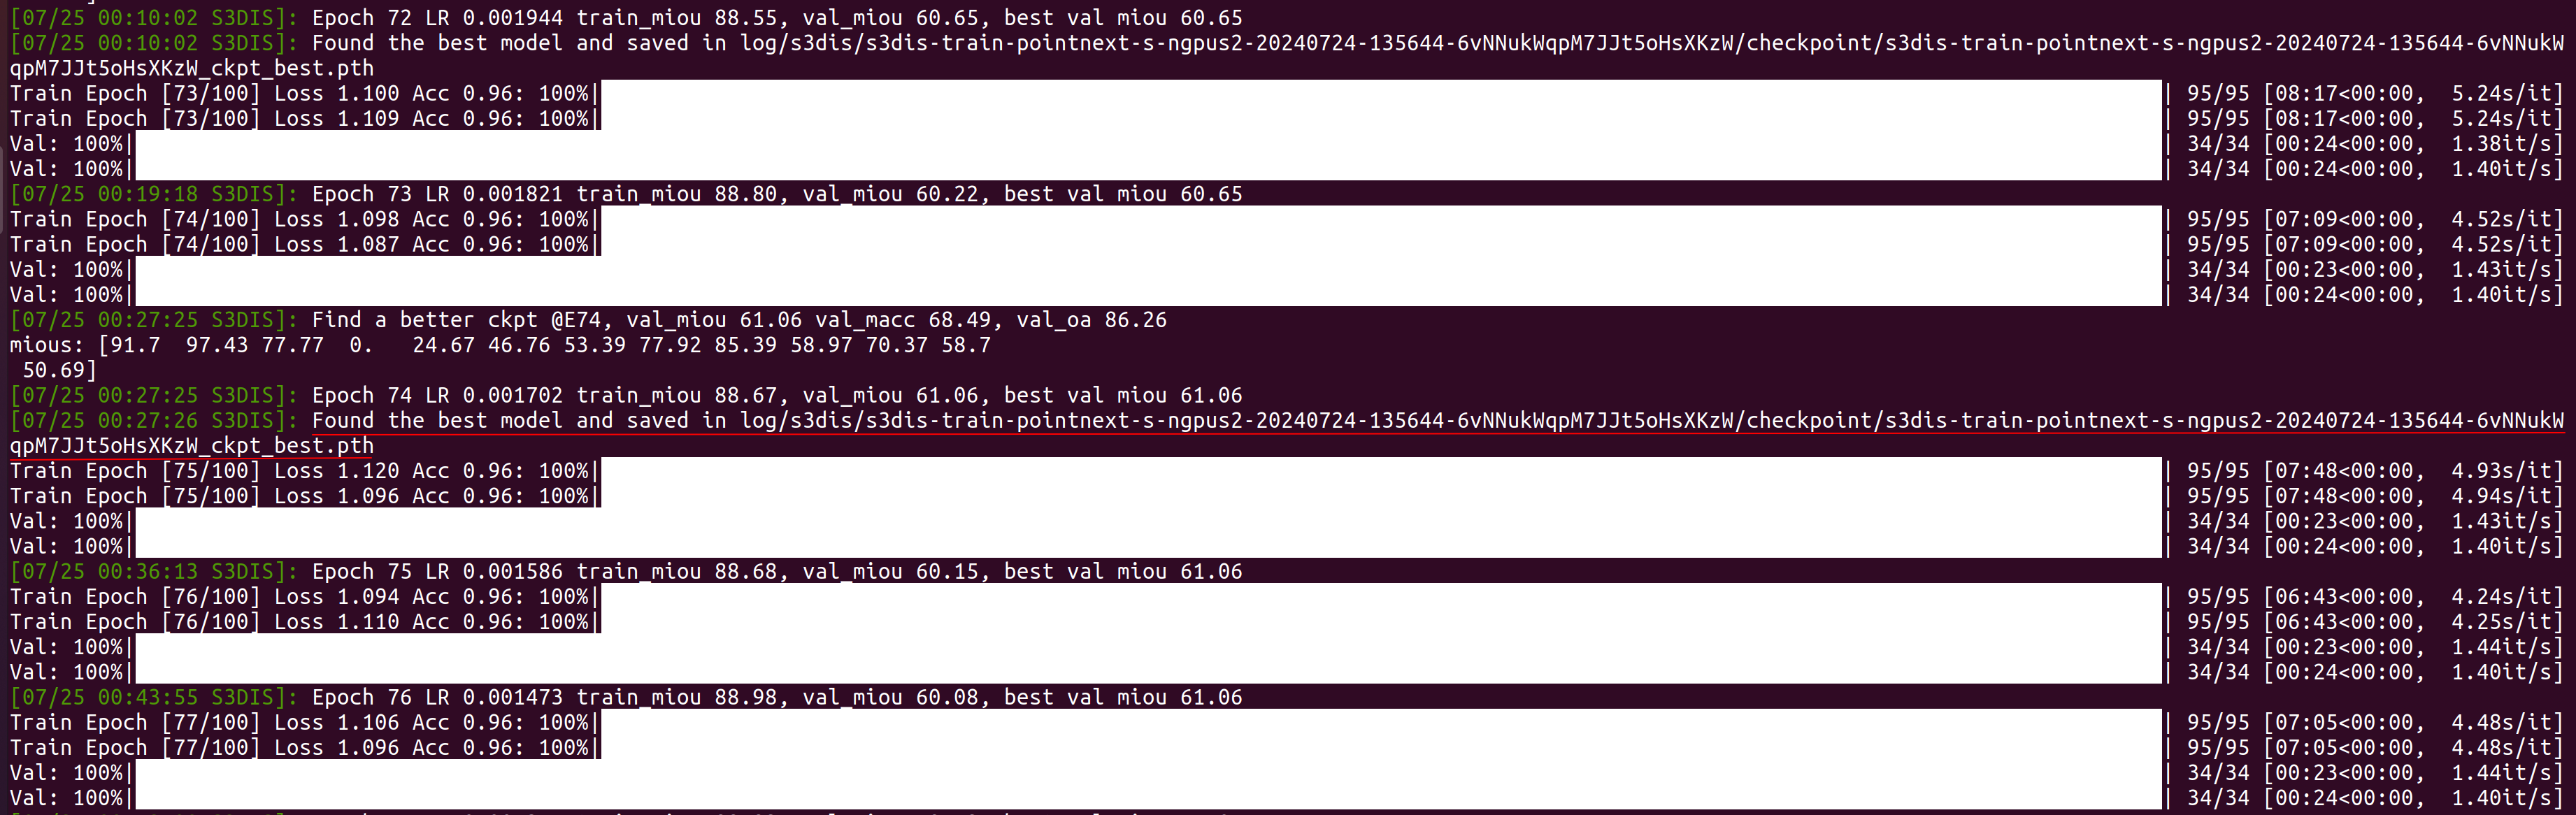
最后训练结束.

期间可以通过
watch -n 1 nvidia-smi
查看 GPU 工作情况.
两块 GeForce RTX 3090 显卡, 训练了将近 14 小时.
3. 测试
利用训练中得到的最佳模型 (预训练模型) 进行验证测试.
CUDA_VISIBLE_DEVICES=0,1 python examples/segmentation/main.py \
				--cfg cfgs/s3dis/pointnext-s.yaml  mode=test \
				--pretrained_path ./log/s3dis/s3dis-train-pointnext-s-ngpus2-20240724-135644-6vNNukWqpM7JJt5oHsXKzW/checkpoint/s3dis-train-pointnext-s-ngpus2-20240724-135644-6vNNukWqpM7JJt5oHsXKzW_ckpt_best.pth

也可利用训练中得到的最佳模型 (预训练模型) 进行带有可视化输出的验证测试.
CUDA_VISIBLE_DEVICES=0,1 bash script/main_segmentation.sh \
		cfgs/s3dis/pointnext-s.yaml wandb.use_wandb=False mode=test \
		--pretrained_path ./log/s3dis/s3dis-train-pointnext-s-ngpus2-20240724-135644-6vNNukWqpM7JJt5oHsXKzW/checkpoint/s3dis-train-pointnext-s-ngpus2-20240724-135644-6vNNukWqpM7JJt5oHsXKzW_ckpt_best.pth \
		visualize=True
测试验证过程中, 会在 /PointNeXt/log/s3dis/s3dis-train-pointnext-s-ngpus2-20240724-135644-6vNNukWqpM7JJt5oHsXKzW/visualization 下生成一堆 .obj 3D 文件.
任意选取其中一个, 如 gt-s3dis-Area5-2.obj, 利用 Meshlab 软件打开, 可以查看可视化结果.
| 视角 | 不同视角下的点云图像 |
|---|---|
| 1. 门口 |  |
| 2. 轴侧 |  |
| 3. 内部 |  |
4. 标注颜色
上面分割测试的可视化结果, 由颜色来表示分类标签. 这里的标注/标签的颜色我们简单绘图对照一下.
import matplotlib.pyplot as plt
import numpy as np

class2color = {'ceiling':     [0, 255, 0],
                'floor':       [0, 0, 255],
                'wall':        [0, 255, 255],
                'beam':        [255, 255, 0],
                'column':      [255, 0, 255],
                'window':      [100, 100, 255],
                'door':        [200, 200, 100],
                'table':       [170, 120, 200],
                'chair':       [255, 0, 0],
                'sofa':        [200, 100, 100],
                'bookcase':    [10, 200, 100],
                'board':       [200, 200, 200],
                'clutter':     [50, 50, 50]}

index = 0
nrows = 4
ncols = 4
fig, axs = plt.subplots(nrows=nrows, ncols=ncols, figsize=(6,8))
for label, color in class2color.items():
    color_img = np.array(color)
    color_img = np.expand_dims(color_img, 0).repeat(5, axis=0)
    color_img = np.expand_dims(color_img, 0).repeat(5, axis=0)
    # 构造颜色块

    axs[index//ncols][index%ncols].imshow(color_img)
    axs[index//ncols][index%ncols].axis("off")
    axs[index//ncols][index%ncols].set_title(label)
    index += 1

while index < 16:
    axs[index//ncols][index%ncols].axis("off")
    index += 1

plt.savefig("color.png")
plt.show()
得到分类标签对应的颜色表.
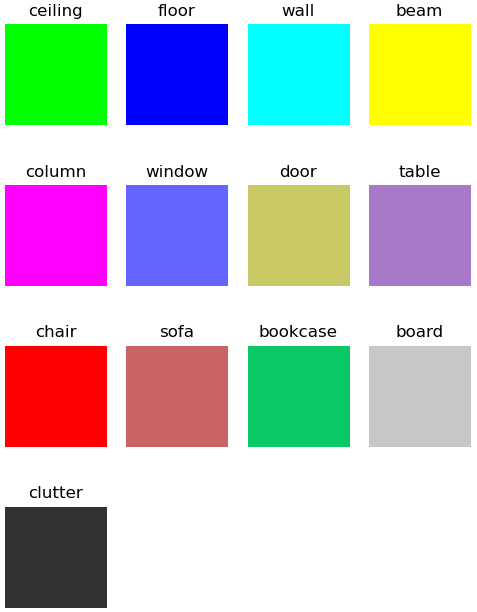
这样对照分类标注/标签颜色表, 打开可视化结果 .obj 文件,可以感受一下 PointNeXt 的对点云的理解与分割能力.
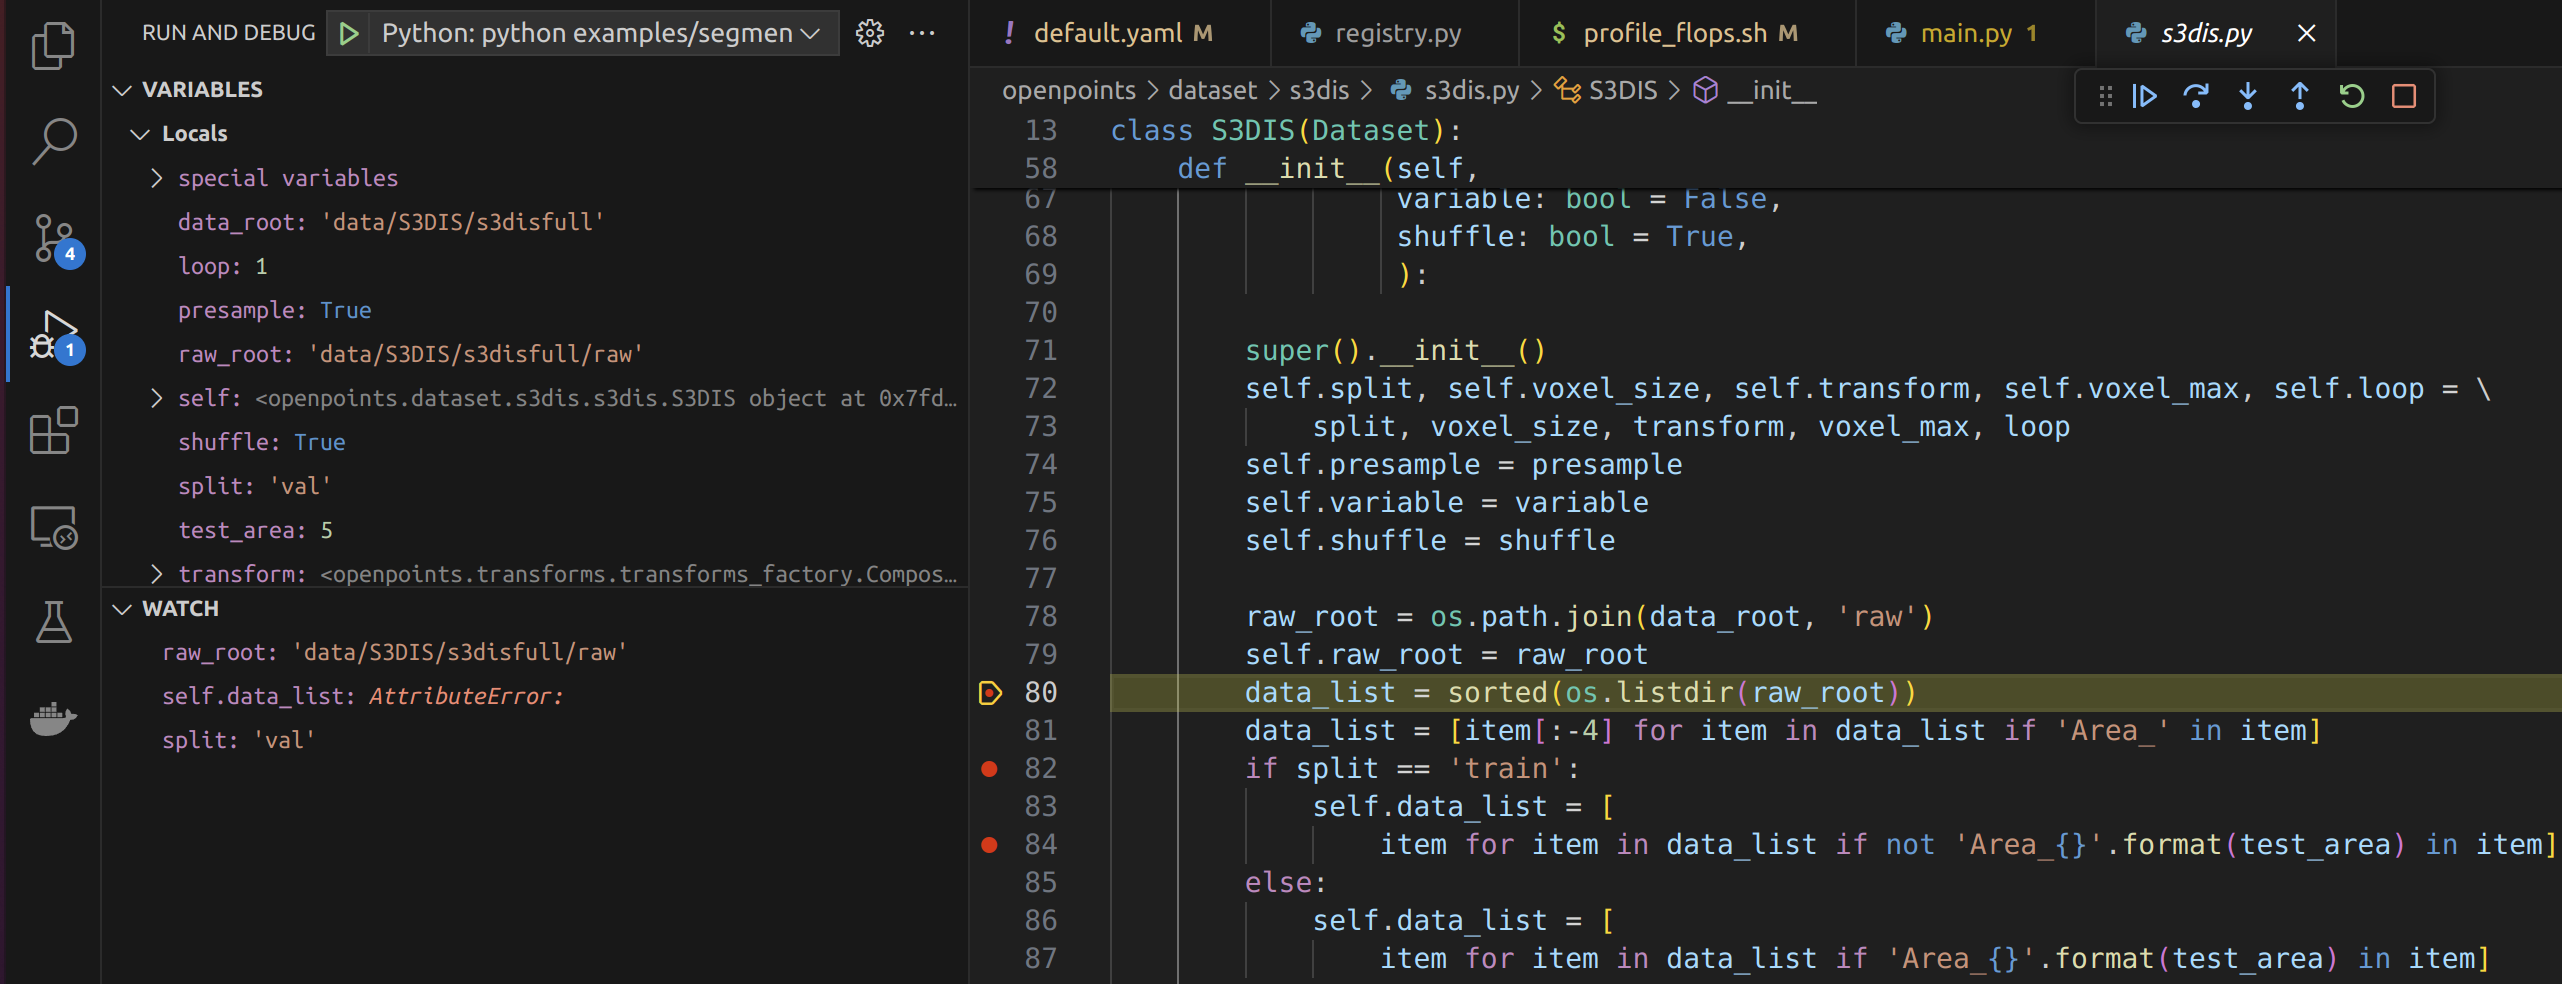
V. 调试配置
宿主机上用 vscode, 打开容器中的 PointNeXt 代码
vscode terminal 中虚拟环境改为 openpoints
conda activate openpoints
ctrl+shift+P, 选择 python 解释器为虚拟环境对应解释器 Python 3.7.12('openpoints') ~/miniforge3/envs/openpoints/bin/python.
我们利用 vpdb 这一给 vscode 自动生成调试配置的工具, 来实现 docker 中 PointNeXt 的跟踪调试设置.
先虚拟环境中安装 vpdb
pip intall vpdb
只需在正常的 Python 命令行前面加上 vpdb, 就可以利用 vpdb 创建调试启动配置用的 .vscode/launch.json 文件.
vpdb CUDA_VISIBLE_DEVICES=0,1 python examples/segmentation/main.py \
					--cfg cfgs/s3dis/pointnext-s.yaml  mode=train
下面就可以愉快地跟踪、调试、学习了.
总结
只是日常踩坑记录, 以备忘.
如有问题请指教.
版权声明:本文为博主原创文章,遵循 CC 4.0 BY 版权协议,转载请附上原文出处链接和本声明。
本文链接:https://blog.youkuaiyun.com/woyaomaishu2/article/details/140701492
本文作者:wzf@robotics_notes


 171
171

 被折叠的 条评论
为什么被折叠?
被折叠的 条评论
为什么被折叠?
 到【灌水乐园】发言


