


 本文详述使用SWIG为C++程序生成Python接口的方法,包括环境搭建、基本使用、参数处理、STL支持等内容。
SWIG是Simplified Wrapper and Interface Generator的缩写,可以用来给C/C++程序生成脚本语言的接口,这样就可以使用脚本语言去调用C/C++程序。本文主要讲述使用SWIG给C++程序生成python3接口。
一 准备
本文使用的的环境是ubuntu16.04.6,系统自带python3.5。安装以下程序,
sudo apt install python3-dev (提供Python.h)
sudo apt install swig (安装swig)
安装完成后查看swig版本,

二 简单例子
首先编写一个简单的类,word.h如下,
#ifndef __WORD_H__
#define __WORD_H__

#include <string>

class word
{
public:
	word(std::string content);
	virtual ~word();

	virtual void updateWord(std::string new_content);
	std::string getWord(void);

private:
	std::string m_content;
};

#endif
word.cpp如下,
#include "word.h"


word::word(std::string content) : m_content(content)
{
}

word::~word()
{}

void word::updateWord(std::string new_content)
{
	m_content = new_content;
}

std::string word::getWord(void)
{
	return m_content;
}
然后编写swig的输入文件example.i,
/*--- File: example.i ---*/
%module example
%{
#include "word.h"
%}

%include "std_string.i"
%include "word.h"
下面是简单解释,
- 第一行是注释,表示文件名字
- 第二行表示模块名字叫example,后面使用python调用模块时就是import这个模块名
- %{…%}里包含的是要被wrap的C/C++函数、类或者变量的声明,也可以使用头文件,因为头文件里一般都是声明,这部分内容会被直接拷贝到swig生成的wrap文件里
- 最后2行的%include是swig的专有指令,std_string.i是用来处理C++的string类,而出现的word.h,是用来告诉swig对word.h里声明的内容进行分析并生成对应的wrapper
以上三个文件放在同一目录下,

然后输入以下命令,
swig -c++ -python example.i
会生成example.py和example_wrap.cxx,如下,

然后输入以下个命令,
g++ -fpic -c example_wrap.cxx word.cpp -I/usr/include/python3.5m
其中的-I是为了引入Python.h,这个文件可以通过sudo find / -iname "Python.h"来进行查找,注意如果想以后用python2去调用C++程序,那么就要引入python2的Python.h,这里引入的是python3的Python.h,
接着输入下面的命令,生成动态库
g++ -shared example_wrap.o word.o -o _example.so
最终生成的文件如下,

在该目录下使用python3按照如下操作进行测试,
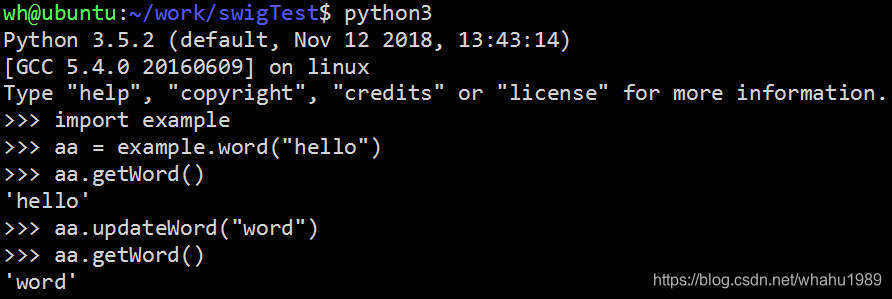
测试OK。经过上述操作后,实际有用的文件是_example.so和example.py,

可以把这2个文件单独拷贝到别的路径下,然后再进行之前的python3测试,也是OK的。
三 处理函数参数
C++函数参数有很多种,下面分3个情况分别进行分析,
1. 常规类型
常规类型如int,double,char等等,比较简单,传参数直接传值就可以了。我们给class word增加一个方法testFunc(),其参数有int,double,char。
word.h如下,注意引入了iostream,
#ifndef __WORD_H__
#define __WORD_H__

#include <string>
#include <iostream>

class word
{
public:
    word(std::string content);
    virtual ~word();

    virtual void updateWord(std::string new_content);
    std::string getWord(void);

    int testFunc(int data1, double data2, char data3); // new added

private:
    std::string m_content;
};


#endif
word.cpp如下,
#include "word.h"

word::word(std::string content) : m_content(content)
{
}

word::~word()
{}

void word::updateWord(std::string new_content)
{
	m_content = new_content;
}

std::string word::getWord(void)
{
	return m_content;
}

int word::testFunc(int data1, double data2, char data3)
{
    std::cout << "data1: " << data1 << "\n";
    std::cout << "data2: " << data2 << "\n";
    std::cout << "data3: " << data3 << "\n";

    return 100;
}
example.i 内容如下,
/*File: example.i*/
%module example
%{
#include "word.h"
%}

%include "std_string.i"
%include "std_iostream.i"
%include "word.h"
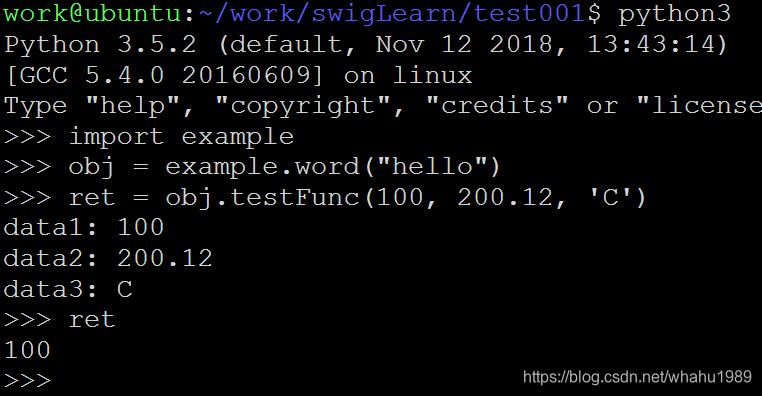
按照上一节的步骤进行操作生成wrapper,然后输入终端下输入python3去测试,
2. 引用类型
对于引用类型的参数,该怎么办呢?假设要wrapp的类如下,
word.h如下,
#ifndef __WORD_H__
#define __WORD_H__

class word
{
public:
    word();
    virtual ~word();

    void testReference(int& data);
};

#endif
word.cpp如下,
#include "word.h"

word::word()
{
}

word::~word()
{
}


void word::testReference(int& data)
{
    data = 100;
}
example.i 的内容如下,
/*---- File: example.i ----*/
%module example
%include typemaps.i
%apply int &OUTPUT { int &};
%{
#include "word.h"
%}

%include "word.h"
%include typemaps.i是引入swig的类型映射,%apply int &OUTPUT { int &};是用来处理int的引用类型。
然后执行之前的编译语句,
swig -c++ -python example.i
g++ -fpic -c example_wrap.cxx word.cpp -I/usr/include/python3.5m
g++ -shared example_wrap.o word.o -o _example.so
ok后,编写python脚本test.py(注意,test.py是要跟examle.py和_example.so在同一目录下),如下
import example


obj = example.word()

ret = obj.testReference()

print('ret is {}'.format(ret))
然后执行python3 test.py,得到运行结果,

可以看到引用类型的值作为函数返回值返回了,这样就可以拿到其值了。
细心的同学可能发现test.py里调用testReference()时没有传递参数,这是为什么呢?
回顾下testReference()的c++实现,对于data这个引用类型变量,我们只是对其赋值,并没有操作其原本的值,意思也就是data只作为输出使用:赋值后,testReference()的调用者就可以拿到data的新值。这样在test.py里调用testReference()时就不需要传递参数了,只需要接受其返回值就行了。
这也是example.i 里%apply int &OUTPUT { int &}; 语句中OUTPUT的由来。
那如果我们在c++函数里要操作引用类型的变量值怎么办(这是很普遍的用法),如下,
void word::testReference(int& data)
{
    data += 100;
}
data自加100
那么example.i 的写法就需要改改,
/*---- File: example.i ----*/
%module example
%include typemaps.i
%apply int &INOUT { int &};
%{
#include "word.h"
%}

%include "word.h"
由之前的OUTPUT改为INOUT,因为我们既要使用data的原始值,又要获取函数调用后的data值,那么data就既有输出又有输入功能了。
写好example.i后再次运行前面的编译命令。
test.py脚本如下,
import example

obj = example.word()

data = 200
ret = obj.testReference(data)

print('ret is {}'.format(ret))
这个时候就需要传参数了。运行如下

如果函数的返回类型不是void怎么办,那么该返回哪个呢?假设testReference()如下,
int testReference(int& data);
int word::testReference(int& data)
{
    data += 100;

    return 500;
}
example.i 不变,test.py里修改打印,
import example

obj = example.word()

data = 200
ret = obj.testReference(data)

print(ret)
最后执行python3 test.py,结果如下,

可以看到swig使用了python的list很好的处理了这种情况。
本小结以int举例,其它类型也是类似的。
3. 指针类型
有了上节对引用的了解,这节对于指针就很容易理解了,只是把&换成*。
这里就只讲一个例子,假设要wrap的c++类如下,
word.h如下
#ifndef __WORD_H__
#define __WORD_H__

class word
{
public:
    word();
    virtual ~word();

    int testPointer(int* data);
};

#endif
word.cpp如下,
#include "word.h"

word::word()
{
}

word::~word()
{
}

int word::testPointer(int* data)
{
    *data += 100;

    return 500;
}
example.i 的写法如下(只是把&换成了*),
/*---- File: example.i ----*/
%module example
%include typemaps.i
%apply int *INOUT { int *};
%{
#include "word.h"
%}

%include "word.h"
执行之前的三行编译命令,ok后编写python脚本test.py,如下
import example

obj = example.word()

data = 200
ret = obj.testPointer(data)

print(ret)
然后执行python3 test.py,结果如下,

本小节以int举例,其它类型也是类似的。
四 处理STL
这里只讲下std::string和std::vector,其它的可以去swig官网教程去查看或者谷歌查查。
std::string
其实前面的例子也讲到过std::string的swig处理,这里就再简单讲下,
word.h如下,
#ifndef __WORD_H__
#define __WORD_H__

#include <string>

class word
{
public:
	word();
	virtual ~word();

    std::string testFunc(std::string& data);
};

#endif
word.cpp如下,
#include "word.h"

word::word()
{
}

word::~word()
{
}

std::string word::testFunc(std::string& data)
{
    return data + "123";
}
example.i内容如下,
/*--- File: example.i ---*/
%module example
%include "std_string.i"
%apply std::string &INOUT {std::string&}
%{
#include "word.h"
%}

%include "word.h"
这里使用了%include std_string.i去处理std::string,将其转为python的字符串类型。如果参数不是引用,那么就不需要%apply std::string &INOUT {std::string&}这句话了。
执行之前的三行编译命令,ok后编写python脚本test.py,如下,
import example

obj = example.word()

ret = obj.testFunc("abc")

print(ret)
执行python3 test.py,输出如下,

std::vector
vector是个模板,实例化时需要指定类型,这里以int和unsigned int举例,
word.h如下
#include<vector>

class word
{
public:
    word();
    virtual ~word();

    int testFunc(const std::vector<int>& data1, const std::vector<unsigned int>& data2);
};
word.cpp如下,
#include "word.h"


word::word()
{
    // TODO: constructor
}

word::~word()
{
    // TODO: destructor
}

int word::testFunc(const std::vector<int>& data1, const std::vector<unsigned int>& data2)
{
    if (data1.size() == 3)
        return data1[0]+data2[0]+data1[1]+data2[1]+data1[2]+data2[2];

    return 0;
}
example.i 内容如下,
/*--- File: example.i ---*/
%module example
%{
#include "word.h"
%}

%include "std_vector.i"

namespace std {
    %template(VectorInt) vector<int>;
    %template(VectorUInt32) vector<unsigned int>;
}

%include "word.h"
这里使用了%include "std_vector.i",用来处理std::vector,另外对需要用到的vector类型进行模板处理,用到哪种就要声明哪种,本例程使用了int和unsigned int。
执行之前的三行编译命令后,编写测试脚本test.py如下,
import example

obj = example.word()

#data1 = [1,2,3]
#data2 = [4,5,6]
ret = obj.testFunc([1,2,3], [4,5,6])
print(ret)
注意,因为testFunc的c++实现用的是引用,所以这里就不需要定义变量去传了,直接传list,传变量会运行错误…。如果不是引用,而是如下这样,那么传变量或者直接list都可以。
int testFunc(std::vector<int> data1, std::vector<unsigned int> data2);
最后,执行python3 test.py,结果如下,

关于STL的其它例子可以参看官方文档,点这里
五 总结
本文主要讲述如何使用swig给C++程序添加接口,以例子来讲解一些常用情况的处理,详细描述可以去官网查看。
如果有写的不对的地方,希望能留言指正,谢谢阅读。


 812
812

 被折叠的 条评论
为什么被折叠?
被折叠的 条评论
为什么被折叠?
 到【灌水乐园】发言


