


 本文详细介绍了如何在Ubuntu20.04上安装ROS2的Foxy版本,包括设置编码、添加源、安装依赖、配置环境、验证安装等步骤。随后,讲解了如何安装Autoware,涉及git克隆、vcs导入、colcon编译等过程,并提到了使用ADE进行容器化开发。最后,文章提及了遇到问题的解决方案和后续学习资源。
ubuntu20.04搭建autoware开发环境
-
安装Ubuntu20.04系统
在网上下载Ubuntu20.04镜像,创建虚拟机进行安装即可。
Ubuntu 20.04官方下载网址:https://cn.ubuntu.com/download
Ubuntu 20.04官方下载网址:https://ubuntu.com/download/desktop -
在ubuntu20.04下apt安装ros2的foxy版本
1) 设置编码
sudo locale-gen en_US en_US.UTF-8
sudo update-locale LC_ALL=en_US.UTF-8 LANG=en_US.UTF-8
export LANG=en_US.UTF-82) 添加key
sudo apt update && sudo apt install curl gnupg2 lsb-release
curl -s https://raw.githubusercontent.com/ros/rosdistro/master/ros.asc | sudo apt-key add -3) 添加ros源
sudo sh -c ‘echo “deb [arch=$(dpkg --print-architecture)] http://packages.ros.org/ros2/ubuntu $(lsb_release -cs) main” > /etc/apt/sources.list.d/ros2-latest.list’4) 安装ros2
sudo apt update
sudo apt install ros-foxy-desktop5) 加载ros2
source /opt/ros/foxy/setup.bash6) 自动补全
sudo apt install python3-argcomplete7) 安装开发工具和ros工具
sudo apt update && sudo apt install -y
build-essential \
cmake \
git \
libbullet-dev \
python3-colcon-common-extensions \
python3-flake8 \
python3-pip \
python3-pytest-cov \
python3-rosdep \
python3-setuptools \
python3-vcstool \
wget#install some pip packages needed for testing
python3 -m pip install -U \
argcomplete \
flake8-blind-except \
flake8-builtins \
flake8-class-newline \
flake8-comprehensions \
flake8-deprecated \
flake8-docstrings \
flake8-import-order \
flake8-quotes \
pytest-repeat \
pytest-rerunfailures \
pytest#install Fast-RTPS dependencies
sudo apt install --no-install-recommends -y \
libasio-dev \
libtinyxml2-dev#install Cyclone DDS dependencies
sudo apt install --no-install-recommends -y \
libcunit1-dev8) 测试验证
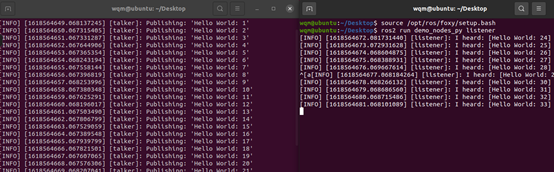
新开终端,发布话题
source /opt/ros/foxy/setup.bash
ros2 run demo_nodes_cpp talker新开终端,订阅话题
source /opt/ros/foxy/setup.bash
ros2 run demo_nodes_py listener
-
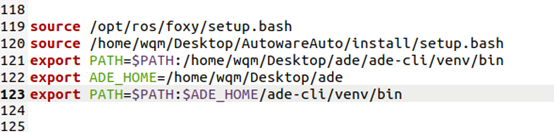
配置ros2环境
source /opt/ros/foxy/setup.bash
加入到bashrc: echo “source /opt/ros/foxy/setup.bash” >> ~/.bashrc
source /opt/ros/$ROS_DISTRO/setup.bash $ROS_DISTRO:为ros版本foxy
参考网址:https://www.ncnynl.com/archives/201802/2278.html
-
安装ros2依赖
$ sudo apt update
$ sudo apt install -y python3-rosdep
$ sudo rosdep init
$ rosdep update -
安装autoware
$ git clone https://gitlab.com/autowarefoundation/autoware.auto/AutowareAuto.git
$ cd AutowareAuto
$ vcs import < autoware.auto.$ROS_DISTRO.repos
$ rosdep install -y -i --from-paths src -
编译
$ cd AutowareAuto
$ vcs import < autoware.auto.$ROS_DISTRO.repos
$ git lfs pull --exclude=“” --include=“*”
$export COLCON_DEFAULTS_FILE=/path/to/AutowareAuto/tools/ade_image/colcon-defaults.yaml
$colcon build
$ colcon test
$ colcon test-result –verbose -
安装ADE
1) 安装docker
$sudo apt-get update
$sudo apt-get install \
apt-transport-https \
ca-certificates \
curl \
gnupg \
lsb-release
$curl -fsSL https://download.docker.com/linux/ubuntu/gpg | sudo gpg --dearmor -o /usr/share/keyrings/docker-archive-keyring.gpg
$ echo
“deb [arch=amd64 signed-by=/usr/share/keyrings/docker-archive-keyring.gpg] https://download.docker.com/linux/ubuntu \
$(lsb_release -cs) stable” | sudo tee /etc/apt/sources.list.d/docker.list > /dev/null
$sudo apt-get update
$sudo apt-get install docker-ce docker-ce-cli containerd.io
$apt-cache madison docker-ce
$sudo apt-get install docker-ce=<VERSION_STRING> docker-ce-cli=<VERSION_STRING> containerd.io (##<VERSION_STRING>替换一下)
#sudo docker run hello-world (###验证docker)2) 安装ADE
$ cd /path/from/step/above (###我自己随便建立的文件夹)
$ wget https://gitlab.com/ApexAI/ade-cli/uploads/f6c47dc34cffbe90ca197e00098bdd3f/ade+x86_64
$ mv ade+x86_64 ade
$ chmod +x ade
$ ./ade --version
4.0.0
$ ./ade update-cli
$ ./ade –version
$ which ade
/path/to/ade
$ ade --version
<version>
<latest-version>3) 安装ade-cli
$ git clone https://gitlab.com/ApexAI/ade-cli
$ cd ade-cli
$ ./osx-install
$ which ade
~/.local/bin/ade
$ ade --version
<version>4)启动ADE
$ cd AutowareAuto
$ ade start --update –enter5)退出
ade$ exit
$ ade stop
$ ade start --update –enter -
验证
-
后续问题记录
1)环境变量
2)Got permission denied while trying to connect to Docker Daemon
解决:sudo usermod -aG docker $USER newgrp docker
官网学习: https://autowarefoundation.gitlab.io/autoware.auto/AutowareAuto/index.html
欢迎留言反馈,谢谢!


 1617
1617

 被折叠的 条评论
为什么被折叠?
被折叠的 条评论
为什么被折叠?
 到【灌水乐园】发言


