


目录
【什么是中断 ?】
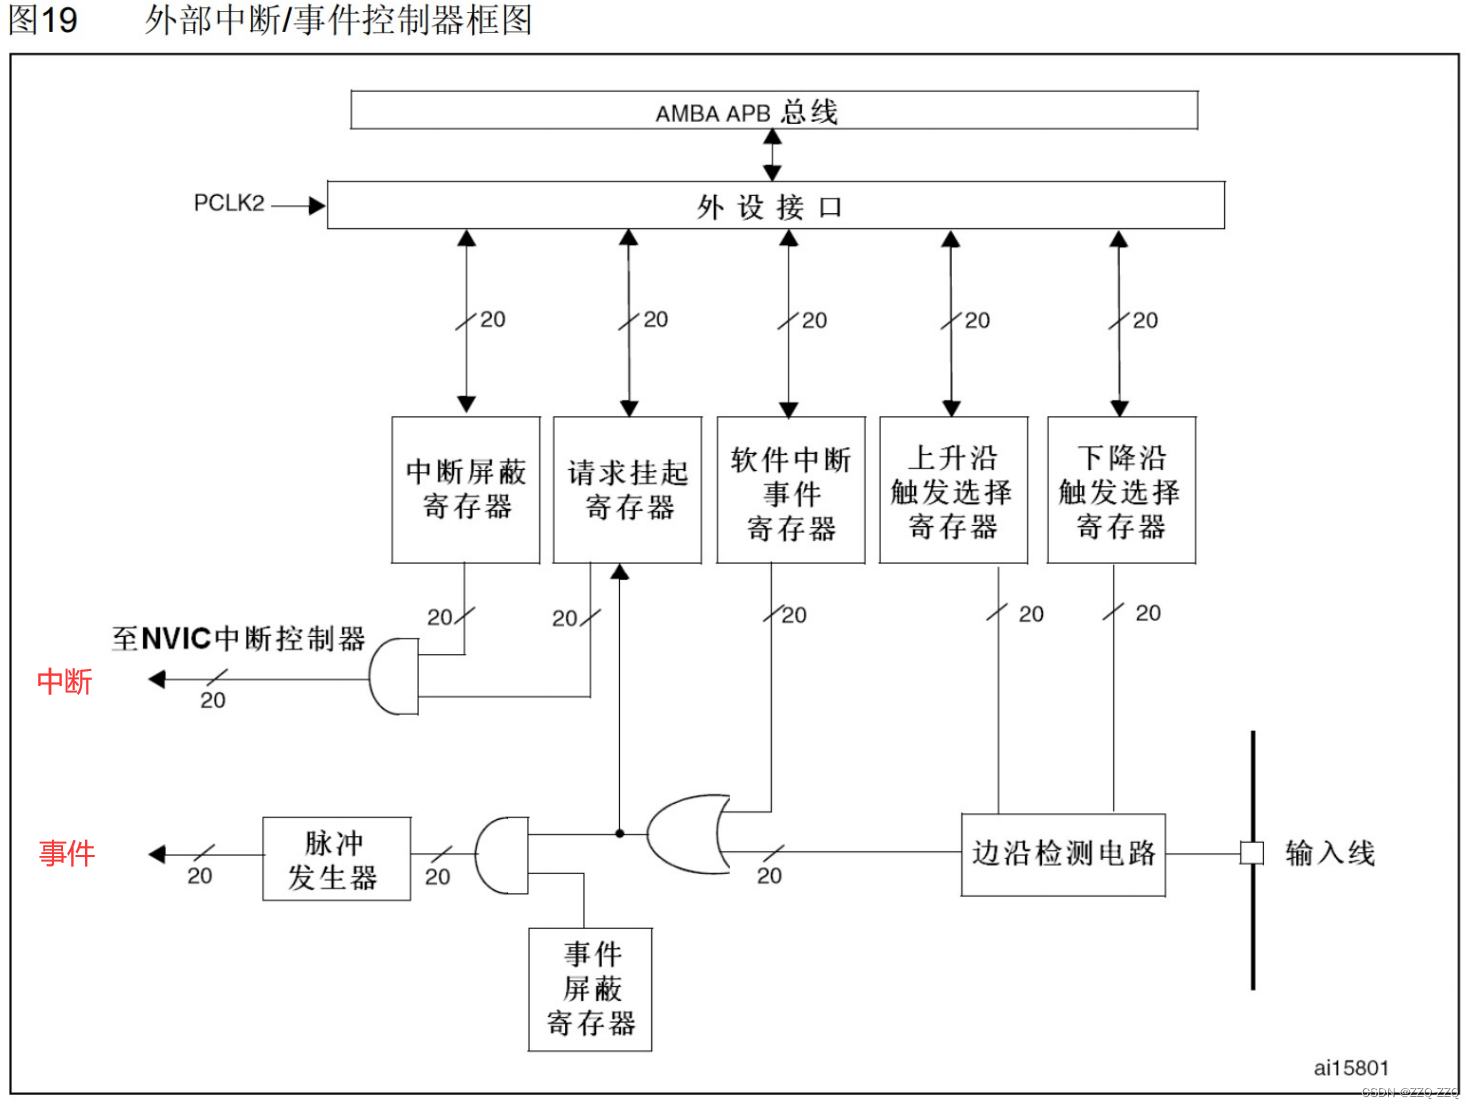
【什么是EXTI ?】
EXTI初始化结构体
typedef struct
{
//中断/事件线
uint32_t EXTI_Line;                 /*!< Specifies the EXTI lines to be enabled or disabled.
                                    This parameter can be any combination value of @ref EXTI_Lines */
//EXTI 模式
EXTIMode_TypeDef EXTI_Mode;         /*!< Specifies the mode for the EXTI lines.
                                    This parameter can be a value of @ref EXTIMode_TypeDef */
//触发类型
EXTITrigger_TypeDef EXTI_Trigger;   /*!< Specifies the trigger signal active edge for the EXTI lines.
                                    This parameter can be a value of @ref EXTITrigger_TypeDef */
//EXTI 控制
FunctionalState EXTI_LineCmd;       /*!< Specifies the new state of the selected EXTI lines.
                                    This parameter can be set either to ENABLE or DISABLE */
}EXTI_InitTypeDef;
中断/事件线
#define EXTI_Line0 ((uint32_t)0x00001) /*!< External interrupt line 0 */
#define EXTI_Line1 ((uint32_t)0x00002) /*!< External interrupt line 1 */
#define EXTI_Line2 ((uint32_t)0x00004) /*!< External interrupt line 2 */
#define EXTI_Line3 ((uint32_t)0x00008) /*!< External interrupt line 3 */
#define EXTI_Line4 ((uint32_t)0x00010) /*!< External interrupt line 4 */
#define EXTI_Line5 ((uint32_t)0x00020) /*!< External interrupt line 5 */
#define EXTI_Line6 ((uint32_t)0x00040) /*!< External interrupt line 6 */
#define EXTI_Line7 ((uint32_t)0x00080) /*!< External interrupt line 7 */
#define EXTI_Line8 ((uint32_t)0x00100) /*!< External interrupt line 8 */
#define EXTI_Line9 ((uint32_t)0x00200) /*!< External interrupt line 9 */
#define EXTI_Line10 ((uint32_t)0x00400) /*!< External interrupt line 10 */
#define EXTI_Line11 ((uint32_t)0x00800) /*!< External interrupt line 11 */
#define EXTI_Line12 ((uint32_t)0x01000) /*!< External interrupt line 12 */
#define EXTI_Line13 ((uint32_t)0x02000) /*!< External interrupt line 13 */
#define EXTI_Line14 ((uint32_t)0x04000) /*!< External interrupt line 14 */
#define EXTI_Line15 ((uint32_t)0x08000) /*!< External interrupt line 15 */
#define EXTI_Line16 ((uint32_t)0x10000) /*!< External interrupt line 16
Connected to the PVD Output */
#define EXTI_Line17 ((uint32_t)0x20000) /*!< External interrupt line 17
Connected to the RTC Alarm event */
#define EXTI_Line18 ((uint32_t)0x40000) /*!< External interrupt line 18
Connected to the USB OTG FS Wakeup from suspend event */
#define EXTI_Line19 ((uint32_t)0x80000) /*!< External interrupt line 19
Connected to the Ethernet Wakeup event */
#define EXTI_Line20 ((uint32_t)0x00100000) /*!< External interrupt line 20
Connected to the USB OTG HS (configured in FS) Wakeup event */
#define EXTI_Line21 ((uint32_t)0x00200000) /*!< External interrupt line 21
Connected to the RTC Tamper and Time Stamp events */
#define EXTI_Line22 ((uint32_t)0x00400000) /*!< External interrupt line 22
Connected to the RTC Wakeup event */
EXTI模式
typedef enum
{
EXTI_Mode_Interrupt = 0x00,     // 产生中断
EXTI_Mode_Event = 0x04          // 产生事件
}EXTIMode_TypeDef;
触发类型
typedef enum
{
EXTI_Trigger_Rising = 0x08, //上升沿
EXTI_Trigger_Falling = 0x0C, //下降沿
EXTI_Trigger_Rising_Falling = 0x10 //上升沿和下降沿都触发
}EXTITrigger_TypeDef;
EXTI控制
ENABLE or DISABLE【什么是优先级 ?】
【什么是优先级分组 ?】
【什么是NVIC ?】
【什么是中断向量表 ?】
所有中断的中断服务程序入口地址构成一个表,称为中断向量表
也有的机器把中断服务程序入口的跳转指令构成一张表,称为中断向量跳转表
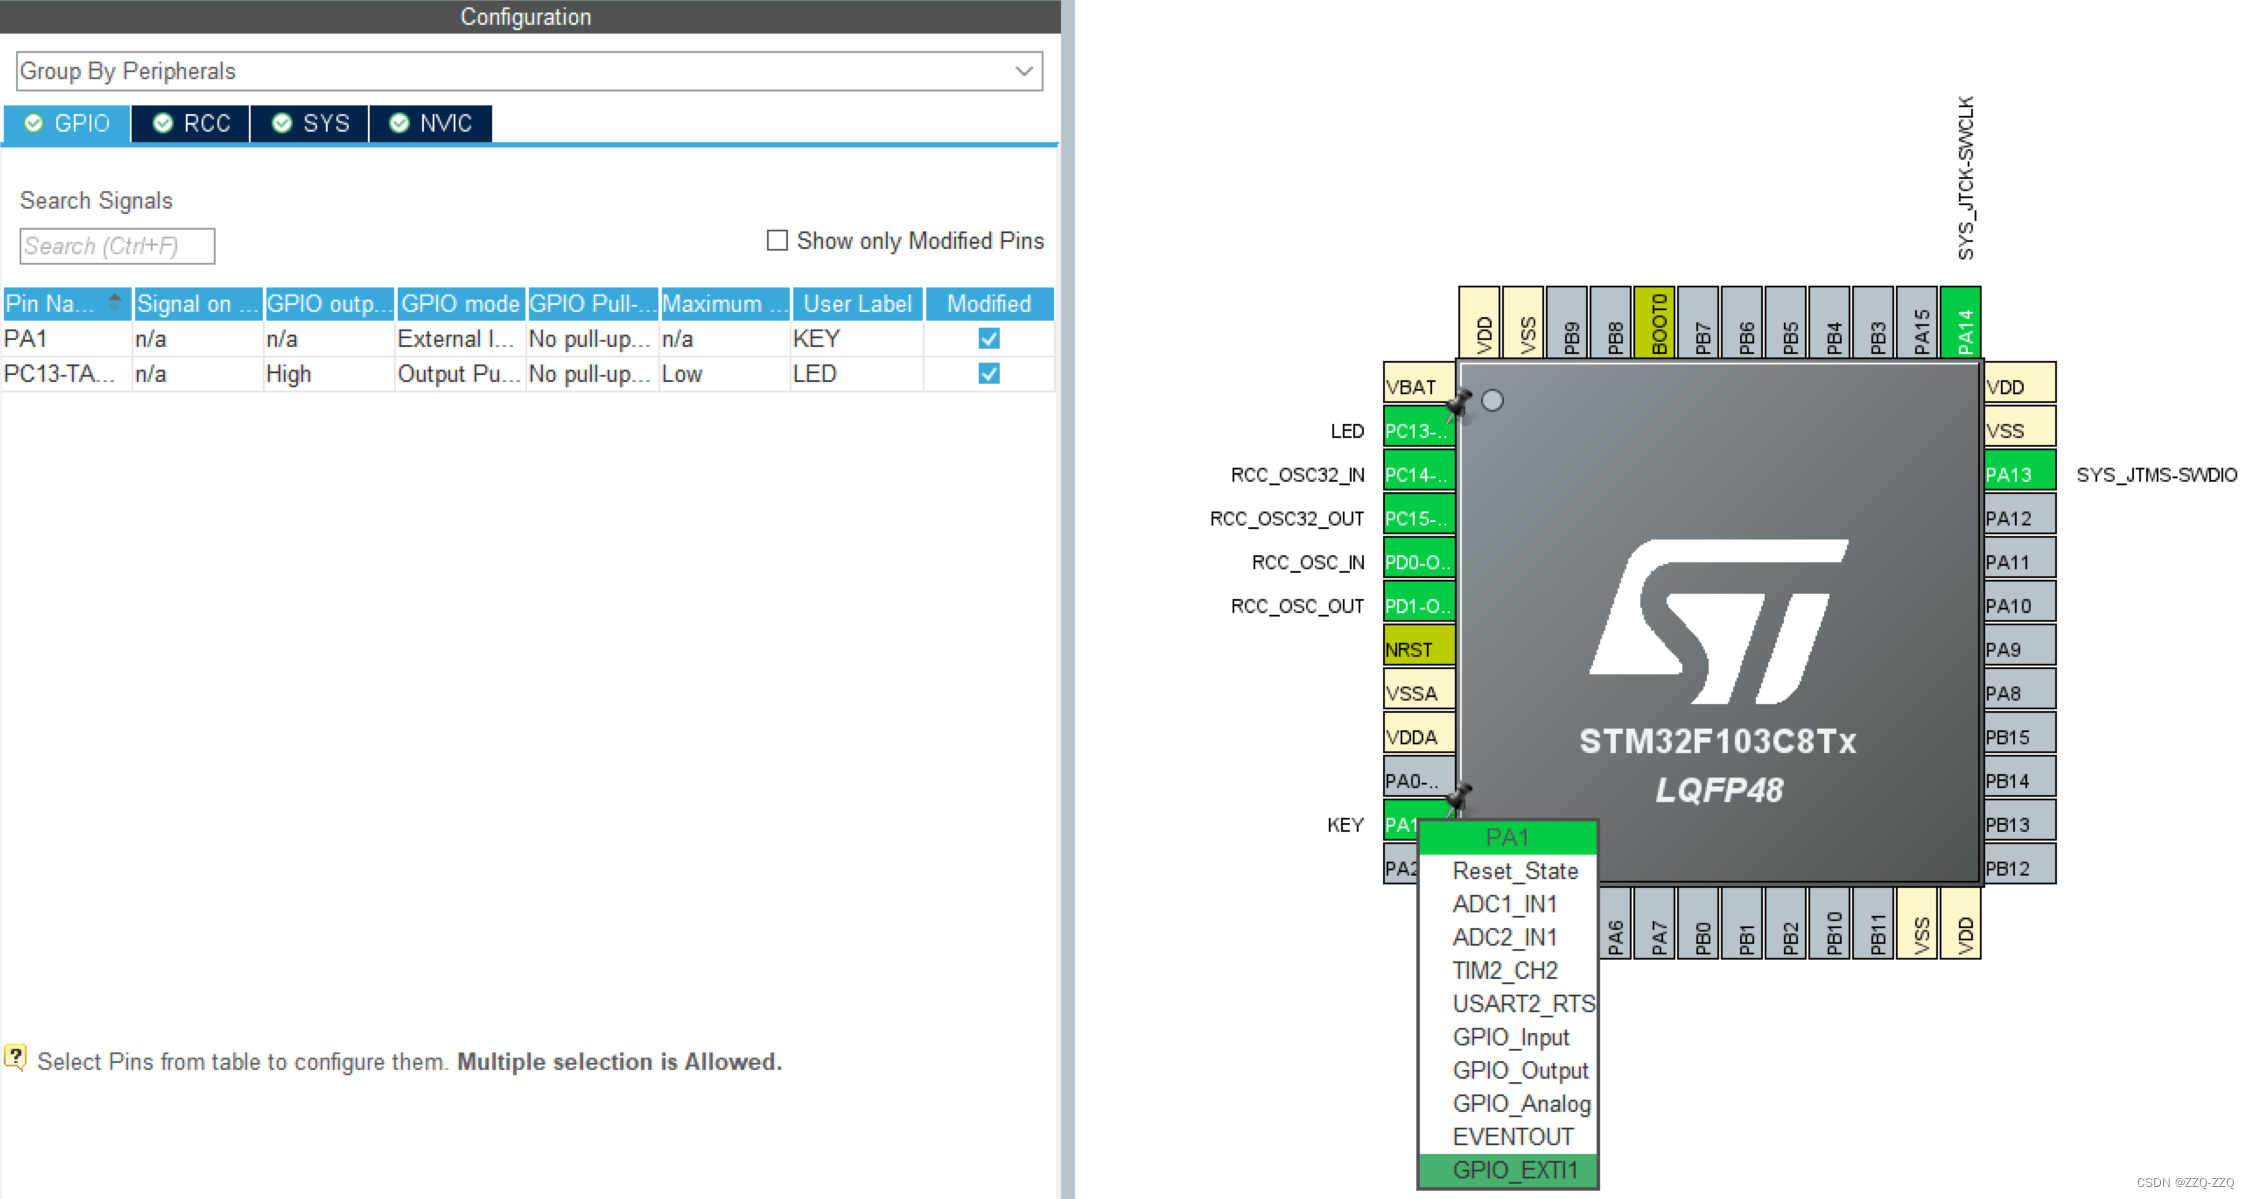
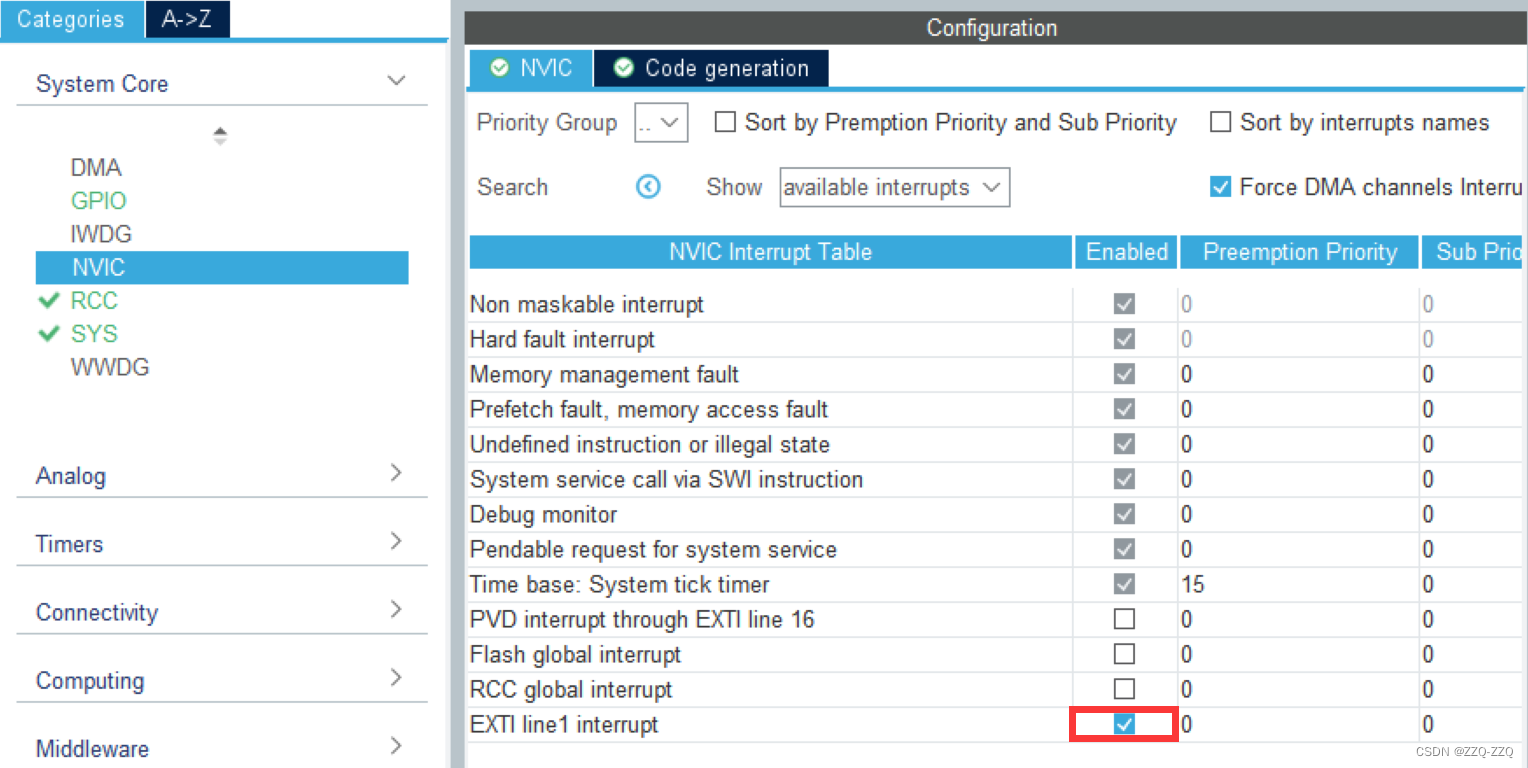
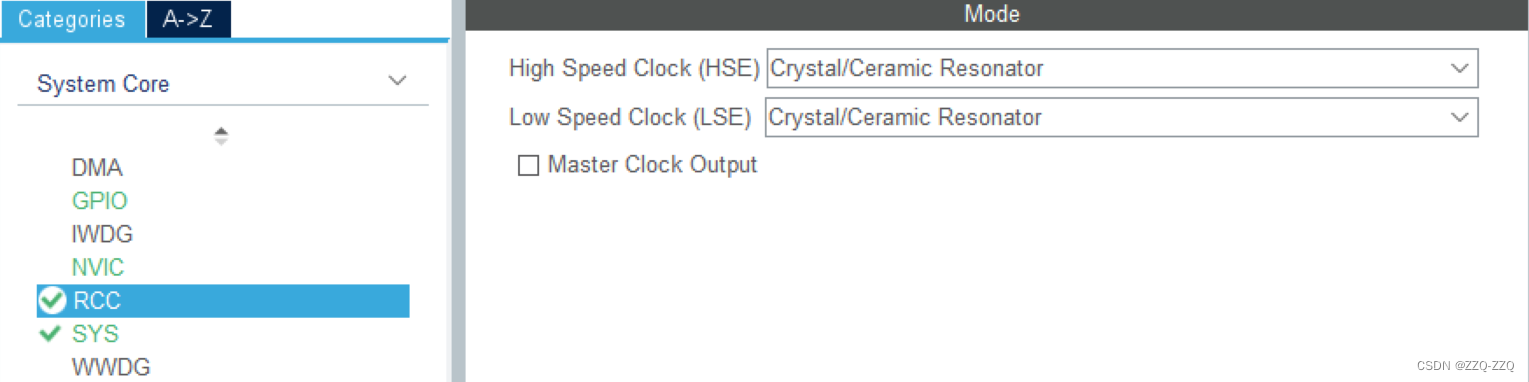
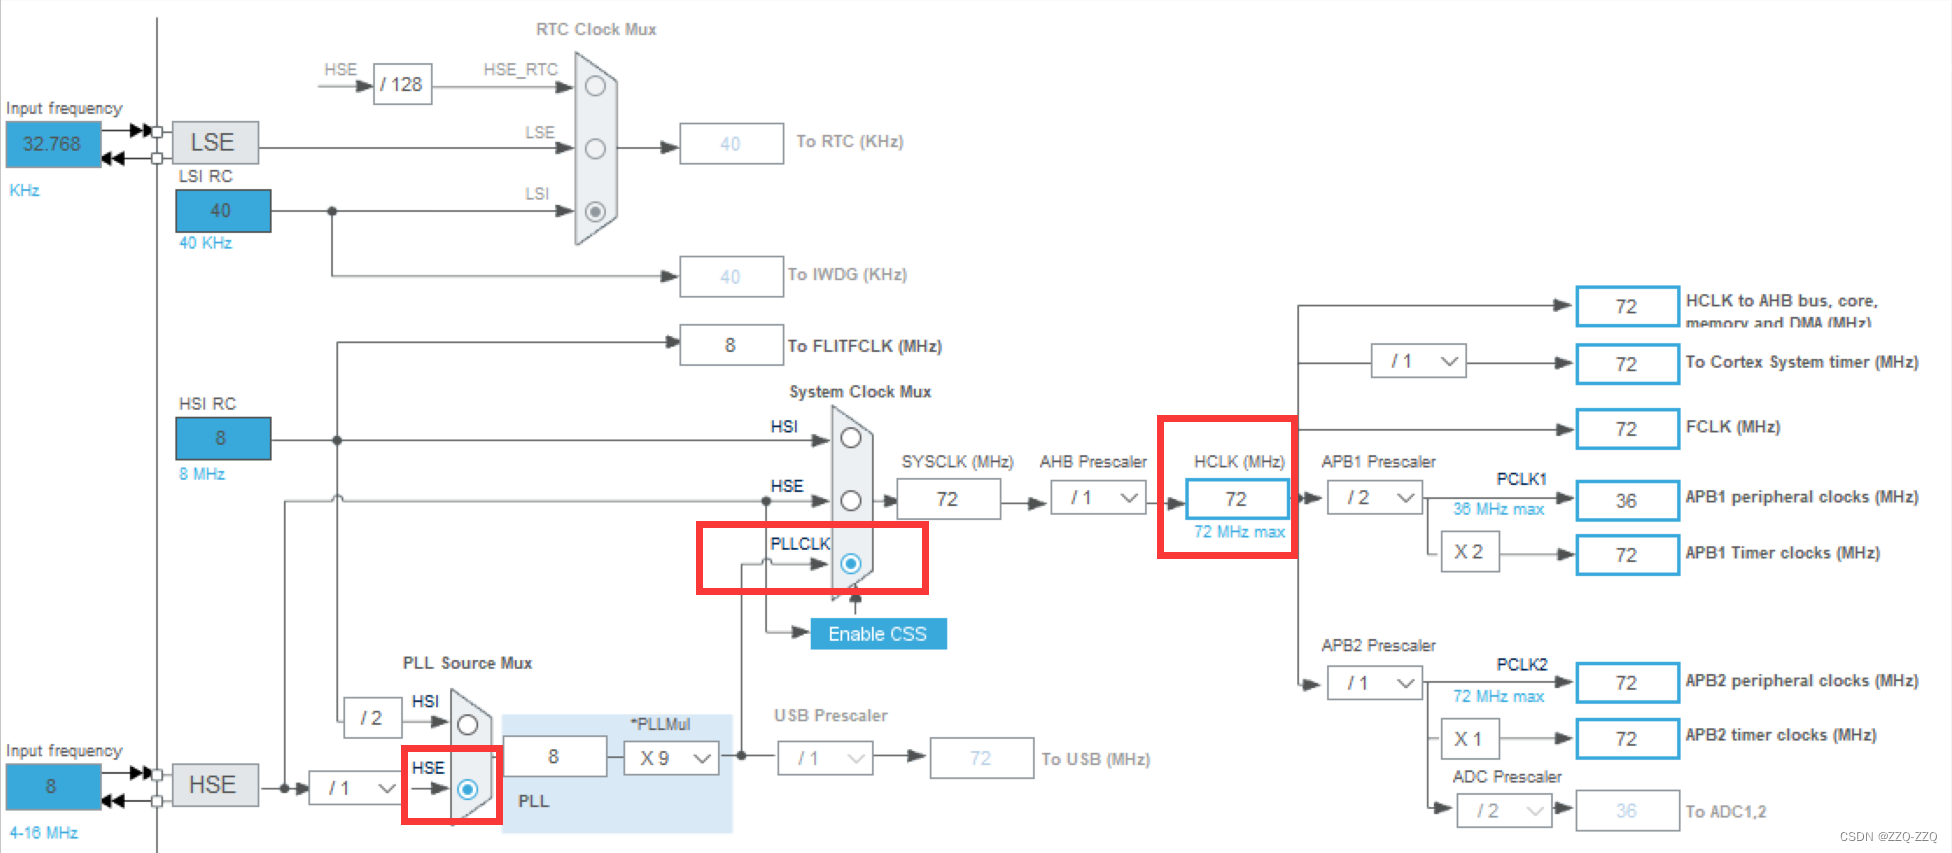
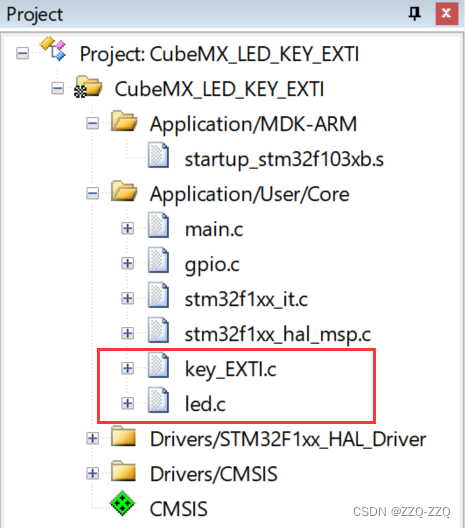
【demo · GPIO_EXTI】


注意:关于.h的引用问题:
● main.h中引入stm32f1xx_hal.h(CubeMx会自动生成)
● main.c中引入用户所有自建的.h文件
● 每个用户自建的.h文件仅需引用main.h
● 用户自建.c文件仅需引用对应自身的.h
● 用户自建.c文件中所有函数都应该在对应.h文件中声明
● 共享变量定义在.c中,并在对应的.h中使用extern声明(extern时不可赋值)
共享的宏定义一般直接定义在.h中
需要引用该共享变量的.c文件需引用该.h文件
● 若在.c中需要用另一个.c的函数,可使用extern声明,或在.c中引用目标.c文件的.h文件
如:在a.c中需要用b.c的函数led(),则a.c中写入:#include<b.h>
或者:在a.c前面声明extern void led(); 后面再调用led()
● 若在.c中需要用另一个.c的变量(定义在.c中而不是.h),可使用extern声明
如:在a.c中需要用b.c的变量int m,则在a.c前面声明extern int m; 后面再使用m
/* main.h */
#ifndef __MAIN_H
#define __MAIN_H

#include "stm32f1xx_hal.h"


#define LED_Pin GPIO_PIN_13
#define LED_GPIO_Port GPIOC
#define KEY_Pin GPIO_PIN_1
#define KEY_GPIO_Port GPIOA

#define KEY_OFF 0
#define KEY_ON  1

#endif /* __MAIN_H */
/* key_EXTI.h */
#ifndef __KEY_H__
#define __KEY_H__
#include "main.h"
void HAL_GPIO_EXTI_Callback(uint16_t GPIO_Pin);
#endif /*__ KEY_H__ *//* led.h */
#ifndef __LED_H__
#define __LED_H__
#include "main.h"
void led(uint8_t KEY_FLAG);
#endif /*__ LED_H__ *//* key_EXTI.c */
#include "key_EXTI.h"
#include "led.h"
void HAL_GPIO_EXTI_Callback(uint16_t GPIO_Pin)
{
switch(GPIO_Pin)
{
case KEY_Pin:
led(KEY_ON);
}
}/* led.c */
#include "led.h"
void led(uint8_t KEY_FLAG)
{
if(KEY_FLAG == KEY_ON)
{
HAL_GPIO_TogglePin(LED_GPIO_Port,LED_Pin);
}
}main.c中无需添加任何函数,因为中断是自动调用,回调函数已经写在key_EXTI.c中
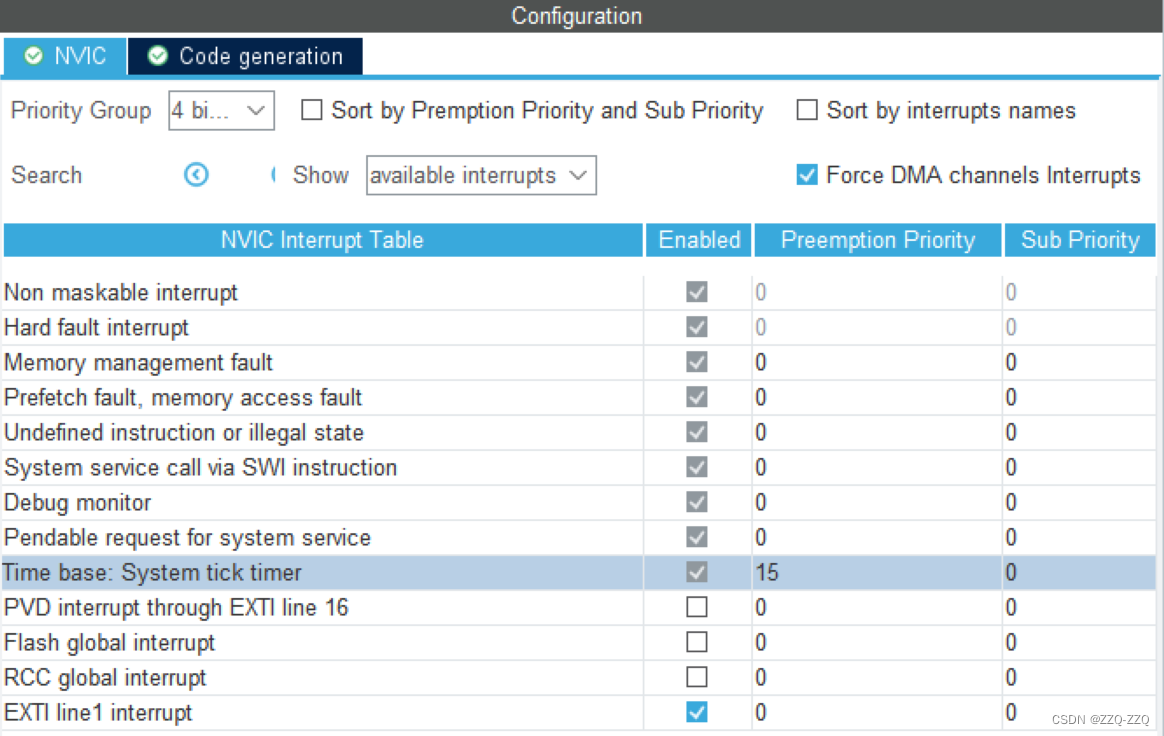
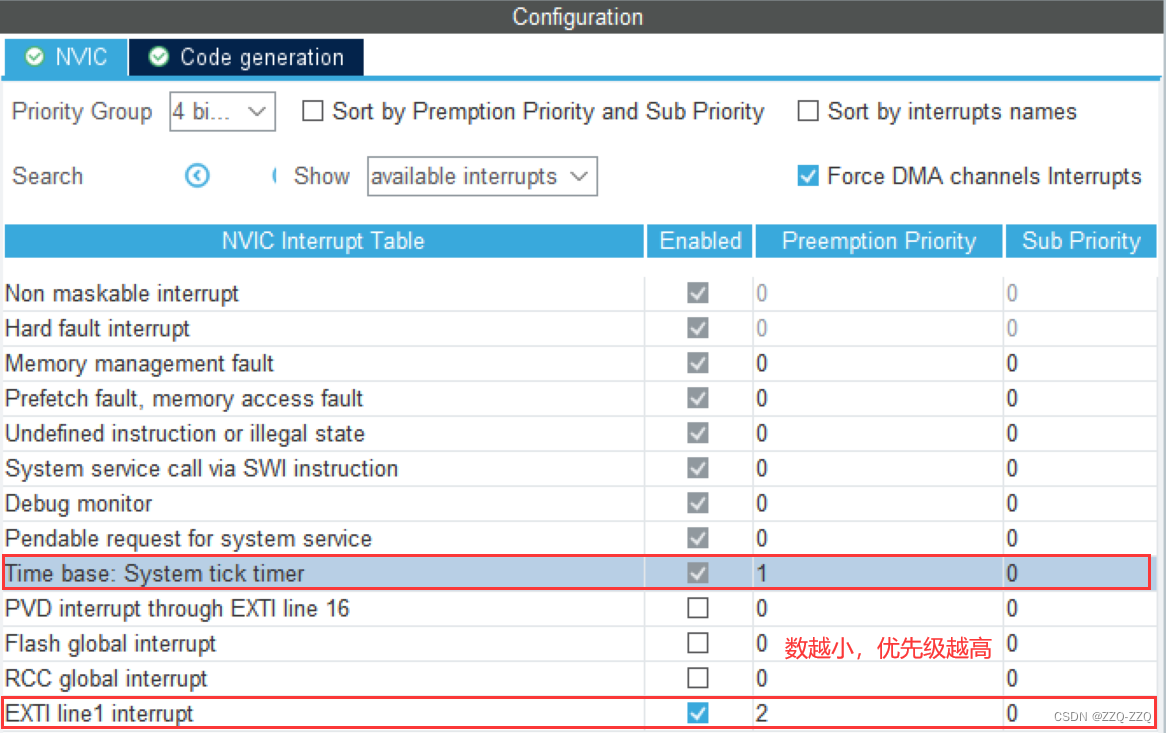
【中断函数中使用HAL_delay】
上面 /* key_EXTI.c */ 中的按键判断函数没有消抖,下面进行消抖
若要在中断函数中使用HAL_delay,则需在NVIC中更改优先级,因为HAL_delay用了滴答定时器
/* key_EXTI.c */

#include "key_EXTI.h"

#include "led.h"

void HAL_GPIO_EXTI_Callback(uint16_t GPIO_Pin)
{
	switch(GPIO_Pin)
	{
		case KEY_Pin:
			HAL_Delay(60);
			if(HAL_GPIO_ReadPin(KEY_GPIO_Port,KEY_Pin) == GPIO_PIN_RESET)
				led(KEY_ON);
		break;
	}
}
此处的switch case语句也可替换为if判断
/* key_EXTI.c */

#include "key_EXTI.h"

#include "led.h"

void HAL_GPIO_EXTI_Callback(uint16_t GPIO_Pin)
{
    if(GPIO_Pin == KEY_Pin) //一根中断线上接有多个中断源,判断中断源是否来自目标引脚
    {
	    HAL_Delay(60);
		if(HAL_GPIO_ReadPin(KEY_GPIO_Port,KEY_Pin) == GPIO_PIN_RESET)
        {
		    led(KEY_ON);
        }
	}
} 更详细讲解:STM32 HAL库 中断处理中使用延时函数(HAL_Delay)_Dir_xr的博客-优快云博客
扩展说明:
① 按键模块可以直接替换为振动模块、触摸模块等(本质和按键一样,都是人为施加信号时,模块信号引脚输出低电平),程序中仅需根据实际情况调整消抖的延迟时间
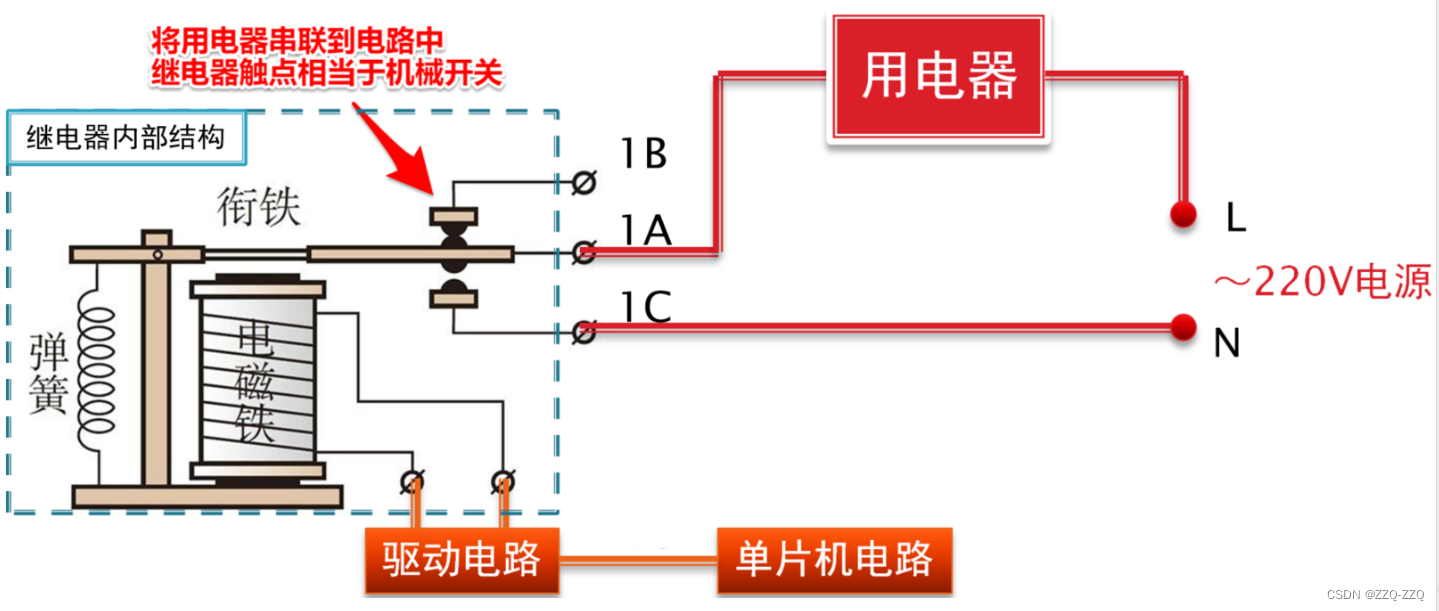
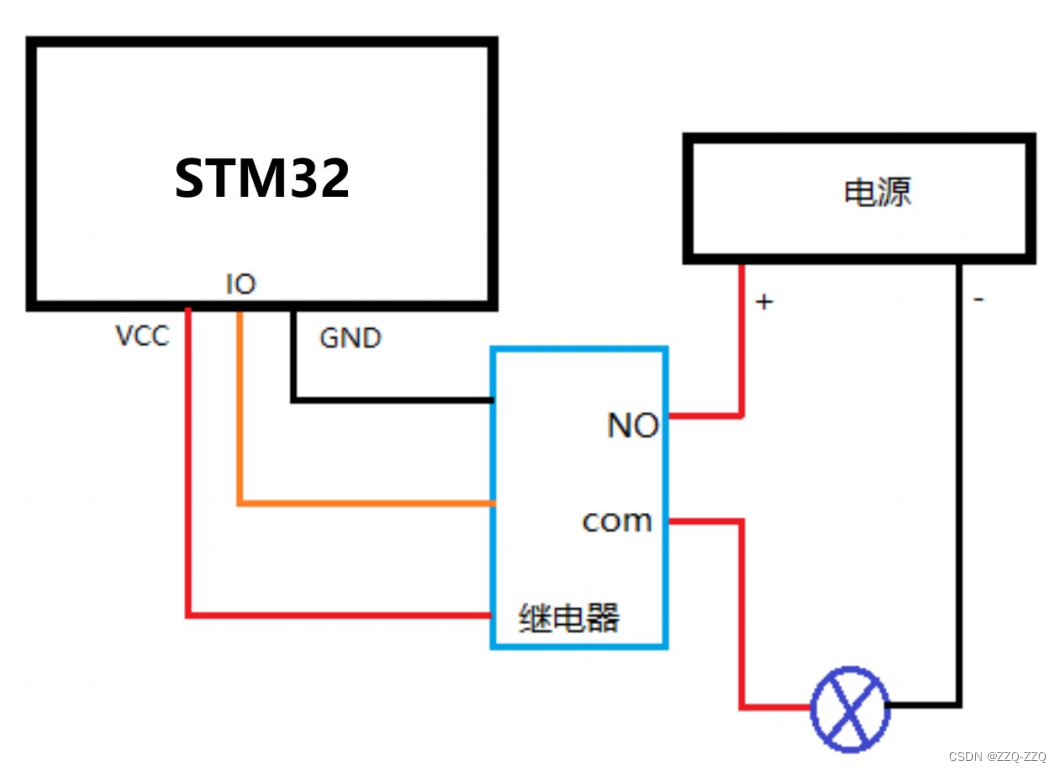
② LED可替换为继电器模块,下图所用的继电器规格为DC 5V,Low level trigger
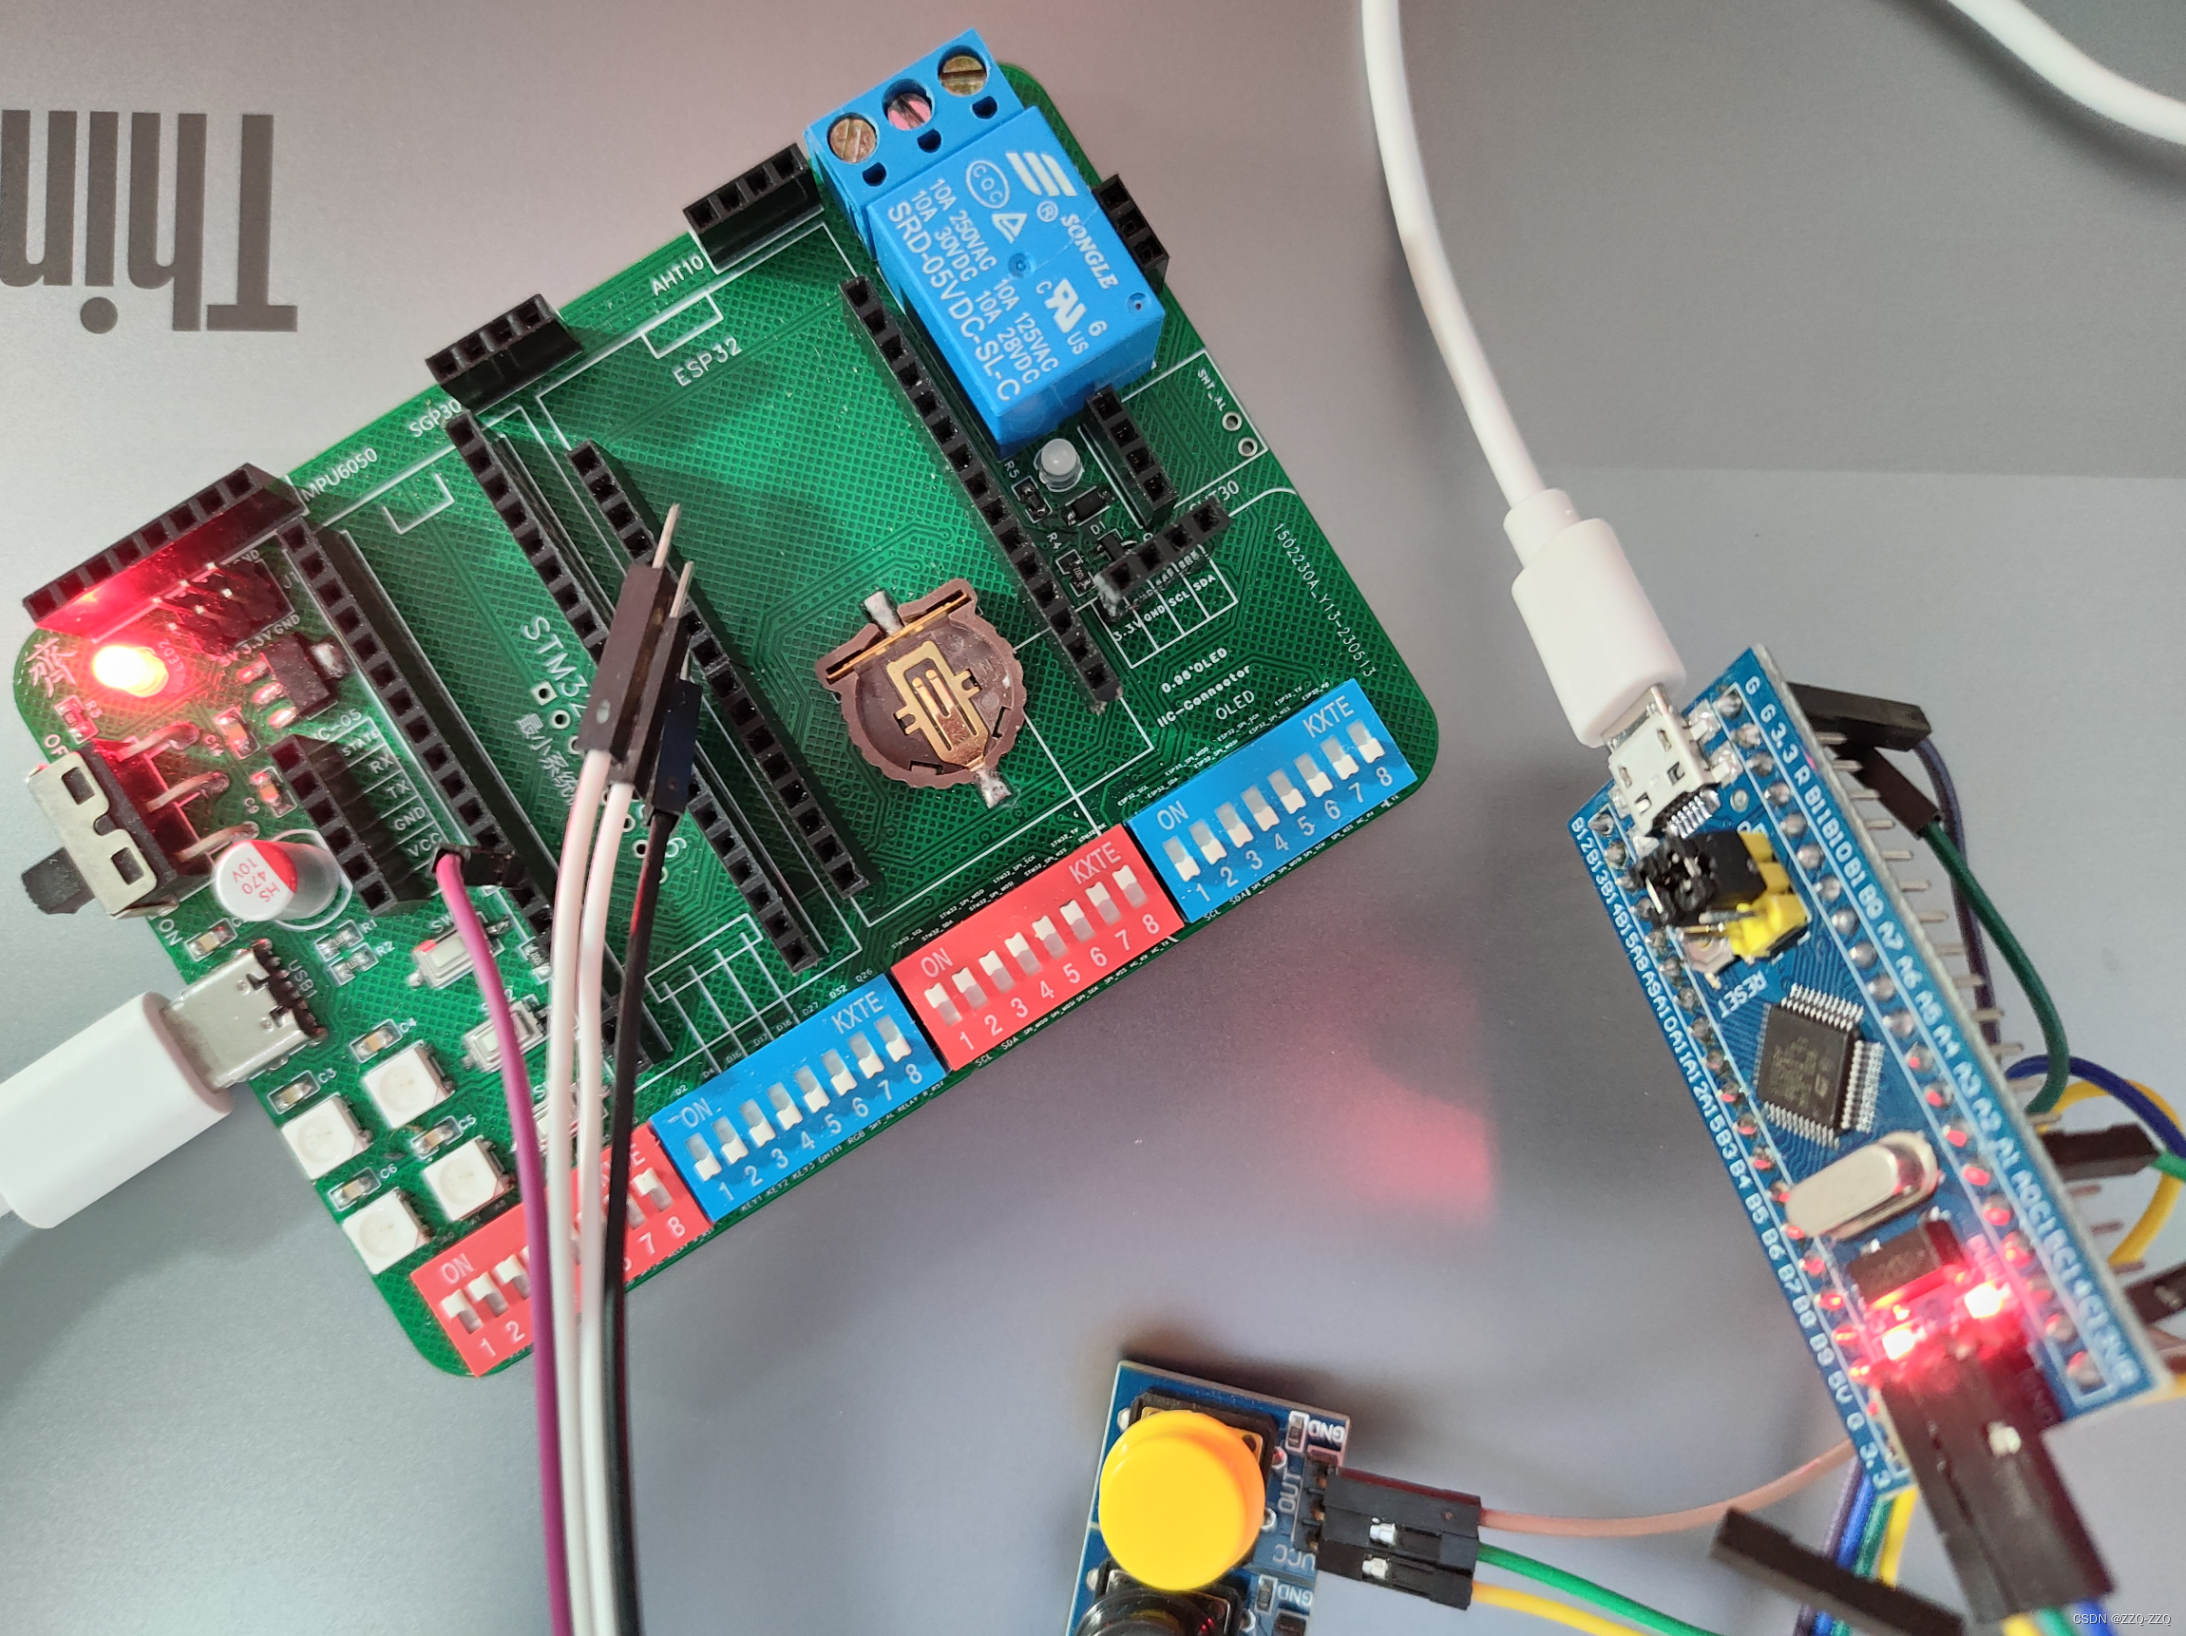
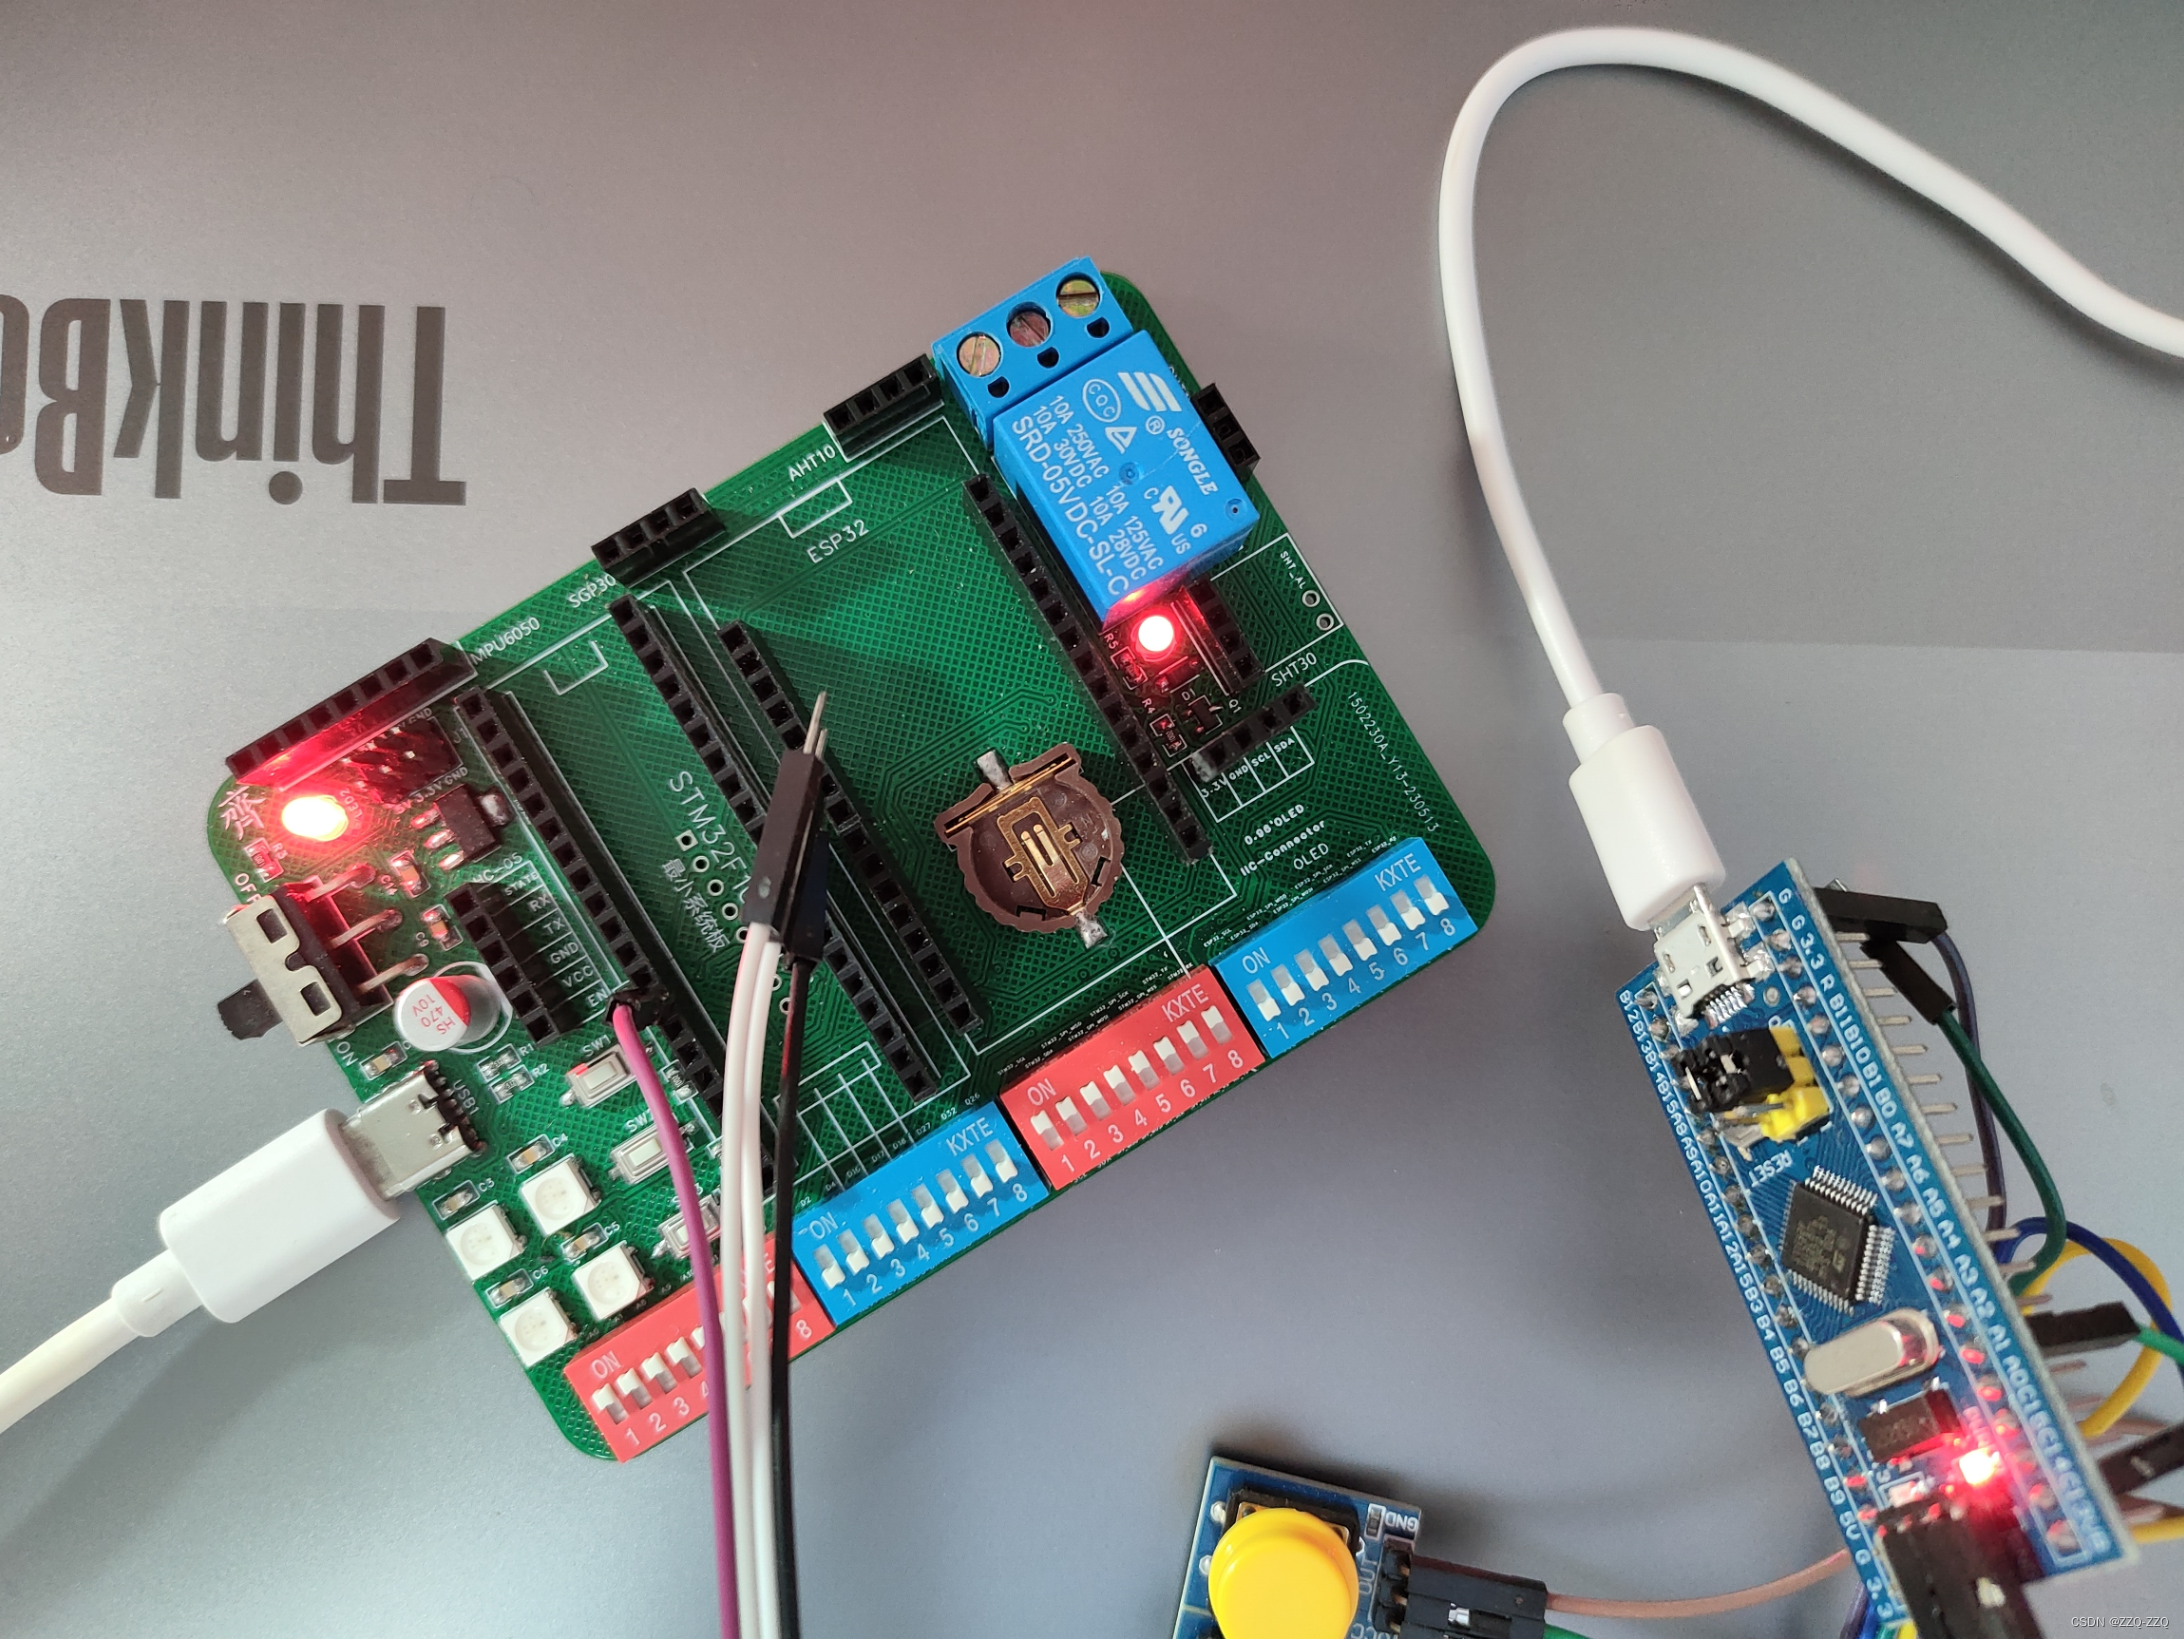
继电器:
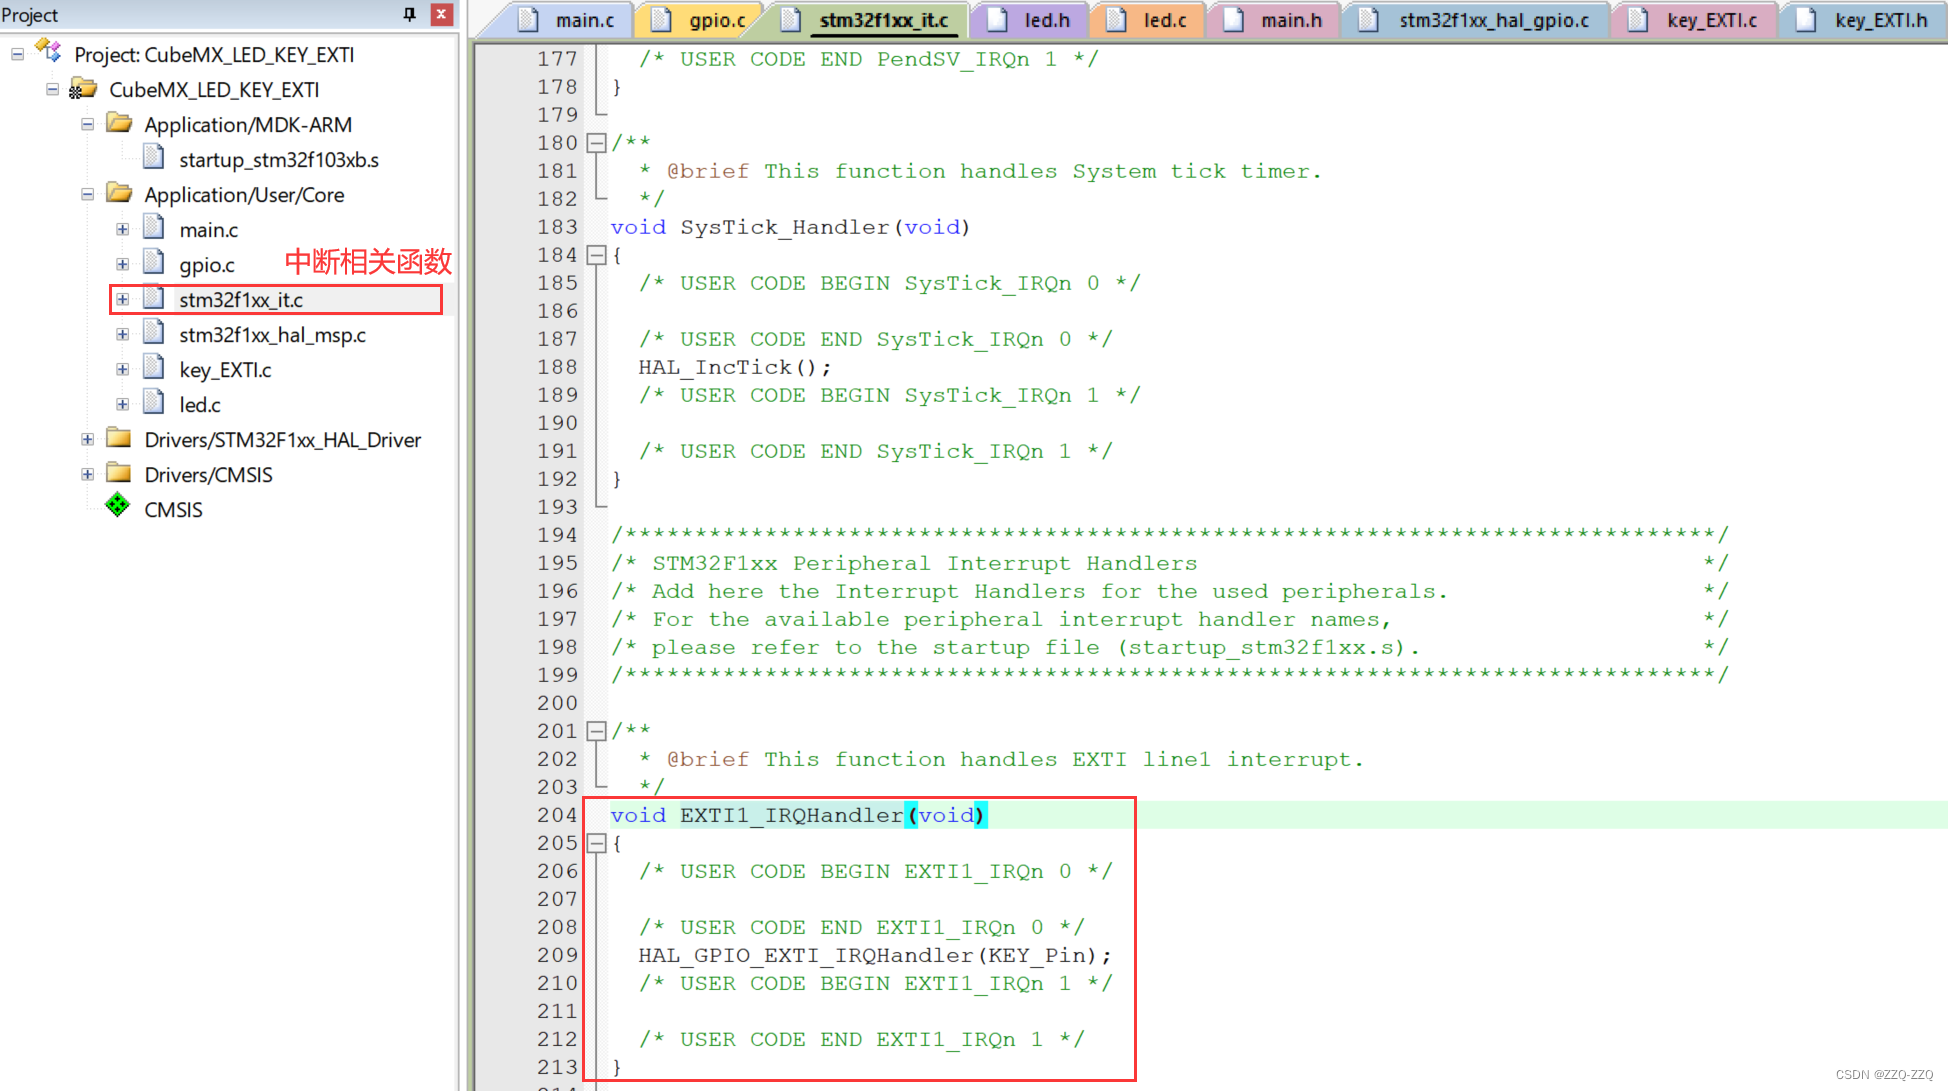
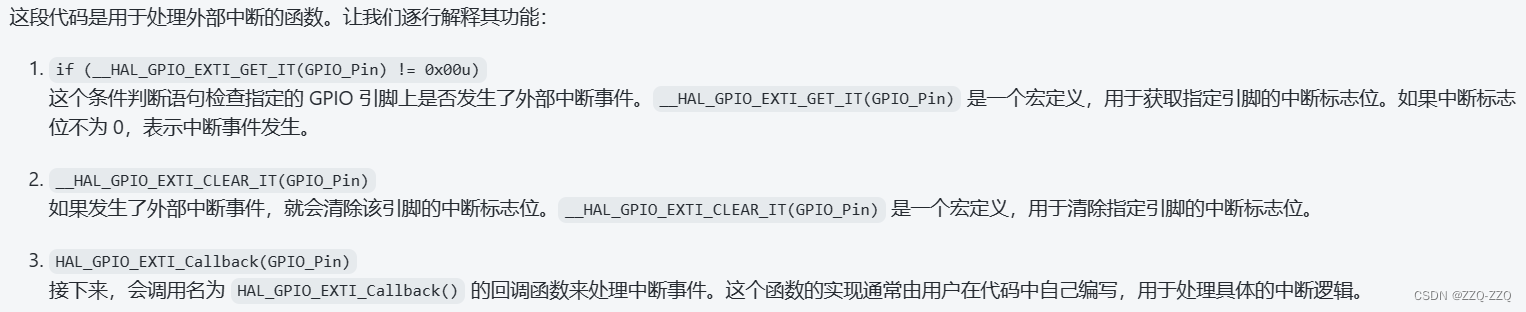
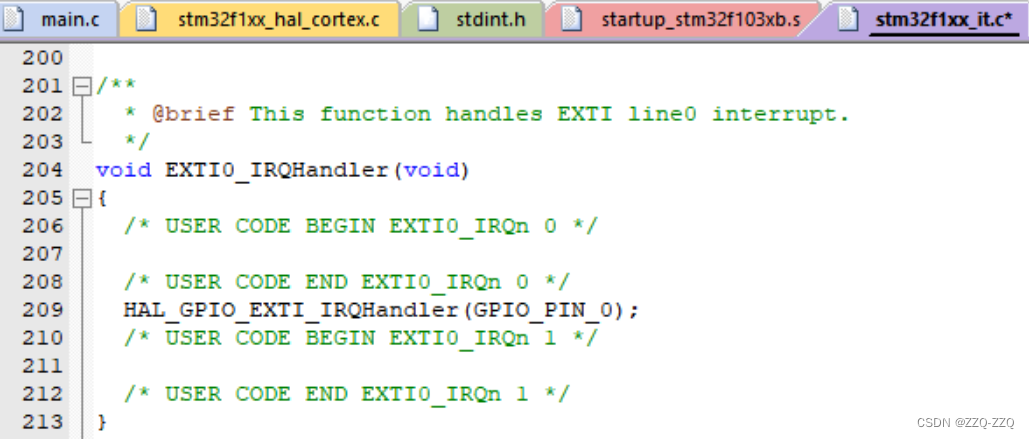
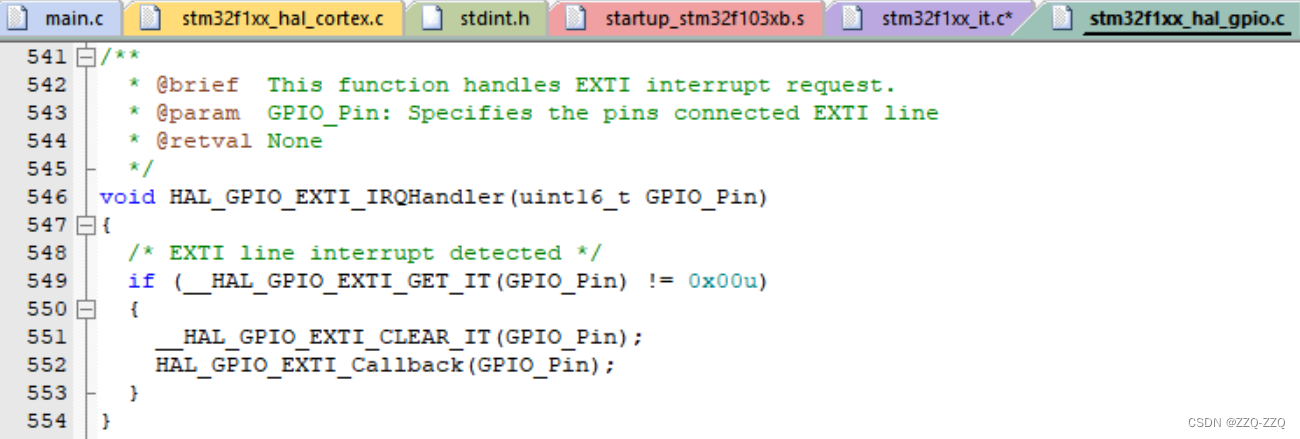
【外部中断调用流程】
① stm32f1xx_it.c中的 EXTIX_IRQHandler(void)
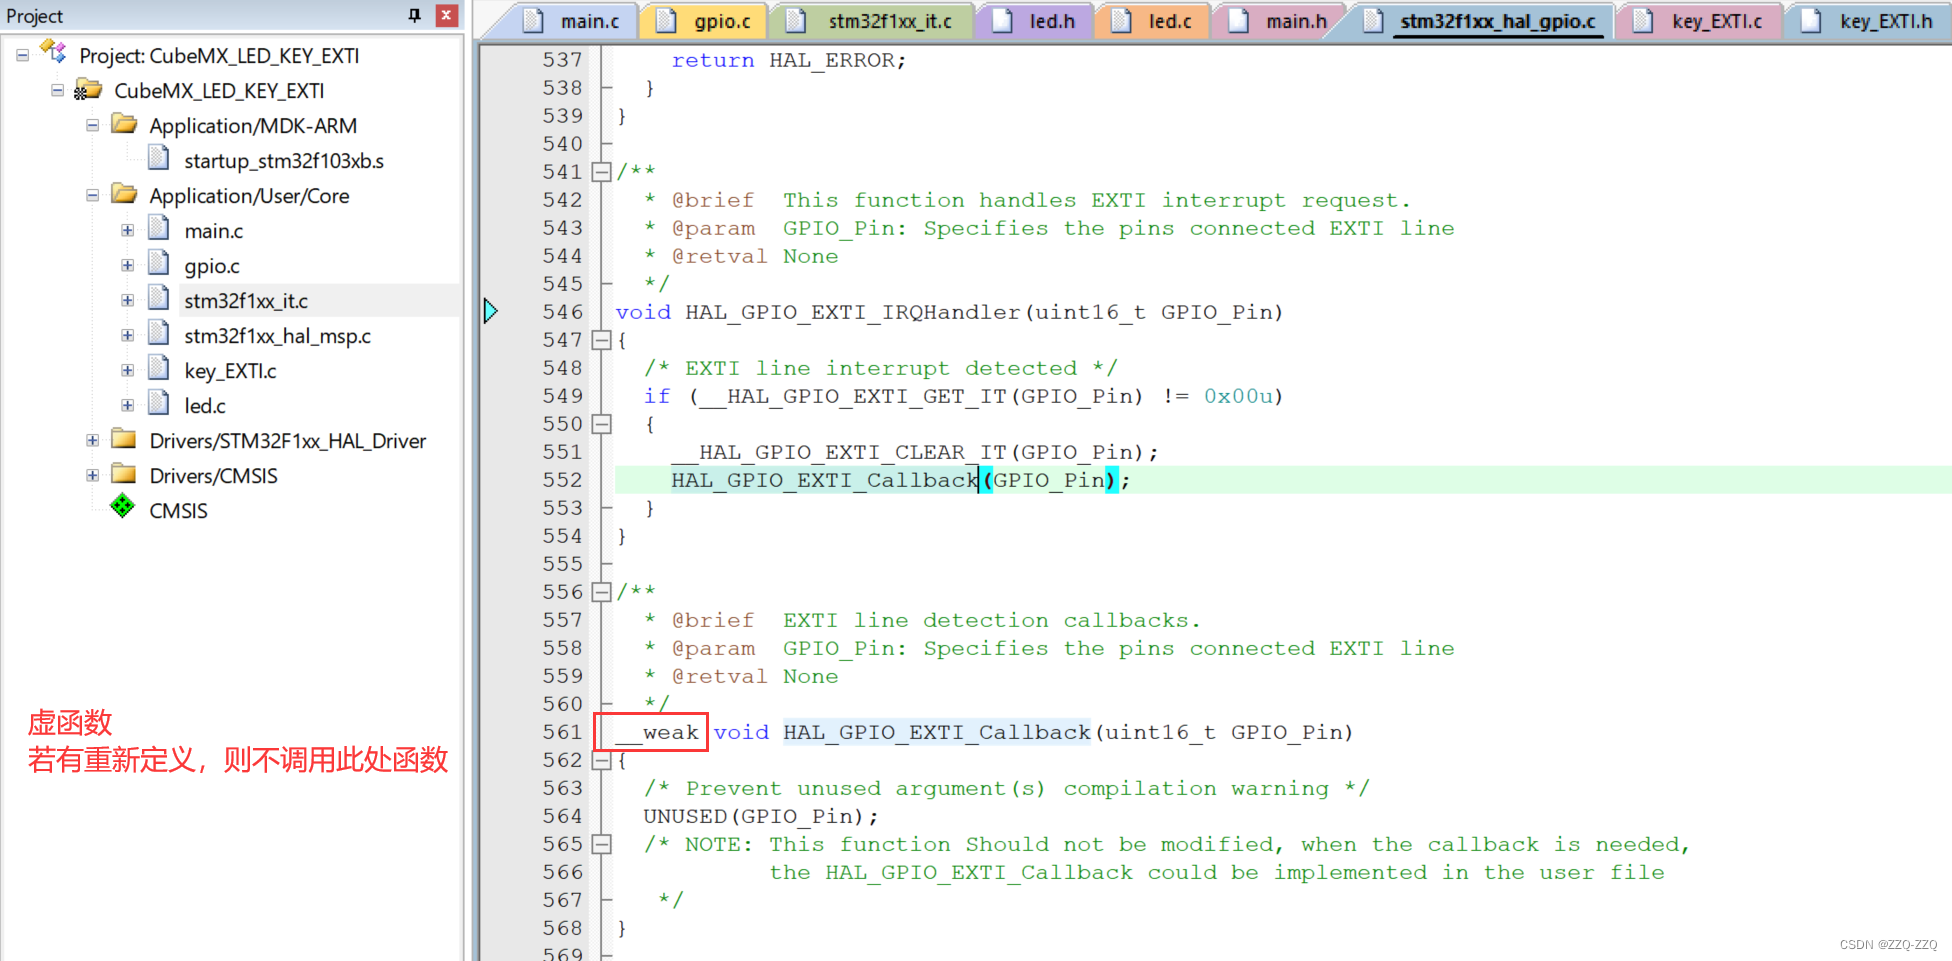
② stm32f1xx_hal_gpio.c中的 HAL_GPIO_EXTI_IRQHandler(uint16_t GPIO_Pin)
③ 自己找位置重写的 HAL_GPIO_EXTI_Callback(uint16_t GPIO_Pin)
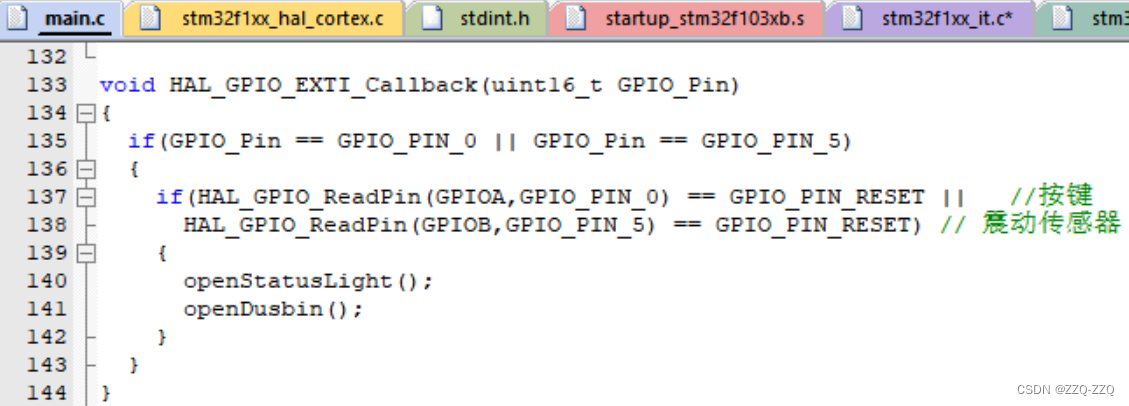
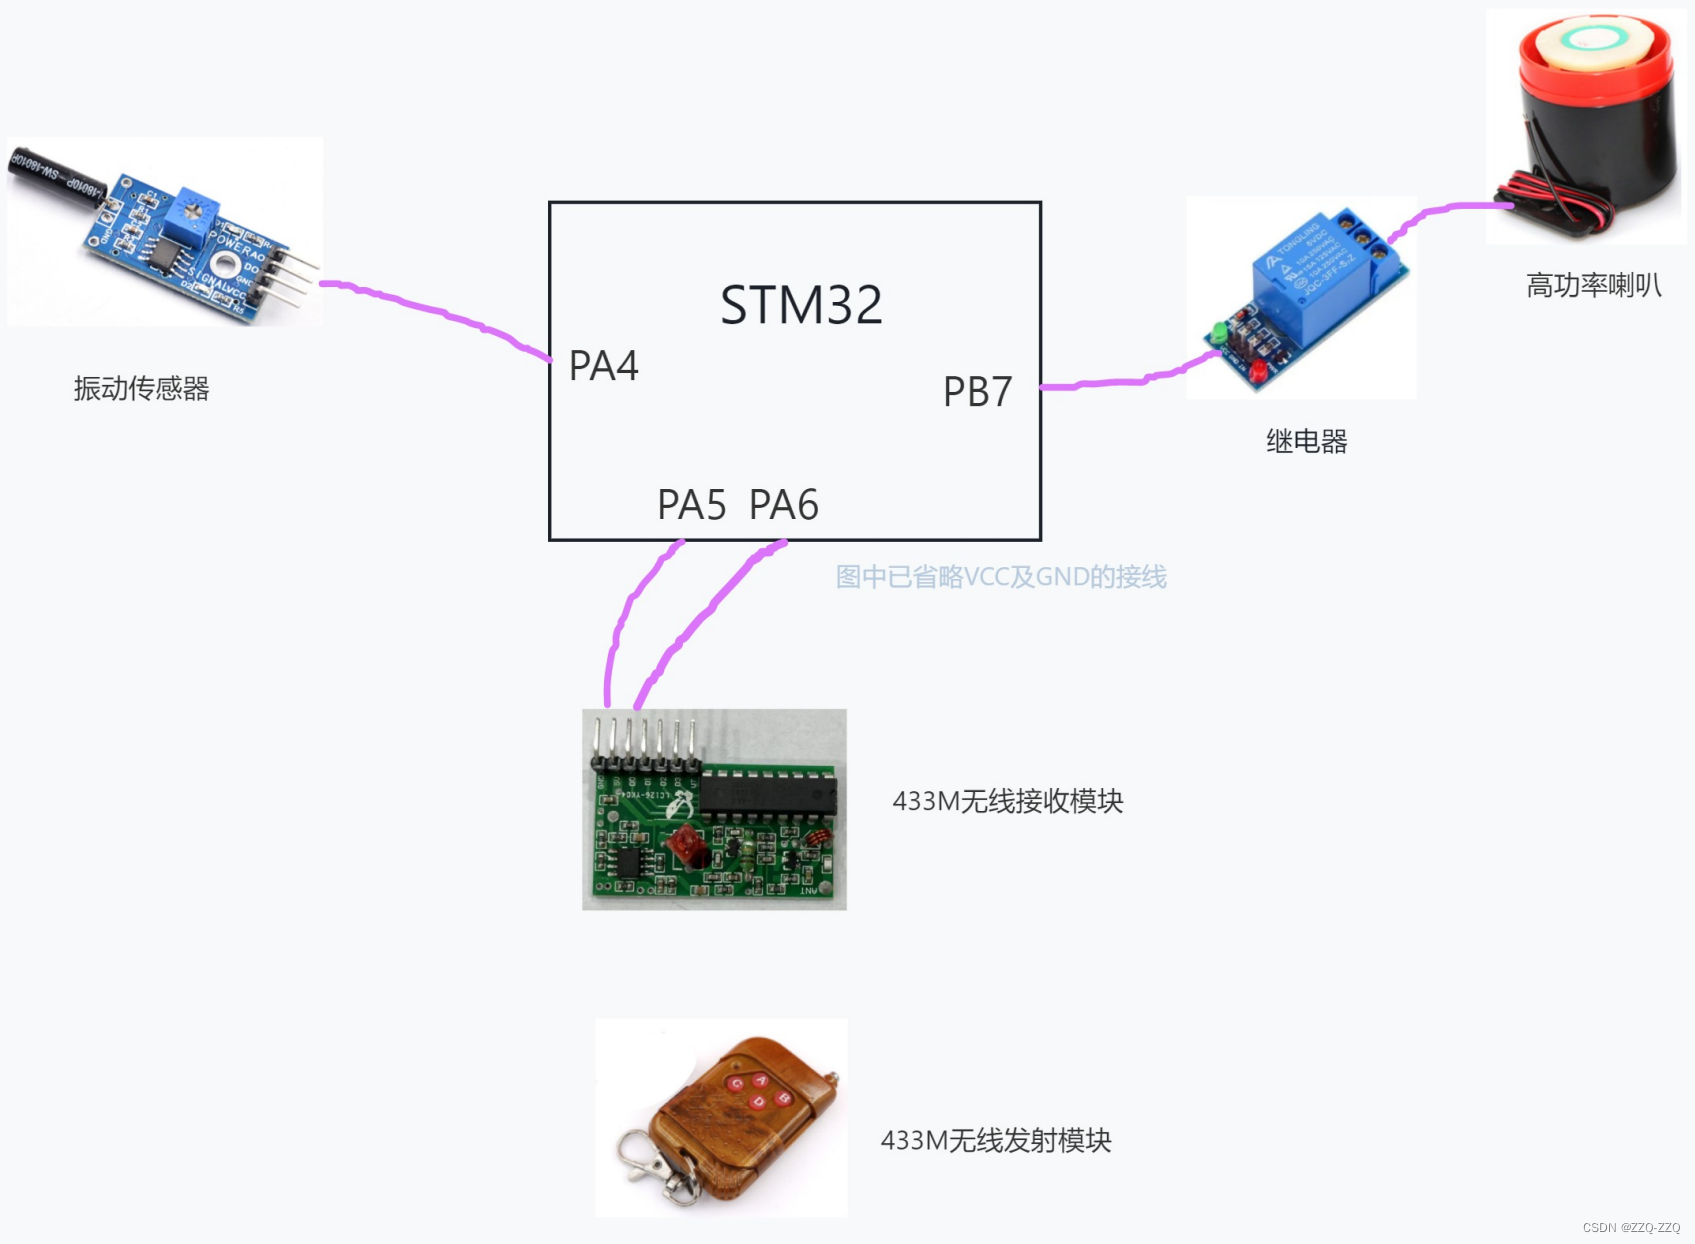
【小试牛刀:电动车报警项目】
项目功能:
①若检测到PA4被拉低(小偷偷车)且警报模式打开:将PB7拉低,继电器通电,喇叭一直响
②若检测到PA5被拉高(按下按键A):开启警报模式(ON),将PB7拉低2秒(喇叭响2秒)
③若检测到PA6被拉高(按下按键B):关闭警报模式(OFF),将PB7拉低1秒(喇叭响1秒)
#define J_ON 1
#define J_OFF 0
//重写中断服务函数,如果检测到EXTI中断请求,则进入此函数
void HAL_GPIO_EXTI_Callback(uint16_t GPIO_Pin)
{
    static int mark = J_OFF;
    switch(GPIO_Pin)
    {
        case GPIO_PIN_4:
            //如果检测到PA4被拉低(小偷偷车),并且警报模式打开
            if(HAL_GPIO_ReadPin(GPIOA, GPIO_PIN_4) == GPIO_PIN_RESET && mark == J_ON)
            {
                //则将PB7拉低,继电器通电,喇叭一直响
                HAL_GPIO_WritePin(GPIOB, GPIO_PIN_7, GPIO_PIN_RESET);
            }
        break;
        // 如果检测到PA5被拉高(按键A按下),设定为开启警报模式
        case GPIO_PIN_5:
            if(HAL_GPIO_ReadPin(GPIOA, GPIO_PIN_5) == GPIO_PIN_SET)
            {
                // 则将PB7拉低(喇叭响),2秒后恢复电平(喇叭不响),表示进入警报模式
                HAL_GPIO_WritePin(GPIOB, GPIO_PIN_7, GPIO_PIN_RESET);
                HAL_Delay(2000);
                HAL_GPIO_WritePin(GPIOB, GPIO_PIN_7, GPIO_PIN_SET);
                // 同时将标志位设置为ON
                mark = J_ON;
            }
        break;
        // 如果检测到PA6被拉高(按键B按下),设定为关闭警报模式
        case GPIO_PIN_6:
        if(HAL_GPIO_ReadPin(GPIOA, GPIO_PIN_6) == GPIO_PIN_SET)
            {
            // 则将PB7拉低(喇叭响),1秒后恢复电平(喇叭不响),表示关闭警报模式
            HAL_GPIO_WritePin(GPIOB, GPIO_PIN_7, GPIO_PIN_RESET);
            HAL_Delay(1000);
            HAL_GPIO_WritePin(GPIOB, GPIO_PIN_7, GPIO_PIN_SET);
            // 同时将标志位设置为OFF
            mark = J_OFF;
            }
        break;
    }
}注意:mark变量要设置为静态变量
static修饰的静态变量存储在全局数据区而不是栈中,这意味着该变量在程序运行期间始终存在,因此能够保存变量的值
参考:
STM32 HAL库 STM32CubeMx -- 外部中断_gpio pullup和pulldown_Dir_xr的博客-优快云博客
STM32 中断NVIC应用讲解(标准库andHAL库结合代码对比讲解,)-优快云博客
【按键库 MultiButton】
MultiButton | 一个小巧简单易用的事件驱动型按键驱动模块-优快云博客


 4853
4853

 被折叠的 条评论
为什么被折叠?
被折叠的 条评论
为什么被折叠?
 到【灌水乐园】发言


