


窗口管理(2)
本文基于
weston分支10.0.2进行描述.
五、概述
本文为窗口管理(1)的续章,更多站在开发者角度,以 weston 的代码实现讲解窗口管理(1)中所实现的部分业务场景.
六、数据结构
在窗口管理(1)中曾经描述过 weston 具体的分层逻辑,如下:
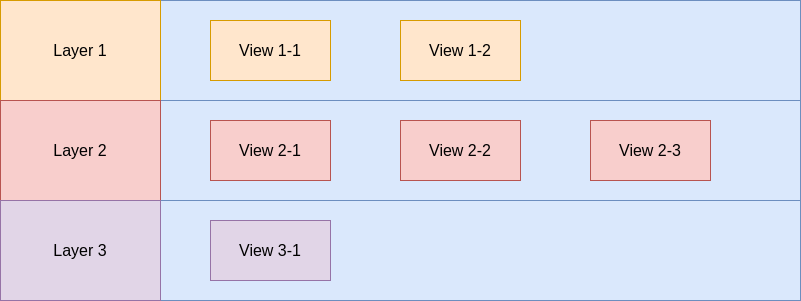
再进一步可以把 WESTON_LAYER_POSITION_NORMAL 展开为 workspace,那么就可以用下图来进行描述:
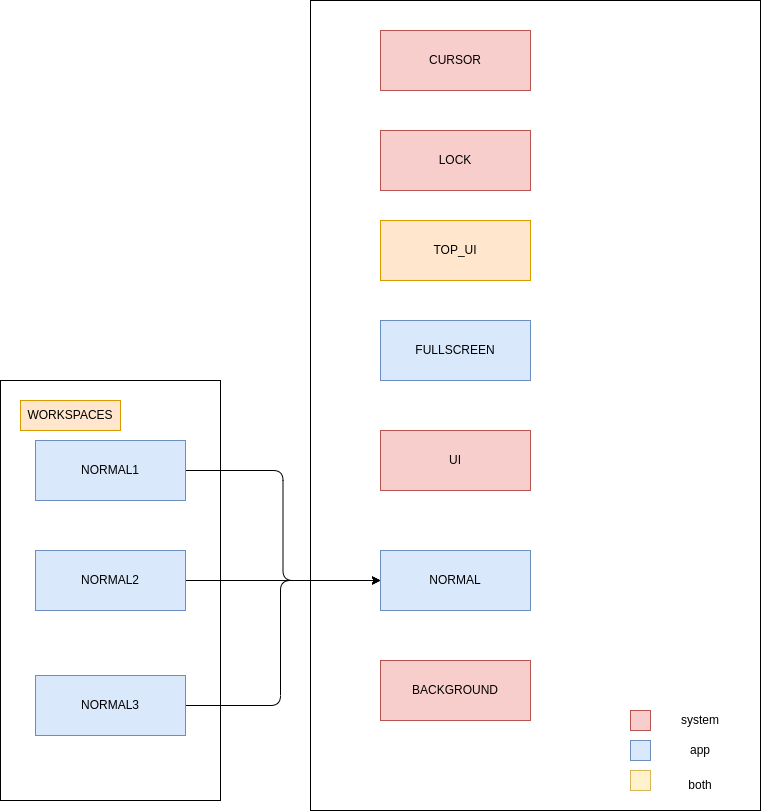
weston 有关于窗口管理部分的逻辑代码实现大多数位于 desktop-shell 文件夹下,有关于此的数据描述为:
// file : desktop-shell/shell.h
struct desktop_shell {
    // ...
    struct weston_layer fullscreen_layer;    /* 全屏层     (WESTON_LAYER_POSITION_FULLSCREEN) */
    struct weston_layer panel_layer;         /* 系统桌面层  (WESTON_LAYER_POSITION_UI) 对于 weston 参考 panel-position (weston.ini) */
    struct weston_layer background_layer;    /* 背景层     (WESTON_LAYER_POSITION_BACKGROUND) */
    struct weston_layer lock_layer;          /* 锁屏层     (WESTON_LAYER_POSITION_LOCK) */
    struct weston_layer input_panel_layer;   /* 输入层     (WESTON_LAYER_POSITION_TOP_UI) 一般输入法位于此层 */
    struct weston_layer minimized_layer;     /* 最小化层   (逻辑层) */
    // ...
    struct {
        struct wl_array array;
        unsigned int current;                   /* 索引(array),指向当前工作空间 */
        unsigned int num;                       /* 工作空间的最大数量 */
        // ...
    } workspaces;
};
其中单个 worksapce 的数据结构为:
struct workspace {
    struct weston_layer layer;                      /* 普通应用层 (WESTON_LAYER_POSITION_NORMAL) */
    // ...
};
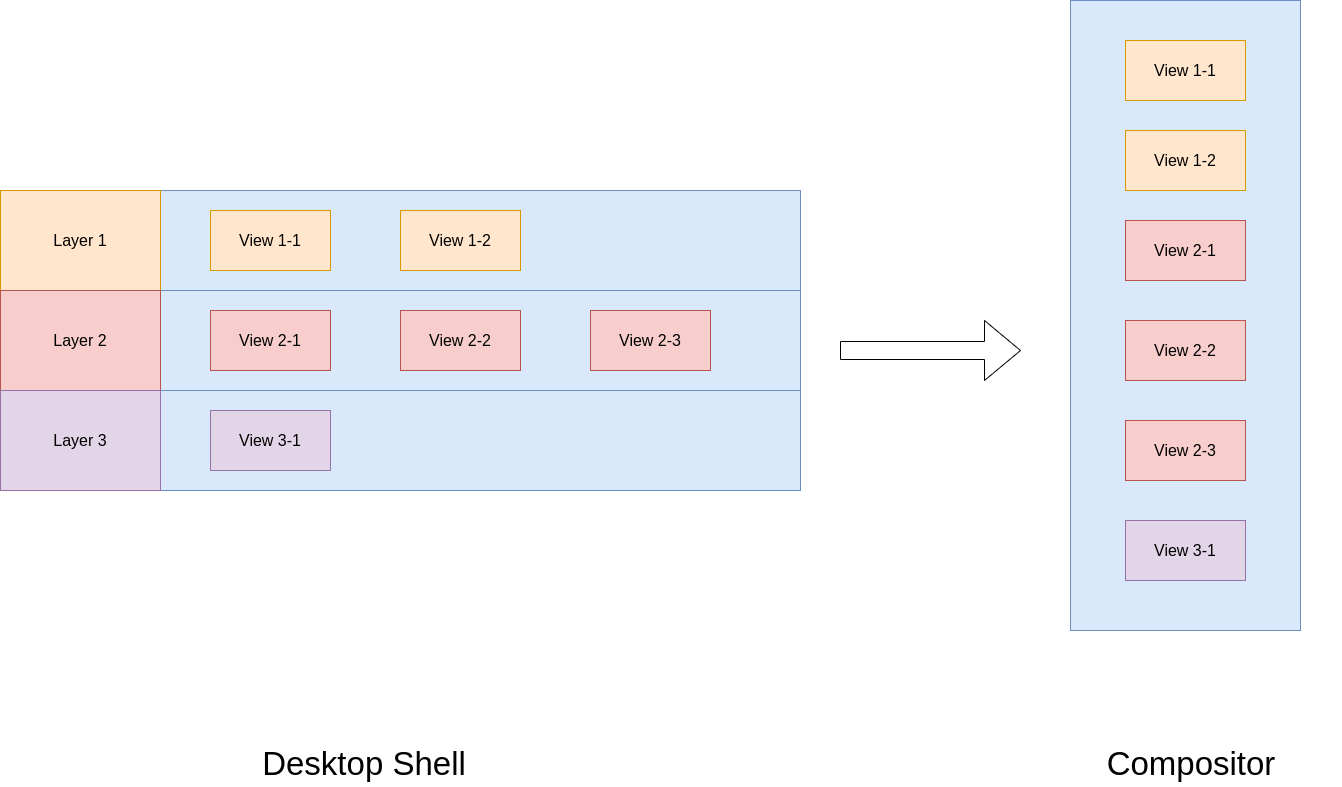
以上删除了部分与此无关的代码,从整理逻辑上来看 weston 的分层设计确实就是一个简单的二维链表(layer 中包含多个 view), 其中 normal layer 的实现比较特殊,可以看做是三维链表;除此之外并没有太多需要说明的地方.
除了上述的数据结构之外,窗口管理(1) 中还曾经说到过最终这些都会转化为一个一维只包含有 views 的链表:

支撑起右侧的数据结构为:
// file : libweston/compositor.c
struct weston_compositor {
    // ...
    struct wl_list layer_list;  /* struct weston_layer::link */
    struct wl_list view_list;   /* struct weston_view::link */
    // ...
};
从这里也可以看出来其实 weston 其实也是"业务"代码,各种上下文状态变量疯狂变更转移,实际上都是在内存里操作数据,真正干事的还是得靠系统接口;只是比较接近于系统级(虽然它也算是系统级程序,但本质来说也是一个应用层程序).
七、业务行为
(1) desktop_shell 与 weston_compositor 数据绑定
要想实现将 layer 的二维数据结构转化为一维数据结构,而二维数据结构存放在 desktop_shell::*_layer 中,一维数据结构则是存放在 weston_compositor::view_list 中;所以需要将 desktop_shell 与 weston_compositor 部分数据结构进行绑定.
首先是先需要提供 desktop_shell 中的 layer 注册至 weston_compositor, 这主要是以下两个接口实现的:
void weston_layer_set_position(struct weston_layer *layer, enum weston_layer_position position)
{
    struct weston_layer *below;

    wl_list_remove(&layer->link);

    /* 根据 position 将其按序添加入 compositor */
    layer->position = position;
    wl_list_for_each_reverse(below, &layer->compositor->layer_list, link) {
        if (below->position >= layer->position) {
            wl_list_insert(&below->link, &layer->link);
            return;
        }
    }
    wl_list_insert(&layer->compositor->layer_list, &layer->link);
}

void weston_layer_unset_position(struct weston_layer *layer)
{
    // Hint : layer->link 实际指向到了 weston_compositor::layer_list, 注意 weston_compositor 中的注释
    // See also : 有兴趣也可以了解一下Linux内核实现 `container_of` (百度),然后在看看 wayland CBB 的具体实现
    wl_list_remove(&layer->link);
    wl_list_init(&layer->link);
}
以上代码实际上非常简单,但是 weston 是基于 wayland 开发了,使用了 wayland 提供的 CBB 基础组件库,所以需要理解这个库的成本,在这里展开.
在 weston_layer_set_position 中出现了描述 layer 优先级的枚举 weston_layer_position, 其定义如下:
// file : include/libweston/libweston.h
/**
 * Higher value means higher in the stack.
 *
 * These values are based on well-known concepts in a classic desktop
 * environment. Third-party modules based on libweston are encouraged to use
 * them to integrate better with other projects.
 *
 * A fully integrated environment can use any value, based on these or not,
 * at their discretion.
 */
enum weston_layer_position {
    /*
        * Special value to make the layer invisible and still rendered.
        * This is used by compositors wanting e.g. minimized surfaces to still
        * receive frame callbacks.
        */
    WESTON_LAYER_POSITION_HIDDEN     = 0x00000000,

    /*
        * There should always be a background layer with a surface covering
        * the visible area.
        *
        * If the compositor handles the background itself, it should use
        * BACKGROUND.
        *
        * If the compositor supports runtime-loadable modules to set the
        * background, it should put a solid color surface at (BACKGROUND - 1)
        * and modules must use BACKGROUND.
        */
    WESTON_LAYER_POSITION_BACKGROUND = 0x00000002,

    /* For "desktop widgets" and applications like conky. */
    WESTON_LAYER_POSITION_BOTTOM_UI  = 0x30000000,

    /* For regular applications, only one layer should have this value
        * to ensure proper stacking control. */
    WESTON_LAYER_POSITION_NORMAL     = 0x50000000,

    /* For desktop UI, like panels. */
    WESTON_LAYER_POSITION_UI         = 0x80000000,

    /* For fullscreen applications that should cover UI. */
    WESTON_LAYER_POSITION_FULLSCREEN = 0xb0000000,

    /* For special UI like on-screen keyboard that fullscreen applications
        * will need. */
    WESTON_LAYER_POSITION_TOP_UI     = 0xe0000000,

    /* For the lock surface. */
    WESTON_LAYER_POSITION_LOCK       = 0xffff0000,

    /* Values reserved for libweston internal usage */
    WESTON_LAYER_POSITION_CURSOR     = 0xfffffffe,
    WESTON_LAYER_POSITION_FADE       = 0xffffffff,
};
基于以上的代码片段可知, weston_compositor::layer_list 中 layer 的排序是有顺序的,并且按照 weston_layer_position 的规则;其次 weston_compositor::layer_list 中的数据只是引用,其实都是来自于 desktop_shell.
然后 desktop_shell 会将 layer 插入 weston_compositor 中去,大致分为初始化以及运行时,截取部分初始化代码如下:
// file : desktop-shell/shell.c
int wet_shell_init(struct weston_compositor *ec, int *argc, char *argv[])
{
    // ...
    weston_layer_init(&shell->fullscreen_layer, ec);
    weston_layer_init(&shell->panel_layer, ec);
    weston_layer_init(&shell->background_layer, ec);
    weston_layer_init(&shell->lock_layer, ec);
    weston_layer_init(&shell->input_panel_layer, ec);

    weston_layer_set_position(&shell->fullscreen_layer,
                    WESTON_LAYER_POSITION_FULLSCREEN);
    weston_layer_set_position(&shell->panel_layer,
                    WESTON_LAYER_POSITION_UI);
    weston_layer_set_position(&shell->background_layer,
                    WESTON_LAYER_POSITION_BACKGROUND);
    // ...
    // 工作空间初始化 (normal layer)
    for (i = 0; i < shell->workspaces.num; i++) {
        pws = wl_array_add(&shell->workspaces.array, sizeof *pws);
        if (pws == NULL)
            return -1;

        *pws = workspace_create(shell);
        if (*pws == NULL)
            return -1;
    }
    activate_workspace(shell, 0);
    // ...
(2) layer 平面化
有了第一点 desktop_shell 与 weston_compositor 数据绑定 的描述,这一步就非常简单了,就操作一下链表就完事了:
void weston_compositor_build_view_list(struct weston_compositor *compositor, struct weston_output *output)
{
    struct weston_view *view, *tmp;
    struct weston_layer *layer;

    // ...
    // (1) 清空 compositor::view_list
    wl_list_for_each_safe(view, tmp, &compositor->view_list, link)
        wl_list_init(&view->link);
    wl_list_init(&compositor->view_list);
    // (2) 遍历 compositor::layer_list, 并将其中的 view 插入到 compositor::view_list
    wl_list_for_each(layer, &compositor->layer_list, link) {
        wl_list_for_each(view, &layer->view_list.link, layer_link.link) {
            view_list_add(compositor, view, output);
        }
    }
    // ...
}
经过了 weston_compositor_build_view_list 就实现了 layer 的平面化 (逻辑意义上的).
Tips :
weston_compositor_build_view_list何时调用? 每次 UI 刷新都调用,不使用缓存,从而确保图层关系正确刷新.
(3) 切换工作空间
快捷键 WIN + Fx
// file : desktop-shell/shell.c
void update_workspace(struct desktop_shell *shell, unsigned int index, struct workspace *from /* 原来的工作空间 */, struct workspace *to /* 现在的工作空间 */)
{
    shell->workspaces.current = index;
    weston_layer_set_position(&to->layer, WESTON_LAYER_POSITION_NORMAL);  // 添加至 weston_compositor::layer_list
    weston_layer_unset_position(&from->layer);                            // 从 weston_compositor::layer_list 中移除
}
(4) NORMAL layer 工作区域计算
// file :esktop-shell/shell.c
void
get_output_work_area(struct desktop_shell *shell,
            struct weston_output *output, /* 存储屏幕宽高 */
            pixman_rectangle32_t *area)
{
    int32_t panel_width = 0, panel_height = 0;

    if (!output) {
        area->x = 0;
        area->y = 0;
        area->width = 0;
        area->height = 0;

        return;
    }

    area->x = output->x;
    area->y = output->y;

    // 获取任务栏宽高
    get_output_panel_size(shell, output, &panel_width, &panel_height);

    switch (shell->panel_position) /* 任务栏其实有上下左右四个位置,默认为上 */ {
    case WESTON_DESKTOP_SHELL_PANEL_POSITION_TOP:
    default:
        area->y += panel_height;
        /* fallthrough */
    case WESTON_DESKTOP_SHELL_PANEL_POSITION_BOTTOM:
        area->width = output->width;
        area->height = output->height - panel_height;
        break;
    case WESTON_DESKTOP_SHELL_PANEL_POSITION_LEFT:
        area->x += panel_width;
        /* fallthrough */
    case WESTON_DESKTOP_SHELL_PANEL_POSITION_RIGHT:
        area->width = output->width - panel_width;
        area->height = output->height;
        break;
    }
}
(5) 最大化实现
void
shell_configure_fullscreen(struct shell_surface *shsurf)
{
    // ...
    // 将 weston view 从之前绑定的 layer 删除(如果存在的话),一般来说应该是处于某个 workspace 中的 normal layer
    weston_layer_entry_remove(&shsurf->view->layer_link);
    // 并将其转移到 fullscreen layer
    weston_layer_entry_insert(&shsurf->shell->fullscreen_layer.view_list,
                    &shsurf->view->layer_link);
    // ...
}
(6) 最小化实现
void set_minimized(struct weston_desktop_surface *desktop_surface, struct weston_surface *surface)
{
    // ...
    // 从 workspace layer 中移除
    weston_layer_entry_remove(&view->layer_link);
    // 将其缓存至 desktop_shell 中的 minimized_layer
    weston_layer_entry_insert(&shsurf->shell->minimized_layer.view_list, &view->layer_link);
    // 并将输入设备的焦点从其移除 (不在本章讨论范围之内)
    drop_focus_state(shsurf->shell, current_ws, view->surface);
    surface_keyboard_focus_lost(surface);
    // ...
}
八、结语
实际上本章只是初步讲解了一下有关于窗口管理相关的一些数据结构,并利用这些数据结构描述了一些具体场景;实际上的业务场景还将更加复杂,例如在本章最后一个最小化实现的例子中出现了焦点的概念,以及view还是套娃的结构,具有 sub view,同时 view 还要跟 surface 扯上关系,各种各样的;如果全部描述清楚工作量是相当大的,并且没有什么太大的价值;本文的职责实际就是一个引子而已,减低入门门槛罢了.


 6485
6485

 被折叠的 条评论
为什么被折叠?
被折叠的 条评论
为什么被折叠?
 到【灌水乐园】发言


