 使用Threejs加载与显示JSON点云数据


 本文介绍如何在Threejs项目中将PLY点云数据转换为JSON格式,并利用Points方法进行显示。通过C++和jsoncpp库将PLY文件转换,然后在Web端使用同步的Ajax调用JSON文件,最后在Threejs中呈现点云效果。
在Threejs导入并显示点云数据
最近在项目中遇到需求,需要在web端显示点云数据。将我的实现步骤介绍在这里供大家参考。我使用的是threejs开源库,最终实现
1. 数据格式
原本是点云数据是ply格式的。在threejs中有ply导入的loader,经过简略的阅读和学习。我只找到了它加载mesh文件的支持函数,对于点云没有找到相关的支持。于是我就考虑使用对html来说更容易读取的json格式存储和导入点云数据。
值得一提的是,json文件占用空间会更大,如果有时间我也希望可以使用一些二进制的存储方式,但是在这里只是为了实现,暂时不考虑太多效率方面的问题。
于是我使用C++,先将ply文件转写成json文件。
1.1 jsoncpp
C++上使用的是jsoncpp,但是cmakelist配置遇到了一点问题。最后综合了许多回答。加载了头文件之后,我自己在电脑中找到了静态库文件加载到了项目中。可能不是很优美,但是可以完美的运行和使用了。
find_package(PkgConfig REQUIRED)
pkg_check_modules(JSONCPP jsoncpp)

include_directories(
${JSONCPP_INCLUDE_DIRS}
)

target_link_libraries(example
  /usr/local/lib/libjsoncpp.a
)
1.2 C++重写文件
我使用了下面的函数读取并重写了json文件。
void Ulocalization::LoadPlyAndSaveJson(const std::string& load_path, const std::string& save_path)
{
    std::cout << std::endl << "[TO JSON]  Load fused down sampled point cloud and save to . " << std::endl;

    std::vector<PlyPoint> plypointT = ReadPly(load_path);
    std::cout << "   There are " << plypointT.size() << " points." << std::endl;

    Json::Value root;
    Json::Value vertex;
    Json::Value color;
    constexpr bool shouldUseOldWay = false;
    root["descrition"] = "vertex and color, each is a 3 element vector";
    root["name"] = "spring square";
    root["size"] = plypointT.size();

    for(size_t i=0, iend=plypointT.size(); i<iend;i++)
    {
        float xpt = plypointT[i].x;
        float ypt = plypointT[i].y;
        float zpt = plypointT[i].z;
        int rcolor = plypointT[i].r;
        int gcolor = plypointT[i].g;
        int bcolor = plypointT[i].b;
        vertex.append(xpt);
        vertex.append(ypt);
        vertex.append(zpt);
        color.append(rcolor);
        color.append(gcolor);
        color.append(bcolor);
    }

    root["vertex"] = vertex;
    root["color"] = color;

    std::ofstream ofs;
    ofs.open(save_path);
    ofs << root.toStyledString();
    ofs.close();

    std::cout << "   Saved to " << save_path << std::endl << std::endl;
}
2. JSON的读取
在html中读取json我使用的是下面的这个库,在网上可以找到一些相关的使用方法。
<script src="https://code.jquery.com/jquery-3.4.1.min.js"></script>
它主要有两种调用方法,一个是通过 “.getJSON (jsonFile, function(data){…})” 。
var x,y,z,r,g,b;
var jsonFile = "../resources/fused_downsampled.json";

//var particlesX = new Array(200);
//var particles = new Array(200);
// see more https://blog.youkuaiyun.com/weixin_39823527/article/details/80392839
// we cannot use this mehtod, we need synchronous method, otherwise the json file will load fail.
//$.getJSON (jsonFile, function(data){
//	var index = 0;
    //	$.each(data.vertex, function(i,item){
    			//		if (i%3 == 0) x = parseInt(item*10);
			//		else if (i%3 == 1) y = parseInt(item*10);
			//		else if (i%3 == 2) {
			//			z = parseInt(item*10);
			//			var particle = new THREE.Vector3(x, y, z);
			//			particlesX[index] = x;
			//			particles[index] = particle;
			//			index = index + 1;
			//		}
			//		if(index > 199) return false;
  			//	});
			//	console.log("load done!");
			//});
但是上面的是异步的调用方式。为了方便我使用的是".ajax({…})"提供的同步调用。
$.ajax({
         type: "get",
         url: jsonFile,
         dataType: "json",
         async: false,
         success: function(data){
             var index = 0;
			 console.log("start load!");
             console.log("data point size :", data.size);
			 for(var i = 0; i < data.size; i++){
				  if (i%3 == 2) {
						x = -data.vertex[i-2]*10;
					    y = -data.vertex[i-1]*10;
						z = data.vertex[i]*10;
						r = data.color[i-2]/255;
						g = data.color[i-1]/255;
						b = data.color[i]/255;
						var particle = new THREE.Vector3(x, y, z);
						geometry.vertices.push(particle);
						geometry.colors.push(new THREE.Color(r,g,b));
					}
  				}
				console.log("load done!");
                }
});
3. 使用threejs中的Points
threejs中提供了Points方法以加载和显示点云数据。我们使用它来显示点云。
var cloud;
cloud = new THREE.Points(geometry, material);
scene.add(cloud);
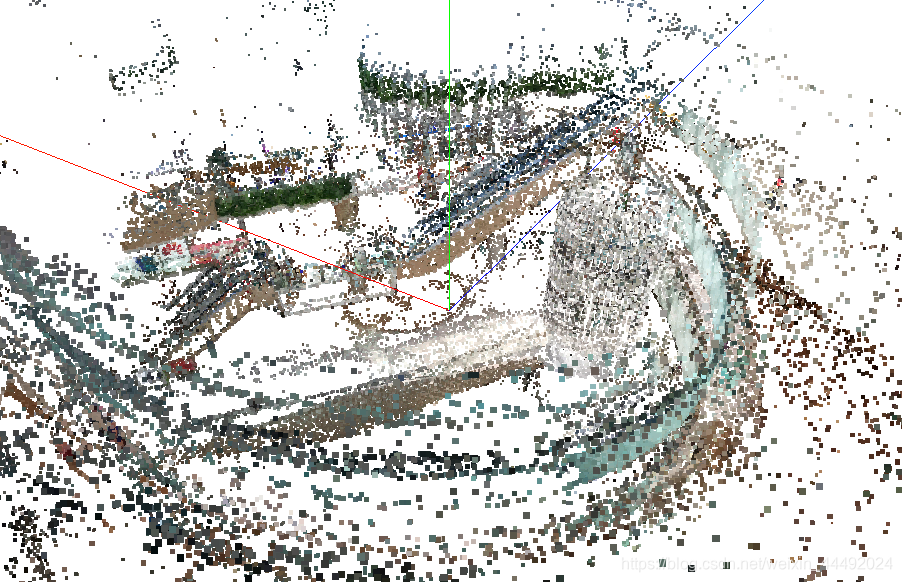
最终的效果如下所示,也可以访问网页最终实现。值得一提的是,我使用github来发布,但是github上有文件大小的限制(25m),json的文件又相对比较大,所以我对点云做了降采样处理,然后才成功完成。


 1591
1591


 到【灌水乐园】发言


