


 本文介绍YOLO(You Only Look Once)算法在自驾车检测系统中的应用。YOLO模型通过一次前向传播就能进行物体检测,实现高准确性和实时性。模型输入为608x608图像,输出为19x19x5x85的编码,包含每个网格的5个锚框信息。非极大抑制用于过滤低得分的预测框,减少重叠的检测结果。最后,将编码输出通过过滤和非极大抑制处理,得到最终的检测结果。
1 - Problem Statement
You are working on a self-driving car. As a critical component of this project, you'd like to first build a car detection system. To collect data, you've mounted a camera to the hood (meaning the front) of the car, which takes pictures of the road ahead every few seconds while you drive around.
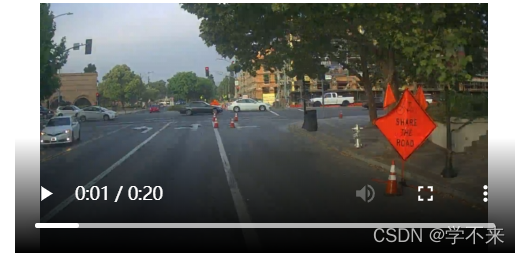
Pictures taken from a car-mounted camera while driving around Silicon Valley.
We would like to especially thank [drive.ai](https://www.drive.ai/) for providing this dataset! Drive.ai is a company building the brains of self-driving vehicles.
![]()
You've gathered all these images into a folder and have labelled them by drawing bounding boxes around every car you found. Here's an example of what your bounding boxes look like.
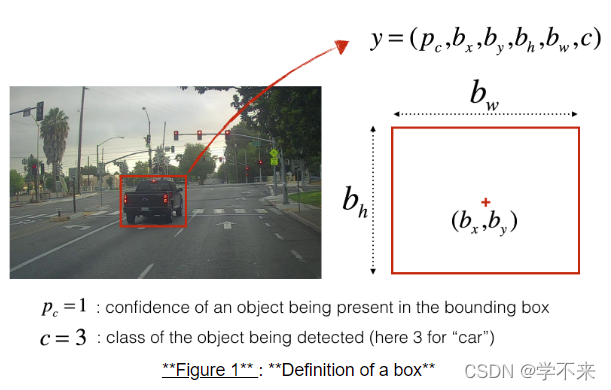
If you have 80 classes that you want YOLO to recognize, you can represent the class label 𝑐 either as an integer from 1 to 80, or as an 80-dimensional vector (with 80 numbers) one component of which is 1 and the rest of which are 0. The video lectures had used the latter representation; in this notebook, we will use both representations, depending on which is more convenient for a particular step.
In this exercise, you will learn how YOLO works, then apply it to car detection. Because the YOLO model is very computationally expensive to train, we will load pre-trained weights for you to use.
2 - YOLO
YOLO ("you only look once") is a popular algoritm because it achieves high accuracy while also being able to run in real-time. This algorithm "only looks once" at the image in the sense that it requires only one forward propagation pass through the network to make predictions. After non-max suppression, it then outputs recognized objects together with the bounding boxes.
2.1 - Model details
First things to know:
- The input is a batch of images of shape (m, 608, 608, 3)
- The output is a list of bounding boxes along with the recognized classes. Each bounding box is represented by 6 numbers (𝑝𝑐,𝑏𝑥,𝑏𝑦,𝑏ℎ,𝑏𝑤,𝑐) as explained above. If you expand 𝑐c into an 80-dimensional vector, each bounding box is then represented by 85 numbers.
We will use 5 anchor boxes. So you can think of the YOLO architecture as the following: IMAGE (m, 608, 608, 3) -> DEEP CNN -> ENCODING (m, 19, 19, 5, 85).
Lets look in greater detail at what this encoding represents.
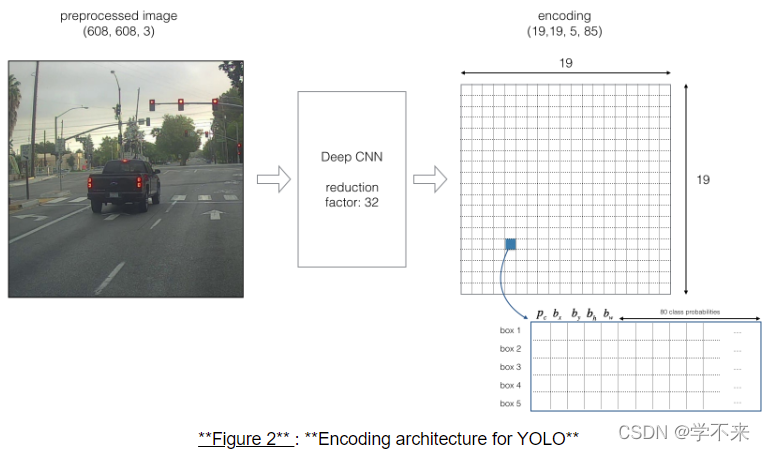
If the center/midpoint of an object falls into a grid cell, that grid cell is responsible for detecting that object.
Since we are using 5 anchor boxes, each of the 19 x19 cells thus encodes information about 5 boxes. Anchor boxes are defined only by their width and height.
For simplicity, we will flatten the last two last dimensions of the shape (19, 19, 5, 85) encoding. So the output of the Deep CNN is (19, 19, 425).
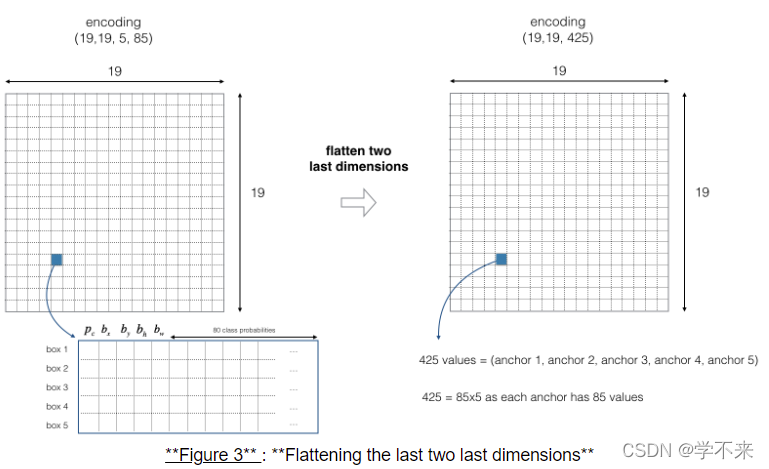
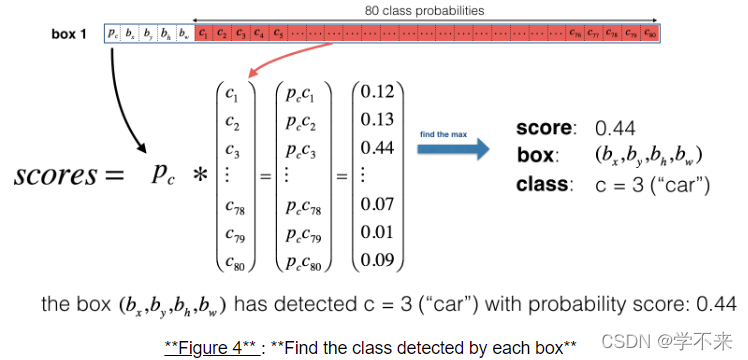
Now, for each box (of each cell) we will compute the following elementwise product and extract a probability that the box contains a certain class.
Here's one way to visualize what YOLO is predicting on an image:
- For each of the 19x19 grid cells, find the maximum of the probability scores (taking a max across both the 5 anchor boxes and across different classes).
- Color that grid cell according to what object that grid cell considers the most likely.
Doing this results in this picture:
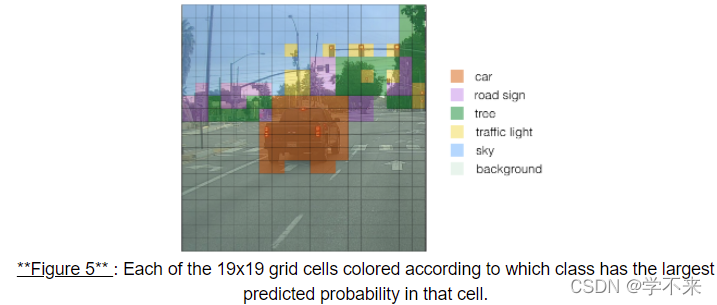
Note that this visualization isn't a core part of the YOLO algorithm itself for making predictions; it's just a nice way of visualizing an intermediate result of the algorithm.
Another way to visualize YOLO's output is to plot the bounding boxes that it outputs. Doing that results in a visualization like this:
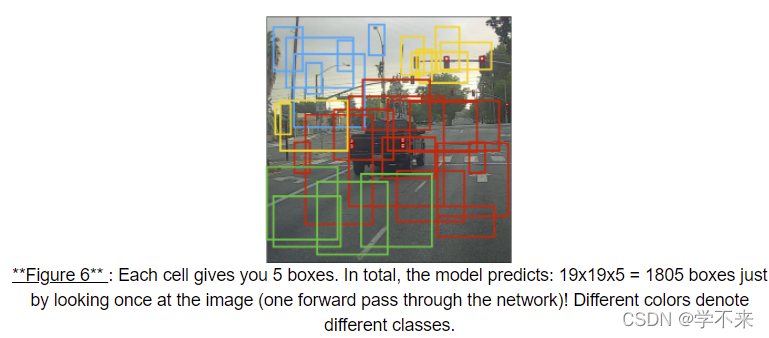
In the figure above, we plotted only boxes that the model had assigned a high probability to, but this is still too many boxes. You'd like to filter the algorithm's output down to a much smaller number of detected objects. To do so, you'll use non-max suppression. Specifically, you'll carry out these steps:
- Get rid of boxes with a low score (meaning, the box is not very confident about detecting a class)
- Select only one box when several boxes overlap with each other and detect the same object.
2.2 - Filtering with a threshold on class scores
You are going to apply a first filter by thresholding. You would like to get rid of any box for which the class "score" is less than a chosen threshold.
The model gives you a total of 19x19x5x85 numbers, with each box described by 85 numbers. It'll be convenient to rearrange the (19,19,5,85) (or (19,19,425)) dimensional tensor into the following variables:
box_confidence: tensor of shape (19×19,5,1)(19×19,5,1) containing 𝑝𝑐pc (confidence probability that there's some object) for each of the 5 boxes predicted in each of the 19x19 cells.boxes: tensor of shape (19×19,5,4)(19×19,5,4) containing (𝑏𝑥,𝑏𝑦,𝑏ℎ,𝑏𝑤)(bx,by,bh,bw) for each of the 5 boxes per cell.box_class_probs: tensor of shape (19×19,5,80)(19×19,5,80) containing the detection probabilities (𝑐1,𝑐2,...𝑐80)(c1,c2,...c80) for each of the 80 classes for each of the 5 boxes per cell.
Exercise: Implement yolo_filter_boxes().
- Compute box scores by doing the elementwise product as described in Figure 4. The following code may help you choose the right operator:
a = np.random.randn(19*19, 5, 1) b = np.random.randn(19*19, 5, 80) c = a * b # shape of c will be (19*19, 5, 80) - For each box, find:
- Create a mask by using a threshold. As a reminder:
([0.9, 0.3, 0.4, 0.5, 0.1] < 0.4)returns:[False, True, False, False, True]. Th
 最低0.47元/天 解锁文章


 155
155

 被折叠的 条评论
为什么被折叠?
被折叠的 条评论
为什么被折叠?
 到【灌水乐园】发言


