


 本文提供了一份详细的Caffe安装教程,适用于Ubuntu 16.04系统。内容涵盖依赖软件安装、环境配置、编译步骤及常见问题解决方案。
install caffe on ubuntu 16.04
可以参看视频:youtube http://caffe.berkeleyvision.org
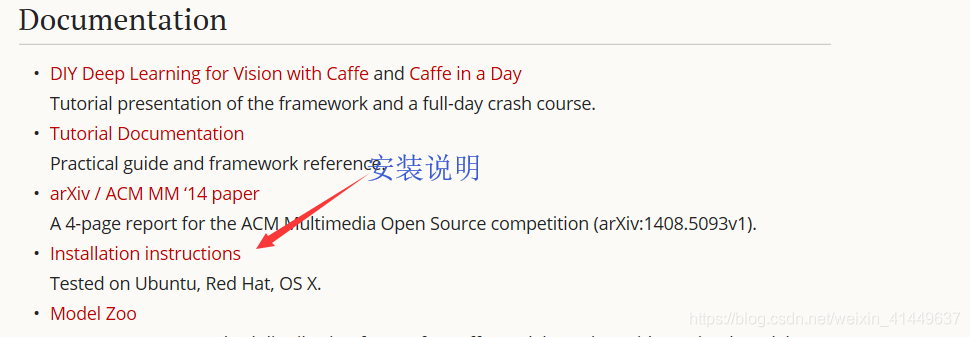
1.官网的安装说明
documentation --> installation instrument
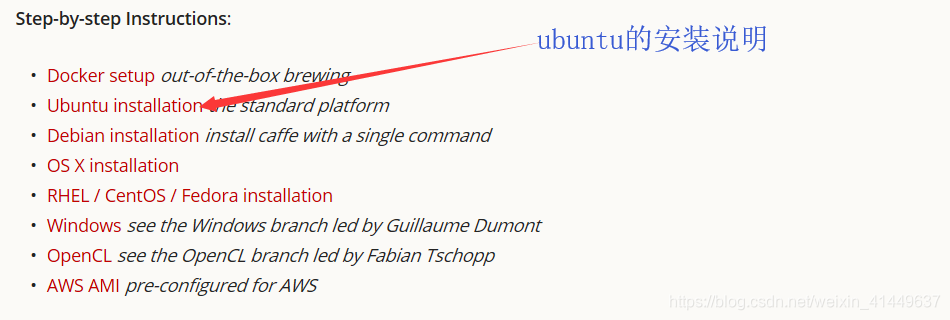
Step-by-step Instructions: ->Ubuntu installation the standard platform
2.接下来就是在命令窗口复制、粘贴、执行命令了
For Ubuntu (< 17.04) . #分2条执行
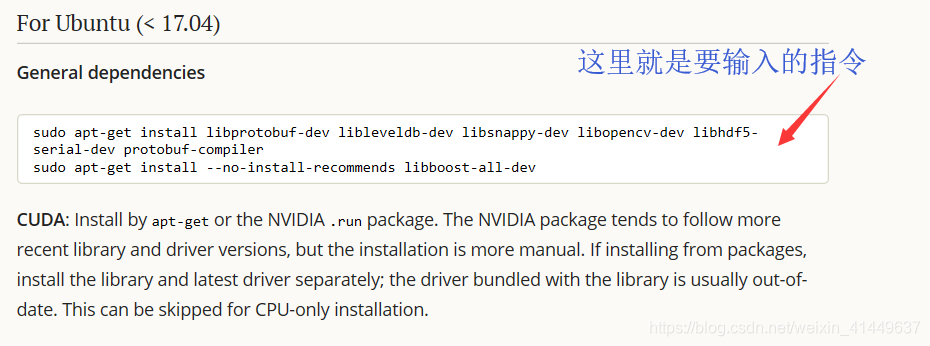
注解:黄色标记的文本就是要执行的命令
sudo apt-get install libprotobuf-dev libleveldb-dev libsnappy-dev libopencv-dev libhdf5-serial-dev protobuf-compiler
sudo apt-get install --no-install-recommends libboost-all-dev
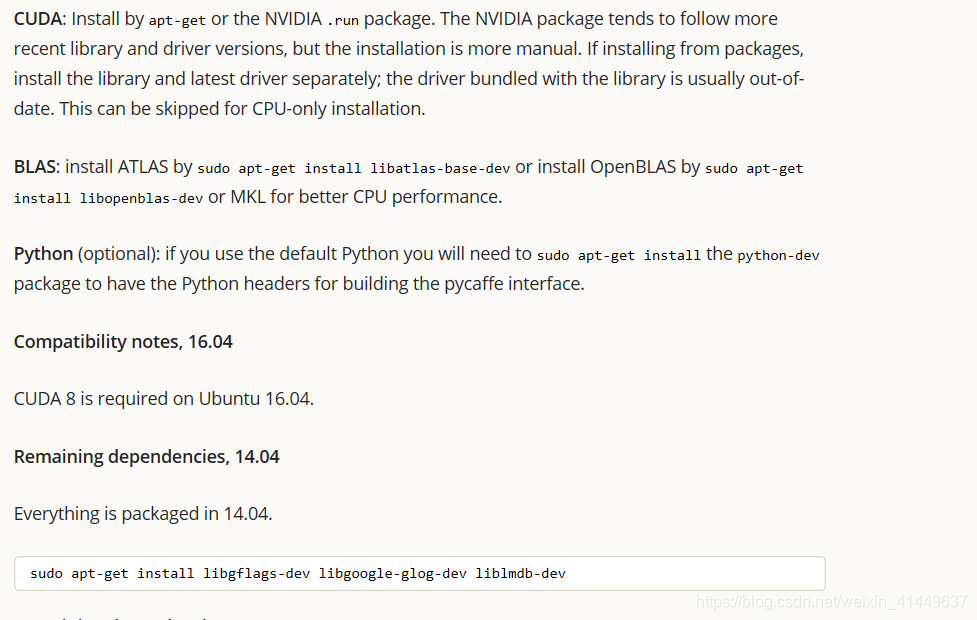
CUDA: Install by apt-get or the NVIDIA
This can be skipped for CPU-only installation.
BLAS: install ATLAS by sudo apt-get install libatlas-base-dev or install OpenBLAS by sudo apt-get install libopenblas-dev or MKL for better CPU performance.
Python (optional): if you use the default Python you will need to sudo apt-get install the python-dev package to have the Python headers for building the pycaffe interface.
sudo apt-get install python
Compatibility notes, 16.04
CUDA 8 is required on Ubuntu 16.04.
install cuda8 #视频没有做,建议提前安装上
Remaining dependencies, 14.04
Everything is packaged in 14.04.
sudo apt-get install libgflags-dev libgoogle-glog-dev liblmdb-dev
Continue with compilation.
Python
The main requirements are numpy and boost.python (provided by boost). pandas is useful too and needed for some examples.
#以下是预备工作
require https://github.com/BVLC/caffe
https://github.com/BVLC/caffe.git #复制这行
mkdir .local/install #创建文件夹
cd .local/install #进入文件夹
git clone https://github.com/BVLC/caffe.git #下载到本地文件夹,
sudo apt install git #第一次安装出现
补充:
.local/install 的具体位置 :  /home/~/.local/install
~/ #指的是用户的文件夹
.文件为隐藏的文件  #查看方法:进入自己主目录,按ctrl+h.就能看见以点号开头的隐藏文件

 ls -a  显示所有文件,也包括隐藏文件
删除文件夹 命令:sudo rm -r 文件夹名
cd caffe #不换路径,直接cd即可
ls #查看当前路径下的文件
find -name requirements.txt #找到requirements
cd python #进入此文件夹,即可找到requirement.txt 文件
sudo apt install python-pip #第一次安装出现
==for req in $(cat requirements.txt); do pip install $req; done #安装requirement里的依赖包 ==
cd … #回到caffe文件下
but we suggest first installing the Anaconda Python distribution, which provides most of the necessary packages, as well as the hdf5 library dependency. #建议安装anconda
python -m site #查看python目录,找到以site-package结尾的,copy路径
3.Compilation 编译
Caffe can be compiled with either Make or CMake. Make is officially supported while CMake is supported by the community.
ls #目的是下面的命令输入时,可以参考文件名
cp Makefile.config.example Makefile.config #复制文件
vi Makefile.config #此处的编辑可以用 xcode
#修改的makefile.config的地方有两处,如下:
CPU_ONLY := 1 #去掉注释
==PYTHON_INCLUDE := /usr/include/python2.7 ==
#在此处粘贴刚才复制的site-package的路径,替换掉下面的路径
/usr/lib/python2.7/dist-packages/numpy/core/include #该行不要
:wq #退出并保存
ls /。。。/sitepackage前的路径
find / …/site-packages -name numpy
vi Makefile.config #注意请提前切换路径
#在此处粘贴刚才复制的site-package的路径 添加 numpy/core/include
find /Library/Frameworks/Python.framework/Versions/2.7/lib/python2.7/site-packages/ -name numpy #
#执行完上条命令,可以看到有 numpy/core/include/numpy
/Library/Frameworks/Python.framework/Versions/2.7/lib/python2.7/site-packages//numpy/core/include/numpy
==WITH_PYTHON_LAYER := 1 ==#该行的注释去掉
添加
/usr/lib/x86_64-linux-gnu/hdf5
查看linux下的opencv安装路径:
sudo find / -iname “opencv”
4.遇到的问题
编译 pycaffe时报错:fatal error: numpy/arrayobject.h没有那个文件或目录
sudo apt-get install python-numpy
然后
sudo make pycaffe -j16
wget http://archive.ipython.org/release/5.1.0/ipython-5.1.0.tar.gz
tar -xzf ipython-5.1.0.tar.gz
cd ipython-5.1.0
sudo python setup.py install
ImportError: cannot import name '_validate_lengths
numpy版本太高,我对numpy进行了重新安装:
pip install numpy1.15.0==
ImportError: No module named scipy
pip install 'scipy0.13.2’==
cannot import name _denoise_bilateral
pip install 'scikit-image0.9.3’==
ImportError: No module named pydot
sudo apt-get install graphviz
pip install pydot
export PYTHONPATH=/home/cody/.local/install/caffe/python
/home/cody/.local/lib/python2.7/site-packages/scipy/stats/stats.py:252: RuntimeWarning: numpy.ufunc size changed, may indicate binary incompatibility
from ._rank import rankdata, tiecorrect
解决办法:
pip uninstall numpy 1.15.0
pip install numpy1.16.4
以上,如有问题,请百度或这Google或者GitHub,对,GitHub才是真正解决问题的地方


 1662
1662

 被折叠的 条评论
为什么被折叠?
被折叠的 条评论
为什么被折叠?
 到【灌水乐园】发言


