import tensorflow as tf
import matplotlib.pyplot as plt
mnist = tf.keras.datasets.mnist
(x_train, y_train), (x_test, y_test) = mnist.load_data()
x_train = tf.expand_dims(x_train / 255.0, -1)
class Encoder(tf.keras.Model):
def __init__(self):
super(Encoder, self).__init__()
self.conv = tf.keras.Sequential([
tf.keras.layers.Conv2D(filters=32, kernel_size=(7, 7), activation='relu', strides=2),
tf.keras.layers.BatchNormalization(),
tf.keras.layers.Conv2D(filters=64, kernel_size=(5, 5), activation='relu', strides=1),
tf.keras.layers.BatchNormalization(),
tf.keras.layers.Conv2D(filters=128, kernel_size=(3, 3), activation='relu', strides=1),
tf.keras.layers.BatchNormalization(),
])
self.fc = tf.keras.Sequential([
tf.keras.layers.Flatten(),
tf.keras.layers.Dense(128, activation='relu'),
tf.keras.layers.Dense(128, activation='relu'),
tf.keras.layers.Dense(2, activation='tanh')
])
def call(self, inputs):
x = self.conv(inputs)
y = self.fc(x)
return y
class Decoder(tf.keras.Model):
def __init__(self):
super(Decoder, self).__init__()
self.fc = tf.keras.Sequential([
tf.keras.layers.Dense(128, activation='relu'),
tf.keras.layers.Dense(128, activation='relu'),
tf.keras.layers.Dense(5 * 5 * 128, activation='relu'),
])
self.d_conv = tf.keras.Sequential([
tf.keras.layers.Conv2DTranspose(filters=64, kernel_size=(3, 3), activation='relu', strides=1),
tf.keras.layers.BatchNormalization(),
tf.keras.layers.Conv2DTranspose(filters=32, kernel_size=(5, 5), activation='relu', strides=1),
tf.keras.layers.BatchNormalization(),
tf.keras.layers.Conv2DTranspose(filters=1, kernel_size=(8, 8), activation='sigmoid', strides=2),
tf.keras.layers.BatchNormalization(),
])
def call(self, inputs):
x = self.fc(inputs)
x = tf.reshape(x, [-1, 5, 5, 128])
y = self.d_conv(x)
return y
if __name__ == '__main__':
encoder = Encoder()
decoder = Decoder()
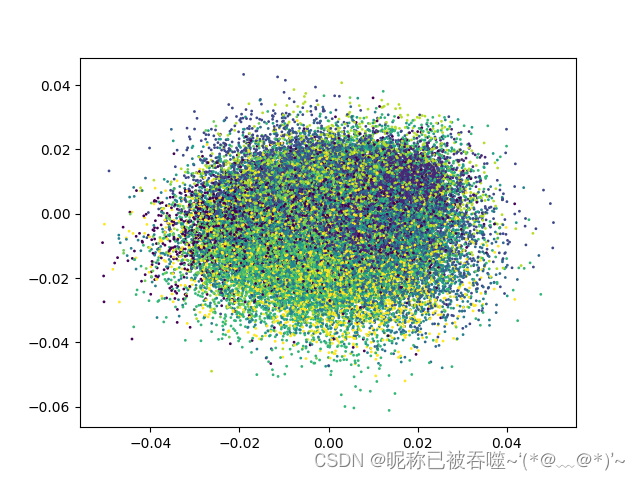
out = encoder.predict(x_train)
plt.scatter(out.T[0], out.T[1], c=y_train, s=1)
plt.show()
model = tf.keras.Sequential([
encoder, decoder
])
model.compile(optimizer='adam', loss='MSE')
model.fit(x_train, x_train, batch_size=1024, epochs=100)
out = encoder.predict(x_train)
plt.scatter(out.T[0], out.T[1], c=y_train, s=1)
plt.show()
encode before training
encode after training
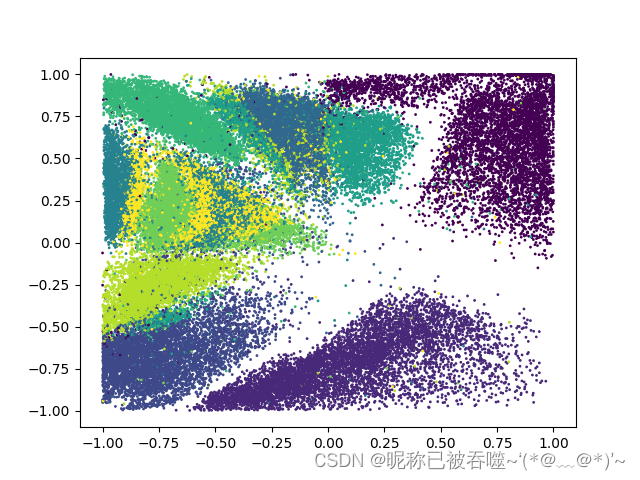


 本文介绍了使用TensorFlow构建的自动编码器模型,包括编码器和解码器的设计,以及如何对MNIST数据集进行预处理和训练。通过编码前后的特征可视化,展示了模型在数据压缩和重构上的效果。


 4370
4370

 被折叠的 条评论
为什么被折叠?
被折叠的 条评论
为什么被折叠?
 到【灌水乐园】发言


