


 本文详细介绍了如何从GitHub下载FFmpeg5.1分支源码,编译安装过程包括在macOS上的步骤,以及编译后的目录结构。此外,还提供了在macOS上运行示例程序的方法,包括remuxing网络HLS流到MP4的演示。对于Windows平台,文章提到了使用msys2和mingw编译libfdk-aac库的额外步骤。
目录
源码下载
请于此GitHub - FFmpeg/FFmpeg: Mirror of https://git.ffmpeg.org/ffmpeg.git下载ffmpeg源码,并切换到分支 release/5.1。
目录结构
切换到release/5.1分支后,执行 tree -L 1查看ffmpeg的目录结构:
macos@localhost FFmpeg % tree -L 1
.
├── CONTRIBUTING.md
├── COPYING.GPLv2
├── COPYING.GPLv3
├── COPYING.LGPLv2.1
├── COPYING.LGPLv3
├── CREDITS
├── Changelog
├── INSTALL.md
├── LICENSE.md
├── MAINTAINERS
├── Makefile
├── README.md
├── RELEASE
├── RELEASE_NOTES
├── compat
├── config.h
├── config_components.h
├── configure
├── doc
├── ffbuild
├── ffmpeg
├── ffmpeg_g
├── ffplay
├── ffplay_g
├── ffprobe
├── ffprobe_g
├── fftools
├── libavcodec
├── libavdevice
├── libavfilter
├── libavformat
├── libavutil
├── libpostproc
├── libswresample
├── libswscale
├── mac_build
├── presets
├── tests
└── tools
编译安装
要运行ffmpeg的examples,首先编译安装ffmpeg各库,然后再编译运行其examples,在上面的ffmpeg根目录下,执行如下命令:
./configure --prefix=./mac_build

make clean

make -j 8

make -j 8 install
待编译安装完毕后,mac_build目录结构大致如下:
.
├── bin
│   ├── ffmpeg
│   ├── ffplay
│   └── ffprobe
├── include
│   ├── libavcodec
│   │   ├── ac3_parser.h
│   │   ├── adts_parser.h
│   │   ├── avcodec.h
│   │   ├── avdct.h
│   │   ├── avfft.h
│   │   ├── bsf.h
│   │   ├── codec.h
│   │   ├── codec_desc.h
│   │   ├── codec_id.h
│   │   ├── codec_par.h
│   │   ├── d3d11va.h
│   │   ├── defs.h
│   │   ├── dirac.h
│   │   ├── dv_profile.h
│   │   ├── dxva2.h
│   │   ├── jni.h
│   │   ├── mediacodec.h
│   │   ├── packet.h
│   │   ├── qsv.h
│   │   ├── vdpau.h
│   │   ├── version.h
│   │   ├── version_major.h
│   │   ├── videotoolbox.h
│   │   ├── vorbis_parser.h
│   │   └── xvmc.h
│   ├── libavdevice
│   │   ├── avdevice.h
│   │   ├── version.h
│   │   └── version_major.h
│   ├── libavfilter
│   │   ├── avfilter.h
│   │   ├── buffersink.h
│   │   ├── buffersrc.h
│   │   ├── version.h
│   │   └── version_major.h
│   ├── libavformat
│   │   ├── avformat.h
│   │   ├── avio.h
│   │   ├── version.h
│   │   └── version_major.h
│   ├── libavutil
│   │   ├── adler32.h
│   │   ├── aes.h
│   │   ├── aes_ctr.h
│   │   ├── attributes.h
│   │   ├── audio_fifo.h
│   │   ├── avassert.h
│   │   ├── avconfig.h
│   │   ├── avstring.h
│   │   ├── avutil.h
│   │   ├── base64.h
│   │   ├── blowfish.h
│   │   ├── bprint.h
│   │   ├── bswap.h
│   │   ├── buffer.h
│   │   ├── camellia.h
│   │   ├── cast5.h
│   │   ├── channel_layout.h
│   │   ├── common.h
│   │   ├── cpu.h
│   │   ├── crc.h
│   │   ├── csp.h
│   │   ├── des.h
│   │   ├── detection_bbox.h
│   │   ├── dict.h
│   │   ├── display.h
│   │   ├── dovi_meta.h
│   │   ├── downmix_info.h
│   │   ├── encryption_info.h
│   │   ├── error.h
│   │   ├── eval.h
│   │   ├── ffversion.h
│   │   ├── fifo.h
│   │   ├── file.h
│   │   ├── film_grain_params.h
│   │   ├── frame.h
│   │   ├── hash.h
│   │   ├── hdr_dynamic_metadata.h
│   │   ├── hdr_dynamic_vivid_metadata.h
│   │   ├── hmac.h
│   │   ├── hwcontext.h
│   │   ├── hwcontext_cuda.h
│   │   ├── hwcontext_d3d11va.h
│   │   ├── hwcontext_drm.h
│   │   ├── hwcontext_dxva2.h
│   │   ├── hwcontext_mediacodec.h
│   │   ├── hwcontext_opencl.h
│   │   ├── hwcontext_qsv.h
│   │   ├── hwcontext_vaapi.h
│   │   ├── hwcontext_vdpau.h
│   │   ├── hwcontext_videotoolbox.h
│   │   ├── hwcontext_vulkan.h
│   │   ├── imgutils.h
│   │   ├── intfloat.h
│   │   ├── intreadwrite.h
│   │   ├── lfg.h
│   │   ├── log.h
│   │   ├── lzo.h
│   │   ├── macros.h
│   │   ├── mastering_display_metadata.h
│   │   ├── mathematics.h
│   │   ├── md5.h
│   │   ├── mem.h
│   │   ├── motion_vector.h
│   │   ├── murmur3.h
│   │   ├── opt.h
│   │   ├── parseutils.h
│   │   ├── pixdesc.h
│   │   ├── pixelutils.h
│   │   ├── pixfmt.h
│   │   ├── random_seed.h
│   │   ├── rational.h
│   │   ├── rc4.h
│   │   ├── replaygain.h
│   │   ├── ripemd.h
│   │   ├── samplefmt.h
│   │   ├── sha.h
│   │   ├── sha512.h
│   │   ├── spherical.h
│   │   ├── stereo3d.h
│   │   ├── tea.h
│   │   ├── threadmessage.h
│   │   ├── time.h
│   │   ├── timecode.h
│   │   ├── timestamp.h
│   │   ├── tree.h
│   │   ├── twofish.h
│   │   ├── tx.h
│   │   ├── uuid.h
│   │   ├── version.h
│   │   ├── video_enc_params.h
│   │   └── xtea.h
│   ├── libswresample
│   │   ├── swresample.h
│   │   ├── version.h
│   │   └── version_major.h
│   └── libswscale
│       ├── swscale.h
│       ├── version.h
│       └── version_major.h
├── lib
│   ├── libavcodec.a
│   ├── libavdevice.a
│   ├── libavfilter.a
│   ├── libavformat.a
│   ├── libavutil.a
│   ├── libswresample.a
│   ├── libswscale.a
│   └── pkgconfig
│       ├── libavcodec.pc
│       ├── libavdevice.pc
│       ├── libavfilter.pc
│       ├── libavformat.pc
│       ├── libavutil.pc
│       ├── libswresample.pc
│       └── libswscale.pc
└── share
    ├── ffmpeg
    │   ├── examples
    │   ├── ffprobe.xsd
    │   ├── libvpx-1080p.ffpreset
    │   ├── libvpx-1080p50_60.ffpreset
    │   ├── libvpx-360p.ffpreset
    │   ├── libvpx-720p.ffpreset
    │   └── libvpx-720p50_60.ffpreset
    └── man
        ├── man1
        └── man3
demo运行
编译出来的执行文件在mac_build的bin目录下,若要基于ffmpeg的api开发,则include和lib目录就是所需要的了。而原来的doc/examples中的例子都被拷贝到了mac_build/share/ffmpeg/examples中,在此目录中会生成一个新的Makefile,此Makefile才是用来编译examples的。
接下来,执行 cd mac_build/share/ffmpeg/examples进入此examples的目录,执行如下命令编译examples:
cd mac_build/share/ffmpeg/examples

make
至此,examples编译完成,可以跑examples了。以下是用examples中的remuxing程序拉取网络hls流,并转封装为mp4的例子:
macos@localhost examples % ./remuxing http://192.168.31.242:8080/hls/test.m3u8 test.mp4
[hls @ 0x149605860] Skip ('#EXT-X-VERSION:3')
[hls @ 0x149605860] Opening 'http://192.168.31.242:8080/hls/enc.key' for reading
[hls @ 0x149605860] Opening 'crypto+http://192.168.31.242:8080/hls/test22.ts' for reading
Input #0, hls, from 'http://192.168.31.242:8080/hls/test.m3u8':
  Duration: 00:00:42.04, start: 221.408000, bitrate: 0 kb/s
  Program 0
    Metadata:
      variant_bitrate : 0
  Stream #0:0: Video: h264 (Main) ([27][0][0][0] / 0x001B), yuv420p(tv), 1920x1080 [SAR 1:1 DAR 16:9], 25 fps, 25 tbr, 90k tbn
    Metadata:
      variant_bitrate : 0
  Stream #0:1: Audio: aac (LC) ([15][0][0][0] / 0x000F), 48000 Hz, stereo, fltp
    Metadata:
      variant_bitrate : 0
Output #0, mp4, to 'test.mp4':
  Stream #0:0: Video: h264 (Main), yuv420p(tv), 1920x1080 [SAR 1:1 DAR 16:9], q=2-31
  Stream #0:1: Audio: aac (LC), 48000 Hz, stereo, fltp
in: pts:19926720 pts_time:221.408 dts:19926720 dts_time:221.408 duration:1920 duration_time:0.0213333 stream_index:1
以上就是基于ffmpeg release/5.1分支编译运行,并跑examples的步骤。
Win编译ffmpeg
请参见 安全验证 - 知乎 ,sdl2库、x264库以及ffmpeg按此文章均能一次性编译通过,此处只补充1点:那就是在编译libfdk-aac库时通过cmake构建,生成vs工程文件,再打开sln解决方案编译libfdk-aac库,没有生成include目录文件。
经测试,通过msys2 + mingw编译libfdk-aac库,可生成二开所需的inlcude/lib文件。以下是步骤:
1)先于msys2命令行中,键入以下命令,安装mingw工具链:
pacman -S --needed base-devel mingw-w64-x86_64-toolchain2)mingw工具链安装完毕后, 进入到libfdk-aac库代码根目录,执行:
sh autogen.sh
./configure --prefix=/usr
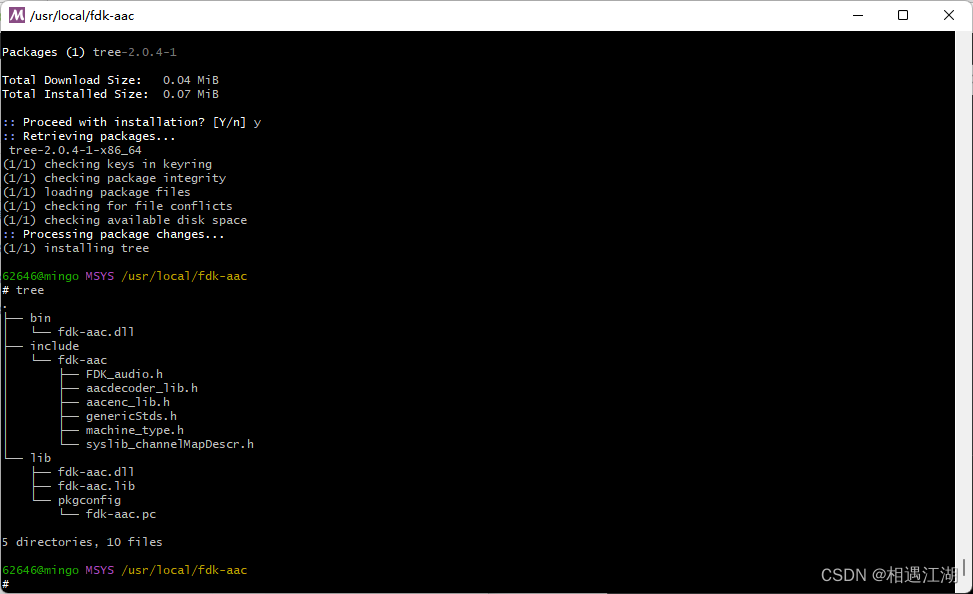
make -j6 && make install3)编译并安装完libfdk-aac库后, include目录会放在/usr/include/fdk-aac目录下,lib目录会放在/usr/lib下,请拷贝lib目录下的dll和lib文件到ffmpeg编译后所在目录,此处为msys2目录下的/usr/local/fdk-aac/lib,需把fdk-aac目录拷贝到include目录下,文件目录结构参照如下:
4)编译完成ffmpeg之后,若要运行examples,可进入ffmpeg的根目录,执行 make examples 命令跑例子,清理可执行 make examplesclean;
5)附ffmpeg配置项: ./configure --prefix=/usr/local/ffmpeg --arch=x86_64 --enable-shared --disable-doc --enable-libx264 --enable-gpl --enable-libfdk-aac --enable-nonfree --enable-openssl --toolchain=msvc


 2万+
2万+

 被折叠的 条评论
为什么被折叠?
被折叠的 条评论
为什么被折叠?
 到【灌水乐园】发言


