


点击下方卡片,关注“小白玩转Python”公众号
在本文中,我们将深入探讨一个实际的现实世界用例,结合两个强大工具的优势,以最大化Florence-2模型的效率和易用性。我们将首先使用OpenVINO将原始的PyTorch模型转换为优化的压缩格式,使其能够在仅使用CPU的机器上高效运行。为了进一步提高其实用性并解锁额外功能,我们将利用FiftyOne——一个用于探索和策划图像数据集的多功能工具——帮助我们在现实世界场景中充分利用模型的预测。
目录
每个组件的简要介绍
从Pexels获取免费图片
FiftyOne数据集
OpenVINO Florence-2模型
将Florence-2预测添加到我们的FiftyOne数据集中
探索结果
参考文献、有用链接和源代码
我尽量保持简单,以便我们开始探索这个流程的潜力。下图显示了数据流,从我们收集的图像(没有标签的RGB图像)到一个已经具有一些有用功能和Florence-2模型预测的FiftyOne数据集。
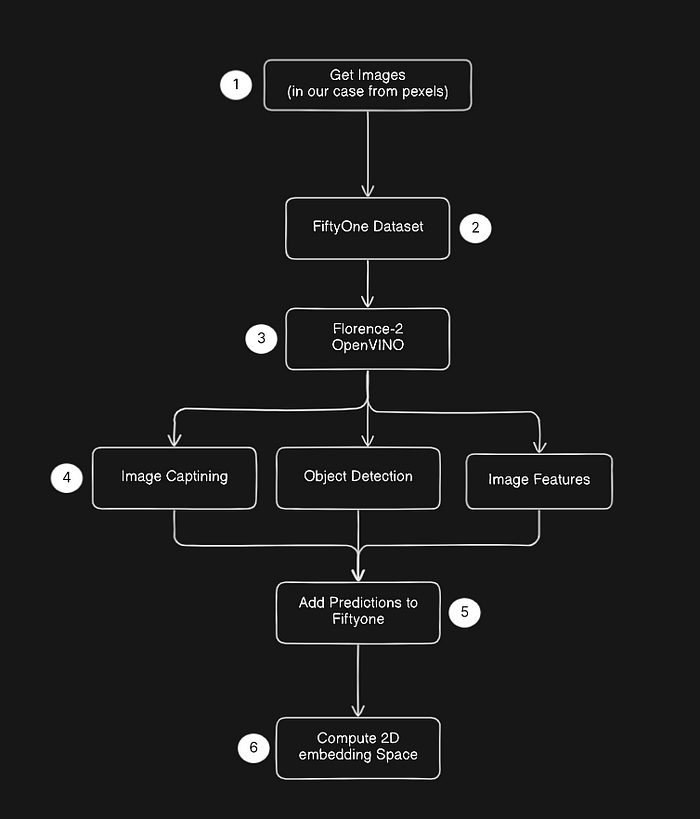
流程概述
每个组件的简要介绍
让我们非常简要地讨论一下提到的每个组件,Florence-2模型、OpenVINO和FiftyOne。
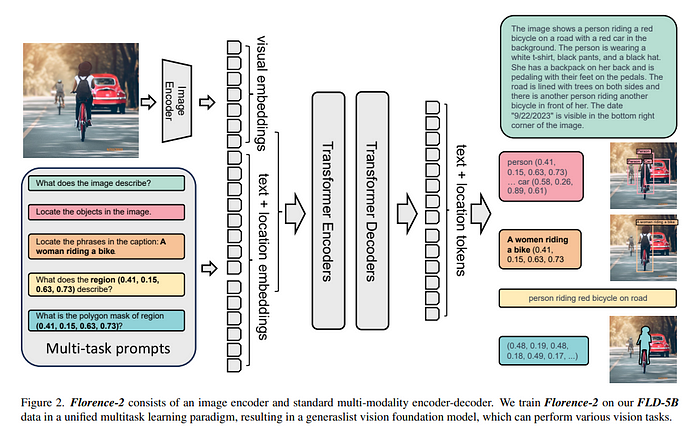
Florence-2是一个尖端的视觉基础模型,能够使用简单的文本提示处理广泛的计算机视觉和视觉-语言任务。与传统模型在多项任务上挣扎不同,Florence-2可以轻松地在图像描述、目标检测和分割等任务之间切换。它通过使用一个庞大的数据集实现这一点,该数据集包含126百万图像上的54亿视觉注释,使其能够理解复杂的视觉信息。这使得Florence-2成为开发者和研究人员的有力工具,提供了在多种应用中零样本学习和微调的高级功能。
“OpenVINO是一个开源工具包,用于优化和部署从云端到边缘的深度学习模型。它加速了各种用例的深度学习推理,例如生成性AI、视频、音频和语言,支持PyTorch、TensorFlow、ONNX等流行框架的模型。转换和优化模型,并在Intel®硬件和环境的混合部署,在本地和设备上,在浏览器或云端。”
FiftyOne为优化图像数据集分析流程提供了构建块。包括可视化复杂标签、评估模型预测、识别失败模式、查找注释错误等。这是一个非常好的工具,强烈推荐你查看他们的官方网站。
从Pexels获取免费图片
首先,我们需要一些图片来开始工作。在这个例子中,我将从pexels.com收集具有通用许可的图片,为了更有效地下载它们,我使用了一个名为pexel-downloader的Python包,不过你可以使用任何地方的任何图片池。
安装pexel-downloader
pip install pexel-downloader我已经下载了一些“奥林匹克运动”的图片,使用pexel-downloader的代码如下:
from pexel_downloader import PexelDownloader


if __name__ == '__main__':
    downloader = PexelDownloader(api_key="<YOUR-PEXELS-API-KEY>")


    query = "olympics sports"
    save_dir = "./dataset/images"
    downloader.download_images(query=query,
                               num_images=100,
                               save_directory=save_dir,
                               size='medium')
这将下载100张图片并将它们保存到“./dataset/images”文件夹中。
FiftyOne数据集
一旦我们有了图片文件夹,我们就可以创建我们的初始FiftyOne数据集。安装FiftyOne和创建五十一数据集的代码片段:
pip install fiftyoneimport fiftyone as fo
images_dir = "./datasets/images"
dataset_name = "sports-dataset"
dataset = fo.Dataset.from_images_dir(images_dir,
name=dataset_name,
persistent=True)
# You can launch the FiftyOne UI from here or later using the CLI program
# to launch it from here you can just do
session = fo.launch_app(dataset)
session.wait(-1)
# to launch from your terminal just do
# fiftyone app launch <dataset-name>当Fiftyone应用程序运行时,你现在可以从浏览器(默认localhost:5151)探索你的数据集。
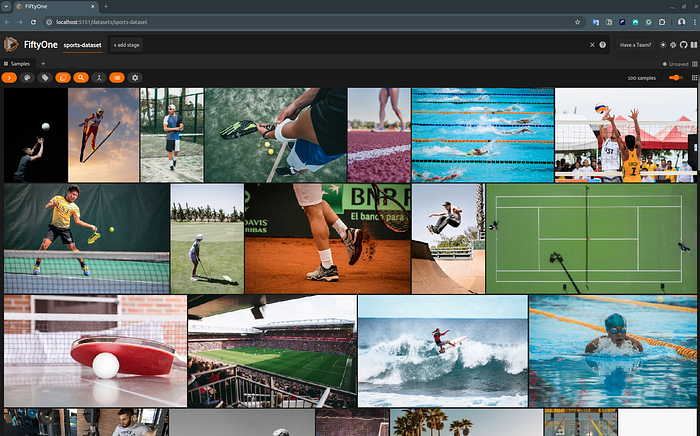
没有标签的我们运动数据集的FiftyOne UI
OpenVINO Florence-2模型
下一步是使用OpenVINO优化Florence-2模型。幸运的是,我们可以依赖英特尔OpenVINO团队的出色工作。他们已经创建了一个全面的演示和代码,展示了如何从Hugging Face转换Florence-2 PyTorch模型。你可以从我的Google Drive获取转换后的模型,只需将其下载到完整代码项目目录的主文件夹中(本文的完整Github代码见文章末尾)。
将Florence-2预测添加到我们的FiftyOne数据集中
最后,让我们将OpenVINO Florence-2预测添加到我们的FiftyOne数据集中!为此,我们只使用目标检测和图像描述。此外,让我们探索另一个非常有用的特性,即图像嵌入空间探索工具,为此,让我们将佛罗伦萨图像编码器的输出保存为我们的图像嵌入。完整的代码如下所述,基本上,它加载我们已经创建的Fiftyone数据集,并从磁盘加载我们的模型(使用openvino-notebook示例中的OVFlorence2Model)。
import click
import fiftyone.brain as fob
import fiftyone as fo
from ov_florence2_helper import OVFlorence2Model
from transformers import AutoProcessor
from PIL import Image


import numpy as np


def normalize_bbox(bbox, image_height, image_width):
    x1, y1, x2, y2 = bbox
    return (x1 / image_width, y1 / image_height,
            (x2 - x1) / image_width, (y2 - y1) / image_height)


def run_inference(sample_collection, model_path):
    processor = AutoProcessor.from_pretrained(model_path, trust_remote_code=True)
    model = OVFlorence2Model(model_path, "AUTO")


    for sample in sample_collection.iter_samples(autosave=True, progress=True):
        try:
            # Load image
            image = Image.open(sample.filepath)
            width, height = image.width, image.height


            # Extract image-features (embedding)
            inputs = processor(text="<OD>", images=image, return_tensors="pt")
            image_features = model.encode_image(inputs["pixel_values"])


            # Object detection and caption inference in a single loop
            detections, caption = [], None
            for task in ["<OD>", "<CAPTION>"]:
                if task == "<CAPTION>":
                    inputs = processor(text=task, images=image, return_tensors="pt")
                generated_ids = model.generate(input_ids=inputs["input_ids"],
                                            pixel_values=inputs["pixel_values"],
                                            max_new_tokens=1024,
                                            do_sample=False,
                                            image_features=image_features,
                                            num_beams=3)
                generated_text = processor.batch_decode(generated_ids, skip_special_tokens=False)[0]
                parsed_answer  = processor.post_process_generation(generated_text, task=task, image_size=(width, height))


                if task == "<OD>":
                    for idx, bbox in enumerate(parsed_answer[task]['bboxes']):
                        label = parsed_answer[task]["labels"][idx]
                        normalized_bbox = normalize_bbox(bbox, height, width)
                        detections.append(fo.Detection(label=label, bounding_box=normalized_bbox))
                else:
                    caption = parsed_answer[task]


            # Add predictions to sample
            sample["detections"] = fo.Detections(detections=detections)
            sample["caption"] = caption
            sample["florence2_image_feats"] = image_features.reshape(-1) # flatting image features
        except Exception as e:
            continue


@click.command()
@click.option("--dataset-name",
              "--name",
              required=True,
              prompt="Name of the dataset?")
@click.option("--model-path",
              "-m",
              required=False,
              default="Florence-2-base")
def main(dataset_name, model_path):
    assert fo.dataset_exists(dataset_name), f"Dataset {dataset_name} does not exist yet."
    dataset = fo.load_dataset(dataset_name)
    run_inference(dataset, model_path)


    ###################################################################
    # Get 2D embedding space visualization from florence2-image-feats #
    ###################################################################
    # recovery embeddings (image features) from the sample field "florence2_image_feats", populated during "run_inference"
    florence_embeddings = dataset.values(field_or_expr="florence2_image_feats")
    florence_embeddings = np.array(florence_embeddings).reshape(len(dataset), -1)


    print("[INFO] Computing 2D visualization using embeddings")
    fob.compute_visualization(dataset,
                              embeddings=florence_embeddings,
                              method="umap",
                              brain_key="florence2_embegginds_viz")


if __name__ == '__main__':
    main()
我们添加了模型的三个期望内容,目标检测(边界框)、标题(文本)和图像嵌入(编码器的图像特征)。
sample["detections"] = fo.Detections(detections=detections)
sample["caption"] = caption
sample["florence2_image_feats"] = image_features.reshape(-1) # flatting image features
在遍历所有样本并添加预测之后,我们可以使用“florence2_image_feats”创建嵌入空间的2D可视化。下面的代码片段显示了如何使用FiftyOne大脑模块(fiftyone.brain)的内置函数来实现这一点。
###################################################################
# Get 2D embedding space visualization from florence2-image-feats #
###################################################################
# recovery embeddings (image features) from the sample field "florence2_image_feats", populated during "run_inference"
florence_embeddings = dataset.values(field_or_expr="florence2_image_feats")
florence_embeddings = np.array(florence_embeddings).reshape(len(dataset), -1)


print("[INFO] Computing 2D visualization using embeddings")
fob.compute_visualization(dataset,
                          embeddings=florence_embeddings,
                          method="umap",
                          brain_key="florence2_embegginds_viz")
探索结果
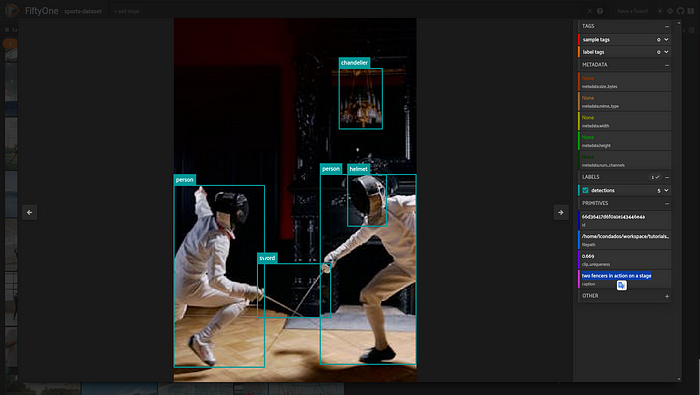
带有标题的样本示例:“两个击剑运动员在舞台上进行动作”
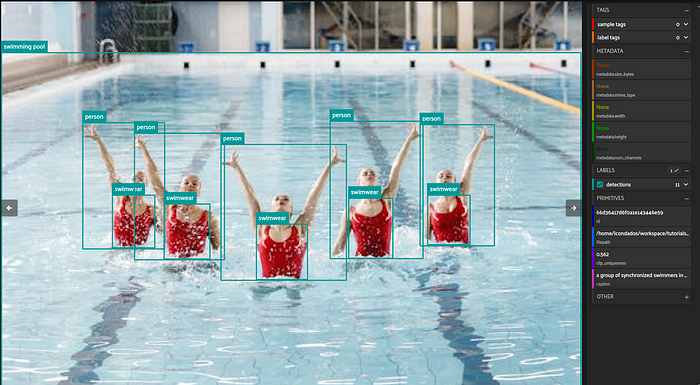
标题:“一群花样游泳运动员在游泳池中”
让我们也检查一下嵌入空间以及嵌入接近的样本之间的关系(“聚类意义”)。
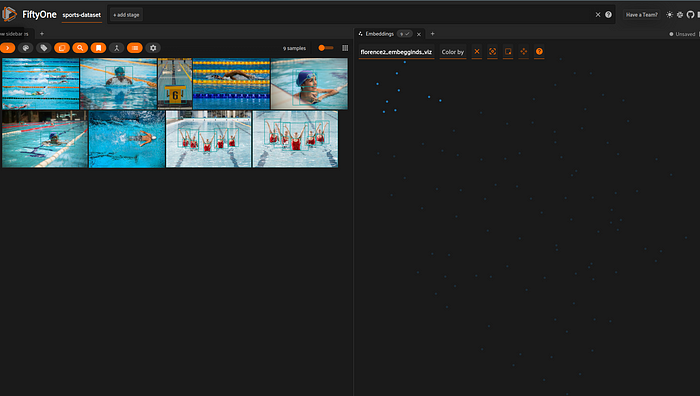
一个包含游泳池/水的图像群
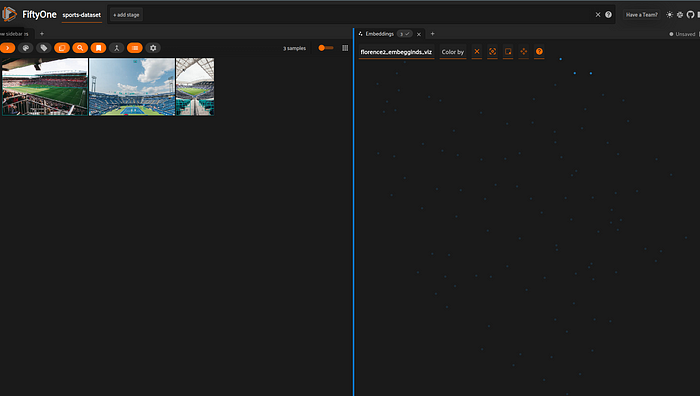
体育场
参考资料
OpenVINO的官方文档:https://docs.openvino.ai/2024/index.html
完整代码:https://github.com/Gabriellgpc/computer-vision-dataset-maker
·  END  ·

🌟 想要变身计算机视觉小能手?快来「小白玩转Python」公众号!回复“Python视觉实战项目”,解锁31个超有趣的视觉项目大礼包!🎁
本文仅供学习交流使用,如有侵权请联系作者删除


 2760
2760

 被折叠的 条评论
为什么被折叠?
被折叠的 条评论
为什么被折叠?
 到【灌水乐园】发言


