


点击下方卡片,关注“小白玩转Python”公众号
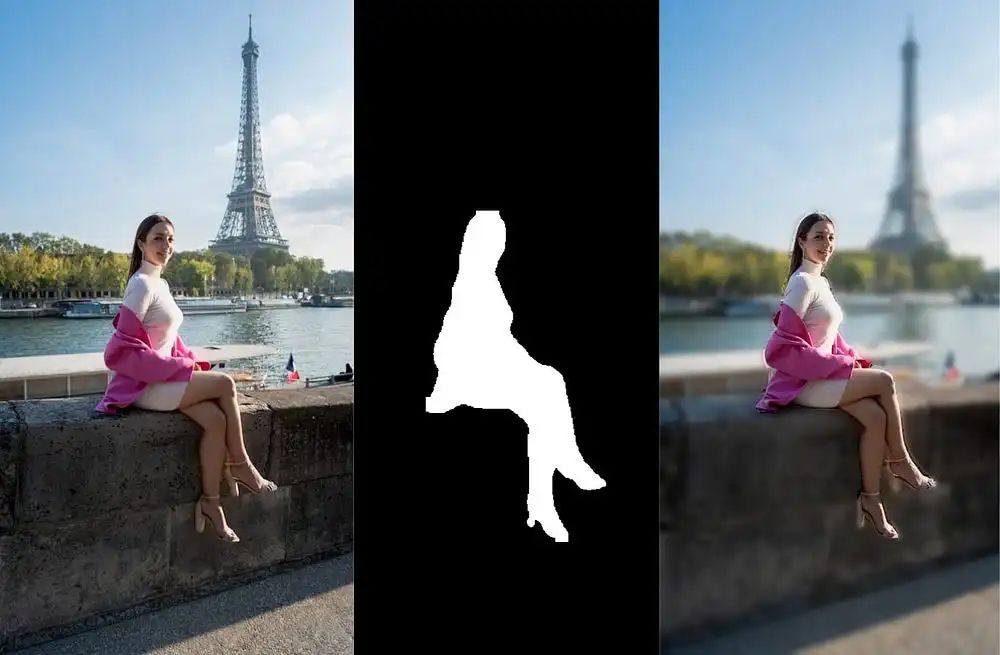
分割和高斯模糊后的图像
本文通过结合最新的YOLO11实例分割模型和高斯模糊,为你的图片应用人像效果。我们将使用YOLO11将人物从背景中分割出来,并对除了主体之外的所有内容应用模糊效果。
1. 安装Ultralytics库
首先创建并激活一个Python虚拟环境来管理依赖项。如果你不熟悉虚拟环境,请查看这个教程:
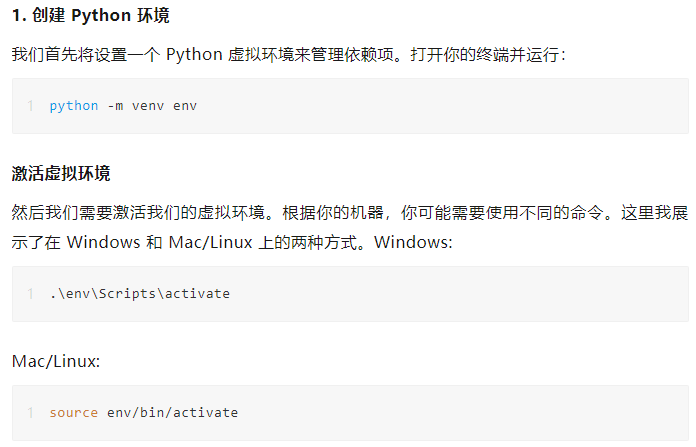
激活虚拟环境后,我们需要安装ultralytics库,这将允许我们使用YOLO11实例分割模型。运行以下命令在你的环境里安装库:
pip install ultralytics2. 下载测试图片
接下来,让我们从Unsplash下载一张测试图片进行测试,你可以使用任何你选择的图片。我为我们的测试目的选择了以下图片:

在.py文件中,添加以下代码来下载和加载图片:
import urllib.request
import cv2


# Download the image
url, filename = ("https://images.unsplash.com/photo-1634646493821-9fca74f85f59?w=600&auto=format&fit=crop&q=60&ixlib=rb-4.0.3&ixid=M3wxMjA3fDB8MHxzZWFyY2h8Mzk0fHx1bmJsdXJyZWQlMjBwb3J0YWl0fGVufDB8fDB8fHww", "scene.jpg")
urllib.request.urlretrieve(url, filename)


# Load the input image using OpenCV
image = cv2.imread(filename)
3. 生成分割掩码
图片加载后,下一步是创建一个分割掩码,以识别图片中的人物。有关使用YOLO11实例分割模型识别人物的更详细教程,请查看这个教程:《YOLO11 实例分割模型做行人分割》
模型将检测人物,我们将创建一个掩码以将主体与背景隔离。我们将使用yolo11n-seg.pt模型,但你可以使用Ultralytics YOLO11文档中的任何你喜欢的模型。以下是加载模型并生成掩码的代码:
import urllib.request
import cv2
from ultralytics import YOLO
import numpy as np


def segment_image(image, model):
    # Predict with the model
    results = model(filename)  # predict on an image


    # Create an empty mask for segmentation
    segmentation_mask = np.zeros_like(image, dtype=np.uint8)

    # Iterate over the results
    for i, r in enumerate(results):
        # Iterate through the detected masks
        for j, mask in enumerate(r.masks.xy):
            # Convert the class tensor to an integer
            class_id = int(r.boxes.cls[j].item())  # Extract the class ID as an integer

            # Check if the detected class corresponds to 'person' (class ID 0)
            if class_id == 0:
                # Convert mask coordinates to an integer format for drawing
                mask = np.array(mask, dtype=np.int32)

                # Fill the segmentation mask with color (e.g., white for people)
                cv2.fillPoly(segmentation_mask, [mask], (255, 255, 255))

    return segmentation_mask


# Download the image
url, filename = ("https://images.unsplash.com/photo-1634646493821-9fca74f85f59?w=600&auto=format&fit=crop&q=60&ixlib=rb-4.0.3&ixid=M3wxMjA3fDB8MHxzZWFyY2h8Mzk0fHx1bmJsdXJyZWQlMjBwb3J0YWl0fGVufDB8fDB8fHww", "scene.jpg")
urllib.request.urlretrieve(url, filename)


# Load the input image using OpenCV
image = cv2.imread(filename)


# Load the model
model = YOLO("yolo11n-seg.pt")  # load an official YOLO model

# Generate the segmentation mask
segmentation_mask = segment_image(image, model)


# Visualize the segmentation mask before combining it with the original image
cv2.imwrite("mask.jpg", segmentation_mask)
这一步将生成一个二进制掩码,其中人物被突出显示,如下例所示:

图像二进制分割掩码
4. 使用掩码对图像应用高斯模糊
现在我们有了分割掩码,我们可以在保持人物清晰的同时对背景应用高斯模糊。我们将模糊整个图像,然后使用掩码将清晰的人物区域与模糊的背景结合起来。以下是分割和应用模糊的所有代码:
import urllib.request
import cv2
from ultralytics import YOLO
import numpy as np


def segment_image(image, model):
    # Predict with the model
    results = model(filename)  # predict on an image


    # Create an empty mask for segmentation
    segmentation_mask = np.zeros_like(image, dtype=np.uint8)

    # Iterate over the results
    for i, r in enumerate(results):
        # Iterate through the detected masks
        for j, mask in enumerate(r.masks.xy):
            # Convert the class tensor to an integer
            class_id = int(r.boxes.cls[j].item())  # Extract the class ID as an integer

            # Check if the detected class corresponds to 'person' (class ID 0)
            if class_id == 0:
                # Convert mask coordinates to an integer format for drawing
                mask = np.array(mask, dtype=np.int32)

                # Fill the segmentation mask with color (e.g., white for people)
                cv2.fillPoly(segmentation_mask, [mask], (255, 255, 255))

    return segmentation_mask


def apply_blur_using_mask(image, mask, blur_strength=(25, 25)):
    # Apply Gaussian blur to the entire image
    blurred_image = cv2.GaussianBlur(image, blur_strength, 0)


    # Create an inverted mask where the background is white and the person is black
    inverted_mask = cv2.bitwise_not(mask)


    # Use the mask to keep the person sharp and blur the background
    background_blur = cv2.bitwise_and(blurred_image, blurred_image, mask=inverted_mask[:, :, 0])
    person_region = cv2.bitwise_and(image, image, mask=mask[:, :, 0])


    # Combine the sharp person region with the blurred background
    final_image = cv2.add(person_region, background_blur)

    return final_image


# Download the image
url, filename = ("https://images.unsplash.com/photo-1634646493821-9fca74f85f59?w=600&auto=format&fit=crop&q=60&ixlib=rb-4.0.3&ixid=M3wxMjA3fDB8MHxzZWFyY2h8Mzk0fHx1bmJsdXJyZWQlMjBwb3J0YWl0fGVufDB8fDB8fHww", "scene.jpg")
urllib.request.urlretrieve(url, filename)


# Load the input image using OpenCV
image = cv2.imread(filename)


# Load the model
model = YOLO("yolo11n-seg.pt")  # load an official YOLO model

# Generate the segmentation mask
segmentation_mask = segment_image(image, model)


# Call the function to apply the blur and save the result
final_image = apply_blur_using_mask(image, segmentation_mask)


# Visualize the segmentation mask before combining it with the original image
cv2.imwrite("mask.jpg", segmentation_mask)


# Save the result
cv2.imwrite("blurred_image.jpg", final_image)


# Optionally display the image (make sure you're running in a GUI environment)
cv2.imshow("Blurred Image Result", final_image)
cv2.waitKey(0)
cv2.destroyAllWindows()
最终结果
这段代码将清晰的人物与模糊的背景结合起来,为你的图像提供专业的人像效果。分割掩码确保人物保持聚焦,而背景则通过高斯模糊变柔和。
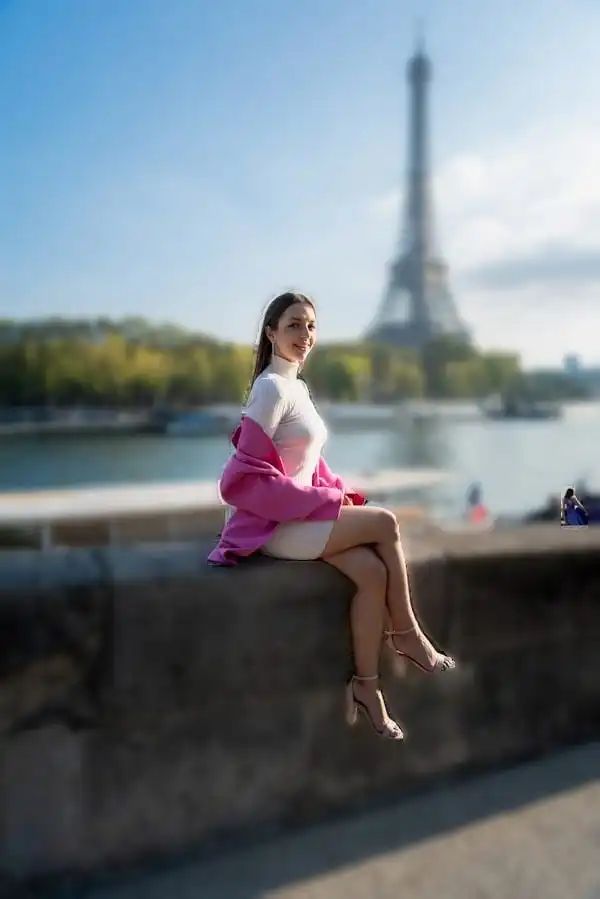
示例结果
完整代码:https://github.com/Brianhulela/background_blur
· END ·
🌟 想要变身计算机视觉小能手?快来「小白玩转Python」公众号!
回复“Python视觉实战项目”,解锁31个超有趣的视觉项目大礼包!🎁
本文仅供学习交流使用,如有侵权请联系作者删除


 700
700

 被折叠的 条评论
为什么被折叠?
被折叠的 条评论
为什么被折叠?
 到【灌水乐园】发言


