


隶属于:
C:\Users\Public\Documents\MVTec\HALCON-23.05-Progress\examples\solution_guide\1d_measuring
此例,主要是用measure_projection来获取轮廓线的位置,再用获取的灰度值分析,用一阶导数过零点作为待选特征点,用二阶导数在一阶导数处的值的大小,此处大于8,则认为是边界点。根据测量矩形的信息计算到边界位置,再用相机参数信息,获取像素毫米比信息,用image_points_to_world_plane将像素信息转化为
调用的函数:
显示边位置用。这里可借鉴生成位置。
p_disp_edge_marker (RowLine, ColLine, Phi, Length2, ‘black’, 5)
- Determine the number of edges
NumRows := |Rows|
NumCols := |Cols|
Num := min([NumRows,NumCols]) - Loop over the edges
for i := 0 to Num - 1 by 1
Row := Rows[i]
Col := Cols[i]
*- Determine start and end point of the edge marker.
RowStart := Row + Length * cos(Phi)
RowEnd := Row - Length * cos(Phi)
ColStart := Col + Length * sin(Phi)
ColEnd := Col - Length * sin(Phi) - Generate a contour that connects the start and end point.
gen_contour_polygon_xld (Marker, [RowStart,RowEnd], [ColStart,ColEnd]) - Display the contour with the specified style.
dev_set_color (Color)
dev_set_line_width (LineWidth)
dev_display (Marker)
endfor
return ()
- Determine start and end point of the edge marker.
新算子measure_projection说明:
在HALCON中,measure_projection 是一个用于提取灰度值轮廓的算子,主要用于1D测量。它通过在指定的矩形或环状弧区域内,沿着垂直于轮廓的方向采样灰度值,从而生成一个灰度值轮廓。这个轮廓可以用于后续的边缘检测、特征提取和测量等操作。
measure_projection 的基本用法
功能:提取垂直于矩形或环状弧的灰度值轮廓。
输入参数:
Image:输入图像。
MeasureHandle:测量对象的句柄,通过 gen_measure_rectangle2 或 gen_measure_arc 初始化。
输出参数:
GrayValues:输出的灰度值轮廓。
使用步骤
初始化测量对象:使用 gen_measure_rectangle2 或 gen_measure_arc 初始化测量对象,并设置测量区域的参数(如位置、大小、方向等)。
提取灰度值轮廓:调用 measure_projection 提取灰度值轮廓。
后续处理:根据需要对提取的灰度值轮廓进行进一步处理,例如边缘检测、特征提取等。
示例应用
测量卡尺的间距线之间的距离:通过提取灰度值轮廓,可以精确测量卡尺上间距线之间的距离。
检查物体的完整性:例如检查鱼棒的完整性,通过测量灰度值轮廓来检测物体的边缘。
检测物体的倾斜角度:例如检查SMD元件是否倾斜。
如果需要将图像坐标转换为度量化的坐标系统,通常需要结合相机标定参数和物体的姿态信息。相机标定可以通过HALCON的标定工具完成,具体步骤包括创建标定数据模型、获取标定图像、计算内参和外参等。
读图
创建一个测量区域
并用measure_projection测量灰度存入GrayValues数组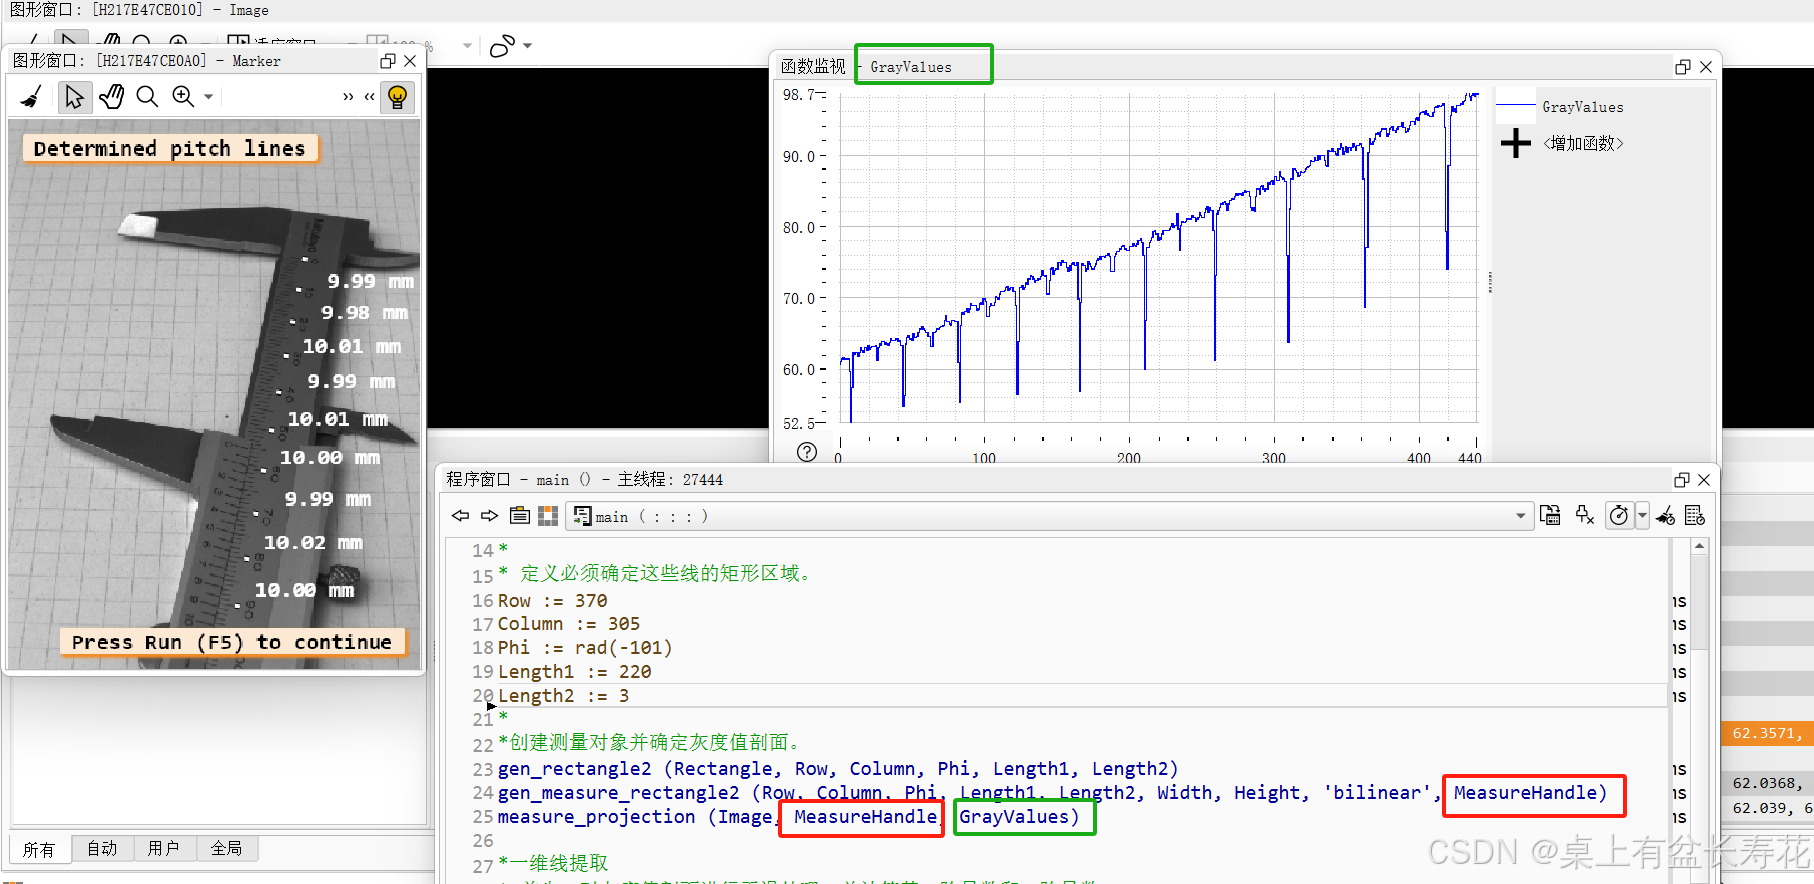
创建一个一维数组,并平滑,进行一阶求导,二阶求导。
并求一阶导数过零点。
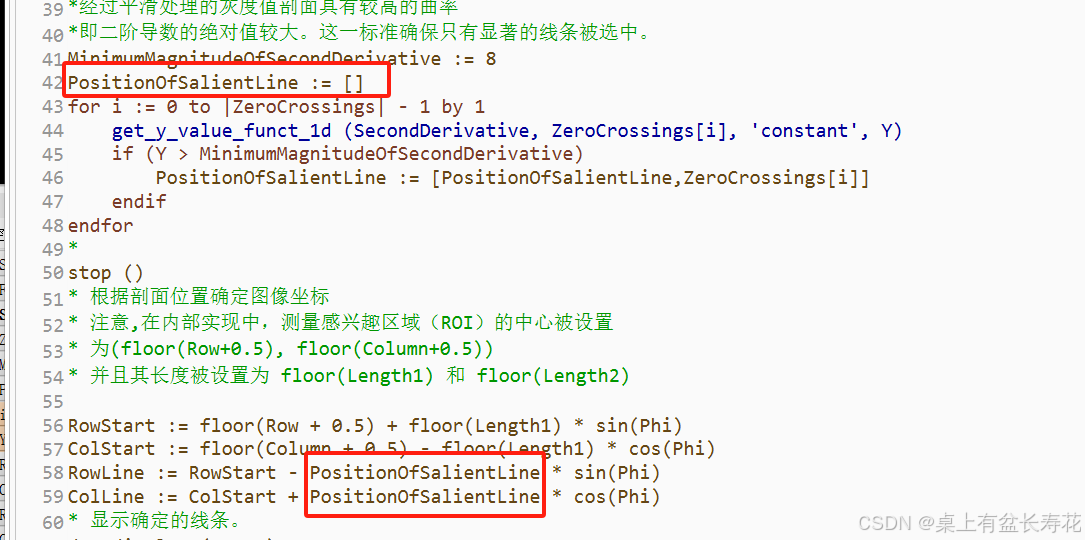
一阶导数过零点,表示有灰度值阶跃,再判断,二阶导此处的值若大于一定值,则找到从黑到白的位置。可以找到边。
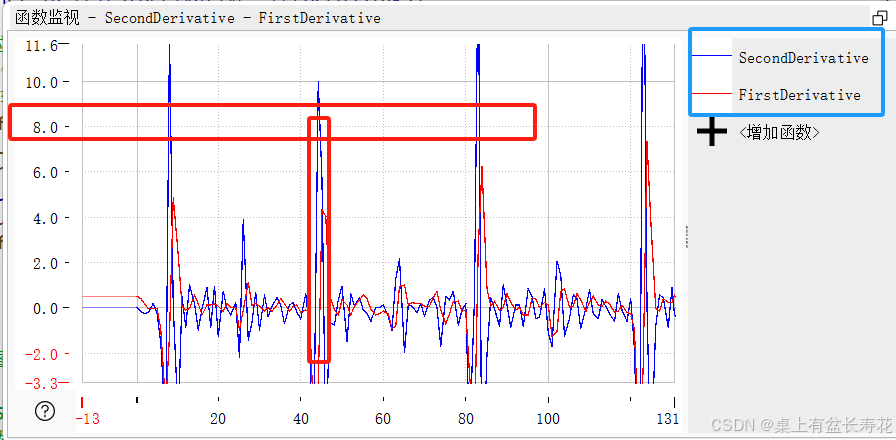
根据一阶导数的过零点,获取在当前一阶导数位置,此时的二阶导数,如果此时大于一定值,则认为是边缘位置,记录此时的位置在数组PositionOfSalientLine
并根据测量时候的矩形中心,计算得到边位置
显示边缘
放大显示
可借鉴:
1、用面阵相机参数和相机位姿,即可知道相机的参数,并通过image_points_to_world_plane ,将像素值转化为mm。
gen_cam_par_area_scan_division (0.00846, -2591.63, 7.2956e-6, 7.3e-6, 240.74, 334.91, Width, Height, CamParam)
create_pose (-0.100432, -0.051077, 0.257936, 323.234, 4.615, 0.229, ‘Rp+T’, ‘gba’, ‘point’, WorldPose)
image_points_to_world_plane (CamParam, WorldPose, RowLine, ColLine, ‘mm’, X, Y)
2、可以一次获取多个点点距离
Num := |X|
distance_pp (X[0:Num - 2], Y[0:Num - 2], X[1:Num - 1], Y[1:Num - 1], Distance)
* 该程序展示了如何使用measure_projection算子确定灰度值剖面。
* 从这个灰度值剖面中,提取出一维线段,即那些大致与剖面线垂直的线
* 然后,将这些线的剖面位置转换为像素坐标(行,列)
* 最后,将像素坐标转换为度量化的世界坐标系
dev_close_window ()
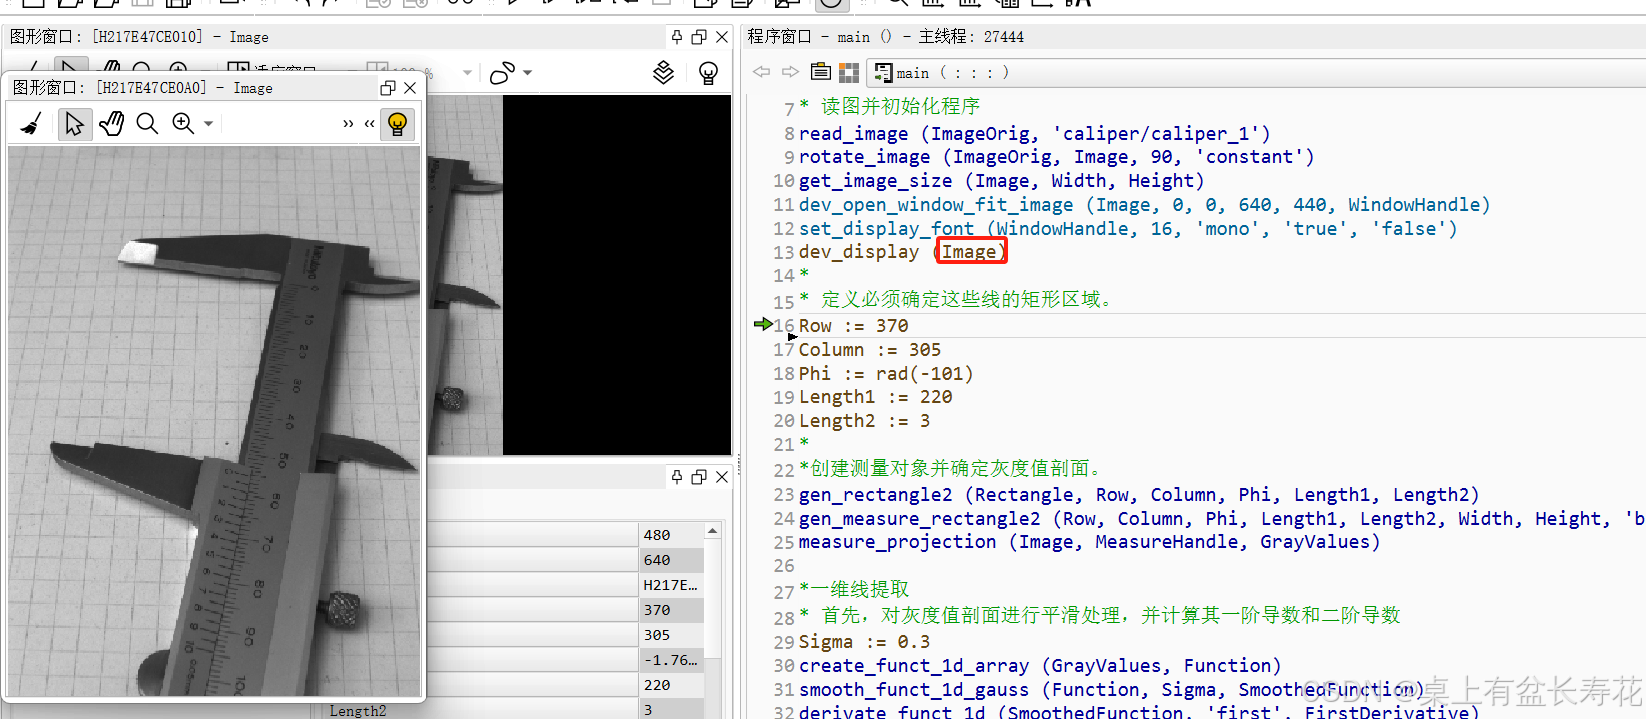
* 读图并初始化程序
read_image (ImageOrig, 'caliper/caliper_1')
rotate_image (ImageOrig, Image, 90, 'constant')
get_image_size (Image, Width, Height)
dev_open_window_fit_image (Image, 0, 0, 640, 640, WindowHandle)
set_display_font (WindowHandle, 16, 'mono', 'true', 'false')
dev_display (Image)
*
* 定义必须确定这些线的矩形区域。
Row := 370
Column := 305
Phi := rad(-101)
Length1 := 220
Length2 := 3
*
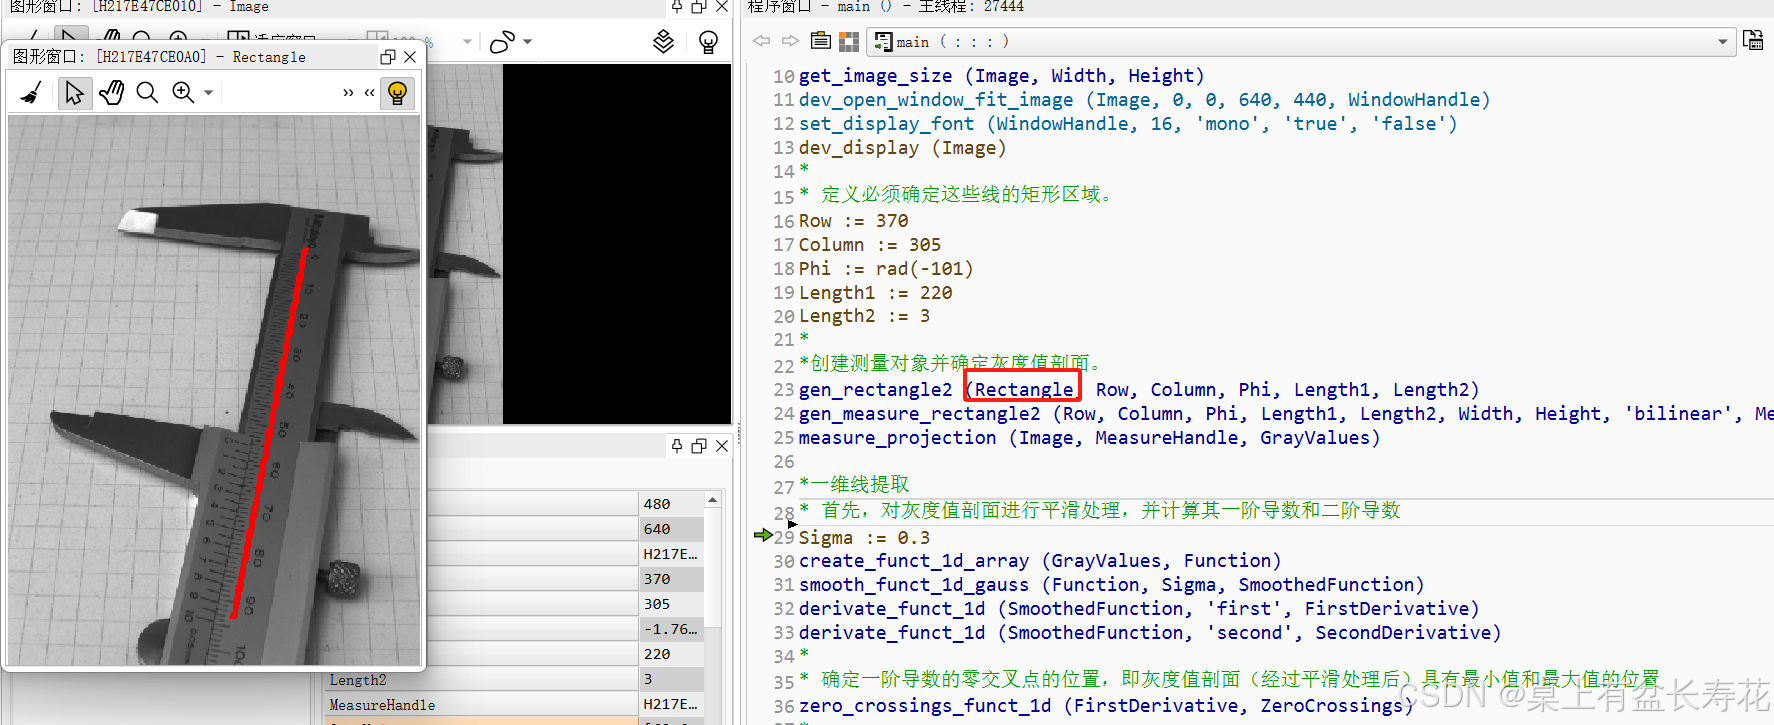
*创建测量对象并确定灰度值剖面。
gen_measure_rectangle2 (Row, Column, Phi, Length1, Length2, Width, Height, 'bilinear', MeasureHandle)
measure_projection (Image, MeasureHandle, GrayValues)
*一维线提取
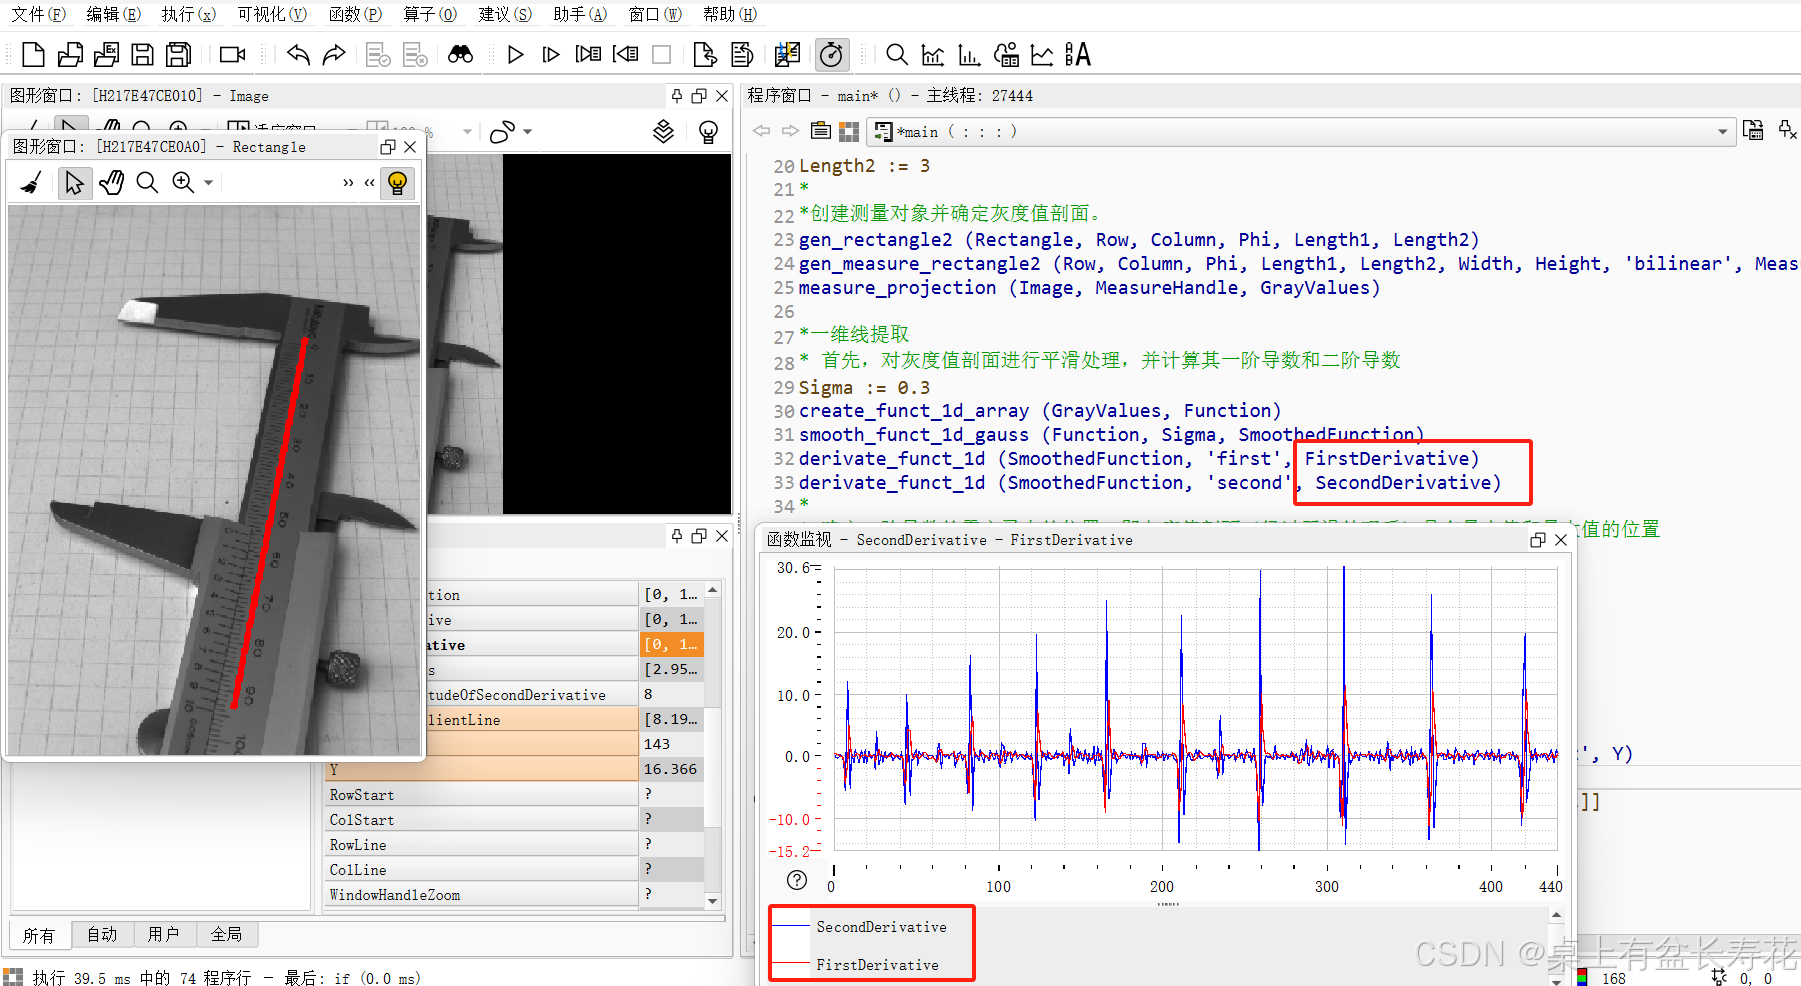
* 首先,对灰度值剖面进行平滑处理,并计算其一阶导数和二阶导数
Sigma := 0.3
create_funct_1d_array (GrayValues, Function)
smooth_funct_1d_gauss (Function, Sigma, SmoothedFunction)
derivate_funct_1d (SmoothedFunction, 'first', FirstDerivative)
derivate_funct_1d (SmoothedFunction, 'second', SecondDerivative)
*
* 确定一阶导数的零交叉点的位置,即灰度值剖面(经过平滑处理后)具有最小值和最大值的位置
zero_crossings_funct_1d (FirstDerivative, ZeroCrossings)
*
* 选择那些最小值的位置(即二阶导数为正的位置),在这些位置上
*经过平滑处理的灰度值剖面具有较高的曲率
*即二阶导数的绝对值较大。这一标准确保只有显著的线条被选中。
MinimumMagnitudeOfSecondDerivative := 8
PositionOfSalientLine := []
for i := 0 to |ZeroCrossings| - 1 by 1
get_y_value_funct_1d (SecondDerivative, ZeroCrossings[i], 'constant', Y)
if (Y > MinimumMagnitudeOfSecondDerivative)
PositionOfSalientLine := [PositionOfSalientLine,ZeroCrossings[i]]
endif
endfor
*
* 根据剖面位置确定图像坐标
* 注意,在内部实现中,测量感兴趣区域(ROI)的中心被设置
* 为(floor(Row+0.5), floor(Column+0.5))
* 并且其长度被设置为 floor(Length1) 和 floor(Length2)
RowStart := floor(Row + 0.5) + floor(Length1) * sin(Phi)
ColStart := floor(Column + 0.5) - floor(Length1) * cos(Phi)
RowLine := RowStart - PositionOfSalientLine * sin(Phi)
ColLine := ColStart + PositionOfSalientLine * cos(Phi)
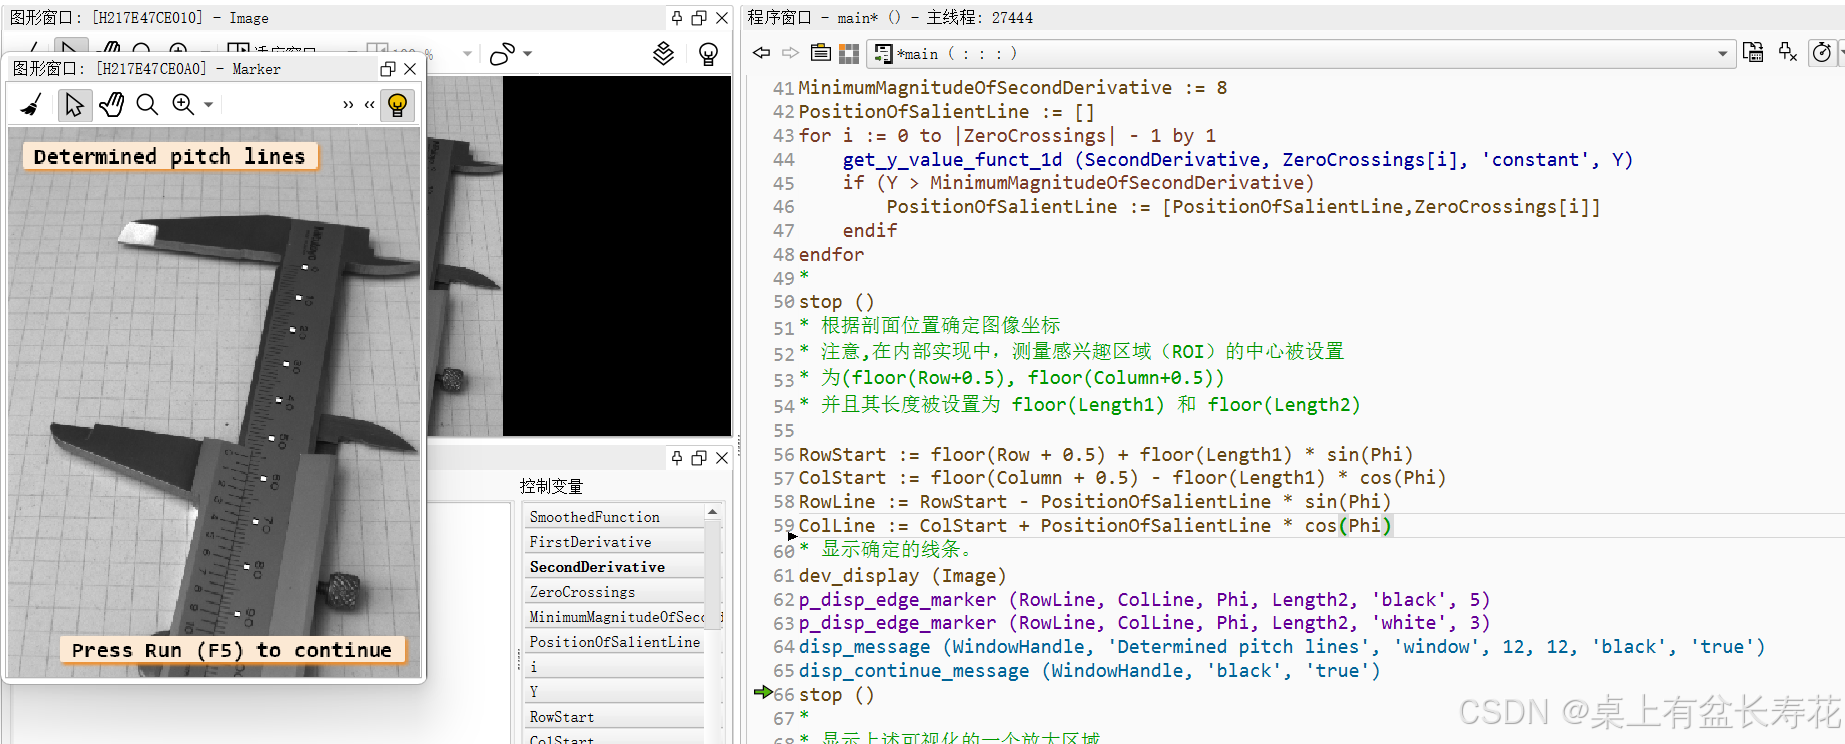
* 显示确定的线条。
dev_display (Image)
p_disp_edge_marker (RowLine, ColLine, Phi, Length2, 'black', 5)
p_disp_edge_marker (RowLine, ColLine, Phi, Length2, 'white', 3)
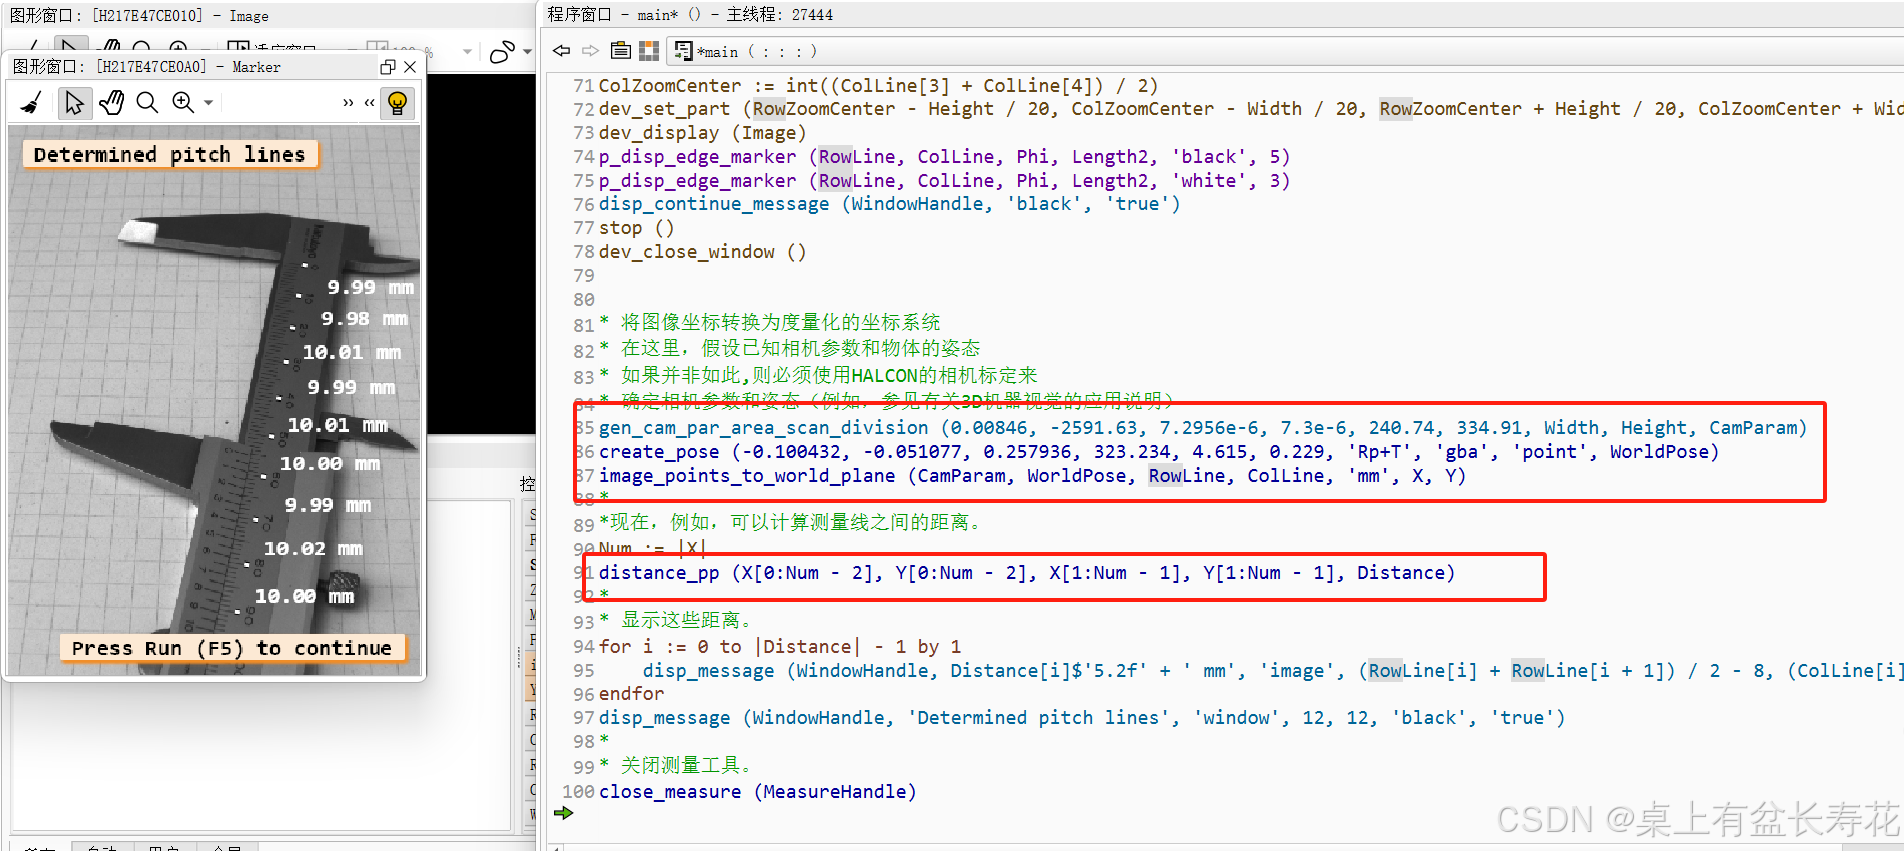
disp_message (WindowHandle, 'Determined pitch lines', 'window', 12, 12, 'black', 'true')
disp_continue_message (WindowHandle, 'black', 'true')
stop ()
*
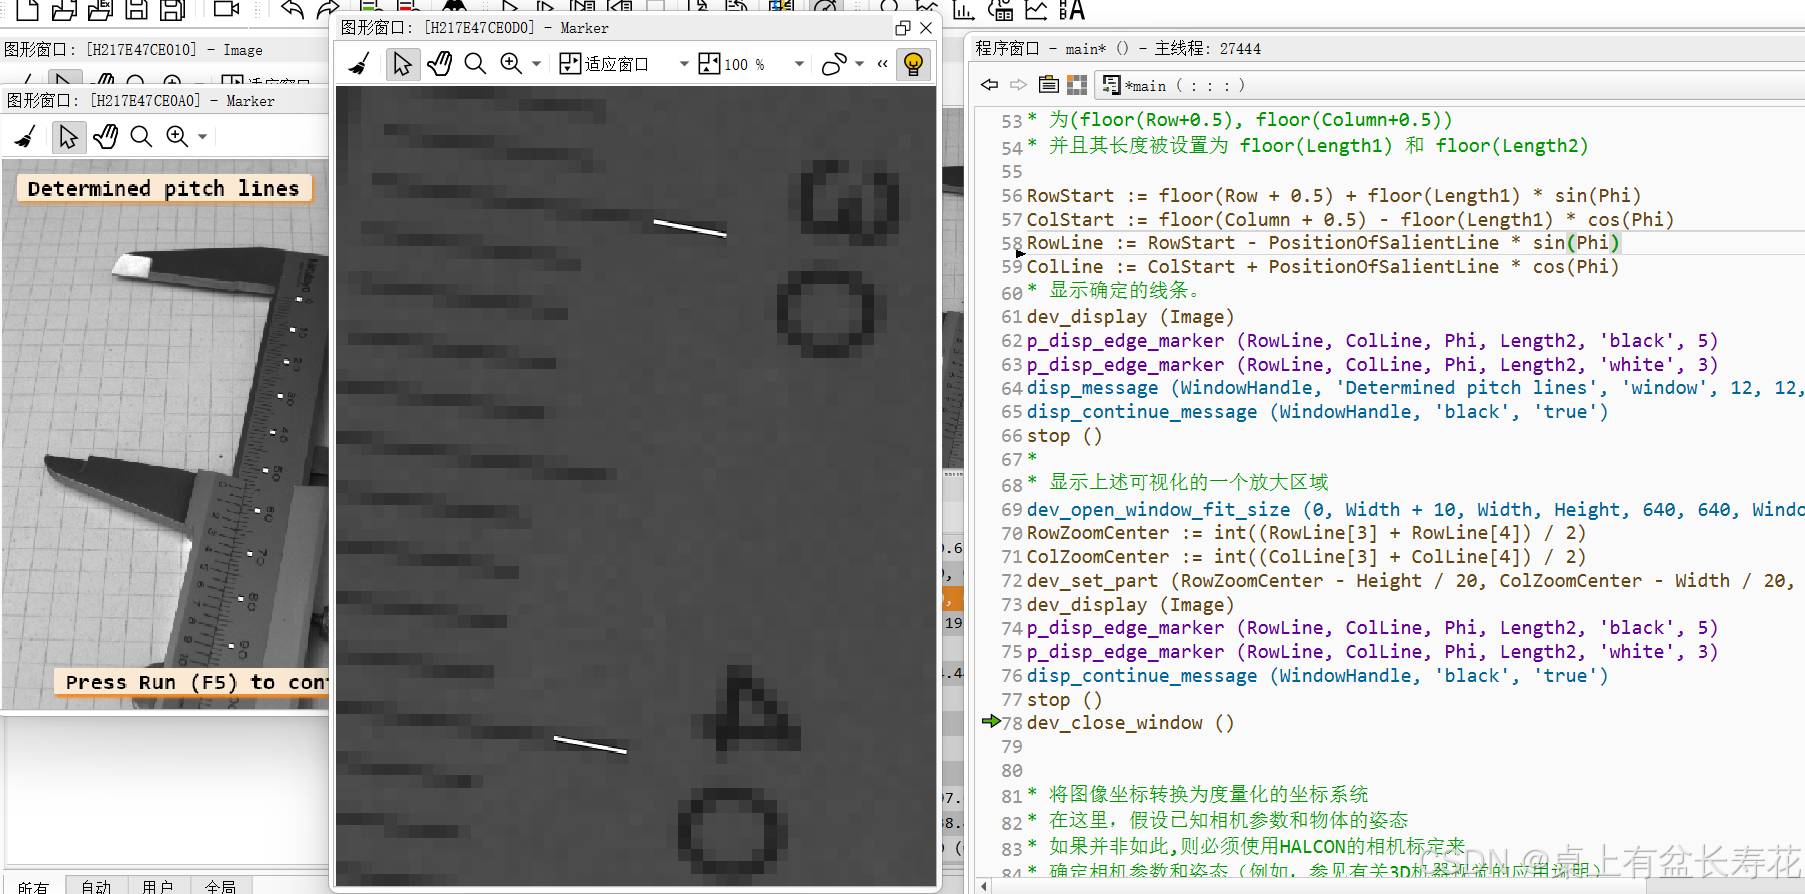
* 显示上述可视化的一个放大区域
dev_open_window_fit_size (0, Width + 10, Width, Height, 640, 640, WindowHandleZoom)
RowZoomCenter := int((RowLine[3] + RowLine[4]) / 2)
ColZoomCenter := int((ColLine[3] + ColLine[4]) / 2)
dev_set_part (RowZoomCenter - Height / 20, ColZoomCenter - Width / 20, RowZoomCenter + Height / 20, ColZoomCenter + Width / 20)
dev_display (Image)
p_disp_edge_marker (RowLine, ColLine, Phi, Length2, 'black', 5)
p_disp_edge_marker (RowLine, ColLine, Phi, Length2, 'white', 3)
disp_continue_message (WindowHandle, 'black', 'true')
stop ()
dev_close_window ()
* 将图像坐标转换为度量化的坐标系统
* 在这里,假设已知相机参数和物体的姿态
* 如果并非如此,则必须使用HALCON的相机标定来
* 确定相机参数和姿态(例如,参见有关3D机器视觉的应用说明)
gen_cam_par_area_scan_division (0.00846, -2591.63, 7.2956e-6, 7.3e-6, 240.74, 334.91, Width, Height, CamParam)
create_pose (-0.100432, -0.051077, 0.257936, 323.234, 4.615, 0.229, 'Rp+T', 'gba', 'point', WorldPose)
image_points_to_world_plane (CamParam, WorldPose, RowLine, ColLine, 'mm', X, Y)
*
*现在,例如,可以计算测量线之间的距离。
Num := |X|
distance_pp (X[0:Num - 2], Y[0:Num - 2], X[1:Num - 1], Y[1:Num - 1], Distance)
*
* 显示这些距离。
for i := 0 to |Distance| - 1 by 1
disp_message (WindowHandle, Distance[i]$'5.2f' + ' mm', 'image', (RowLine[i] + RowLine[i + 1]) / 2 - 8, (ColLine[i] + ColLine[i + 1]) / 2 + 15, 'white', 'false')
endfor
disp_message (WindowHandle, 'Determined pitch lines', 'window', 12, 12, 'black', 'true')
*
* 关闭测量工具。
close_measure (MeasureHandle)


 2153
2153

 被折叠的 条评论
为什么被折叠?
被折叠的 条评论
为什么被折叠?
 到【灌水乐园】发言


