


 本文介绍了如何使用TensorFlow 1.15或更高版本创建深度学习模型,进行训练,然后将其转换为轻量级的Tflite模型,并使用Edge TPU编译器进行编译,以便在Edge设备上进行低延迟推理。文章涵盖了从数据准备到模型部署的全过程。
深度学习(Deep Learning)
In this article, you will learn to create a deep learning model in Tensorflow, create a tflite model with post-training quantization, and then compile it for an Edge TPU device.
在本文中,您将学习在Tensorflow中创建深度学习模型,使用后期训练量化创建tflite模型,然后将其编译为Edge TPU设备。
We are in an information-centric era with the advent of the Internet of Things devices used in factories or in communities. Data generated from these IoT devices has exponentially increased the demands on the computing power and need for near real-time inferences.
随着工厂或社区中使用的物联网设备的出现,我们处于以信息为中心的时代。 从这些物联网设备生成的数据成倍增加了对计算能力的需求以及对近实时推理的需求。
Edge computing is done directly on the devices where the data is generated, this reduces the dependency on the network, resulting in reduced latencies. Data is also secure as it is not transmitted to other devices or networks for processing.
边缘计算直接在生成数据的设备上完成,这减少了对网络的依赖性,从而减少了延迟。 数据也很安全,因为它不会传输到其他设备或网络进行处理。
The dataset used here is Intel Image Classification from Kaggle
这里使用的数据集是来自Kaggle的Intel图像分类
Dataset has 6 classes: buildings, forest, glacier, mountain, sea, and street
数据集有6类:建筑物,森林,冰川,山脉,海洋和街道
In a nutshell, we will follow these steps for deploying the model at the Edge TPU device
简而言之,我们将按照以下步骤在Edge TPU设备上部署模型
Create the model
创建模型
Train the model
训练模型
Save the model
保存模型
Apply post-training quantization
应用训练后量化
Convert the model to TensorFlow Lite version
将模型转换为TensorFlow Lite版本
Compile the tflite model using edge TPU compiler for Edge TPU devices like Coral Dev board to TPU USB Accelerator
使用Edge TPU编译器将tflite模型编译为Edge TPU设备(如Coral开发板)到TPU USB Accelerator
Deploy the model at Edge to make inferences
在Edge上部署模型以进行推断
Edge Inference on TPU is possible via two options
通过两个选项可以在TPU上进行边缘推理
Edge TPU API or
Edge TPU API或
TensorFlow Lite API
TensorFlow Lite API
This example can be used on both Coral Dev Board as well the Edge TPU compiled model can be deployed for TPU USB Accelerator.
该示例可以在Coral Dev Board上使用,也可以将Edge TPU编译模型部署到TPU USB Accelerator。
步骤1:使用TensorFlow 1.15或更高版本创建深度学习模型。 (Step 1: Create a deep learning model using TensorFlow 1.15 or higher.)
Importing required libraries
导入所需的库
from numpy.random import seed
import randomimport numpy as np
import pandas as pd
import os
import glob
import shutilfrom PIL import Image
import tensorflow as tf
from tensorflow.keras.models import Sequential
from tensorflow.keras.layers import Dense, Conv2D, Flatten, Dropout, MaxPooling2D, BatchNormalization
from tensorflow.keras.preprocessing.image import ImageDataGenerator, img_to_array, load_img, array_to_img
from tensorflow.keras.models import load_model
from tensorflow.keras import optimizers, callbacks
import tensorflow_model_optimization as tfmot
Create training and validation dataset
创建训练和验证数据集
#setting the train, test and val directories
train_dir = r'\Intel_Images\seg_train\seg_train'
test_dir = r'\Intel_Images\seg_pred'
val_dir = r'\Intel_Images\seg_test\seg_test'#setting basic parameters for the model
IMG_WIDTH=100
IMG_HEIGHT=100
IMG_DIM = (IMG_HEIGHT, IMG_WIDTH)
input_shape = (IMG_HEIGHT, IMG_WIDTH ,3)
batch_size = 4
epochs = 25#Apply image Augmentation to the Training dataset
#will generate batches of tensor image data with real-time data augmentation
image_gen_train = ImageDataGenerator(rescale=1./255,                                     zoom_range=0.3, rotation_range=25,                                    shear_range=0.1,featurewise_std_normalization=False)train_data_gen = image_gen_train.flow_from_directory(batch_size=batch_size,                                                     directory=train_dir,                                                     shuffle=True,                                                     target_size=IMG_DIM,                                                     class_mode='sparse')#Generate the validation dataset
image_gen_val = ImageDataGenerator(rescale=1./255)val_data_gen = image_gen_val.flow_from_directory(batch_size=batch_size,
directory=val_dir,                                                 target_size=IMG_DIM,                                                 class_mode='sparse')
Printing the class name and class indices
打印班级名称和班级索引
class_names = list(train_data_gen.class_indices.keys())
print(train_data_gen.class_indices)
步骤2:建立模型,编译和训练模型 (Step 2: Create the model, compile and train the model)
#Create the deep learning model for 6 classes
model = Sequential()
model.add(Conv2D(16, kernel_size=(3, 3), activation='relu',
                 input_shape=(IMG_HEIGHT, IMG_WIDTH ,3)))
model.add(MaxPooling2D(pool_size=(2, 2)))
model.add(Conv2D(64, kernel_size=(3, 3), activation='relu'))
model.add(MaxPooling2D(pool_size=(2, 2)))
model.add(Dropout(0.2))
model.add(Conv2D(128, kernel_size=(3, 3), activation='relu'))
model.add(MaxPooling2D(pool_size=(2, 2)))
model.add(Flatten())
model.add(Dense(128, activation='relu'))
model.add(Dropout(0.2))
model.add(Dense(6, activation='softmax'))#Compile the model using Adam optimizer
model.compile(optimizer=optimizers.Adam(lr=0.0001),
              loss='sparse_categorical_crossentropy',
              metrics=['accuracy'])# Train the model
history = model.fit_generator(
    train_data_gen,
    steps_per_epoch=len(train_data_gen)/batch_size,
    epochs=10,
    validation_data=val_data_gen,
    validation_steps=len(val_data_gen)/batch_size
)
I have trained the model for 50 epochs.
我已经为模型训练了50个纪元。
Visualizing the accuracy of the training and validation dataset for the 50 epochs.
可视化50个纪元的训练和验证数据集的准确性。
acc = history.history['acc']
val_acc = history.history['val_acc']loss = history.history['loss']
val_loss = history.history['val_loss']epochs_range = range(epochs)plt.figure(figsize=(8, 8))
plt.subplot(1, 2, 1)
plt.plot(epochs_range, acc, label='Training Accuracy')
plt.plot(epochs_range, val_acc, label='Validation Accuracy')
plt.legend(loc='lower right')
plt.title('Training and Validation Accuracy')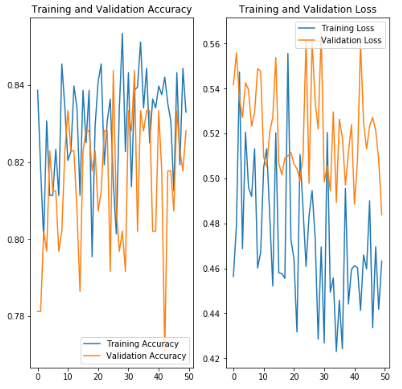
Testing the model using Test dataset using a few random images
使用测试数据集使用一些随机图像测试模型
#printing class names
class_names = list(train_data_gen.class_indices.keys())# Creating the test dataset
test_data_gen = image_gen_val.flow_from_directory(batch_size=1,
                                                 directory=test_dir,
                                               target_size=IMG_DIM,
                                               class_mode='sparse')
Predicting the first 10 images from the test data generator
从测试数据生成器预测前10张图像
#predicting 10 images from test_data_gen
nb_samples = 10
predict = model.predict_generator(test_data_gen,steps = nb_samples)pred_idx = []
for index, result in enumerate(predict, 0):
    pred_idx.append(class_names[np.argmax(predict[index])])
    print("Pred==",class_names[np.argmax(predict[index])] + "  Filename: " + test_data_gen.filenames[index])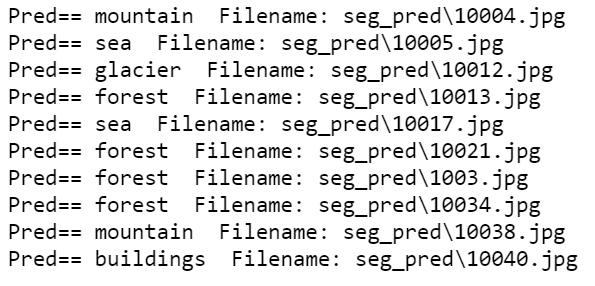
步骤3:保存模型 (Step 3: Save the model)
The saved Model serializes the architecture of the Model, the weights and the biases, and training configuration in a single file. The saved model can be easily used for sharing or deploying the models.
保存的模型将模型的结构,权重和偏差以及训练配置序列化为一个文件。 保存的模型可以轻松用于共享或部署模型。
model.save('Intel_epoch50_batch16.h5')Step 4: Apply Post-Training Quantization
步骤4:套用训练后量化
We apply quantization to the models as the models at Edge needs to be light-weight for low latencies. Light-weight models reduce the amount of computation required to make inferences.
我们将量化应用于模型,因为Edge上的模型需要轻量级以实现低延迟。 轻量级模型减少了进行推理所需的计算量。
TFlite Quantized models
TFlite量化模型
Take less space on the Edge devices.
在Edge设备上占用更少的空间。
Have faster download time on networks with lower bandwidth
在带宽较低的网络上具有更快的下载时间
Occupy less Memory for the Model to make inferences faster
为模型占用更少的内存,以加快推理速度
Quantization will reduce the size of the model and improves latency however there is a trade-off between the size of the model and the accuracy of the model.
量化将减小模型的大小并改善延迟,但是在模型的大小和模型的准确性之间要进行权衡。
TensorFlow saved model stores the graphs containing the computational operation, activation functions, weights, and biases. The activation function, weights, and biases are 32-bit floating points.
TensorFlow保存的模型存储包含计算操作,激活函数,权重和偏差的图形。 激活函数,权重和偏差是32位浮点。
Quantization reduces the precision of the numbers used to represent different parameters of the TensorFlow model from float32, 32-bit floating points to int, which is 8-bit and this makes models light-weight
量化降低了用于表示TensorFlow模型的不同参数的数字的精度,从float32、32位浮点到int(即8位),这使模型轻巧
Both weights and activations can be quantized by converting to an integer, and this will give low latency, smaller size, and reduced power consumption.
权重和激活都可以通过转换为整数来量化,这将提供低延迟,更小的尺寸和更低的功耗。
The decision tree below will guide you to know which post-training quantization is best for your use case
下面的决策树将指导您了解哪种训练后量化最适合您的用例
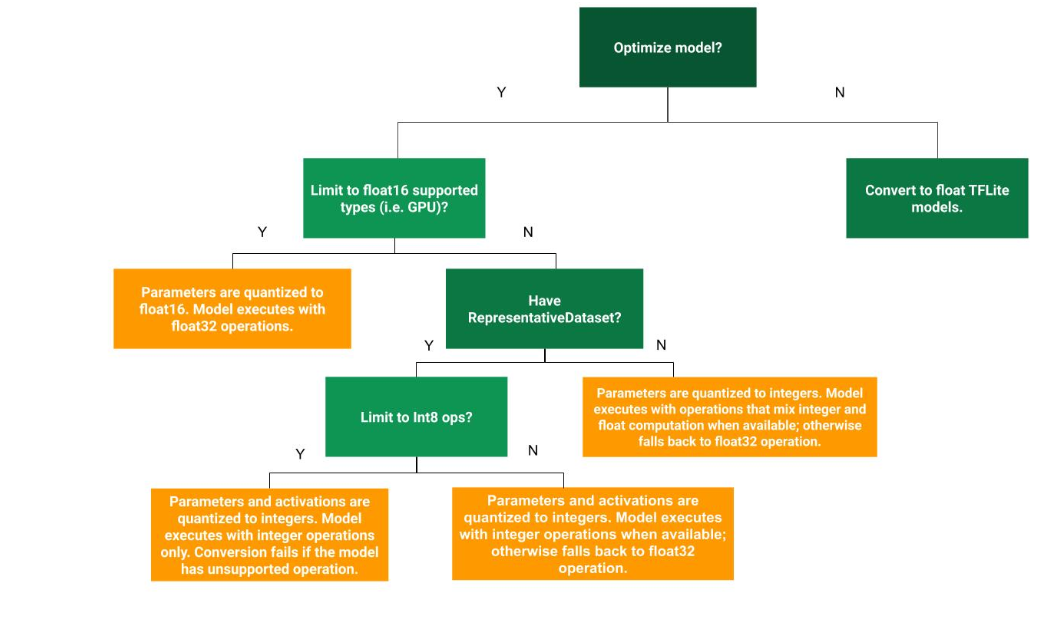
We will create a Representative Dataset and enforce full integer quantization for both the input and output.
我们将创建一个代表数据集,并对输入和输出强制执行完整的整数量化。
Representative datasets help with an accurate dynamic range of activations. To support multiple inputs, each representative data point is a list and each element in the list is fed to the model according to its indices
代表性的数据集有助于激活的准确动态范围。 为了支持多个输入,每个代表性数据点都是一个列表,并且列表中的每个元素根据其索引被馈送到模型
def representative_data_gen():
  dataset_list = tf.data.Dataset.list_files(test_dir + '\\*')
  for i in range(100):
    image = next(iter(dataset_list))
    image = tf.io.read_file(image)
    image = tf.io.decode_jpeg(image, channels=3)
    image = tf.image.resize(image, (100,100))
    image = tf.cast(image / 255., tf.float32)
    image = tf.expand_dims(image, 0)# Model has only one input so each data point has one element
    yield [image]
步骤5:转换为Tflite版本 (Step 5: Convert to Tflite version)
keras_model='Intel_epoch50_batch16.h5'#For loading the saved model and tf.compat.v1 is for compatibility with TF1.15
converter=tf.compat.v1.lite.TFLiteConverter.from_keras_model_file(keras_model)  # This enables quantization
converter.optimizations = [tf.lite.Optimize.DEFAULT]# This ensures that if any ops can't be quantized, the converter throws an error
converter.target_spec.supported_ops = [tf.lite.OpsSet.TFLITE_BUILTINS_INT8]# Set the input and output tensors to uint8
converter.inference_input_type = tf.uint8
converter.inference_output_type = tf.uint8# set the representative dataset for the converter so we can quantize the activations
converter.representative_dataset = representative_data_gen
tflite_model = converter.convert()#write the quantized tflite model to a file
with open('Intel_class.tflite', 'wb') as f:
  f.write(tflite_model)with open('Intel_epoch50_batch16.tflite', 'wb') as f:
  f.write(tflite_model)
You can see the huge size difference between the saved Keras model and the tflite model
您会看到保存的Keras模型和tflite模型之间的巨大尺寸差异
步骤6:使用Edge TPU编译器编译tflite模型(Step 6: Compile the tflite model using edge TPU compiler)
To compile the Tflite model for Edge TPU, we need to complete the following installation.
要为Edge TPU编译Tflite模型,我们需要完成以下安装。
# Install compiler
! curl https://packages.cloud.google.com/apt/doc/apt-key.gpg | sudo apt-key add -! echo "deb https://packages.cloud.google.com/apt coral-edgetpu-stable main" | sudo tee /etc/apt/sources.list.d/coral-edgetpu.list! sudo apt-get update! sudo apt-get install edgetpu-compiler
and then Compile the TFlite model using Edge TPU compiler
然后使用Edge TPU编译器编译TFlite模型
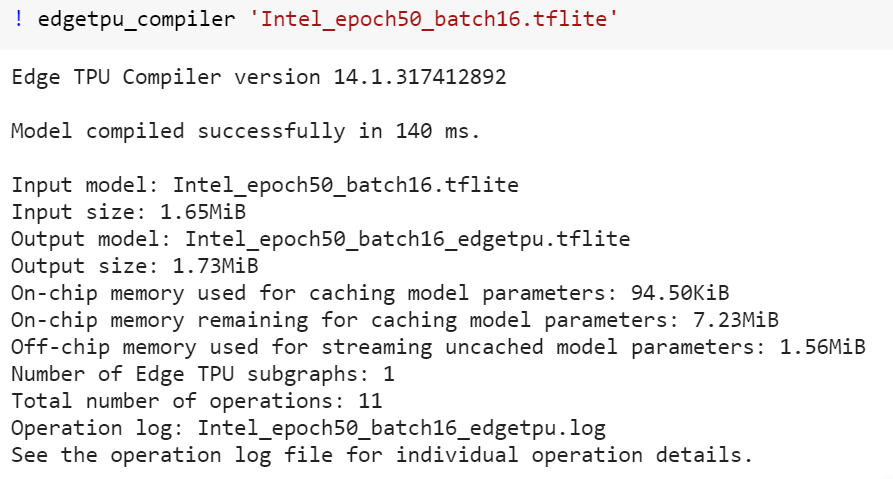
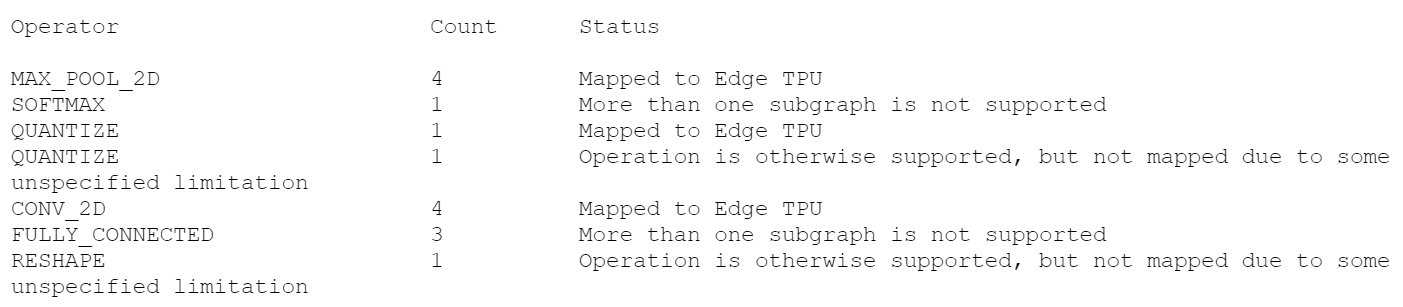
This will generate two files, an Edgetpu tflite, and a log file.
这将生成两个文件,一个Edgetpu tflite和一个日志文件。

The logfile will mention how many operations will execute on the TPU and how many will run on the CPU.
日志文件将提到将在TPU上执行多少操作,以及在CPU上执行多少操作。
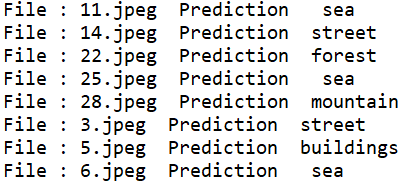
Step 7: Deploy the model at Edge to make inferences
步骤7:在Edge上部署模型以进行推断
import tflite_runtime.interpreter as tflite
from tflite_runtime.interpreter import Interpreter
from tflite_runtime.interpreter import load_delegate

compute='TPU'
test_dir=r'\images'
intel_class=['buildings', 'forest', 'glacier', 'mountain', ' sea', 'street']def set_input_tensor(interpreter, input):
  input_details = interpreter.get_input_details()[0]
  tensor_index = input_details['index']
  input_tensor = interpreter.tensor(tensor_index)()[0]
  scale, zero_point = input_details['quantization']
  input_tensor[:, :] = np.uint8(input / scale + zero_point)

def classify_image(interpreter, input):
  set_input_tensor(interpreter, input)
  interpreter.invoke()
  output_details = interpreter.get_output_details()[0]
  output = interpreter.get_tensor(output_details['index'])
  # Outputs from the TFLite model are uint8, so we dequantize the results:
  scale, zero_point = output_details['quantization']
  output = scale * (output - zero_point)
  top_1 = np.argmax(output)
  return top_1, outputfor file in os.listdir(test_dir):
    image_file = os.path.join(test_dir,  file)
    test_imgs=img_to_array(load_img(image_file, target_size=(100,100,3)))
    test_imgs = np.array(test_imgs)
    test_imgs = test_imgs.astype('float32')
    test_imgs = tf.cast(test_imgs / 255., tf.float32)
    #test_imgs = tf.expand_dims(test_imgs, 0)
    if compute=='TPU':
       interpreter = tflite.Interpreter('Intel_epoch50_batch16_edgetpu.tflite',
                                 experimental_delegates=[tflite.load_delegate('edgetpu.dll')])
    else:
        interpreter = tflite.Interpreter('Intel_epoch50_batch16.tflite')
    interpreter.allocate_tensors()
    interpreter.get_input_details()
    prediction, results = classify_image(interpreter,test_imgs )
    print("File :", file, " Prediction ", intel_class[prediction])


 614
614

 被折叠的 条评论
为什么被折叠?
被折叠的 条评论
为什么被折叠?
 到【灌水乐园】发言


