


 本文介绍了如何利用OpenCV进行区域感兴趣(ROI)的分割、轮廓检测和图像阈值化操作,主要关注计算机视觉中的图像处理技术。
opencv 阈值求roi
OpenCV is a huge open-source library widely used in computer vision, artificial intelligence and image processing domains. The quintessential applications of it in real world are face recognition, object detection, human activity recognition, object tracking and such others.
OpenCV是一个巨大的开源库,广泛用于计算机视觉,人工智能和图像处理领域。 它在现实世界中的典型应用是人脸识别,物体检测,人类活动识别,物体跟踪等。
Now, imagine you have to only detect an object from an entire input frame. So, instead of handling an entire frame, what if you can define a sub-region in the frame and treat it as the new frame to apply the processing. How do we do that you ask? Well, we are going to have a hands-on experience of implementing that in three different stages:
现在,假设您只需要从整个输入帧中检测到一个对象。 因此,代替处理整个框架,如果您可以在框架中定义一个子区域并将其视为要应用处理的新框架,该怎么办。 您如何要求我们? 好吧,我们将有一个在三个不同阶段实施该实践的经验:
Defining Region of Interest(ROI)
定义兴趣区
Detecting Contours in ROI
在ROI中检测轮廓
Thresholding the frame outlined by detected contours
阈值检测轮廓轮廓线
Let’s get started, shall we?
让我们开始吧,好吗?
什么是投资回报率? (What is ROI?)
In simple terms, a sub-region within a frame wherein our object of interest lies is known as Region of Interest(ROI).
简而言之,我们感兴趣的对象所在的帧内的子区域称为感兴趣区域(ROI)。
我们如何定义投资回报率? (How do we define ROI?)
The process of defining the ROI in an input frame is known as ROI Segmentation.
在输入帧中定义ROI的过程称为ROI分割。
In ROI Segmentation, (here) we are selecting a specific region in the frame and providing it’s dimensions in the rectangle method so that it will draw the rectangle-shaped ROI on the frame.
在“ ROI细分”中,(此处)我们选择框架中的特定区域并以矩形方法提供其尺寸,以便它将在框架上绘制矩形的ROI。
import numpy as np
import cv2
import math


camera = cv2.VideoCapture(0)
camera.set(10,200)


while camera.isOpened():
    ret, frame = camera.read()


    frame = cv2.bilateralFilter(frame, 5, 50, 100)  # smoothening filter
    frame = cv2.flip(frame, 1)  # flip the frame horizontally
    cv2.rectangle(frame, (int(cap_region_x_begin * frame.shape[1]), 0),
                 (frame.shape[1], int(cap_region_y_end * frame.shape[0])), (255, 0, 0), 2) #draw ROI
    cv2.imshow('original', frame) #show the frame


    # Press q to quit
    k = cv2.waitKey(1) & 0xFF
    if k == ord('q'):
        break


# When everything done, release the capture.
cap.release()
cv2.destroyAllWindows()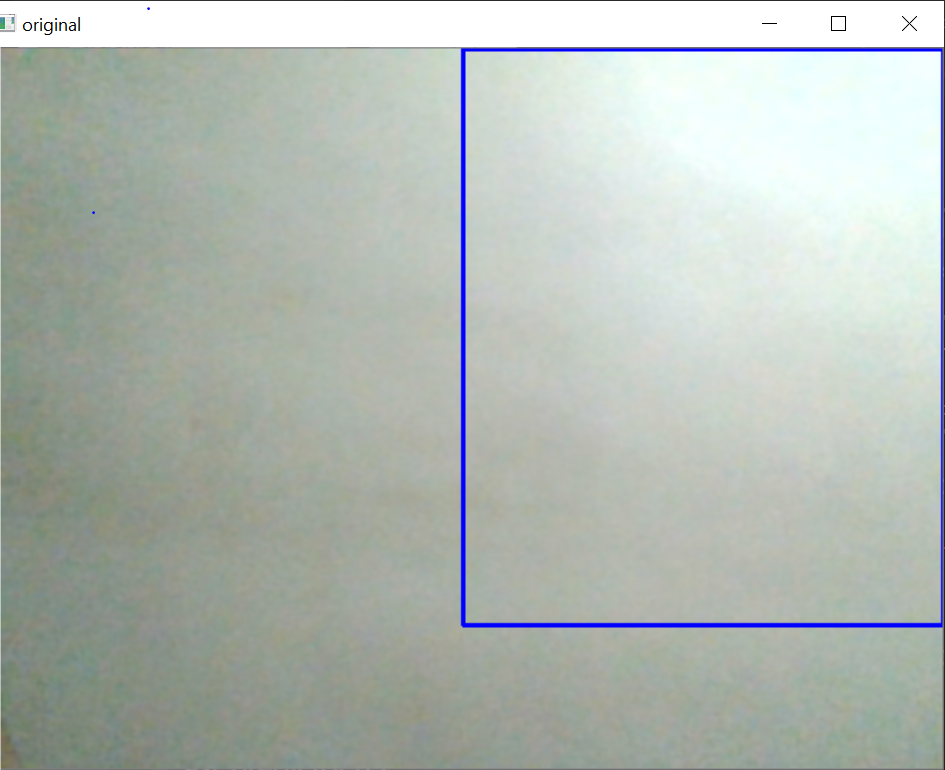
Now, if you want to bound the object of interest too then we can do that by finding contours in the ROI.
现在,如果您也想绑定感兴趣的对象,那么我们可以通过在ROI中找到轮廓来实现。
什么是轮廓? (What is a Contour?)
A Contour means an outline representing or say bounding a shape of an object.
轮廓表示 轮廓代表或说出物体形状的轮廓。
如何在框架中找到轮廓? (How to find Contours in the frame?)
For me, finding contours works best after thresholding the ROI frame. So, for finding the contours, the question on the hand is -
对我而言,在将ROI框架设为阈值后,找到轮廓效果最佳。 因此,要找到轮廓,手上的问题是-
什么是阈值? (What is Thresholding?)
Thresholding is nothing but a simple form of image segmentation. It is a process of transforming a grayscale or rgb image into a binary image. For an instance,
阈值不过是图像分割的一种简单形式。 这是将灰度或rgb图像转换为二进制图像的过程。 例如

So after thresholding the rgb frame, it becomes easy for the program to find contours because since the color of the object of interest in the ROI will be either Black(in simple Binary Threshing) or White(in Inverse Binary Threshing as above), the segmentation(separating background from foreground i.e our object) will be easily done.
因此,在对rgb帧进行阈值处理之后,程序很容易找到轮廓,因为由于ROI中感兴趣对象的颜色将是黑色(在简单二进制脱粒中)或白色(在反向二进制脱粒中,如上所述),因此分割(将背景与前景即我们的对象分开)将很容易完成。
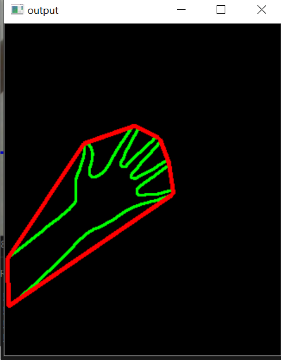
After thresholding the frame and detecting the contours, we apply convex hull technique to the set a tight fitting convex boundary around the points of the object. Implementing this, the frame should look like this-
在对框架进行阈值处理并检测到轮廓之后,我们应用凸包技术对围绕对象点的紧密拟合凸边界进行设置。 实施此步骤后,框架应如下所示-
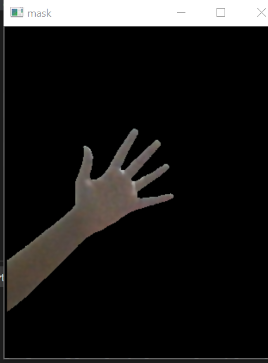
Another thing we can do is we can mask the ROI to display the object covered by the detected contours itself only. Again-
我们可以做的另一件事是,我们可以遮盖ROI以仅显示被检测到的轮廓本身覆盖的对象。 再次-
什么是图像遮罩? (What is Image Masking?)
Image masking is a process to hide some portions of an image and to reveal some portions. It is a non-destructive process of image editing. Most of the time it enables you to adjust and tweak the mask later if necessary. Very often, it is efficient and more creative way of the image manipulation.
图像遮罩是隐藏图像的某些部分并显示某些部分的过程。 这是图像编辑的非破坏性过程。 在大多数情况下,它使您可以在以后根据需要调整和调整遮罩。 通常,它是一种有效且更具创意的图像处理方式。
So, Basically here we will mask the background of the ROI. To do so, first we will fix the background of the ROI. Then, after fixing the background, we’ll subtract it from the frame and replace it with the background wewant(here, a simple black frame).
因此,基本上在这里我们将掩盖ROI的背景。 为此,首先我们将修复ROI的背景。 然后,在固定背景之后,我们将从框架中减去背景,并用wewant背景(这里是一个简单的黑色框架)替换它。
Implementing above mentioned technique, we should get an output like this-
实施上述技术,我们应该得到如下输出:
Here’s the complete code for the desired implementation of the techniques explained.
这是所说明技术的理想实现的完整代码。
import cv2
import numpy as np
import copy
import math


x=0.5  # start point/total width
y=0.8  # start point/total width
threshold = 60  # BINARY threshold
blurValue = 7  # GaussianBlur parameter
bgSubThreshold = 50
learningRate = 0


# variables
isBgCaptured = 0   # whether the background captured


def removeBG(frame): #Subtracting the background
    fgmask = bgModel.apply(frame,learningRate=learningRate)


    kernel = np.ones((3, 3), np.uint8)
    fgmask = cv2.erode(fgmask, kernel, iterations=1)
    res = cv2.bitwise_and(frame, frame, mask=fgmask)
    return res


# Camera
camera = cv2.VideoCapture(0)
camera.set(10,200)


while camera.isOpened():
    ret, frame = camera.read()
    frame = cv2.bilateralFilter(frame, 5, 50, 100)  # smoothening filter
    frame = cv2.flip(frame, 1)  # flip the frame horizontally
    cv2.rectangle(frame, (int(x * frame.shape[1]), 0),
                 (frame.shape[1], int(y * frame.shape[0])), (255, 0, 0), 2) #drawing ROI
    cv2.imshow('original', frame)


    #  Main operation
    if isBgCaptured == 1:  # this part wont run until background captured
        img = removeBG(frame)
        img = img[0:int(y * frame.shape[0]),
                    int(x * frame.shape[1]):frame.shape[1]]  # clip the ROI
        cv2.imshow('mask', img)


        # convert the image into binary image
        gray = cv2.cvtColor(img, cv2.COLOR_BGR2GRAY)
        blur = cv2.GaussianBlur(gray, (blurValue, blurValue), 0)
        cv2.imshow('blur', blur)
        ret, thresh = cv2.threshold(blur, threshold, 255, cv2.THRESH_BINARY) #thresholding the frame
        cv2.imshow('ori', thresh)


        # get the coutours
        thresh1 = copy.deepcopy(thresh)
        contours, hierarchy = cv2.findContours(thresh1, cv2.RETR_TREE, cv2.CHAIN_APPROX_SIMPLE) #detecting contours
        length = len(contours)
        maxArea = -1
        if length > 0:
            for i in range(length):  # find the biggest contour (according to area)
                temp = contours[i]
                area = cv2.contourArea(temp)
                if area > maxArea:
                    maxArea = area
                    ci = i


            res = contours[ci]
            hull = cv2.convexHull(res) #applying convex hull technique
            drawing = np.zeros(img.shape, np.uint8)
            cv2.drawContours(drawing, [res], 0, (0, 255, 0), 2) #drawing contours
            cv2.drawContours(drawing, [hull], 0, (0, 0, 255), 3) #drawing convex hull

        cv2.imshow('output', drawing)


    # Keyboard OP
    k = cv2.waitKey(10)
    if k == 27:
        camera.release()
        cv2.destroyAllWindows()
        break
    elif k == ord('b'):  # press 'b' to capture the background
        bgModel = cv2.createBackgroundSubtractorMOG2(0, bgSubThreshold)
        isBgCaptured = 1
        print( 'Background Captured')
    elif k == ord('r'):  # press 'r' to reset the background
        bgModel = None
        isBgCaptured = 0
print ('Reset BackGround')现在,您很好!(Now, you’re good to go!)
opencv 阈值求roi


 4389
4389

 被折叠的 条评论
为什么被折叠?
被折叠的 条评论
为什么被折叠?
 到【灌水乐园】发言


