


 本文介绍了VisionTransformer(ViT)的基本原理,包括如何将图像切分为patch并进行编码。接着,重点讨论了SwinTransformer,它结合了ResNet和Transformer的特点,通过patchmerging和window-basedmultiheadself-attention(W-MSA)以及shiftedW-MSA实现层次化和减少复杂度。SwinTransformer在保持Transformer的全局信息处理能力的同时,引入了局部连接性和多尺度特征,提高了模型性能。
建议通过标题来快速跳转
Vit (Vision Transformer)
Vit把图片打成了patch,然后过标准的TransformerEncoder,最后用CLS token来做分类。关于怎么打成patch再写一些介绍,假设一个图片是224×224×3,每个patch大小是16×16,那么就会有224×224/(16×16)=196的seq_length,每个patch的维度就是16×16×3=768,这个768再过一个Linear层,最终一个图就可以用196×768表示了,再补个cls token,就成了197×768
Vit的位置编码
作者在文中试了几种方式,发现这几种在分类上效果差不多
- 1-dimensional positional embedding
- 2-dimensional positional embedding
- Relative positional embeddings
Vit少了Inductive bias
In CNNs, locality, two-dimensional neighborhood structure, and translation equivariance are baked into each layer throughout the whole model。卷积和FFN相比主要的优先就是局部连接和权值共享。
SwinTransformer
SwinTransformer可以看成是披着ResNet外壳的vision transformer,swin 就是两个关键词:patch + 多尺度。下面结合code来说一些重点的细节:
总览图
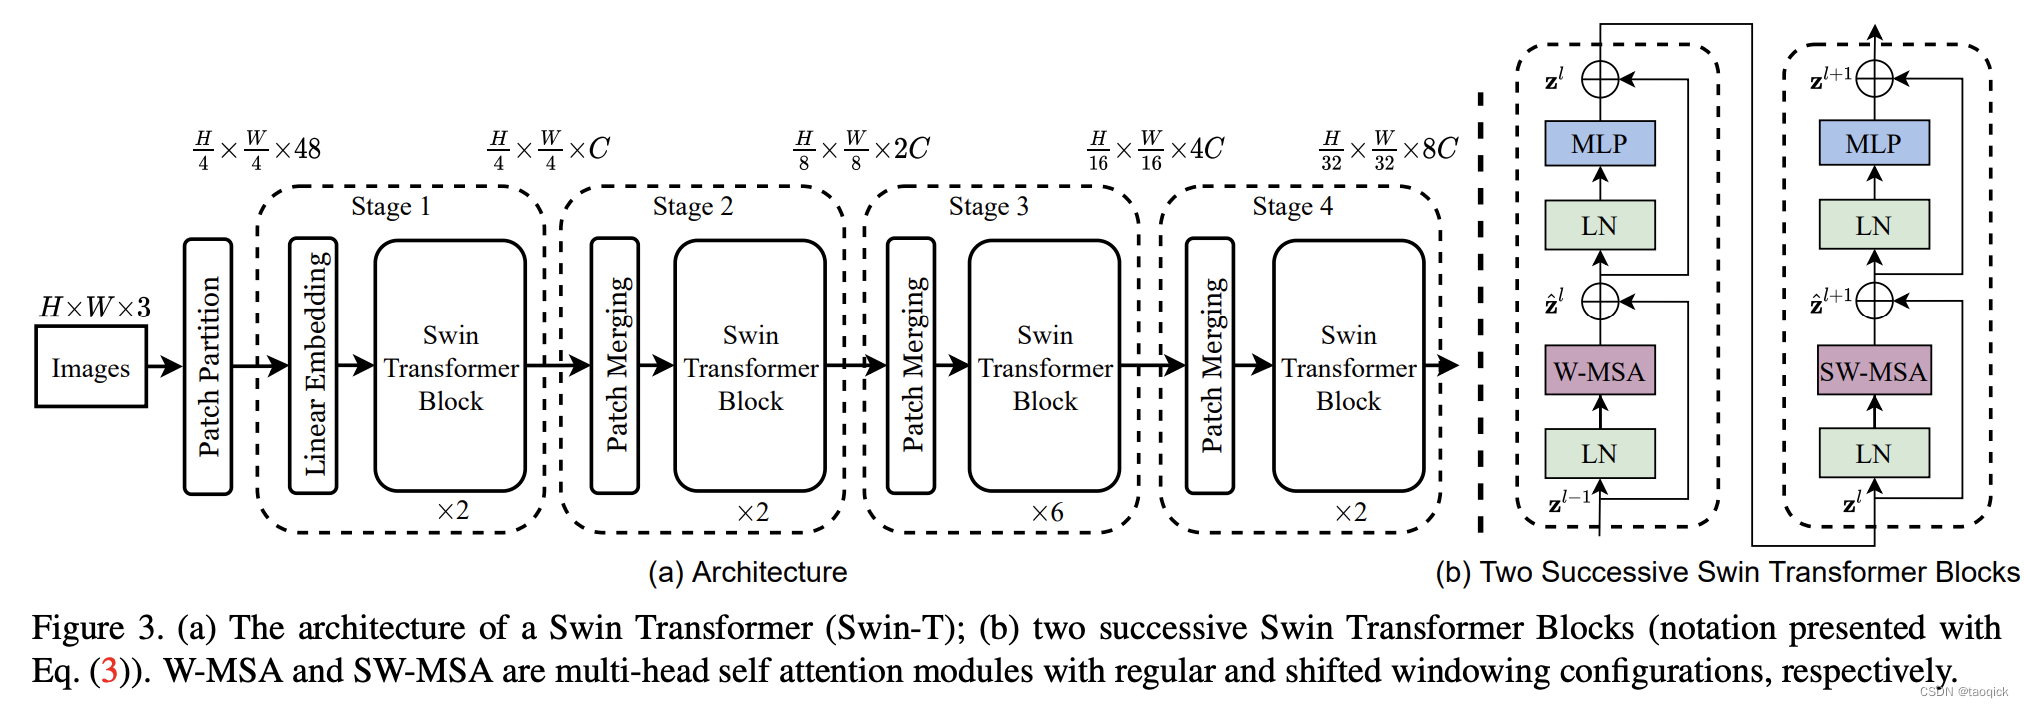
这里W-MSA缩写是window-multi head self attention,SW-MSA缩写是shifted window-multi head self attention。整个模型采取层次化的设计,一共包含4个Stage,每个stage都会缩小输入特征图的分辨率,像CNN一样逐层扩大感受野。
- 在输入开始的时候,做了一个Patch Embedding,将图片切成一个个图块,并嵌入到Embedding。
- 在每个Stage里,由Patch Merging和多个Block组成。其中Patch Merging模块主要在每个Stage一开始降低图片分辨率(把H×W×C转成(H/2)×(W/2)×(2C)),把进而形成层次化的设计,同时也能节省一定运算量。
- 而Block具体结构如右图所示,主要是LayerNorm,MLP,window-multi head self attention和 shifted window-multi head self attention组成。所以一个Block里至少有两个MSA结构
结合代码实现看更多细节
Patch Embedding
在输入进Block前,我们需要将图片切成一个个patch,然后嵌入向量。采用patch_size * patch_size的窗口大小,通过nn.Conv2d,将stride,kernelsize设置为patch_size大小,patch_size设置为4。值得注意的是SwinTransformer的patch_size×patch_size是4×4,而Vit的patch_size×patch_size是16×16,所以SwinTransformer的序列长度就会长很多,这对于Transformer是吃不消的,因此就有了W-MSA放在一个窗口内减少复杂度。
class PatchEmbed(nn.Module):
    def __init__(self,
                 img_size=224,
                 patch_size=4,
                 in_chans=3,
                 embed_dim=96,
                 norm_layer=None):
        super().__init__()
        img_size = to_2tuple(img_size)
        patch_size = to_2tuple(patch_size)
        patches_resolution = [
            img_size[0] // patch_size[0], img_size[1] // patch_size[1]
        ]
        self.img_size = img_size
        self.patch_size = patch_size
        self.patches_resolution = patches_resolution
        self.num_patches = patches_resolution[0] * patches_resolution[1]

        self.in_chans = in_chans
        self.embed_dim = embed_dim

        self.proj = nn.Conv2d(in_chans,
                              embed_dim,
                              kernel_size=patch_size,
                              stride=patch_size)
        if norm_layer is not None:
            self.norm = norm_layer(embed_dim)
        else:
            self.norm = None

    def forward(self, x):
        B, C, H, W = x.shape
        # FIXME look at relaxing size constraints
        assert H == self.img_size[0] and W == self.img_size[1], \
            f"Input image size ({

     H}*{

     W}) doesn't match model ({

     self.img_size[0]}*{

     self.img_size[1]})."
        x = self.proj(x).flatten(2).transpose(1, 2)  # B Ph*Pw C
        if self.norm is not None:
            x = self.norm(x)
        return x
Patch Merging
这一步用Yi Zhu老师的图最好了,Patch Merging模块主要在每个Stage一开始降低图片分辨率(把H×W×C转成(H/2)×(W/2)×(2C)),把进而形成层次化的设计,同时也能节省一定运算量。

class PatchMerging(nn.Module):
    r""" Patch Merging Layer.

    Args:
        input_resolution (tuple[int]): Resolution of input feature.
        dim (int): Number of input channels.
        norm_layer (nn.Module, optional): Normalization layer.  Default: nn.LayerNorm
    """
    def __init__(self, input_resolution, dim, norm_layer=nn.LayerNorm):
        super().__init__()
        self.input_resolution = input_resolution
        self.dim = dim
        self.reduction = nn.Linear(4 * dim, 2 * dim, bias=False)
        self.norm = norm_layer(4 * dim)

    def forward(self, x):
        """
        x: B, H*W, C
        """
        H, W = self.input_resolution
        B, L, C = x.shape
        assert L == H * W, "input feature has wrong size"
        assert H % 2 == 0 and W % 2 == 0, f"x size ({

     H}*{

     W}) are not even."

        x = x.view(B, H, W, C)

        x0 = x[:, 0::2, 0::2, :]  # B H/2 W/2 C
        x1 = x[:, 1::2, 0::2, :]  # B H/2 W/2 C
        x2 = x[:, 0::2, 1::2, :]  # B H/2 W/2 C
        x3 = x[:, 1::2, 1::2, :]  # B H/2 W/2 C
        x = torch.cat([x0, x1, x2, x3], -1)  # B H/2 W/2 4*C
        x = x.view(B, -1, 4 * C)  # B H/2*W/2 4*C

        x = self.norm(x)
        x = self.reduction(x)

        return x
Window Attention
这部分关键点就两点:
- 刚才提到的用了Window减少复杂度
- 加了相对位置编码,把SoftMax(QKT/d)SoftMax(QK^T/\sqrt d)SoftMax(QKT/d)变成SoftMax((QKT+B)/d)SoftMax((QK^T+B)/\sqrt d)Sof
 最低0.47元/天 解锁文章


 10万+
10万+

 被折叠的 条评论
为什么被折叠?
被折叠的 条评论
为什么被折叠?
 到【灌水乐园】发言


