


📝 面试求职: 「面试试题小程序」 ,内容涵盖 测试基础、Linux操作系统、MySQL数据库、Web功能测试、接口测试、APPium移动端测试、Python知识、Selenium自动化测试相关、性能测试、性能测试、计算机网络知识、Jmeter、HR面试,命中率杠杠的。(大家刷起来…)
📝 职场经验干货:
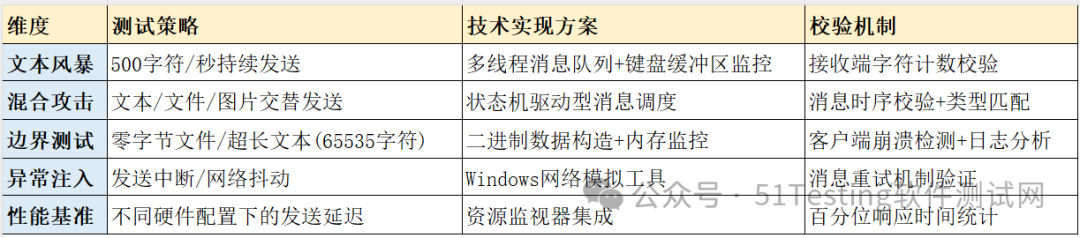
功能测试面临的挑战
在微信消息模块的测试需求中,需应对高频消息轰炸(1分钟/万级消息流)等严苛场景,但传统人工测试存在三大瓶颈:
-
人力消耗黑洞:万级异质消息发送需要高强度人工操作
-
结果不可追溯:人工操作难以精确记录
-
场景覆盖局限:复杂边界条件难以稳定复现
技术突围策略
采用自动化测试框架实现:
✅ 消息风暴模拟引擎
✅ 多维度异常注入机制
✅ 智能结果校验体系
微信界面智能捕获
1、先动态窗口定位
import uiautomation as auto
import win32gui
import win32con
from typing import List
import time
class WeChatWindowManager:
    def __init__(self):
        self._main_handle = None
        self._chat_panel = None

    def _find_main_window(self) -> List[auto.Control]:
        """直接查找微信主窗口"""
        window = auto.WindowControl(ClassName='WeChatMainWndForPC', Name='微信')
        return [window] if window.Exists() else []

    def activate_window(self) -> bool:
        """窗口激活与状态校验"""
        candidates = self._find_main_window()
        if not candidates:
            raise RuntimeError("未检测到运行中的微信客户端")

        target = candidates[0]
        handle = target.NativeWindowHandle
        # 恢复窗口并置顶
        win32gui.ShowWindow(handle, win32con.SW_RESTORE)
        win32gui.SetWindowPos(handle, win32con.HWND_TOPMOST,
                            0, 0, 0, 0,
                            win32con.SWP_NOMOVE | win32con.SWP_NOSIZE)
        # 确保窗口前置
        win32gui.SetForegroundWindow(handle)
        time.sleep(0.5)
        auto.SendKeys("{ESC}")  # 清除弹窗
        self._main_handle = handle
        return self._verify_activation()

    def _verify_activation(self) -> bool:
        """校验窗口是否处于前台"""
        return win32gui.GetForegroundWindow() == self._main_handle
2、接下来设计关键的测试场景
①由excel生成测试场景进行调用
import pandas as pd
import pyautogui
from concurrent.futures import ThreadPoolExecutor
from dataclasses import dataclass
@dataclassclass MessageProfile:
    content: str
    msg_type: str
    retry_policy: int
    validation: str
class WeChatBot:
    def __init__(self, excel_path: str):
        self._load_scenarios(excel_path)
        self._setup_engine()

    def _load_scenarios(self, path: str):
        """加载Excel测试场景"""
        df = pd.read_excel(path, sheet_name='Scenarios')
        self.scenarios = [
            MessageProfile(
                content=row['Content'],
                msg_type=row['Type'],
                retry_policy=row['Retry'],
                validation=row['Validation']
            ) for _, row in df.iterrows()
        ]

    def _setup_engine(self):
        """初始化发送引擎"""
        self.executor = ThreadPoolExecutor(max_workers=5)
        self._init_controls()

    def _init_controls(self):
        """绑定聊天窗口控件"""
        self.input_area = auto.Control(
            searchDepth=3,
            AutomationId="chatInputArea"
        )
        self.send_btn = auto.ButtonControl(
            searchFrom=self.input_area,
            Name="发送(S)"
        )

    def _smart_send(self, text: str):
        """智能发送策略"""
        # 剪贴板注入模式
        pyperclip.copy(text)
        self.input_area.Click()
        pyautogui.hotkey('ctrl', 'v', interval=0.1)
        # 防检测机制
        auto.Sleep(0.3)
        self.send_btn.Click()

    def stress_test(self, cycles: int):
        """执行压力测试"""
        futures = []
        for _ in range(cycles):
            for scenario in self.scenarios:
                future = self.executor.submit(
                    self._execute_scenario,
                    scenario
                )
                futures.append(future)
        return futures

    def _execute_scenario(self, profile: MessageProfile):
        """执行单个测试场景"""
        try:
            for attempt in range(profile.retry_policy):
                self._smart_send(profile.content)
                if self._validate(profile.validation):
                    break
        except Exception as e:
self._log_error(e)②最后我们在发消息的过程中可以监控性能反馈,并生成性能报告
import psutil
class PerformanceMonitor:
    def __init__(self, pid: int):
        self.process = psutil.Process(pid)
        self._metrics = []

    def start_monitoring(self, interval=1):
        """资源占用监控"""
        while True:
            cpu_percent = self.process.cpu_percent()
            mem_info = self.process.memory_info()
            self._metrics.append({
                'timestamp': time.time(),
                'cpu': cpu_percent,
                'rss': mem_info.rss
            })
            time.sleep(interval)

    def generate_report(self):
        """生成性能报告"""
        df = pd.DataFrame(self._metrics)
        df.to_csv("performance_report.csv", index=False)
3、该方案将人工操作转化为可编程测试资产,使测试人员:
✅单机即可模拟2000+并发消息流
✅精确记录微秒级响应延迟
✅自动生成测试对比报告
✅实现7×24小时无人值守测试
通过工程化改造,原本需要8人日的压力测试任务,可压缩至15分钟自动完成,且获得更精准的性能基准数据。将传统功能测试转化为可持续集成的质量保障体系,极大提升了测试效率与软件质量。
最后: 下方这份完整的软件测试视频教程已经整理上传完成,需要的朋友们可以自行领取【保证100%免费】


 5万+
5万+

 被折叠的 条评论
为什么被折叠?
被折叠的 条评论
为什么被折叠?
 到【灌水乐园】发言


