


让我们一起走向未来
🎓作者简介:全栈领域优质创作者
🌐个人主页:百锦再@新空间代码工作室
📞工作室:新空间代码工作室(提供各种软件服务)
💌个人邮箱:[15045666310@163.com]
📱个人微信:15045666310
🌐网站:https://meihua150.cn/
💡座右铭:坚持自己的坚持,不要迷失自己!要快乐


在 Element Plus 中,如果你需要在修改信息时将已有的图片 URL 列表(如 [“url1”, “url2”])添加到 fileList 的初始数据并进行预览,可以按照以下步骤进行操作:
1. 定义 fileList 的初始数据
首先,你需要将从后端获取的图片 URL 列表转换为 fileList 所需的格式。fileList 需要是一个对象数组,每个对象至少包含 name 和 url 两个属性。
2. 转换图片 URL 列表
你可以编写一个函数来将 URL 列表转换为 fileList 所需的格式。例如:
JavaScript复制
const convertImageUrlsToFileList = (imageUrls) => {
  return imageUrls.map((url) => {
    const fileName = url.split('/').pop(); // 获取 URL 的最后一部分作为文件名
    return { name: fileName, url };
  });
};
3. 在组件中使用 fileList
在 Vue 组件中,你可以使用 ref 来定义 fileList,并在组件的 setup 函数中初始化它。例如:
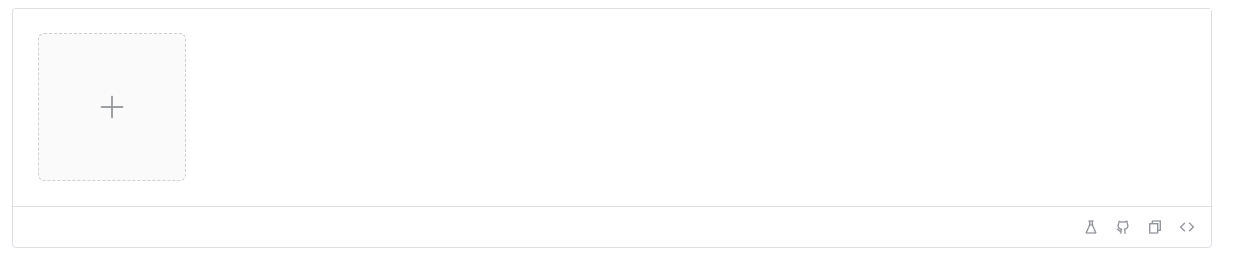
<template>
  <el-upload
    v-model:file-list="fileList"
    list-type="picture-card"
    action="https://jsonplaceholder.typicode.com/posts/"
    :on-preview="handlePreview"
    :on-remove="handleRemove"
    :on-success="handleSuccess"
  >
    <i class="el-icon-plus"></i>
  </el-upload>
</template>

<script setup>
import { ref } from 'vue';
import { convertImageUrlsToFileList } from './utils';

const props = defineProps({
  initialImageUrls: Array, // 从父组件传入的初始图片 URL 列表
});

const fileList = ref(convertImageUrlsToFileList(props.initialImageUrls));

const handlePreview = (file) => {
  console.log('Preview:', file);
};

const handleRemove = (file, fileList) => {
  console.log('Remove:', file, fileList);
};

const handleSuccess = (response, file, fileList) => {
  console.log('Success:', response, file, fileList);
};
</script>
4. 处理图片预览
你可以使用 el-image 组件来实现图片预览功能。例如:
<template>
  <div>
    <el-upload
      v-model:file-list="fileList"
      list-type="picture-card"
      action="https://jsonplaceholder.typicode.com/posts/"
      :on-preview="handlePreview"
      :on-remove="handleRemove"
      :on-success="handleSuccess"
    >
      <i class="el-icon-plus"></i>
    </el-upload>
    <el-dialog :visible.sync="dialogVisible">
      <img :src="dialogImageUrl" alt="Preview Image" style="width: 100%;">
    </el-dialog>
  </div>
</template>

<script setup>
import { ref } from 'vue';
import { convertImageUrlsToFileList } from './utils';

const props = defineProps({
  initialImageUrls: Array, // 从父组件传入的初始图片 URL 列表
});

const fileList = ref(convertImageUrlsToFileList(props.initialImageUrls));
const dialogVisible = ref(false);
const dialogImageUrl = ref('');

const handlePreview = (file) => {
  dialogImageUrl.value = file.url;
  dialogVisible.value = true;
};

const handleRemove = (file, fileList) => {
  console.log('Remove:', file, fileList);
};

const handleSuccess = (response, file, fileList) => {
  console.log('Success:', response, file, fileList);
};
</script>
5. 完整示例
以下是一个完整的示例,展示了如何将初始图片 URL 列表转换为 fileList 并进行预览:
<template>
  <div>
    <el-upload
      v-model:file-list="fileList"
      list-type="picture-card"
      action="https://jsonplaceholder.typicode.com/posts/"
      :on-preview="handlePreview"
      :on-remove="handleRemove"
      :on-success="handleSuccess"
    >
      <i class="el-icon-plus"></i>
    </el-upload>
    <el-dialog :visible.sync="dialogVisible">
      <img :src="dialogImageUrl" alt="Preview Image" style="width: 100%;">
    </el-dialog>
  </div>
</template>

<script setup>
import { ref } from 'vue';

const convertImageUrlsToFileList = (imageUrls) => {
  return imageUrls.map((url) => {
    const fileName = url.split('/').pop(); // 获取 URL 的最后一部分作为文件名
    return { name: fileName, url };
  });
};

const props = defineProps({
  initialImageUrls: Array, // 从父组件传入的初始图片 URL 列表
});

const fileList = ref(convertImageUrlsToFileList(props.initialImageUrls));
const dialogVisible = ref(false);
const dialogImageUrl = ref('');

const handlePreview = (file) => {
  dialogImageUrl.value = file.url;
  dialogVisible.value = true;
};

const handleRemove = (file, fileList) => {
  console.log('Remove:', file, fileList);
};

const handleSuccess = (response, file, fileList) => {
  console.log('Success:', response, file, fileList);
};
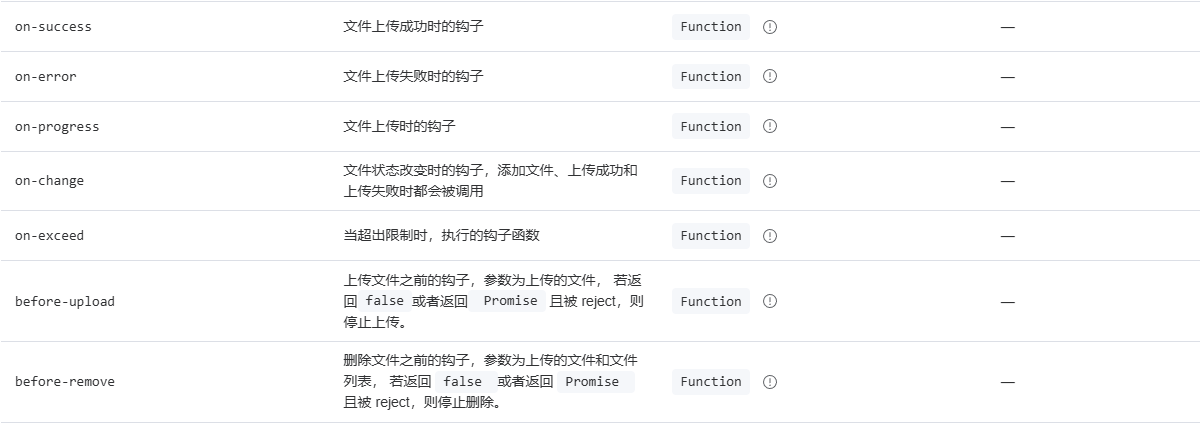
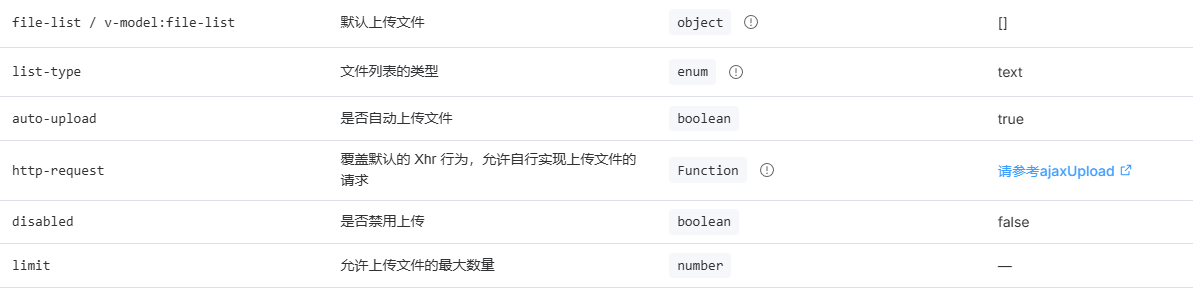
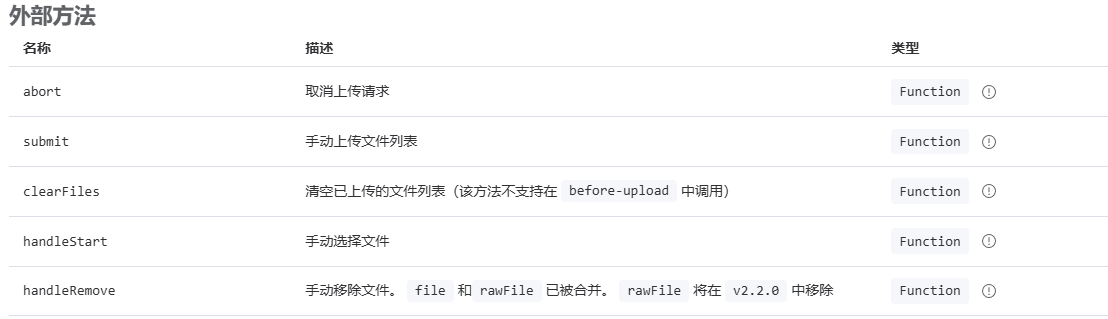
Upload的属性


 1万+
1万+

 被折叠的 条评论
为什么被折叠?
被折叠的 条评论
为什么被折叠?
 到【灌水乐园】发言


