


1.简介
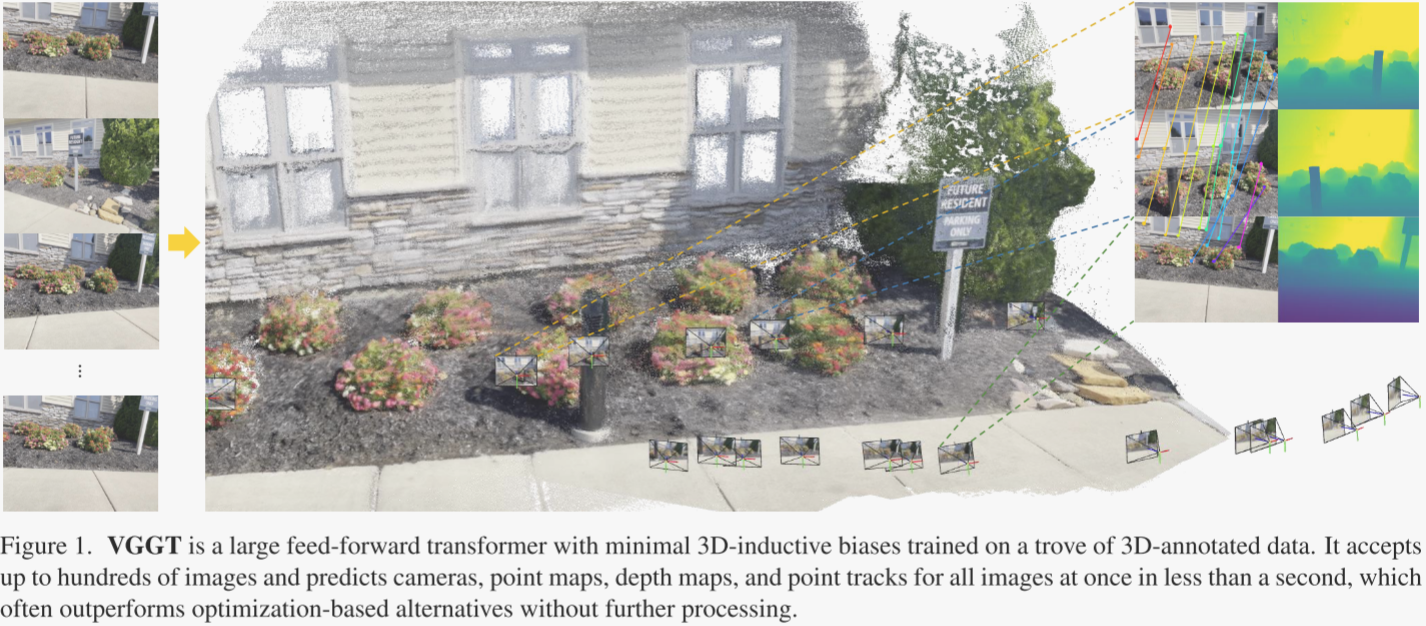
本文介绍了一种名为VGGT(Visual Geometry Grounded Transformer)的新型前馈神经网络,旨在直接从单张、少数或数百张图像中推断出场景的关键三维属性,包括相机参数、点云图、深度图和三维点轨迹。VGGT通过单一前馈传递在不到一秒钟的时间内完成这些预测,且性能通常优于需要后处理优化的传统方法。
该网络基于标准的大型Transformer架构,通过大量带有三维注释的公开数据集进行训练,无需特别设计三维归纳偏差。VGGT不仅在相机参数估计、多视图深度估计、密集点云重建和三维点跟踪等多个三维任务中取得了最先进的结果,还能作为特征骨干显著提升下游任务的性能。
在线体验:https://huggingface.co/facebook/VGGT-1B/tree/main
github地址:https://github.com/facebookresearch/vggt
权重地址:https://huggingface.co/facebook/VGGT-1B/tree/main
-
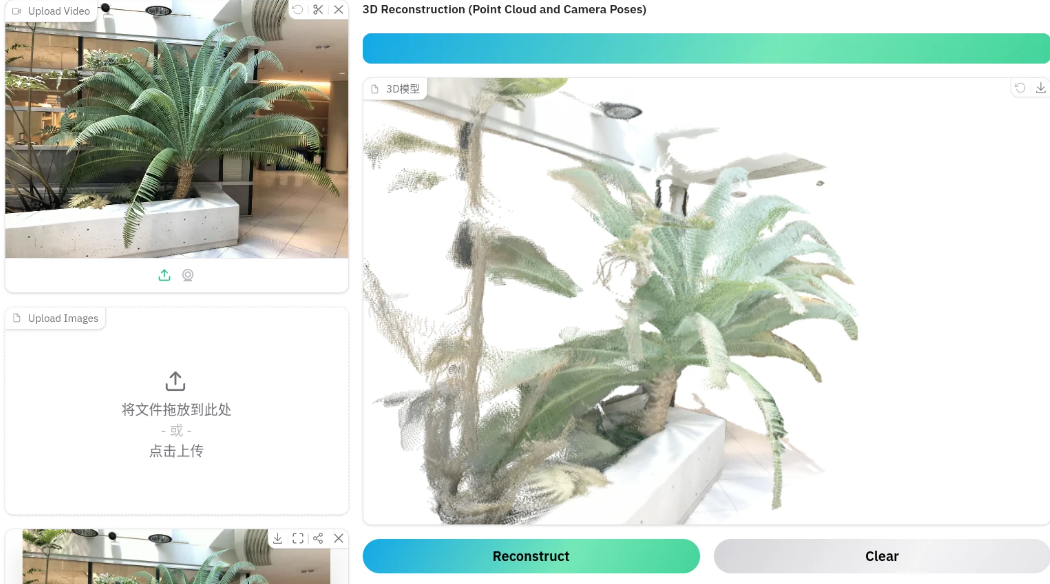
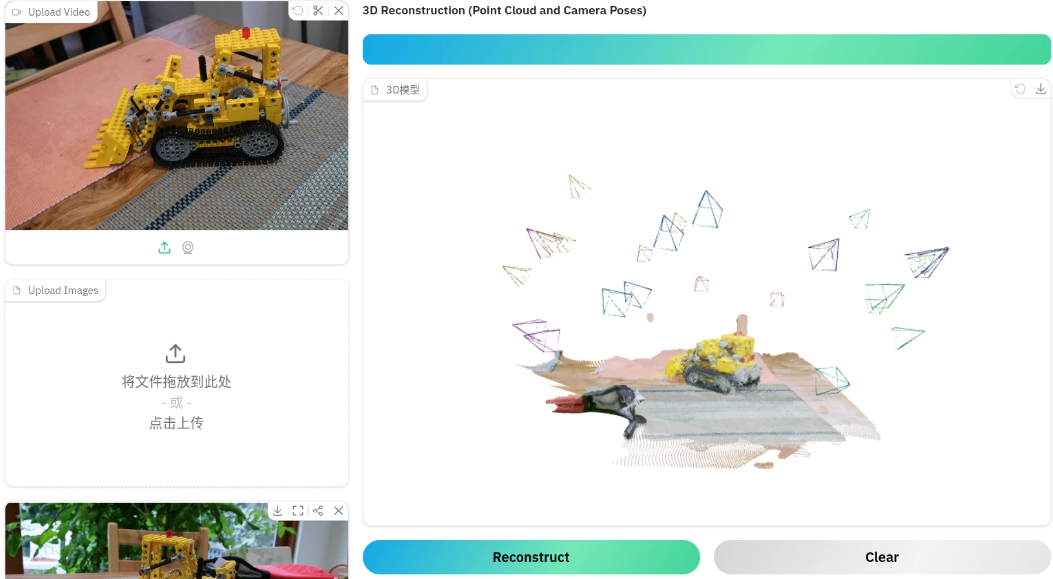
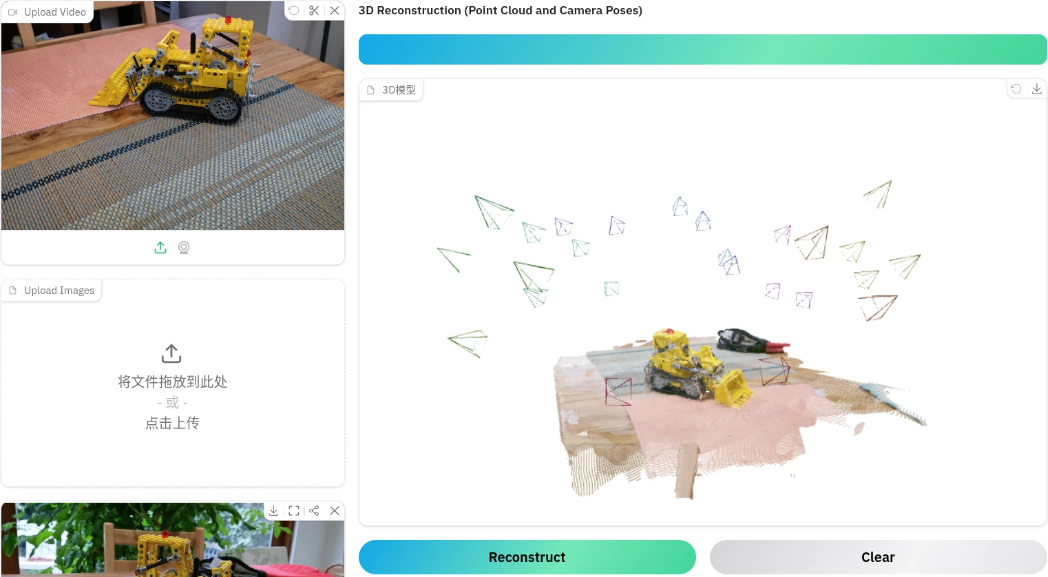
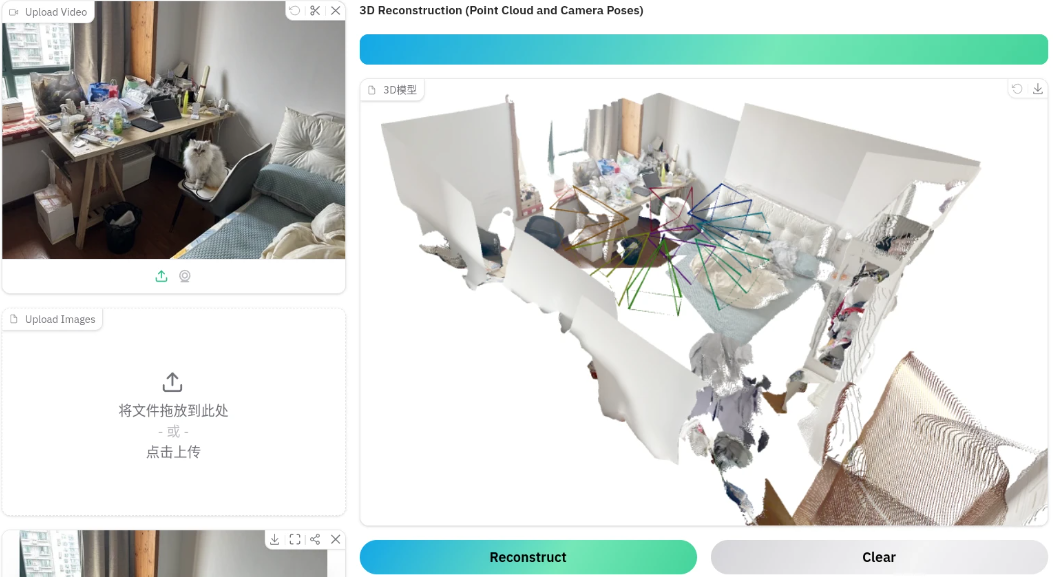
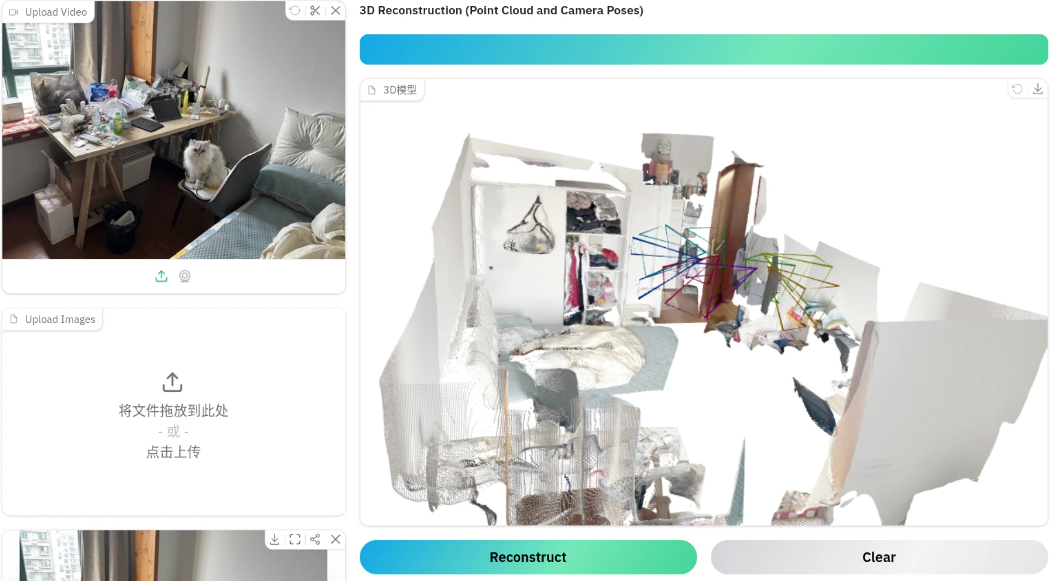
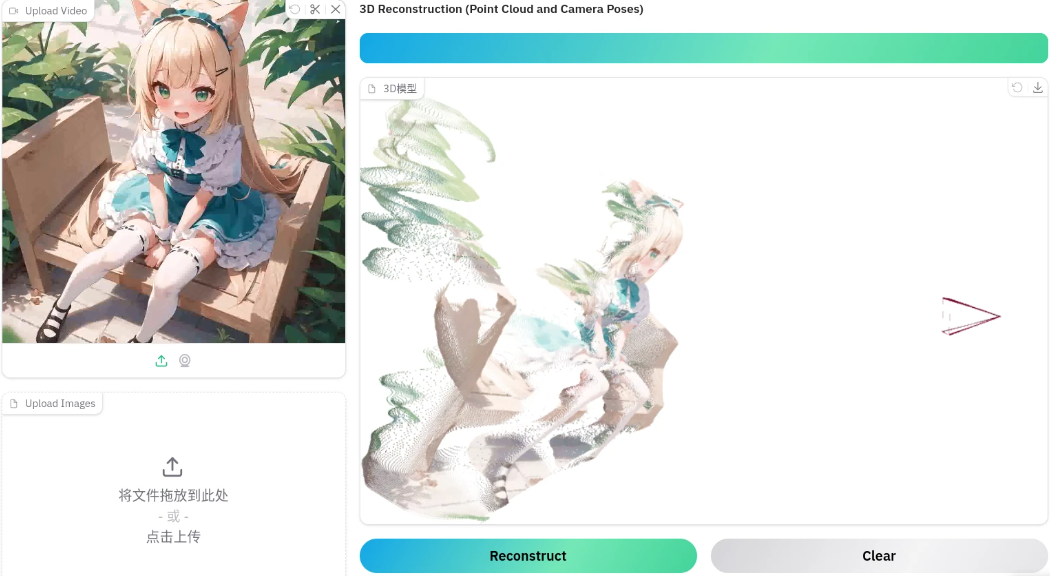
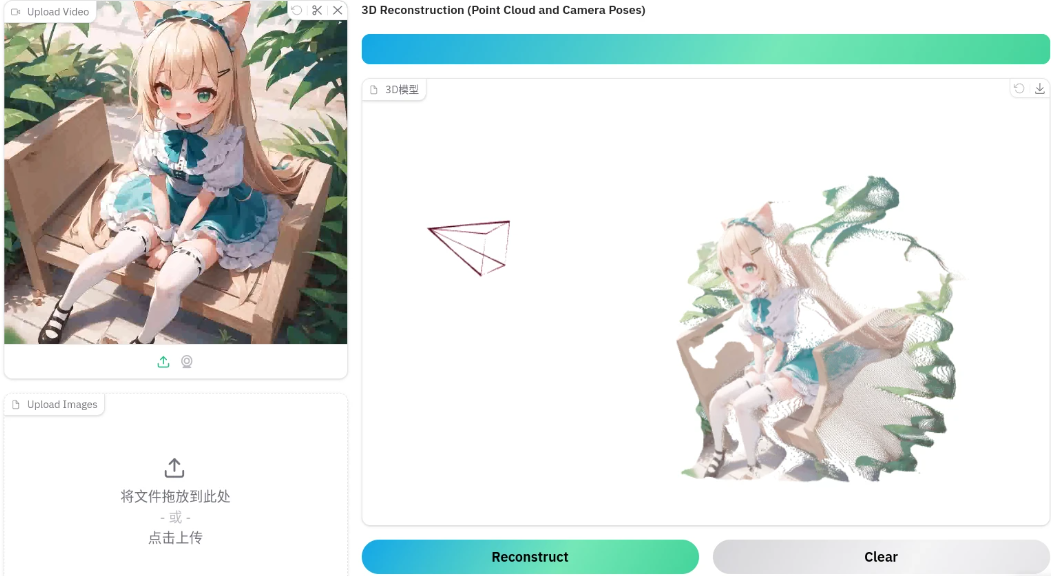
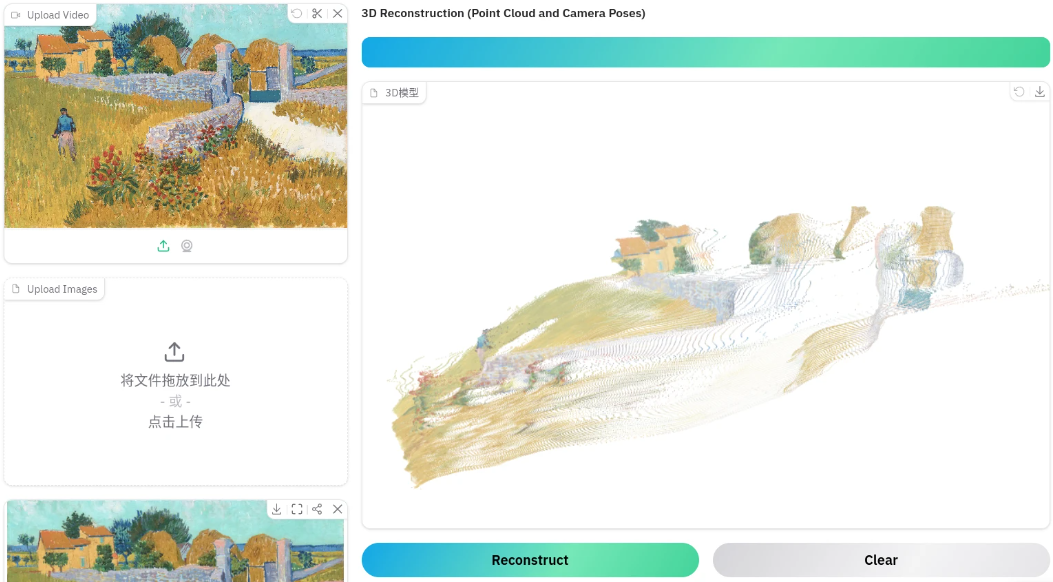
模型效果
以下均为多张图片生成三维空间点云

-
-
2.论文详解
传统上,三维重建一直依赖于视觉几何方法,使用诸如Bundle Adjustment(BA)之类的迭代优化技术。机器学习通常在其中发挥重要的补充作用,解决仅靠几何方法无法解决的任务,例如特征匹配和单目深度预测。因此,视觉几何在三维重建中占据主导地位,这增加了复杂性和计算成本。
随着网络变得越来越强大,作者思考是否最终可以完全由神经网络直接解决三维任务,几乎完全摒弃几何后处理。最近像DUSt3R及其演进版本MASt3R等研究在这个方向上取得了有前景的成果,但这些网络一次只能处理两张图像,并且依赖后处理来重建更多图像,即融合两两重建的结果。
在本文中,作者进一步朝着消除三维几何后处理优化的需求迈出了重要一步。作者引入了Visual Geometry Grounded Transformer(VGGT),这是一种前馈神经网络,能够从一个、几个甚至上百个输入视图中进行三维重建。VGGT能够在单次前向传播中预测完整的三维属性,包括相机参数、深度图、点图和三维点轨迹,且仅需几秒钟。
-
方法
问题定义
简单来说,输入是N张图片,输出是若干3D信息。详细定义如下:
输入是一组 的 N 张 RGB 图像,表示为,其中每张图像
,这些图片观察的是同一个三维场景。VGGT 是一个函数,将这组图像映射到每帧对应的三维注释集:
,即将每张图像
映射到其相机参数
(内参和外参)、深度图
、点图
,以及用于点跟踪的 C 维特征的网格
。定义如下:
- 对于相机参数
,作者
,这是旋转四元数
、平移向量
以及视场
的拼接。作者假设相机的主点位于图像中心,这在 SfM 框架中是常见设定。
- 深度图
将每个像素位置
与其对应的深度值
关联起来,这是从第 i 个相机观察到的。
- 同样,点图
将每个像素与其对应的三维场景点
关联起来。注意:点图是视点不变的,这意味着三维点
是在第一个相机
- 最后,对于关键点跟踪,作者遵循如track-anypoint方法。即,给定查询图像
中的一个固定查询图像点
,网络输出一个由所有图像
中对应的二维点
形成的轨迹
。请注意,上述变换器 f 并不直接输出轨迹,而是输出用于跟踪的特征
。跟踪被委托给一个单独的模块,该模块接收查询点
,然后计算轨迹。两个网络 VGGT 和 跟踪模块 被联合端到端训练。
-
整个模型架构就是首先用DINO切分图片,然后利用骨干网络提取特征,然后使用若干预测头预测3D信息(如深度、点云) ,详细流程如下:
-
骨干网络
模型 f 是一个大型的骨干网络。其流程如下:
- 每张输入图像 I 最初通过DINO被分割成一组 K 个token
。
- 然后,所有帧的图像token ,即
,通过主网络结构进行处理,其内部交替使用帧内和全局自注意力层。
交替注意力。作者通过引入交替注意力(Alternating-Attention,AA),简单来说,每一层有两个注意力层:全局注意力、帧间注意力。VGGT以交替方式在每个帧内和全局范围内计算注意力。
具体来说:帧内自注意力分别关注每个帧内的标记 ,而全局自注意力则联合关注所有帧中的标记
。
请注意,VGGT的架构没有使用任何交叉注意力层,只使用了自注意力层。
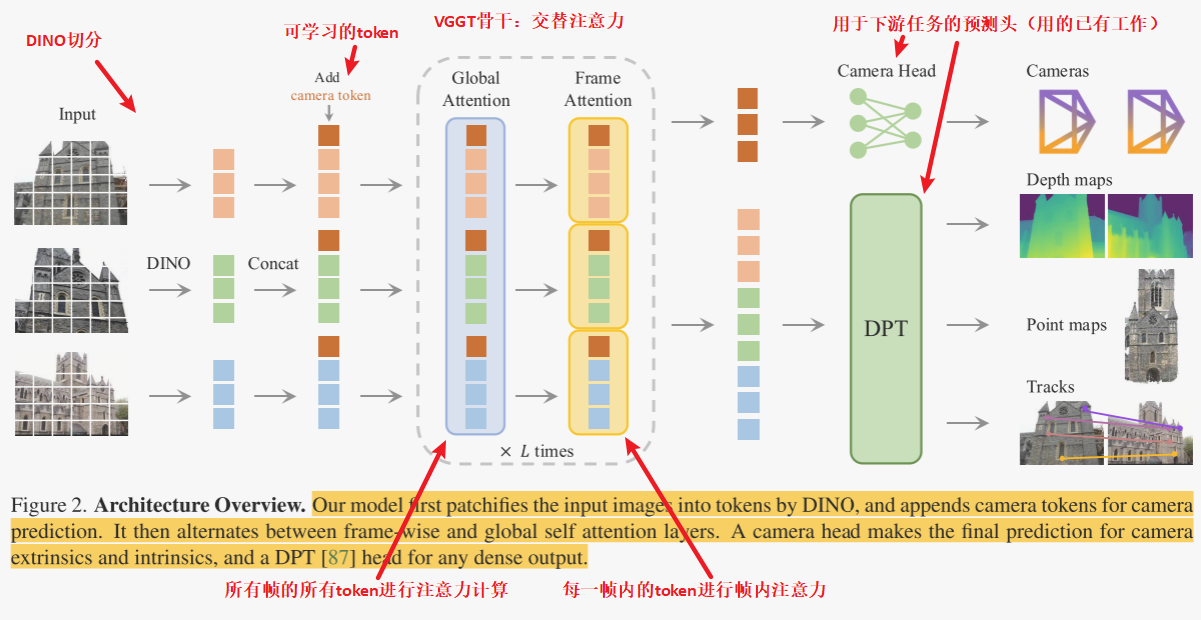
预测头
f 如何预测相机参数、深度图、点图和点轨迹:
- 首先,对于每张输入图像
与一个额外的相机标记
和四个寄存器标记
进行拼接。
- 然后,将
的拼接传递给骨干网络,产生输出标记
。
- 这里,第一帧的相机标记和寄存器标记
被设置为与所有其他帧
不同的一组可学习标记
,这使得模型能够区分第一帧和其余帧,并将三维预测表示在第一台相机的坐标系中。
- 请注意,相机和寄存器标记现在变得特定于帧——这是因为帧内自注意力层,帧内自注意力层允许模型专注于每一帧图像内部的信息。具体来说,这种注意力层会分别处理每帧图像中的特征标记(token),通过计算帧内不同标记之间的关系,来增强模型对当前帧内部信息的理解和表示。
- 这里,第一帧的相机标记和寄存器标记
- 按照常见做法,输出的寄存器标记
被丢弃,而
用于预测。
坐标系。如上所述,作者在第一台相机 的坐标系中预测相机、点图和深度图。因此,第一台相机输出的外参被设置为单位矩阵,即第一台的旋转四元数是
,第一台的平移向量是
。其余相机参数均在第一帧的基础上计算。
相机预测。相机参数 是从输出相机标记
使用四个额外的自注意力层后接一个线性层预测的。这用于预测相机的内参和外参。
密集预测。输出图像标记 被用来预测密集输出,即深度图
、点图
和跟踪特征
。更具体地说,
首先通过一个DPT层(现成模块)转换为密集特征图
。然后,每个
通过一个
卷积层映射到相应的深度图和点图
和
。此外,DPT头部还输出密集特征
,这些特征作为跟踪头部的输入。作者还预测了每个深度图和点图的不确定性
和
。
跟踪。为了实现跟踪模块 T,作者使用了CoTracker2架构(现成模块),它将密集跟踪特征 作为输入。更具体地说,给定查询图像
中的一个查询点
(在训练期间,作者总是设置 q = 1,但任何其他图像都可以潜在地用作查询),跟踪头部 T 预测所有图像
中与同一3D点 y 对应的一组2D点
。
为此,首先在查询点 处对查询图像的特征图
进行双线性采样以获得其特征。然后,将此特征与所有其他特征图
相关联以获得一组相关图。然后这些图通过自注意力层处理以预测最终的2D点
,这些点都与
对应。请注意,类似于VGGSfM,作者的跟踪器不假设输入帧的任何时间顺序,因此可以应用于任何一组输入图像,而不仅仅是视频。
-
训练
训练损失。作者端到端地训练VGGT模型 f,使用一个多任务损失:
作者发现相机()、深度(
)和点图(
)损失具有相似的范围,不需要相互加权。跟踪损失
通过一个因子
进行降权。
- 相机损失
监督相机
:
,其使用Huber损失
比较预测的相机
与真实值
- 深度损失
权衡预测深度
与真实深度
。与DUSt3R不同的是,作者还应用了一个基于梯度的项,这在单目深度估计中被广泛使用。因此,深度损失是
, 其中
是通道广播的逐元素乘积。
- 点图损失类似定义,但使用点图不确定性
:
- 最后,跟踪损失由
给出。这里,外层求和遍历查询图像
,
是
是通过应用跟踪模块
获得的相应预测。此外,遵循CoTracker2,作者应用了一个可见性损失(二元交叉熵)来估计一个点在给定帧中是否可见。
真实坐标归一化。如果我们缩放场景或改变其全局参考框架,场景的图像根本不受影响,这意味着任何这样的变体都是三维重建的合法结果。作者通过归一化数据来消除这种歧义,从而做出规范选择,并要求VGGT输出这种特定的变体。作者遵循文献,首先,将所有量表达在第一台相机 的坐标系中。然后,计算点图中所有三维点 P 到原点的平均欧几里得距离,并使用这个比例来归一化相机平移 t、点图 P 和深度图 D。不同的是,作者没有对输出的预测应用这样的归一化;相反,作者迫使它从训练数据中学习作者选择的归一化。
实现细节。默认情况下,作者分别使用了 L = 24 层全局和帧内注意力。模型总共包含大约12亿个参数。作者通过优化训练损失并使用AdamW优化器进行了160K次迭代来训练模型。作者使用了一个余弦学习率调度器,峰值学习率为0.0002,并进行了8K次迭代的预热。对于每个批次,作者从随机训练场景中随机抽取2到24帧。输入帧、深度图和点图被调整到最大尺寸为518像素。长宽比在0.33到1.0之间随机化。作者还随机对帧应用颜色抖动、高斯模糊和灰度增强。训练在64个A100 GPU上运行了九天。作者使用1.0的阈值进行梯度范数裁剪,以确保训练的稳定性。作者利用bfloat16精度和梯度检查点来提高GPU内存和计算效率。
训练数据。模型是使用大量且多样化的数据集集合进行训练的,包括:Co3Dv2,BlendMVS,DL3DV,MegaDepth,Kubric,WildRGB,ScanNet,HyperSim,Mapillary,Habitat,Replica,MVS-Synth,PointOdyssey,Virtual KITTI,Aria Synthetic Environments,Aria Digital Twin,以及一个类似于Objaverse的由艺术家创建的资产的合成数据集。这些数据集涵盖了多个领域,包括室内和室外环境,并包括合成和真实世界场景。这些数据集的三维注释来源于多个来源,如直接传感器捕获、合成引擎或SfM技术。作者的数据集组合在规模和多样性上大致可与MASt3R相当。
-
实验
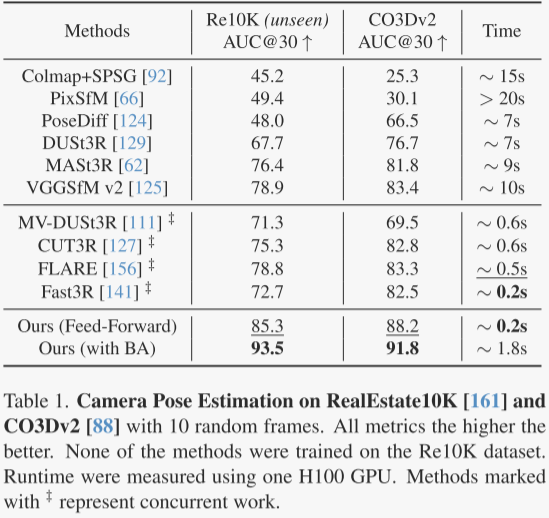
作者首先在CO3Dv2和RealEstate10K数据集上评估了相机姿态估计的方法,如表1所示。
结果显示,作者的前馈模型VGGT在所有度量上都优于其他方法,包括需要后优化步骤的方法,而且VGGT仅需0.2秒,比通常需要10秒以上的方法快得多。即使在未训练的RealEstate10K数据集上,VGGT也表现出更好的泛化能力。
此外,结合视觉几何优化方法(如BA)可以进一步提升VGGT的性能,尤其是在优化相机姿态和轨迹方面。这种方法直接预测准确的点/深度图,为BA提供了良好的初始化,从而加快了处理速度(即使使用BA也大约只需要2秒)。
尽管VGGT的前馈模式已经优于所有其他方案,但后优化仍有改进空间。
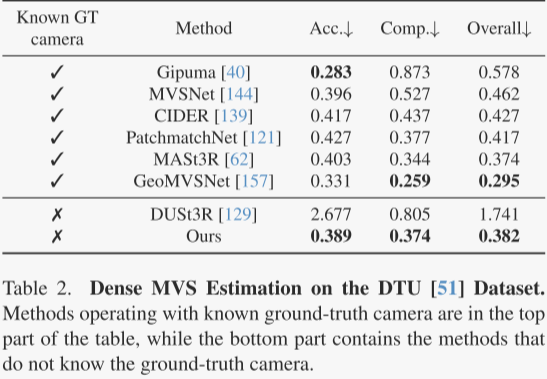
作者在DTU数据集上测试了多视图深度估计,使用了准确度、完整性和总体(Chamfer距离)这三个标准指标。在没有真实相机信息的情况下,作者的VGGT方法比DUSt3R表现更好,总体得分从1.741降到了0.382。VGGT的表现几乎可以与那些在测试时知道真实相机信息的方法相媲美。这种性能提升主要得益于VGGT的多图像训练方式,它能够直接处理多视图三角测量,而不是依赖简单的对齐方法。
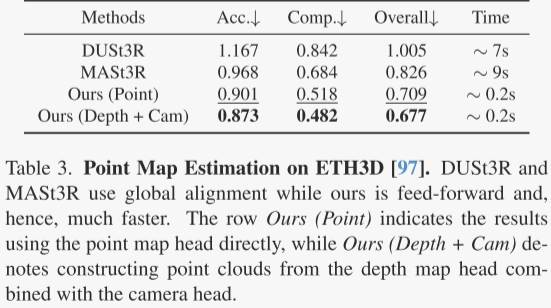
作者在ETH3D数据集上比较了VGGT、DUSt3R和MASt3R预测的点云的准确性。作者随机选取每个场景的10帧图像,用Umeyama算法对点云进行对齐,并使用官方掩码过滤无效点。结果显示,尽管DUSt3R和MASt3R需要大约10秒的优化时间,VGGT在仅0.2秒的前馈时间内就能取得更好的效果。
作者还发现,通过深度和相机预测(即将预测的深度图反投影到3D空间)得到的结果比直接使用估计的点图更准确。这可能是因为将复杂的点图估计任务分解为更简单的子任务(如深度图和相机预测)带来了好处。VGGT在各种复杂场景下都能输出高质量的预测,表现出良好的泛化能力。
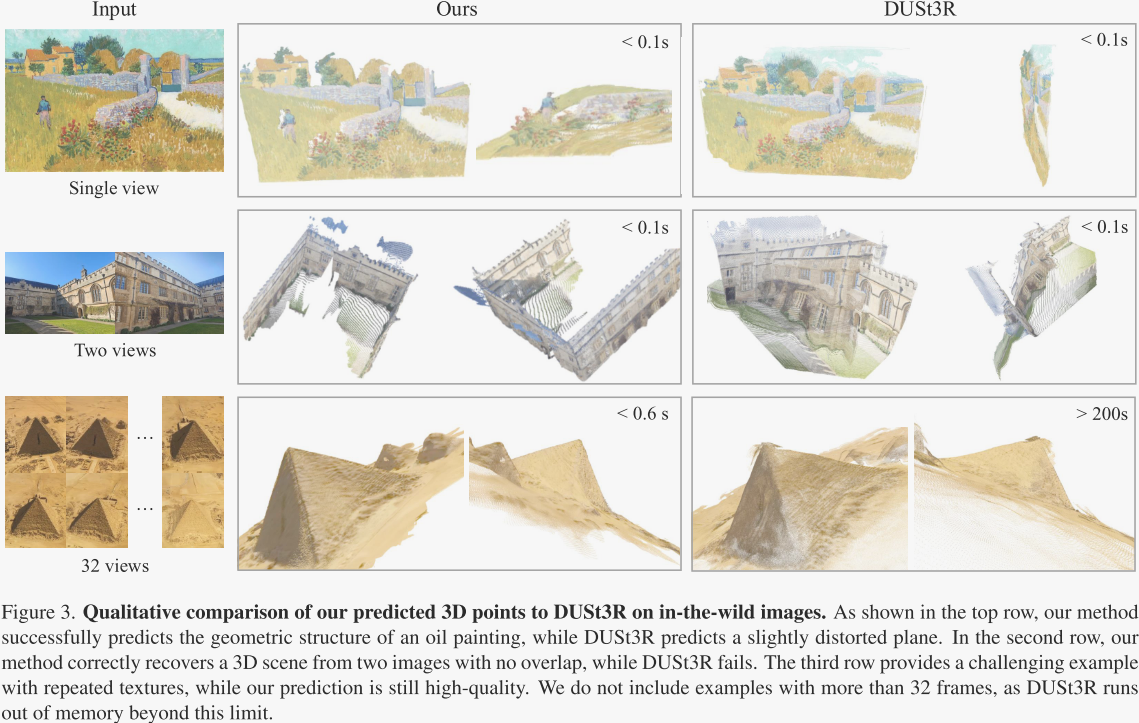
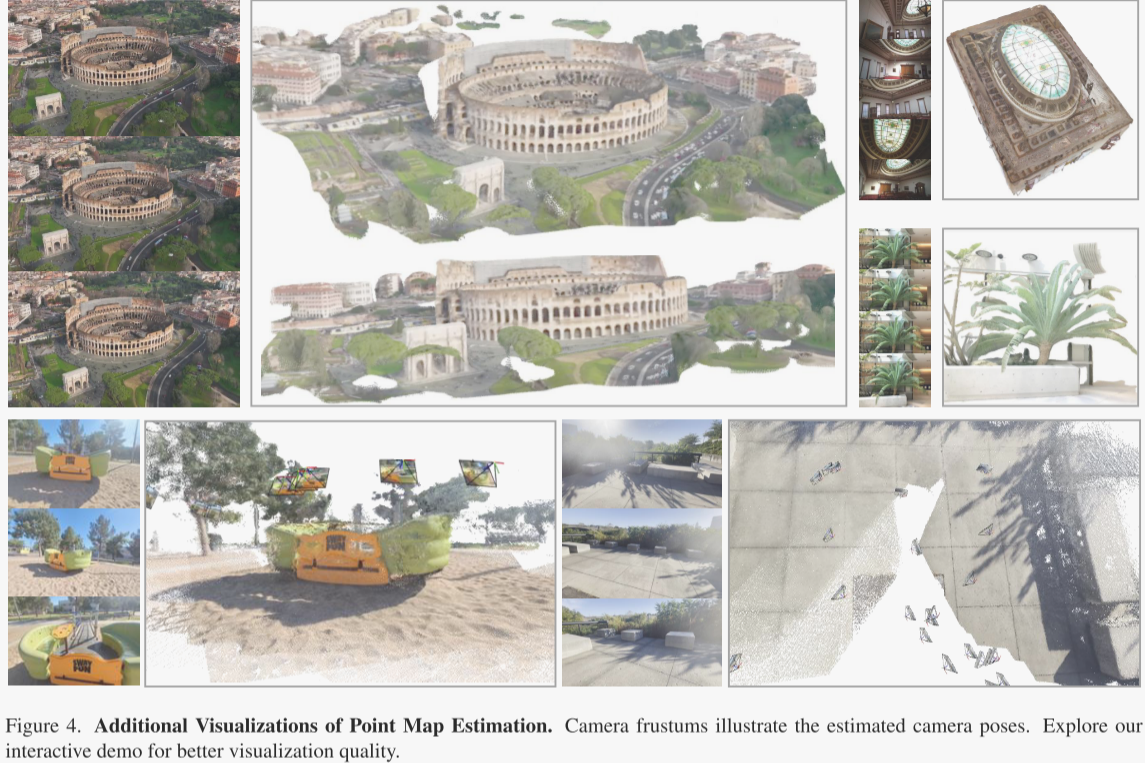
作者在图3中与DUSt3R在野外场景进行了定性比较,并在图4中提供了更多示例。VGGT输出高质量的预测,并且泛化良好,在具有挑战性的跨领域示例上表现出色,例如油画、不重叠的帧和具有重复或同质纹理的场景,如沙漠。
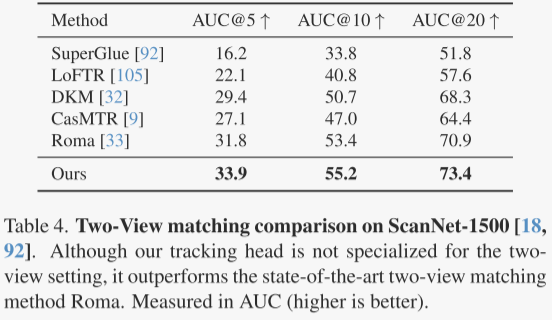
作者研究了双视图图像匹配,这是一个在计算机视觉领域广泛探讨的主题,也是刚性点跟踪的一个特殊情况。尽管作者的模型VGGT并不是专门为这个任务设计的,作者还是用它在ScanNet数据集上进行了测试,并在表4中展示了结果。
作者从图像对中提取匹配点,用它们来估计相机的相对位置。使用ALIKED工具检测关键点,并在两幅图像之间寻找匹配点。尽管VGGT没有专门训练来处理双视图匹配,但它在所有比较的模型中表现最好,显示出最高的准确性。
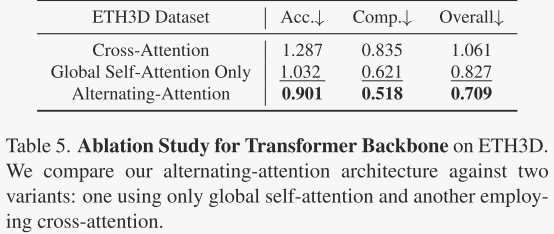
作者测试了他们提出的交替注意力机制,与其他两种注意力结构进行了比较:只有全局自注意力和交叉注意力。所有模型保持相同的参数数量,以确保公平比较。结果显示,交替注意力在点图估计的准确性上优于其他两种方法。
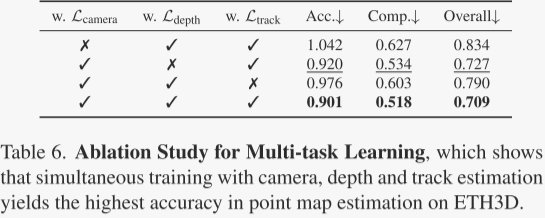
此外,作者还研究了多任务学习的效果,即训练一个网络同时处理多个3D任务。结果表明,同时训练多个任务可以提高点图估计的准确性,尤其是相机参数估计对提高准确性帮助最大,而深度估计的改进相对较小。
-
讨论
局限性。虽然作者的方法在多样化的实际场景中表现出强大的泛化能力,但仍存在一些局限性。首先,当前模型不支持鱼眼或全景图像。此外,在涉及极端输入旋转的条件下,重建性能会下降。而且,尽管作者的模型可以处理轻微非刚性运动的场景,但在涉及显著非刚性变形的情况下会失败。然而,作者方法的一个重要优势是其灵活性和易于适应性。通过在针对性的数据集上对模型进行微调,几乎无需对架构进行修改,就可以直接解决这些局限性。
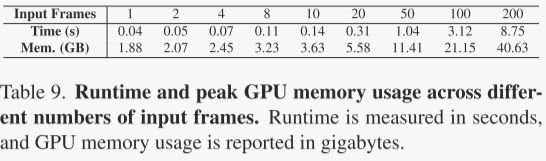
运行时间和内存。如表9所示,作者评估了在处理不同数量输入帧时特征主干的推理运行时间和峰值GPU内存使用情况。测量是使用单个NVIDIA H100 GPU和flash attention v3进行的。图像的分辨率为336×518。作者关注与特征主干相关的成本,因为用户可能会根据他们的具体需求和可用资源选择不同的分支组合。相机头部很轻量,通常占运行时间的大约5%,占特征主干使用的GPU内存的大约2%。DPT头部平均每帧使用0.03秒和0.2 GB GPU内存。当GPU内存足够时,可以在单次前向传递中高效处理多个帧。
同时,在作者的模型中,帧间关系仅在特征主干内处理,DPT头部每帧进行独立预测。因此,受GPU资源限制的用户可以逐帧进行预测。作者将这种权衡留给用户自行决定。作者认识到,大量标记的全局自注意力的简单实现可能会非常内存密集。可以通过采用大型语言模型(LLM)部署中使用的技术来实现节省或加速。例如,Fast3R使用张量并行来加速多GPU推理,这可以直接应用于作者的模型。
图像分块。作者探索了通过使用14×14卷积层或预训练的DINOv2模型将图像分块化为标记的方法。经验结果表明,DINOv2模型提供了更好的性能;此外,它确保了更稳定的训练,特别是在初始阶段。DINOv2模型对学习率或动量等超参数的变化也不那么敏感。因此,作者选择了DINOv2作为模型中分块化的默认方法。
单视图重建。与DUSt3R和MASt3R等系统不同,它们必须复制一张图像来创建一对,作者的模型架构固有地支持输入单张图像。在这种情况下,全局注意力简单地转变为帧内注意力。尽管作者的模型没有明确针对单视图重建进行训练,但它显示出出人意料的好结果。一些示例可以在图3和图7中找到。作者强烈建议尝试作者的演示以获得更好的可视化效果。
预测归一化。作者的方法使用3D点的平均欧几里得距离来归一化真实值。虽然一些方法,如DUSt3R,也对网络预测应用这种归一化,但作者的发现表明,这既不是收敛的必要条件,也不利于最终模型性能。此外,它倾向于在训练阶段引入额外的不稳定性。
-
-
3.代码详解
环境安装
下载代码后,下载权重
代码地址:https://github.com/facebookresearch/vggt
权重地址: https://huggingface.co/facebook/VGGT-1B/tree/main
然后安装Python包:
pip install -r requirements.txt-
模型架构
VGGT
vggt的主要部分如下:
class VGGT(nn.Module, PyTorchModelHubMixin):
    def __init__(self, img_size=518, patch_size=14, embed_dim=1024):
        super().__init__()

        self.aggregator = Aggregator(img_size=img_size, patch_size=patch_size, embed_dim=embed_dim)     # 特征聚合主干
        self.camera_head = CameraHead(dim_in=2 * embed_dim)         # 用于相机参数估计;
        self.point_head = DPTHead(dim_in=2 * embed_dim, output_dim=4, activation="inv_log", conf_activation="expp1")        # 用于点云预测
        self.depth_head = DPTHead(dim_in=2 * embed_dim, output_dim=2, activation="exp", conf_activation="expp1")            # 深度图预测
        self.track_head = TrackHead(dim_in=2 * embed_dim, patch_size=patch_size)        # 用于跟踪任务。

    def forward(self, images: torch.Tensor, query_points: torch.Tensor = None):
        # 输入处理:自动补全缺失的批次维度      If without batch dimension, add it
        if len(images.shape) == 4:
            images = images.unsqueeze(0)
        if query_points is not None and len(query_points.shape) == 2:
            query_points = query_points.unsqueeze(0)

        aggregated_tokens_list, patch_start_idx = self.aggregator(images)       # 通过aggregator提取图像的聚合特征

        predictions = {}

        # 多任务预测
        with torch.cuda.amp.autocast(enabled=False):
            if self.camera_head is not None:
                pose_enc_list = self.camera_head(aggregated_tokens_list)
                predictions["pose_enc"] = pose_enc_list[-1]  # pose encoding of the last iteration

            if self.depth_head is not None:
                depth, depth_conf = self.depth_head(
                    aggregated_tokens_list, images=images, patch_start_idx=patch_start_idx
                )
                predictions["depth"] = depth
                predictions["depth_conf"] = depth_conf

            if self.point_head is not None:
                pts3d, pts3d_conf = self.point_head(
                    aggregated_tokens_list, images=images, patch_start_idx=patch_start_idx
                )
                predictions["world_points"] = pts3d
                predictions["world_points_conf"] = pts3d_conf

        if self.track_head is not None and query_points is not None:        # 若提供查询点,使用track_head进行点跟踪并预测可见性与置信度
            track_list, vis, conf = self.track_head(
                aggregated_tokens_list, images=images, patch_start_idx=patch_start_idx, query_points=query_points
            )
            predictions["track"] = track_list[-1]  # track of the last iteration
            predictions["vis"] = vis
            predictions["conf"] = conf

        predictions["images"] = images

        # 结果返回:将所有预测结果封装为字典返回。
        return predictions
Aggregator
其中主干部分的代码如下:
class Aggregator(nn.Module):
    def forward(self, images: torch.Tensor) -> Tuple[List[torch.Tensor], int]:
        B, S, C_in, H, W = images.shape

        # 归一化   Normalize images and reshape for patch embed
        images = (images - self._resnet_mean) / self._resnet_std

        # 合并批次与帧数维度以进行 patch 嵌入。    Reshape to [B*S, C, H, W] for patch embedding
        images = images.view(B * S, C_in, H, W)     # [B*S, C, H, W]=[1*S, 3, H,W]
        patch_tokens = self.patch_embed(images)     # patch 嵌入  ->[B*S, P=H*W, C]=[,,1024]

        _, P, C = patch_tokens.shape

        # Expand camera and register tokens to match batch size and sequence length
        camera_token = slice_expand_and_flatten(self.camera_token, B, S)        # 对 camera 和 register token 进行扩展与拼接,使其适配每帧数据。[1, 2, X, C]->[B*S,X,C]
        register_token = slice_expand_and_flatten(self.register_token, B, S)

        # Concatenate special tokens with patch tokens
        tokens = torch.cat([camera_token, register_token, patch_tokens], dim=1)     # 在第1维拼接,->[B*S,X+X+H*W,C]

        pos = None
        if self.rope is not None:       # 若启用 RoPE 编码,则生成对应的位置信息,
            pos = self.position_getter(B * S, H // self.patch_size, W // self.patch_size, device=images.device)

        if self.patch_start_idx > 0:        # 为特殊 token 设置零位置编码。
            # do not use position embedding for special tokens (camera and register tokens)
            # so set pos to 0 for the special tokens
            pos = pos + 1
            pos_special = torch.zeros(B * S, self.patch_start_idx, 2).to(images.device).to(pos.dtype)
            pos = torch.cat([pos_special, pos], dim=1)

        # update P because we added special tokens
        _, P, C = tokens.shape

        frame_idx = 0
        global_idx = 0
        output_list = []

        for _ in range(self.aa_block_num):      # 按设定的注意力类型(frame/global)依次处理 token 序列
            for attn_type in self.aa_order:
                if attn_type == "frame":
                    tokens, frame_idx, frame_intermediates = self._process_frame_attention(     # 应用帧内注意力机制
                        tokens, B, S, P, C, frame_idx, pos=pos
                    )
                elif attn_type == "global":
                    tokens, global_idx, global_intermediates = self._process_global_attention(      # 应用全局注意力机制
                        tokens, B, S, P, C, global_idx, pos=pos
                    )
                else:
                    raise ValueError(f"Unknown attention type: {attn_type}")

            for i in range(len(frame_intermediates)):       # 收集中间输出
                # concat frame and global intermediates, [B x S x P x 2C]
                concat_inter = torch.cat([frame_intermediates[i], global_intermediates[i]], dim=-1)
                output_list.append(concat_inter)

        del concat_inter
        del frame_intermediates
        del global_intermediates
        return output_list, self.patch_start_idx        # 返回注意力中间结果列表和 patch token 起始索引
其中patch_tokens = self.patch_embed(images)部分的代码如下:
这是一个用于 图像分块嵌入(Patch Embedding) 的PyTorch模块(PatchEmbed),属于视觉Transformer(ViT)及其变体模型中的核心预处理组件。它的作用是将输入图像划分为规则网格的小块(patches),并将每个块线性映射到指定维度的特征空间,为后续的Transformer处理做准备。
class PatchEmbed(nn.Module):
    def __init__() -> None:

        image_HW = make_2tuple(img_size)
        patch_HW = make_2tuple(patch_size)
        patch_grid_size = (image_HW[0] // patch_HW[0], image_HW[1] // patch_HW[1])

        self.img_size = image_HW
        self.patch_size = patch_HW
        self.patches_resolution = patch_grid_size
        self.num_patches = patch_grid_size[0] * patch_grid_size[1]

        self.in_chans = in_chans
        self.embed_dim = embed_dim

        self.flatten_embedding = flatten_embedding

        self.proj = nn.Conv2d(in_chans, embed_dim, kernel_size=patch_HW, stride=patch_HW)
        self.norm = norm_layer(embed_dim) if norm_layer else nn.Identity()

    def forward(self, x: Tensor) -> Tensor:
        ...

        x = self.proj(x)    # 投影变换:通过 self.proj 将图像分块并映射到嵌入维度; B C H W
        H, W = x.size(2), x.size(3)
        x = x.flatten(2).transpose(1, 2)  # B HW C
        x = self.norm(x)        # 归一化
        if not self.flatten_embedding:
            x = x.reshape(-1, H, W, self.embed_dim)  # B H W C
        return x
特殊令牌 (Special Tokens) 处理
- camera_token = slice_expand_and_flatten(self.camera_token, B, S) 和
- register_token = slice_expand_and_flatten(self.register_token, B, S)
原self.camera_token和self.register_token的定义如下:
- 代码定义了两个摄像头令牌camera_token(第1维度=2),一个用于第一帧,另一个用于其余帧;
- 代码同样定义了两个寄存器令牌register_token(第1维度=2),一个用于第一帧,另一个用于其余帧 。
self.camera_token = nn.Parameter(torch.randn(1, 2, 1, embed_dim))
self.register_token = nn.Parameter(torch.randn(1, 2, num_register_tokens, embed_dim))
其中slice_expand_and_flatten()如下:
def slice_expand_and_flatten(token_tensor, B, S):
    """
    该函数将输入张量 token_tensor(形状为 (1, 2, X, C))进行切片、扩展和拼接,最终展平为 (B*S, X, C) 形状
    """

    # Slice out the "query" tokens => shape (1, 1, ...)
    query = token_tensor[:, 0:1, ...].expand(B, 1, *token_tensor.shape[2:])     # 提取第一个位置的 token 作为“query”,扩展至 B 个批次
    # Slice out the "other" tokens => shape (1, S-1, ...)
    others = token_tensor[:, 1:, ...].expand(B, S - 1, *token_tensor.shape[2:])     # 提取第二个位置的 token 作为“others”,扩展至 B 个批次和 S-1 帧
    # Concatenate => shape (B, S, ...)
    combined = torch.cat([query, others], dim=1)        # 拼接 query 和 others,形成 (B, S, X, C) 的序列;

    # Finally flatten => shape (B*S, ...)
    combined = combined.view(B * S, *combined.shape[2:])        # 展平为 (B*S, X, C)
    return combined
接着将上述特殊token和图像token拼接
# Concatenate special tokens with patch tokens
tokens = torch.cat([camera_token, register_token, patch_tokens], dim=1) # 在第1维拼接,->[B*S,X+X+H*W,C]接着生成位置编码 (RoPE)
- 首先为原始图片分块生成2D位置编码
-
将特殊令牌(
camera/register)的位置编码设为0,避免干扰语义。(也就是说,位置编码只考虑图片的,不会管特殊token)
pos = None
if self.rope is not None:       # 若启用 RoPE 编码,则生成对应的位置信息,
    pos = self.position_getter(B * S, H // self.patch_size, W // self.patch_size, device=images.device)

    if self.patch_start_idx > 0:        # 为特殊 token 设置零位置编码。
    # do not use position embedding for special tokens (camera and register tokens)
    # so set pos to 0 for the special tokens
        pos = pos + 1
        pos_special = torch.zeros(B * S, self.patch_start_idx, 2).to(images.device).to(pos.dtype)
        pos = torch.cat([pos_special, pos], dim=1)
其中PositionGetter如下:
class PositionGetter:
    def __init__(self):

        self.position_cache: Dict[Tuple[int, int], torch.Tensor] = {}

    def __call__(self, batch_size: int, height: int, width: int, device: torch.device) -> torch.Tensor:

        if (height, width) not in self.position_cache:
            y_coords = torch.arange(height, device=device)
            x_coords = torch.arange(width, device=device)
            positions = torch.cartesian_prod(y_coords, x_coords)   # 使用 torch.cartesian_prod 对两个坐标张量 y_coords 和 x_coords 进行笛卡尔积运算,生成所有可能的 (y, x) 坐标对组合,结果存储在 positions 中。
            self.position_cache[height, width] = positions

        cached_positions = self.position_cache[height, width]
        return cached_positions.view(1, height * width, 2).expand(batch_size, -1, -1).clone()
接下来我们利用较小的数对位置编码进行演示:
其中self.position_getter(3,3,3)生成的pos如下:实际上就是3*3的网格坐标重复3次
tensor([[[0, 0],
         [0, 1],
         [0, 2],
         [1, 0],
         [1, 1],
         [1, 2],
         [2, 0],
         [2, 1],
         [2, 2]],

        [[0, 0],
         [0, 1],
         [0, 2],
         [1, 0],
         [1, 1],
         [1, 2],
         [2, 0],
         [2, 1],
         [2, 2]],

        [[0, 0],
         [0, 1],
         [0, 2],
         [1, 0],
         [1, 1],
         [1, 2],
         [2, 0],
         [2, 1],
         [2, 2]]])
而pos+1之后:
tensor([[[1, 1],
         [1, 2],
         [1, 3],
         [2, 1],
         [2, 2],
         [2, 3],
         [3, 1],
         [3, 2],
         [3, 3]],

        [[1, 1],
         [1, 2],
         [1, 3],
         [2, 1],
         [2, 2],
         [2, 3],
         [3, 1],
         [3, 2],
         [3, 3]],

        [[1, 1],
         [1, 2],
         [1, 3],
         [2, 1],
         [2, 2],
         [2, 3],
         [3, 1],
         [3, 2],
         [3, 3]]])
加入对特殊token的全0位置编码后,如下:
tensor([[[0., 0.],
         [0., 0.],
         [1., 1.],
         [1., 2.],
         [1., 3.],
         [2., 1.],
         [2., 2.],
         [2., 3.],
         [3., 1.],
         [3., 2.],
         [3., 3.]],

        [[0., 0.],
         [0., 0.],
         [1., 1.],
         [1., 2.],
         [1., 3.],
         [2., 1.],
         [2., 2.],
         [2., 3.],
         [3., 1.],
         [3., 2.],
         [3., 3.]],

        [[0., 0.],
         [0., 0.],
         [1., 1.],
         [1., 2.],
         [1., 3.],
         [2., 1.],
         [2., 2.],
         [2., 3.],
         [3., 1.],
         [3., 2.],
         [3., 3.]]])
注意力机制交替处理
-
交替执行帧内与全局注意力
-
中间结果收集
for _ in range(self.aa_block_num):      # 按设定的注意力类型(frame/global)依次处理 token 序列
    for attn_type in self.aa_order:
        if attn_type == "frame":
            tokens, frame_idx, frame_intermediates = self._process_frame_attention(     # 应用帧内注意力机制
                tokens, B, S, P, C, frame_idx, pos=pos
            )
        elif attn_type == "global":
            tokens, global_idx, global_intermediates = self._process_global_attention(      # 应用全局注意力机制
                tokens, B, S, P, C, global_idx, pos=pos
            )
        else:
            raise ValueError(f"Unknown attention type: {attn_type}")

    for i in range(len(frame_intermediates)):       # 收集中间输出
        # concat frame and global intermediates, [B x S x P x 2C]
        concat_inter = torch.cat([frame_intermediates[i], global_intermediates[i]], dim=-1)
        output_list.append(concat_inter)
其中执行帧内与全局注意力的代码如下:
注意:乍看这两个代码一样,实际上他们输入到注意力模块的形状不一样:用于frame_attn的形状是[B*S,P,C],而用于global_attn的的形状是[B,S*P,C]。前者实际上是将每一帧都当成了一个batch,利用多个batch进行处理;而后者是一个batch处理全局。
def _process_frame_attention(self, tokens, B, S, P, C, frame_idx, pos=None):
    """
    Process frame attention blocks. We keep tokens in shape (B*S, P, C).
    """
    # If needed, reshape tokens or positions:
    if tokens.shape != (B * S, P, C):       # 主要区别:输入到注意力的形状是(B * S, P, C),即帧间注意力
        tokens = tokens.view(B, S, P, C).view(B * S, P, C)

    if pos is not None and pos.shape != (B * S, P, 2):
        pos = pos.view(B, S, P, 2).view(B * S, P, 2)

    intermediates = []

    # by default, self.aa_block_size=1, which processes one block at a time
    for _ in range(self.aa_block_size):
        if self.training:       # 训练时使用 checkpoint 节省内存
            tokens = checkpoint(self.frame_blocks[frame_idx], tokens, pos, use_reentrant=self.use_reentrant)
        else:       # 推理时直接前向传播,并保存中间结果用于后续使用。
            tokens = self.frame_blocks[frame_idx](tokens, pos=pos)
        frame_idx += 1
        intermediates.append(tokens.view(B, S, P, C))

    return tokens, frame_idx, intermediates


def _process_global_attention(self, tokens, B, S, P, C, global_idx, pos=None):
    """
    Process global attention blocks. We keep tokens in shape (B, S*P, C).
    """
    if tokens.shape != (B, S * P, C):       # 主要区别:输入到注意力的形状是(B, S * P, C),即全局注意力
        tokens = tokens.view(B, S, P, C).view(B, S * P, C)

    if pos is not None and pos.shape != (B, S * P, 2):
        pos = pos.view(B, S, P, 2).view(B, S * P, 2)

    intermediates = []

    # by default, self.aa_block_size=1, which processes one block at a time
    for _ in range(self.aa_block_size):
        if self.training:
            tokens = checkpoint(self.global_blocks[global_idx], tokens, pos, use_reentrant=self.use_reentrant)
        else:
            tokens = self.global_blocks[global_idx](tokens, pos=pos)
        global_idx += 1
        intermediates.append(tokens.view(B, S, P, C))

    return tokens, global_idx, intermediates
最后返回
-
CameraHead
这个 CameraHead 模块是一个用于 相机位姿预测(Camera Pose Estimation) 的神经网络,主要用于从视觉特征中迭代预测相机的位姿参数(平移、旋转和焦距)。
模型的整体架构类似于DiT
class CameraHead(nn.Module):

    def __init__(...):
        super().__init__()

        if pose_encoding_type == "absT_quaR_FoV":
            self.target_dim = 9
        else:
            raise ValueError(f"Unsupported camera encoding type: {pose_encoding_type}")

        self.trans_act = trans_act
        self.quat_act = quat_act
        self.fl_act = fl_act
        self.trunk_depth = trunk_depth

        # Build the trunk using a sequence of transformer blocks.
        self.trunk = nn.Sequential(         # Attn+FFN
            *[
                Block(dim=dim_in, num_heads=num_heads, mlp_ratio=mlp_ratio, init_values=init_values)
                for _ in range(trunk_depth)
            ]
        )

        # Normalizations for camera token and trunk output.
        self.token_norm = nn.LayerNorm(dim_in)
        self.trunk_norm = nn.LayerNorm(dim_in)

        # Learnable empty camera pose token.
        self.empty_pose_tokens = nn.Parameter(torch.zeros(1, 1, self.target_dim))
        self.embed_pose = nn.Linear(self.target_dim, dim_in)

        # Module for producing modulation parameters: shift, scale, and a gate.
        self.poseLN_modulation = nn.Sequential(nn.SiLU(), nn.Linear(dim_in, 3 * dim_in, bias=True))

        # Adaptive layer normalization without affine parameters.
        self.adaln_norm = nn.LayerNorm(dim_in, elementwise_affine=False, eps=1e-6)
        self.pose_branch = Mlp(in_features=dim_in, hidden_features=dim_in // 2, out_features=self.target_dim, drop=0)

    def forward(self, aggregated_tokens_list: list, num_iterations: int = 4) -> list:
        # 提取最后一层网络的token    Use tokens from the last block for camera prediction.
        tokens = aggregated_tokens_list[-1]

        # Extract the camera tokens
        pose_tokens = tokens[:, :, 0]       # 提取camera_token
        pose_tokens = self.token_norm(pose_tokens)      # 归一化

        pred_pose_enc_list = self.trunk_fn(pose_tokens, num_iterations)
        return pred_pose_enc_list

    def trunk_fn(self, pose_tokens: torch.Tensor, num_iterations: int) -> list:
        B, S, C = pose_tokens.shape  # S is expected to be 1.
        pred_pose_enc = None
        pred_pose_enc_list = []

        for _ in range(num_iterations):
            # Use a learned empty pose for the first iteration.
            if pred_pose_enc is None:       # 首次迭代,使用可学习的空姿态作为输入
                module_input = self.embed_pose(self.empty_pose_tokens.expand(B, S, -1))
            else:
                # Detach the previous prediction to avoid backprop through time.
                pred_pose_enc = pred_pose_enc.detach()
                module_input = self.embed_pose(pred_pose_enc)

            # 当前输入生成自适应的归一化参数(shift、scale、gate) Generate modulation parameters and split them into shift, scale, and gate components.
            shift_msa, scale_msa, gate_msa = self.poseLN_modulation(module_input).chunk(3, dim=-1)

            # 对 pose_tokens 进行调制并更新     Adaptive layer normalization and modulation.
            pose_tokens_modulated = gate_msa * modulate(self.adaln_norm(pose_tokens), shift_msa, scale_msa)
            pose_tokens_modulated = pose_tokens_modulated + pose_tokens

            pose_tokens_modulated = self.trunk(pose_tokens_modulated)       # 通过神经网络主干 trunk 提取特征   Attn+FFN
            # 预测姿态编码的增量 pred_pose_enc_delta 并累加更新   Compute the delta update for the pose encoding.
            pred_pose_enc_delta = self.pose_branch(self.trunk_norm(pose_tokens_modulated))

            if pred_pose_enc is None:
                pred_pose_enc = pred_pose_enc_delta
            else:
                pred_pose_enc = pred_pose_enc + pred_pose_enc_delta

            # Apply final activation functions for translation, quaternion, and field-of-view.
            activated_pose = activate_pose(         # 对输入的位姿编码张量 pred_pose_enc 中的不同部分(平移、四元数、焦距)分别应用指定的激活函数。
                pred_pose_enc, trans_act=self.trans_act, quat_act=self.quat_act, fl_act=self.fl_act
            )
            pred_pose_enc_list.append(activated_pose)

        return pred_pose_enc_list


def modulate(x: torch.Tensor, shift: torch.Tensor, scale: torch.Tensor) -> torch.Tensor:
    # modified from https://github.com/facebookresearch/DiT/blob/796c29e532f47bba17c5b9c5eb39b9354b8b7c64/models.py#L19
    return x * (1 + scale) + shift
-
DPTHead
该模块是由"Vision Transformers for Dense Prediction" 提出的(https://arxiv.org/abs/2103.13413),不是本文提出的,故不多介绍,感兴趣的读者请自行阅读文章和下列代码。
class DPTHead(nn.Module):
    def __init__(...) -> None:
        super(DPTHead, self).__init__()
        self.patch_size = patch_size
        self.activation = activation
        self.conf_activation = conf_activation
        self.pos_embed = pos_embed
        self.feature_only = feature_only
        self.down_ratio = down_ratio
        self.intermediate_layer_idx = intermediate_layer_idx

        self.norm = nn.LayerNorm(dim_in)

        # Projection layers for each output channel from tokens.
        self.projects = nn.ModuleList(      # 投影层 self.projects,将Transformer输出的token映射为多尺度特征图;
            [nn.Conv2d(in_channels=dim_in, out_channels=oc, kernel_size=1, stride=1, padding=0) for oc in out_channels]
        )

        # Resize layers for upsampling feature maps.
        self.resize_layers = nn.ModuleList(     # 上采样层 self.resize_layers,用于恢复特征图尺寸;
            [
                nn.ConvTranspose2d(
                    in_channels=out_channels[0], out_channels=out_channels[0], kernel_size=4, stride=4, padding=0
                ),
                nn.ConvTranspose2d(
                    in_channels=out_channels[1], out_channels=out_channels[1], kernel_size=2, stride=2, padding=0
                ),
                nn.Identity(),
                nn.Conv2d(
                    in_channels=out_channels[3], out_channels=out_channels[3], kernel_size=3, stride=2, padding=1
                ),
            ]
        )

        self.scratch = _make_scratch(out_channels, features, expand=False)      # 创建特征处理模块

        # Attach additional modules to scratch.
        self.scratch.stem_transpose = None
        self.scratch.refinenet1 = _make_fusion_block(features)      # 添加融合模块
        self.scratch.refinenet2 = _make_fusion_block(features)
        self.scratch.refinenet3 = _make_fusion_block(features)
        self.scratch.refinenet4 = _make_fusion_block(features, has_residual=False)

        head_features_1 = features
        head_features_2 = 32

        if feature_only:
            self.scratch.output_conv1 = nn.Conv2d(head_features_1, head_features_1, kernel_size=3, stride=1, padding=1)
        else:
            self.scratch.output_conv1 = nn.Conv2d(
                head_features_1, head_features_1 // 2, kernel_size=3, stride=1, padding=1
            )
            conv2_in_channels = head_features_1 // 2

            self.scratch.output_conv2 = nn.Sequential(
                nn.Conv2d(conv2_in_channels, head_features_2, kernel_size=3, stride=1, padding=1),
                nn.ReLU(inplace=True),
                nn.Conv2d(head_features_2, output_dim, kernel_size=1, stride=1, padding=0),
            )

    def forward(...) -> Union[torch.Tensor, Tuple[torch.Tensor, torch.Tensor]]:
        B, S, _, H, W = images.shape

        # 若frames_chunk_size为None或大于总帧数S,则一次性处理所有帧。     If frames_chunk_size is not specified or greater than S, process all frames at once
        if frames_chunk_size is None or frames_chunk_size >= S:
            return self._forward_impl(aggregated_tokens_list, images, patch_start_idx)

        # Otherwise, process frames in chunks to manage memory usage
        assert frames_chunk_size > 0

        # 否则将帧分成小块逐块处理,避免内存溢出。      Process frames in batches
        all_preds = []
        all_conf = []

        for frames_start_idx in range(0, S, frames_chunk_size):
            frames_end_idx = min(frames_start_idx + frames_chunk_size, S)

            # Process batch of frames
            if self.feature_only:
                chunk_output = self._forward_impl(
                    aggregated_tokens_list, images, patch_start_idx, frames_start_idx, frames_end_idx
                )
                all_preds.append(chunk_output)
            else:
                chunk_preds, chunk_conf = self._forward_impl(
                    aggregated_tokens_list, images, patch_start_idx, frames_start_idx, frames_end_idx
                )
                all_preds.append(chunk_preds)
                all_conf.append(chunk_conf)

        # 将各块的输出在序列维度拼接,返回最终预测结果或包含置信度的元组。      Concatenate results along the sequence dimension
        if self.feature_only:
            return torch.cat(all_preds, dim=1)
        else:
            return torch.cat(all_preds, dim=1), torch.cat(all_conf, dim=1)

    def _forward_impl(...) -> Union[torch.Tensor, Tuple[torch.Tensor, torch.Tensor]]:
        if frames_start_idx is not None and frames_end_idx is not None:     # 处理输入图像帧:根据指定的起始和结束帧索引裁剪图像序列
            images = images[:, frames_start_idx:frames_end_idx].contiguous()

        B, S, _, H, W = images.shape

        patch_h, patch_w = H // self.patch_size, W // self.patch_size

        out = []
        dpt_idx = 0

        for layer_idx in self.intermediate_layer_idx:
            x = aggregated_tokens_list[layer_idx][:, :, patch_start_idx:]

            # Select frames if processing a chunk
            if frames_start_idx is not None and frames_end_idx is not None:
                x = x[:, frames_start_idx:frames_end_idx]

            x = x.view(B * S, -1, x.shape[-1])

            x = self.norm(x)            # 归一化

            x = x.permute(0, 2, 1).reshape((x.shape[0], x.shape[-1], patch_h, patch_w))

            x = self.projects[dpt_idx](x)
            if self.pos_embed:                      # 位置嵌入
                x = self._apply_pos_embed(x, W, H)
            x = self.resize_layers[dpt_idx](x)      # 上采样

            out.append(x)
            dpt_idx += 1

        # Fuse features from multiple layers.
        out = self.scratch_forward(out)     # 将不同层的输出通过scratch_forward融合
        # Interpolate fused output to match target image resolution.
        out = custom_interpolate(       # 使用自定义插值函数custom_interpolate将输出分辨率调整为目标尺寸
            out,
            (int(patch_h * self.patch_size / self.down_ratio), int(patch_w * self.patch_size / self.down_ratio)),
            mode="bilinear",
            align_corners=True,
        )

        if self.pos_embed:
            out = self._apply_pos_embed(out, W, H)

        if self.feature_only:
            return out.view(B, S, *out.shape[1:])

        out = self.scratch.output_conv2(out)
        preds, conf = activate_head(out, activation=self.activation, conf_activation=self.conf_activation)      # 生成预测结果

        preds = preds.view(B, S, *preds.shape[1:])
        conf = conf.view(B, S, *conf.shape[1:])
        return preds, conf

    def _apply_pos_embed(self, x: torch.Tensor, W: int, H: int, ratio: float = 0.1) -> torch.Tensor:
        """
        Apply positional embedding to tensor x.
        """
        patch_w = x.shape[-1]
        patch_h = x.shape[-2]
        pos_embed = create_uv_grid(patch_w, patch_h, aspect_ratio=W / H, dtype=x.dtype, device=x.device)    # 使用 create_uv_grid 创建基于UV坐标的位置网格。
        pos_embed = position_grid_to_embed(pos_embed, x.shape[1])       # 将位置网格转换为嵌入向量。
        pos_embed = pos_embed * ratio       # 缩放嵌入向量
        pos_embed = pos_embed.permute(2, 0, 1)[None].expand(x.shape[0], -1, -1, -1)     # 调整张量维度并扩展到 batch size,使其与输入 x 的形状匹配。
        return x + pos_embed

    def scratch_forward(self, features: List[torch.Tensor]) -> torch.Tensor:

        layer_1, layer_2, layer_3, layer_4 = features       # 输入来自不同层级的特征图

        layer_1_rn = self.scratch.layer1_rn(layer_1)        # 通过对应的layer*_rn进行通道调整
        layer_2_rn = self.scratch.layer2_rn(layer_2)
        layer_3_rn = self.scratch.layer3_rn(layer_3)
        layer_4_rn = self.scratch.layer4_rn(layer_4)

        # 自上而下依次通过refinenet4到refinenet1融合特征
        out = self.scratch.refinenet4(layer_4_rn, size=layer_3_rn.shape[2:])
        del layer_4_rn, layer_4

        out = self.scratch.refinenet3(out, layer_3_rn, size=layer_2_rn.shape[2:])
        del layer_3_rn, layer_3

        out = self.scratch.refinenet2(out, layer_2_rn, size=layer_1_rn.shape[2:])
        del layer_2_rn, layer_2

        out = self.scratch.refinenet1(out, layer_1_rn)
        del layer_1_rn, layer_1

        out = self.scratch.output_conv1(out)        # 最终通过output_conv1输出融合后的结果
        return out
其中FeatureFusionBlock的 定义如下:
class FeatureFusionBlock(nn.Module):
    def __init__(...):
        super(FeatureFusionBlock, self).__init__()

        self.deconv = deconv
        self.align_corners = align_corners
        self.groups = groups
        self.expand = expand
        out_features = features
        if self.expand == True:
            out_features = features // 2

        self.out_conv = nn.Conv2d(
            features, out_features, kernel_size=1, stride=1, padding=0, bias=True, groups=self.groups
        )

        if has_residual:
            self.resConfUnit1 = ResidualConvUnit(features, activation, bn, groups=self.groups)

        self.has_residual = has_residual
        self.resConfUnit2 = ResidualConvUnit(features, activation, bn, groups=self.groups)

        self.skip_add = nn.quantized.FloatFunctional()
        self.size = size

    def forward(self, *xs, size=None):
        output = xs[0]

        if self.has_residual:       # 残差连接(可选)
            res = self.resConfUnit1(xs[1])
            output = self.skip_add.add(output, res)

        output = self.resConfUnit2(output)      # 通过 resConfUnit2 处理输出

        if (size is None) and (self.size is None):
            modifier = {"scale_factor": 2}
        elif size is None:
            modifier = {"size": self.size}
        else:
            modifier = {"size": size}

        output = custom_interpolate(output, **modifier, mode="bilinear", align_corners=self.align_corners)  # 根据条件放大两倍或设置指定输出尺寸
        output = self.out_conv(output)      # 通过 out_conv 输出最终结果。

        return output
其中ResidualConvUnit的定义如下:
class ResidualConvUnit(nn.Module):
    def __init__(self, features, activation, bn, groups=1):
        super().__init__()

        self.bn = bn
        self.groups = groups
        self.conv1 = nn.Conv2d(features, features, kernel_size=3, stride=1, padding=1, bias=True, groups=self.groups)
        self.conv2 = nn.Conv2d(features, features, kernel_size=3, stride=1, padding=1, bias=True, groups=self.groups)

        self.norm1 = None
        self.norm2 = None

        self.activation = activation
        self.skip_add = nn.quantized.FloatFunctional()

    def forward(self, x):
        out = self.activation(x)
        out = self.conv1(out)
        if self.norm1 is not None:
            out = self.norm1(out)

        out = self.activation(out)
        out = self.conv2(out)
        if self.norm2 is not None:
            out = self.norm2(out)

        return self.skip_add.add(out, x)
-
TrackHead
TrackHead 是一个 基于Transformer特征的点跟踪头,用于在视频或多视图序列中预测给定查询点(query_points)的运动轨迹。其关键组件包括:
- 特征提取器 (
DPTHead) - 跟踪预测器 (
BaseTrackerPredictor)
class TrackHead(nn.Module):
    def __init__():
        super().__init__()

        self.patch_size = patch_size

        # Feature extractor based on DPT architecture
        # Processes tokens into feature maps for tracking
        self.feature_extractor = DPTHead(       # 构建特征提取器:使用 DPTHead 将视觉Transformer输出的token转换为用于跟踪的特征图
            dim_in=dim_in,
            patch_size=patch_size,
            features=features,
            feature_only=True,  # Only output features, no activation
            down_ratio=2,  # Reduces spatial dimensions by factor of 2
            pos_embed=False,
        )

        # Tracker module that predicts point trajectories
        # Takes feature maps and predicts coordinates and visibility
        self.tracker = BaseTrackerPredictor(        # 构建跟踪预测器:使用 BaseTrackerPredictor 基于特征图预测点的坐标和可见性
            latent_dim=features,  # Match the output_dim of feature extractor
            predict_conf=predict_conf,
            stride=stride,
            corr_levels=corr_levels,
            corr_radius=corr_radius,
            hidden_size=hidden_size,
        )

        self.iters = iters

    def forward(self, aggregated_tokens_list, images, patch_start_idx, query_points=None, iters=None):
        B, S, _, H, W = images.shape

        # Extract features from tokens
        # 通过feature_extractor从tokens中提取多帧特征图(尺寸缩小至1/2)    feature_maps has shape (B, S, C, H//2, W//2) due to down_ratio=2
        feature_maps = self.feature_extractor(aggregated_tokens_list, images, patch_start_idx)

        # Use default iterations if not specified
        if iters is None:
            iters = self.iters

        # 执行追踪:将特征输入tracker模块,输出坐标预测、可见性与置信度得分。     Perform tracking using the extracted features
        coord_preds, vis_scores, conf_scores = self.tracker(query_points=query_points, fmaps=feature_maps, iters=iters)

        return coord_preds, vis_scores, conf_scores
其中BaseTrackerPredictor如下:
该模块也是现成的模块,来自https://github.com/facebookresearch/co-tracker/ ,感兴趣的读者请自行阅读,本文不再赘述。
class BaseTrackerPredictor(nn.Module):
    def __init__(...):

        self.stride = stride
        self.latent_dim = latent_dim
        self.corr_levels = corr_levels
        self.corr_radius = corr_radius
        self.hidden_size = hidden_size
        self.max_scale = max_scale
        self.predict_conf = predict_conf

        self.flows_emb_dim = latent_dim // 2

        self.corr_mlp = Mlp(
            in_features=self.corr_levels * (self.corr_radius * 2 + 1) ** 2,
            hidden_features=self.hidden_size,
            out_features=self.latent_dim,
        )

        self.transformer_dim = self.latent_dim + self.latent_dim + self.latent_dim + 4

        self.query_ref_token = nn.Parameter(torch.randn(1, 2, self.transformer_dim))

        space_depth = depth if use_spaceatt else 0
        time_depth = depth

        self.updateformer = EfficientUpdateFormer(      # 包含时空注意力机制的Transformer模块
            space_depth=space_depth,
            time_depth=time_depth,
            input_dim=self.transformer_dim,
            hidden_size=self.hidden_size,
            output_dim=self.latent_dim + 2,
            mlp_ratio=4.0,
            add_space_attn=use_spaceatt,
        )

        self.fmap_norm = nn.LayerNorm(self.latent_dim)
        self.ffeat_norm = nn.GroupNorm(1, self.latent_dim)

        # A linear layer to update track feats at each iteration
        self.ffeat_updater = nn.Sequential(nn.Linear(self.latent_dim, self.latent_dim), nn.GELU())

        self.vis_predictor = nn.Sequential(nn.Linear(self.latent_dim, 1))

        if predict_conf:
            self.conf_predictor = nn.Sequential(nn.Linear(self.latent_dim, 1))

    def forward(self, query_points, fmaps=None, iters=6, return_feat=False, down_ratio=1, apply_sigmoid=True):

        B, N, D = query_points.shape
        B, S, C, HH, WW = fmaps.shape

        assert D == 2, "Input points must be 2D coordinates"

        # 归一化特征图:对输入特征图 fmaps 进行 LayerNorm 归一化处理    apply a layernorm to fmaps here
        fmaps = self.fmap_norm(fmaps.permute(0, 1, 3, 4, 2))
        fmaps = fmaps.permute(0, 1, 4, 2, 3)

        # Scale the input query_points because we may downsample the images
        # by down_ratio or self.stride
        # e.g., if a 3x1024x1024 image is processed to a 128x256x256 feature map
        # its query_points should be query_points/4
        # 调整查询点坐标尺度:根据下采样比例 down_ratio 和 self.stride 缩放查询点坐标
        if down_ratio > 1:
            query_points = query_points / float(down_ratio)

        query_points = query_points / float(self.stride)

        # 初始化跟踪坐标:将查询点复制到所有帧序列作为初始跟踪位置      Init with coords as the query points
        # It means the search will start from the position of query points at the reference frames
        coords = query_points.clone().reshape(B, 1, N, 2).repeat(1, S, 1, 1)

        # 提取查询帧特征:使用 sample_features4d 提取初始查询点的特征   Sample/extract the features of the query points in the query frame
        query_track_feat = sample_features4d(fmaps[:, 0], coords[:, 0])

        # init track feats by query feats
        track_feats = query_track_feat.unsqueeze(1).repeat(1, S, 1, 1)  # B, S, N, C
        # back up the init coords
        coords_backup = coords.clone()

        fcorr_fn = CorrBlock(fmaps, num_levels=self.corr_levels, radius=self.corr_radius)       # 构建相关性块:使用 CorrBlock 构建多尺度相关特征金字塔

        coord_preds = []

        # Iterative Refinement
        for _ in range(iters):
            # Detach the gradients from the last iteration
            # (in my experience, not very important for performance)
            coords = coords.detach()

            fcorrs = fcorr_fn.corr_sample(track_feats, coords)      # 特征相关性计算:使用 fcorr_fn.corr_sample 提取当前位置与初始查询点之间的特征相关性。

            # 嵌入构建输入:将相对位移(flows_emb)、相关性特征(fcorrs_)和跟踪特征(track_feats_)拼接作为Transformer输入。
            corr_dim = fcorrs.shape[3]
            fcorrs_ = fcorrs.permute(0, 2, 1, 3).reshape(B * N, S, corr_dim)
            fcorrs_ = self.corr_mlp(fcorrs_)

            flows = (coords - coords[:, 0:1]).permute(0, 2, 1, 3).reshape(B * N, S, 2)

            flows_emb = get_2d_embedding(flows, self.flows_emb_dim, cat_coords=False)

            # (In my trials, it is also okay to just add the flows_emb instead of concat)
            flows_emb = torch.cat([flows_emb, flows / self.max_scale, flows / self.max_scale], dim=-1)

            track_feats_ = track_feats.permute(0, 2, 1, 3).reshape(B * N, S, self.latent_dim)

            # Concatenate them as the input for the transformers
            transformer_input = torch.cat([flows_emb, fcorrs_, track_feats_], dim=2)

            # 2D positional embed   # 位置编码添加:为Transformer输入添加2D位置编码(positional embedding)    Movement of current coords relative to query points
            # TODO: this can be much simplified
            pos_embed = get_2d_sincos_pos_embed(self.transformer_dim, grid_size=(HH, WW)).to(query_points.device)
            sampled_pos_emb = sample_features4d(pos_embed.expand(B, -1, -1, -1), coords[:, 0])

            sampled_pos_emb = rearrange(sampled_pos_emb, "b n c -> (b n) c").unsqueeze(1)

            x = transformer_input + sampled_pos_emb

            # 引入参考Token:加入可学习的参考Token(query_ref_token),增强模型对初始查询点的记忆能力。     Add the query ref token to the track feats
            query_ref_token = torch.cat(
                [self.query_ref_token[:, 0:1], self.query_ref_token[:, 1:2].expand(-1, S - 1, -1)], dim=1
            )
            x = x + query_ref_token.to(x.device).to(x.dtype)

            # B, N, S, C
            x = rearrange(x, "(b n) s d -> b n s d", b=B)

            # Transformer处理:通过 updateformer 模块预测坐标和特征更新量(delta)。    Compute the delta coordinates and delta track features
            delta, _ = self.updateformer(x)

            # 更新特征与坐标:根据预测的delta更新跟踪特征和坐标位置。        BN, S, C
            delta = rearrange(delta, " b n s d -> (b n) s d", b=B)
            delta_coords_ = delta[:, :, :2]
            delta_feats_ = delta[:, :, 2:]

            track_feats_ = track_feats_.reshape(B * N * S, self.latent_dim)
            delta_feats_ = delta_feats_.reshape(B * N * S, self.latent_dim)

            # Update the track features
            track_feats_ = self.ffeat_updater(self.ffeat_norm(delta_feats_)) + track_feats_

            track_feats = track_feats_.reshape(B, N, S, self.latent_dim).permute(0, 2, 1, 3)  # BxSxNxC

            # B x S x N x 2
            coords = coords + delta_coords_.reshape(B, N, S, 2).permute(0, 2, 1, 3)

            # Force coord0 as query
            # because we assume the query points should not be changed
            coords[:, 0] = coords_backup[:, 0]

            # 输出尺度适配:将最终坐标映射回原始图像尺度并保存到 coord_preds。    The predicted tracks are in the original image scale
            if down_ratio > 1:
                coord_preds.append(coords * self.stride * down_ratio)
            else:
                coord_preds.append(coords * self.stride)

        # B, S, N
        # 可见性预测:将输入特征 track_feats 展平后通过 self.vis_predictor 网络,再恢复为 (B, S, N) 形状,根据 apply_sigmoid 决定是否应用 sigmoid 激活
        vis_e = self.vis_predictor(track_feats.reshape(B * S * N, self.latent_dim)).reshape(B, S, N)
        if apply_sigmoid:
            vis_e = torch.sigmoid(vis_e)

        # 置信度预测(可选):如果 self.predict_conf 为真,则使用 self.conf_predictor 进行类似处理;
        if self.predict_conf:
            conf_e = self.conf_predictor(track_feats.reshape(B * S * N, self.latent_dim)).reshape(B, S, N)
            if apply_sigmoid:
                conf_e = torch.sigmoid(conf_e)
        else:
            conf_e = None

        # 返回结果:根据 return_feat 决定是否返回中间特征 track_feats 和 query_track_feat。
        if return_feat:
            return coord_preds, vis_e, track_feats, query_track_feat, conf_e
        else:
            return coord_preds, vis_e, conf_e
-
-
4.总结
本文介绍了一种名为VGGT(Visual Geometry Grounded Transformer)的新型前馈神经网络,它能够直接从单张、少数或数百张图像中高效地预测出场景的关键三维属性,包括相机参数、深度图、点云图和三维点轨迹。VGGT的设计目标是简化传统的三维重建流程,避免复杂的后处理优化步骤,同时提供高质量的三维重建结果。
研究背景:传统的三维重建方法通常依赖于视觉几何方法,如结构化运动(Structure from Motion, SfM)和多视图立体(Multi-View Stereo, MVS),这些方法需要通过迭代优化技术(如Bundle Adjustment)来获得准确的结果。然而,这些优化步骤通常计算复杂且耗时。近年来,随着深度学习的发展,一些方法开始尝试将深度学习与传统几何方法相结合,但仍需要后处理步骤来优化三维几何信息。VGGT的出现旨在进一步减少对这些后处理步骤的依赖,直接通过神经网络预测三维属性。
VGGT的核心贡献
-
高效预测三维属性:VGGT能够在不到一秒钟的时间内,从大量输入图像中直接预测出相机参数、深度图、点云图和三维点轨迹等关键三维属性。这一速度远超传统的基于优化的方法。
-
无需后处理优化:VGGT的预测结果通常优于或至少与需要后处理优化的现有方法相当。即使不进行额外的优化步骤,VGGT也能提供高质量的三维重建结果。
-
多任务学习:VGGT通过一个共享的神经网络骨干结构同时预测多个三维属性,这种多任务学习方式不仅提高了预测的准确性,还增强了模型的泛化能力。
-
作为特征骨干的应用:VGGT预训练的特征提取器可以显著提升下游任务的性能,例如非刚性点跟踪和前馈新视图合成。
结论:VGGT通过其高效的预测能力和多任务学习框架,为三维重建领域提供了一种新的解决方案。它不仅能够快速生成高质量的三维属性预测,还能够作为强大的特征提取器支持下游任务。VGGT的设计和实验结果表明,神经网络可以直接解决复杂的三维任务,而无需依赖于传统的几何优化方法。这一成果为未来的三维计算机视觉研究提供了一个新的方向。
如果你喜欢我的内容,别忘了点赞、收藏和关注哦!你的每一个点赞都是对我最大的支持,让我知道我的努力没有白费;收藏起来,方便你随时回顾,也许还能在不经意间发现新的惊喜;关注我,就能第一时间看到我的最新动态。感谢有你,让我们一起在这个美好的世界里,探索更多未知的精彩!


 405
405

 被折叠的 条评论
为什么被折叠?
被折叠的 条评论
为什么被折叠?
 到【灌水乐园】发言


