DCGAN原理与实现
- 一、DCGAN 原理
- 1.1 基本概念
- 1.2 核心思想
- 1.3 架构创新
- 1.4 损失函数
- 二、DCGAN 实现
- 2.1 导包
- 2.2 数据加载和处理
- 2.3 构建生成器
- 2.4 构建判别器
- 2.5 训练和保存模型
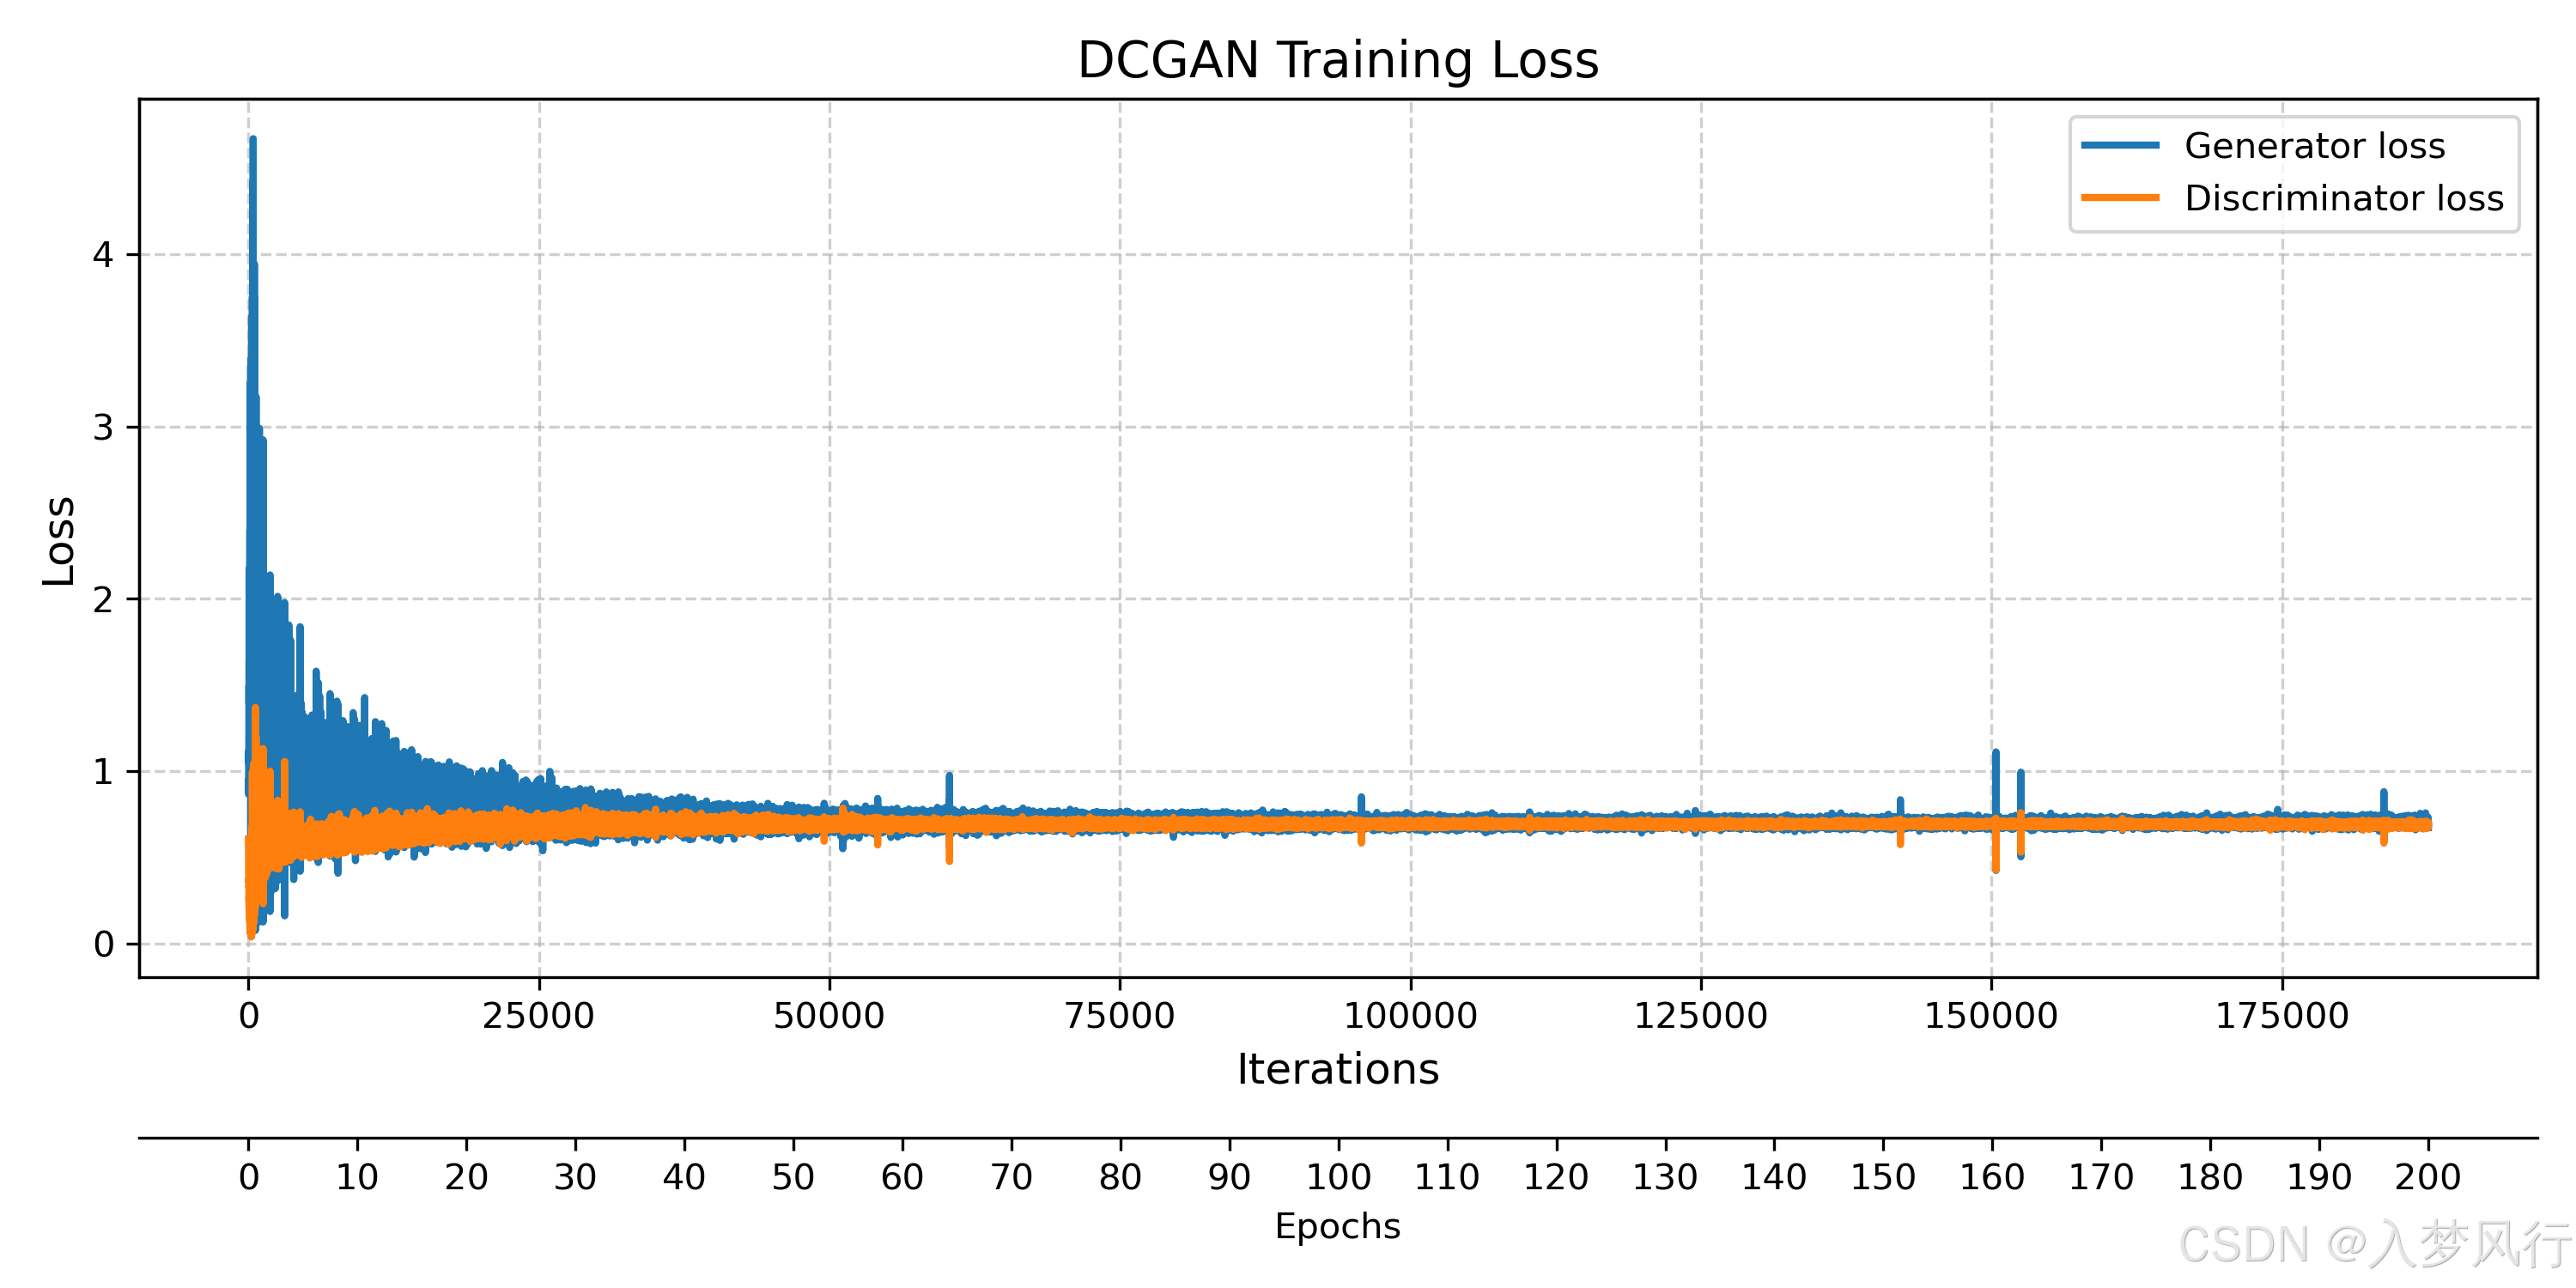
- 2.6 绘制训练损失图
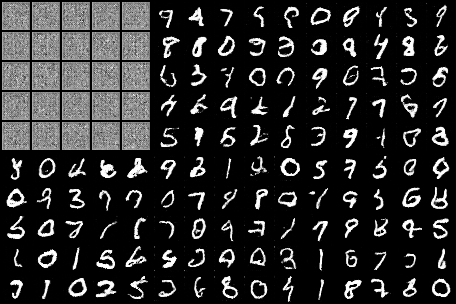
- 2.7 训练生成过程
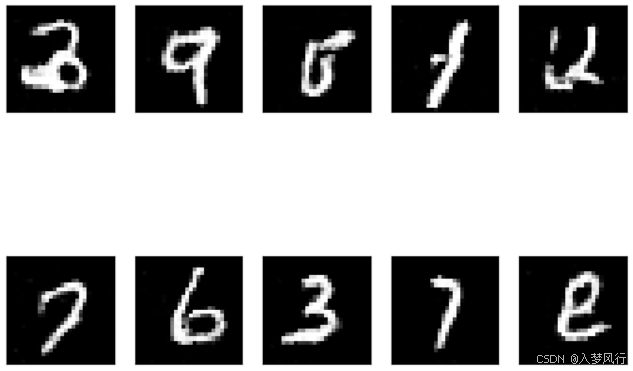
- 2.8 模型加载和生成
一、DCGAN 原理
1.1 基本概念
DCGAN(Deep Convolutional Generative Adversarial Network)是 Radford 等人 在 2015 年提出的改进版 GAN,首次成功将卷积神经网络(CNN) 引入 GAN 框架,大幅提升了生成图像的质量和训练稳定性。DCGAN 已成为 GAN 研究的重要里程碑,并为后续 StyleGAN、ProGAN 等模型奠定了基础。
1.2 核心思想
DCGAN的核心仍然是生成器(Generator)和判别器(Discriminator)的对抗训练:
- 生成器(G):接收随机噪声,生成假图像
- 判别器(D):判断输入图像是真实的(来自训练集)还是生成的(来自G)

1.3 架构创新
DCGAN相对于原始GAN的主要改进:
全卷积网络:- 生成器使用转置卷积(Transposed Convolution)进行上采样
- 判别器使用带步长的卷积代替池化层
移除全连接层:- 使用全卷积结构,只在生成器输出和判别器输入处进行reshape
批量归一化(BatchNorm):- 在生成器和判别器中都使用批量归一化
- 生成器的输出层和判别器的输入层除外
激活函数选择:- 生成器输出层使用tanh激活函数
- 判别器使用LeakyReLU激活函数(α=0.2)
1.4 损失函数
DCGAN使用标准的GAN损失函数:
- 生成器损失: L G = − E [ l o g ( D ( G ( z ) ) ) ] L_G = -E[log(D(G(z)))] LG=−E[log(D(G(z)))]
- 判别器损失: L D = − E [ l o g ( D ( x ) ) ] − E [ l o g ( 1 − D ( G ( z ) ) ) ] L_D = -E[log(D(x))] - E[log(1 - D(G(z)))] LD=−E[log(D(x))]−E[log(1−D(G(z)))]
其中:
- x x x: 真实图像
- z z z: 随机噪声
- G ( z ) G(z) G(z): 生成器生成的图像
- D ( ⋅ ) D(·) D(⋅): 判别器输出(0到1之间的概率值)
二、DCGAN 实现
2.1 导包
import torch
import torch.nn as nn
from torch.utils.data import DataLoader
from torchvision import datasets, transforms
from torchvision.utils import save_image

import os
import time
import matplotlib.pyplot as plt
from tqdm.notebook import tqdm
from torchsummary import summary

# 判断是否存在可用的GPU
device=torch.device("cuda:0" if torch.cuda.is_available() else "cpu")

# 设置随机种子
np.random.seed(random_seed)    # NumPy
torch.manual_seed(random_seed) # PyTorch(CPU)

# 设置CUDA(GPU)的种子和相关配置
if torch.cuda.is_available():
    torch.cuda.manual_seed(random_seed)        # 设置当前 GPU 的随机种子
    torch.cuda.manual_seed_all(random_seed)    # 设置所有 GPU 的随机种子
    torch.backends.cudnn.deterministic = True  # 避免CUDA算法的不确定性
2.2 数据加载和处理
# 加载 MNIST 数据集
def load_data(batch_size=64,img_shape=(1,28,28)):
    transform = transforms.Compose([
        transforms.Resize((img_shape[1],img_shape[2])),
        transforms.ToTensor(),  # 将图像转换为张量
        transforms.Normalize(mean=[0.5], std=[0.5])  # 归一化到[-1,1]
    ])

    # 下载训练集和测试集
    train_dataset = datasets.MNIST(root='./data', train=True, download=True, transform=transform)
    test_dataset = datasets.MNIST(root='./data', train=False, download=True, transform=transform)

    # 创建 DataLoader
    train_loader = DataLoader(dataset=train_dataset, batch_size=batch_size, num_workers=2,shuffle=True)
    test_loader = DataLoader(dataset=test_dataset, batch_size=batch_size, num_workers=2,shuffle=False)
    return train_loader, test_loader
2.3 构建生成器
class Generator(nn.Module):
    """生成器"""
    def __init__(self, latent_dim=100):
        super(Generator,self).__init__()

        # 转置卷积块
        def convT2d_block(in_channels,out_channels,kernel_size=(3,3),stride=(2,2),padding=1,bias=False,use_bn=True):
            layers=[
                nn.ConvTranspose2d(in_channels,out_channels,kernel_size=kernel_size,stride=stride,padding=padding,bias=bias)
            ]

            # 是否批量归一化
            if use_bn:
                layers.append(nn.BatchNorm2d(num_features=out_channels))
                layers.append(nn.LeakyReLU(negative_slope=0.0001, inplace=True))
            return layers

        # 全连接层
        self.fc = [
            nn.Linear(latent_dim,3136,bias=False),
            nn.BatchNorm1d(num_features=3136),
            nn.LeakyReLU(negative_slope=0.0001,inplace=True), # 负数时斜率为0.0001(防止梯度消失),原地操作(节省内存)
            nn.Unflatten(dim=1, unflattened_size=(64, 7, 7)) # 在dim=1反展平,2维[batch_szie,3136]-> 4维[batch_szie,64,7,7]
        ]

        # 定义模型结构
        self.model=nn.Sequential(
            # 全连接层-1
            *self.fc,
            # 转置卷积层-1
            *convT2d_block(64,32),
            # 转置卷积层-2
            *convT2d_block(32,16),
            # 转置卷积层-3
            *convT2d_block(16,8,stride=(1,1),padding=0),
            # 转置卷积层-4
            *convT2d_block(8,1,kernel_size=(2,2),stride=(1,1),padding=0,use_bn=False),
            nn.Tanh() # 输出归一化到[-1,1]
        )

    def forward(self,z): # 噪声z,2维[batch_size,latent_dim]
        gen_img=self.model(z)
        return gen_img # 4维[batch_size,1,H,W]
- 打印生成器模型结构(一)
model_G = Generator().to(device)
# 打印模型摘要
summary(model_G, input_size=(100,))
----------------------------------------------------------------
        Layer (type)               Output Shape         Param #
================================================================
            Linear-1                 [-1, 3136]         313,600
       BatchNorm1d-2                 [-1, 3136]           6,272
         LeakyReLU-3                 [-1, 3136]               0
         Unflatten-4             [-1, 64, 7, 7]               0
   ConvTranspose2d-5           [-1, 32, 13, 13]          18,432
       BatchNorm2d-6           [-1, 32, 13, 13]              64
         LeakyReLU-7           [-1, 32, 13, 13]               0
   ConvTranspose2d-8           [-1, 16, 25, 25]           4,608
       BatchNorm2d-9           [-1, 16, 25, 25]              32
        LeakyReLU-10           [-1, 16, 25, 25]               0
  ConvTranspose2d-11            [-1, 8, 27, 27]           1,152
      BatchNorm2d-12            [-1, 8, 27, 27]              16
        LeakyReLU-13            [-1, 8, 27, 27]               0
  ConvTranspose2d-14            [-1, 1, 28, 28]              32
             Tanh-15            [-1, 1, 28, 28]               0
================================================================
Total params: 344,208
Trainable params: 344,208
Non-trainable params: 0
----------------------------------------------------------------
Input size (MB): 0.00
Forward/backward pass size (MB): 0.59
Params size (MB): 1.31
Estimated Total Size (MB): 1.91
----------------------------------------------------------------
- 打印生成器模型结构(二)
z = torch.randn(64,100).to(device)
for layer in model_G.model:
    z=layer(z)
    print(f"{layer.__class__.__name__} --> Output shape={tuple(z.shape)}")
Linear --> Output shape=(64, 3136)
BatchNorm1d --> Output shape=(64, 3136)
LeakyReLU --> Output shape=(64, 3136)
Unflatten --> Output shape=(64, 64, 7, 7)
ConvTranspose2d --> Output shape=(64, 32, 13, 13)
BatchNorm2d --> Output shape=(64, 32, 13, 13)
LeakyReLU --> Output shape=(64, 32, 13, 13)
ConvTranspose2d --> Output shape=(64, 16, 25, 25)
BatchNorm2d --> Output shape=(64, 16, 25, 25)
LeakyReLU --> Output shape=(64, 16, 25, 25)
ConvTranspose2d --> Output shape=(64, 8, 27, 27)
BatchNorm2d --> Output shape=(64, 8, 27, 27)
LeakyReLU --> Output shape=(64, 8, 27, 27)
ConvTranspose2d --> Output shape=(64, 1, 28, 28)
Tanh --> Output shape=(64, 1, 28, 28)
2.4 构建判别器
class Discriminator(nn.Module):
    """判别器"""
    def __init__(self,img_shape=(1,28,28)):
        super(Discriminator, self).__init__()

         # 卷积块
        def conv2d_block(in_channels,out_channels,kernel_size=(3,3),stride=(2,2),padding=1,bias=False,use_bn=True):
            layers=[
                nn.Conv2d(in_channels,out_channels,kernel_size=kernel_size,stride=stride,padding=padding,bias=bias)
            ]

            # 是否批量归一化
            if use_bn:
                layers.append(nn.BatchNorm2d(num_features=out_channels))
                layers.append(nn.LeakyReLU(negative_slope=0.0001, inplace=True))
            return layers

        # 定义模型结构
        self.model=nn.Sequential(
             # 卷积层-1
            *conv2d_block(1,8),
             # 卷积层-2
            *conv2d_block(8,32),
            nn.Flatten(), # 展平,4维[batch_size,32,7,7]-> 2维[batch_size,32*7*7]
            # 全连接层-1
            nn.Linear(32*7*7,1),
            # nn.Sigmoid(), 无需归一到[0,1](概率值),
            # 使用nn.BCEWithLogitsLoss(),它结合了 Sigmoid + BCELoss,且数值更稳定
        )

    def forward(self,img): # 输入图片,4维[batc_size,1,H,W]
        pred = self.model(img)
        return pred # 2维[batch_size,1]
- 打印判别器模型结构(一)
model_D = Discriminator().to(device)
# 打印模型摘要
summary(model_D, input_size=(1,28,28))
----------------------------------------------------------------
        Layer (type)               Output Shape         Param #
================================================================
            Conv2d-1            [-1, 8, 14, 14]              72
       BatchNorm2d-2            [-1, 8, 14, 14]              16
         LeakyReLU-3            [-1, 8, 14, 14]               0
            Conv2d-4             [-1, 32, 7, 7]           2,304
       BatchNorm2d-5             [-1, 32, 7, 7]              64
         LeakyReLU-6             [-1, 32, 7, 7]               0
           Flatten-7                 [-1, 1568]               0
            Linear-8                    [-1, 1]           1,569
================================================================
Total params: 4,025
Trainable params: 4,025
Non-trainable params: 0
----------------------------------------------------------------
Input size (MB): 0.00
Forward/backward pass size (MB): 0.08
Params size (MB): 0.02
Estimated Total Size (MB): 0.10
----------------------------------------------------------------
- 打印判别器模型结构(二)
img = torch.randn(64,1,28,28).to(device)
for layer in model_D.model:
    img=layer(img)
    print(f"{layer.__class__.__name__} --> Output shape={tuple(img.shape)}")
Conv2d --> Output shape=(64, 8, 14, 14)
BatchNorm2d --> Output shape=(64, 8, 14, 14)
LeakyReLU --> Output shape=(64, 8, 14, 14)
Conv2d --> Output shape=(64, 32, 7, 7)
BatchNorm2d --> Output shape=(64, 32, 7, 7)
LeakyReLU --> Output shape=(64, 32, 7, 7)
Flatten --> Output shape=(64, 1568)
Linear --> Output shape=(64, 1)
2.5 训练和保存模型
- 定义初始化权重
def weights_init_normal(m):
    # 获取当前层的类名
    classname = m.__class__.__name__

    # 初始化卷积层
    if classname.find("Conv") != -1:
        # 使用正态分布初始化权重
        torch.nn.init.normal_(m.weight.data, 0.0, 0.02

    # 初始化批归一化层
    elif classname.find("BatchNorm2d") != -1:
        # 对权重参数使用正态分布初始化
        torch.nn.init.normal_(m.weight.data, 1.0, 0.02)
        # 将偏置参数初始化为常数0
        torch.nn.init.constant_(m.bias.data, 0.0)
- 训练和保存
# 设置超参数
random_seed = 42 # 随机数生成器种子
batch_size = 64
epochs = 200
lr= 0.0002
latent_dim=100 # 生成器输入噪声向量的长度(维数)
sample_interval=400 #每400次迭代保存生成样本

os.makedirs("./img/dcgan_mnist", exist_ok=True) # 存放生成样本目录
os.makedirs("./model", exist_ok=True) # 模型存放目录

# 设置图片形状1*28*28
img_c,img_h,img_w=1,28,28
img_shape = (img_c,img_h,img_w)

# 加载数据
train_loader,_= load_data(batch_size=batch_size,img_shape=img_shape)

# 实例化生成器G、判别器D
G=Generator().to(device)
D=Discriminator().to(device)

# 初始化权重
G.apply(weights_init_normal)
D.apply(weights_init_normal)

# 设置优化器
optimizer_G = torch.optim.Adam(G.parameters(), lr=lr,betas=(0.5, 0.999))
optimizer_D = torch.optim.Adam(D.parameters(), lr=lr,betas=(0.5, 0.999))

# 损失函数
loss_fn=nn.BCEWithLogitsLoss()

# 开始训练
dis_costs,gen_costs = [],[] # 记录生成器和判别器每次迭代的开销(损失)
start_time = time.time()  # 计时器
loader_len=len(train_loader) #训练集加载器的长度
for epoch in range(epochs):
    # 进入训练模式
    G.train()
    D.train()

    #记录生成器G和判别器D的总损失(1个 epoch 内)
    gen_loss_sum,dis_loss_sum=0.0,0.0

    loop = tqdm(train_loader, desc=f"第{epoch+1}轮")
    for i, (real_imgs, real_labels) in enumerate(loop):
        real_imgs=real_imgs.to(device)  # [B,C,H,W]
        real_labels=real_labels.to(device) # [B,1]

        # 真(全1)、假(全0)标签,2维[B,1]
        valid = torch.ones(size=(real_imgs.shape[0], 1), dtype=torch.float32, requires_grad=False,device=device)
        fake = torch.zeros(size=(real_imgs.shape[0], 1), dtype=torch.float32, requires_grad=False,device=device)

        # -----------------
        #  训练生成器
        # -----------------

        # 获取噪声样本[B,latent_dim]
        # z = torch.empty(real_labels.shape[0], latent_dim, device=device).uniform_(-1, 1)  #从均匀分布中抽样
        z=torch.normal(0,1,size=(real_imgs.shape[0],latent_dim),device=device)  #从正态分布中抽样

        # 更新生成器参数
        gen_imgs=G(z) #生成一个批量的图片
        gen_loss=loss_fn(D(gen_imgs),valid) #计算生成器损失
        optimizer_G.zero_grad() #梯度清零
        gen_loss.backward() #反向传播,计算梯度
        optimizer_G.step()  #更新生成器

        # -----------------
        #  训练判断器
        # -----------------

        # 计算判断器损失=(判断真实图片损失+判断生成图片损失)/2
        real_loss=loss_fn(D(real_imgs),valid)
        fake_loss=loss_fn(D(gen_imgs.detach()),fake)
        dis_loss=(real_loss+fake_loss)/2.0

        # 更新判断器参数
        optimizer_D.zero_grad() #梯度清零
        dis_loss.backward() #反向传播,计算梯度
        optimizer_D.step()  #更新判断器

        # 对生成器和判别器每次迭代的损失进行累加
        gen_loss_sum+=gen_loss
        dis_loss_sum+=dis_loss

        gen_costs.append(gen_loss.item())
        dis_costs.append(dis_loss.item())


        # 每 sample_interval 次迭代保存生成样本
        batches_done = epoch * loader_len + i
        if batches_done % sample_interval == 0:
            save_image(gen_imgs.data[:25], f"./img/dcgan_mnist/{epoch}_{i}.png", nrow=5, normalize=True)
            # 更新进度条
            loop.set_postfix(mean_gen_loss=f"{gen_loss_sum/(loop.n + 1):.8f}",mean_dis_loss=f"{dis_loss_sum/(loop.n + 1):.8f}")

print('总共训练用时: %.2f min' % ((time.time() - start_time)/60))

#仅保存模型的参数(权重和偏置),灵活性高,可以在不同的模型结构之间加载参数
torch.save(G.state_dict(), "./model/DCGAN_G.pth")
torch.save(D.state_dict(), "./model/DCGAN_D.pth")
2.6 绘制训练损失图
# 创建画布
plt.figure(figsize=(10, 5))
ax1 = plt.subplot(1, 1, 1)

# 绘制曲线
ax1.plot(range(len(gen_costs)), gen_costs, label='Generator loss', linewidth=2)
ax1.plot(range(len(dis_costs)), dis_costs, label='Discriminator loss', linewidth=2)

ax1.set_xlabel('Iterations', fontsize=12)
ax1.set_ylabel('Loss', fontsize=12)
ax1.set_title('DCGAN Training Loss', fontsize=14)
ax1.legend(fontsize=10)
ax1.grid(True, linestyle='--', alpha=0.6)

ax2 = ax1.twiny()  # 创建共享Y轴的新X轴
newlabel = list(range(epochs+1))
iter_per_epoch = len(train_loader)
newpos = [e*iter_per_epoch for e in newlabel]

ax2.set_xticks(newpos[::10])
ax2.set_xticklabels(newlabel[::10])

ax2.xaxis.set_ticks_position('bottom')
ax2.xaxis.set_label_position('bottom')
ax2.spines['bottom'].set_position(('outward', 45))  # 坐标轴下移45点
ax2.set_xlabel('Epochs')
ax2.set_xlim(ax1.get_xlim())  # 与主X轴范围同步

plt.tight_layout()  # 自动调整间距
plt.savefig('dcgan_loss.png', dpi=300)
plt.show()

2.7 训练生成过程
from PIL import Image

def create_gif(img_dir="./img/dcgan_mnist", output_file="./img/dcgan_mnist/dcgen_figure.gif", duration=100):
    images = []
    img_paths = [f for f in os.listdir(img_dir) if f.endswith(".png")]

    # 自定义排序:按 "x_y.png" 的 x 和 y 排序
    img_paths_sorted = sorted(
        img_paths,
        key=lambda x: (
            int(x.split('_')[0]),  # 第一个数字(如 0_400.png 的 0)
            int(x.split('_')[1].split('.')[0])  # 第二个数字(如 0_400.png 的 400)
        )
    )

    for img_file in img_paths_sorted:
        img = Image.open(os.path.join(img_dir, img_file))
        images.append(img)

    images[0].save(output_file, save_all=True, append_images=images[1:],
                  duration=duration, loop=0)
    print(f"GIF已保存至 {output_file}")
create_gif()

2.8 模型加载和生成
#载入训练好的模型
G = Generator() # 定义模型结构
G.load_state_dict(torch.load("./model/DCGAN_G.pth",weights_only=True,map_location=device)) # 加载保存的参数
G.to(device) # 将模型移动到设备(GPU 或 CPU)
G.eval() # 将模型设置为评估模式

#抽取噪声数据
z=torch.normal(0,1,size=(10,100),device=device)
#生成假样本
gen_img=G(z).view(-1,28,28) # 4维->3维
gen_img=gen_img.detach().cpu().numpy()

#绘制
for i in range(10):
    plt.subplot(2,5,i+1)
    plt.xticks([], [])
    plt.yticks([], [])
    plt.imshow(gen_img[i])
    plt.gray()
plt.show()


 457
457

 被折叠的 条评论
为什么被折叠?


