


双目相机标定是确定双目相机系统中两个相机之间的相对位置和姿态的过程。它对于双目视觉的后续处理及应用至关重要,例如深度估计和三维重建。双目相机标定的基本原理是利用已知的三维点在图像中的对应关系来估计相机的内参和外参。内参包括内参矩阵和畸变参数,而外参包括旋转矩阵和平移向量,描述了两个相机之间的相对位置和姿态。为此主要步骤可分为以下三个步骤:标定图片的获取、标定图片的拍摄、相机的标定。步骤非常完善了,多多点赞收藏哈!
目录
1.标定图片的获取
标定板具体图案由calib.io在线生成棋盘格网站生成,具体链接为Camera Calibration Pattern Generator – calib.io。该网址提供用于OpenCV、Matlab计算机视觉工具箱以及众多摄影测量软件的相机校准图案,包括ChArUco、标准6x9棋盘格和不规则圆圈网格的PDF下载选项,规格全面,图案可编辑且精确打印。
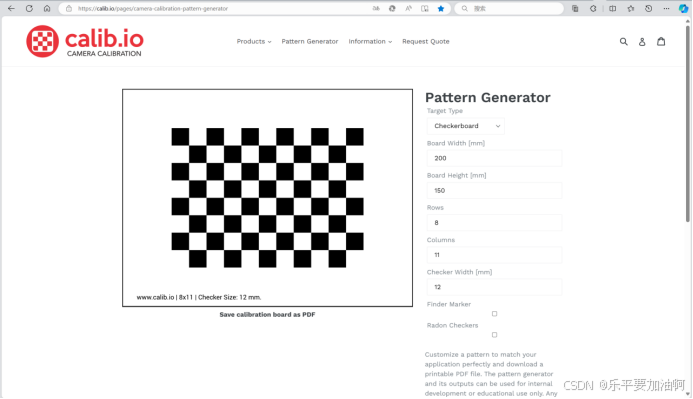
标定板效果如图所示。我选用的是6×9方格、单格长宽为2cm的棋盘格图案,其内点数即为5×8,在代码中输入棋盘格参数时有所涉及;打印时设置1:1打印。
2.标定图片的拍摄
使用双目相机对棋盘格图像进行标记准备工作的采集,考虑从多角度、远近距离拍摄,且相机平面与棋盘格平面要有一定的角度,一组拍摄二十到三十张左右,棋盘格图案大小尽量占总分辨率三分之一以上。采用手动拍摄双目相机单图后自动分割的流程。
import cv2
import os

# 设置输入和输出目录,请根据自身需求修改路径
input_dir = r"D:\usb-camera-shot\1280-480photos"  # 输入图片目录
output_dir = r"D:\usb-camera-shot\640-480photos"  # 输出图片目录

# 创建输出目录(如果不存在)
if not os.path.exists(output_dir):
    os.makedirs(output_dir)

# 遍历输入目录中的每一张图片
for filename in os.listdir(input_dir):
    if filename.lower().endswith(('.jpg', '.jpeg', '.png')):  # 处理不同格式
        # 读取图片
        img_path = os.path.join(input_dir, filename)
        print(f"尝试读取图片: {img_path}")  # 添加调试信息
        img = cv2.imread(img_path)

        if img is None:
            print(f"无法读取图片: {img_path}")
            continue
        print(f"处理图片: {filename},形状: {img.shape}")

        # 对图片进行分割
        height, width = img.shape[:2]
        imgleft = img[0:height, 0:width // 2]
        imgright = img[0:height, width // 2:width]

        # 保存分割后的图片
        left_filename = os.path.join(output_dir, f'left_{filename}')
        right_filename = os.path.join(output_dir, f'right_{filename}')
        cv2.imwrite(left_filename, imgleft)
        cv2.imwrite(right_filename, imgright)
运行结果如下:
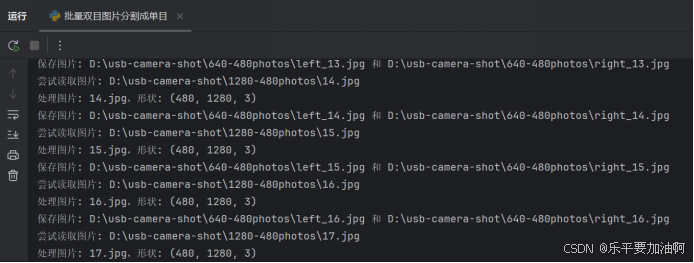
处理完成后可见输出文件夹包含有对半分割后的图像,并且名称尾部分别有left和right的标识,方便分开保存,保存完的文件夹如下:
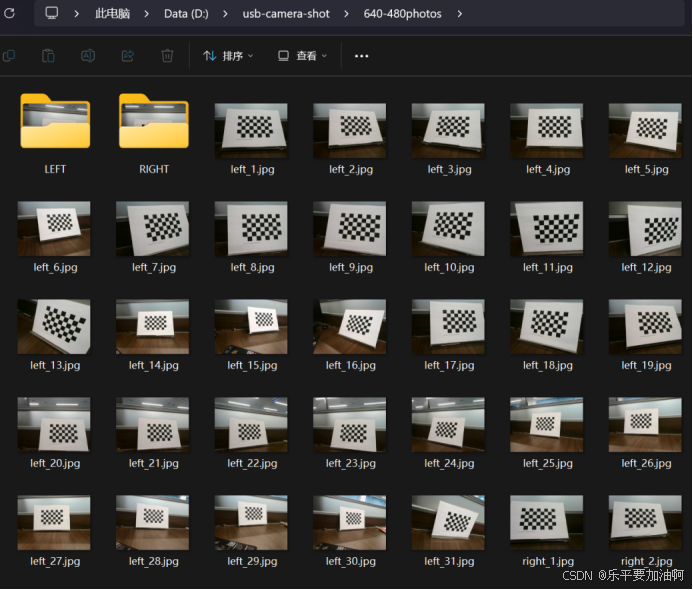
将拍摄到的左右双目图像分别整理保存:

3.相机的标定
思路如下:首先分别调用左右相机图像路径并确保左右一一对应,读取图像并转换为灰度图;接着使用OpenCV检测棋盘格角点,具体为使用cv2.findChessboardCorners函数检测角点,检测成功后使用cv2.cornerSubPix优化角点位置,使用二次插值方法来提高检测精度,使角点坐标达到亚像素级别的精度。之后根据检测到的角点和已知的棋盘格三维坐标进行相机标定,分别对左、右相机调用calibrate camera 函数,计算相机的内参和畸变系数,使用cv2.stereoCalibrate进行立体标定,得到旋转矩阵、平移向量、本质矩阵和基本矩阵。最后将相机内参、畸变系数以及外参保存为YAML文件,通过save_calibration_to_yaml函数实现,并使用compute_reprojection_errors函数计算并输出左右相机的重投影误差,评估标定的质量。最后对图像进行立体校正并显示。
import cv2
import os
import numpy as np
import itertools
import yaml

# 定义左右相机单图文件夹路径
left_folder = "/home/dandy/double-watch/photos/test/left"
right_folder = "/home/dandy/double-watch/photos/test/right"

# 获取图像文件列表并排序
left_images = sorted(os.listdir(left_folder))
right_images = sorted(os.listdir(right_folder))

# 确保左右相机图像数量一致
assert len(left_images) == len(right_images), "左右相机图像数量不一致"

# 加载两个摄像头图片文件夹并将里面的彩图转换为灰度图
def load_images(folder, images):
    img_list = []
    for img_name in images:
        img_path = os.path.join(folder, img_name)
        frame = cv2.imread(img_path)
        if frame is not None:
            gray = cv2.cvtColor(frame, cv2.COLOR_BGR2GRAY)
            img_list.append((frame, gray, img_name))  # 添加图像名称
        else:
            print(f"无法读取图像: {img_path}")
    return img_list


# 检测棋盘格角点
def get_corners(imgs, pattern_size):
    corners = []
    for frame, gray, img_name in imgs:  # 解包时获取图像名称
        ret, c = cv2.findChessboardCorners(gray, pattern_size)  #ret 表示是否成功找到棋盘格角点,c 是一个数组,包含了检测到的角点的坐标
        if not ret:
            print(f"未能检测到棋盘格角点的图像: {img_name}")  # 输出图像文件名称
            continue
        c = cv2.cornerSubPix(gray, c, (5, 5), (-1, -1),
                             (cv2.TERM_CRITERIA_EPS + cv2.TERM_CRITERIA_MAX_ITER, 30, 0.001))   #cv2.cornerSubPix 函数用于提高棋盘格角点的精确度,对初始检测到的角点坐标 c 进行优化
        corners.append(c)   #将优化后的角点坐标 c 添加到 corners 列表中


        # 绘制角点并显示
        vis = frame.copy()
        cv2.drawChessboardCorners(vis, pattern_size, c, ret)
        new_size = (1920, 1080)
        resized_img = cv2.resize(vis, new_size)
        cv2.imshow('Corners', resized_img)
        cv2.waitKey(150)

    return corners

# 相机标定
def calibrate_camera(object_points, corners, imgsize):
    cm_input = np.eye(3, dtype=np.float32)
    ret = cv2.calibrateCamera(object_points, corners, imgsize, cm_input, None)
    return ret

def save_calibration_to_yaml(file_path, cameraMatrix_l, distCoeffs_l, cameraMatrix_r, distCoeffs_r, R, T, E, F):
    data = {
        'camera_matrix_left': {
            'rows': 3,
            'cols': 3,
            'dt': 'd',
            'data': cameraMatrix_l.flatten().tolist()
        },
        'dist_coeff_left': {
            'rows': 1,
            'cols': 5,
            'dt': 'd',
            'data': distCoeffs_l.flatten().tolist()
        },
        'camera_matrix_right': {
            'rows': 3,
            'cols': 3,
            'dt': 'd',
            'data': cameraMatrix_r.flatten().tolist()
        },
        'dist_coeff_right': {
            'rows': 1,
            'cols': 5,
            'dt': 'd',
            'data': distCoeffs_r.flatten().tolist()
        },
        'R': {
            'rows': 3,
            'cols': 3,
            'dt': 'd',
            'data': R.flatten().tolist()
        },
        'T': {
            'rows': 3,
            'cols': 1,
            'dt': 'd',
            'data': T.flatten().tolist()
        },
        'E': {
            'rows': 3,
            'cols': 3,
            'dt': 'd',
            'data': E.flatten().tolist()
        },
        'F': {
            'rows': 3,
            'cols': 3,
            'dt': 'd',
            'data': F.flatten().tolist()
        }
    }

    with open(file_path, 'w') as file:
        yaml.dump(data, file, default_flow_style=False)
    print(f"Calibration parameters saved to {file_path}")


img_left = load_images(left_folder, left_images)      #img_left是个列表,存放左摄像头所有的灰度图片。
img_right = load_images(right_folder, right_images)
pattern_size = (8, 5)
corners_left = get_corners(img_left, pattern_size)       #corners_left的长度表示检测到棋盘格角点的图像数量。corners_left[i] 和 corners_right[i] 中存储了第 i 张图像检测到的棋盘格角点的二维坐标。
corners_right = get_corners(img_right, pattern_size)
cv2.destroyAllWindows()

print(f"成功检测到的左相机角点数量: {len(corners_left)}")
print(f"成功检测到的右相机角点数量: {len(corners_right)}")

# 断言,确保所有图像都检测到角点
assert len(corners_left) == len(img_left), "有图像未检测到左相机的角点"
assert len(corners_right) == len(img_right), "有图像未检测到右相机的角点"

# 准备标定所需数据
points = np.zeros((8 * 5, 3), dtype=np.float32)   #创建40 行 3 列的零矩阵,用于存储棋盘格的三维坐标点。棋盘格的大小是 8 行 5 列,40 个角点(注意为内角点)。数据类型为 np.float32,这是一张图的,因为一个角点对应一个三维坐标
points[:, :2] = np.mgrid[0:8, 0:5].T.reshape(-1, 2) * 20  #给这些点赋予实际的物理坐标,* 20为使用的棋盘格的单格实际尺寸,为20mm

object_points = [points] * len(corners_left)     #包含了所有图像中棋盘格的三维物理坐标点 points。这里假设所有图像中棋盘格的物理坐标是相同的,因此用 points 复制 len(corners_left) 次。
imgsize = img_left[0][1].shape[::-1]     #img_left[0] 是左相机图像列表中的第一张图像。img_left[0][1] 是该图像的灰度图像。shape[::-1] 取灰度图像的宽度和高度,并反转顺序,以符合 calibrateCamera 函数的要求。

print('开始左相机标定')
ret_l = calibrate_camera(object_points, corners_left, imgsize)    #object_points表示标定板上检测到的棋盘格角点的三维坐标;corners_left[i]表示棋盘格角点在图像中的二维坐标;imgsize表示图像大小
retval_l, cameraMatrix_l, distCoeffs_l, rvecs_l, tvecs_l = ret_l[:5]    #返回值里就包含了标定的参数

print('开始右相机标定')
ret_r = calibrate_camera(object_points, corners_right, imgsize)
retval_r, cameraMatrix_r, distCoeffs_r, rvecs_r, tvecs_r = ret_r[:5]

# 立体标定,得到左右相机的外参:旋转矩阵、平移矩阵、本质矩阵、基本矩阵
print('开始立体标定')
criteria_stereo = (cv2.TERM_CRITERIA_EPS + cv2.TERM_CRITERIA_MAX_ITER, 30, 1e-5)
ret_stereo = cv2.stereoCalibrate(object_points, corners_left, corners_right,
                                 cameraMatrix_l, distCoeffs_l,
                                 cameraMatrix_r, distCoeffs_r,
                                 imgsize, criteria=criteria_stereo,
                                 flags=cv2.CALIB_FIX_INTRINSIC)
ret, _, _, _, _, R, T, E, F = ret_stereo

# 输出结果
print("左相机内参:\n", cameraMatrix_l)
print("左相机畸变系数:\n", distCoeffs_l)
print("右相机内参:\n", cameraMatrix_r)
print("右相机畸变系数:\n", distCoeffs_r)
print("旋转矩阵 R:\n", R)
print("平移向量 T:\n", T)
print("本质矩阵 E:\n", E)
print("基本矩阵 F:\n", F)
print("标定完成")

# 保存标定结果
save_calibration_to_yaml('shuangmubiaoding.yaml', cameraMatrix_l, distCoeffs_l, cameraMatrix_r, distCoeffs_r, R, T, E, F)


# 计算重投影误差
def compute_reprojection_errors(objpoints, imgpoints, rvecs, tvecs, mtx, dist):
    total_error = 0
    total_points = 0
    for i in range(len(objpoints)):
        imgpoints2, _ = cv2.projectPoints(objpoints[i], rvecs[i], tvecs[i], mtx, dist)
        error = cv2.norm(imgpoints[i], imgpoints2, cv2.NORM_L2) / len(imgpoints2)
        total_error += error
        total_points += len(imgpoints2)
    mean_error = total_error / total_points
    return mean_error

# 计算并打印左相机和右相机的重投影误差
print("左相机重投影误差: ", compute_reprojection_errors(object_points, corners_left, rvecs_l, tvecs_l, cameraMatrix_l, distCoeffs_l))
print("右相机重投影误差: ", compute_reprojection_errors(object_points, corners_right, rvecs_r, tvecs_r, cameraMatrix_r, distCoeffs_r))

# 立体矫正和显示
def stereo_rectify_and_display(img_l, img_r, cameraMatrix_l, distCoeffs_l, cameraMatrix_r, distCoeffs_r, R, T):
    img_size = img_l.shape[:2][::-1]

    # 立体校正
    R1, R2, P1, P2, Q, _, _ = cv2.stereoRectify(cameraMatrix_l, distCoeffs_l, cameraMatrix_r, distCoeffs_r, img_size, R, T)
    map1x, map1y = cv2.initUndistortRectifyMap(cameraMatrix_l, distCoeffs_l, R1, P1, img_size, cv2.CV_32FC1)
    map2x, map2y = cv2.initUndistortRectifyMap(cameraMatrix_r, distCoeffs_r, R2, P2, img_size, cv2.CV_32FC1)

    # 图像矫正
    rectified_img_l = cv2.remap(img_l, map1x, map1y, cv2.INTER_LINEAR)
    rectified_img_r = cv2.remap(img_r, map2x, map2y, cv2.INTER_LINEAR)

    # 显示矫正后的图像
    combined_img = np.hstack((rectified_img_l, rectified_img_r))
    cv2.imshow('Rectified Images', combined_img)

       # 等待按键,按 'q' 键退出
    #if cv2.waitKey(0) == ord('q'):
    #   cv2.destroyAllWindows()
    #   return

    cv2.imwrite("stereo-jiaozheng.png",combined_img)
    cv2.waitKey(0)
    cv2.destroyAllWindows()
主要需要修改的地方为左右相机图像的输入路径、实际使用的棋盘格的内角点在长度、宽度上的数量及单格的实际尺寸(mm)。注意修改的角点参数为内角点参数,以本人使用的棋盘格为例,内角点数量为8×5,单格物理尺寸为20mm,代码中填写角点数为8×5而非9×6。
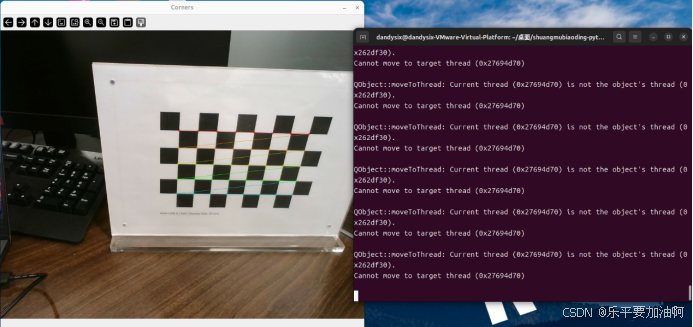
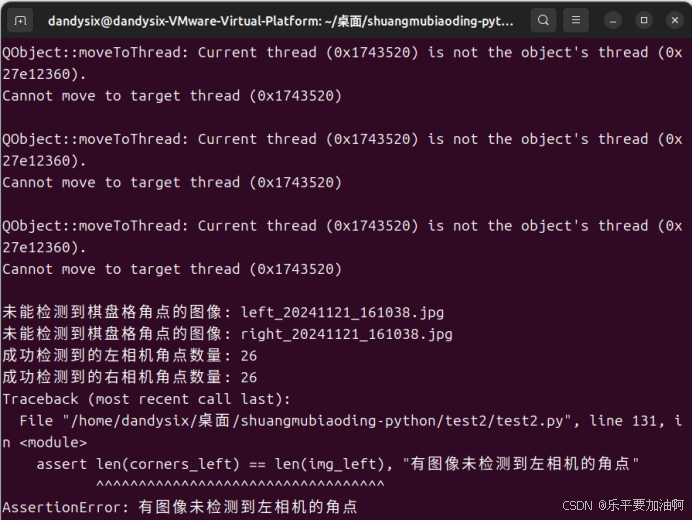
代码运行时会根据左相机图片逐张检测再检测右相机,实时输出标定图片及检查情况,同时标明检测不理想的图片的名称,运行结束后终端输出检测成功数量,便于调整数据集以减小误差。实际运行界面如下(本人在Ubuntu中运行):
若数据集中有不理想照片,只检测可使用图片的角点并实时显示,检测完不进行标定,同时指明问题图片:
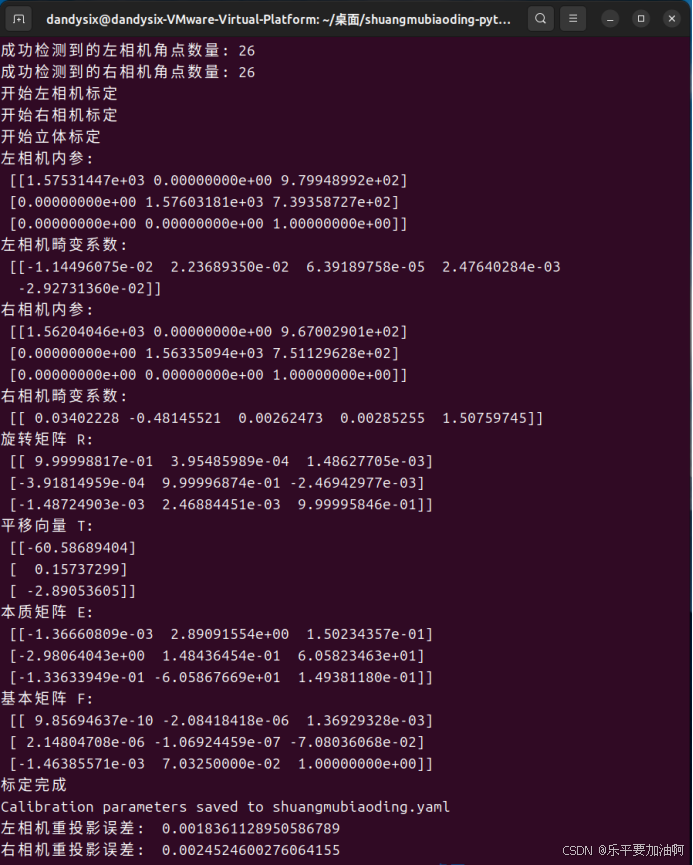
问题图片剔除后重新运行程序,若无问题将进行标定,详细结果输出到终端并在程序同目录生成.yaml文件保存:


 417
417

 被折叠的 条评论
为什么被折叠?
被折叠的 条评论
为什么被折叠?
 到【灌水乐园】发言


