


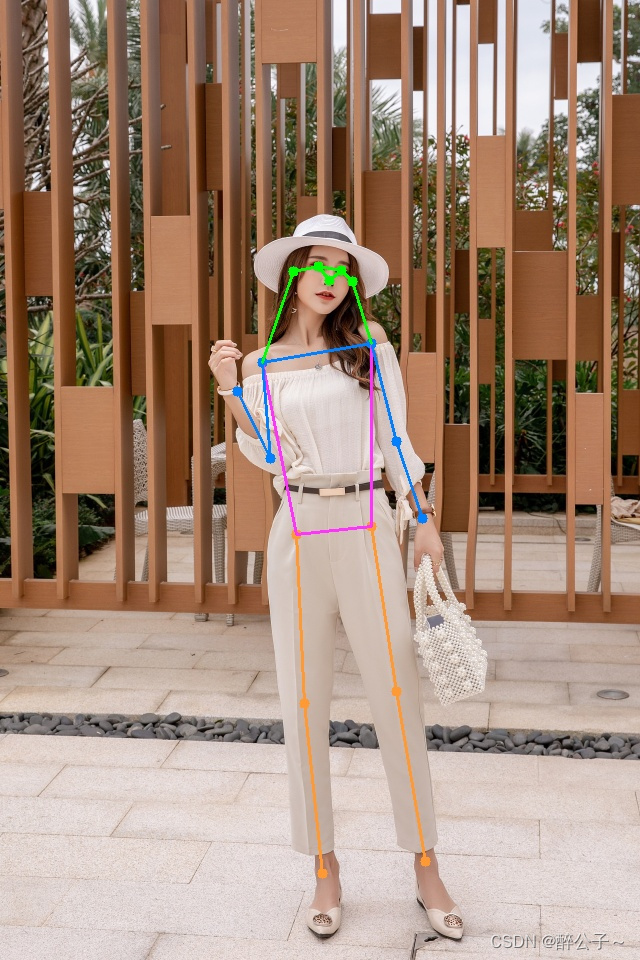
 本文介绍了YOLOv7在人体姿态检测中的应用,相较于前作,YOLOv7在保持高精度的同时提升了运行速度。通过使用labelme工具进行数据标注,然后利用YOLOv7和OpenPose开源代码进行训练和测试,实现了较高的FPS效果。提供了YOLOv7和YOLOv7-openpose的相关资源链接,并分享了测试效果。
前不久yolov7(原yolov4团队)在yolov6(美团)开源不到两周的时间也更新了,
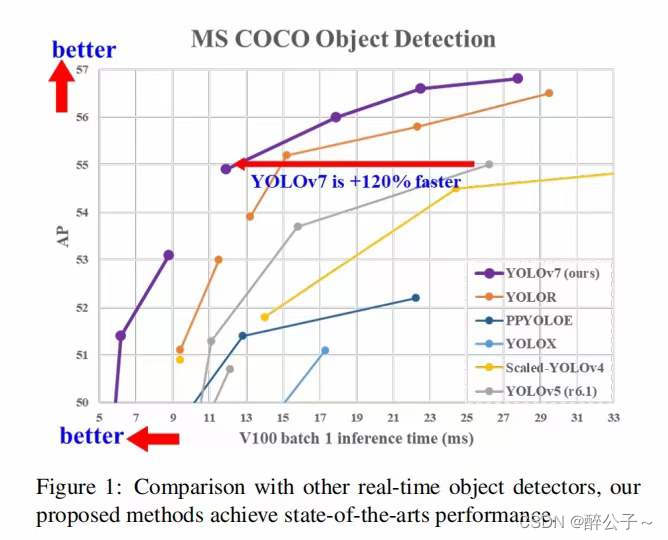
如下图所示,yolov7效果比前面的版本确实牛逼,在精度相同的情况下,速度上面提升了一大截,但是这是在比较好的设备上面;
YOLOv7 的发展方向与当前主流的实时目标检测器不同,研究团队希望它能够同时支持移动 GPU 和从边缘到云端的 GPU 设备。除了架构优化之外,该研究提出的方法还专注于训练过程的优化,将重点放在了一些优化模块和优化方法上。这可能会增加训练成本以提高目标检测的准确性,但不会增加推理成本。我想这才是运用到工业一个巨大的提升。
由于要训练自己的数据集,所以就需要人工标注数据,使用软件为labelme。该工具非常好用,基本可以满足深度学习众多任务的数据标注需求具体使用如下步骤所示:
http://labelme.csail.mit.edu/Release3.0/
安装labelme,数据标注
对于labelme标注工具,它是一个多功能的标注工具:
- 对图像进行多边形,矩形,圆形,多段线,线段,点形式的标注(可用于目标检测,图像分割,等任务)。
- 对图像进行进行 flag 形式的标注(可用于图像分类 和 清理 任务)。
- 视频标注
- 生成 VOC 格式的数据集(for semantic / instance segmentation)
- 生成 COCO 格式的数据集(for instance segmentation)
##################
## for Python 2 ##
##################
conda create --name=labelme python=2.7
source activate labelme
# conda install -c conda-forge pyside2
conda install pyqt
pip install labelme
# 如果想安装最新版本,请使用下列命令安装:
# pip install git+https://github.com/wkentaro/labelme.git

##################
## for Python 3 ##
##################
conda create --name=labelme python=3.6
source activate labelme
# conda install -c conda-forge pyside2
# conda install pyqt
pip install pyqt5  # pyqt5 can be installed via pip on python3
pip install labelme
OPENPOSE肢体检测
完整测试代码,只需要修改模型路径和测试视频路径
import torch
import cv2
import numpy as np
import time
import torchvision
from torchvision import transforms


def xyxy2xywh(x):
    # Convert nx4 boxes from [x1, y1, x2, y2] to [x, y, w, h] where xy1=top-left, xy2=bottom-right
    y = x.clone() if isinstance(x, torch.Tensor) else np.copy(x)
    y[:, 0] = (x[:, 0] + x[:, 2]) / 2  # x center
    y[:, 1] = (x[:, 1] + x[:, 3]) / 2  # y center
    y[:, 2] = x[:, 2] - x[:, 0]  # width
    y[:, 3] = x[:, 3] - x[:, 1]  # height
    return y
def xywh2xyxy(x):
    # Convert nx4 boxes from [x, y, w, h] to [x1, y1, x2, y2] where xy1=top-left, xy2=bottom-right
    y = x.clone() if isinstance(x, torch.Tensor) else np.copy(x)
    y[:, 0] = x[:, 0] - x[:, 2] / 2  # top left x
    y[:, 1] = x[:, 1] - x[:, 3] / 2  # top left y
    y[:, 2] = x[:, 0] + x[:, 2] / 2  # bottom right x
    y[:, 3] = x[:, 1] + x[:, 3] / 2  # bottom right y
    return y
def xywhn2xyxy(x, w=640, h=640, padw=0, padh=0):
    # Convert nx4 boxes from [x, y, w, h] normalized to [x1, y1, x2, y2] where xy1=top-left, xy2=bottom-right
    y = x.clone() if isinstance(x, torch.Tensor) else np.copy(x)
    y[:, 0] = w * (x[:, 0] - x[:, 2] / 2) + padw  # top left x
    y[:, 1] = h * (x[:, 1] - x[:, 3] / 2) + padh  # top left y
    y[:, 2] = w * (x[:, 0] + x[:, 2] / 2) + padw  # bottom right x
    y[:, 3] = h * (x[:, 1] + x[:, 3] / 2) + padh  # bottom right y
    return y
def box_iou(box1, box2):
    # https://github.com/pytorch/vision/blob/master/torchvision/ops/boxes.py
    """
    Return intersection-over-union (Jaccard index) of boxes.
    Both sets of boxes are expected to be in (x1, y1, x2, y2) format.
    Arguments:
        box1 (Tensor[N, 4])
        box2 (Tensor[M, 4])
    Returns:
        iou (Tensor[N, M]): the NxM matrix containing the pairwise
            IoU values for every element in boxes1 and boxes2
    """

    def box_area(box):
        # box = 4xn
        return (box[2] - box[0]) * (box[3] - box[1])

    area1 = box_area(box1.T)
    area2 = box_area(box2.T)

    # inter(N,M) = (rb(N,M,2) - lt(N,M,2)).clamp(0).prod(2)
    inter = (torch.min(box1[:, None, 2:], box2[:, 2:]) - torch.max(box1[:, None, :2], box2[:, :2])).clamp(0).prod(2)
    return inter / (area1[:, None] + area2 - inter)  # iou = inter / (area1 + area2 - inter)
def letterbox(img, new_shape=(640, 640), color=(
最低0.47元/天 解锁文章


 248
248

 被折叠的 条评论
为什么被折叠?
被折叠的 条评论
为什么被折叠?
 到【灌水乐园】发言


