


 本文介绍了一种基于TensorFlow的手写数字识别方法,通过构建和训练神经网络模型来实现对MNIST数据集的识别,并展示了如何保存和加载训练好的模型。
一、导入MNIST数据集
- 导入数据集
from tensorflow.examples.tutorials.mnist import input_data mnist = input_data.read_data_sets('MNIST_data/', one_hot=True) - 数据集的内容
# 查看训练数据的大小 print(mnist.train.images.shape) print(mnist.train.labels.shape) # 查看验证数据的大小 print(mnist.validation.images.shape) print(mnist.validation.labels.shape) # 查看测试数据的大小 print(mnist.test.images.shape) print(mnist.test.labels.shape) - 运行结果

说明:
MNIST数据集包含四个数据包,当本地没有数据包,Tensorflow会检测到并且会自动下载到MNIST_data文件夹中。建议先自行到MNIST官网上下载到本地的MNIST_data文件夹中,以免tensorflow自行下载速度过慢或者下载失败。MNIST官网链接地址:http://yann.lecun.com/exdb/mnist/
二、构建模型
- 搭建模型
#搭建模型 x=tf.placeholder(tf.float32,[None,784])#mnist data维度28*28=784 y=tf.placeholder(tf.float32,[None,10])#0-9 数字,10个类别 - 模型参数设置
#设置模型参数
W=tf.Variable(tf.random_normal([784,10]))
B=tf.Variable(tf.zeros([10]))
#正向传播,得到预测结果
pred=tf.nn.softmax(tf.matmul(x,W)+B)#Softmax分类
#反向传播,将生成的pred与标签进行一次交叉运算最小化cost
cost=tf.reduce_mean(-tf.reduce_sum(y*tf.log(pred),reduction_indices=1))
#学习率设置
learning_rate=0.01
#使用梯度下降优化器,使得cost最小化
optimizer = tf.train.GradientDescentOptimizer(learning_rate=learning_rate).minimize(cost)
#迭代次数设置
training_epochs=25
#每次迭代训练数据的大小
batch_size=100
#显示一次cost的结果
display_step=1
#保存训练的模型
saver=tf.train.Saver()
model_path="log/521model.ckpt"
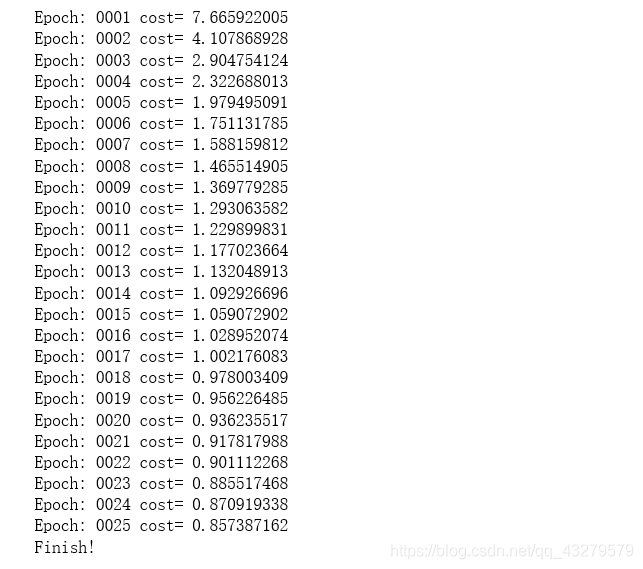
三、训练模型
- 训练代码
with tf.Session() as sess: sess.run(tf.global_variables_initializer()) #启动session,迭代训练模型 for epoch in range(training_epochs): avg_cost=0. total_batch=int(mnist.train.num_examples/batch_size)#每一轮训练多少批次 #遍历全部数据集 for i in range(total_batch): batch_xs,batch_ys=mnist.train.next_batch(batch_size) #运行梯度优化器 _,c=sess.run([optimizer,cost],feed_dict={x:batch_xs, y:batch_ys}) #计算平均值以使得误差值更加平均 avg_cost+=c/total_batch #显示每次迭代训练的详细信息 if (epoch+1)%display_step==0: print("Epoch:","%04d"%(epoch+1),"cost=","{:.9f}".format(avg_cost)) print("Finish!") - 训练过程的中间状态参数变化
四、测试模型
-
模型测试
#模型测试 correct_prediction=tf.equal(tf.argmax(pred,1),tf.argmax(y,1))#argmax将矩阵中每一行最大值所在列取出来 -
准确率获取
#计算准确率 accuracy=tf.reduce_mean(tf.cast(correct_prediction,tf.float32)) print("Accuracy:",accuracy.eval({x: mnist.test.images,y: mnist.test.labels})) -
模型保存
#存储模型 save_path=saver.save(sess,model_path) print("Model saved in files:%s" % save_path) -
运行结果

五、读取模型
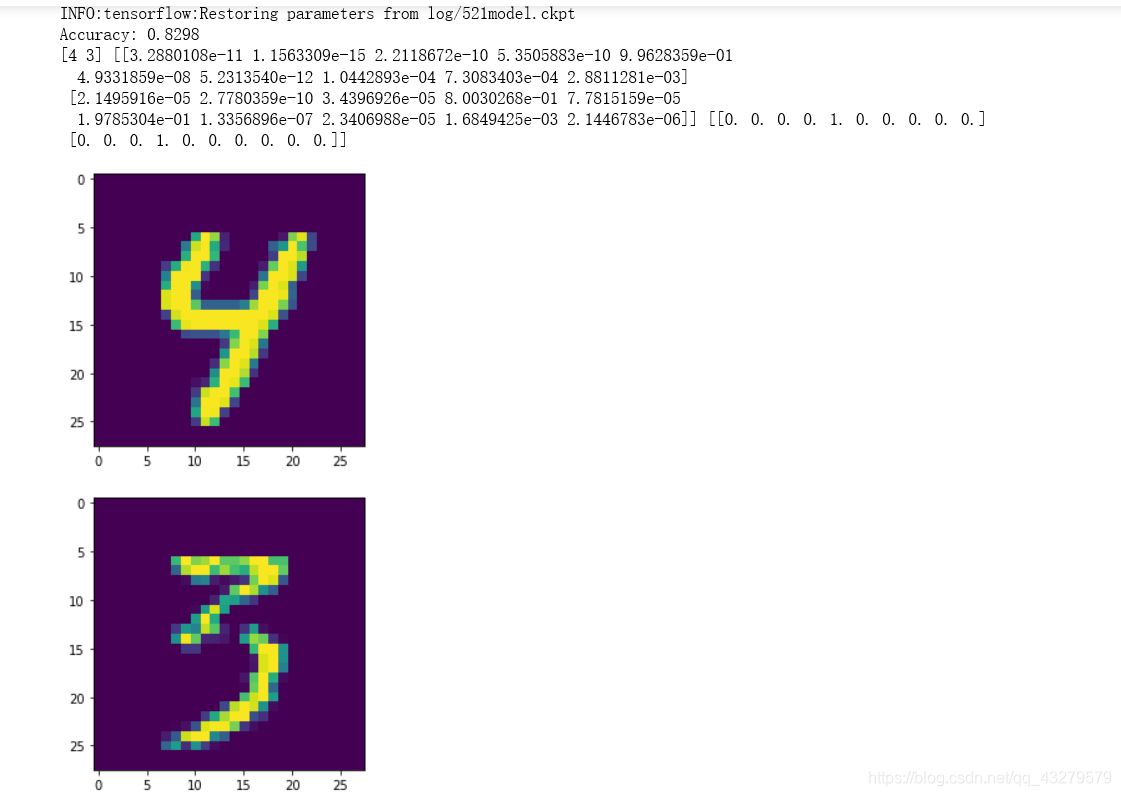
- 读取模型
import pylab #读取模型 with tf.Session() as sess2: #初始化所有变量 sess2.run(tf.global_variables_initializer()) #恢复模型并读取所有变量参数进入sess2 saver.restore(sess2,model_path) - 测试model
#测试model correct_prediction=tf.equal(tf.argmax(pred,1),tf.argmax(y,1)) #计算准确率 accuracy=tf.reduce_mean(tf.cast(correct_prediction,tf.float32)) print("Accuracy:",accuracy.eval({x: mnist.test.images,y: mnist.test.labels})) - 实际识别
output=tf.argmax(pred,1) batch_xs, batch_ys = mnist.train.next_batch(2) # 返回两个手写数字图片 outputval,predv=sess2.run([output,pred],feed_dict={x:batch_xs}) print(outputval,predv,batch_ys) im=batch_xs[0] im=im.reshape(-1,28) pylab.imshow(im) pylab.show() im=batch_xs[1] im=im.reshape(-1,28) pylab.imshow(im) pylab.show() - 结果
参考资料
https://edu.youkuaiyun.com/learn/26036


 6万+
6万+

 被折叠的 条评论
为什么被折叠?
被折叠的 条评论
为什么被折叠?
 到【灌水乐园】发言


