


1. 新建tensor
注意:
在pytorch中,类中的函数采用 . 方式调用 ;采用 [a, b] 方式定义tensor维度 ;
在libtorch中,类中的函数采用 :: 方式调用 ;采用 {a, b} 方式定义tensor维度 ;
无论是啥样子的 用于新建 tensor 的函数 都满足这样的组成:
torch::<function-name>(<function-specific-options>, <sizes>, <tensor-options>)
1. <function-name>:
<function-name> 就是 新建各种常见类型tensor的函数名字,例如ones()函数用于建立一个全一的tensor
常见的 建立 tensor 的函数如下:(新建 tensor 的函数 被称作 Factory Function)

2. <function-specific-options> :
见名知意:<function-specific-options>是特定于函数的参数:对于一些Factory Function ,需要一些特殊指定的参数
例如:torch::randint() 函数
torch::Tensor tensor = torch::randint(/*low=*/3, /*high=*/10, {5, 5});PS :内联注释 /*low=*/ 和 /*high=*/ 不是必需的,但它有助于提高可读性,就像 Python 中的关键字参数一样。这两个数值表示tensor中元素的值的上下界 :[3, 10]
【注】由名字也可知道,这些参数的选择、内容、和是否有default值都是和Factory Function 相关的
3. <sizes> :
这个 <sizes> 参数用于表示tensor的维度 :它是一个 IntArrayRef 类型的对象
因此,通过 tensor.sizes() 获取tensor的维度,返回的是一个 IntArrayRef 类型的对象,特可以直接输出,也可以用一个 IntArrayRef 类型的变量承接后再输出
#include<torch/torch.h>
#include<iostream>

using namespace std;

int main()
{

    torch::Tensor a = torch::rand( {5,6} );
    cout<<a.sizes()<<endl;

    c10::IntArrayRef t_size = a.sizes();     //因为在libtorch中,tensor实例调用.sizes()返回的就是一个 C10::IntArrayRef 类型的对象
    cout<<t_size<<endl;

}
4. <tensor-options> :
<tensor-options>用于表示tensor中内容的一些properties,即: <tensor-options> 指明正在创建的张量的数据类型(例如 float32 或 int64),或者tensor 是否存在于 CPU 或 GPU 内存中。
tensor 实例中的内容的属性,由一个 名为 TensorOptions 的类型对应的实例来指明 :
我们可以简单理解 TensorOptions 类封装了 一个用于指定 tensor属性的东西(construction axes)
TensorOptions 类有四个参数:dtype , layout , device , requires_grad
含义分别如下:
dtype,它控制存储在张量中的元素的数据类型;
layout,用于指明 tensor 是 密集的 或 稀疏的;
device,表示存储张量的计算设备(如 CPU 或 CUDA GPU);
requires_grad,取值为一个布尔值,用于启用或禁用张量的梯度记录;
并有如下取值:

使用方式如下:
auto options =
  torch::TensorOptions()
    .dtype(torch::kFloat32)
    .layout(torch::kStrided)
    .device(torch::kCUDA, 1)
    .requires_grad(true);

torch::Tensor tensor = torch::full({3, 4}, /*value=*/123, options);同时,由于TensorOptions 类的四个参数都有各自的default值(),并且根据 libtorch提供的语法糖,如下的几种简写方式都是合理的:
torch::ones(10, torch::TensorOptions().dtype(torch::kFloat32).layout(torch::kStrided))//如果就只需要指定一个特别的参数:
torch::ones(10, torch::dtype(torch::kFloat32))
//如果需要指定多个参数:[使用 . 连接]
//.device(torch::kCUDA, 1) 这是有多个GPU的情况,指定是在使用哪个GPU
torch::randn({3, 4}, torch::dtype(torch::kFloat32).device(torch::kCUDA, 1).requires_grad(true))
2. tensor将其 内容(元素)属性 进行修改 :
正如我们可以使用 TensorOptions 来配置应该如何创建新张量一样,我们也可以使用 TensorOptions 将张量从tensor的内容属性转换为另一个新属性。
注意,这种转换不是in-place转换,即:具有新属性的tensor和之前的旧tensor不在一块内存上
转换方式如下:
(1)将tensor从 CPU 内存移动到 GPU 内存:
torch::Tensor gpu_tensor = float_tensor.to(torch::kCUDA);如果您有多个可用的 CUDA 设备,上述代码会将张量复制到默认的 CUDA 设备,您可以使用 torch::DeviceGuard 对其进行配置。将代码修改为下述(将tensor移动到 id为 1 的GPU上):
torch::Tensor gpu_two_tensor = float_tensor.to(torch::Device(torch::kCUDA, 1));【注意】对于GPU和CPU之间的数据传输,.to()函数还有个参数 non_blocking :我们还可以通过将 /*non_blocking=*/false 作为最后一个参数传递给 to() 来将内存复制配置为异步
下述代码例子是:设置tensor移动是同步(/*non_blocking=*/true)
torch::Tensor async_cpu_tensor = gpu_tensor.to(torch::kCPU, /*non_blocking=*/true);@@@@@@@@@@@@@@@@@@@@@@@@@@@@@@@
总言之:
#include<torch/torch.h>
#include<iostream>

using namespace std;

int main()
{
    //新建tensor -----------------------------------------------------------------------------------

    // (1)新建一个tensor,给出大小但是并不赋值,此时该tensor中的值就是原来内存对应存放的值
    torch::Tensor a = torch::empty( {2,3} );
    cout<<a<<endl;

    // (2)新建ones tensor :
    torch::Tensor b = torch::ones( {3,4} );
    cout<<b<<endl;

    //(3)新建zeros tensor :
    torch::Tensor c = torch::zeros( {2,2} );
    cout<<c<<endl;

    //(4)新建rand tensor :
    torch::Tensor d = torch::rand( {5,6} );
    cout<<d<<endl;

    //(5)第一个参数指定生成tensor的形状,第二个参数指定tensor中的值
    torch::Tensor e = torch::full( {2,3}, 10 );
    cout<<e<<endl;

}
2. tensor 的数据类型:
当我们输出一个tensor时,会看到有这样的属性:
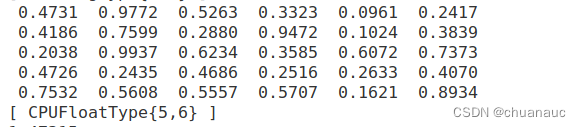
很显然这表示是一个存放在CPU上的tensor,这个tensor的数据类型是FloatType(对应于C++中的float类型),而{5, 6}则表示这个tensor的维度是[5, 6]
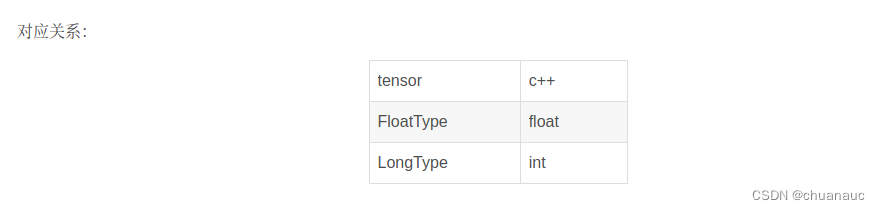
2.1 tensor中元素的数据类型 与 C++ 中数据类型的对应关系:
想对tensor中数据进行处理:
tensor中元素的读取和修改:
#include<torch/torch.h>
#include<iostream>

using namespace std;

int main()
{


    // 新建rand tensor :
    torch::Tensor a = torch::rand( {5,6} );
    cout<<a<<endl;
    cout<<a[0][0]<<endl;        //可以直接输出tensor中的元素
    a[0][0] = a[0][0]+1;        //也可以直接对tensor中的元素进行修改

    //但是读取tensor中的元素的值需要做一些转换

    //第一种转为float的方式
    float value1 = a[0][0].item().toFloat();
    cout<<value1<<endl;
    cout<<a[0][0]<<endl;

    //第一种转为float的方式
    float value2 = a[0][1].item<float>();
    cout<<value2<<endl;
    cout<<a[0][1]<<endl;


}
ref:
官方文档:【整理完了】
tensor的构造和新建tensor的参数含义:
Tensor Creation API — PyTorch master documentation
【以下的没整理完】
libtorch (pytorch c++) 教程(一) - 知乎 [它的教程目录]
c++ 部署libtorch时常用操作API_alex1801的博客-优快云博客
libtorch Tensor张量的常用操作总结(1)_萌萌哒程序猴的博客-优快云博客
libtorch Tensor张量的常用操作总结(2)_萌萌哒程序猴的博客-优快云博客_libtorch tensor赋值


 968
968

 被折叠的 条评论
为什么被折叠?
被折叠的 条评论
为什么被折叠?
 到【灌水乐园】发言


