


ES集群master节点拆分
背景:
公司ES集群内存在20个node节点,每个节点的角色即是master又是data角色

目标:
新增3个节点作为master使用,原20个节点全部转换为data角色,尽量不丢数据!!!
别问为什么尽量,因为之前第4步重启es集群,不是依次重启,全部重启,然后集群挂掉了,铲掉es集群后,新建的es集群发现elk里面索引模板都没了,要是严谨一点,可以把 生命周期管理策略和索引模板先备份一下,保存好输出。
get  _template
get  _template/eapvm-log-template
get _index_template
get _index_template/apc-node-template
get /_ilm/policy
get /_ilm/policy/30-days-default
操作步骤:
1.新增3个节点加入现有ES集群中
配置文件如下:
[root@s1prod-es13 ~]# cat /data01/es/elasticsearch.yml
cluster.name: "es-uat-cluster"
cluster.max_shards_per_node: 10000
node.name: s1prod-es13	#注意修改为本节点主机名
node.attr.box_type: cold		    #注意修改
network.host: 0.0.0.0
network.publish_host: 10.11.20.54	#注意修改为本节点IP
discovery.seed_hosts: ["10.11.20.76", "10.11.20.77", "10.11.20.78"]	#注意修改,改为目前运行的节点
bootstrap.memory_lock: true
xpack.monitoring.collection.enabled: true
cluster.initial_master_nodes: ["10.11.20.76", "10.11.20.77", "10.11.20.78"]	#注意修改,改为最新作为master节点的地址
node.master: true	    #新加入的节点,master为true
node.data: false		#新加入的节点,data为false
xpack.license.self_generated.type: basic
xpack.security.enabled: false
cluster.routing.allocation.same_shard.host: true
cluster.routing.allocation.disk.watermark.low: "90%"
cluster.routing.allocation.disk.watermark.high: "95%"
#cluster.routing.allocation.disk.watermark.low: "85%"
#cluster.routing.allocation.disk.watermark.high: "90%"
cluster.info.update.interval: "30s"
cluster.routing.allocation.disk.include_relocations: true
cluster.routing.allocation.disk.threshold_enabled: true
http.max_content_length: 800mb
http.max_initial_line_length: 100kb
http.max_header_size: 40kb

[root@s1prod-es13 es]# cat docker-compose.yml
version: '3'
services:
  elasticsearch:
    image: '10.11.20.102:80/public/elasticsearch:7.16.2'
    network_mode: host
    restart: always
    environment:
      ES_JAVA_OPTS: '-Xms32G -Xmx32G'	#内存为虚拟机的一半
    ulimits:
      memlock:
        soft: -1
        hard: -1
    volumes:
      - "/data01/es/data:/usr/share/elasticsearch/data"
      - "/data01/es/elasticsearch.yml:/usr/share/elasticsearch/config/elasticsearch.yml"
  elasticsearch-exporter:
    image: '10.11.20.102:80/public/elasticsearch-exporter:1.3.0'
    command:
      - '--es.uri=http://localhost:9200'
    restart: always
    network_mode: host
    depends_on:
      - elasticsearch
启动服务,加入集群
docker-compose -f /data01/es/docker-compose.yml up -d

docker ps

docker logs -f  容器名 	#查看容器启动日志,检查是否正常启动
在elk上运行
GET /_cat/nodes?
新加入的节点应该如下图
![]()
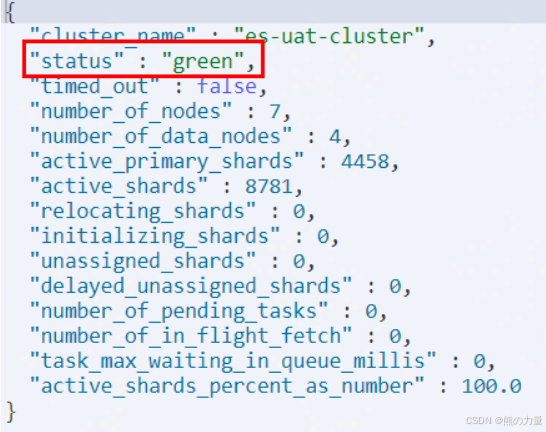
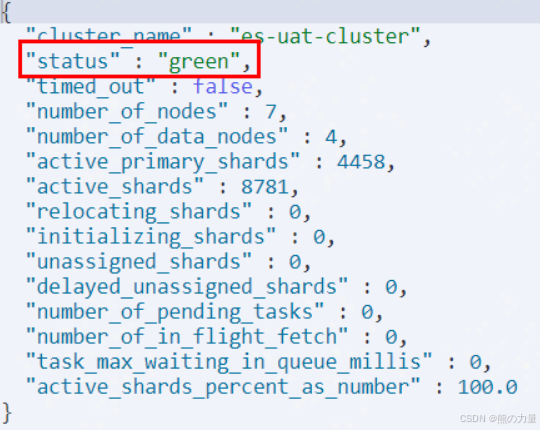
运行如下命令,检查集群状态
GET /_cluster/health?
依次循环,3个master节点均加入集群。
2.将之前20个节点排除master角色候选
运行下面的命令查询cluster.max_voting_config_exclusions的值,默认是10,这里集群改动过了,忽略。
curl -X GET "http://localhost:9200/_cluster/settings?include_defaults=true&filter_path=defaults.cluster.max_voting_config_exclusions,persistent.cluster.max_voting_config_exclusions,transient.cluster.max_voting_config_exclusions&pretty" -H 'Content-Type: application/json'

GET /_cluster/settings?include_defaults=true&filter_path=defaults.cluster.max_voting_config_exclusions,persistent.cluster.max_voting_config_exclusions,transient.cluster.max_voting_config_exclusions&pretty
修改该值为20
  curl -X PUT "http://localhost:9200/_cluster/settings" -H 'Content-Type: application/json' -d'
  {
  "persistent": {
      "cluster.max_voting_config_exclusions": 20
  }
  }'
或者
PUT /_cluster/settings
      {
      "persistent": {
          "cluster.max_voting_config_exclusions": 20
      }
     }
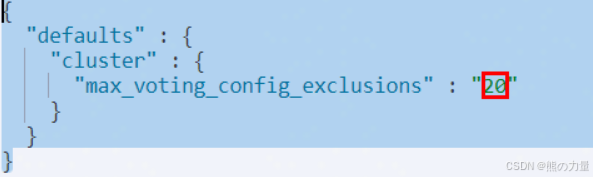
再次检查下配置,核对是否修改为20
GET /_cluster/settings?include_defaults=true&filter_path=defaults.cluster.max_voting_config_exclusions,persistent.cluster.max_voting_config_exclusions,transient.cluster.max_voting_config_exclusions&pretty

去除20个节点的master候选(注意node_names后面改成实际es集群中的node_name)
curl -X POST "http://localhost:9200/_cluster/voting_config_exclusions?node_names=infra-es13,infra-es08,infra-es09,infra-es17,infra-es03,infra-es01,infra-es18,infra-es04,infra-es07,infra-es19,infra-es11,infra-es02,infra-es20,infra-es05,infra-es12,infra-es16,infra-es06,infra-es14,infra-es10,infra-es15"
此时检查集群master状态,是否已经切到新的3个master节点中的一个,并确保集群状态正常,类似下图
get _cat/nodes?
get _cluster/health?pretty

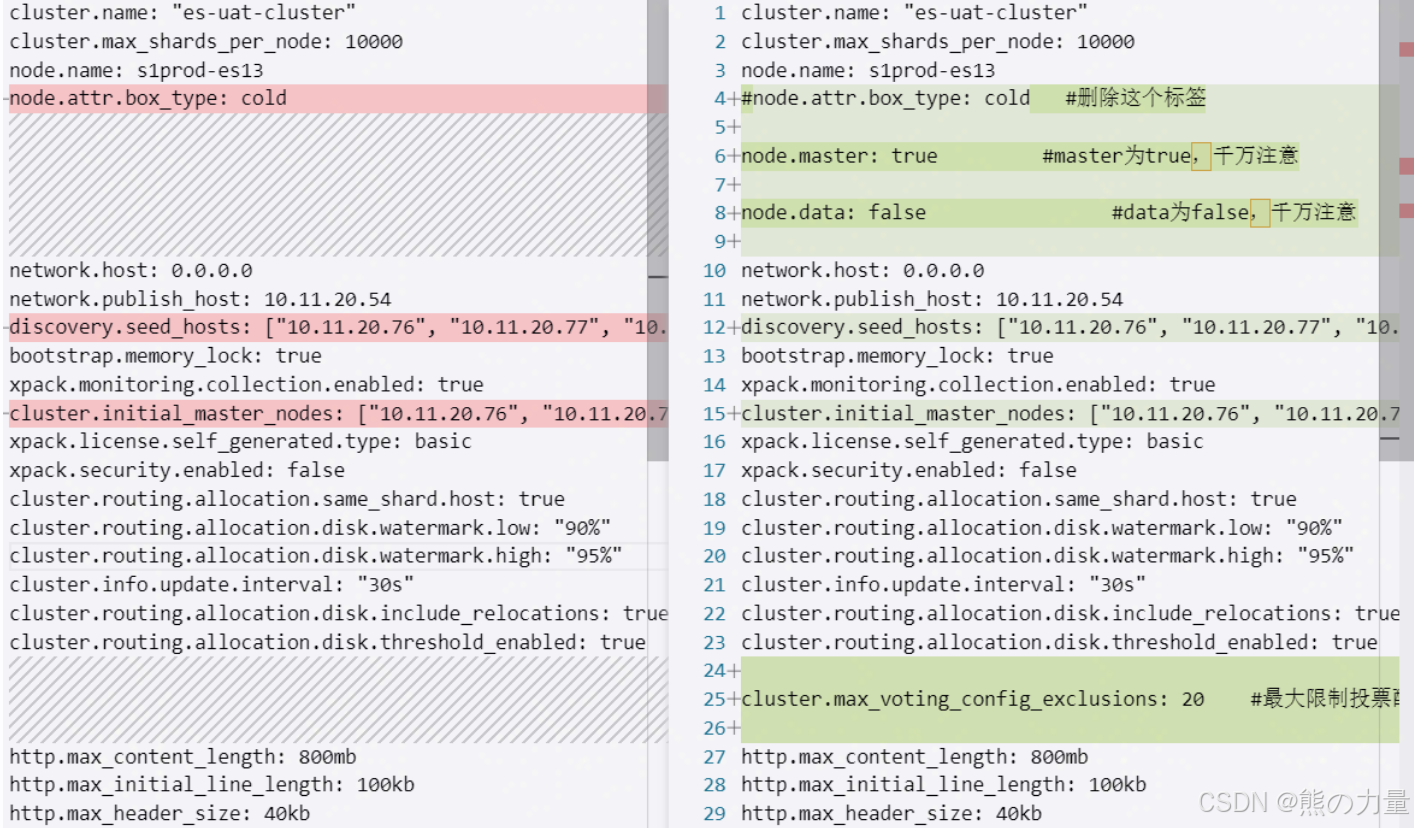
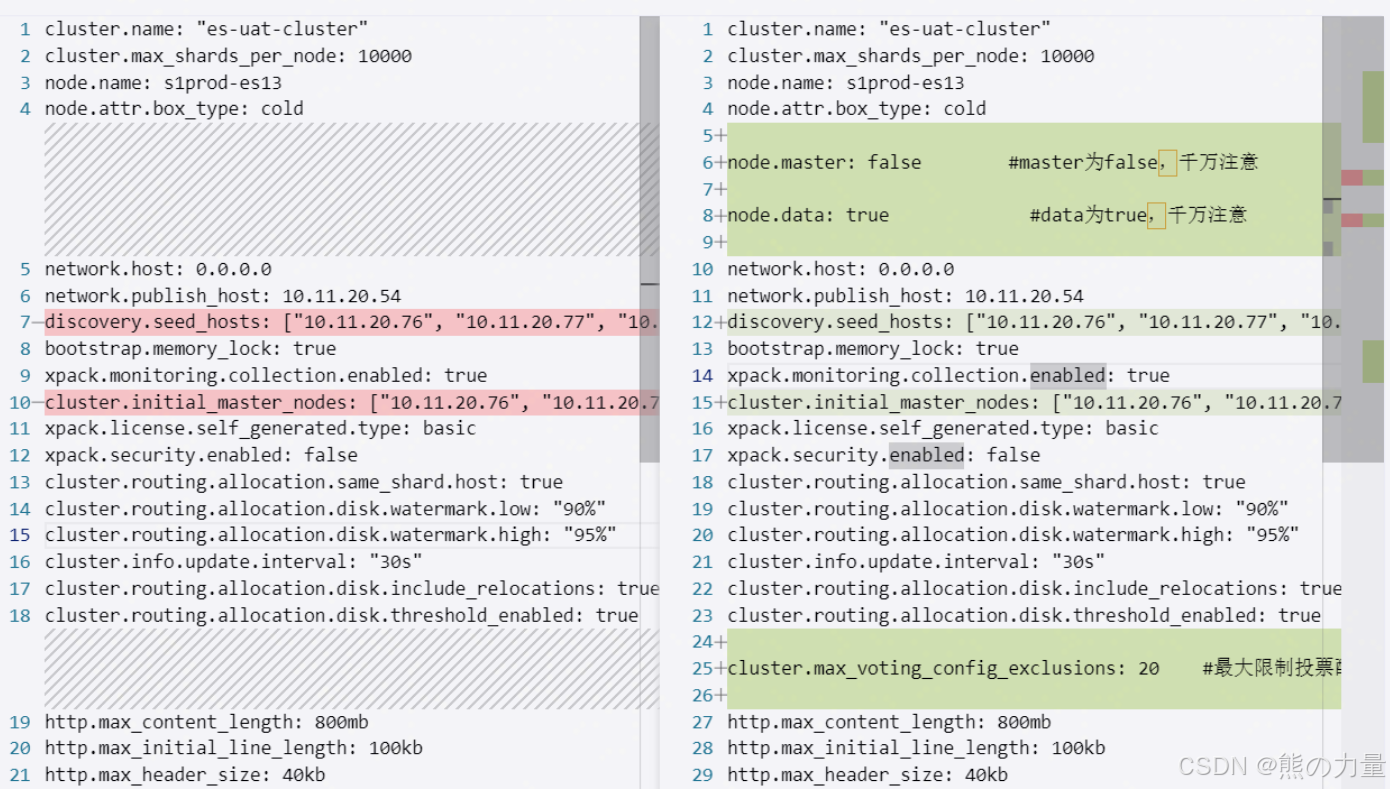
3.修改所有ES节点配置
master节点配置更改如下:
[root@s1prod-es13 ~]# cat /data01/es/elasticsearch.yml
cluster.name: "es-uat-cluster"
cluster.max_shards_per_node: 10000
node.name: s1prod-es13
#node.attr.box_type: cold	        #删除这个标签

node.master: true		            #master为true,千万注意
node.data: false				    #data为false,千万注意

network.host: 0.0.0.0
network.publish_host: 10.11.20.54
discovery.seed_hosts: ["10.11.20.76", "10.11.20.77", "10.11.20.78"]		#更改为3个新master节点地址
bootstrap.memory_lock: true
xpack.monitoring.collection.enabled: true
cluster.initial_master_nodes: ["10.11.20.76", "10.11.20.77", "10.11.20.78"]	#更改为3个新master节点地址
xpack.license.self_generated.type: basic
xpack.security.enabled: false
cluster.routing.allocation.same_shard.host: true
cluster.routing.allocation.disk.watermark.low: "90%"
cluster.routing.allocation.disk.watermark.high: "95%"
cluster.info.update.interval: "30s"
cluster.routing.allocation.disk.include_relocations: true
cluster.routing.allocation.disk.threshold_enabled: true
cluster.max_voting_config_exclusions: 20	#最大限制投票配置排除的数量
http.max_content_length: 800mb
http.max_initial_line_length: 100kb
http.max_header_size: 40kb
data节点配置更改如下:
[root@s1prod-es13 ~]# cat /data01/es/elasticsearch.yml
cluster.name: "es-uat-cluster"
cluster.max_shards_per_node: 10000
node.name: s1prod-es13
node.attr.box_type: cold

node.master: false		    #master为false,千万注意
node.data: true				#data为true,千万注意

network.host: 0.0.0.0
network.publish_host: 10.11.20.54
discovery.seed_hosts: ["10.11.20.76", "10.11.20.77", "10.11.20.78"]		    #更改为3个新master节点地址
bootstrap.memory_lock: true
xpack.monitoring.collection.enabled: true
cluster.initial_master_nodes: ["10.11.20.76", "10.11.20.77", "10.11.20.78"]	#更改为3个新master节点地址
xpack.license.self_generated.type: basic
xpack.security.enabled: false
cluster.routing.allocation.same_shard.host: true
cluster.routing.allocation.disk.watermark.low: "90%"		  #注意
cluster.routing.allocation.disk.watermark.high: "95%"		  #注意
cluster.info.update.interval: "30s"
cluster.routing.allocation.disk.include_relocations: true
cluster.routing.allocation.disk.threshold_enabled: true

cluster.max_voting_config_exclusions: 20	    #最大限制投票配置排除的数量

http.max_content_length: 800mb
http.max_initial_line_length: 100kb
http.max_header_size: 40kb
4.依次迁移分片,逐一重启。
先进行master节点的重启,master节点重启完成后,再执行data节点的重启。
先进行master节点的重启,master节点重启完成后,再执行data节点的重启。
先进行master节点的重启,master节点重启完成后,再执行data节点的重启。
master节点不存储数据,因此可以直接重启。
docker-compose -f /data01/es/docker-compose.yml down

docker-compose -f /data01/es/docker-compose.yml up -d

docker-compose -f /data01/es/docker-compose.yml up -d

docker ps

docker logs -f 容器名 #查看容器启动日志,检查是否正常启动
kibana上运行
get _cat/nodes?

get _cluster/health?pretty
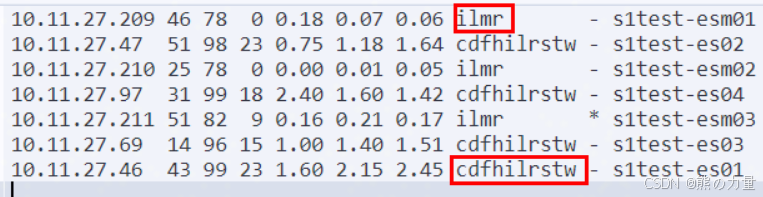
检查节点状态、集群状态,
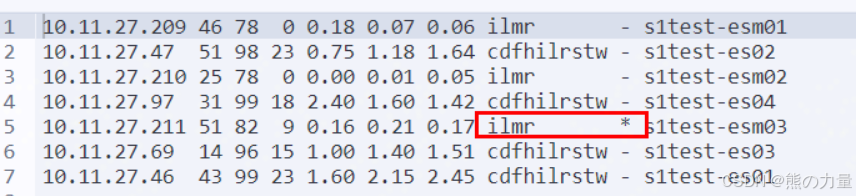
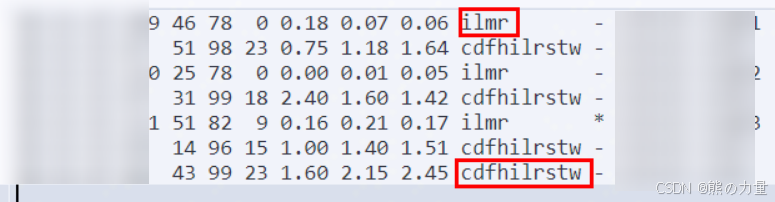
注意:master节点重启完以后只有 ilmr 这几个角色
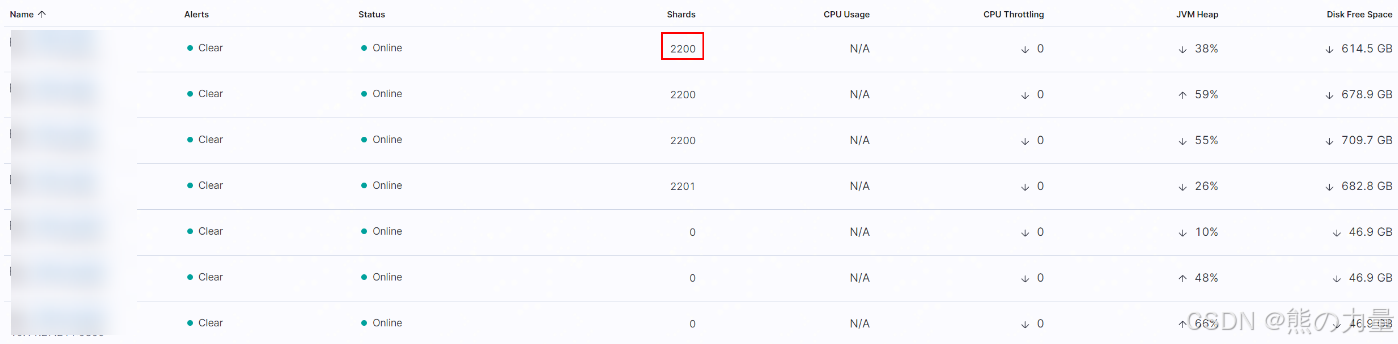
将数据节点分片先迁移到其他节点去,kibana运行:
PUT /_cluster/settings?pretty
{
  "transient": {
    "cluster.routing.allocation.exclude._ip": "10.11.27.46"
  }
}
类似46这台机器,执行完以后,等很久,分片归0,下图红框部分
之后登录节点,检查第3步master、data节点配置是否正确,下图
修改20个data节点的配置
node.master: false
node.data: true
discovery.seed_hosts: [新的3个节点IP,以逗号分隔]
cluster.initial_master_nodes: [新的3个节点IP,以逗号分隔]
cluster.max_voting_config_exclusions: 20


修改3个新master节点的配置:
discovery.seed_hosts: [新的3个节点IP,以逗号分隔]
cluster.max_voting_config_exclusions: 20
如正确,执行
docker-compose -f /data01/es/docker-compose.yml down
然后kibana执行
PUT _cluster/settings
{
  "transient" : {
    "cluster.routing.allocation.exclude._ip" : ""
  }
}
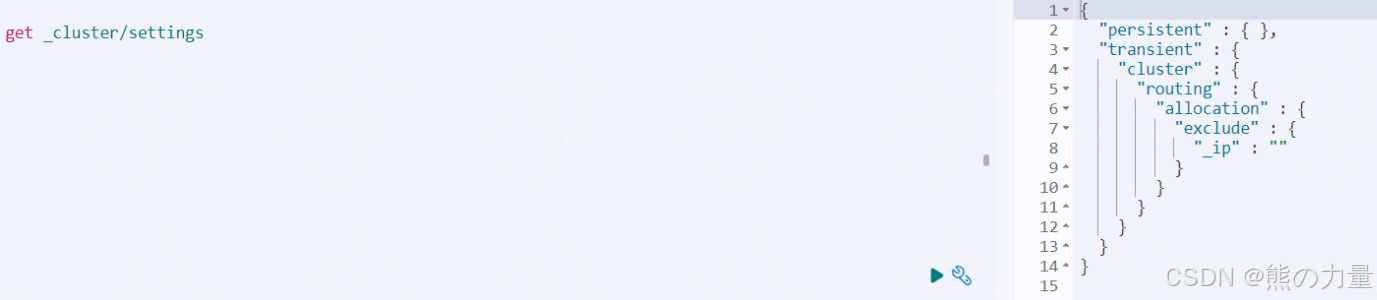
将刚刚排除分片的地址释放,检查配置,为空则正常
get _cluster/settings
然后启动节点配置
docker-compose -f /data01/es/docker-compose.yml up -d

docker ps

docker logs -f  容器名 	#查看容器启动日志,检查是否正常启动

get _cat/nodes?
注意!!! master节点全部为:ilmr
data节点全部为:cdfhilrstw (中间没有m)
get _cluster/health?pretty
循环执行第4步,直至所有集群节点重启一遍。
至此,完成


 705
705

 被折叠的 条评论
为什么被折叠?
被折叠的 条评论
为什么被折叠?
 到【灌水乐园】发言


