


 本文详细介绍了如何在商城项目中使用RabbitMQ,包括MQ的安装、Springboot整合、消息监听、可靠投递与消费。特别讨论了订单服务,涉及到分布式事务、幂等性设计、库存锁定与解锁逻辑。此外,还涵盖了支付功能的实现,如异步通知、支付宝的回调处理,以及秒杀服务的高并发解决方案和Sentinel的流控降级策略。
文章目录
RabbitMQ学习
MQ简介

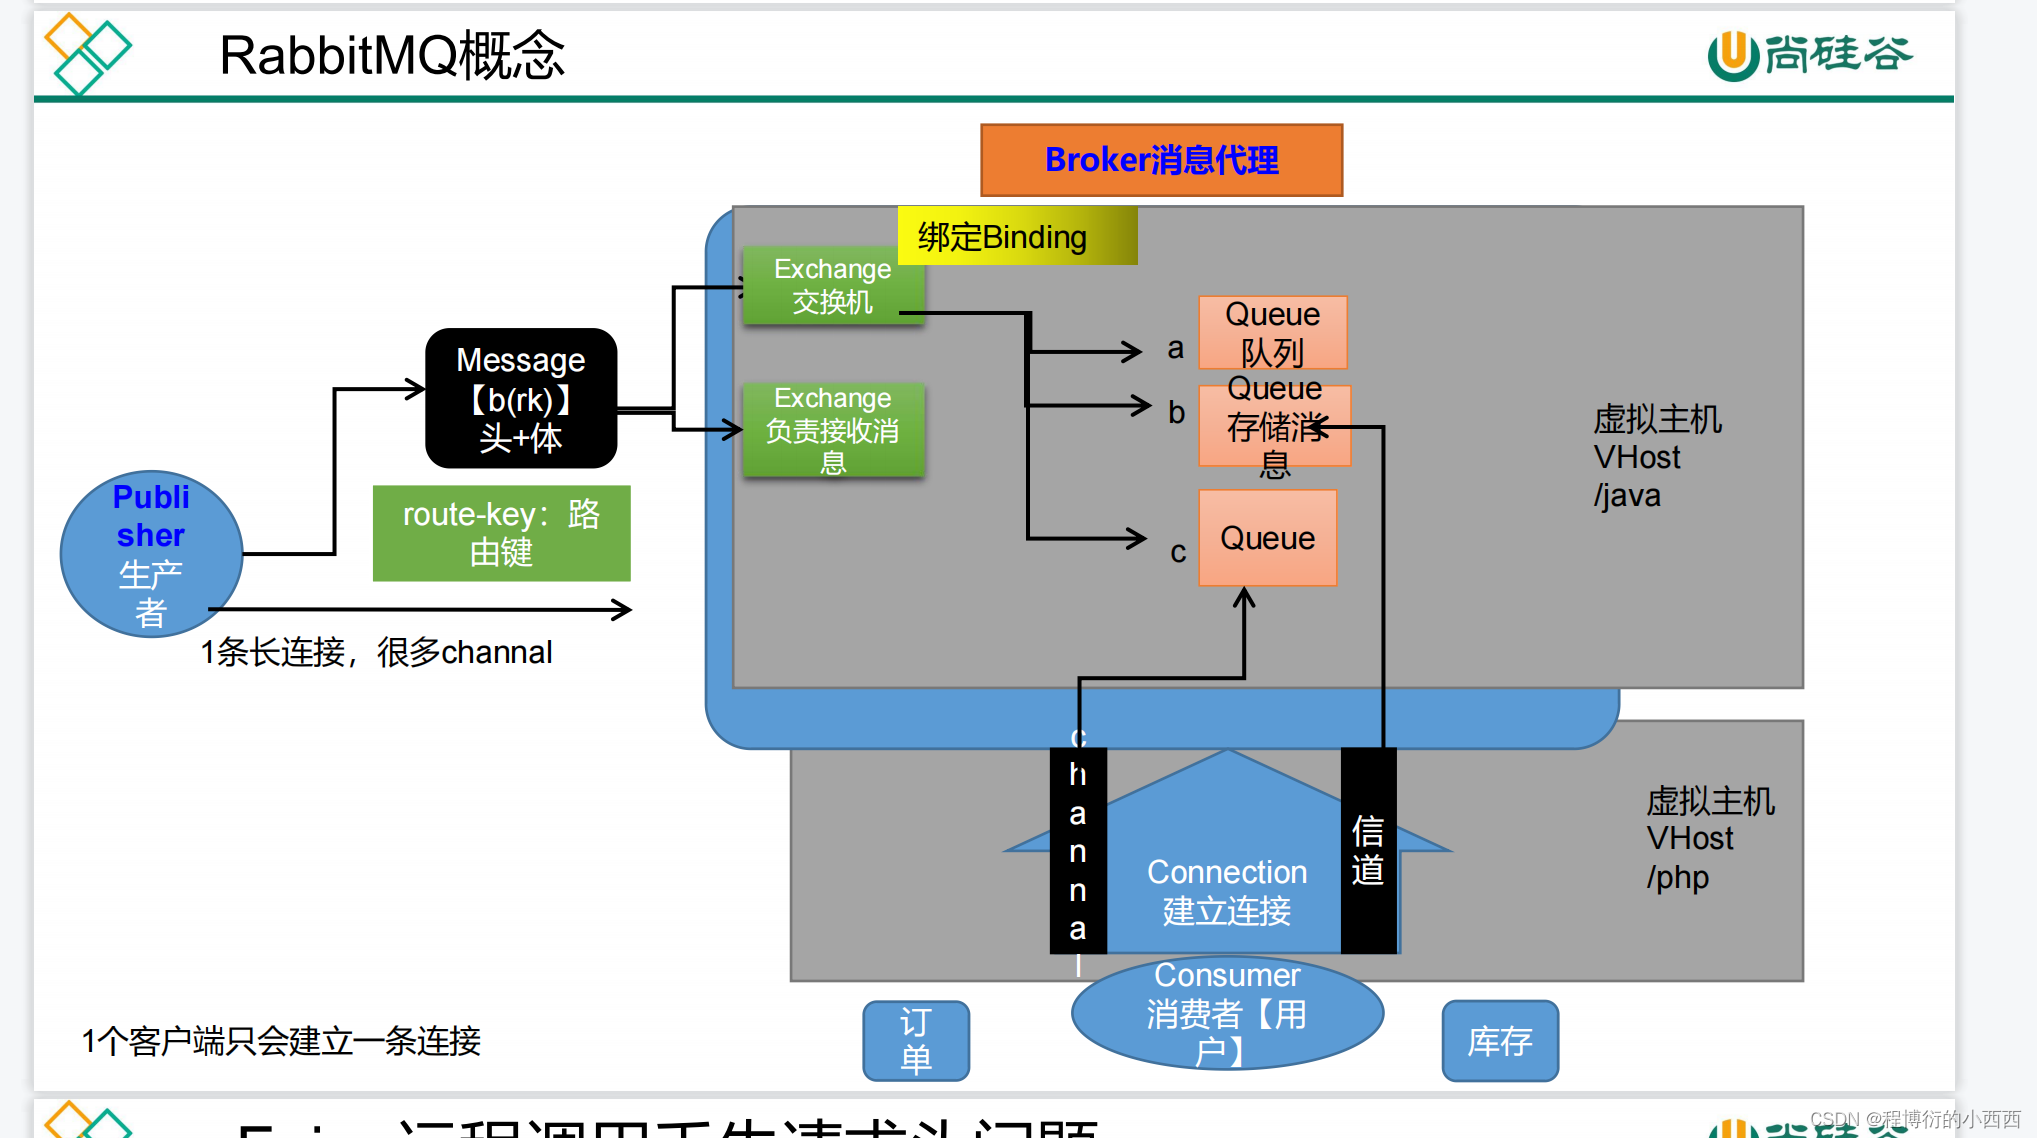
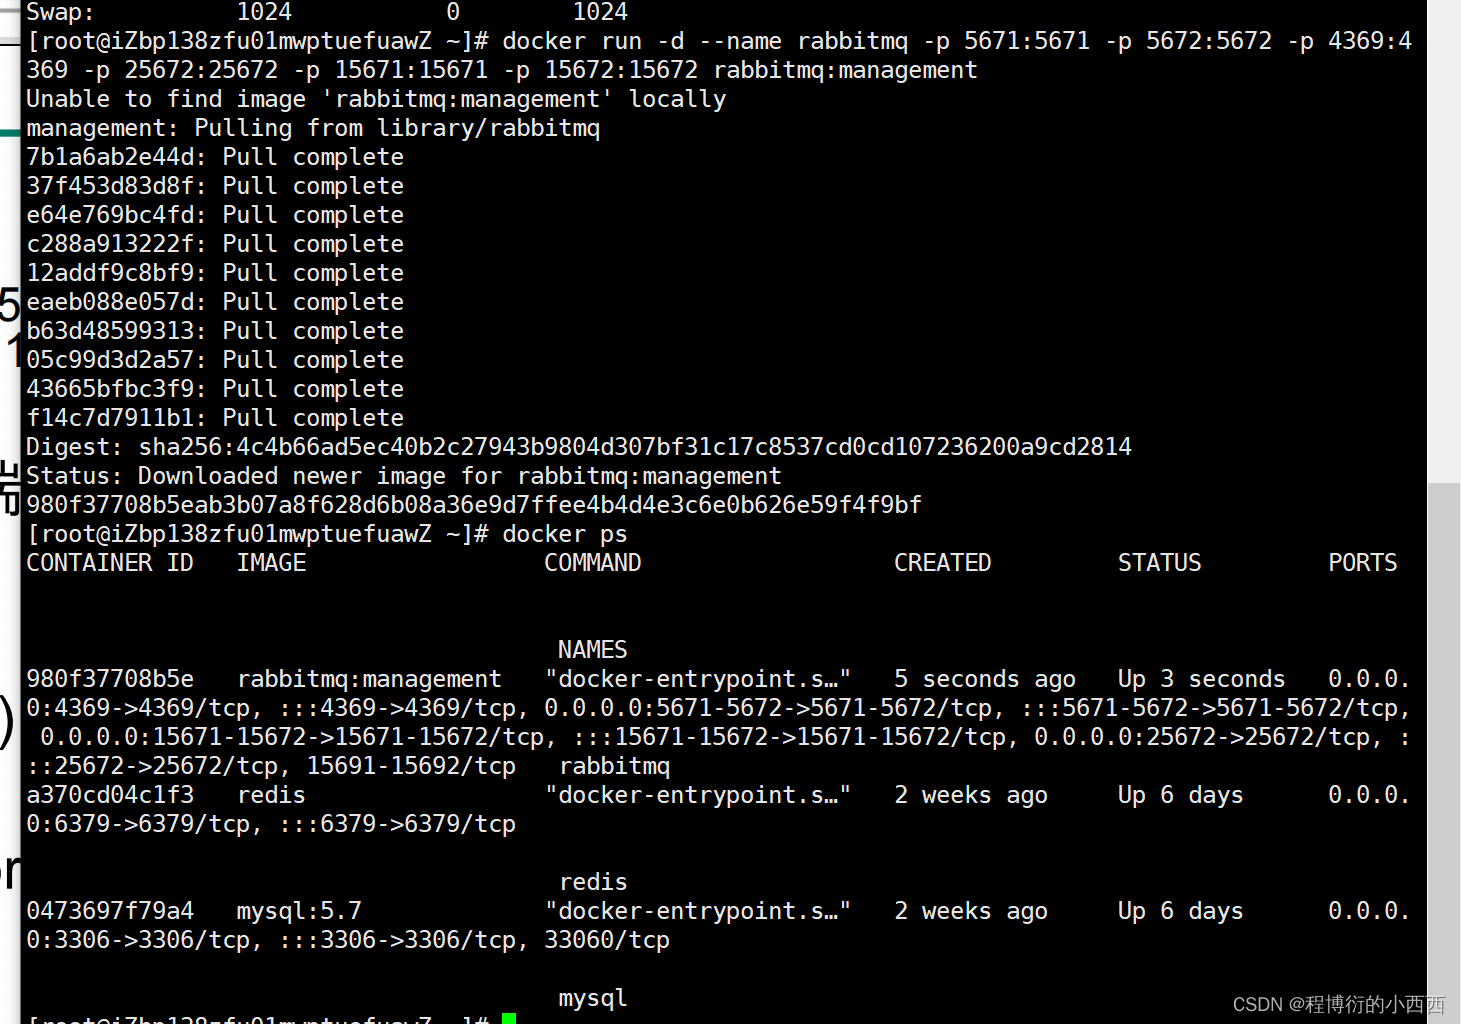
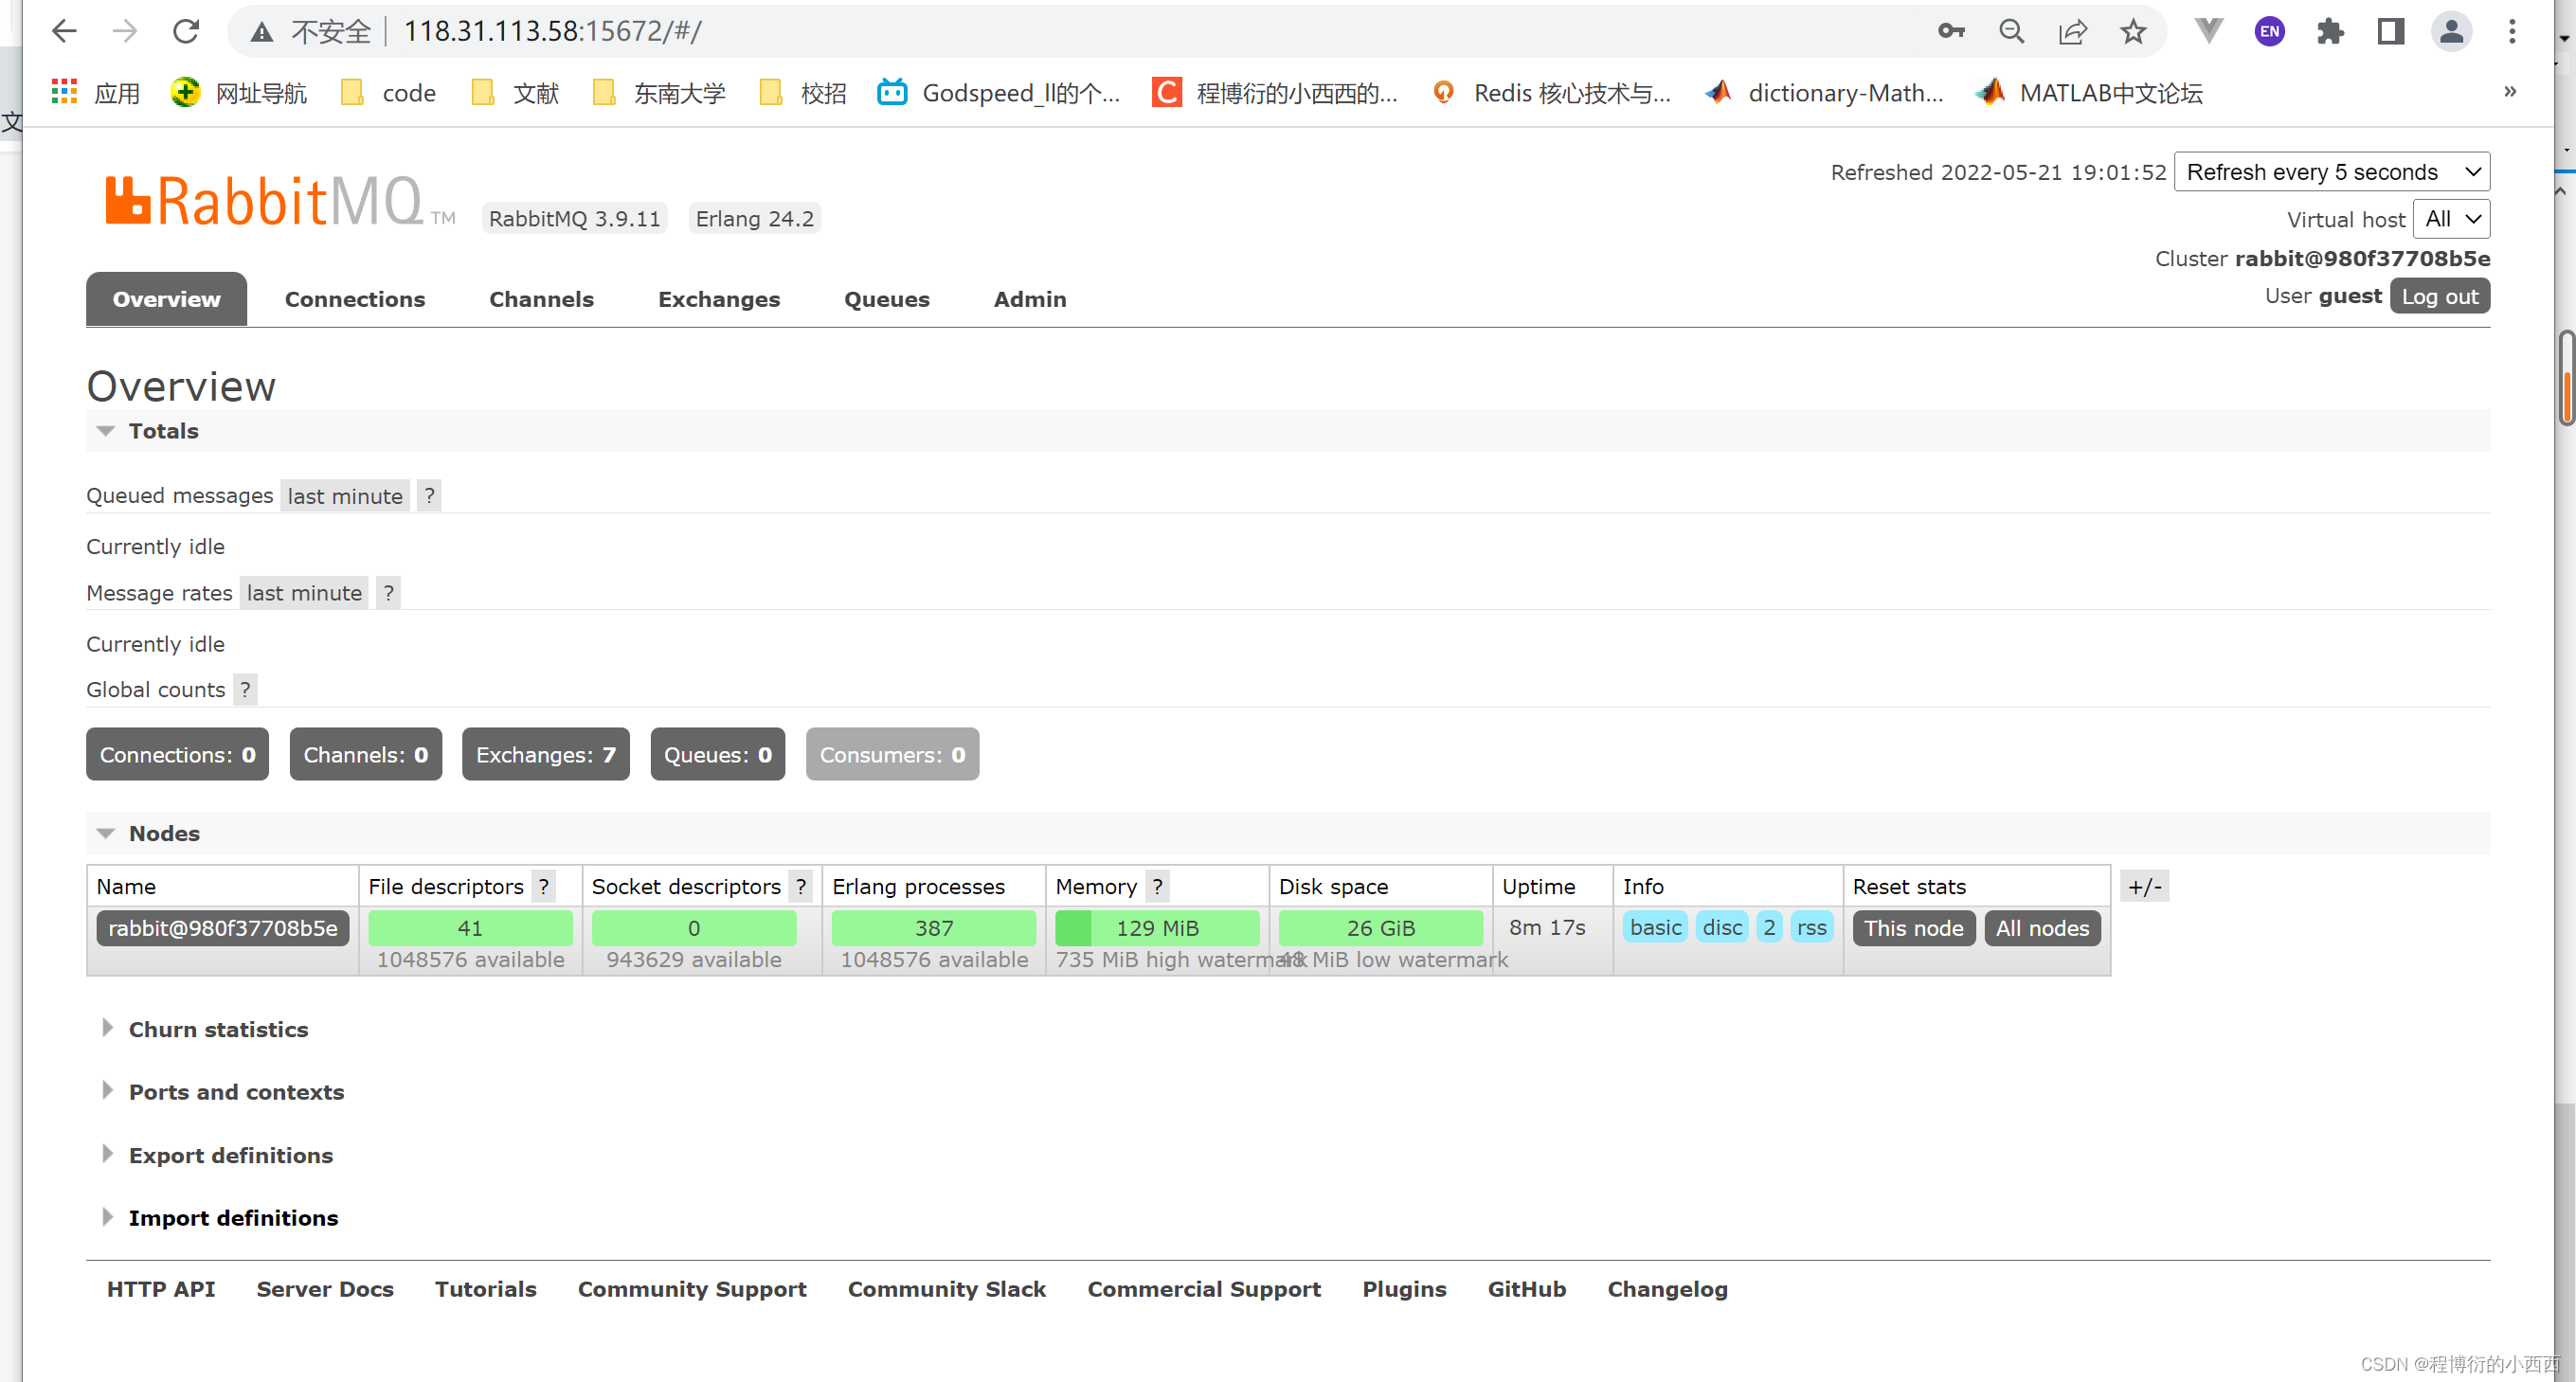
RabbitMQ简介和安装
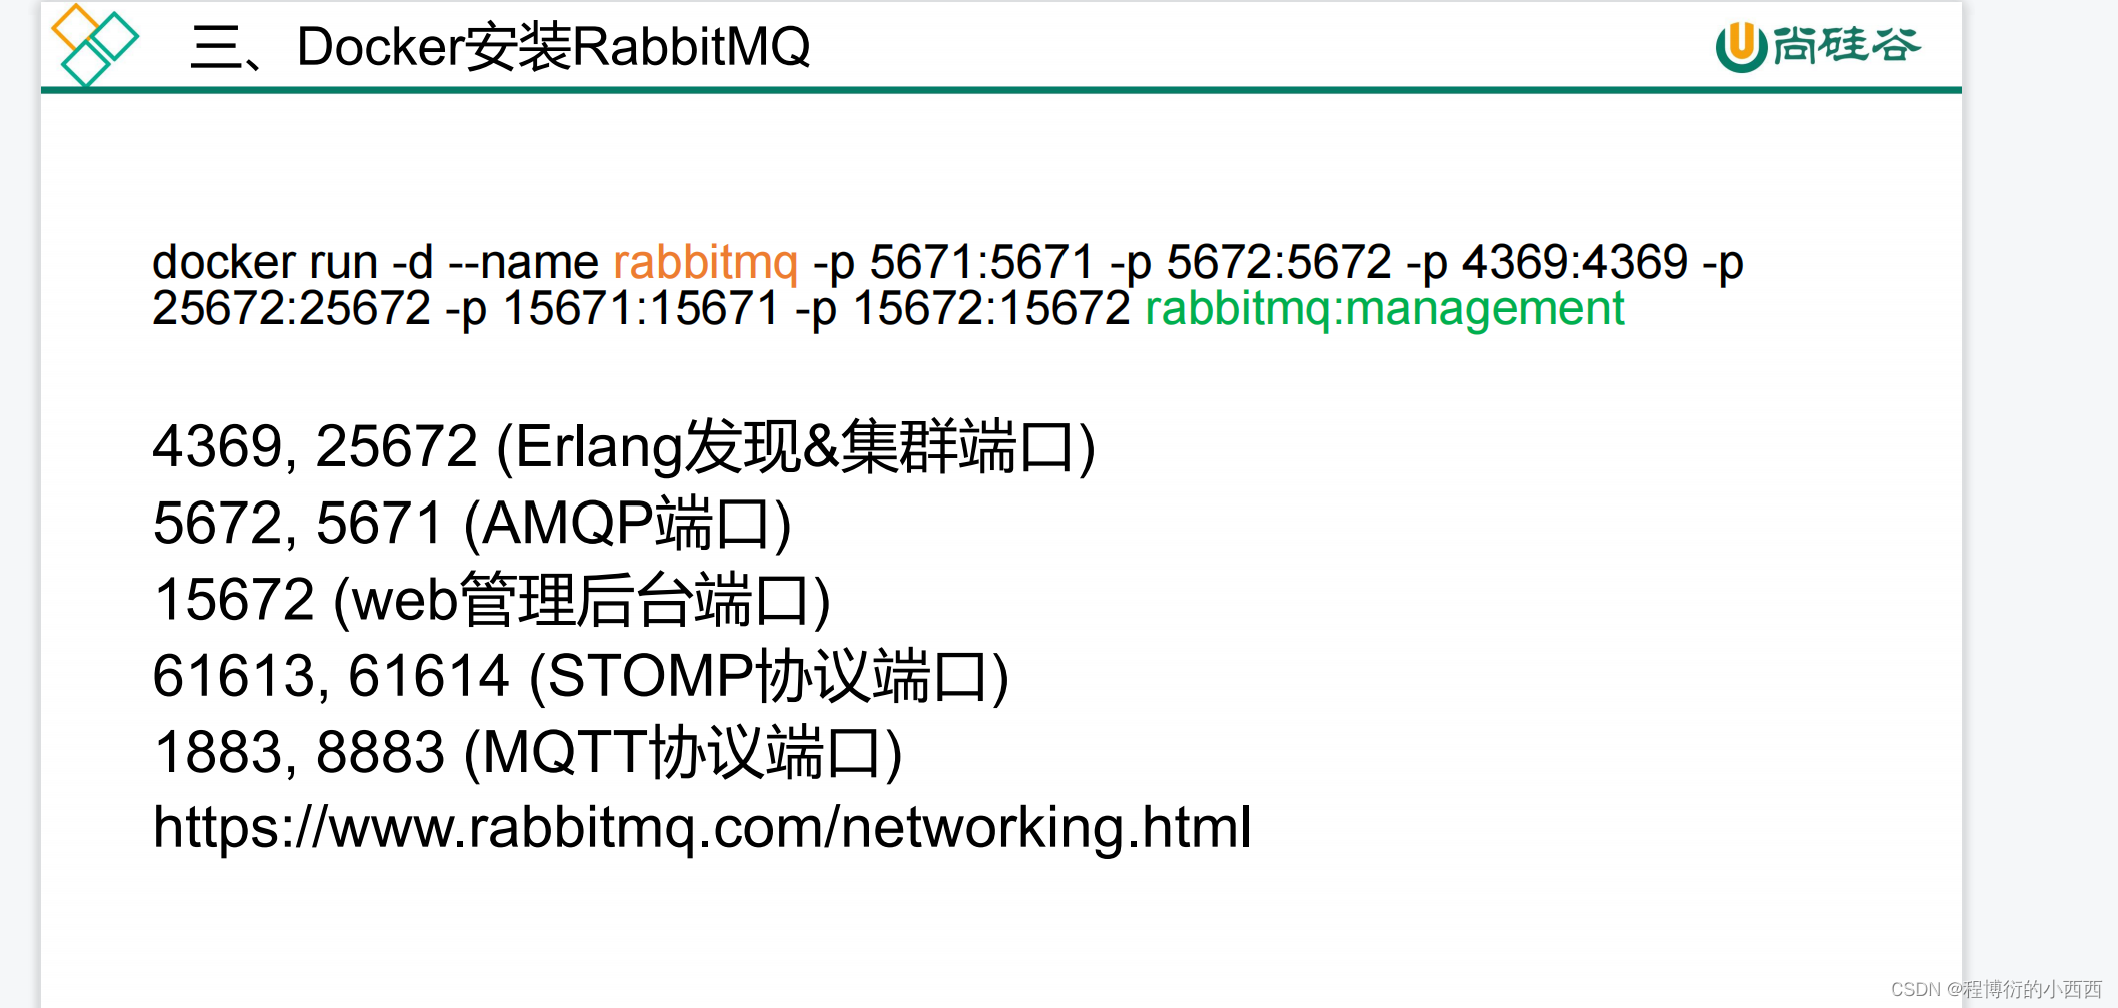
别忘了开启防火墙的端口
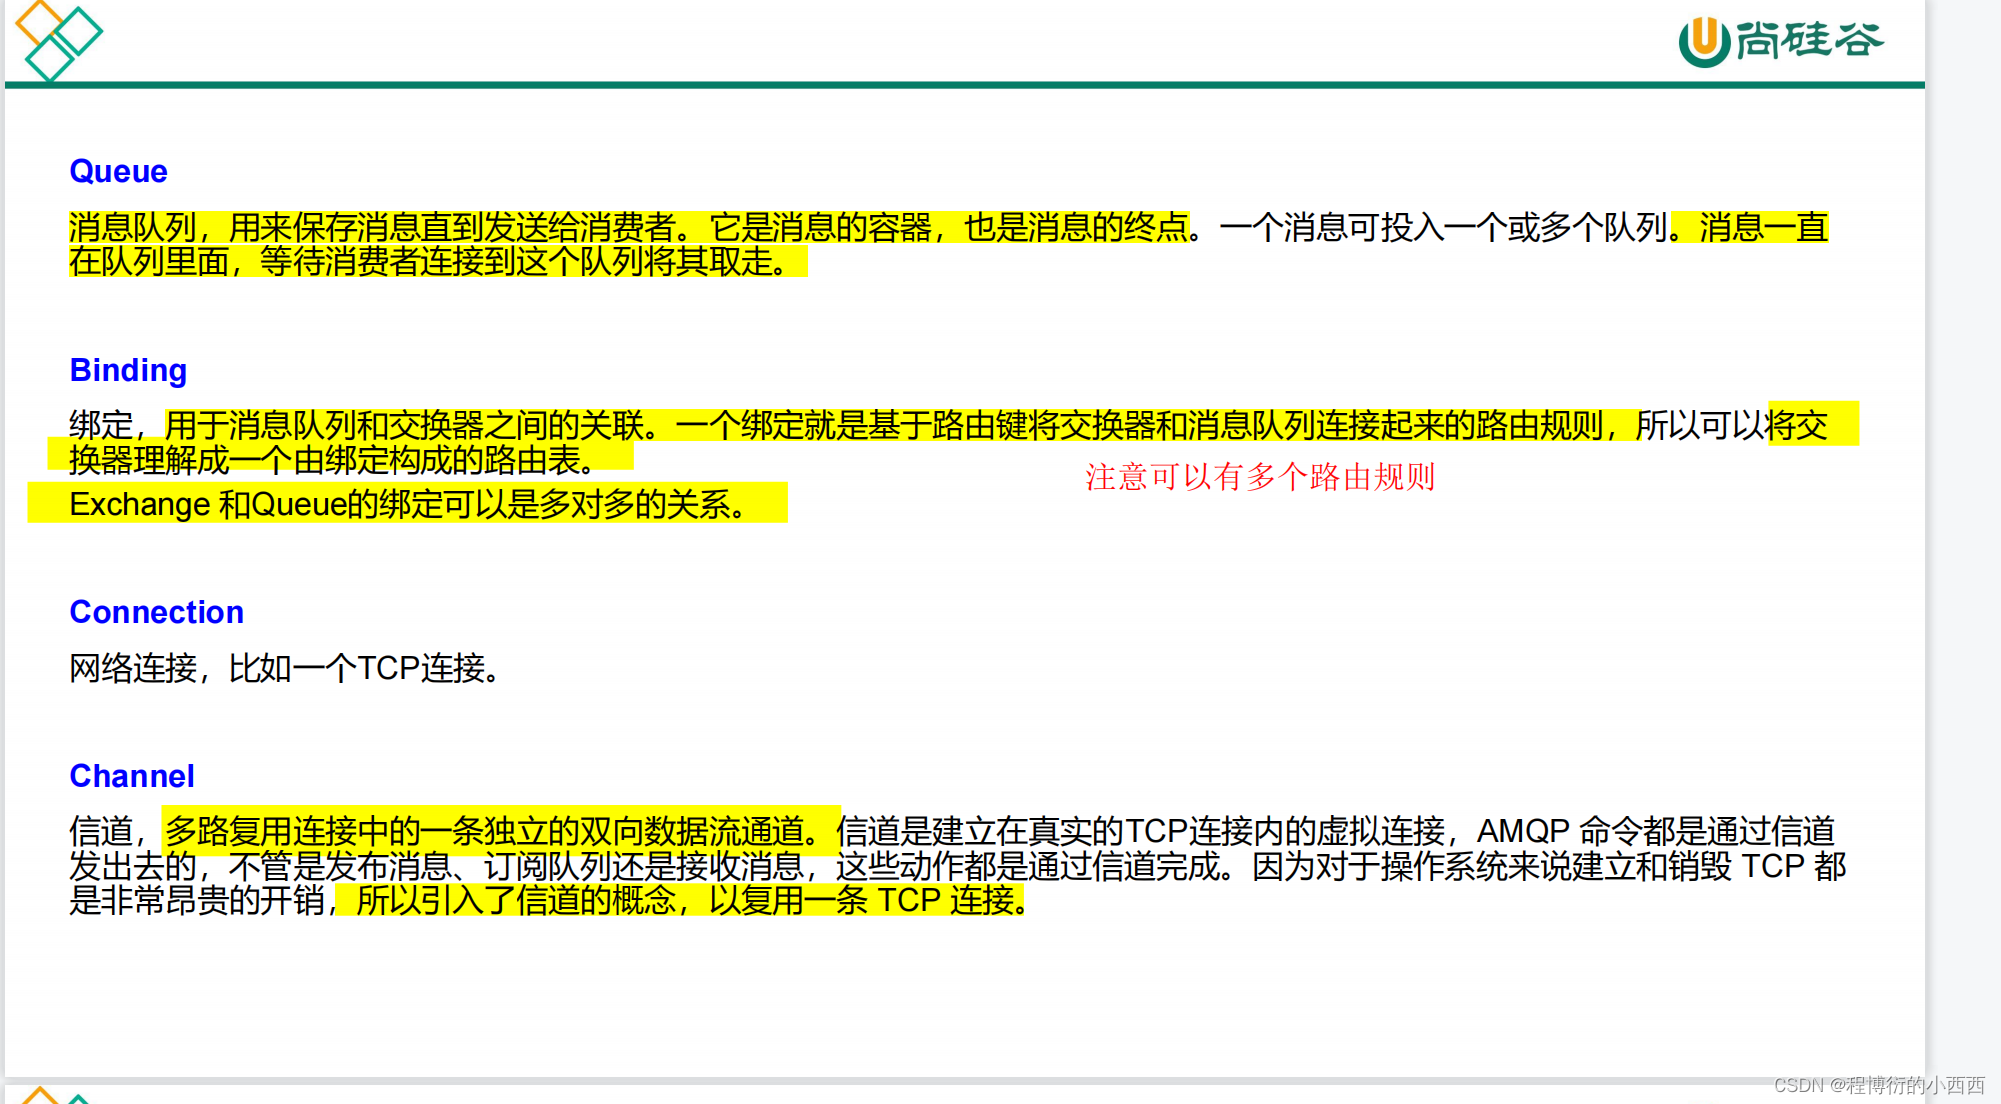
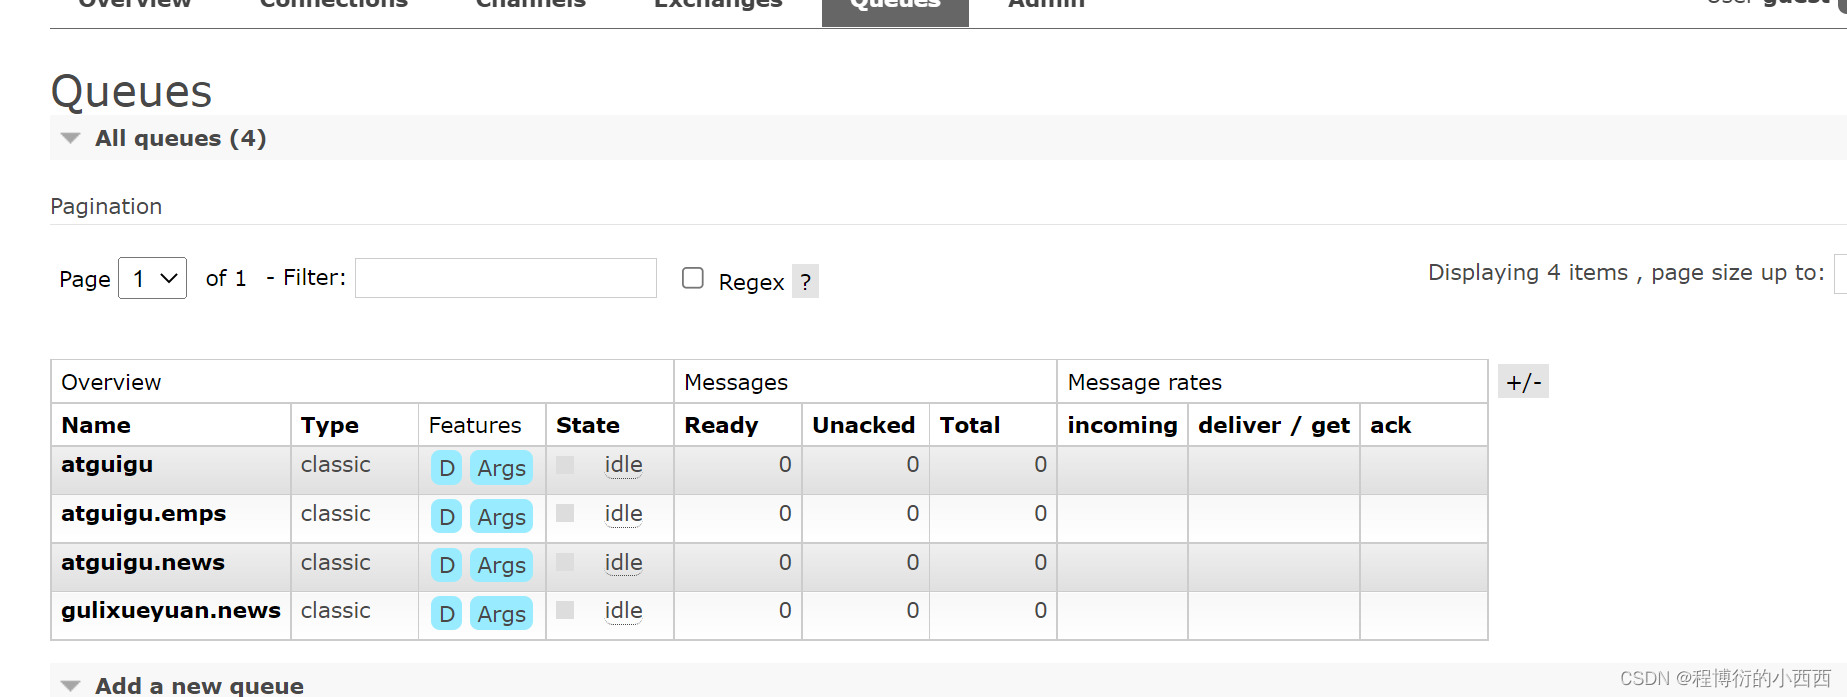
相关基础概念


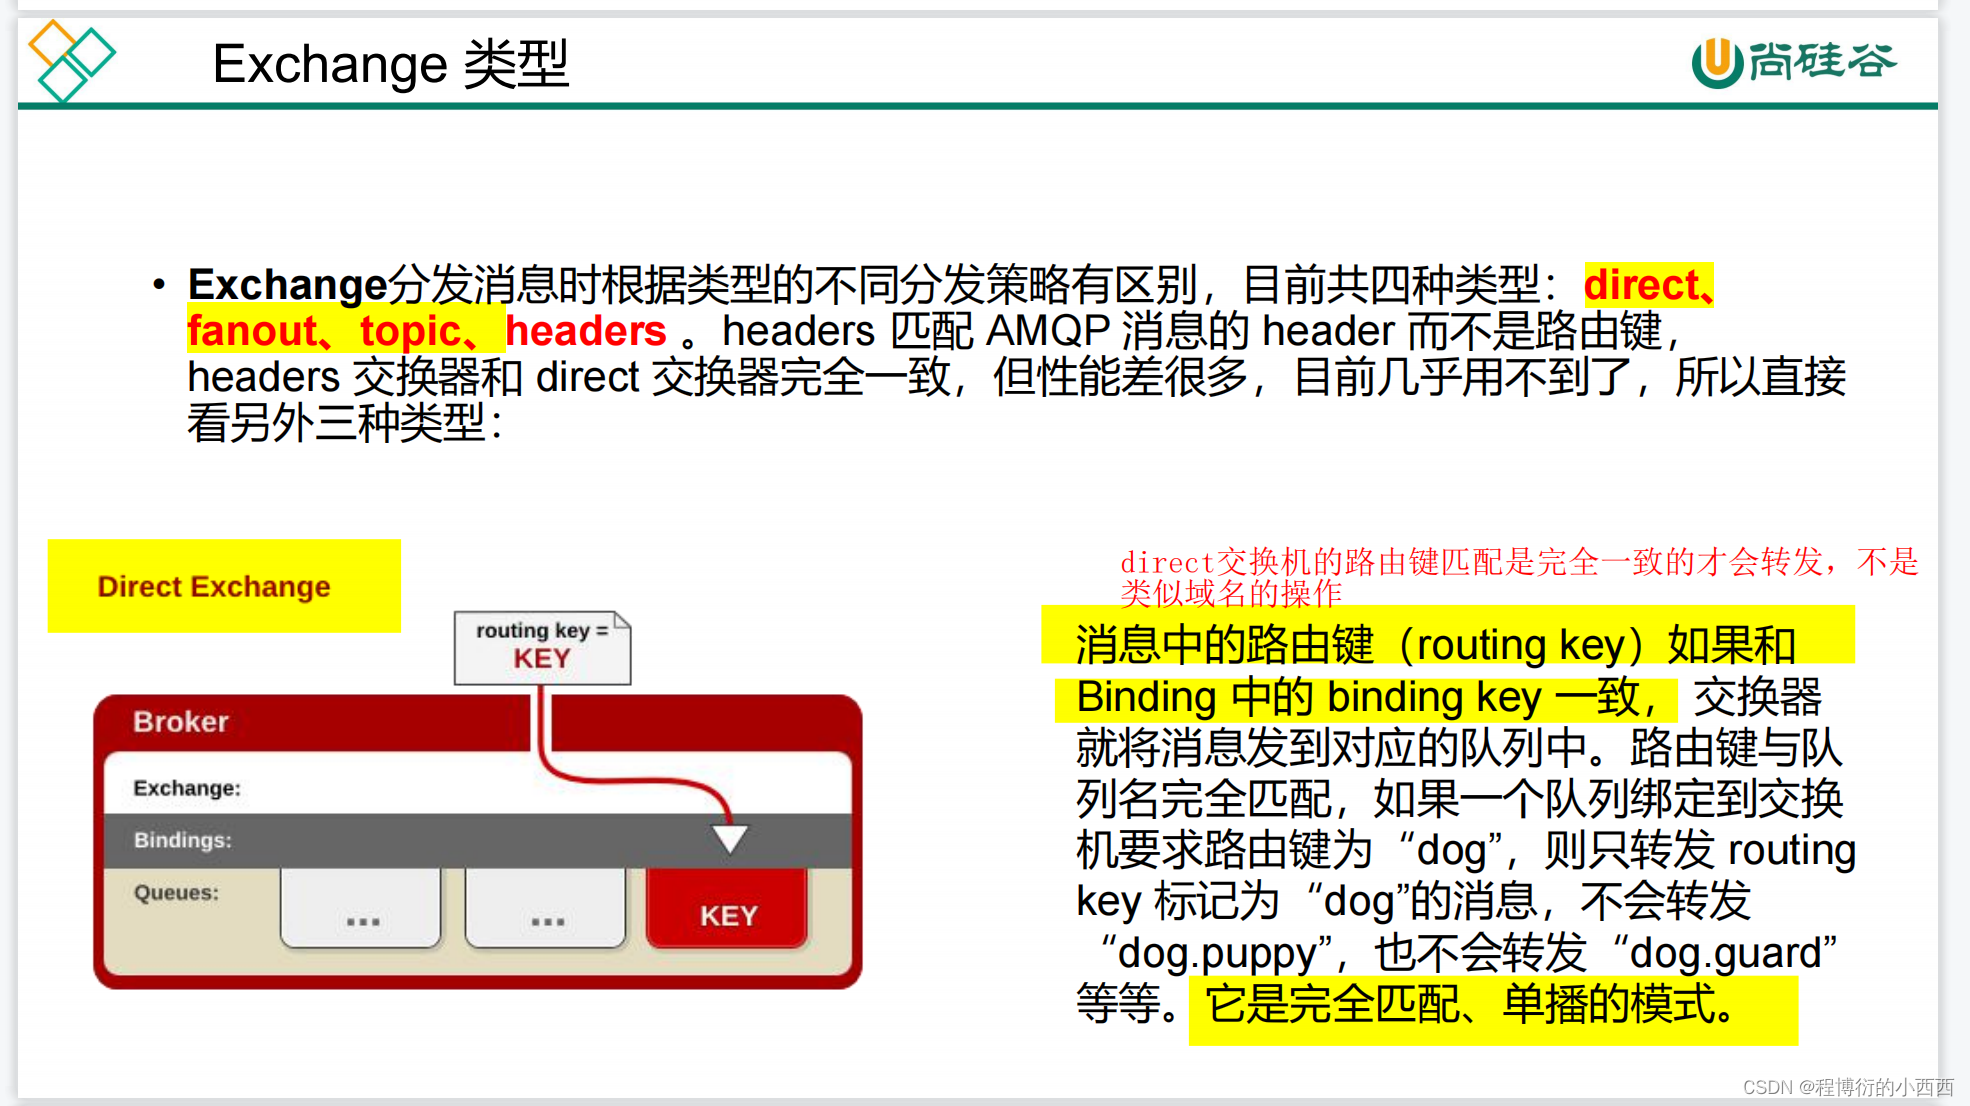
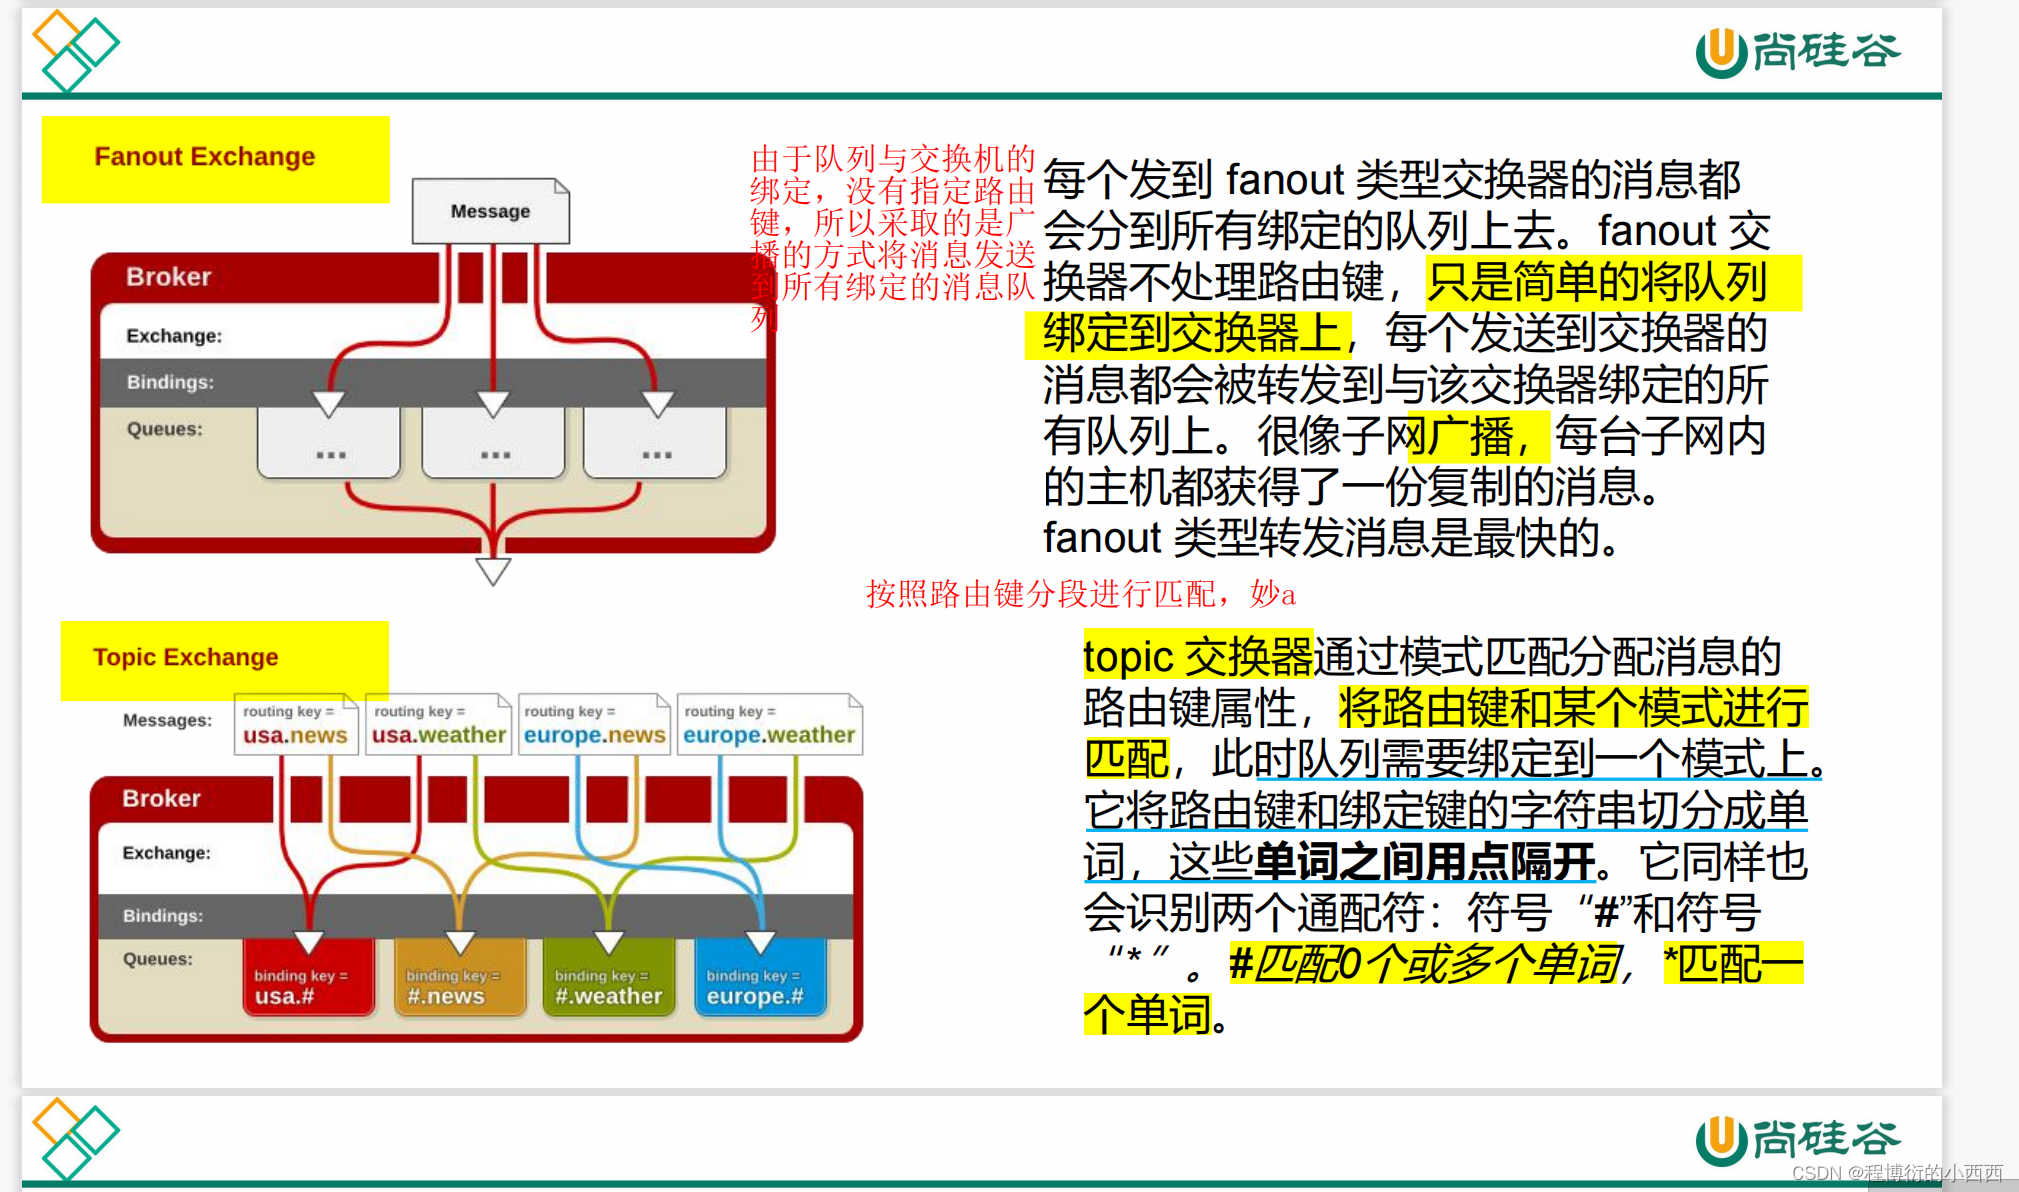
Exchange类型(交换机类型)
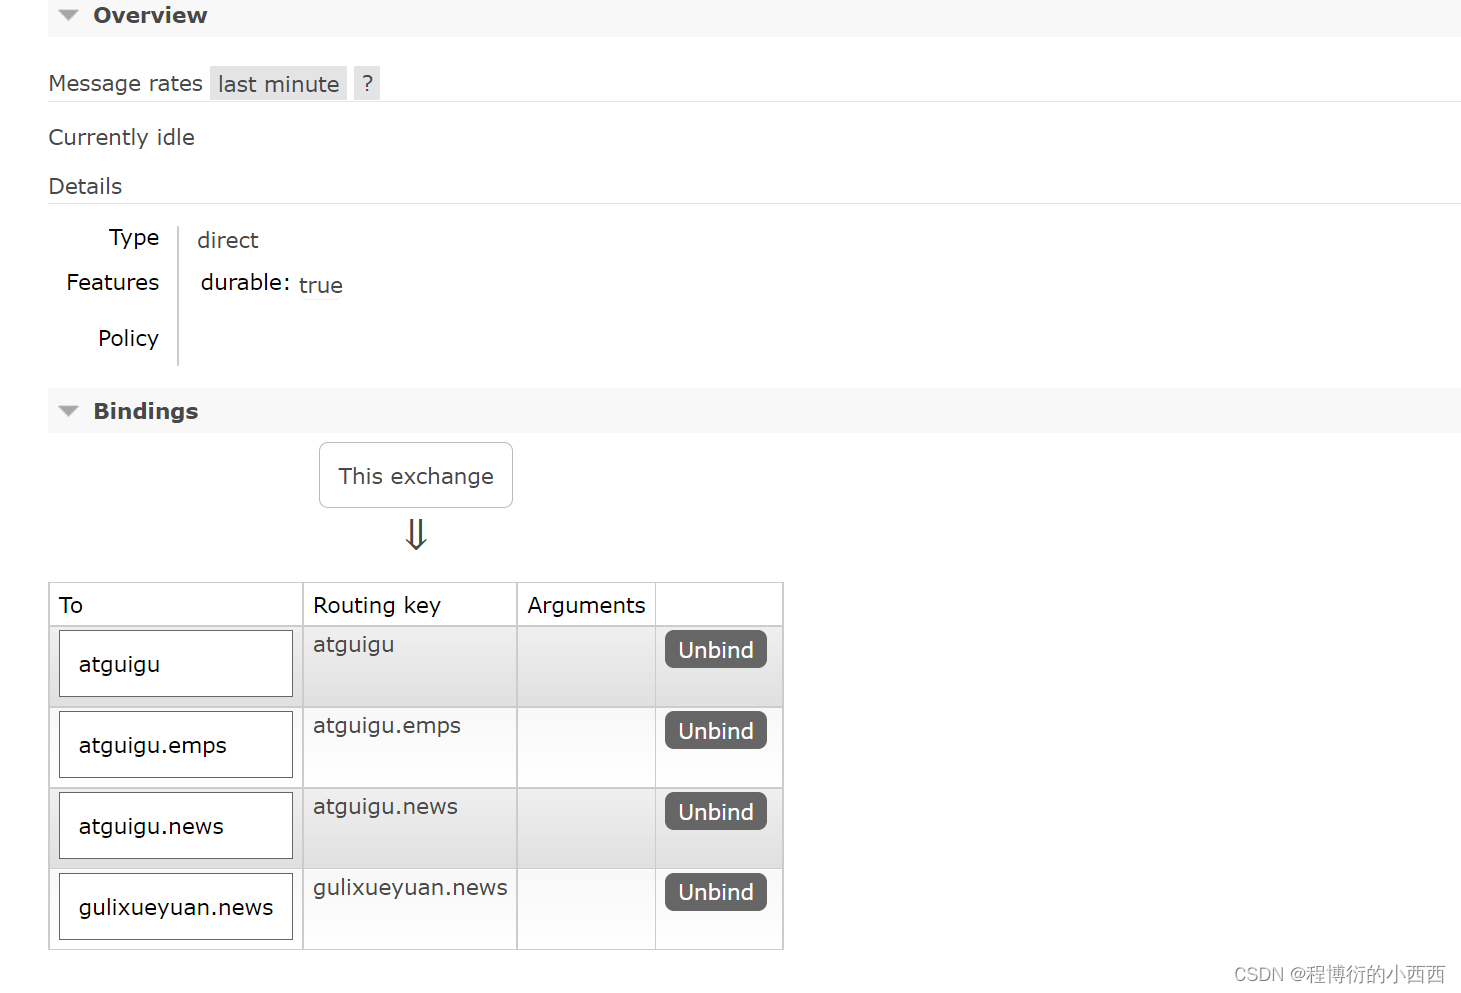
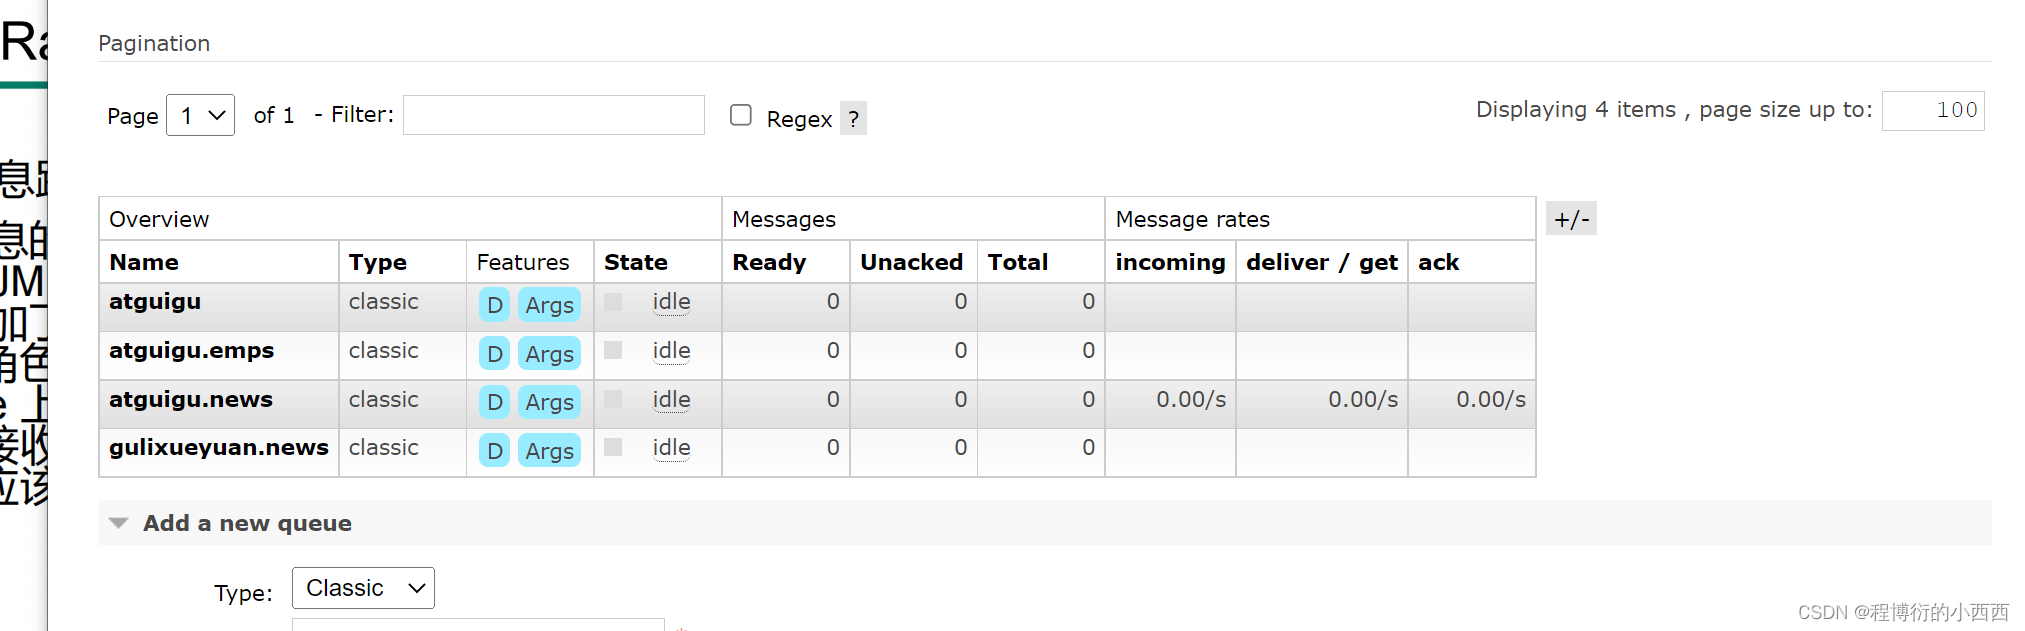
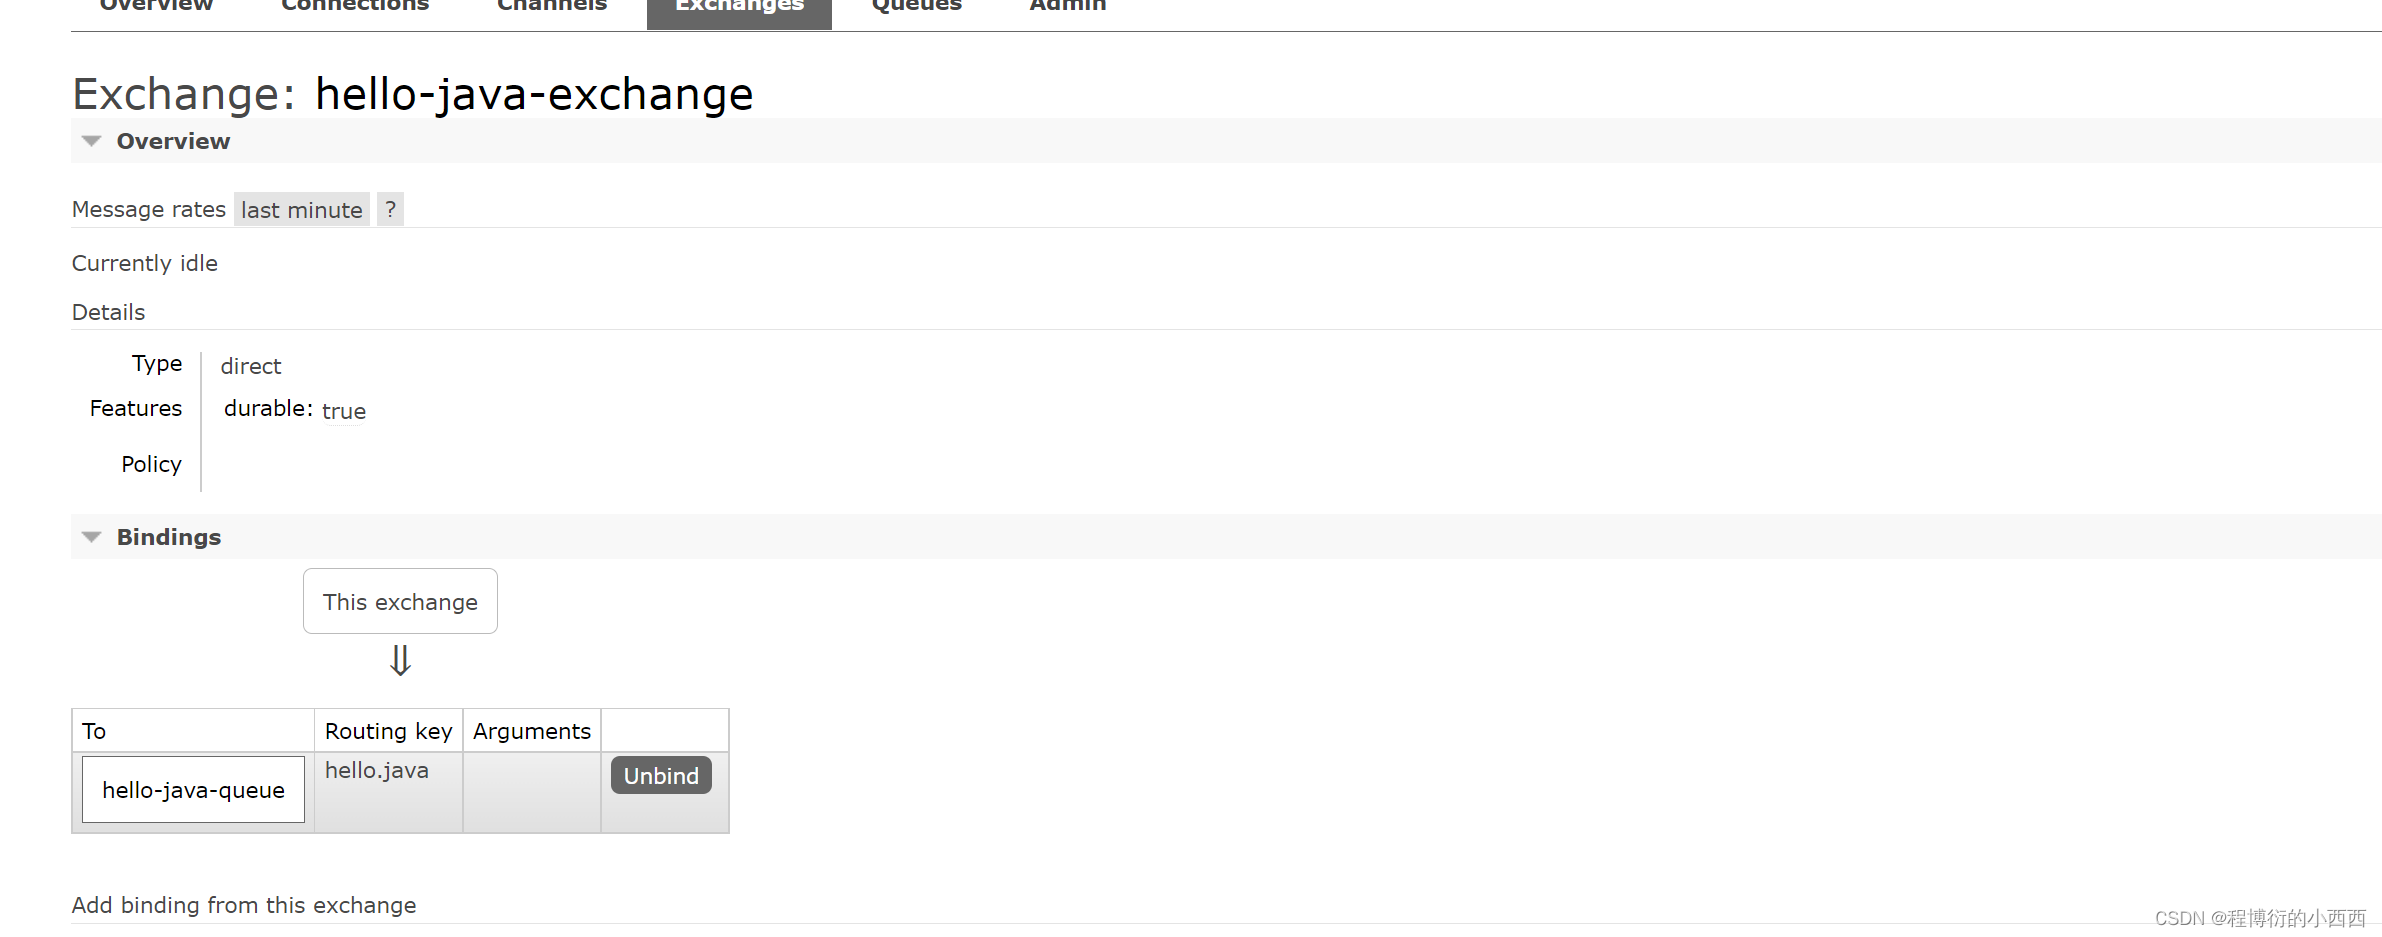
将队列与交换机进行绑定:
Direct Exchange的相关操作
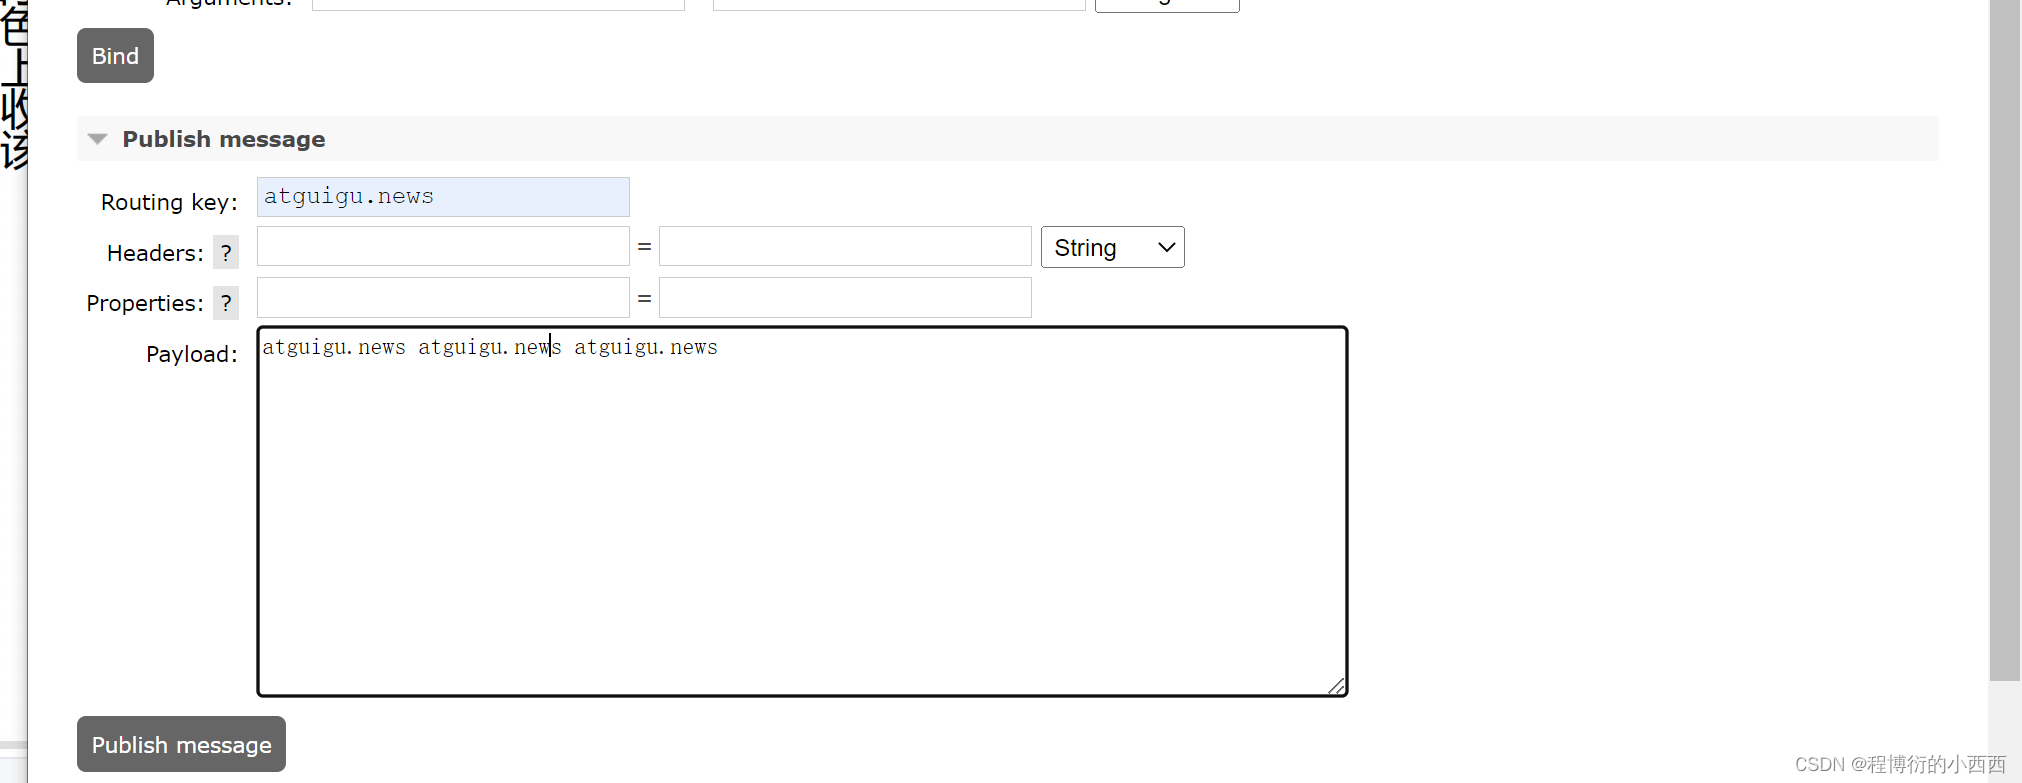
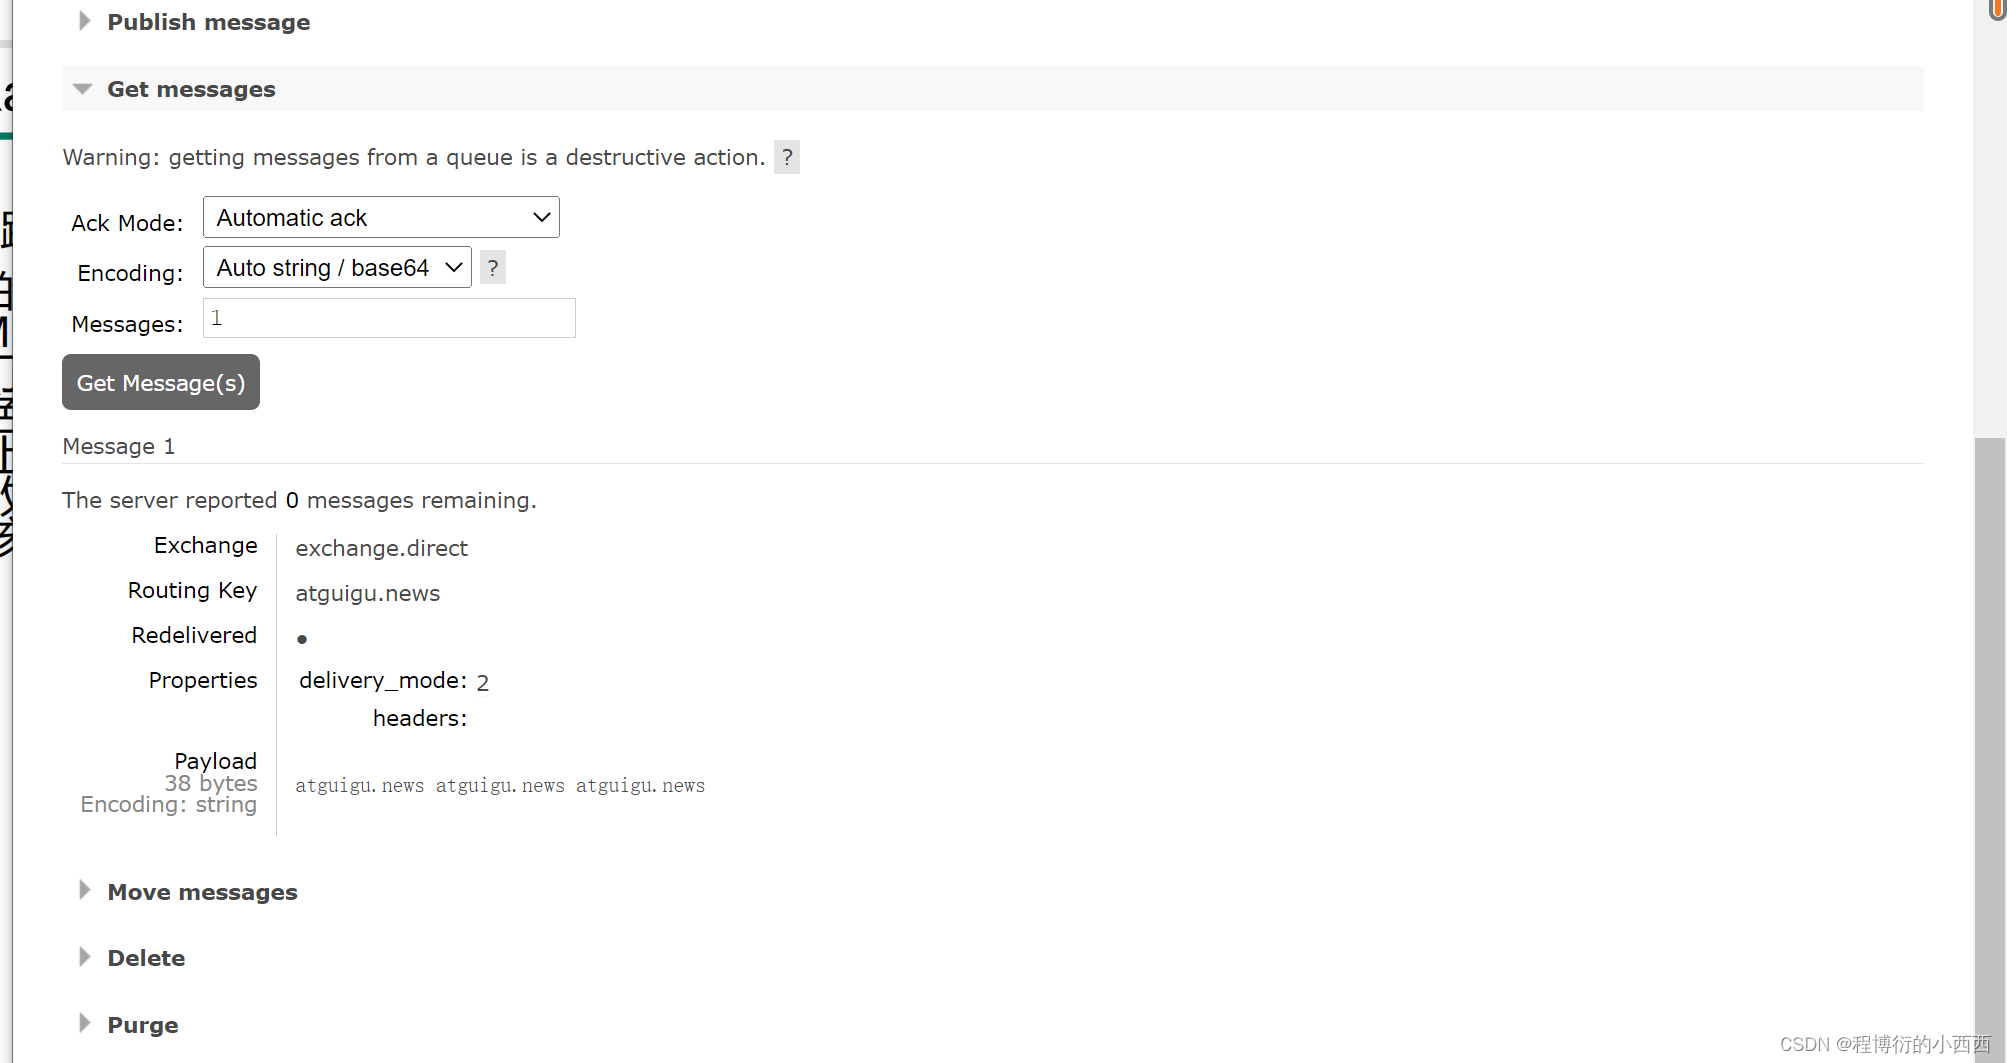
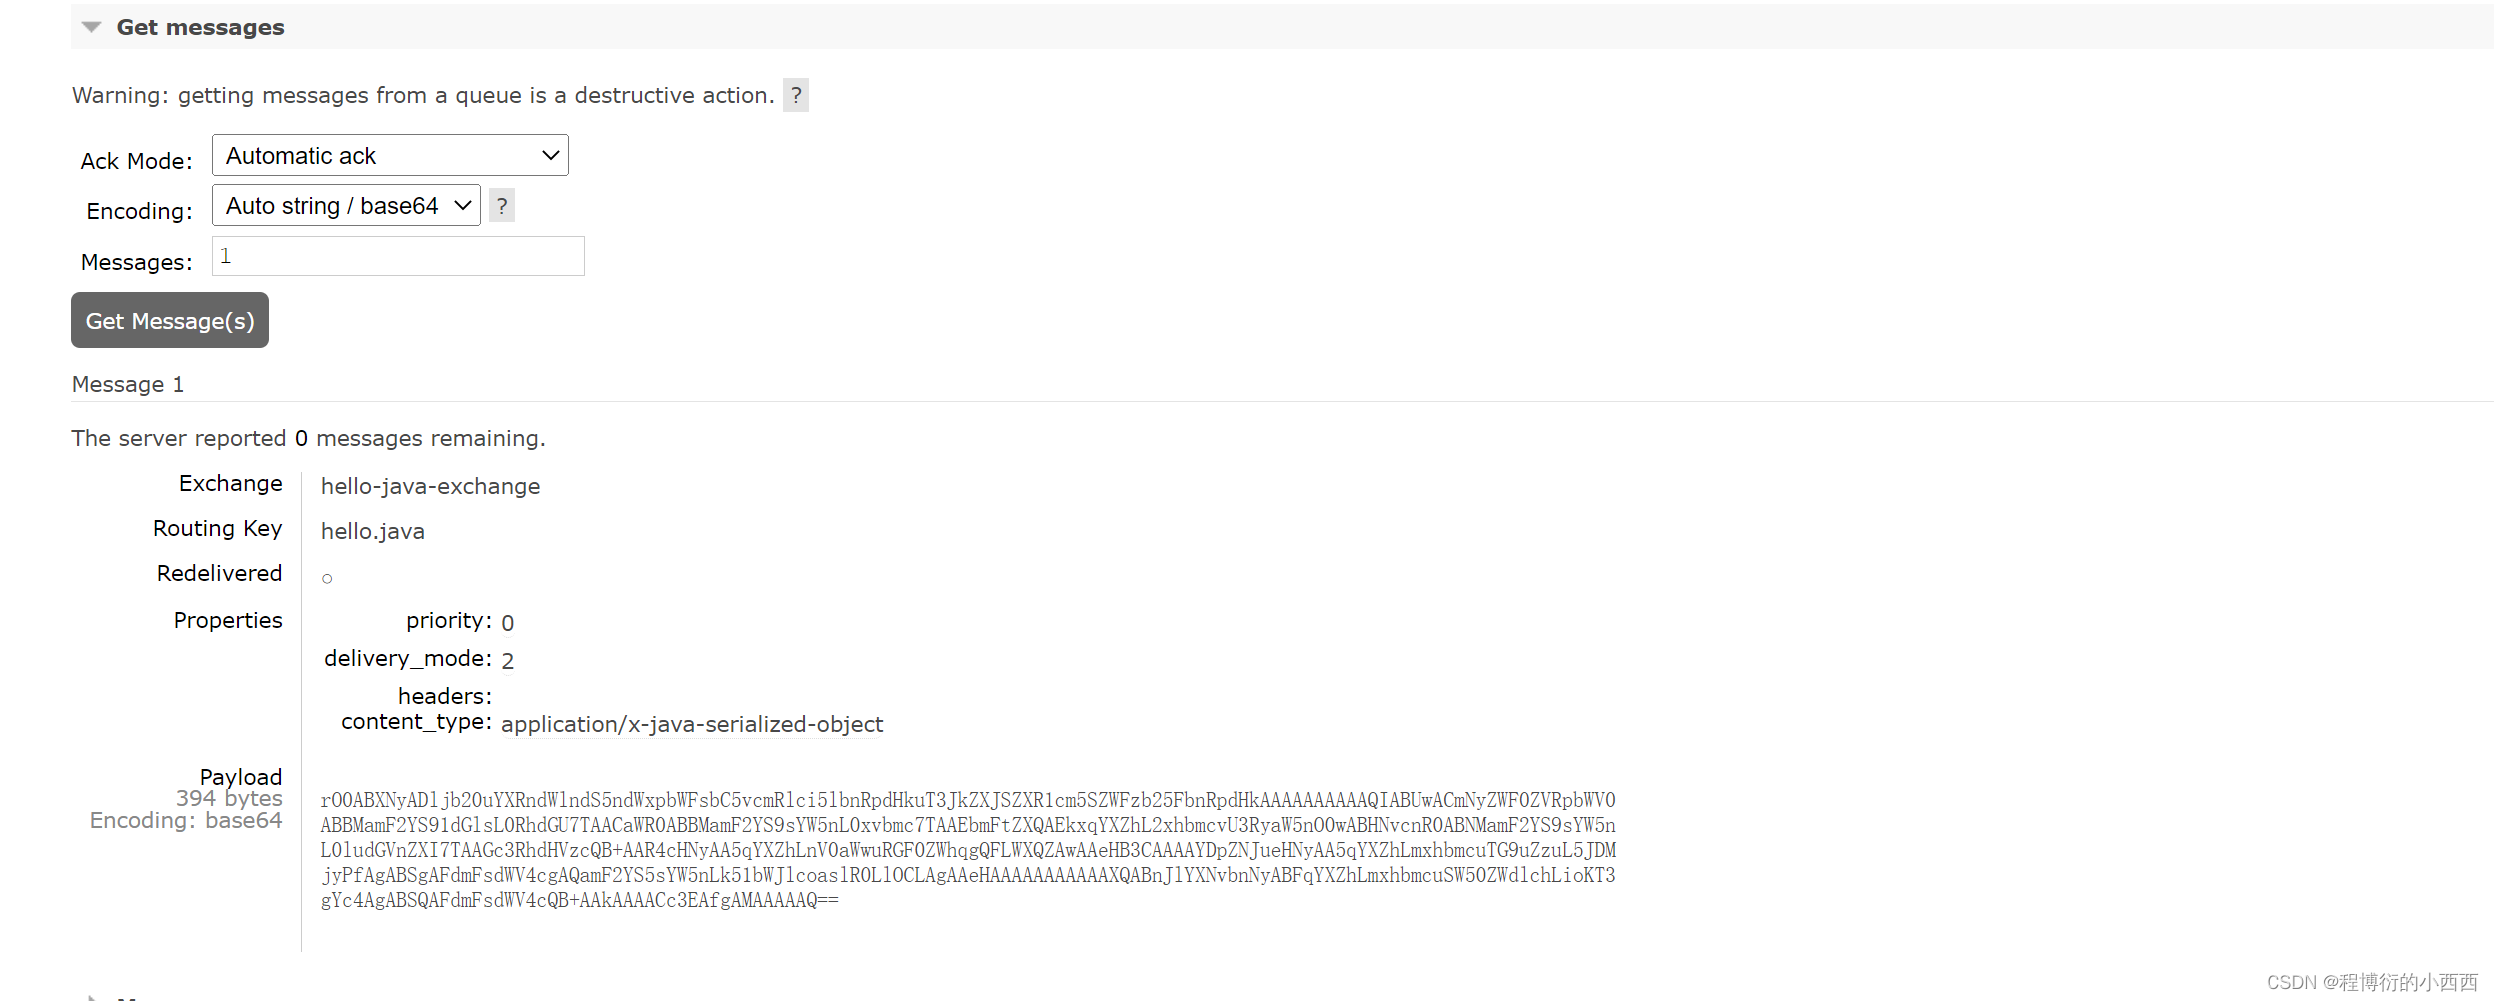
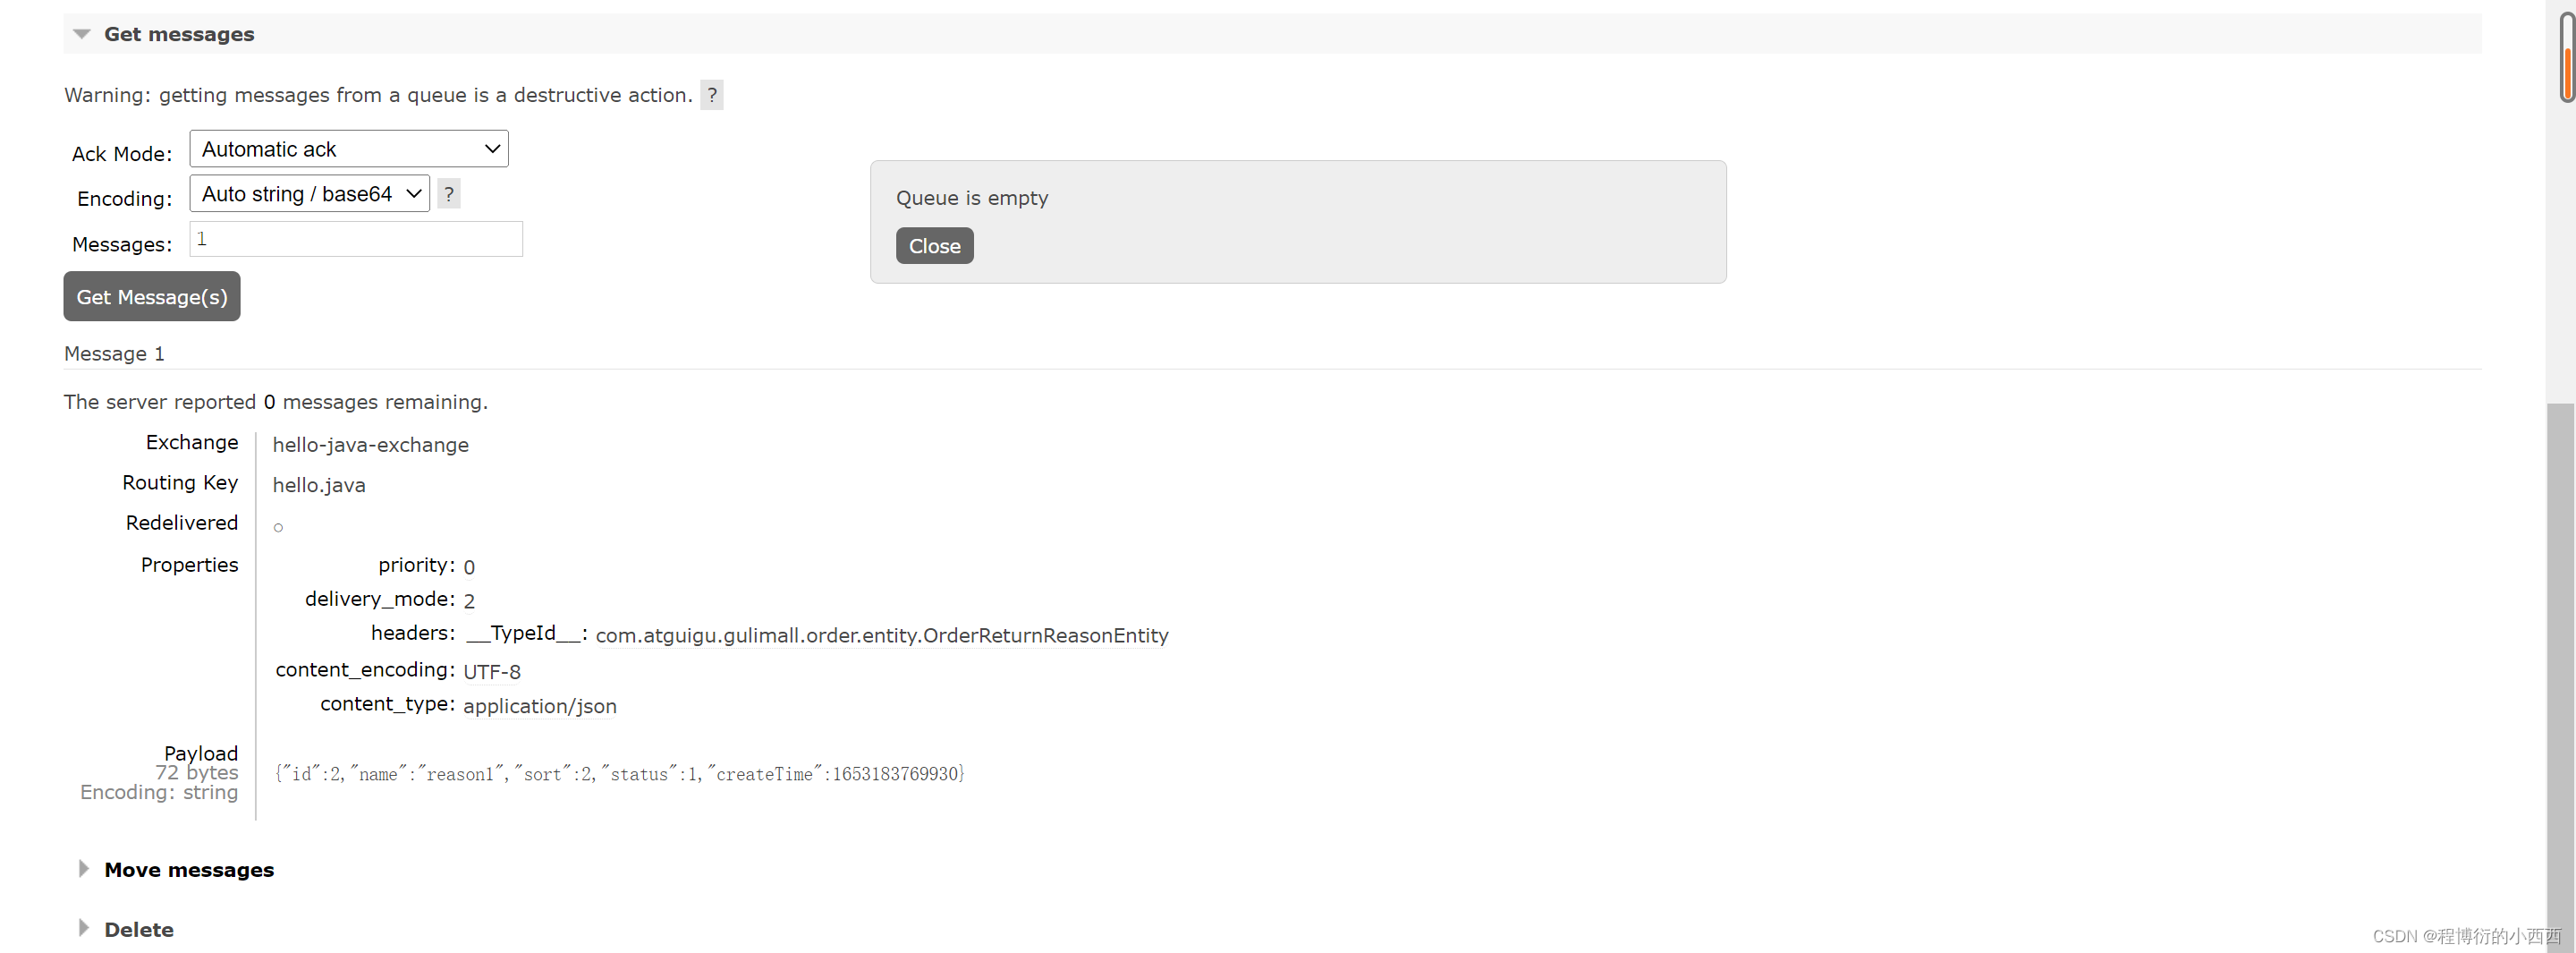
从交换机发送消息,atguigu.news收到了一条消息
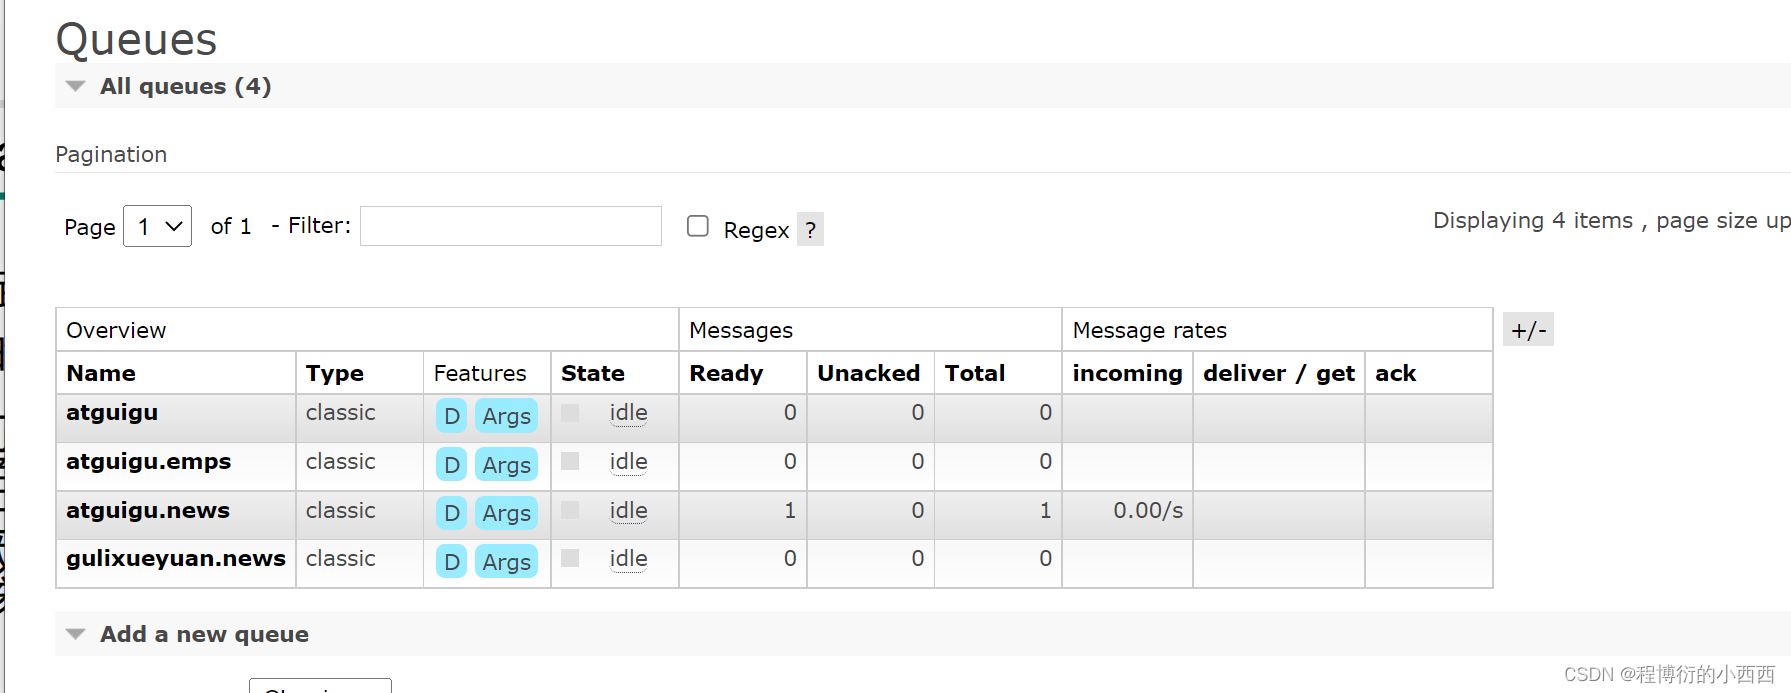
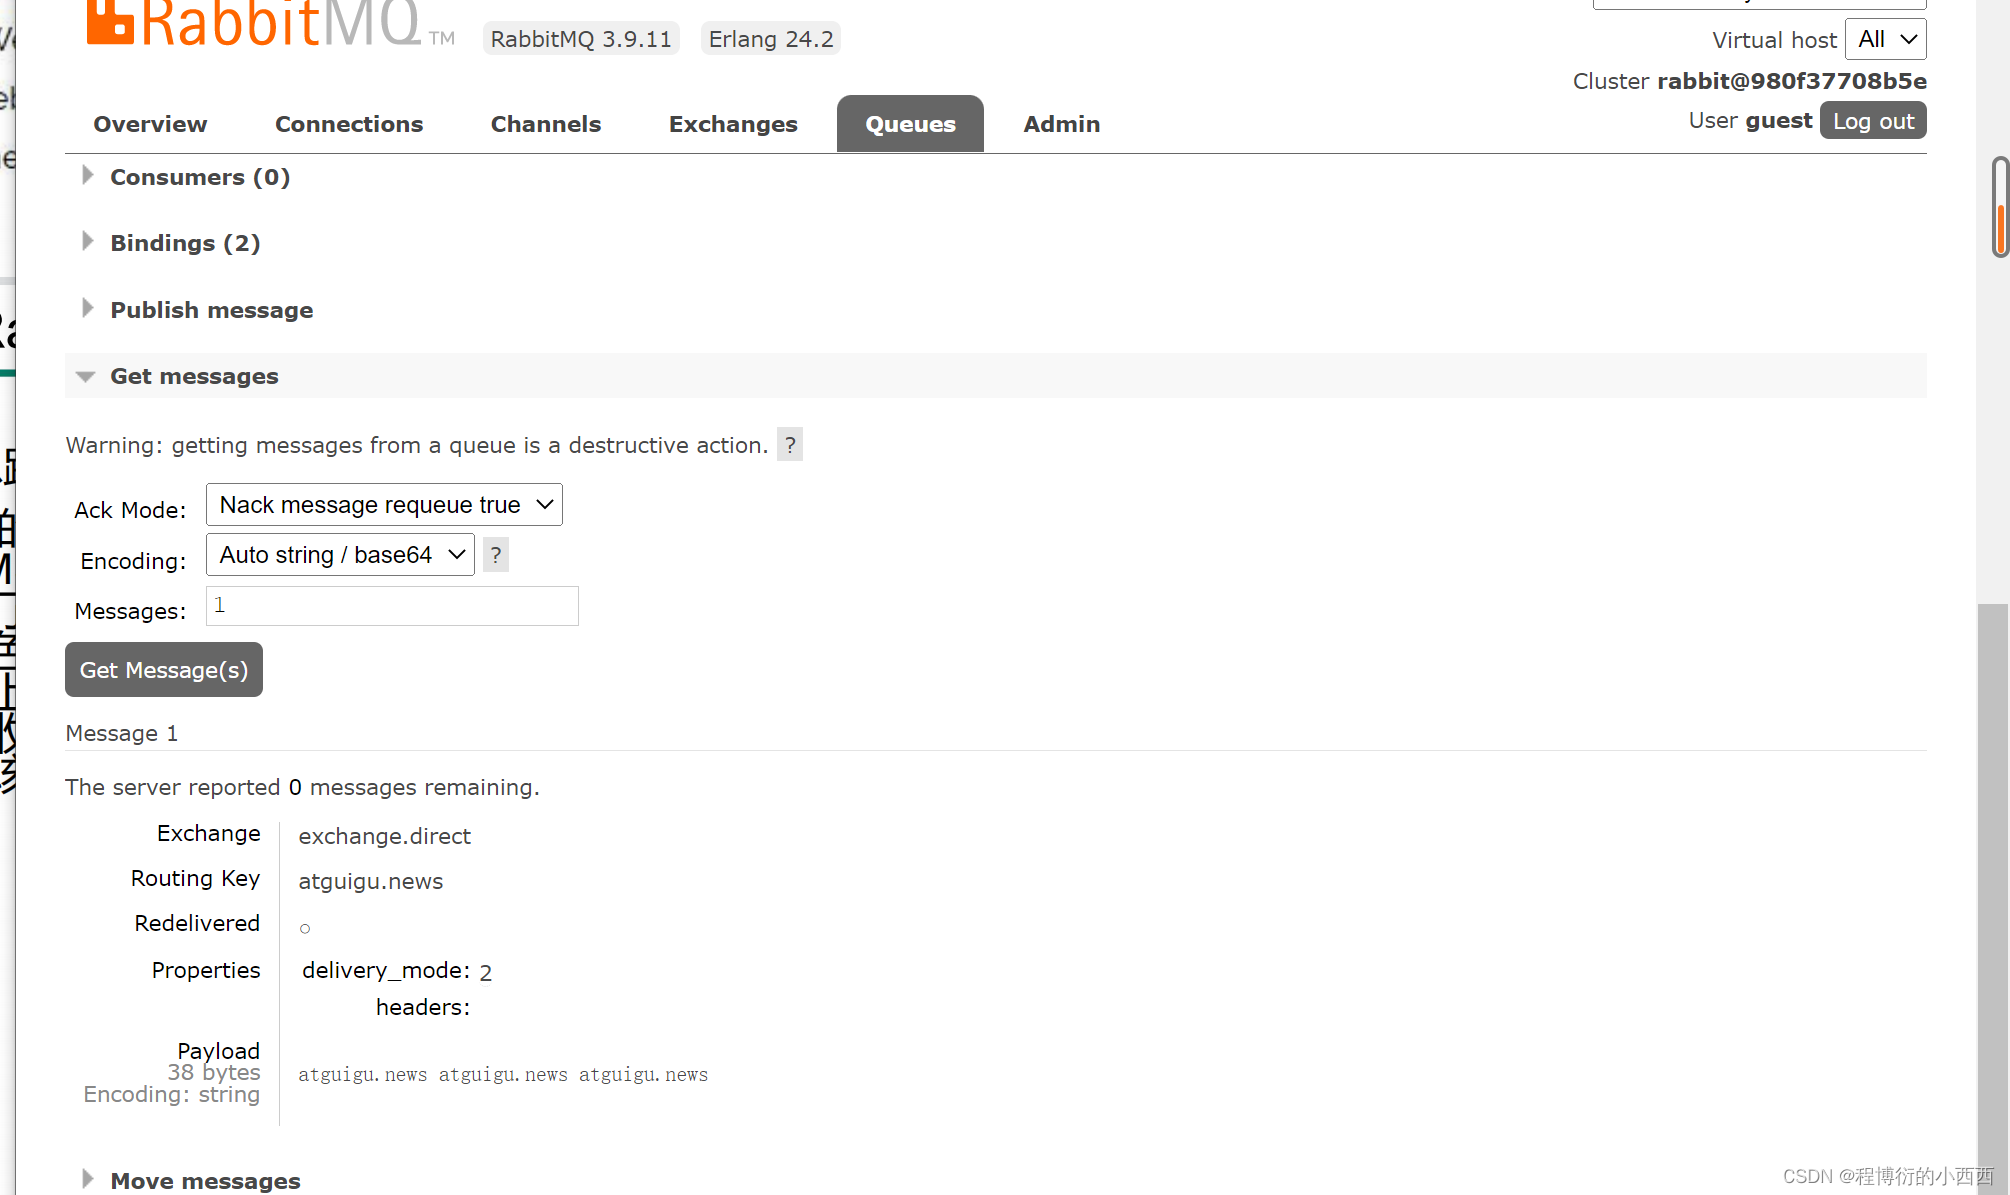
选择ack之后就会将消息已读,队列中没有消息了
Springboot整合RabbitMQ
引入amqp(高级消息队列协议)场景启动器


AmqpAdmin使用
创建交换机,队列,绑定队列
    /**
     * 1、如何创建Exchange、Queue、Binding
     *      1)、使用AmqpAdmin进行创建
     * 2、如何收发消息
     */
    @Test
    public void createExchange() {


        Exchange directExchange = new DirectExchange("hello-java-exchange",true,false);
        amqpAdmin.declareExchange(directExchange);
        log.info("Exchange[{}]创建成功:","hello-java-exchange");
    }

   //创建队列
    @Test
    public void testCreateQueue() {

        Queue queue = new Queue("hello-java-queue",true,false,false);
        amqpAdmin.declareQueue(queue);
        log.info("Queue[{}]创建成功:","hello-java-queue");
    }

    //绑定队列
    @Test
    public void createBinding() {


        Binding binding = new Binding("hello-java-queue",
                Binding.DestinationType.QUEUE,
                "hello-java-exchange",
                "hello.java",
                null);
        amqpAdmin.declareBinding(binding);
        log.info("Binding[{}]创建成功:","hello-java-binding");
    }
指定路由键,指定目的地的交换机,指定目标的队列
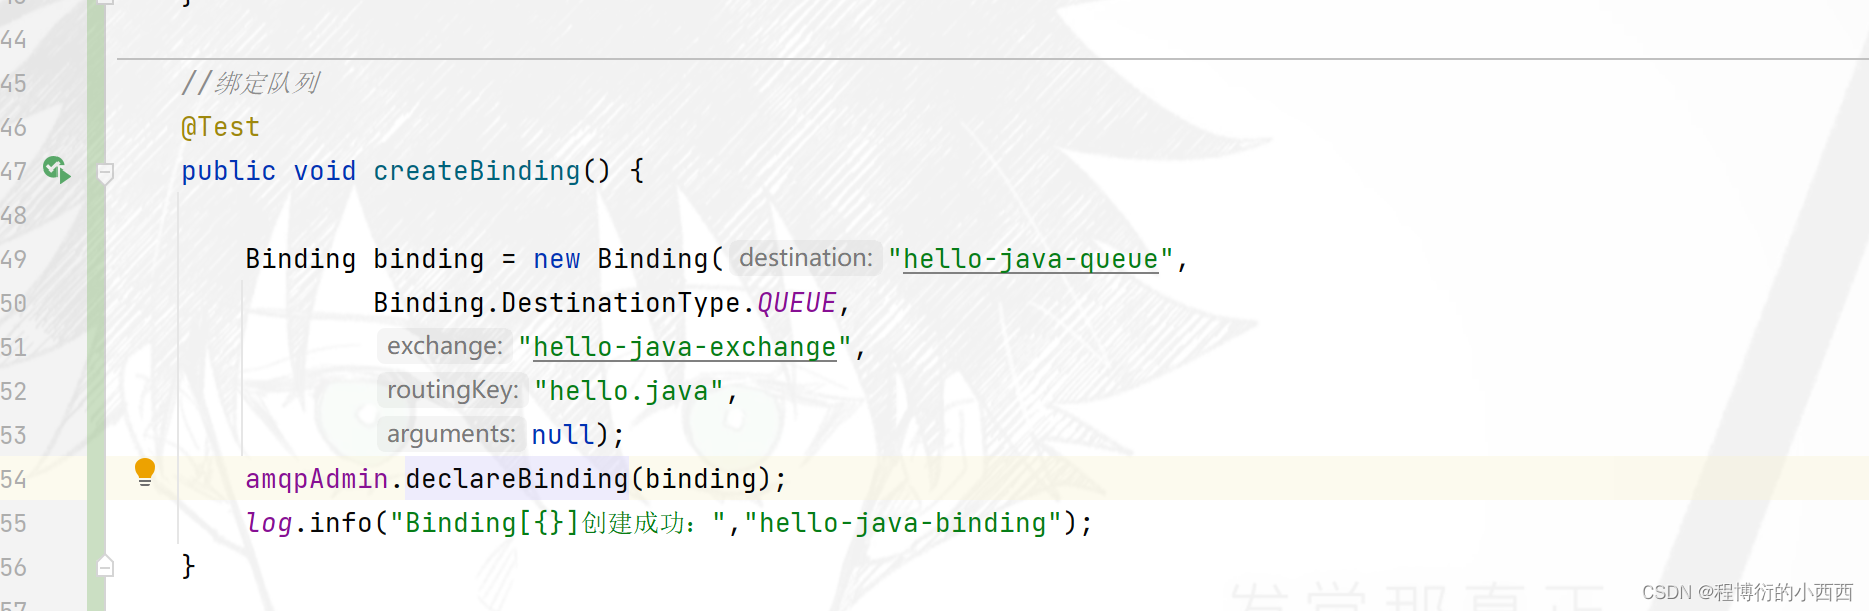
创建成功:


RabbitTemplate使用收发消息
交换机指定路由键,发送消息给队列(测试成功)
//    收发消息
    @Test
    public void sendMessageTest() {

        OrderReturnReasonEntity reasonEntity = new OrderReturnReasonEntity();
        reasonEntity.setId(1L);
        reasonEntity.setCreateTime(new Date());
        reasonEntity.setName("reason");
        reasonEntity.setStatus(1);
        reasonEntity.setSort(2);
        String msg = "Hello World";
        //1、发送消息,如果发送的消息是个对象,会使用序列化机制,将对象写出去,对象必须实现Serializable接口

        //2、发送的对象类型的消息,可以是一个json
        rabbitTemplate.convertAndSend("hello-java-exchange","hello.java.queue",
                reasonEntity,new CorrelationData(UUID.randomUUID().toString()));
        log.info("消息发送完成:{}",reasonEntity);
    }
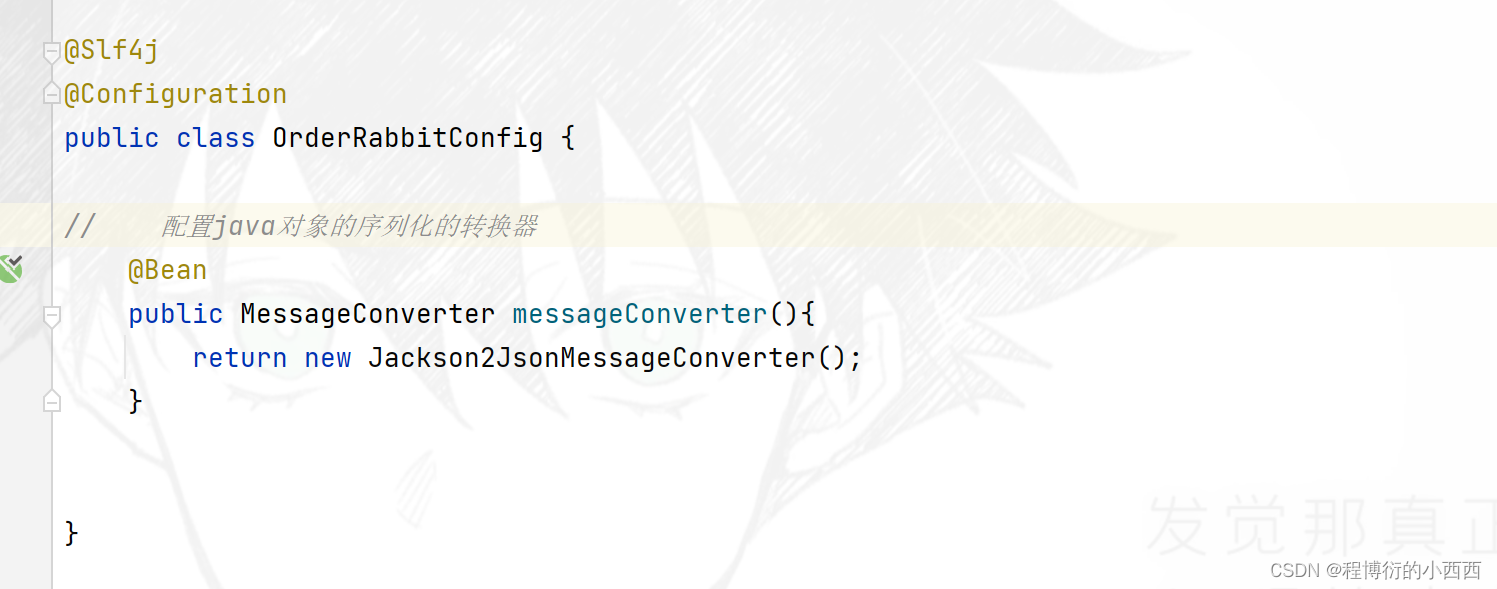
配置java对象的序列化转换器
消息的监听
一旦队列中有消息就会进行监听并执行相关的业务操作
    /**
     * queues:声明需要监听的队列
     * channel:当前传输数据的通道
     */
    @RabbitListener(queues = {
   "hello-java-queue"})
    public void revieveMessage(Message message,
                               OrderReturnReasonEntity content) {

        //拿到主体内容
        byte[] body = message.getBody();
        //拿到的消息头属性信息
        MessageProperties messageProperties = message.getMessageProperties();
        System.out.println("接受到的消息...内容" + message + "===内容:" + content);

    }


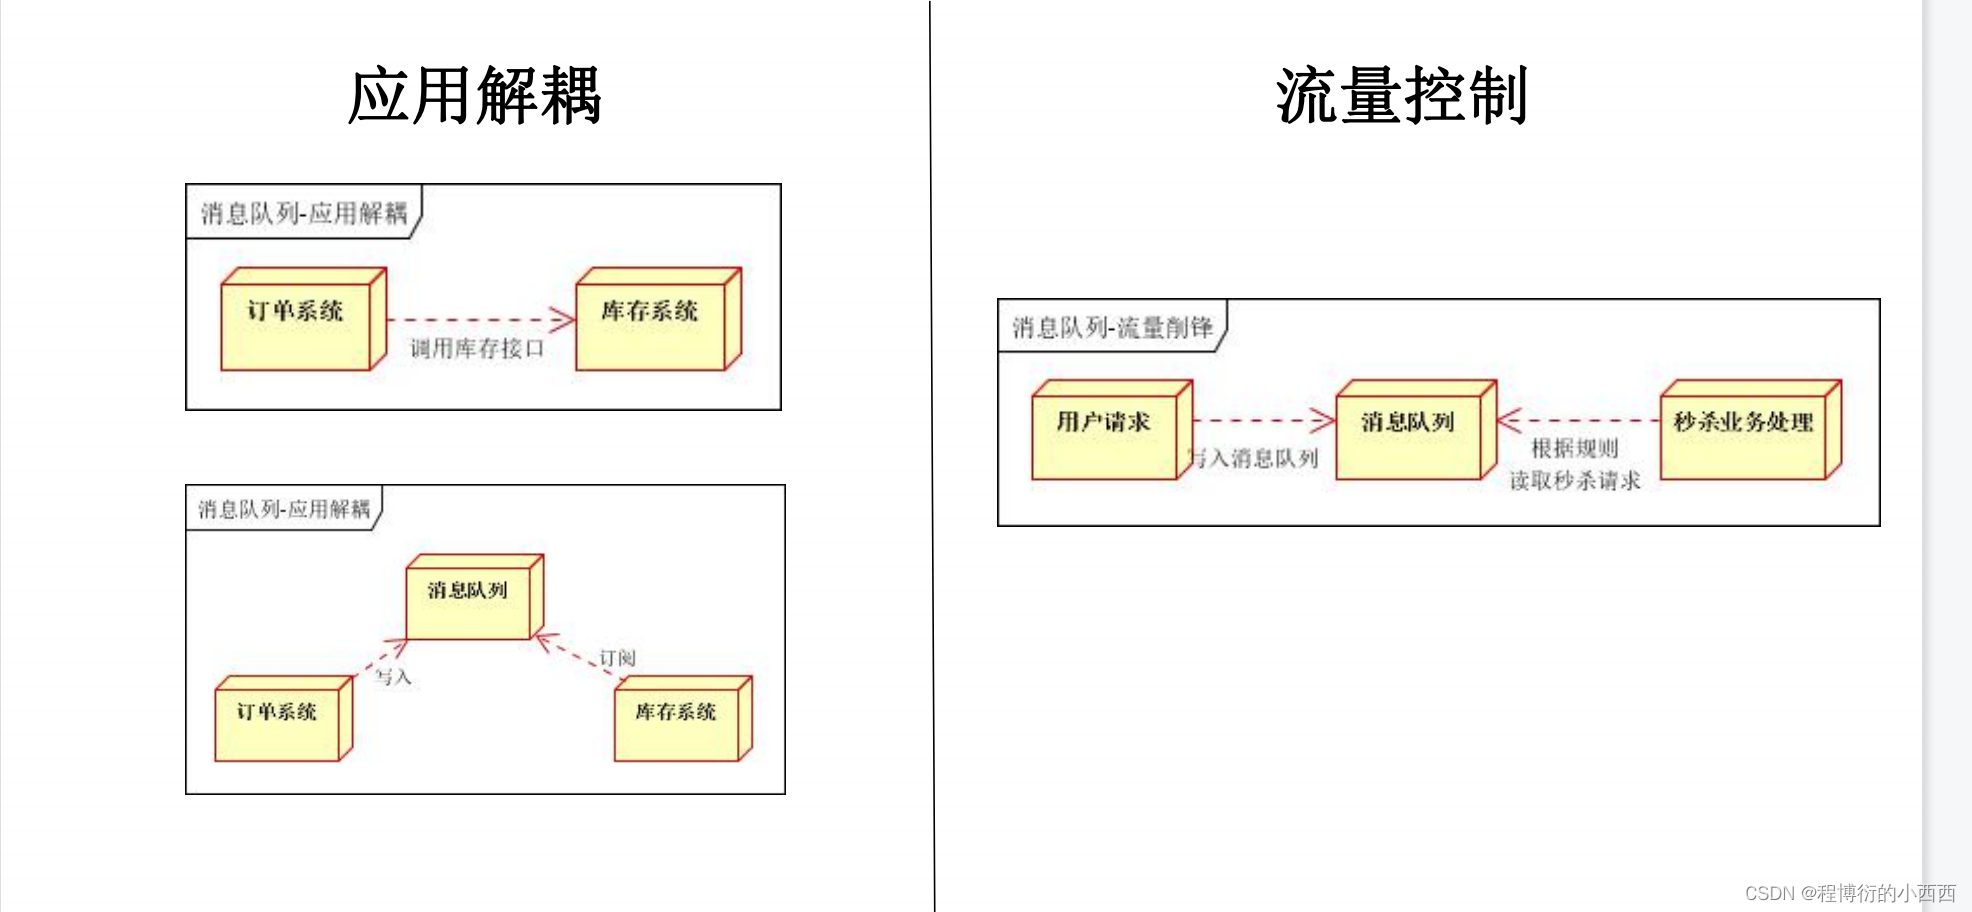
可靠投递与消费
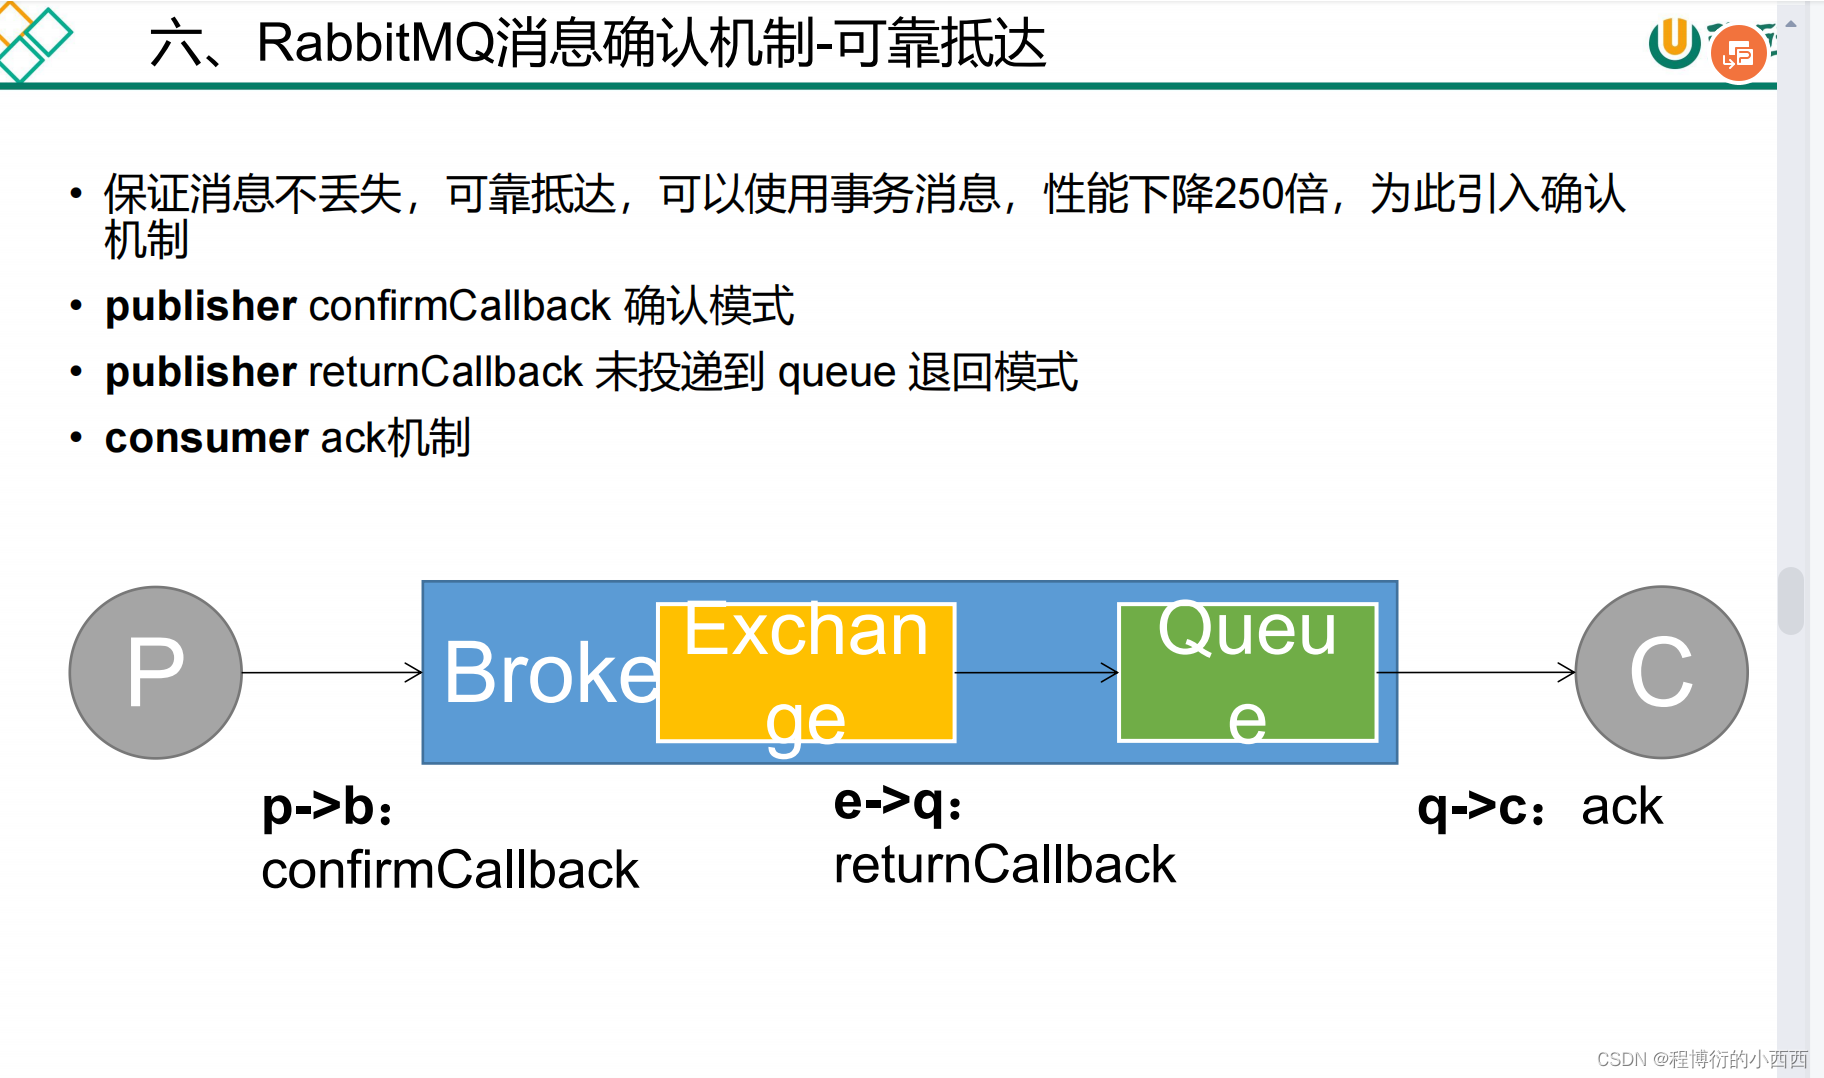
ConfirmCallback可靠抵达—发送端确认


定值RabbitTemplate实现ConfirmCallback
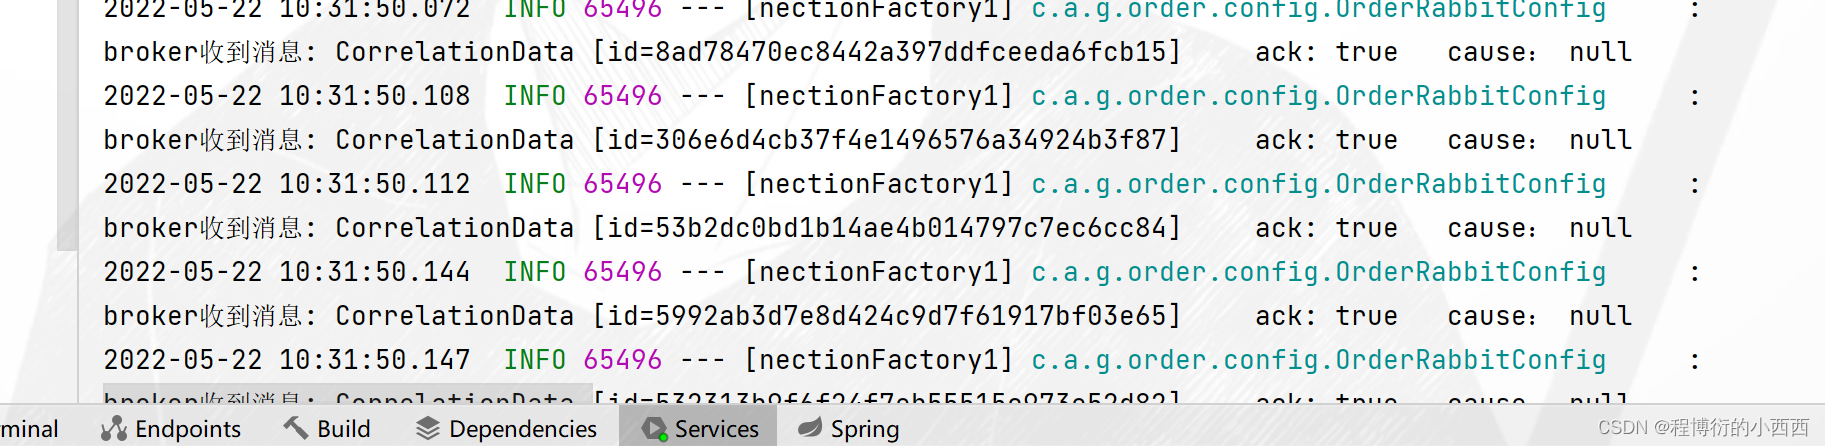
只有消息抵达成功才会回调这个方法
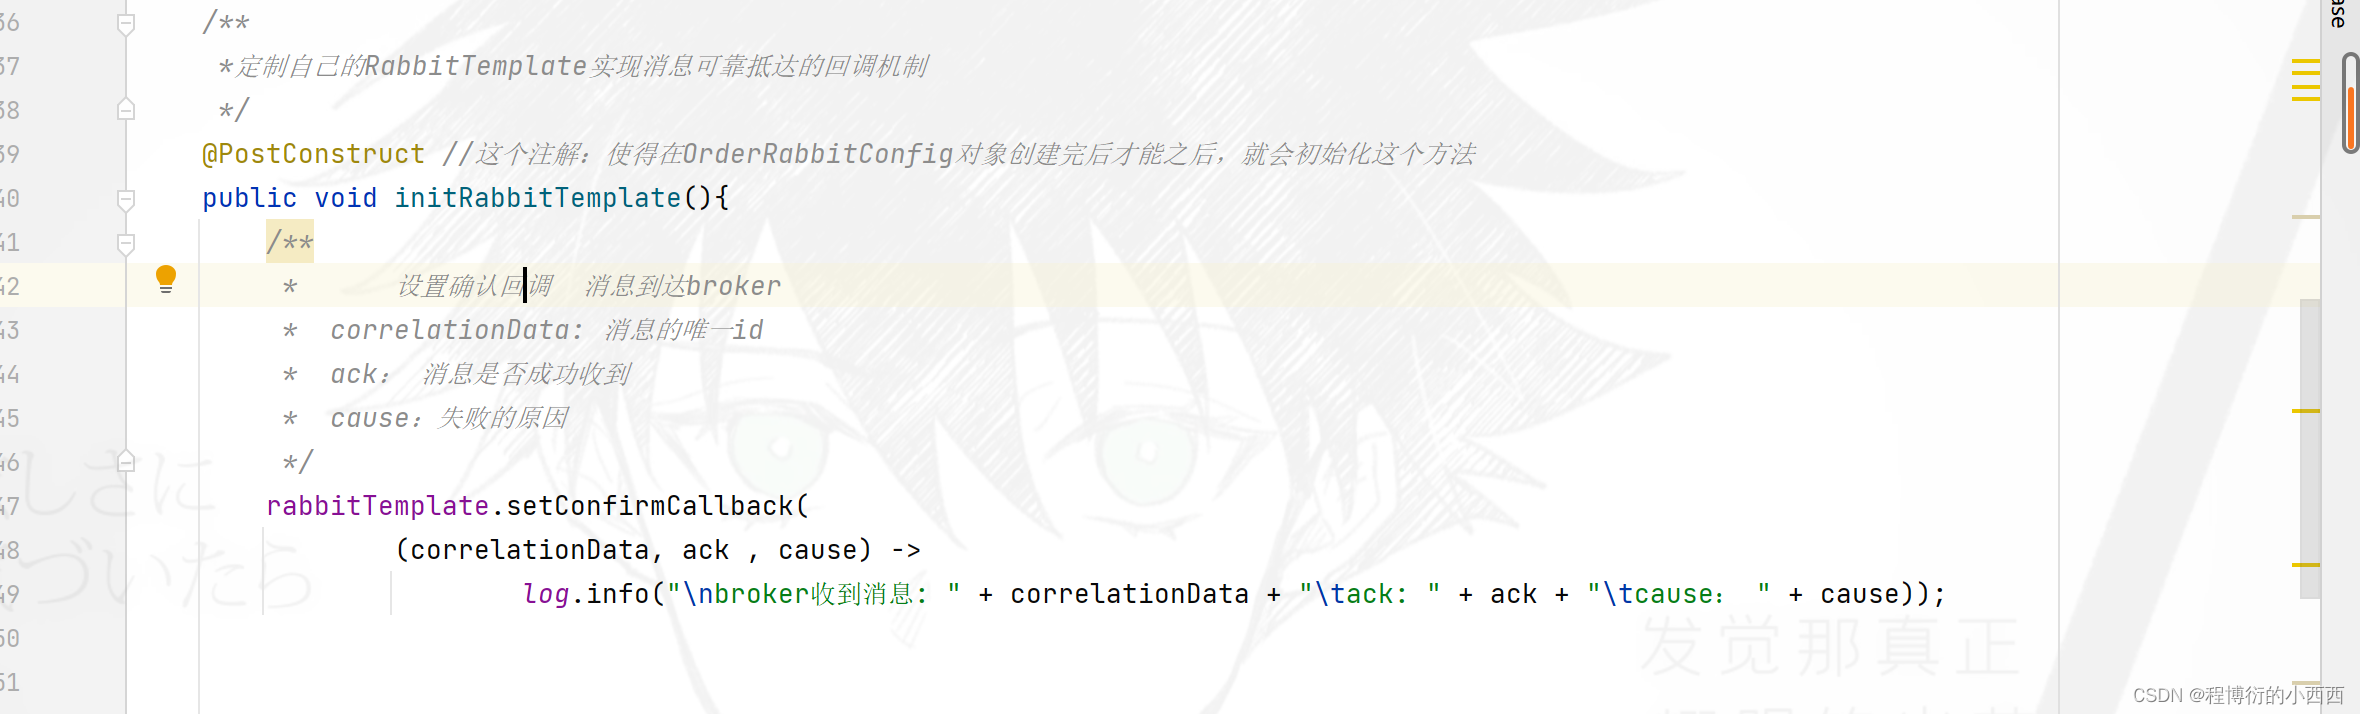
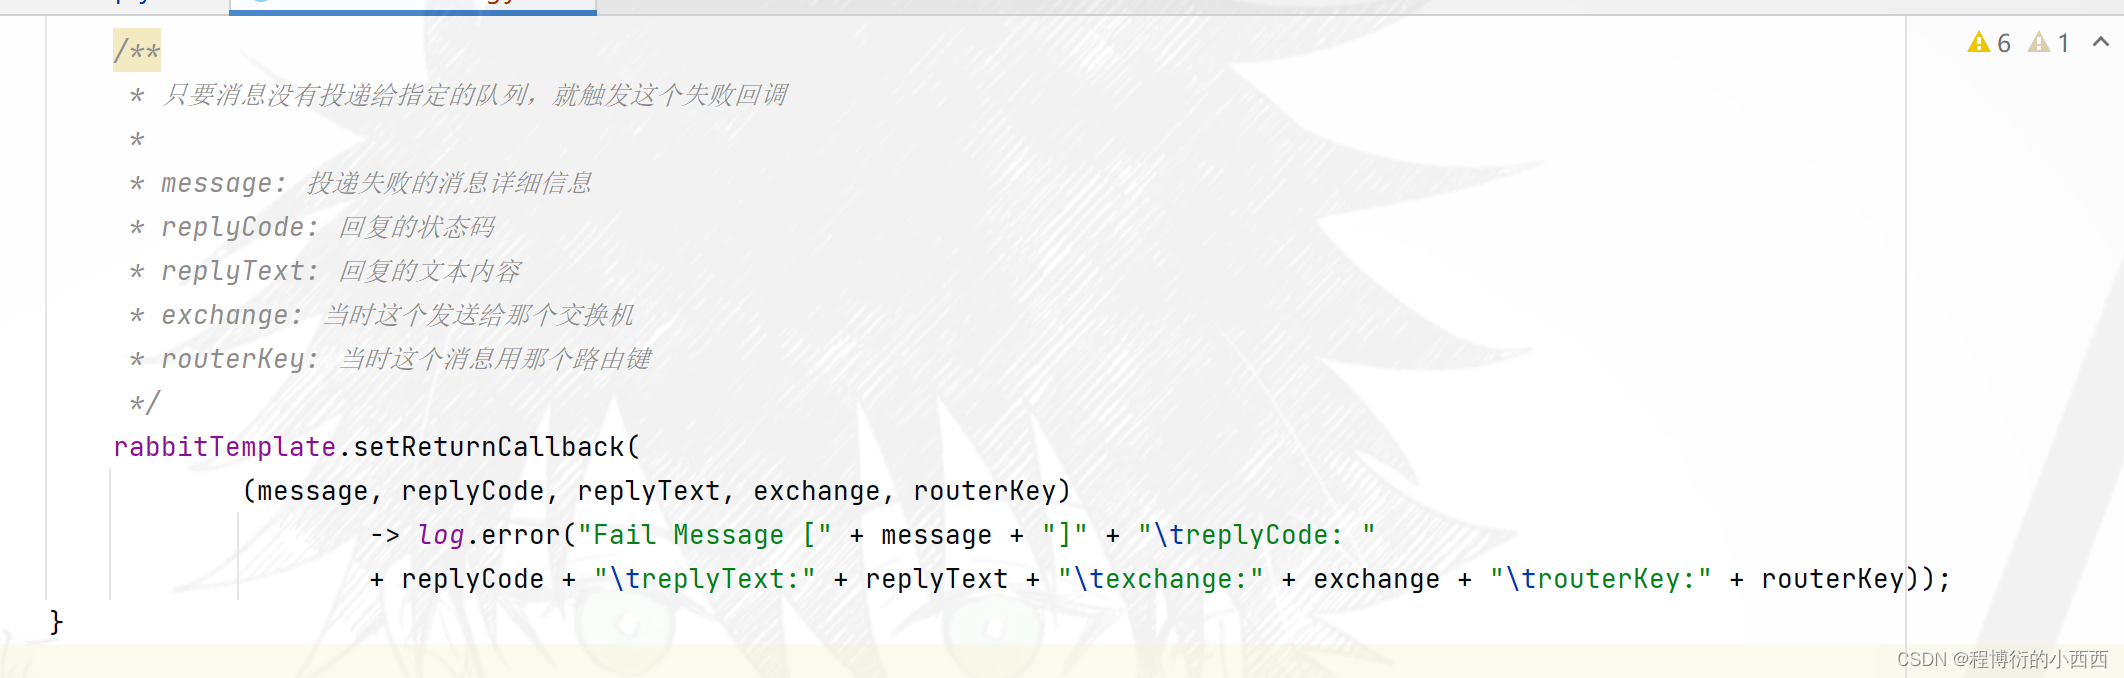
只要消息抵达broker服务器,发送端就会ack
ReturnCallback抵达失败回退—发送端的确认
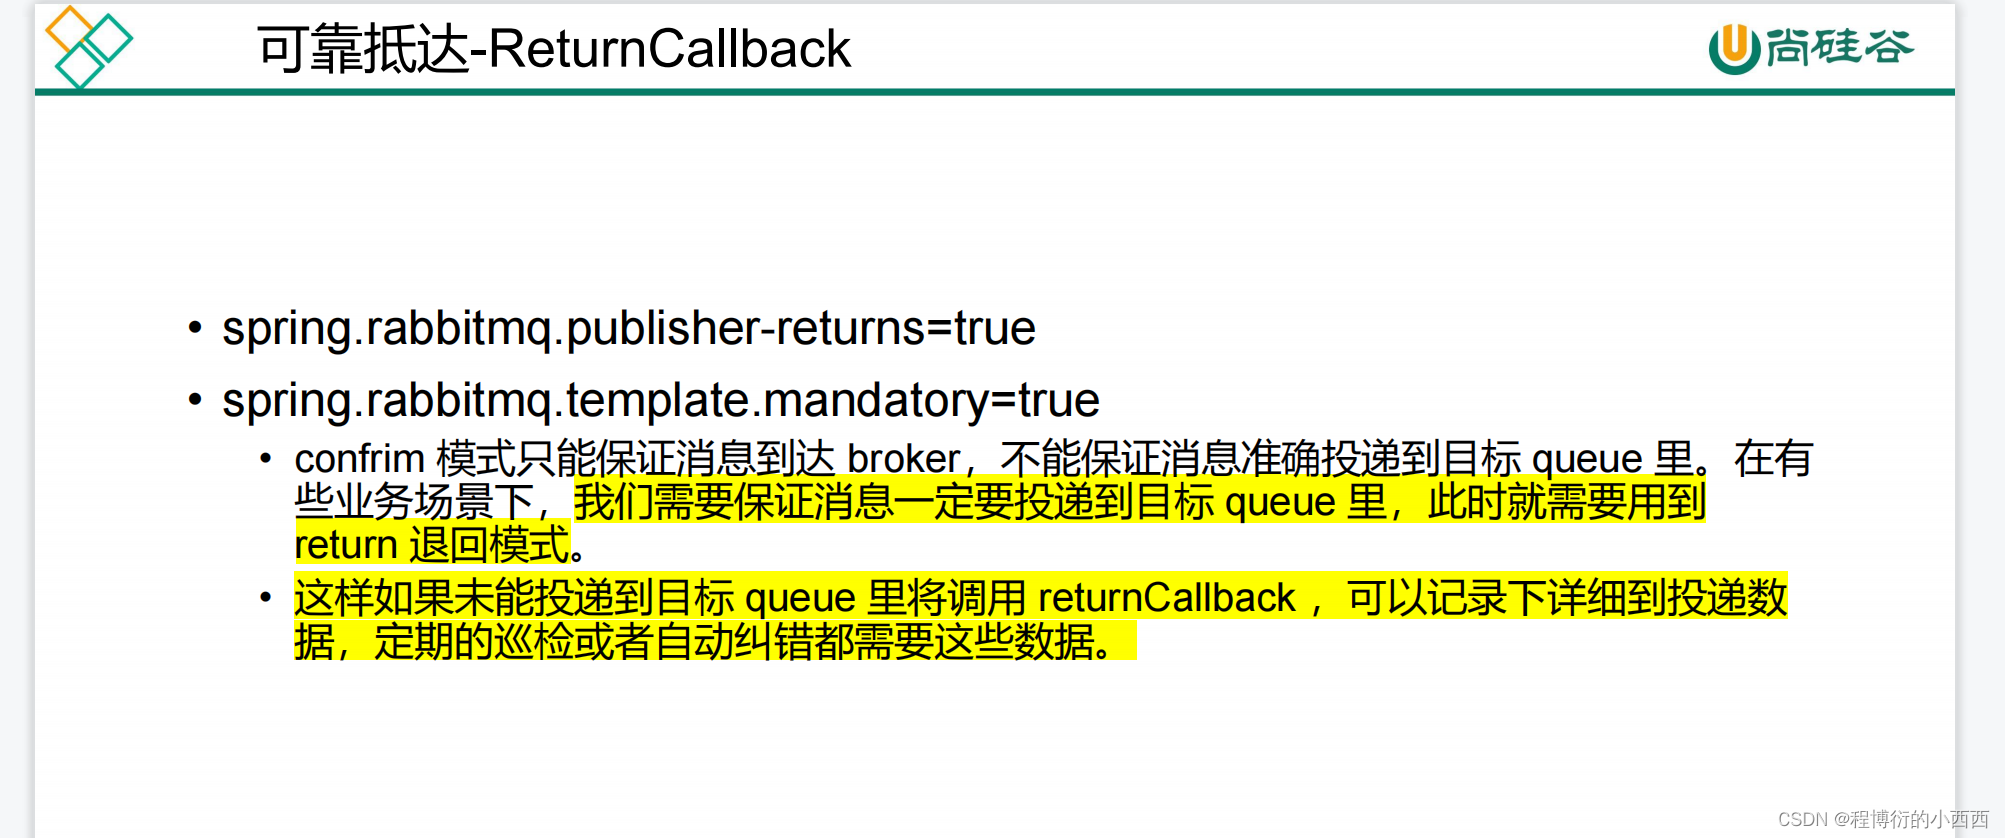


只有消息抵达失败,才会回调这个方法(打印相关的错误信息)
由于成功抵达,所以不会打印失败的信息,但是抵达成功会有ConfirmCallback的回调函数的相关操作
给一个不存在的路由键进行发送消息,模拟消息失败到达的情况(成功回调了ReturnCallBack的方法)


ACK消息确认机制—消费端确认
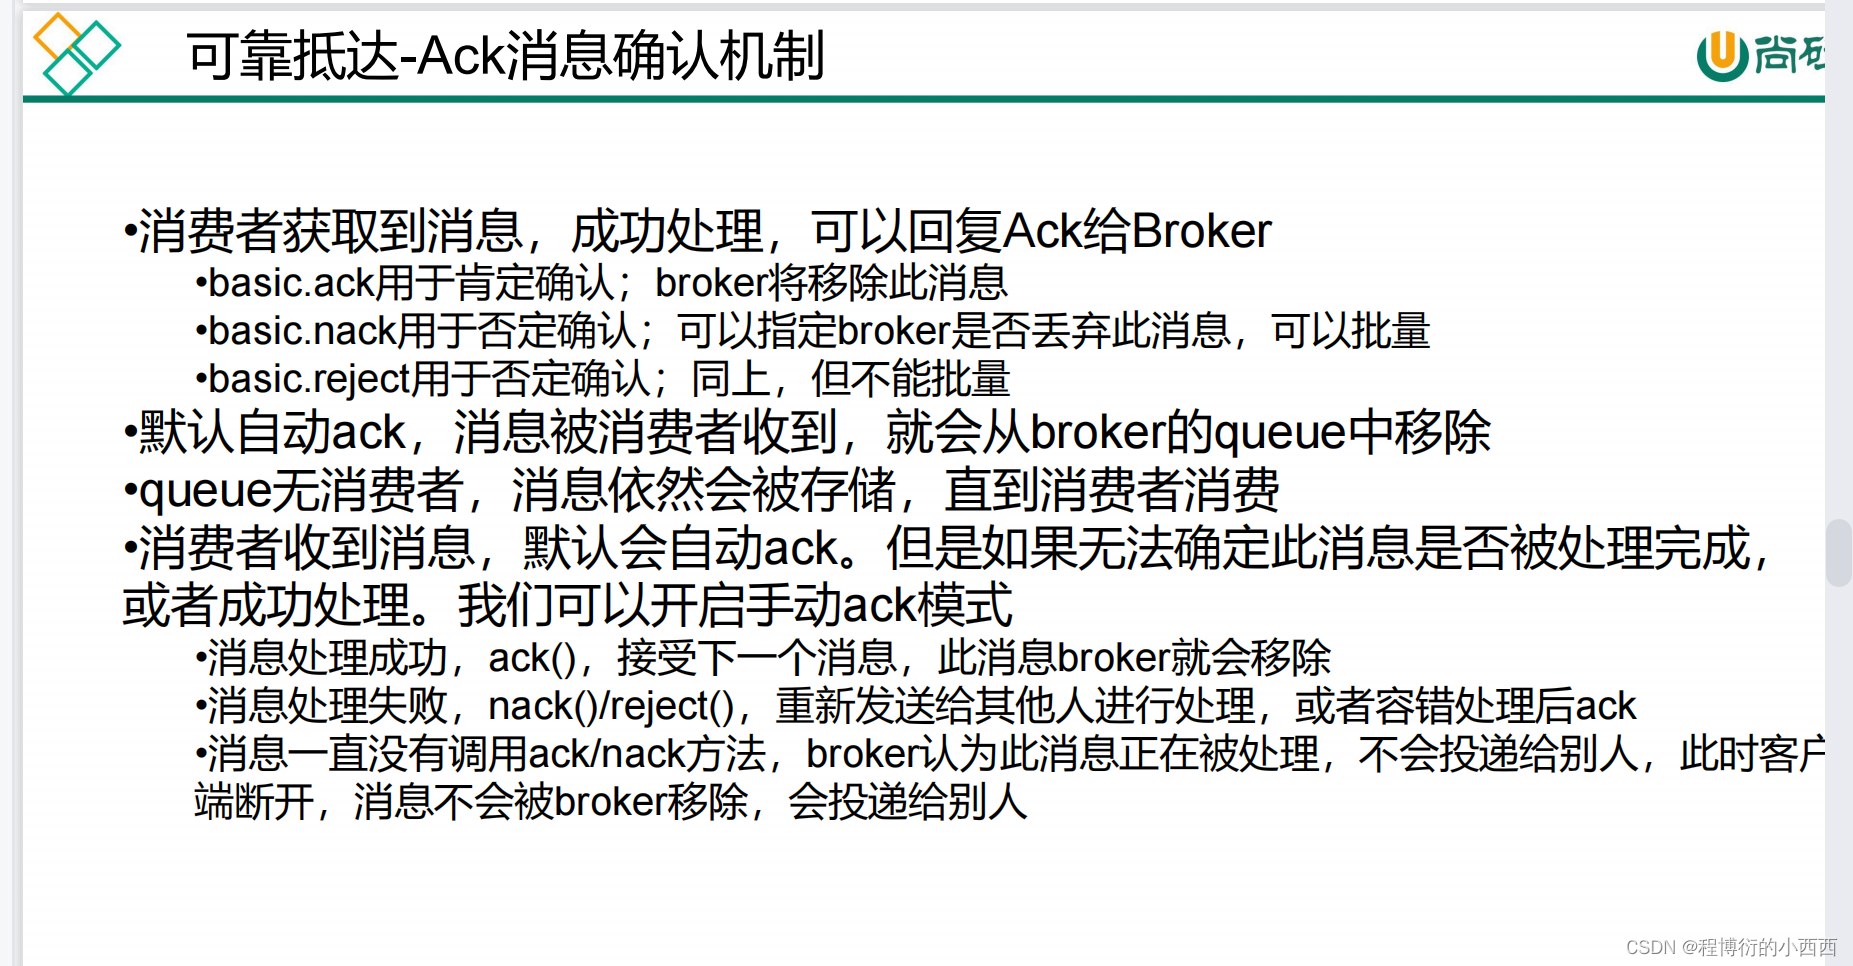


使用channel.basicAck完成手工签收
@RabbitListener(queues = {
"hello-java-queue"})
@RabbitHandler
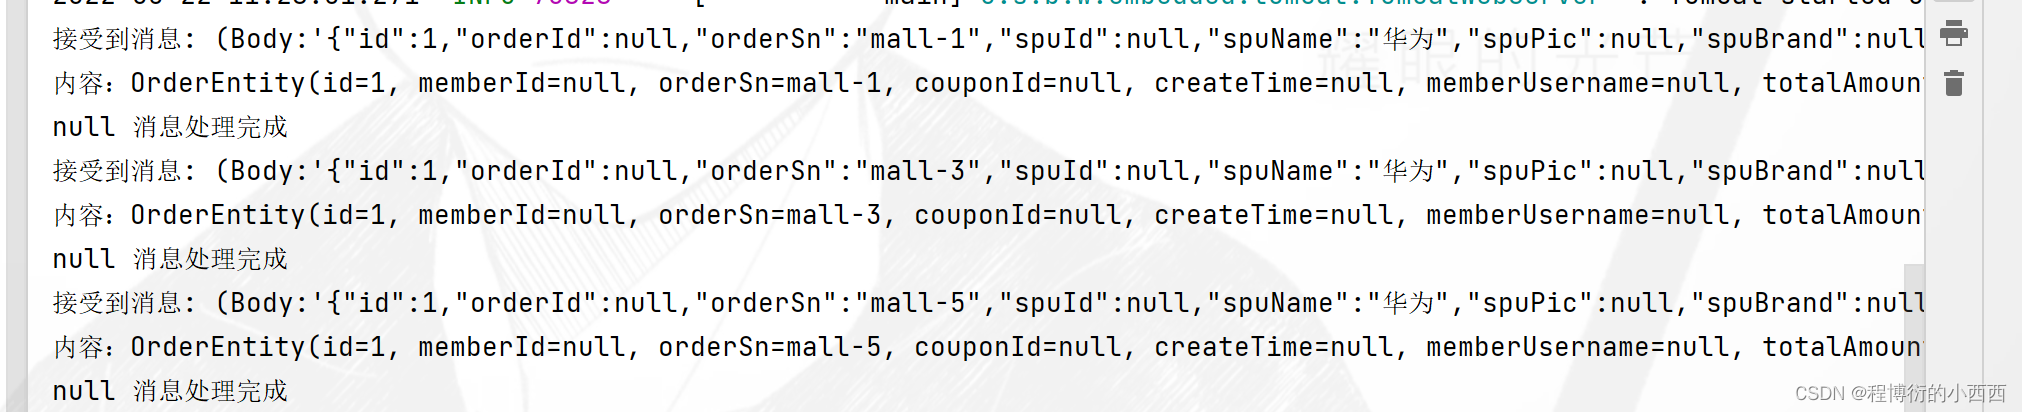
public void receiveMessageA(Message message, OrderEntity orderEntity, Channel channel){
System.out.println("接受到消息: " + message + "\n内容:" + orderEntity);
long deliveryTag = message.getMessageProperties().getDeliveryTag();
try {
// 只签收当前货物 不批量签收(手工一个一个签收)
channel.basicAck(deliveryTag, false);
} catch (IOException e) {
System.out.println("网络中断");
}
System.out.println(orderEntity.getReceiverName() + " 消息处理完成");
}
商城业务:订单服务(重点)
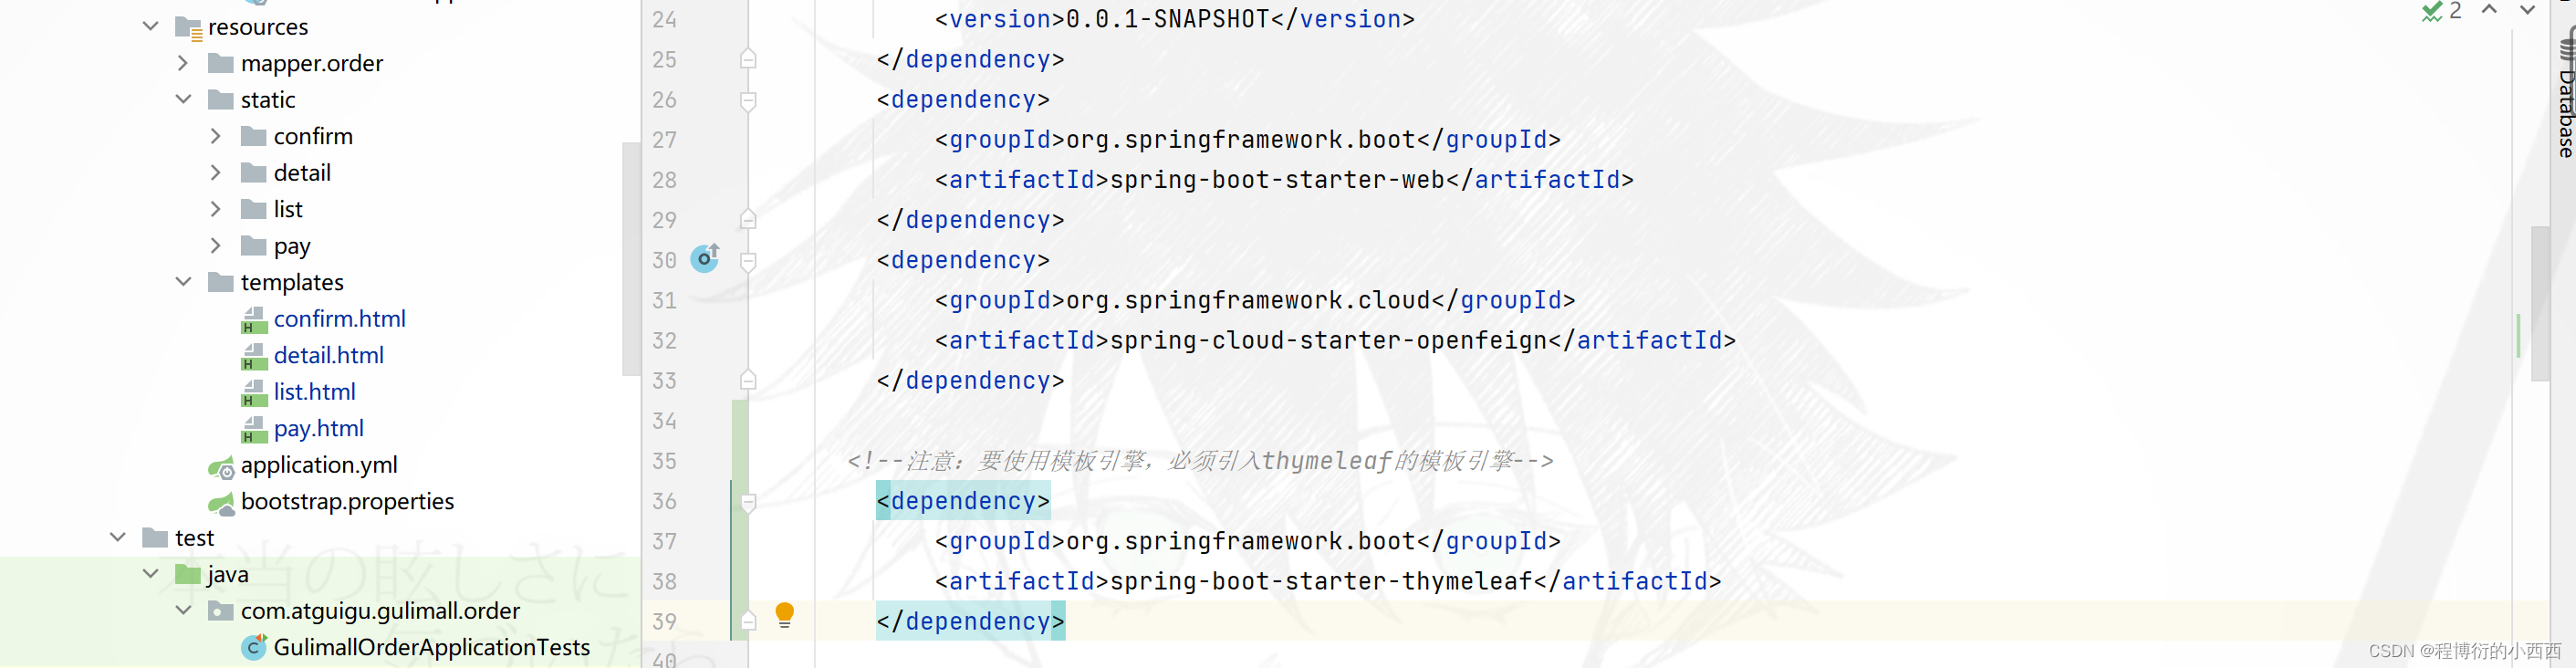
页面环境搭建
注意要使用模板引擎进行页面的跳转,必须引入thymeleaf的依赖
订单的基本概念


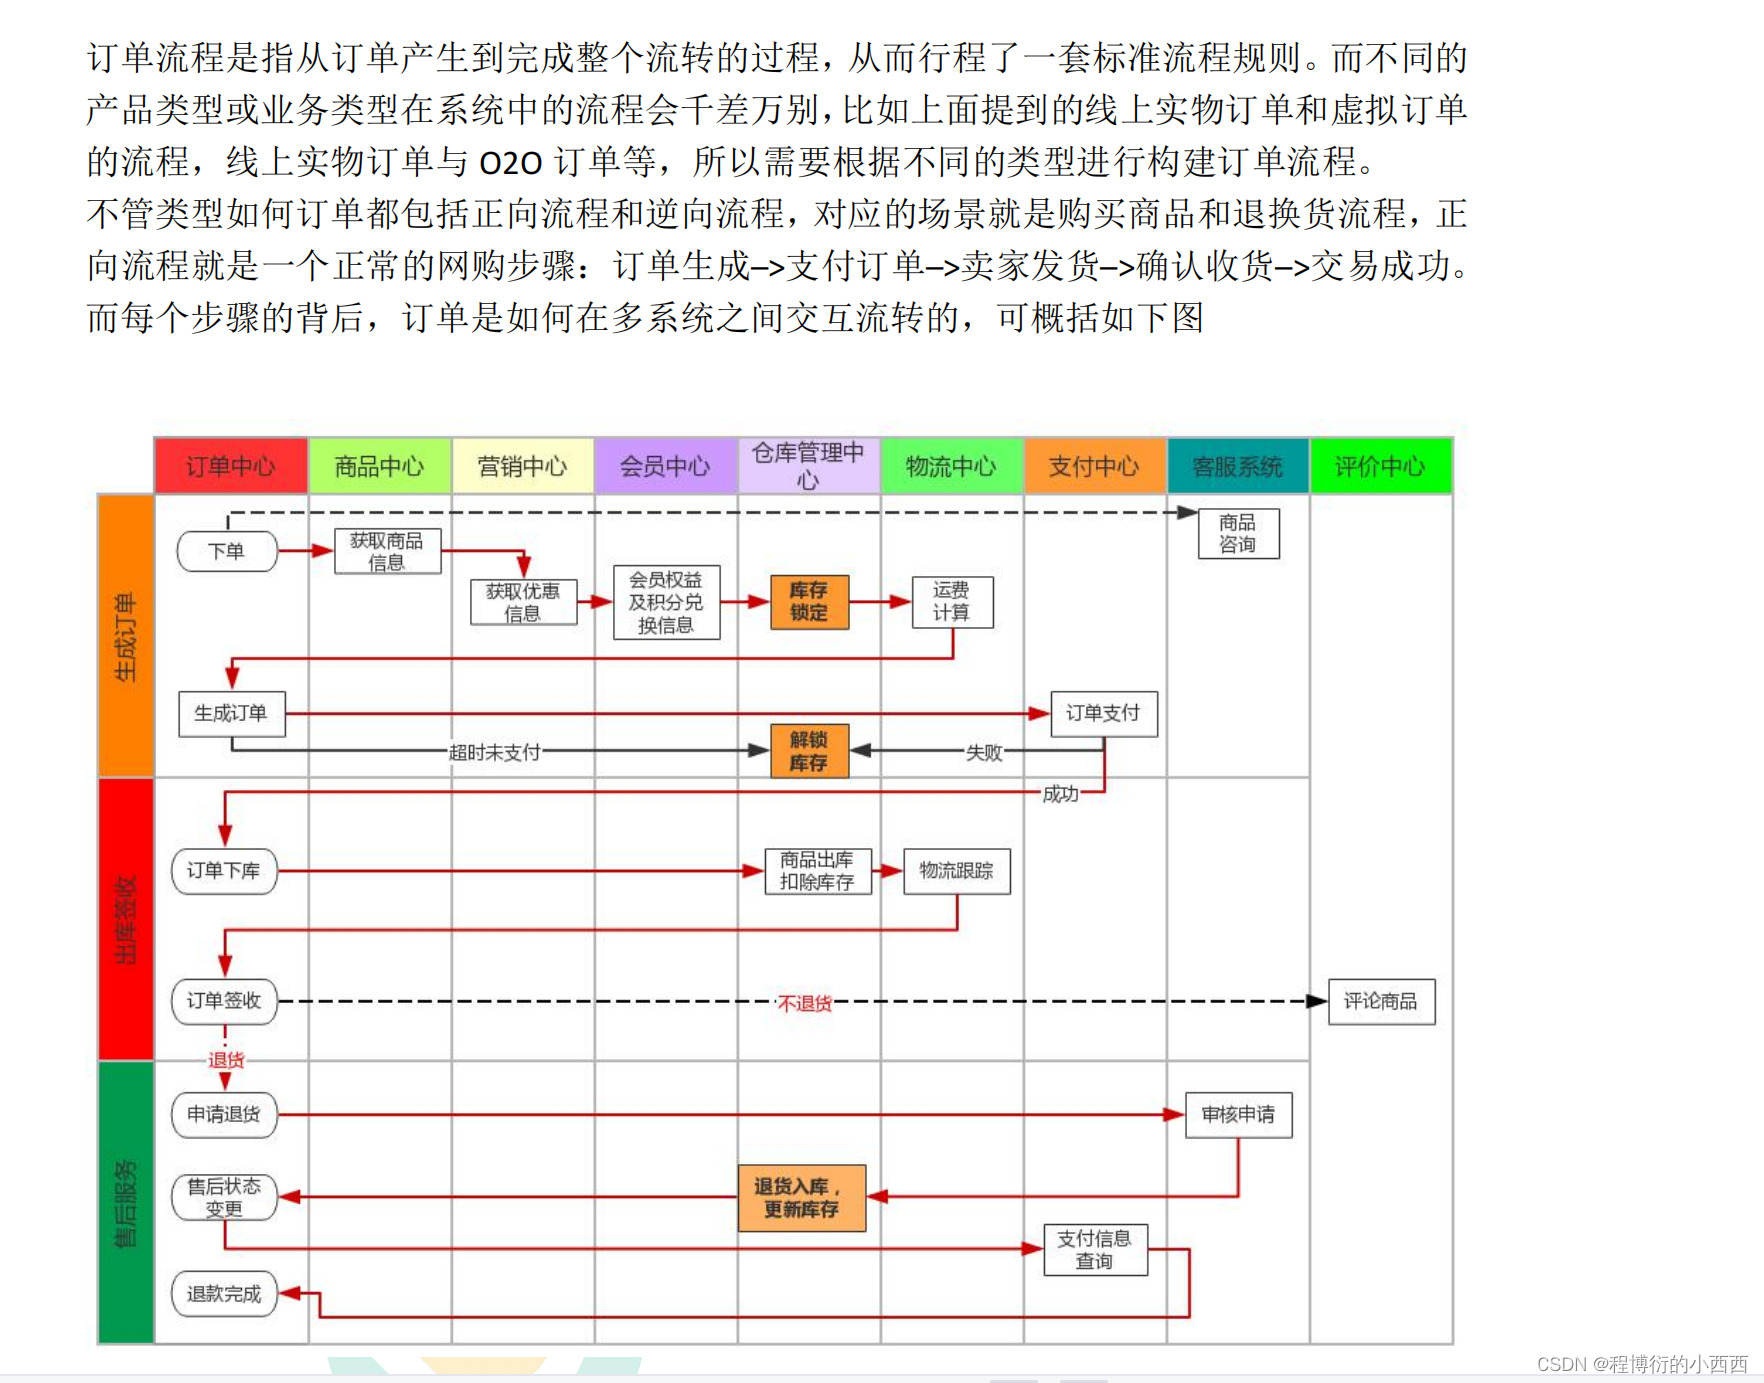
订单的确认页(bug多)
Feign远程调用丢失请求头的问题
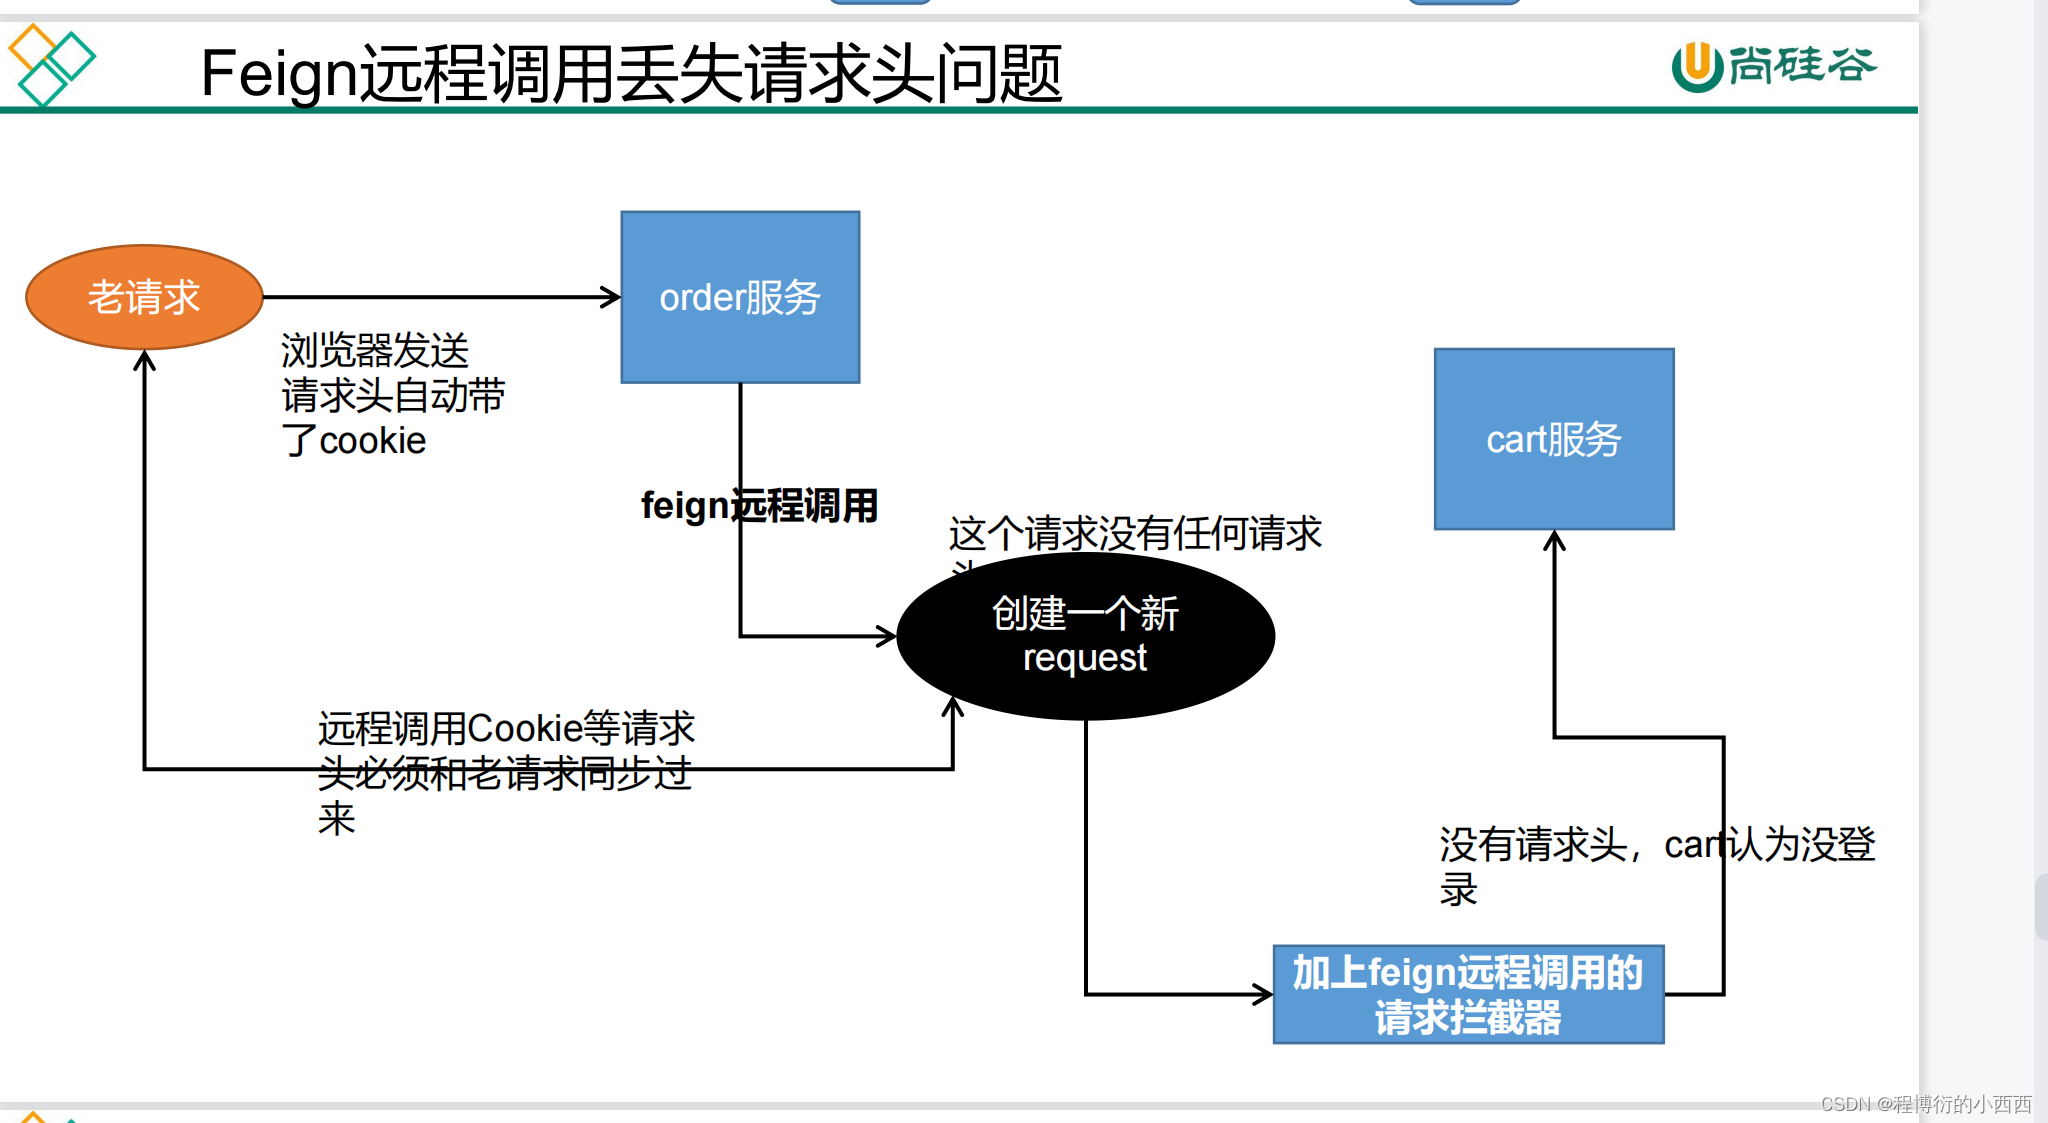
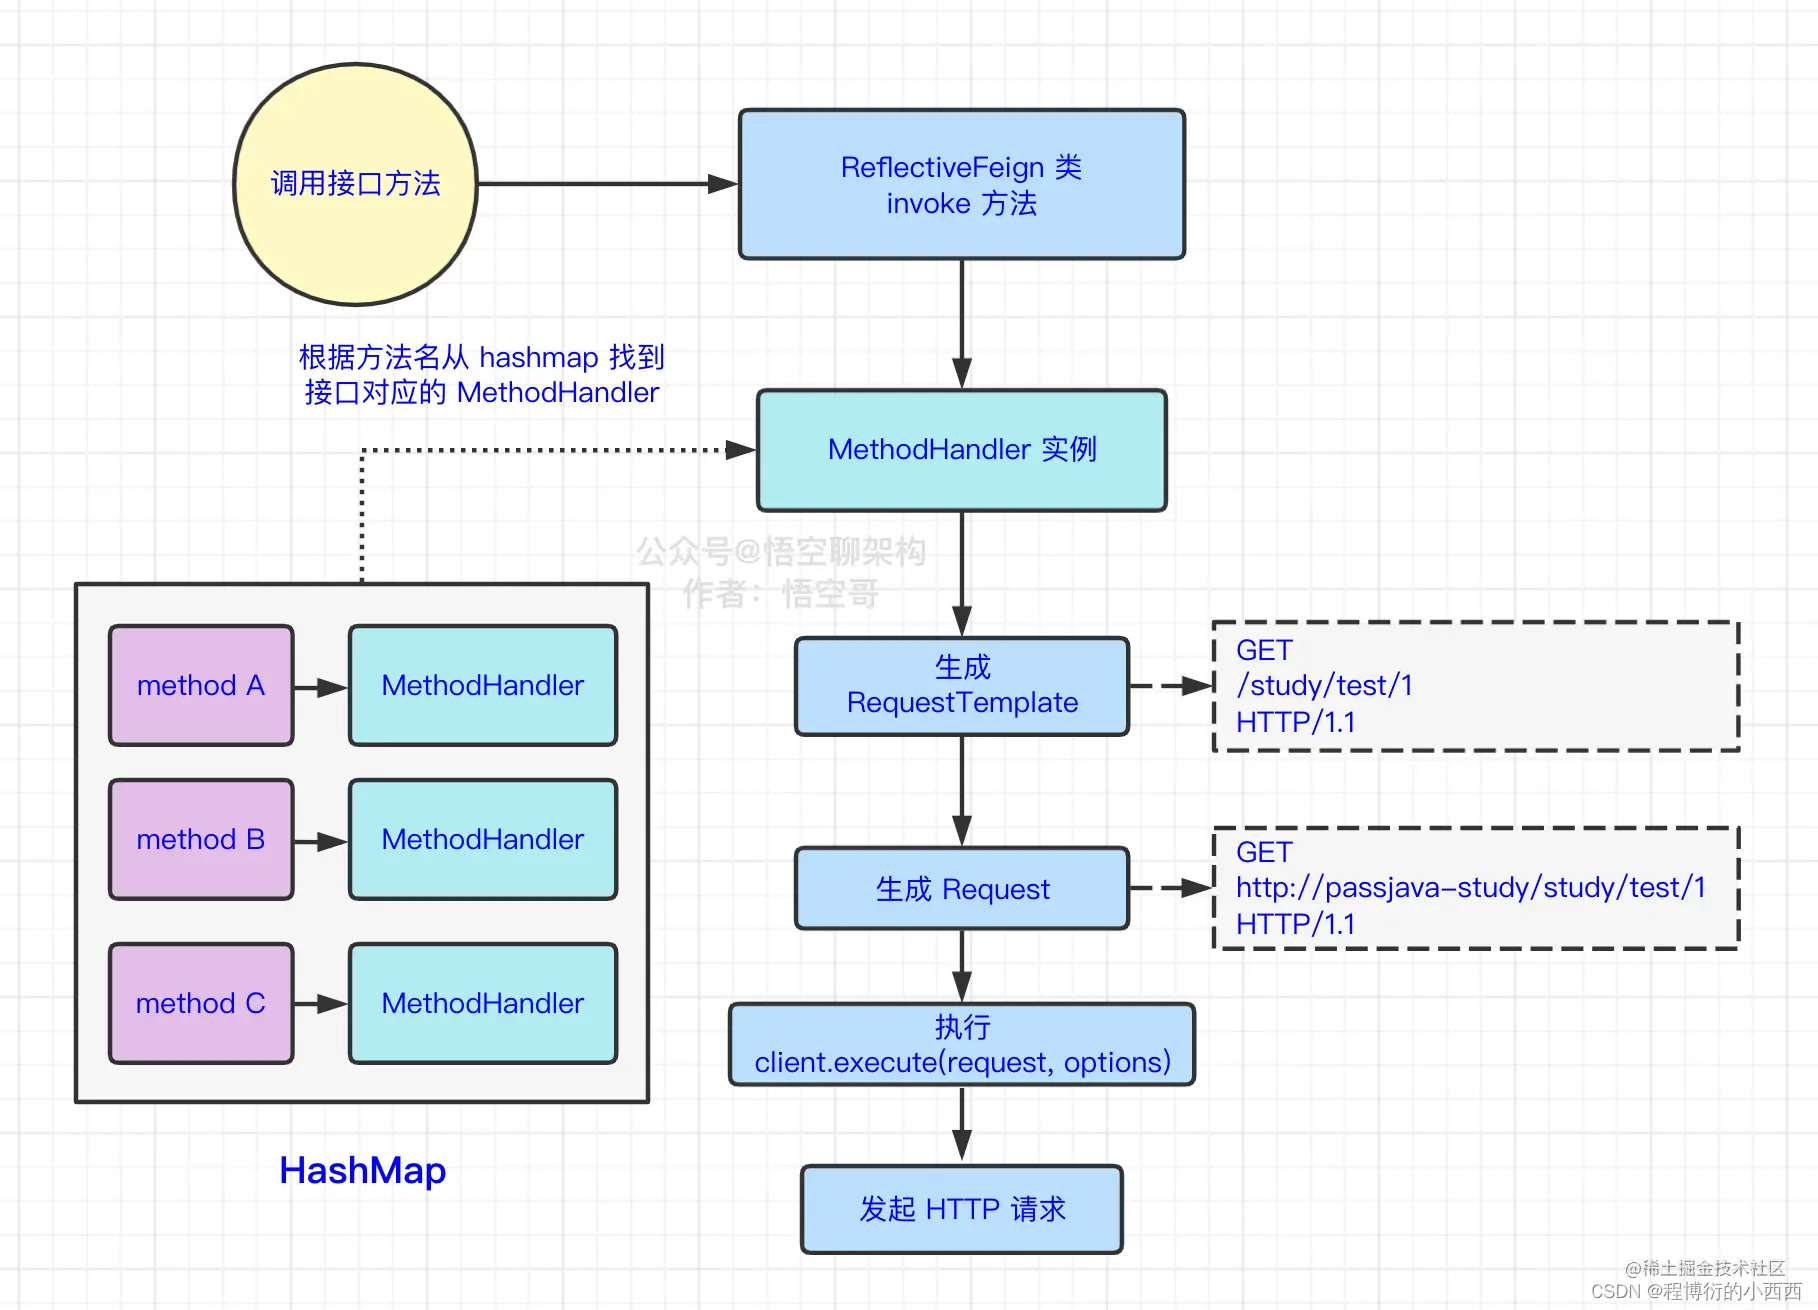
openfeign本身的工作原理
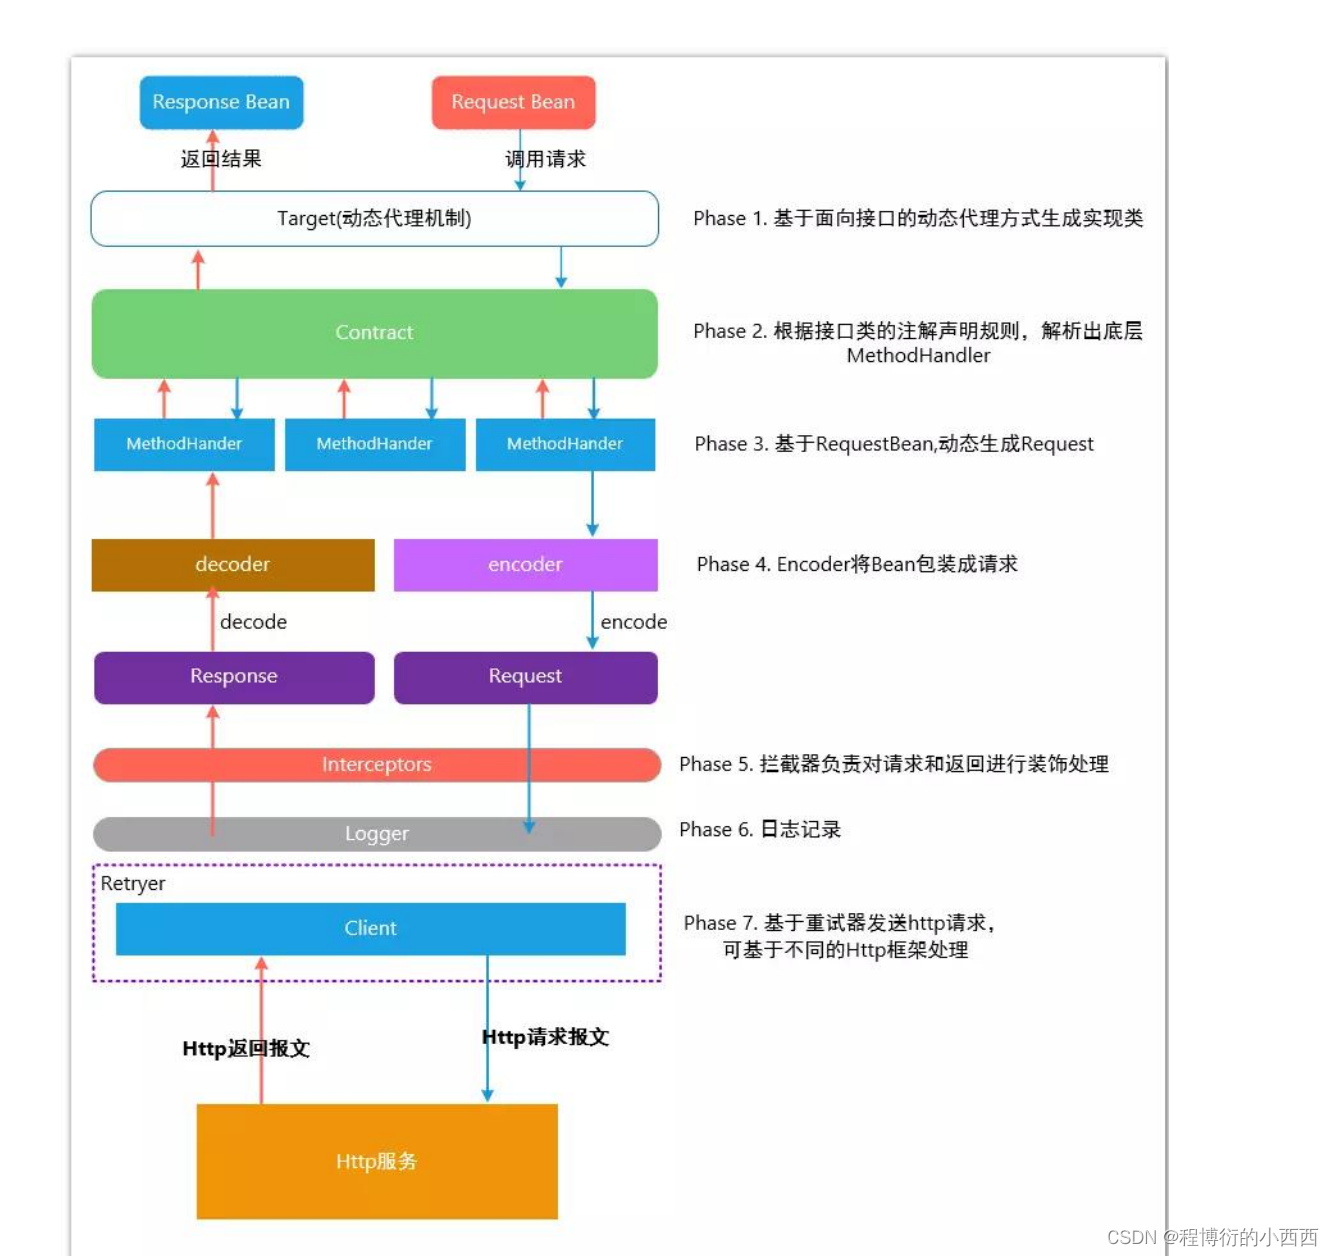
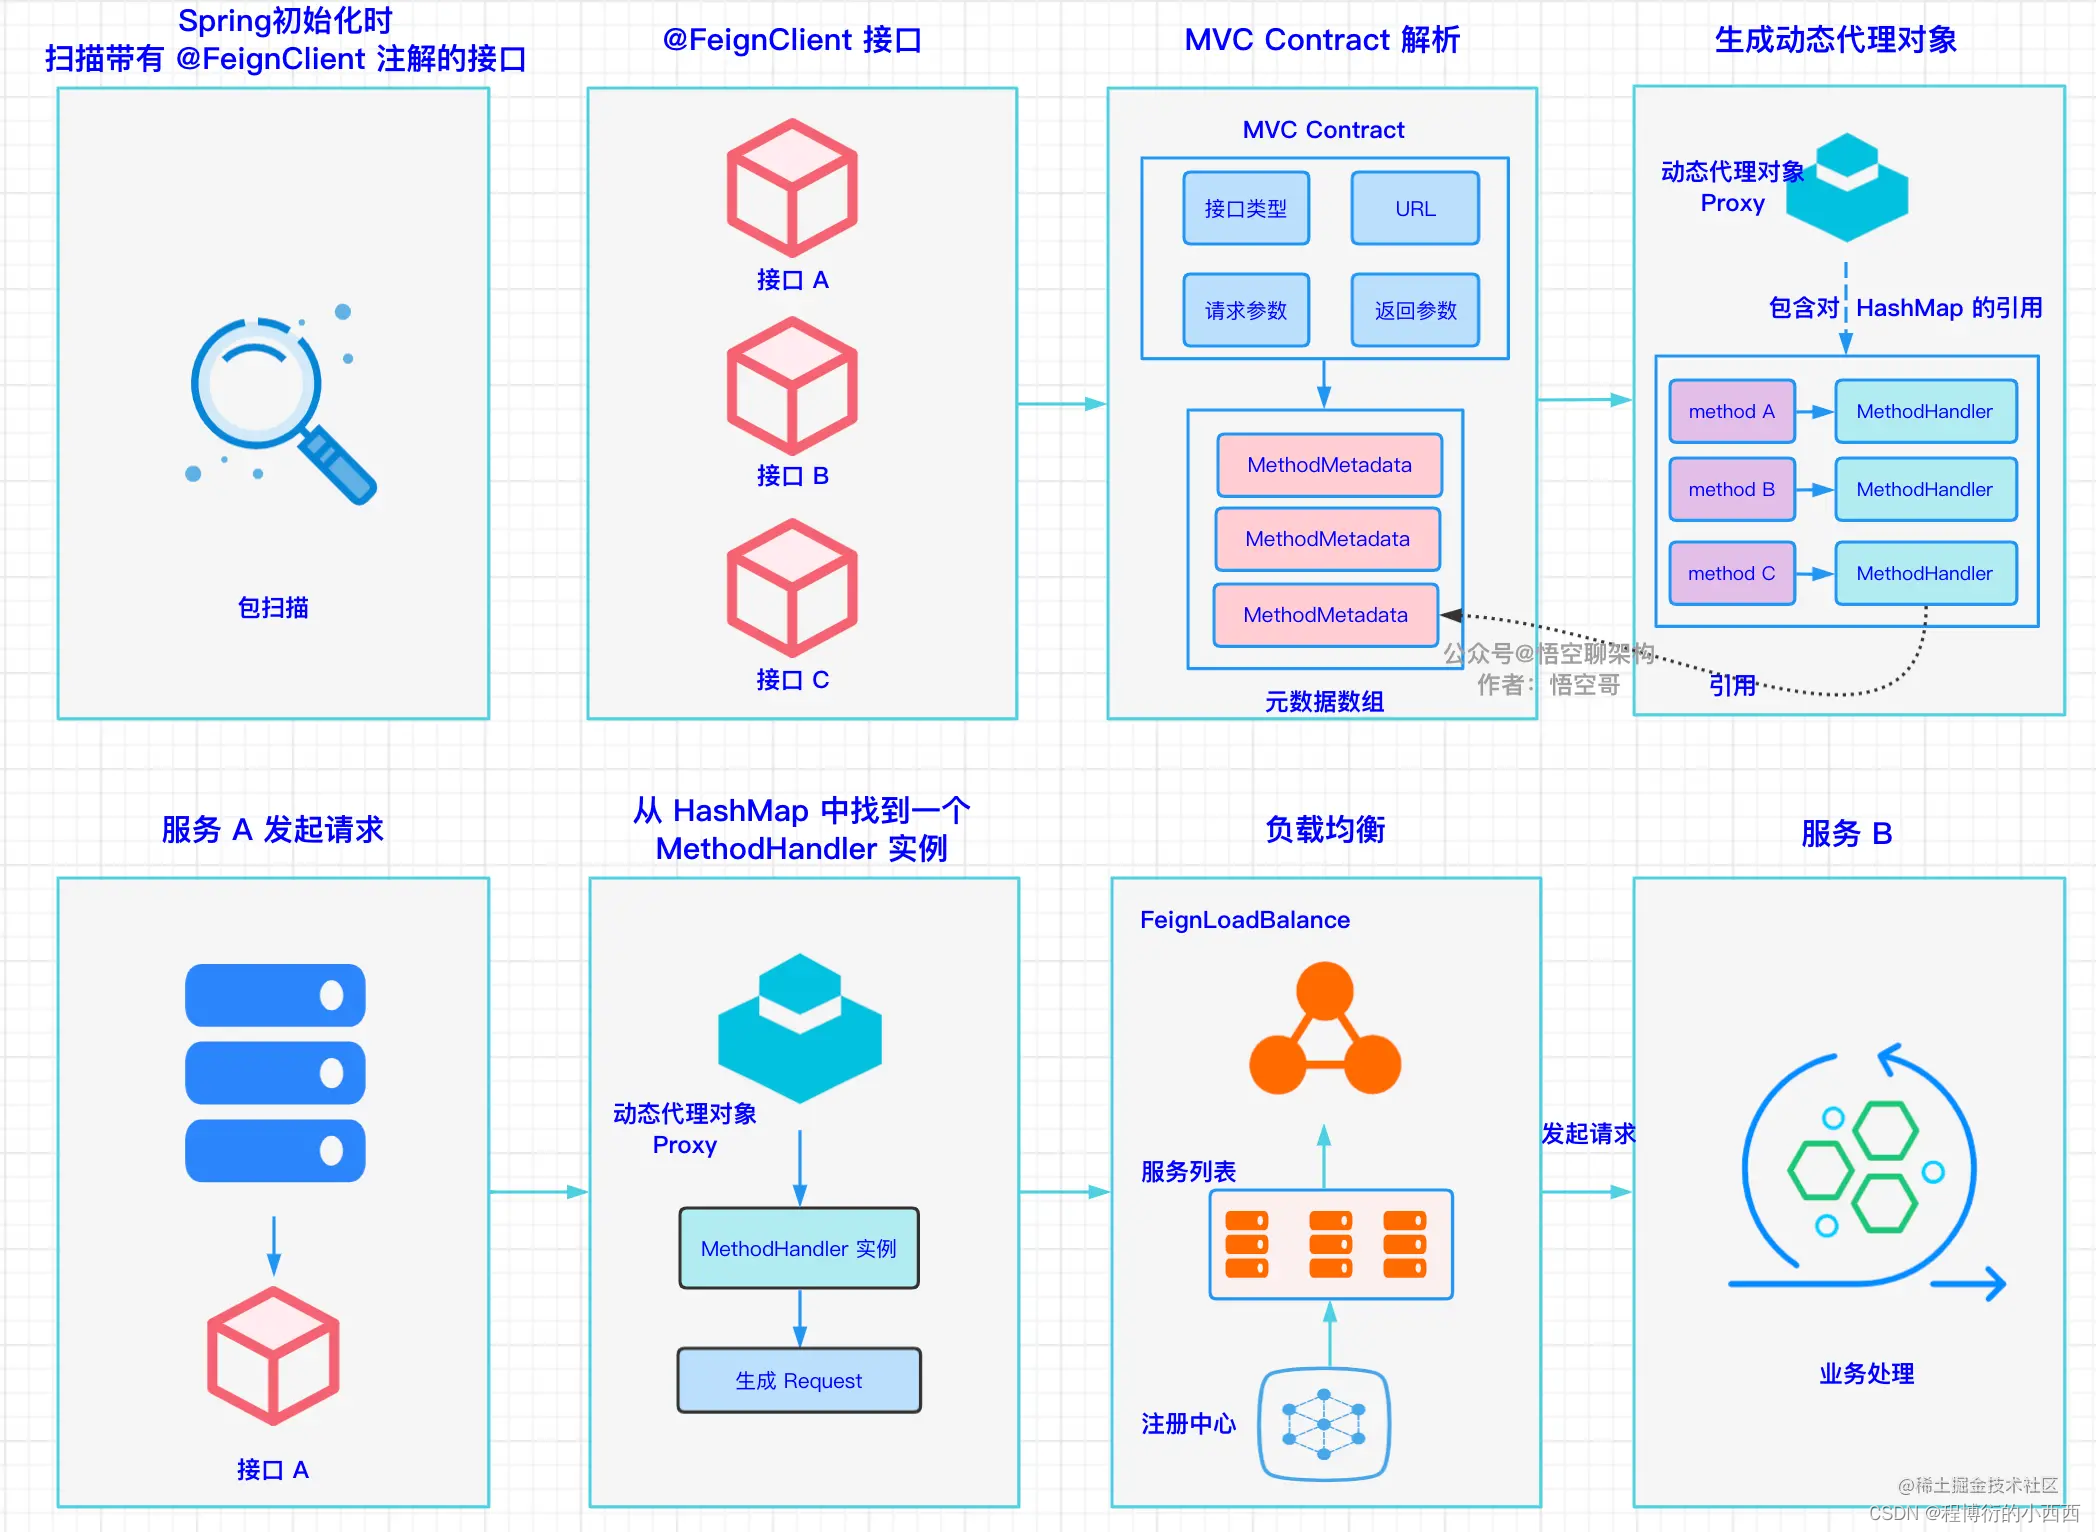
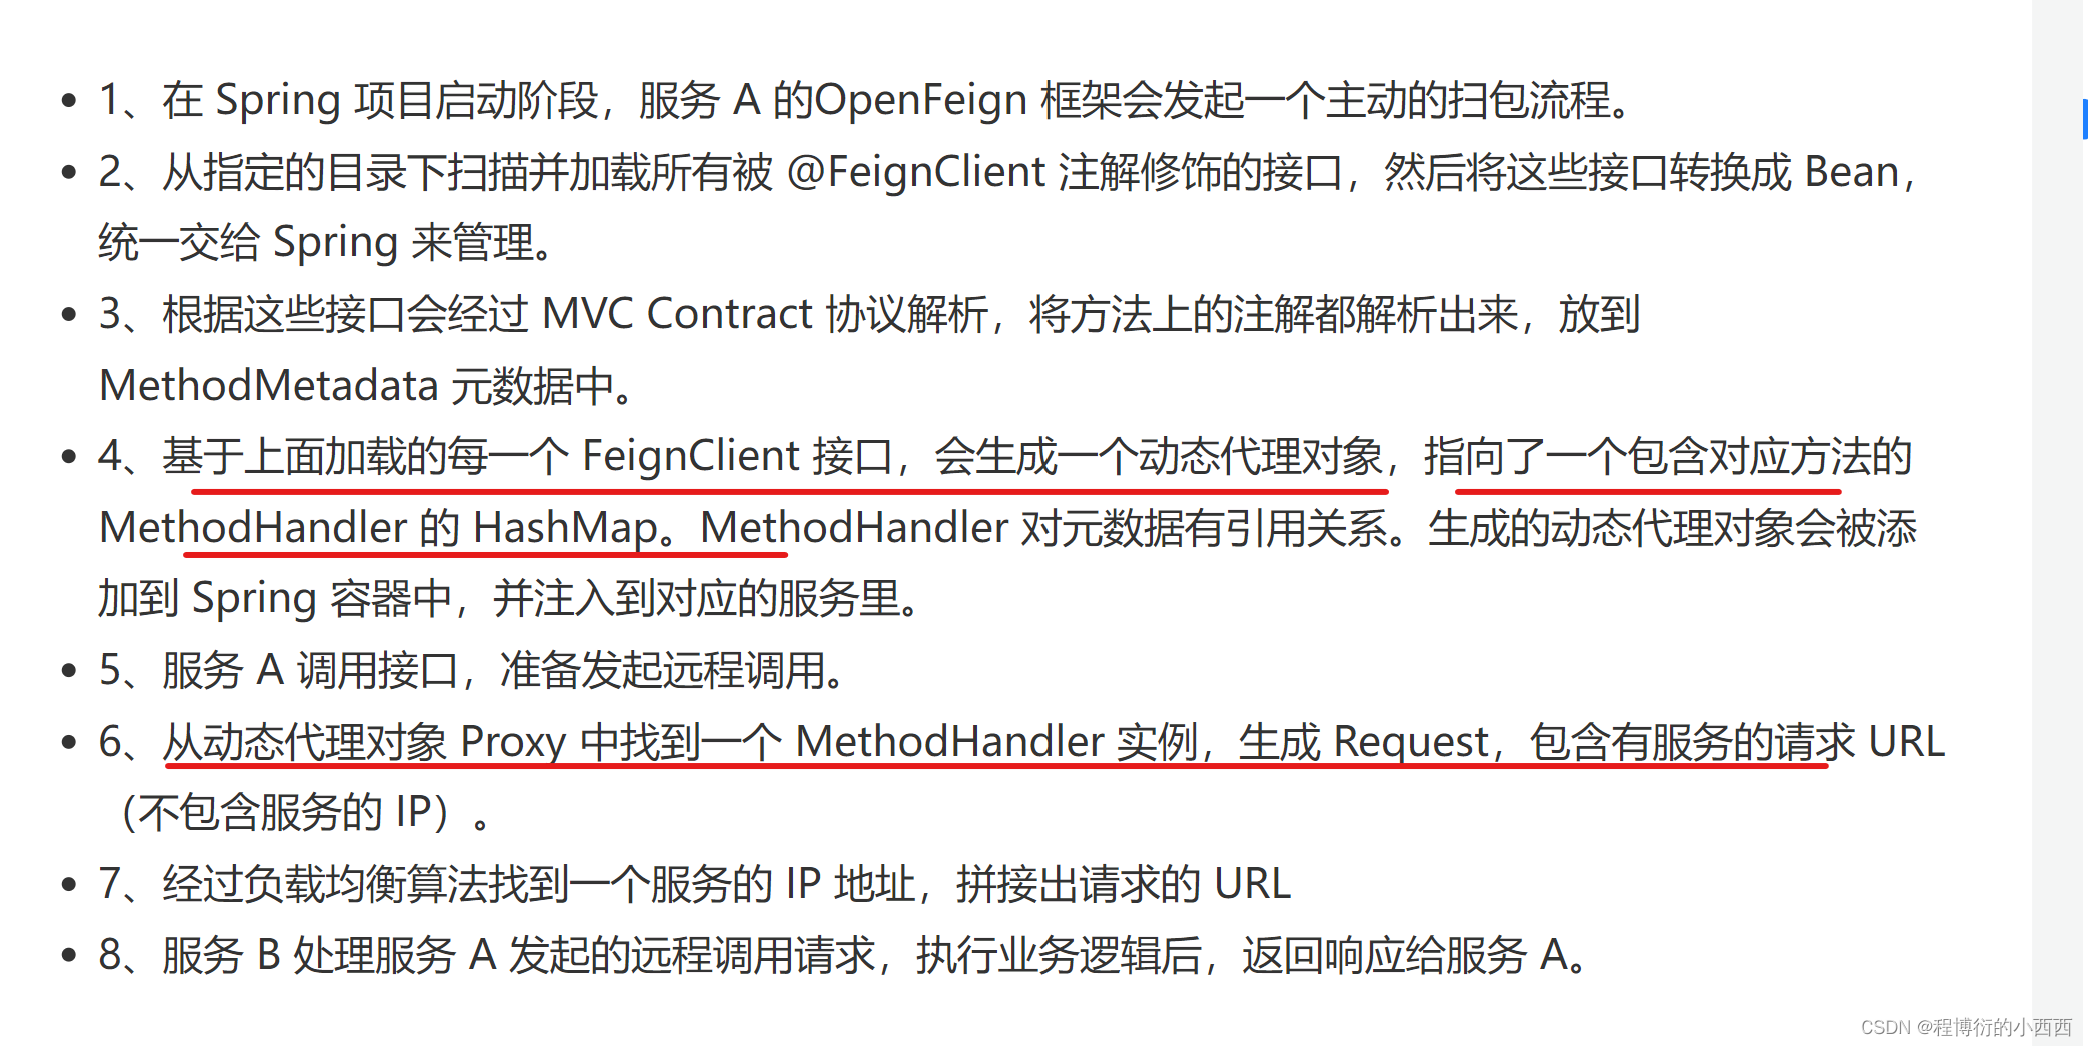
在加载扫描解析@FeignClient的接口时,会为接口生成一个动态代理对象,当调用接口时时机调用的代理对象,代理对象找到对应的MethodHandler来完成生成request。后续,会有request拦截器进一步对request进一步的包装(例如添加请求头)
openFeign家的拦截器

/**
 * 解决feign远程调用,请求头丢失的问题(feign请求调用的拦截器)
 */
@Configuration
public class OrderFeignConfig {


	@Bean("requestInterceptor")
	public RequestInterceptor requestInterceptor(){

		// Feign在远程调用之前都会先经过这个方法
		return new RequestInterceptor() {

			@Override
			public void apply(RequestTemplate template) {

				// RequestContextHolder拿到这个新的请求的环境属性
				ServletRequestAttributes attributes = (ServletRequestAttributes) RequestContextHolder.getRequestAttributes();
				if(attributes != null){

					HttpServletRequest request = attributes.getRequest();//这是老请求
					if(request != null){

						// 同步请求头数据(拿到老请求的请求头数据,来进行更新新的请求的请求头)
						String cookie = request.getHeader("Cookie");
						// 给新请求同步Cookie
						template.header("Cookie", cookie);
					}
				}
			}
		};
	}
}
Feign异步调用丢失请求头问题
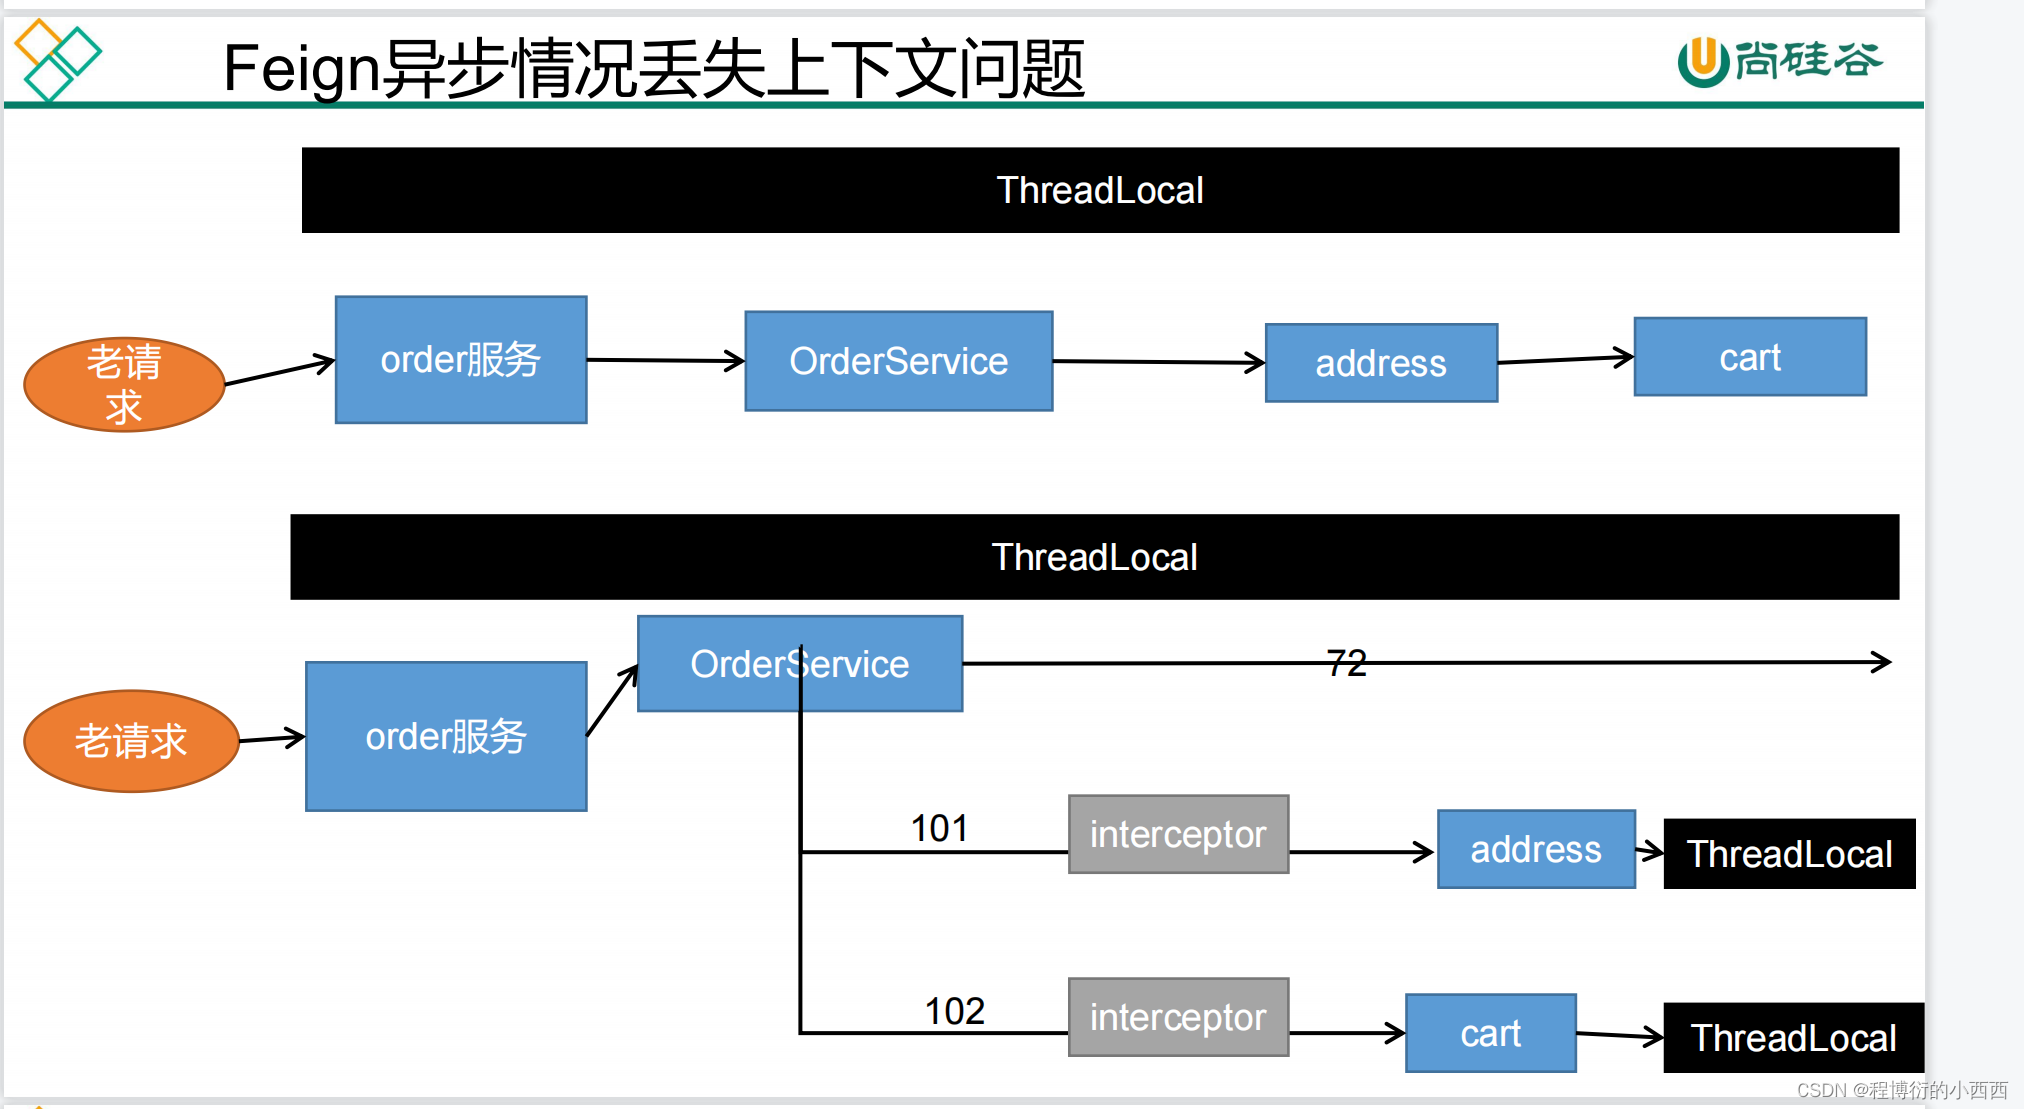
由于使用异步线程,所以对于新的线程没有request数据时,需要我们自己设置进去
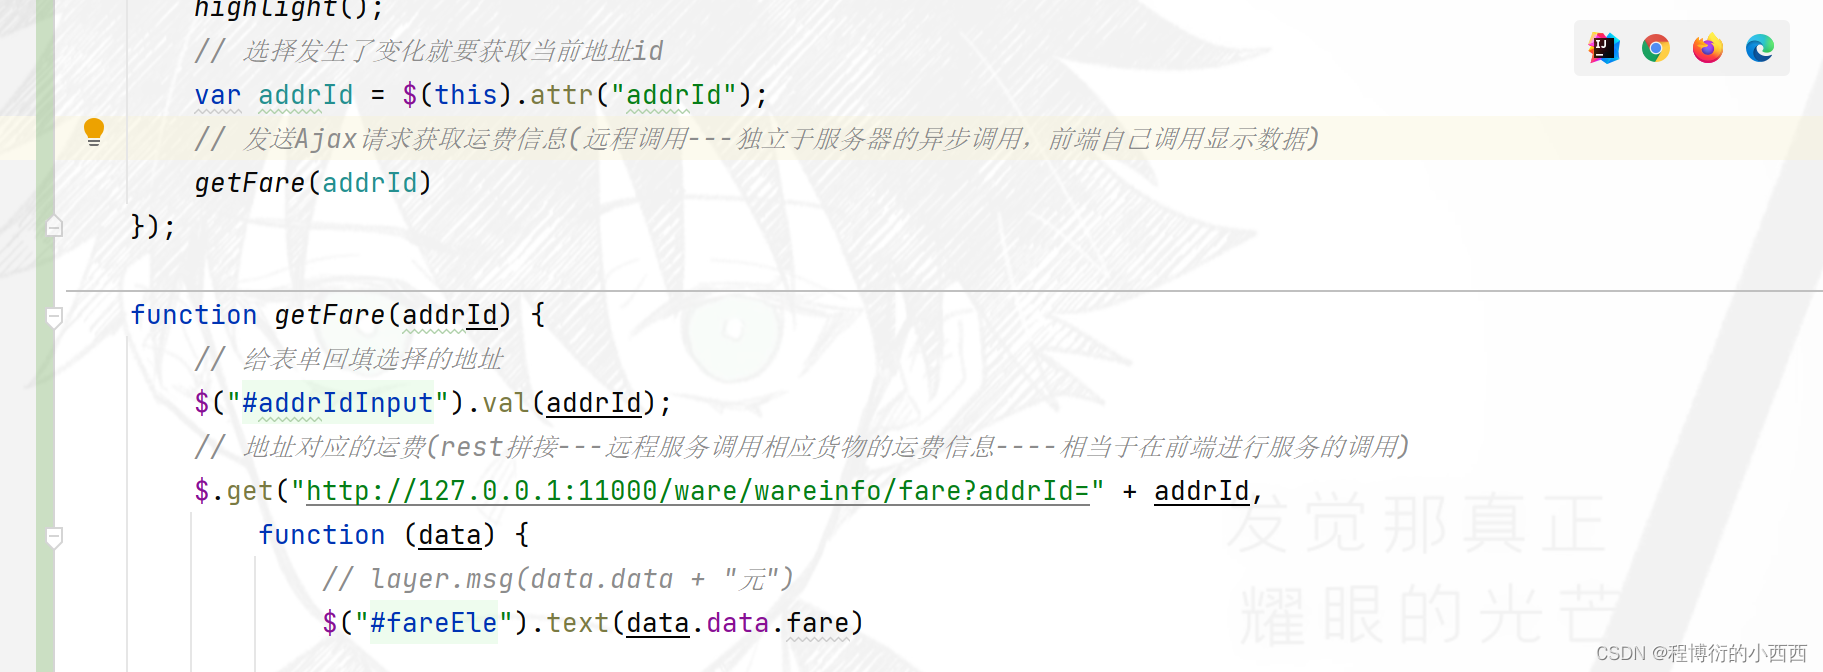
**前端Ajax异步请求获取运费的信息(bug:跨域问题)
相当于前端自己发送请求给仓库服务Gulimall-ware进行远程调用,计算运费(有跨域问题:不知道怎么解决!!)

(在需要被跨域请求的ware微服务添加配置)不过这个可能会出现与gateway配置的相互冲突,但是那个是用在仓库管理系统的!!!
@Configuration
public class CorsConfig implements WebMvcConfigurer {

//防止和gateway配置冲突了
    @Override
    public void addCorsMappings(CorsRegistry registry) {

        registry.addMapping("/**")
            .allowedOrigins("*")
            .allowCredentials(true)
            .allowedMethods("GET", "POST", "PUT", "DELETE", "OPTIONS")
            .maxAge(3600);
    }
}
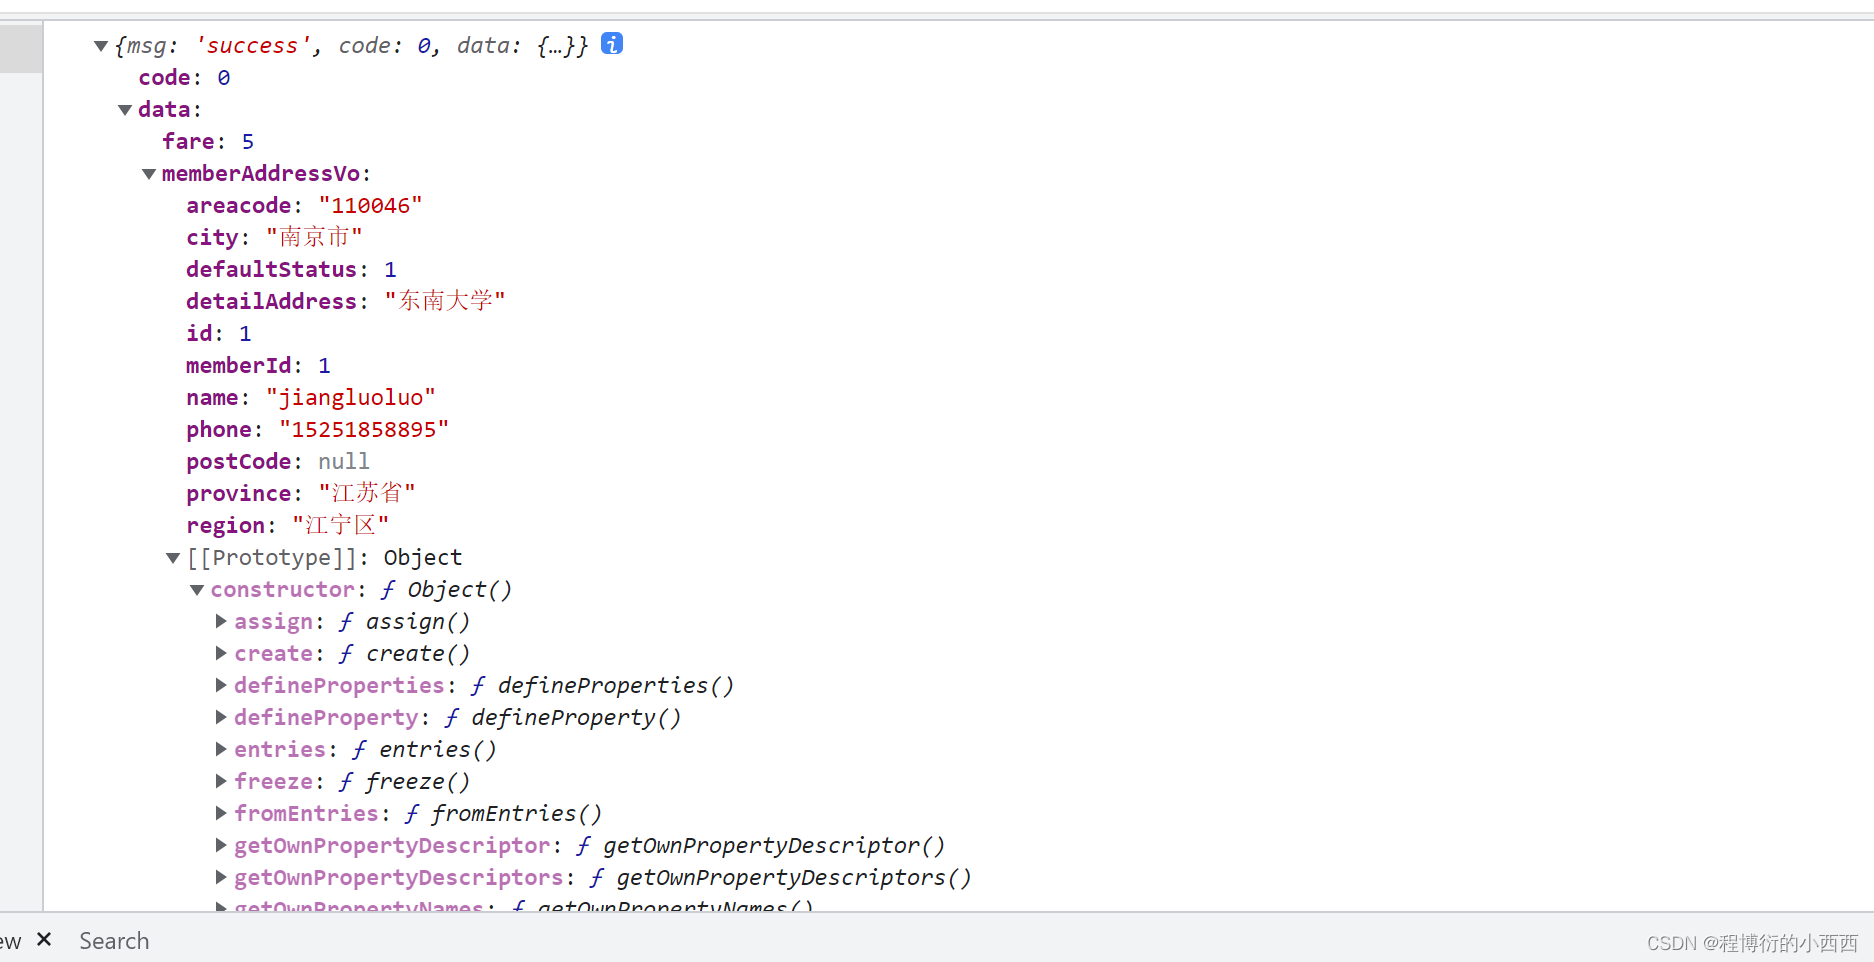
成功跨域请求到这个价格,并能够去结算了!!


完整的业务逻辑
// 订单确认功能实现
@Override
public OrderConfirmVo confirmOrder() throws ExecutionException, InterruptedException {
// 获取用户,用用户信息获取购物车
MemberRespVo memberRespVo = LoginUserInterceptor.threadLocal.get();
// 封装订单
OrderConfirmVo confirmVo = new OrderConfirmVo();
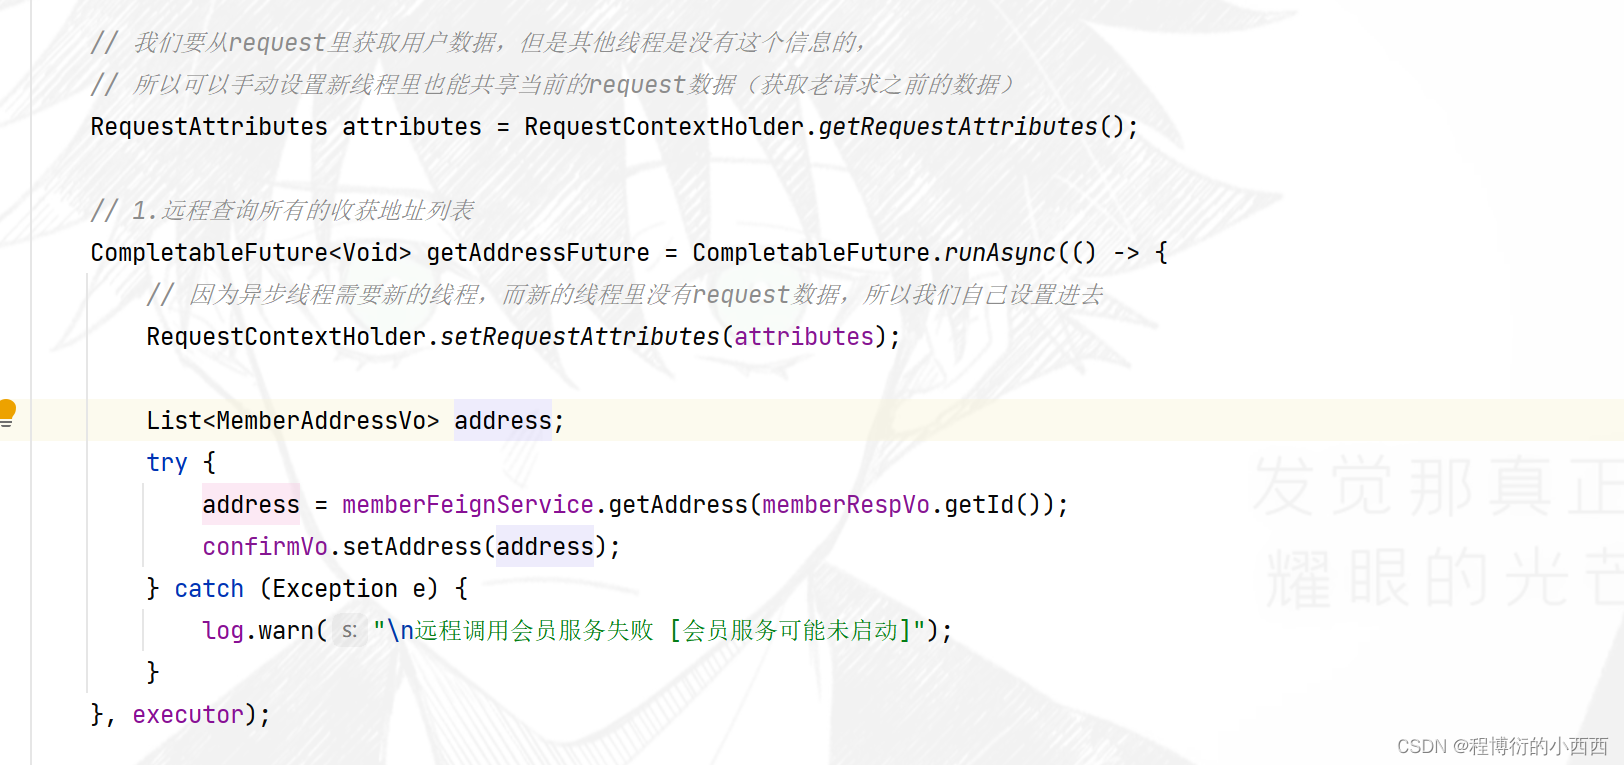
// 我们要从request里获取用户数据,但是其他线程是没有这个信息的,
// 所以可以手动设置新线程里也能共享当前的request数据(获取老请求之前的数据)
RequestAttributes attributes = RequestContextHolder.getRequestAttributes();
// 1.远程查询所有的收获地址列表
CompletableFuture<Void> getAddressFuture = CompletableFuture.runAsync(() -> {
// 因为异步线程需要新的线程,而新的线程里没有request数据,所以我们自己设置进去
RequestContextHolder.setRequestAttributes(attributes);
List<MemberAddressVo> address;
try {
address = memberFeignService.getAddress(memberRespVo.getId());
confirmVo.setAddress(address);
} catch (Exception e) {
log.warn("\n远程调用会员服务失败 [会员服务可能未启动]");
}
}, executor);
// 2. 远程查询购物车服务,并得到每个购物项是否有库存
CompletableFuture<Void> cartFuture = CompletableFuture.runAsync(() -> {
// 异步线程共享 RequestContextHolder.getRequestAttributes()
RequestContextHolder.setRequestAttributes(attributes);
// feign在远程调用之前要构造请求 调用很多拦截器
// 远程获取用户的购物项
List<OrderItemVo> items = cartFeignService.getCurrentUserCartItems();
confirmVo.setItems(items);
}, executor).thenRunAsync(() -> {
//接着查询每个购物项的库存信息
RequestContextHolder.setRequestAttributes(attributes);
List<OrderItemVo> items = confirmVo.getItems();
// 获取所有商品的id(接着查询每个购物项的库存信息)
List<Long> skus = items.stream().map(item -> item.getSkuId()).collect(Collectors.toList());
R hasStock = wmsFeignService.getSkuHasStock(skus);
List<SkuStockVo> data = hasStock.getData(new TypeReference<List<SkuStockVo>>() {
});
if (data != null) {
// 各个商品id 与 他们库存状态的映射map // 学习下收集成map的用法
Map<Long, Boolean> stocks = data.stream().collect 最低0.47元/天 解锁文章


 被折叠的 条评论
为什么被折叠?
被折叠的 条评论
为什么被折叠?
 到【灌水乐园】发言


