


Spring’s flexible and comprehensive set of extensions and third-party libraries let developers build almost any application imaginable. At its core, Spring Framework’s Inversion of Control (IoC) and Dependency Injection (DI) features provide the foundation for a wide-ranging set of features and functionality. Whether you’re building secure, reactive, cloud-based microservices for the web, or complex streaming data flows for the enterprise, Spring has the tools to help.
作为一个Java程序员,在日常的开发工作中,已经离不开Spring的身影,几乎所有的Java应用都基于Spring构建。如果想凌驾于它,就得深入了解它,现在一起来看看Spring启动加载的过程。
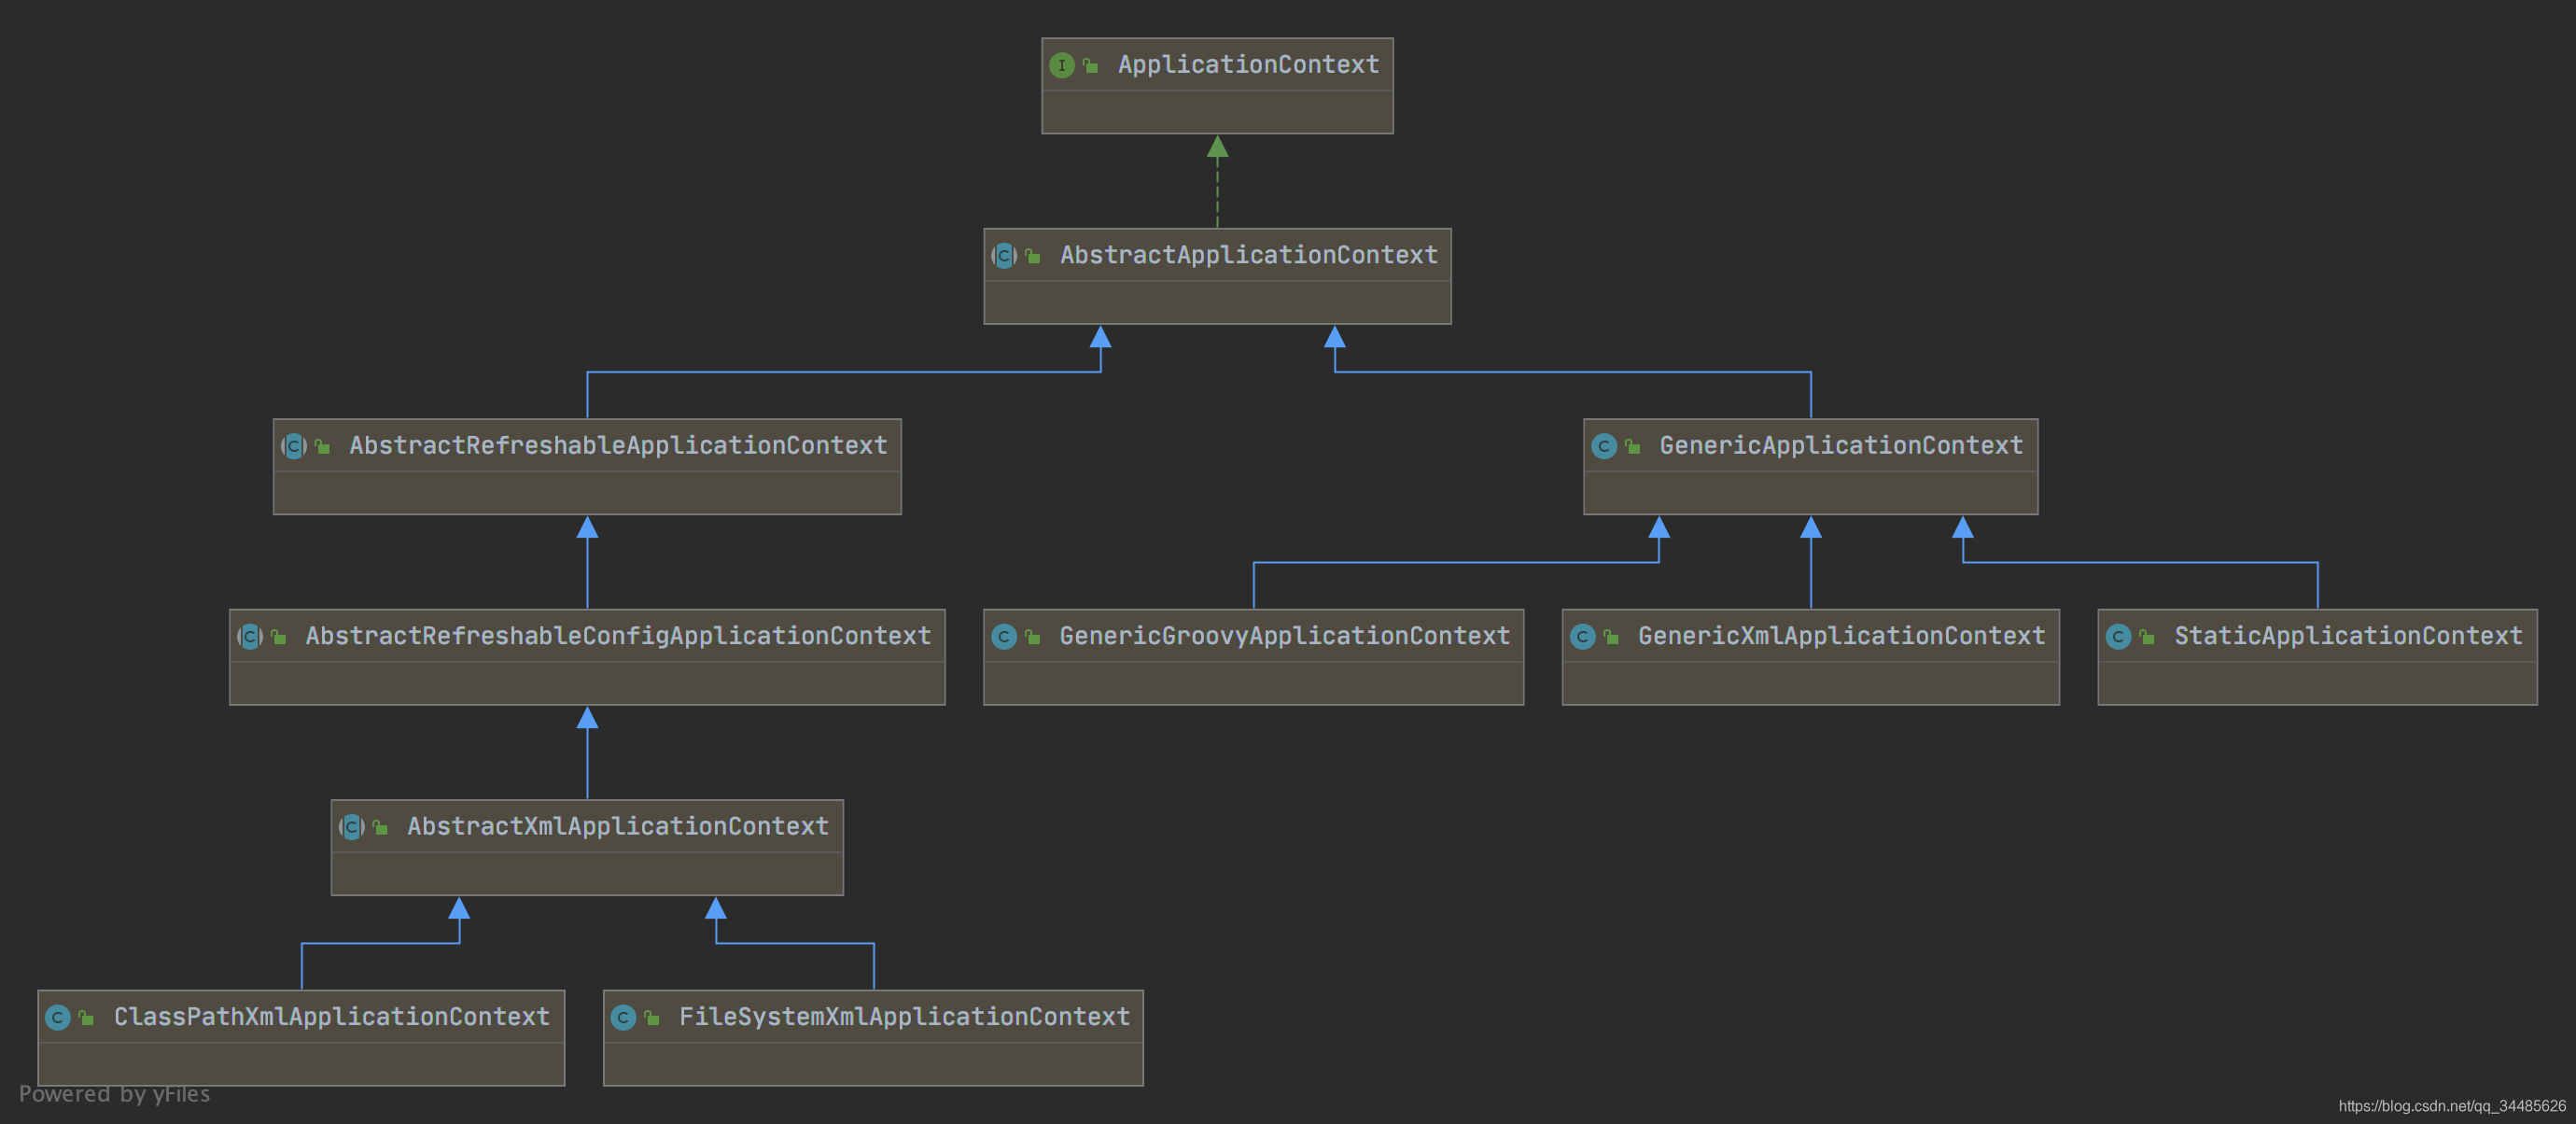
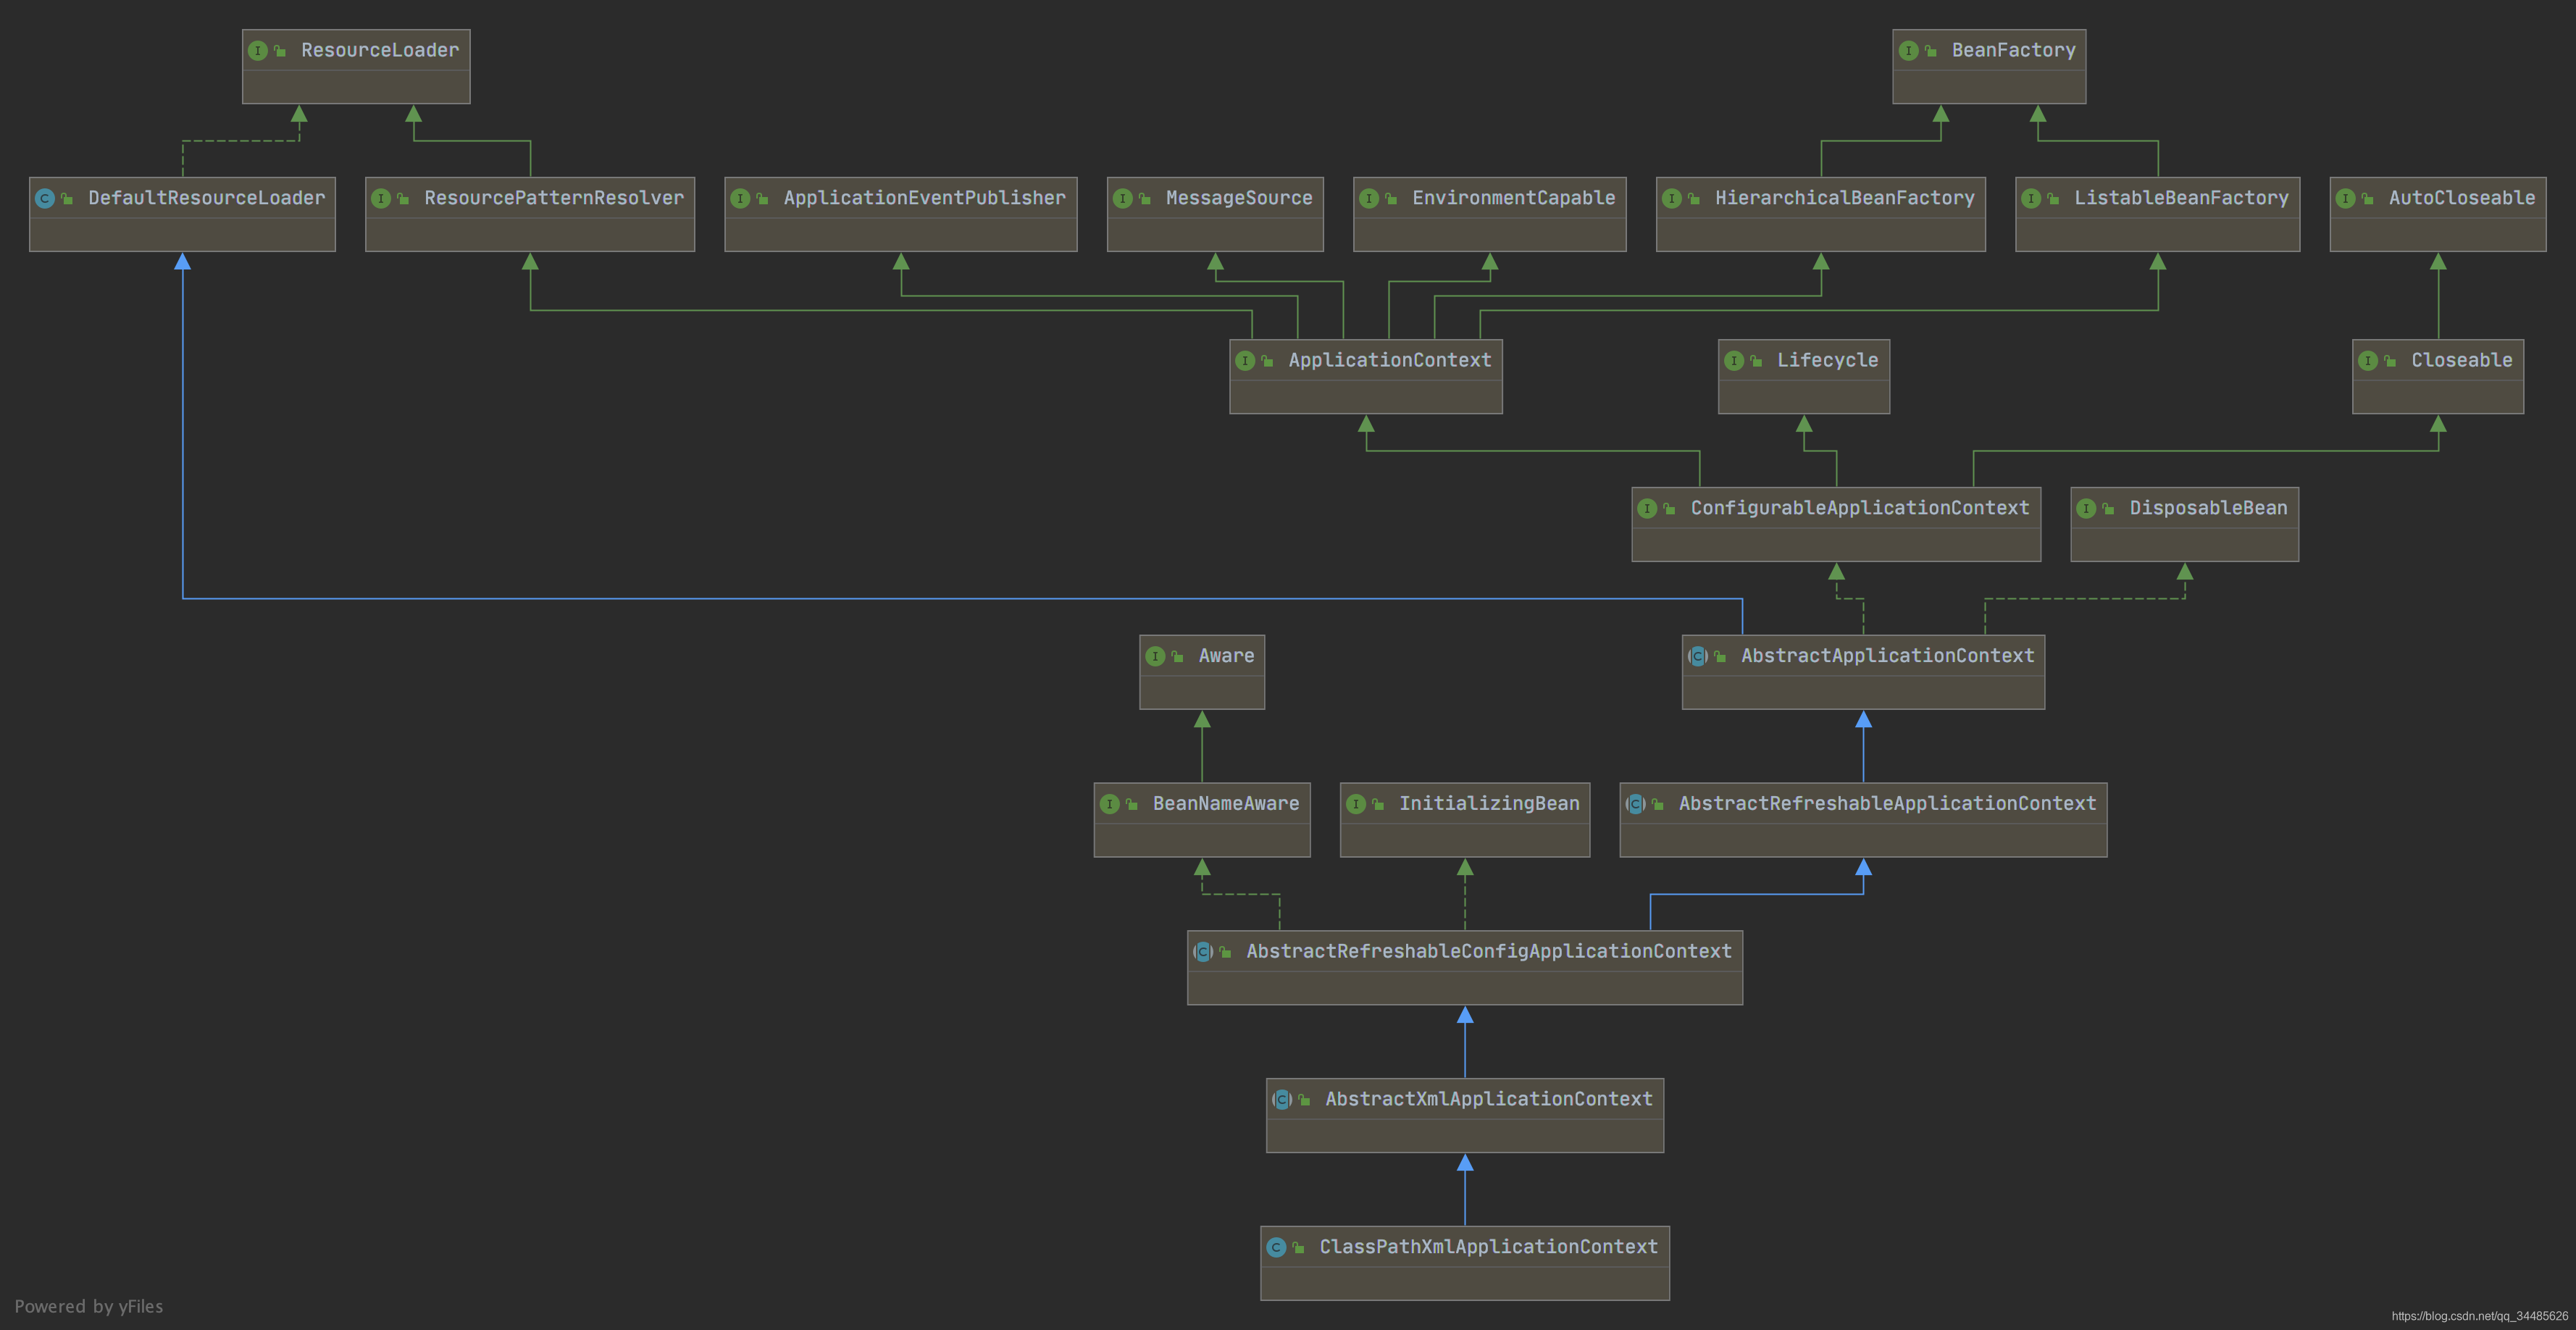
通过UML类图可知应用上下文ApplicationContext作为一个顶级接口(注:这里指的是context,ApplicationContext还继承了EnvironmentCapable, ListableBeanFactory, HierarchicalBeanFactory,MessageSource, ApplicationEventPublisher, ResourcePatternResolver6个接口)它有着5个实现类,平时比较常用的是ClassPathXmlApplicationContext。
基于ClassPathXmlApplicationContext构建一个Spring的应用,常在xml配置文件指定需要管理的类对象,加载的配置等等,启动的时候指定xml配置文件,这里以ClassPathXmlApplicationContext为例来贯穿整个启动过程。
import org.springframework.context.ApplicationContext;
import org.springframework.context.support.ClassPathXmlApplicationContext;

public class Demo {
    public static void main(String[] args) {
        ApplicationContext applicationContext = new ClassPathXmlApplicationContext("applicationContext.xml");
    }
}
ClassPathXmlApplicationContext提供了10个构造器,一个无参构造器,其于9个需要指定xml配置文件或者一个ApplicationContext对象(会被用来加载父类)。 ApplicationContext applicationContext = new ClassPathXmlApplicationContext("applicationContext.xml");这个构造器最终调用的是public ClassPathXmlApplicationContext(String[] configLocations, boolean refresh, ApplicationContext parent) 构造器,会创建出一个ClassPathXmlApplicationContext对象并且加载xml中的定义,loading all bean definitions and creating all singletons.加载所有bean定义和创建所有的单列对象(划重点)。在该构造器中会
1、加载父类的构造器,一直加载到AbstractApplicationContext
2、为应用上下文加载配置地址
3、刷新上下文
public class ClassPathXmlApplicationContext extends AbstractXmlApplicationContext {

	private Resource[] configResources;
    public ClassPathXmlApplicationContext(String configLocation) throws BeansException {
		this(new String[] {configLocation}, true, null);
	}

    public ClassPathXmlApplicationContext(String[] configLocations, boolean refresh, ApplicationContext parent)
			throws BeansException {

		super(parent);
		setConfigLocations(configLocations);
		if (refresh) {
			refresh();
		}
	}
}
1、加载父类的构造器
第三个参数ApplicationContext parent参数名为啥命名为parent,可能是因为该参数一直传给父类的构造器,直到AbstractApplicationContext的构造器(通过上面的UML类图可知,AbstractApplicationContext是最顶级的一个抽象类),在AbstractApplicationContext的构造器中,如果parent不为null,会进行Environment合并操作。
public abstract class AbstractApplicationContext extends DefaultResourceLoader
		implements ConfigurableApplicationContext, DisposableBean {
    public AbstractApplicationContext(ApplicationContext parent) {
		this();
		setParent(parent);
	}

    @Override
	public void setParent(ApplicationContext parent) {
		this.parent = parent;
		if (parent != null) {
			Environment parentEnvironment = parent.getEnvironment();
			if (parentEnvironment instanceof ConfigurableEnvironment) {
				getEnvironment().merge((ConfigurableEnvironment) parentEnvironment);
			}
		}
	}
}
2、为应用上下文加载(解析)配置地址
setConfigLocations方法是在父类AbstractRefreshableConfigApplicationContext中实现的,把传进来的路径进行解析之后存放在private String[] configLocations属性中,所以解析的话,这里就会一个“解析器“——resolvePath,该解析器会把配置路径中出现的占位符${}用用相应的环境属性值替换掉。
public abstract class AbstractRefreshableConfigApplicationContext extends AbstractRefreshableApplicationContext
implements BeanNameAware, InitializingBean {
public void setConfigLocations(String[] locations) {
if (locations != null) {
Assert.noNullElements(locations, "Config locations must not be null");
this.configLocations = new String[locations.length];
for (int i = 0; i < locations.length; i++) {
this.configLocations[i] = resolvePath(locations[i]).trim();
}
}
else {
this.configLocations = null;
}
}
protected String resolvePath(String path) {
return getEnvironment().resolveRequiredPlaceholders(path);
}
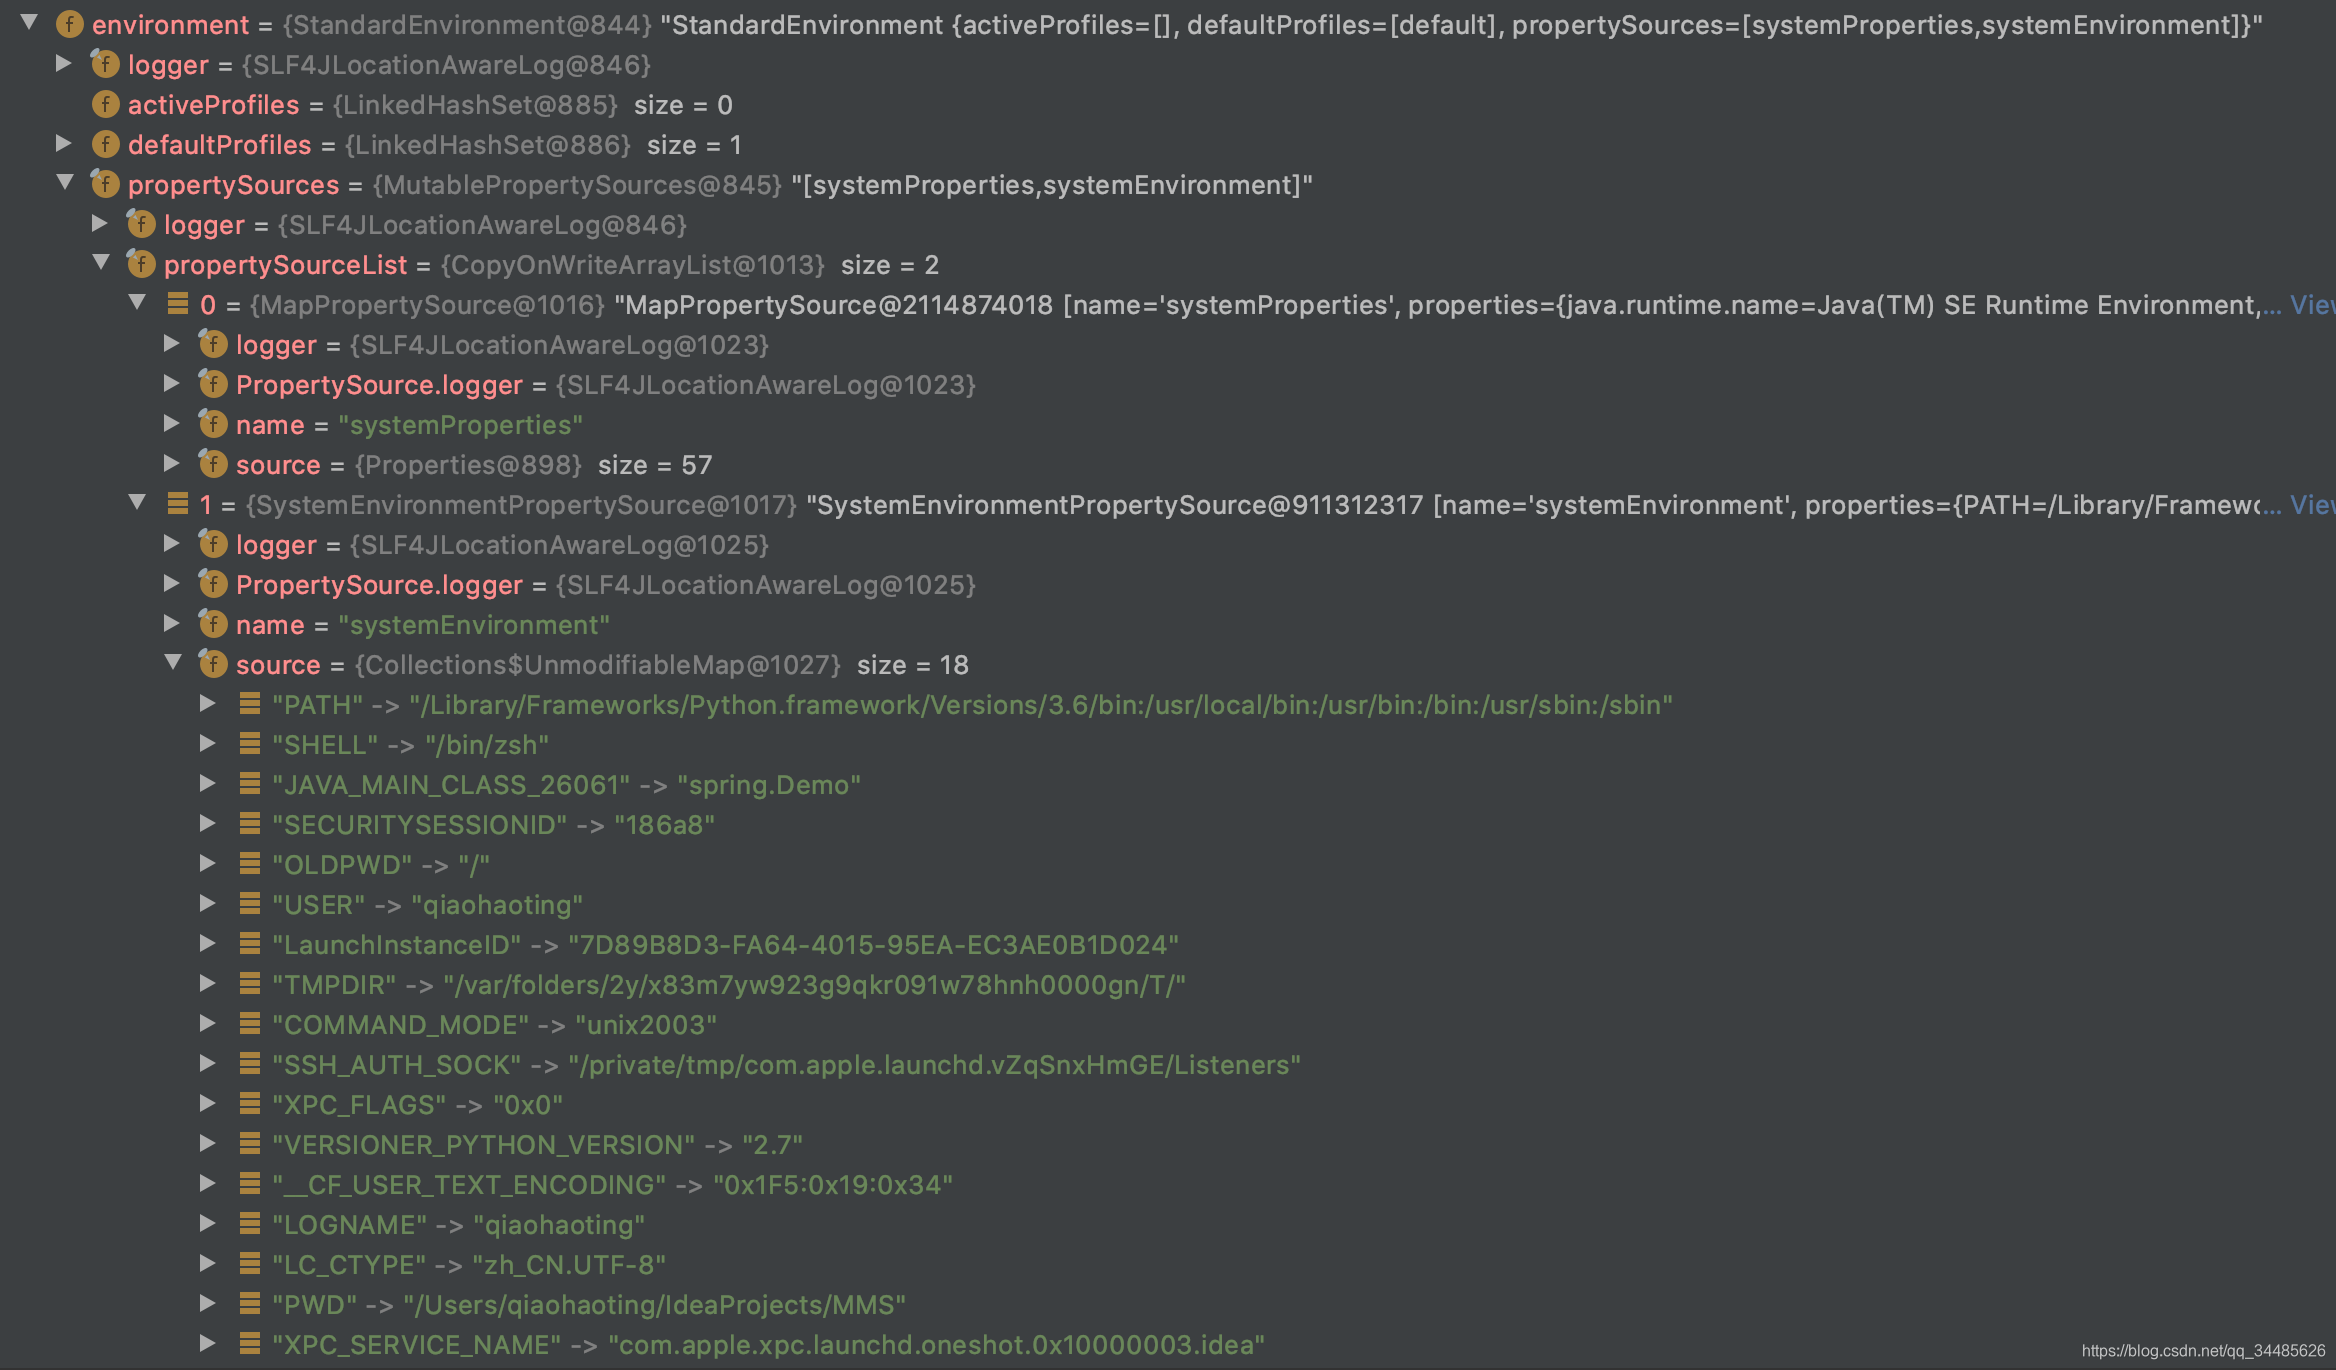
}环境引用的是标准环境StandardEnvironment,相当于跑这个应用的机器环境。getEnvironment是在AbstractApplicationContext实现的,运用了懒加载的单例模式,第一次获取的时候创建StandardEnvironment实例对象。该对象实例化的时候会加载环境配置变量systemEnvironment、systemProperties。
public abstract class AbstractApplicationContext extends DefaultResourceLoader
		implements ConfigurableApplicationContext, DisposableBean {
    @Override
	public ConfigurableEnvironment getEnvironment() {
		if (this.environment == null) {
			this.environment = createEnvironment();
		}
		return this.environment;
	}

    protected ConfigurableEnvironment createEnvironment() {
		return new StandardEnvironment();
	}
}
public class StandardEnvironment extends AbstractEnvironment {
/** System environment property source name: {@value} */
public static final String SYSTEM_ENVIRONMENT_PROPERTY_SOURCE_NAME = "systemEnvironment";
/** JVM system properties property source name: {@value} */
public static final String SYSTEM_PROPERTIES_PROPERTY_SOURCE_NAME = "systemProperties";
@Override
protected void customizePropertySources(MutablePropertySources propertySources) {
propertySources.addLast(new MapPropertySource(SYSTEM_PROPERTIES_PROPERTY_SOURCE_NAME, getSystemProperties()));
propertySources.addLast(new SystemEnvironmentPropertySource(SYSTEM_ENVIRONMENT_PROPERTY_SOURCE_NAME, getSystemEnvironment()));
}
}
在debug调试下可以清晰地看到systemEnvironment维护了57个系统环境信息,systemProperties维护了18个系统属性。这些变量是在java.lang.System中通过native本地方法获取的。
3、refresh
加载或者刷新在xml文件、properties文件、关系型数据库中的持久化表现的配置。该步骤如果中途出错,需要进行销毁,避免出现资源悬空(悬空指针可能会导致不可预估的错误)。换句话说,要么所有的对象都能得到实例化,要么就一个都不实例化(得把已经实例化的对象销毁)。
3.1、刷新准备
3.2、加载/刷新对象工厂
3.3、对象工厂准备
3.4、在应用上下文被标准初始化之后修改它的beanFactory
3.5、执行beanFactory后置处理器
3.6、注册能拦截Bean创建的处理器
3.7、初始化spring上下文的消息源(国际化)
3.8、为spring上下文初始化事件广播器
3.9、在一些特定的spring上下文子类中加载一些特殊的bean
3.10、注册事件监听器
3.11、初始化所有剩余的非懒加载单例对象(懒加载的初次使用的时候才会加载)
3.12、结束spring上下文的刷新,执行LifecycleProcessor的onRefresh方法以及把该上下文作为事件发布出去
3.13、如果发生BeansException异常,则销毁已创建的单例对象
public abstract class AbstractApplicationContext extends DefaultResourceLoader
		implements ConfigurableApplicationContext, DisposableBean {
	/** Synchronization monitor for the "refresh" and "destroy" */
	private final Object startupShutdownMonitor = new Object();

	@Override
	public void refresh() throws BeansException, IllegalStateException {
		synchronized (this.startupShutdownMonitor) {
			// Prepare this context for refreshing.
			prepareRefresh();

			// Tell the subclass to refresh the internal bean factory.
			ConfigurableListableBeanFactory beanFactory = obtainFreshBeanFactory();

			// Prepare the bean factory for use in this context.
			prepareBeanFactory(beanFactory);

			try {
				// Allows post-processing of the bean factory in context subclasses.
				postProcessBeanFactory(beanFactory);

				// Invoke factory processors registered as beans in the context.
				invokeBeanFactoryPostProcessors(beanFactory);

				// Register bean processors that intercept bean creation.
				registerBeanPostProcessors(beanFactory);

				// Initialize message source for this context.
				initMessageSource();

				// Initialize event multicaster for this context.
				initApplicationEventMulticaster();

				// Initialize other special beans in specific context subclasses.
				onRefresh();

				// Check for listener beans and register them.
				registerListeners();

				// Instantiate all remaining (non-lazy-init) singletons.
				finishBeanFactoryInitialization(beanFactory);

				// Last step: publish corresponding event.
				finishRefresh();
			}

			catch (BeansException ex) {
				logger.warn("Exception encountered during context initialization - cancelling refresh attempt", ex);

				// Destroy already created singletons to avoid dangling resources.
				destroyBeans();

				// Reset 'active' flag.
				cancelRefresh(ex);

				// Propagate exception to caller.
				throw ex;
			}
		}
	}
}
3.1、刷新准备prepareRefresh
刷新准备,设置启动时间,设置活跃标志,初始化上下文环境中任何的占位符属性资源,验证所有必须属性是否被解析。
3.2、加载/刷新beanFactory
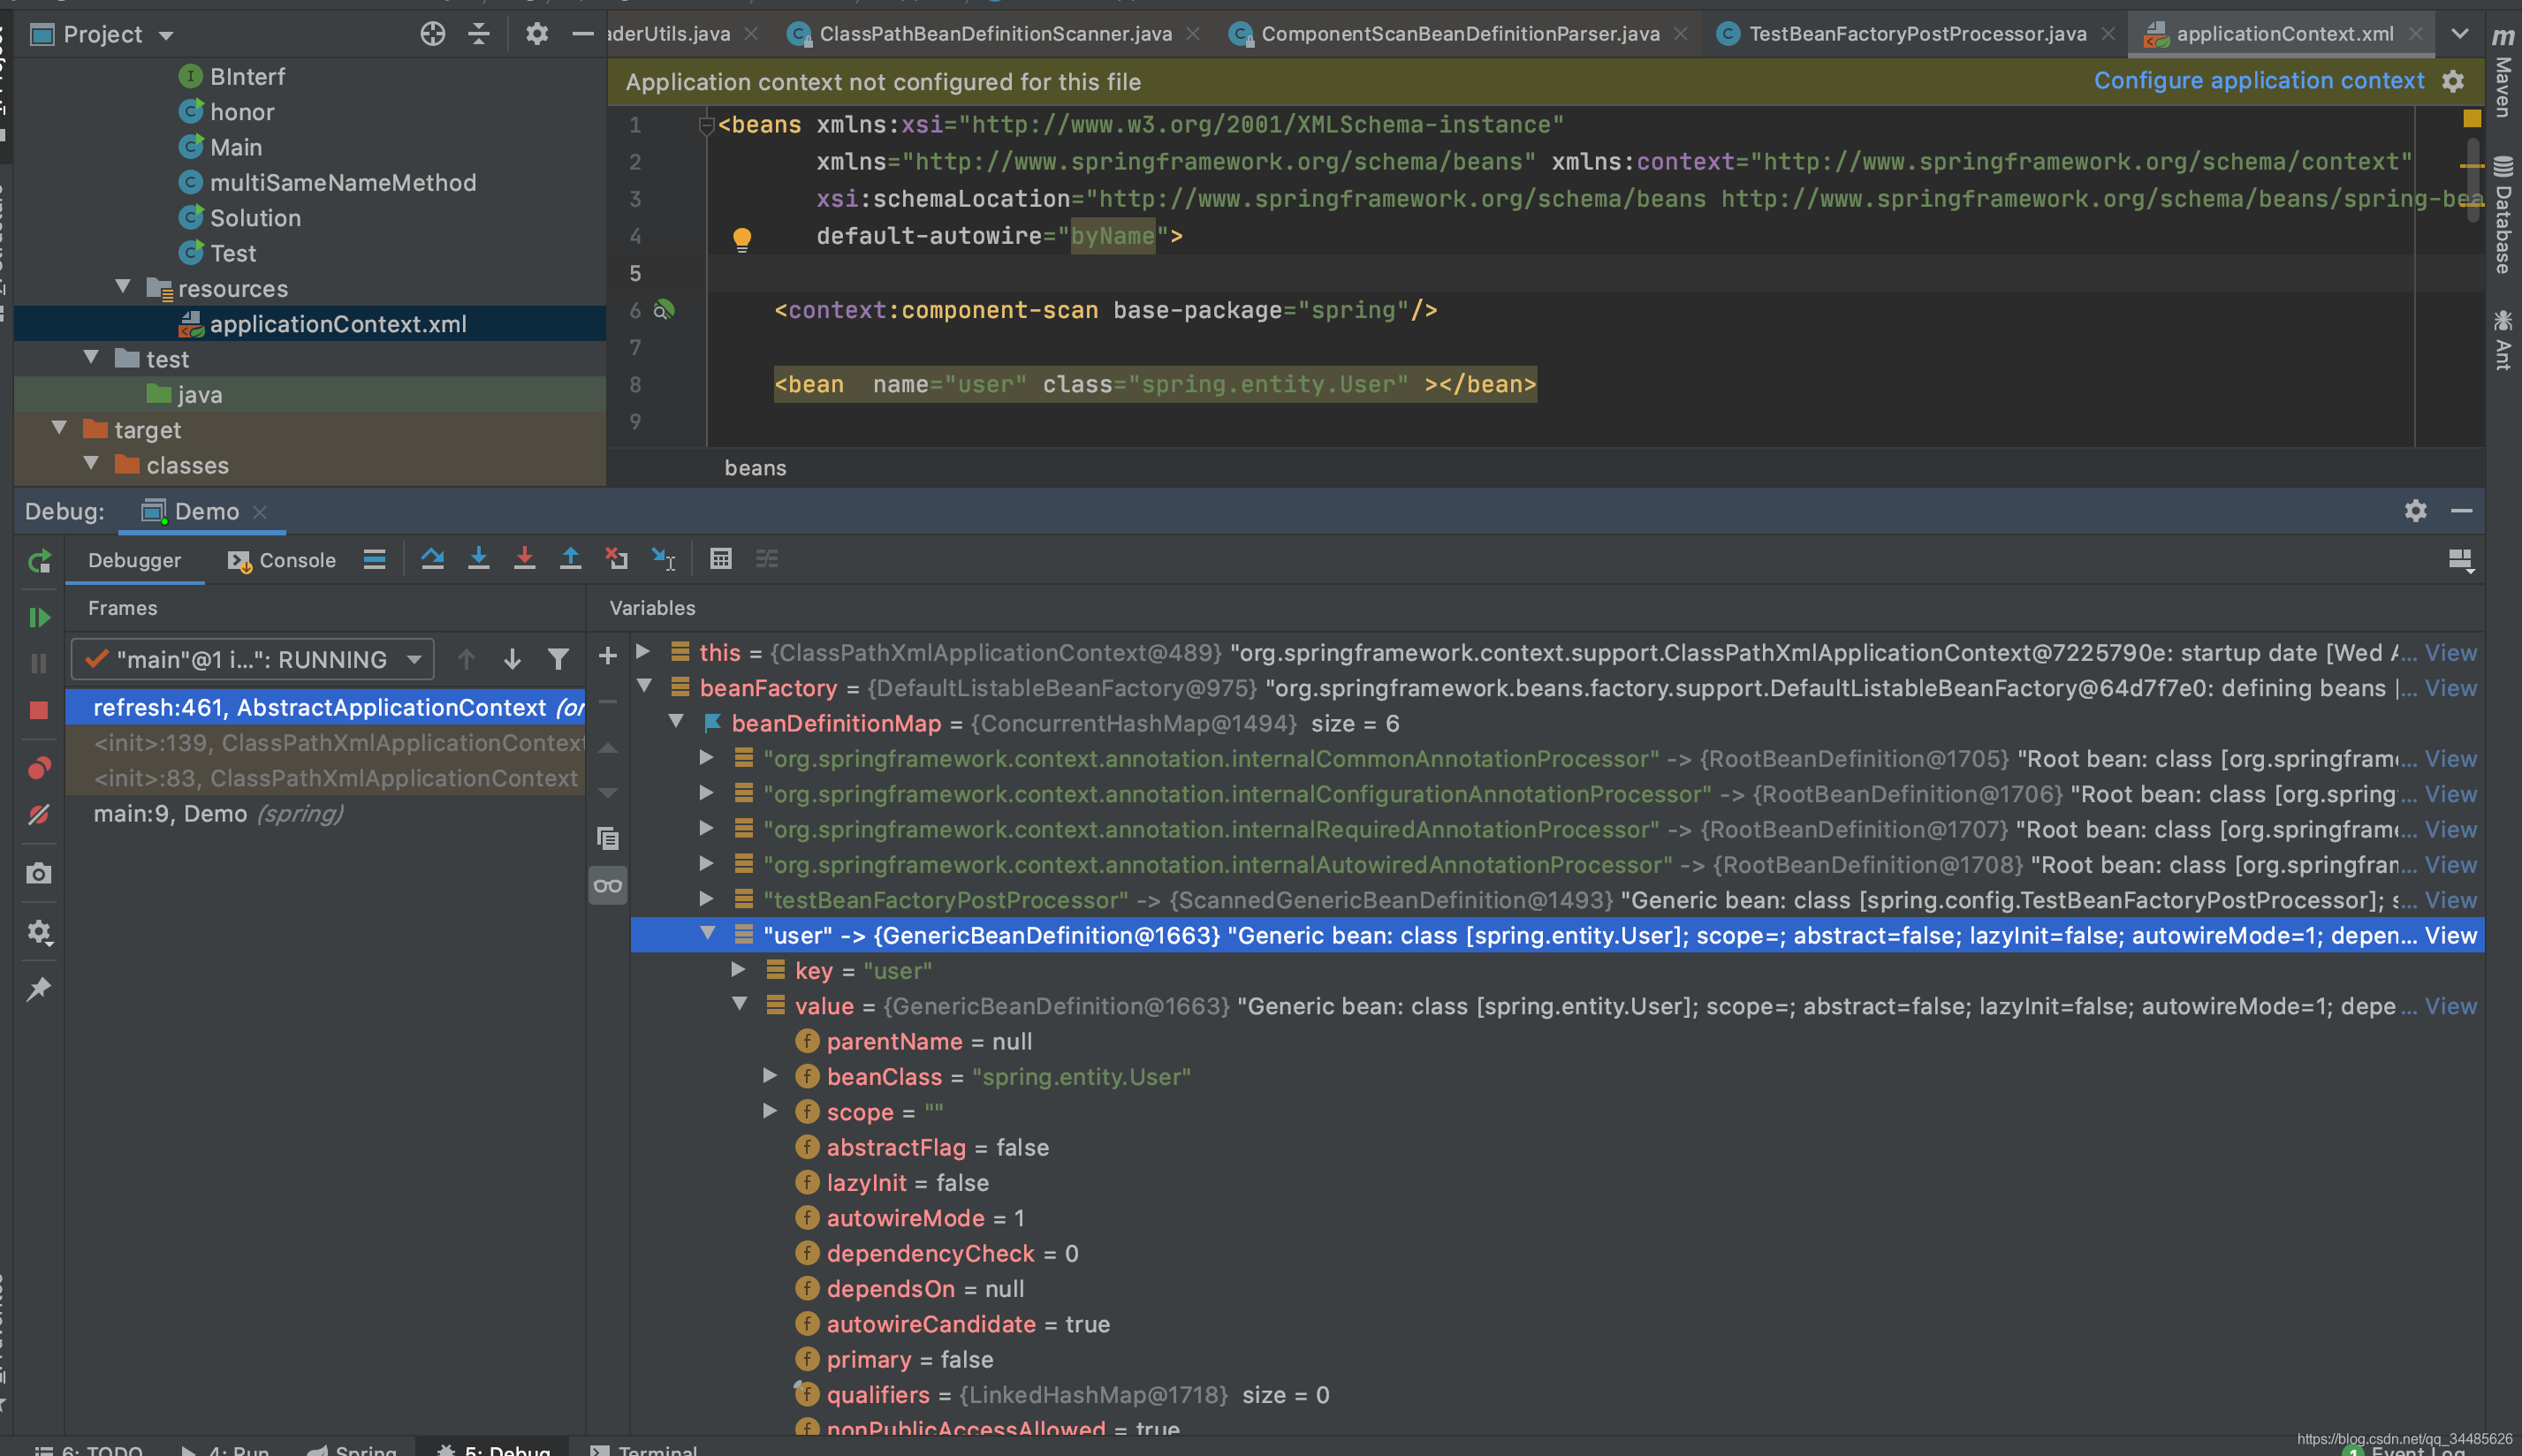
如果当前已有一个beanFactory,那么就销毁现有的bean对象和关闭当前bean工厂,然后创建一个新的DefaultListableBeanFactory对象,最后也是非常重要的一步就是解析出xml文件中配置的bean,并注册到bean注册表beanDefinitionMap中,key为对象名称,value为bean定义。
public abstract class AbstractRefreshableApplicationContext extends AbstractApplicationContext {
	@Override
	protected final void refreshBeanFactory() throws BeansException {
		if (hasBeanFactory()) {
			destroyBeans();
			closeBeanFactory();
		}
		try {
			DefaultListableBeanFactory beanFactory = createBeanFactory();
			beanFactory.setSerializationId(getId());
			customizeBeanFactory(beanFactory);
			loadBeanDefinitions(beanFactory);
			synchronized (this.beanFactoryMonitor) {
				this.beanFactory = beanFactory;
			}
		}
		catch (IOException ex) {
			throw new ApplicationContextException("I/O error parsing bean definition source for " + getDisplayName(), ex);
		}
	}
}
public class DefaultListableBeanFactory extends AbstractAutowireCapableBeanFactory
implements ConfigurableListableBeanFactory, BeanDefinitionRegistry, Serializable {
/** Map of bean definition objects, keyed by bean name */
private final Map<String, BeanDefinition> beanDefinitionMap = new ConcurrentHashMap<String, BeanDefinition>(64);
}如下图,在xml文件中配置了一个user对象,那么对应的就会在注册表beanDefinitionMap中维护着对应的bean定义,定义beanDefinition中维护着完整类名,是否是懒加载,是否自动装配,属性,作用域等等。
3.3、对象工厂准备prepareBeanFactory
在上一步加载出一个最新的工厂对象之后,这一步的准备工作说白了就是对工厂对象的一些属性进行初始化。设置类加载器、对象表达式解析器、对象后置处理器、注册解析依赖;完成三个环境相关的单例对象创建;
3.4、在应用上下文被标准初始化之后修改它的beanFactory。所有的bean定义都被加载了,但是还没有实例化出bean对象。修改:这允许在确定的上下文ApplicationContext实现中注册特殊的对象后置处理器。但是在该版本(spring4.0.9)的ClassPathXmlApplicationContext中并没有实现该方法。可以看一下ResourceAdapterApplicationContext中有实现,如下所示。
public class ResourceAdapterApplicationContext extends GenericApplicationContext {
    private final BootstrapContext bootstrapContext;

    protected void postProcessBeanFactory(ConfigurableListableBeanFactory beanFactory) throws BeansException {
        beanFactory.addBeanPostProcessor(new BootstrapContextAwareProcessor(this.bootstrapContext));
        beanFactory.ignoreDependencyInterface(BootstrapContextAware.class);
        beanFactory.registerResolvableDependency(BootstrapContext.class, this.bootstrapContext);
        beanFactory.registerResolvableDependency(WorkManager.class, new ObjectFactory<WorkManager>() {
            public WorkManager getObject() {
                return ResourceAdapterApplicationContext.this.bootstrapContext.getWorkManager();
            }
        });
    }
}
3.5、执行beanFactory后置处理器。按照给定的顺序,实例化并执行所有的beanFactory后置处理器。该操作必须在实例化单例对象之前。
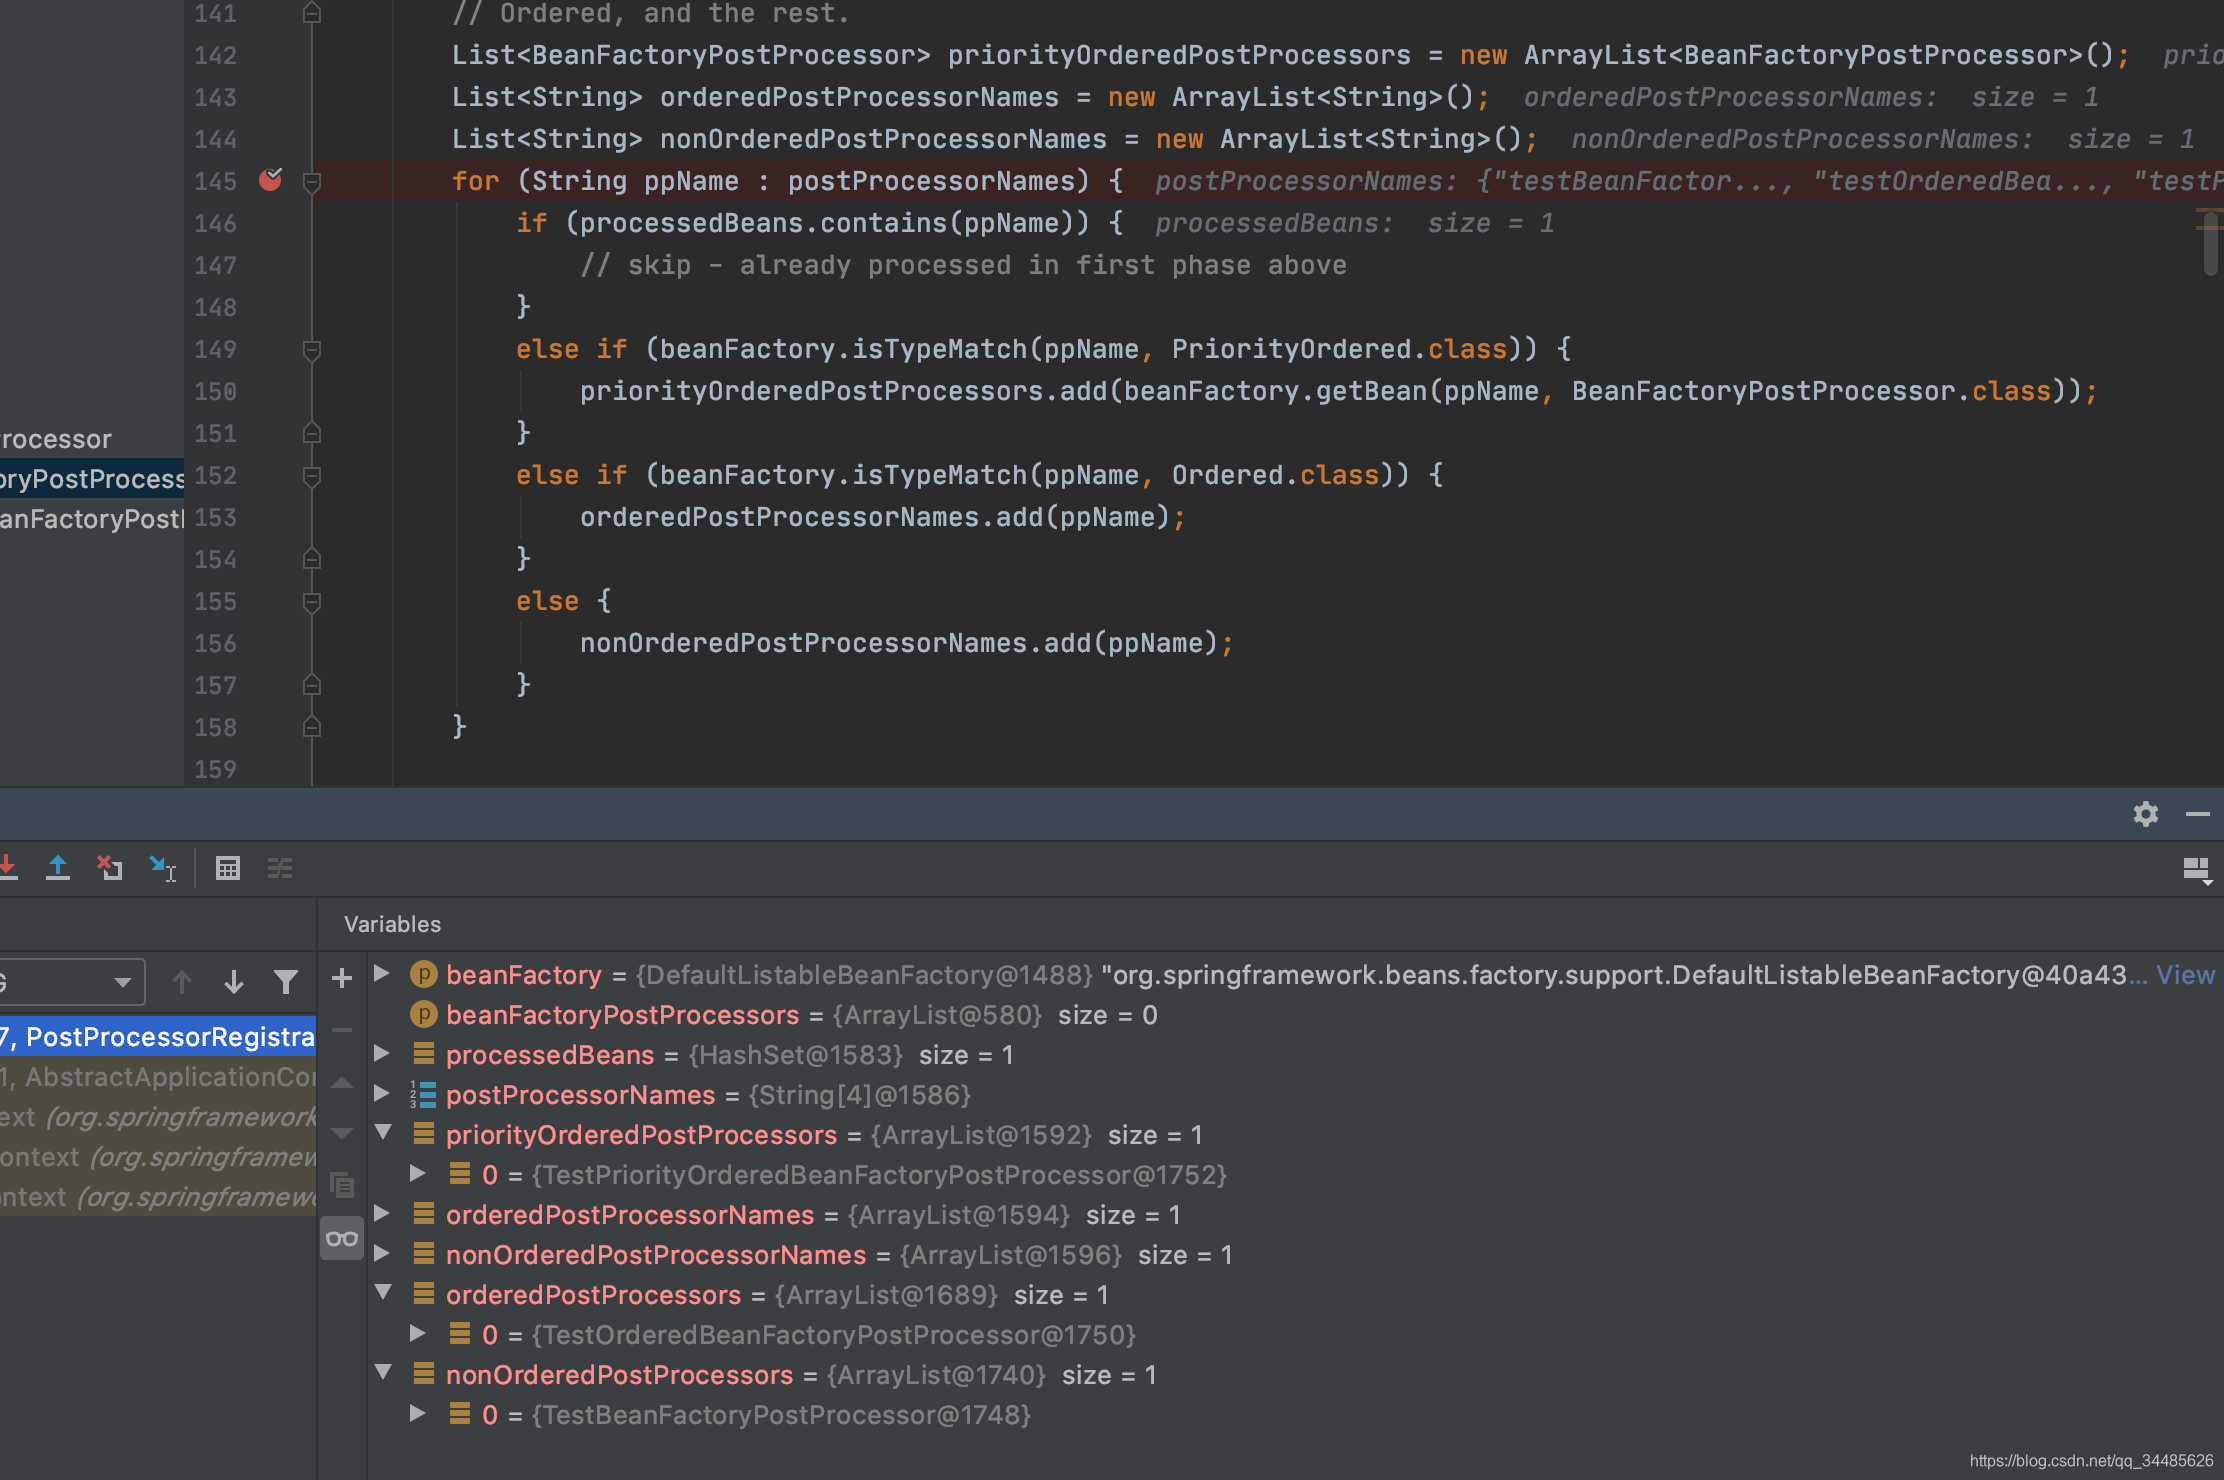
可以看到在第二步加载beanFactory的时候会把改后置处理器相关信息加载到注册表中,现在这一步骤会进行对其进行实例化并执行。核心实现代码在PostProcessorRegistrationDelegate的invokeBeanFactoryPostProcessors函数中,在该函数中如果存在BeanDefinitionRegistryPostProcessors的话就先执行,接着把beanFactory后置处理器按照类别进行分开,实现了PriorityOrdered的分为一类,实现了Ordered的分为一类,都没有实现的分为一类,并先后执行,执行的时候实际上是调用beanFactory的postProcessBeanFactory(ConfigurableListableBeanFactory beanFactory)方法。
class PostProcessorRegistrationDelegate {

    public static void invokeBeanFactoryPostProcessors(
            ConfigurableListableBeanFactory beanFactory, List<BeanFactoryPostProcessor> beanFactoryPostProcessors) {

        // Invoke BeanDefinitionRegistryPostProcessors first, if any.

        // Separate between BeanFactoryPostProcessors that implement PriorityOrdered,
        // Ordered, and the rest.

        // First, invoke the BeanFactoryPostProcessors that implement PriorityOrdered.

        // Next, invoke the BeanFactoryPostProcessors that implement Ordered.

        // Finally, invoke all other BeanFactoryPostProcessors.
    }
}
如下注入三个自定义的beanFactory后置处理器,分别是TestBeanFactoryPostProcessor,实现了实现了Ordered接口的TestOrderedBeanFactoryPostProcessor,实现了PriorityOrdered接口的TestPriorityOrderedBeanFactoryPostProcessor。
@Component
public class TestBeanFactoryPostProcessor implements BeanFactoryPostProcessor {
    @Override
    public void postProcessBeanFactory(ConfigurableListableBeanFactory beanFactory) throws BeansException {
        System.out.println("执行了beanFactory后置处理器");
    }
}
@Component
public class TestOrderedBeanFactoryPostProcessor implements Ordered, BeanFactoryPostProcessor {
@Override
public void postProcessBeanFactory(ConfigurableListableBeanFactory beanFactory) throws BeansException {
System.out.println("执行了实现了Ordered接口的beanFactory后置处理器");
}
@Override
public int getOrder() {
return 0;
}
}@Component
public class TestPriorityOrderedBeanFactoryPostProcessor implements PriorityOrdered, BeanFactoryPostProcessor {
@Override
public int getOrder() {
return 0;
}
@Override
public void postProcessBeanFactory(ConfigurableListableBeanFactory beanFactory) throws BeansException {
System.out.println("执行了PriorityOrdered的接口的beanFactory后置处理器");
}
}如下图所示,进过分类,三个beanFactory后置处理器分别被放在的了不同的容器中。
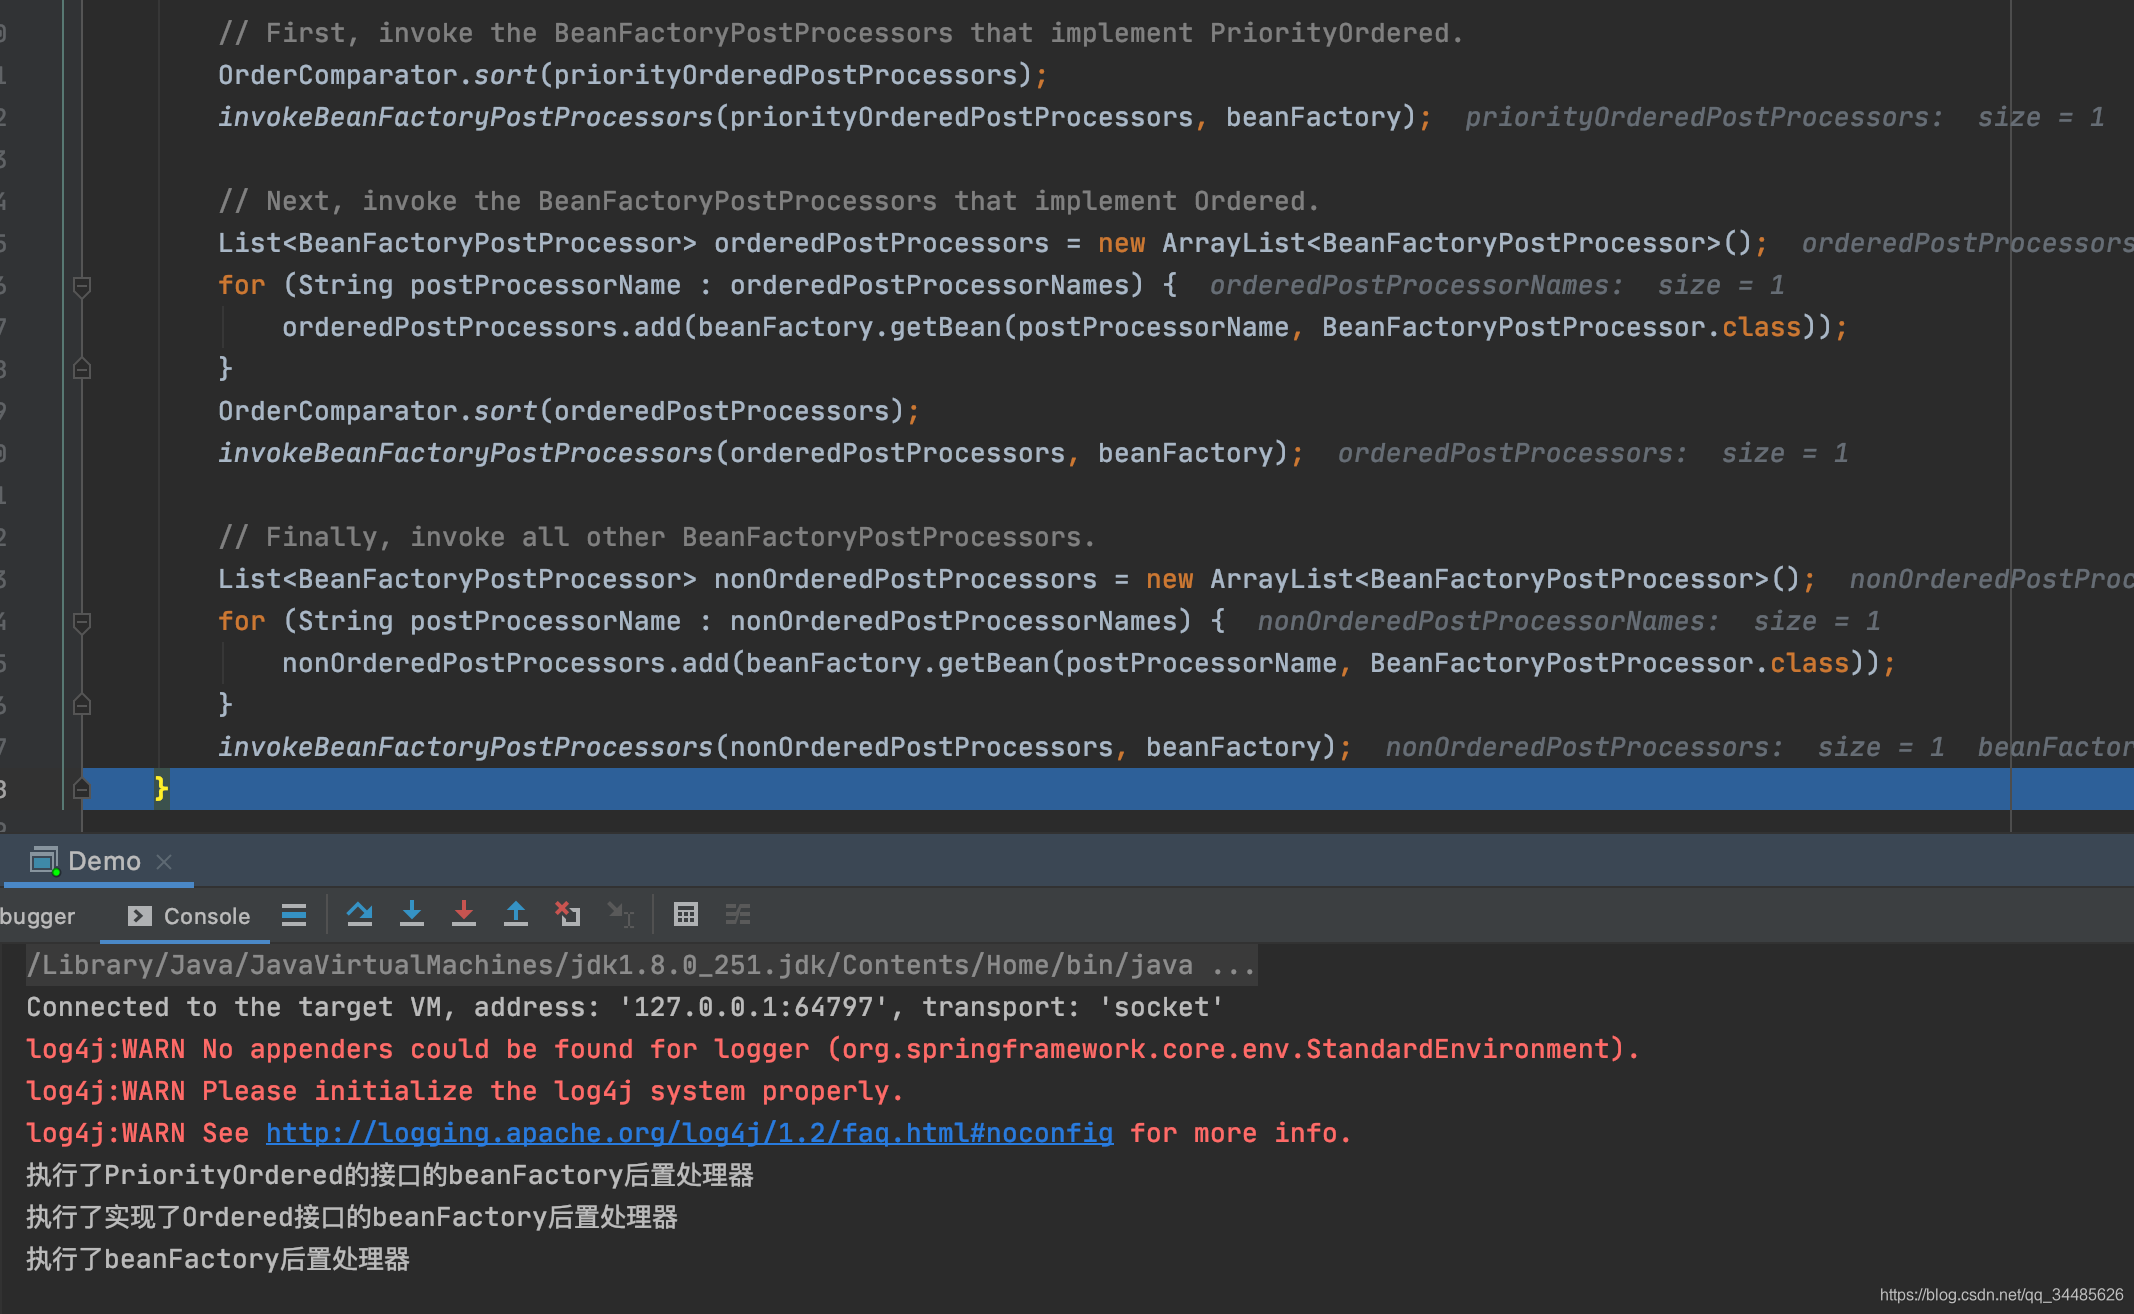
执行结果可见按照了先执行实现了PriorityOrdered接口的beanFactory后置处理,然后执行实现了Ordered接口的beanFactory处理器,最后执行其他的。执行beanFactory后置处理器,并按照给定的顺序来实例化并执行所有的beanFactory后置处理器。 为什么说按照给定的顺序来执行,到这里答案就显而易见了。
3.6、注册能拦截Bean创建的处理器,"能拦截bean创建的处理器"其实就是bean的后置处理器了。在上一步实例化并执行了beanFactory的后置处理器之后,现在按照给定的顺序,实例化以及执行bean后置处理器,并且必须在任何spring上下文bean被实例化之前被调用。核心逻辑在PostProcessorRegistrationDelegate.registerBeanPostProcessors(ConfigurableListableBeanFactory beanFactory, AbstractApplicationContext applicationContext)函数中。
a、获取beanFactory中所有的bean后置处理器
b、向beanFactory中注入一个bean后置处理检查器,该检查器其实也是一个bean对象处理器,满足下面的条件的时候,通过日志记录下来。
			if (bean != null && !(bean instanceof BeanPostProcessor) &&
					this.beanFactory.getBeanPostProcessorCount() < this.beanPostProcessorTargetCount) {
				if (logger.isInfoEnabled()) {
					logger.info("Bean '" + beanName + "' of type [" + bean.getClass() +
							"] is not eligible for getting processed by all BeanPostProcessors " +
							"(for example: not eligible for auto-proxying)");
				}
			}
c、把bean后置处理器按照实现了PriorityOrdered接口、Ordered接口以及其他三类进行分开。如下分别定义了实现PriorityOrdered接口、Ordered接口以及常规的三个bean后置处理器TestPriorityOrderedBeanPostProcessor、TestOrderedBeanPostProcessor和TestBeanPostProcessor。
@Component
public class TestPriorityOrderedBeanPostProcessor implements BeanPostProcessor, PriorityOrdered {
    @Override
    public Object postProcessBeforeInitialization(Object bean, String beanName) throws BeansException {
        System.out.println("在bean:" + beanName + "对象实例化之前执行了实现了PriorityOrdered接口的bean后置处理器");
        if(bean instanceof User) {
            // do something
        }
        return bean;
    }

    @Override
    public Object postProcessAfterInitialization(Object bean, String beanName) throws BeansException {
        System.out.println("在bean:" + beanName + "对象实例化之后执行了实现了PriorityOrdered接口的bean后置处理器");
        if(bean instanceof User) {
            // do something
        }
        return bean;
    }

    @Override
    public int getOrder() {
        return 0;
    }
}
@Component
public class TestOrderedBeanPostProcessor implements BeanPostProcessor, Ordered {
public TestOrderedBeanPostProcessor() {
System.out.println("开始实例化TestOrderedBeanPostProcessor对象");
}
@Override
public Object postProcessBeforeInitialization(Object bean, String beanName) throws BeansException {
System.out.println("在bean:" + beanName + "对象实例化之前执行了实现了Ordered接口的bean后置处理器");
if(bean instanceof User) {
// do something
}
return bean;
}
@Override
public Object postProcessAfterInitialization(Object bean, String beanName) throws BeansException {
System.out.println("在bean:" + beanName + "对象实例化之后执行了实现了Ordered接口的bean后置处理器");
if(bean instanceof User) {
// do something
}
return bean;
}
@Override
public int getOrder() {
return 0;
}
}
@Component
public class TestBeanPostProcessor implements BeanPostProcessor {

    public TestBeanPostProcessor() {
        System.out.println("开始实例化TestBeanPostProcessor对象");
    }

    @Override
    public Object postProcessBeforeInitialization(Object bean, String beanName) throws BeansException {
        System.out.println("在bean:" + beanName + "对象实例化之前执行了bean后置处理器");
        if(bean instanceof User) {
            // do something
        }
        return bean;
    }

    @Override
    public Object postProcessAfterInitialization(Object bean, String beanName) throws BeansException {
        System.out.println("在bean:" + beanName + "对象实例化之后执行了bean后置处理器");
        if(bean instanceof User) {
            // do something
        }
        return bean;
    }
}
如下debug截图,三个不同的级别的bean后置处理器分别会被放到不同的容器中。
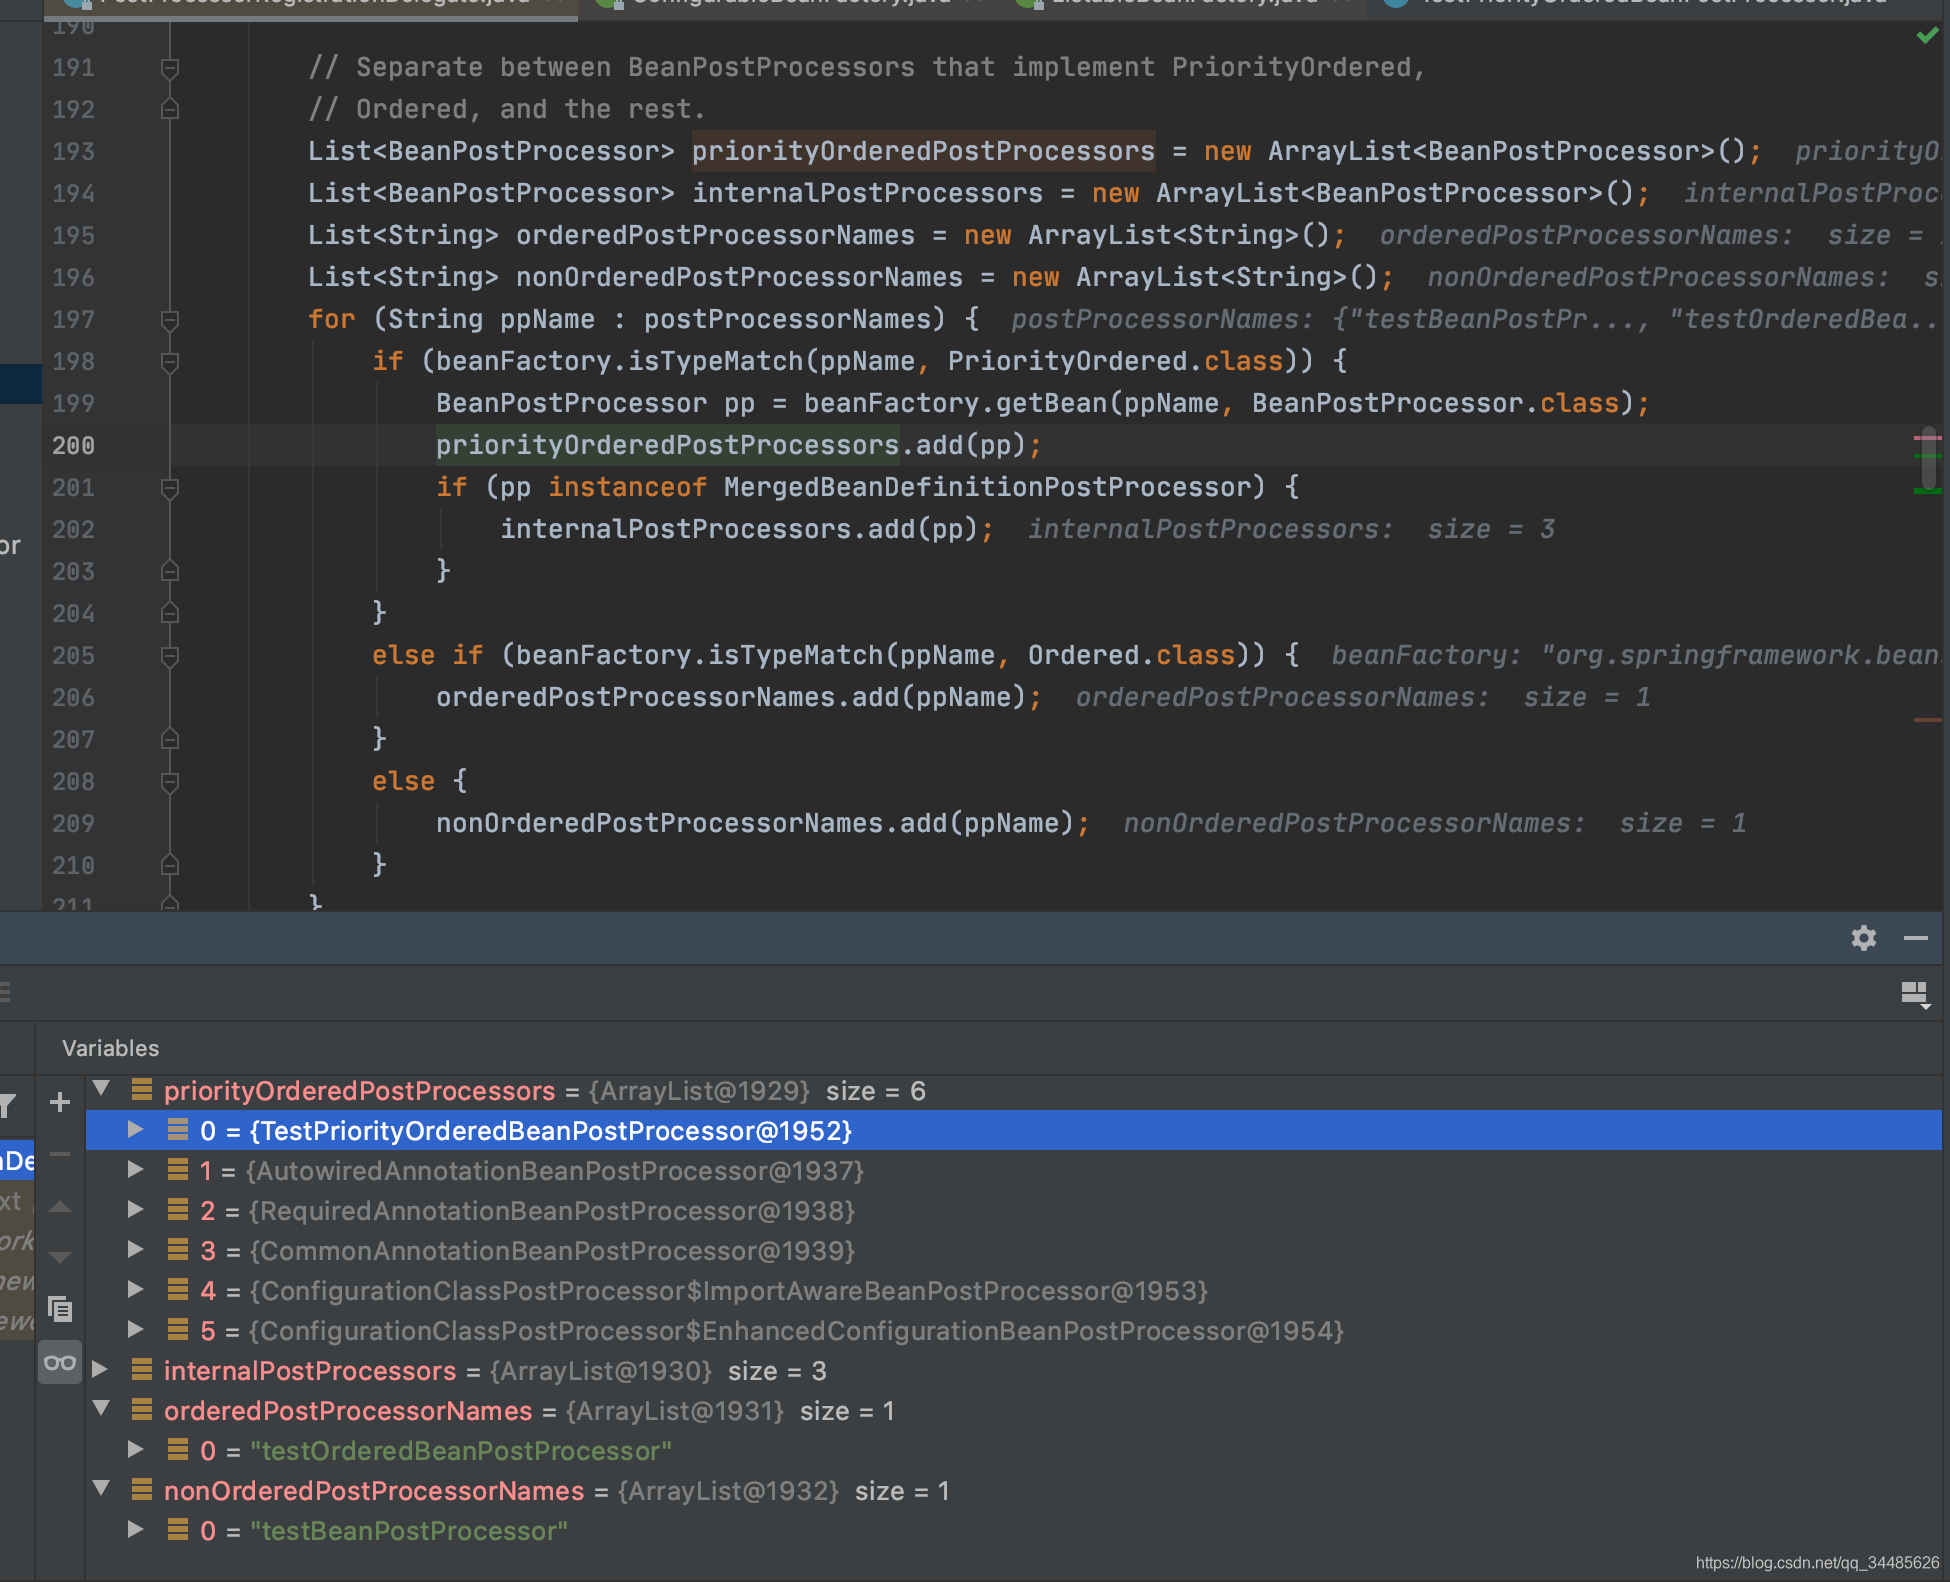
并且实现了PriorityOrdered接口的bean后置处理器在分类的时候就进行了实例化。
d、实例化实现了Ordered接口的bean后置处理器。
e、实例化常规的bean后置处理器。
在实例化bean后置处理器的时候,如果已经有bean后置处理器实例化了,那么已经实例化的bean后置处理器会对正在进行实例化的bean后置处理器生效。通过如下日志可知,TestPriorityOrderedBeanPostProcessor先被实例化,然后实例化TestOrderedBeanPostProcessor,在实例化TestOrderedBeanPostProcessor的时候,TestPriorityOrderedBeanPostProcessor就能够感知到;接着实例化TestBeanPostProcessor,此时TestPriorityOrderedBeanPostProcessor和TestOrderedBeanPostProcessor已经生效。
开始实例化TestOrderedBeanPostProcessor对象
在bean:testOrderedBeanPostProcessor对象实例化之前执行了实现了PriorityOrdered接口的bean后置处理器
在bean:testOrderedBeanPostProcessor对象实例化之后执行了实现了PriorityOrdered接口的bean后置处理器
开始实例化TestBeanPostProcessor对象
在bean:testBeanPostProcessor对象实例化之前执行了实现了PriorityOrdered接口的bean后置处理器
在bean:testBeanPostProcessor对象实例化之前执行了实现了Ordered接口的bean后置处理器
在bean:testBeanPostProcessor对象实例化之后执行了实现了PriorityOrdered接口的bean后置处理器
在bean:testBeanPostProcessor对象实例化之后执行了实现了Ordered接口的bean后置处理器
bean后置处理器的加载跟beanFactory后置处理器的加载也是按照既定的顺序来进行的。通过实现PriorityOrdered、Ordered两个接口来控制顺序、如果有多个实现相同接口的后置处理器,会根据重写getOrder方法返回值的大小来控制先后顺序。
3.7、初始化spring上下文的消息源。就是初始化国际化配置,如果没有配置,则用默认的DelegatingMessageSource。
protected void initMessageSource() {
ConfigurableListableBeanFactory beanFactory = getBeanFactory();
if (beanFactory.containsLocalBean(MESSAGE_SOURCE_BEAN_NAME)) {
this.messageSource = beanFactory.getBean(MESSAGE_SOURCE_BEAN_NAME, MessageSource.class);
// Make MessageSource aware of parent MessageSource.
if (this.parent != null && this.messageSource instanceof HierarchicalMessageSource) {
HierarchicalMessageSource hms = (HierarchicalMessageSource) this.messageSource;
if (hms.getParentMessageSource() == null) {
// Only set parent context as parent MessageSource if no parent MessageSource
// registered already.
hms.setParentMessageSource(getInternalParentMessageSource());
}
}
if (logger.isDebugEnabled()) {
logger.debug("Using MessageSource [" + this.messageSource + "]");
}
}
else {
// Use empty MessageSource to be able to accept getMessage calls.
DelegatingMessageSource dms = new DelegatingMessageSource();
dms.setParentMessageSource(getInternalParentMessageSource());
this.messageSource = dms;
beanFactory.registerSingleton(MESSAGE_SOURCE_BEAN_NAME, this.messageSource);
if (logger.isDebugEnabled()) {
logger.debug("Unable to locate MessageSource with name '" + MESSAGE_SOURCE_BEAN_NAME +
"': using default [" + this.messageSource + "]");
}
}
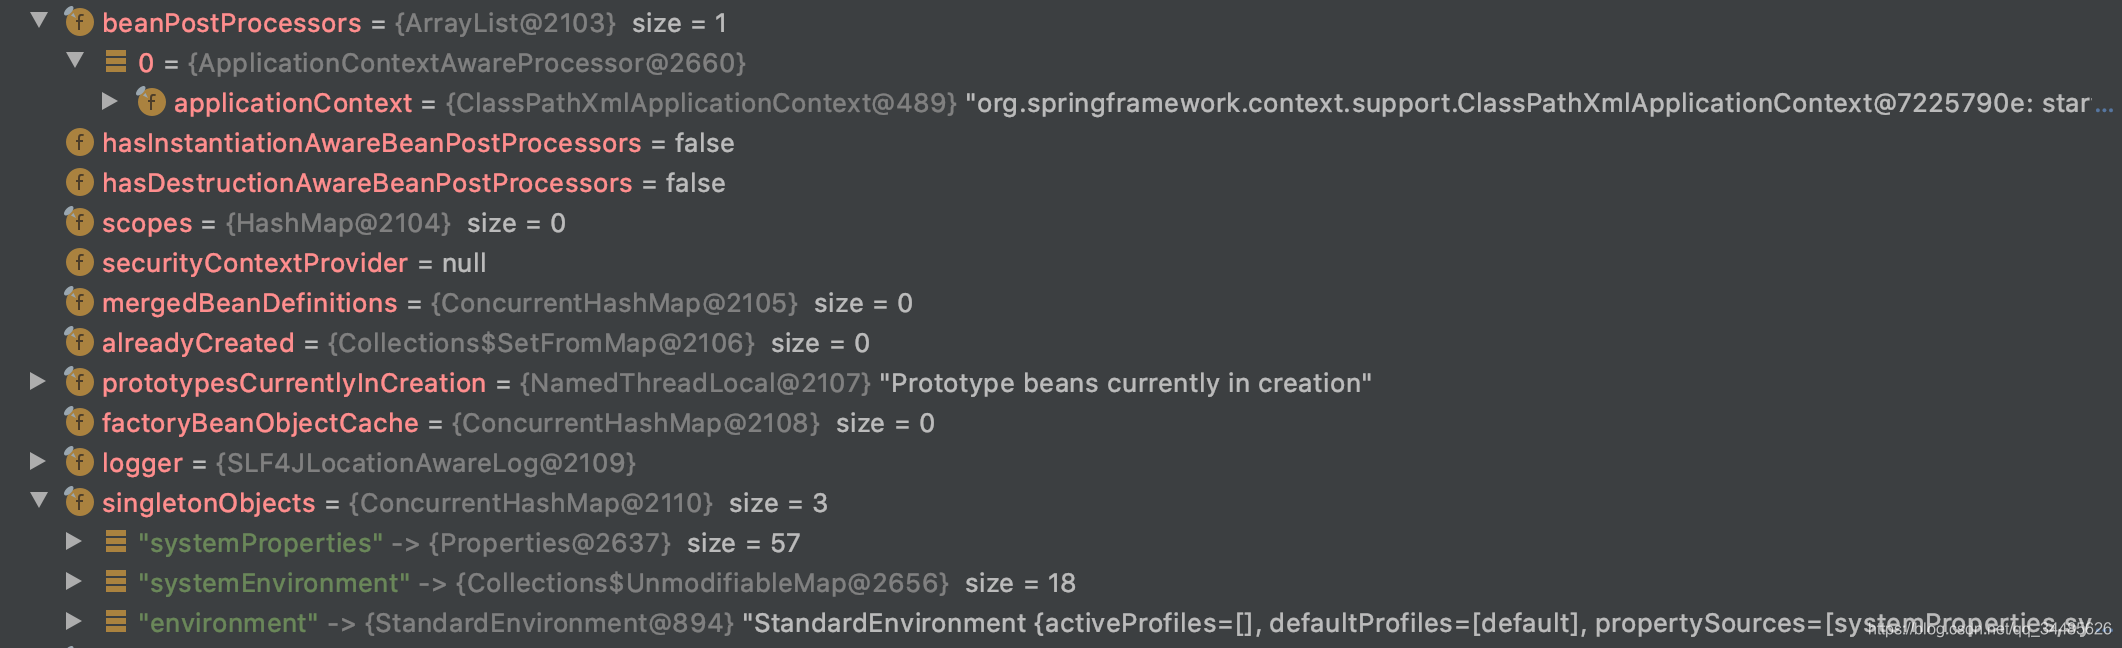
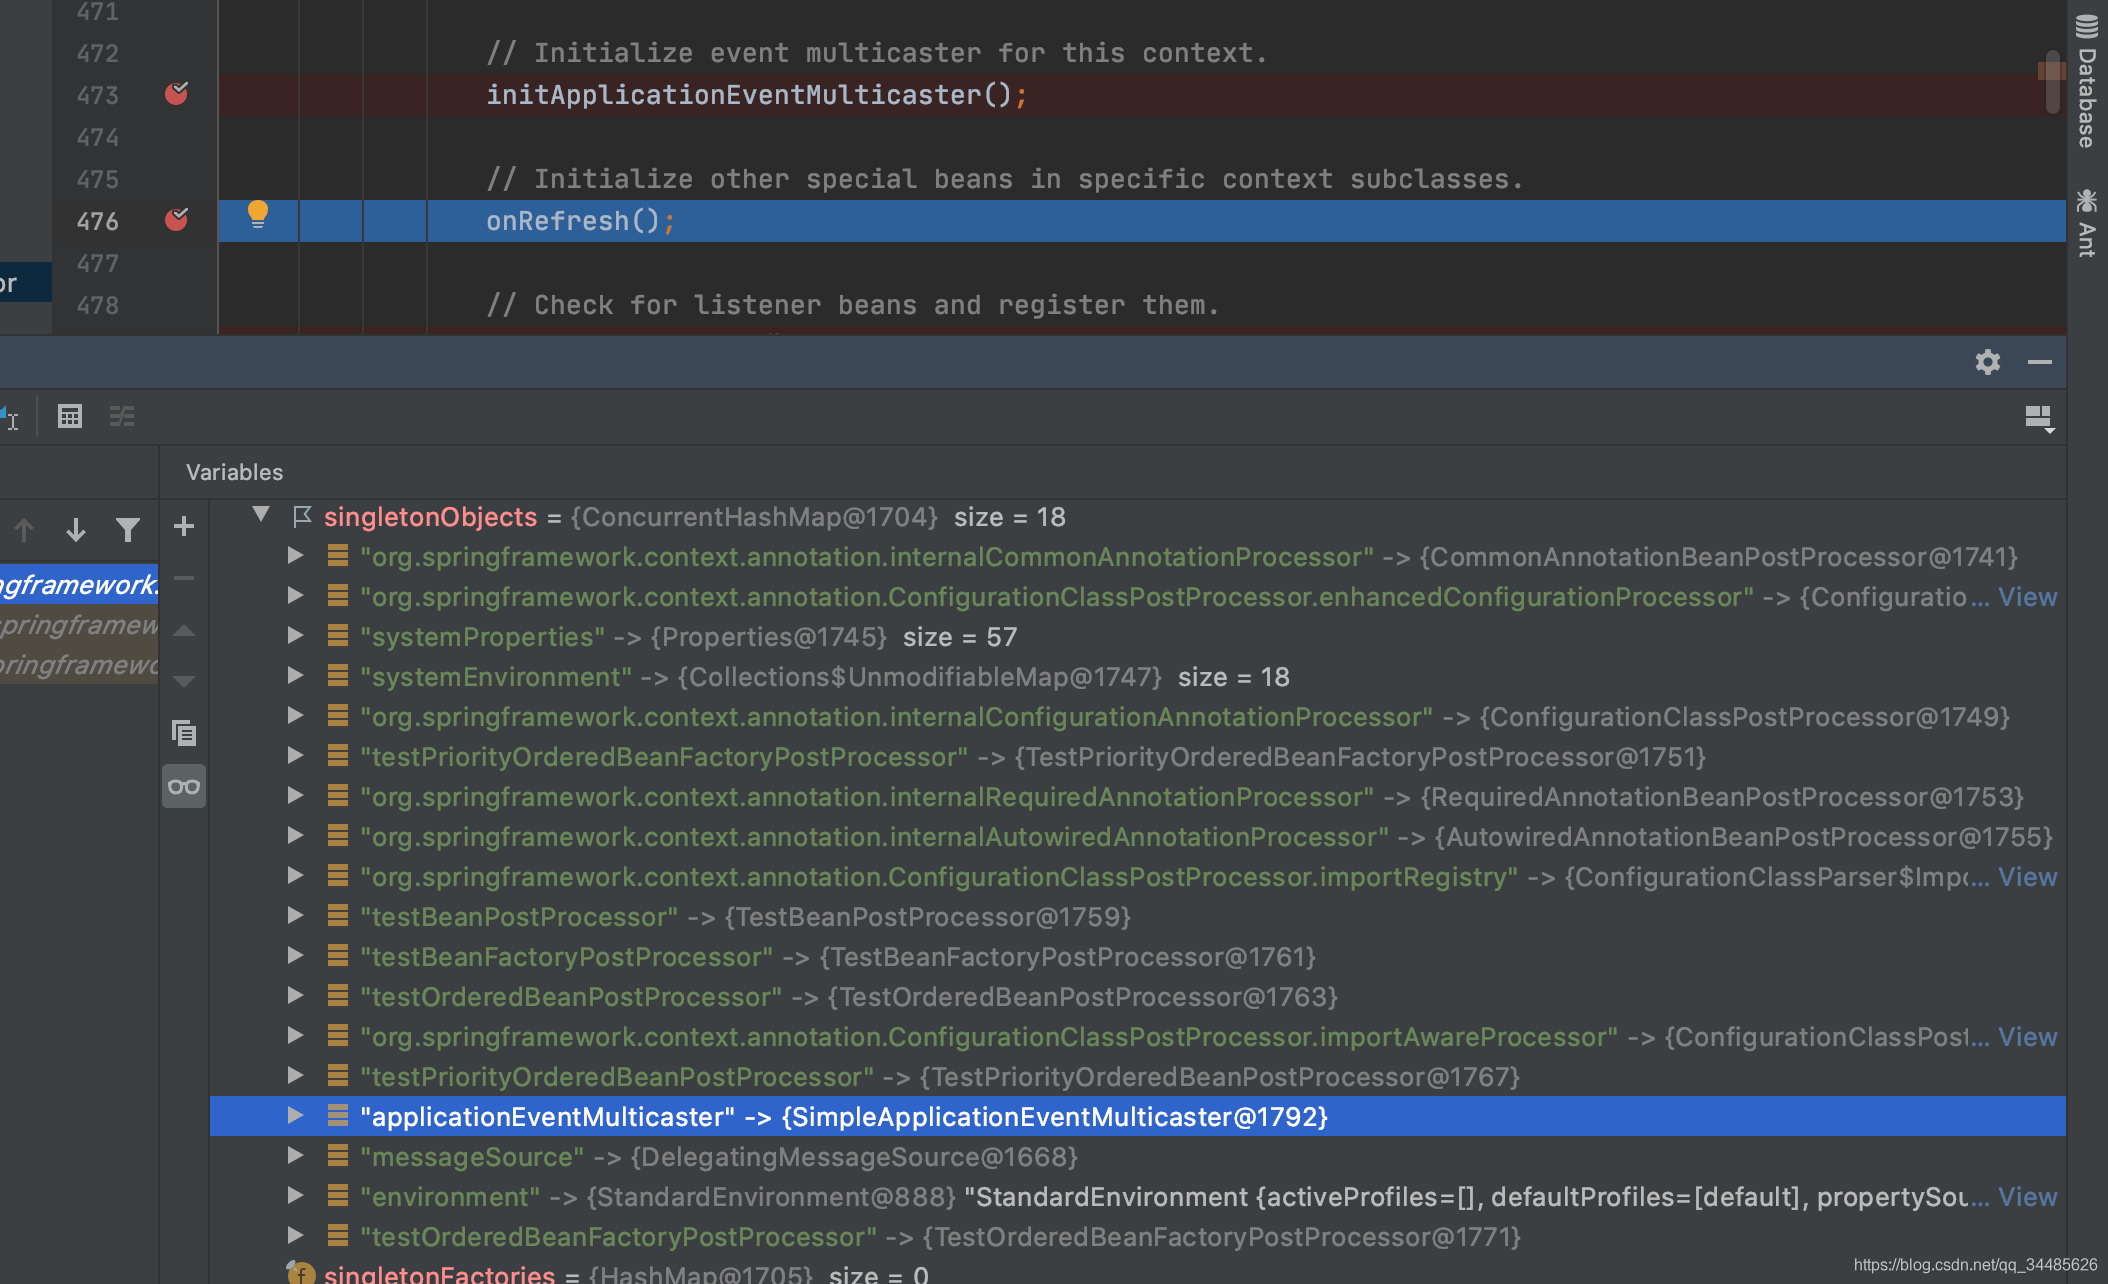
}3.8、为spring上下文初始化事件广播器,先检查beanFactory中是否存在名为applicationEventMulticaster的对象或者定义,如果存在则赋予spring上下文;如果不存在的话,则会使用默认的SimpleApplicationEventMulticaster事件广播器,并注入到beanFactory中(那么下次再进行检查的话,就有了,直接获取使用)。事件广播器是spring中一个观察者模式的实现,并作为模式中的被观察者,在定义的multicastEvent方法中通知所有的观察者,ApplicationListener作为模式中观察者,维护在事件广播器中的一个集合中。SimpleApplicationEventMulticaster中维护了一个线程池,如果线程池被初始化了,通知每个观察者的任务会丢进线程中去执行,如果没有被初始化,则逐个阻塞通知。
	protected void initApplicationEventMulticaster() {
		ConfigurableListableBeanFactory beanFactory = getBeanFactory();
		if (beanFactory.containsLocalBean(APPLICATION_EVENT_MULTICASTER_BEAN_NAME)) {
			this.applicationEventMulticaster =
					beanFactory.getBean(APPLICATION_EVENT_MULTICASTER_BEAN_NAME, ApplicationEventMulticaster.class);
			if (logger.isDebugEnabled()) {
				logger.debug("Using ApplicationEventMulticaster [" + this.applicationEventMulticaster + "]");
			}
		}
		else {
			this.applicationEventMulticaster = new SimpleApplicationEventMulticaster(beanFactory);
			beanFactory.registerSingleton(APPLICATION_EVENT_MULTICASTER_BEAN_NAME, this.applicationEventMulticaster);
			if (logger.isDebugEnabled()) {
				logger.debug("Unable to locate ApplicationEventMulticaster with name '" +
						APPLICATION_EVENT_MULTICASTER_BEAN_NAME +
						"': using default [" + this.applicationEventMulticaster + "]");
			}
		}
	}
如下图所示,初始化之后,单例对象表中便有了applicationEventMulticaster对象。
3.9、onRefresh在一些特定的spring上下文之类中加载一些特殊的bean,onFresh方法是一个AbstractApplicationContext定义的模板方法,在AbstractApplicationContext中并没有实现,留给子类自己定义。在该版本中ClassPathXmlApplicationContext以及它的父类都没有实现重写该方法。
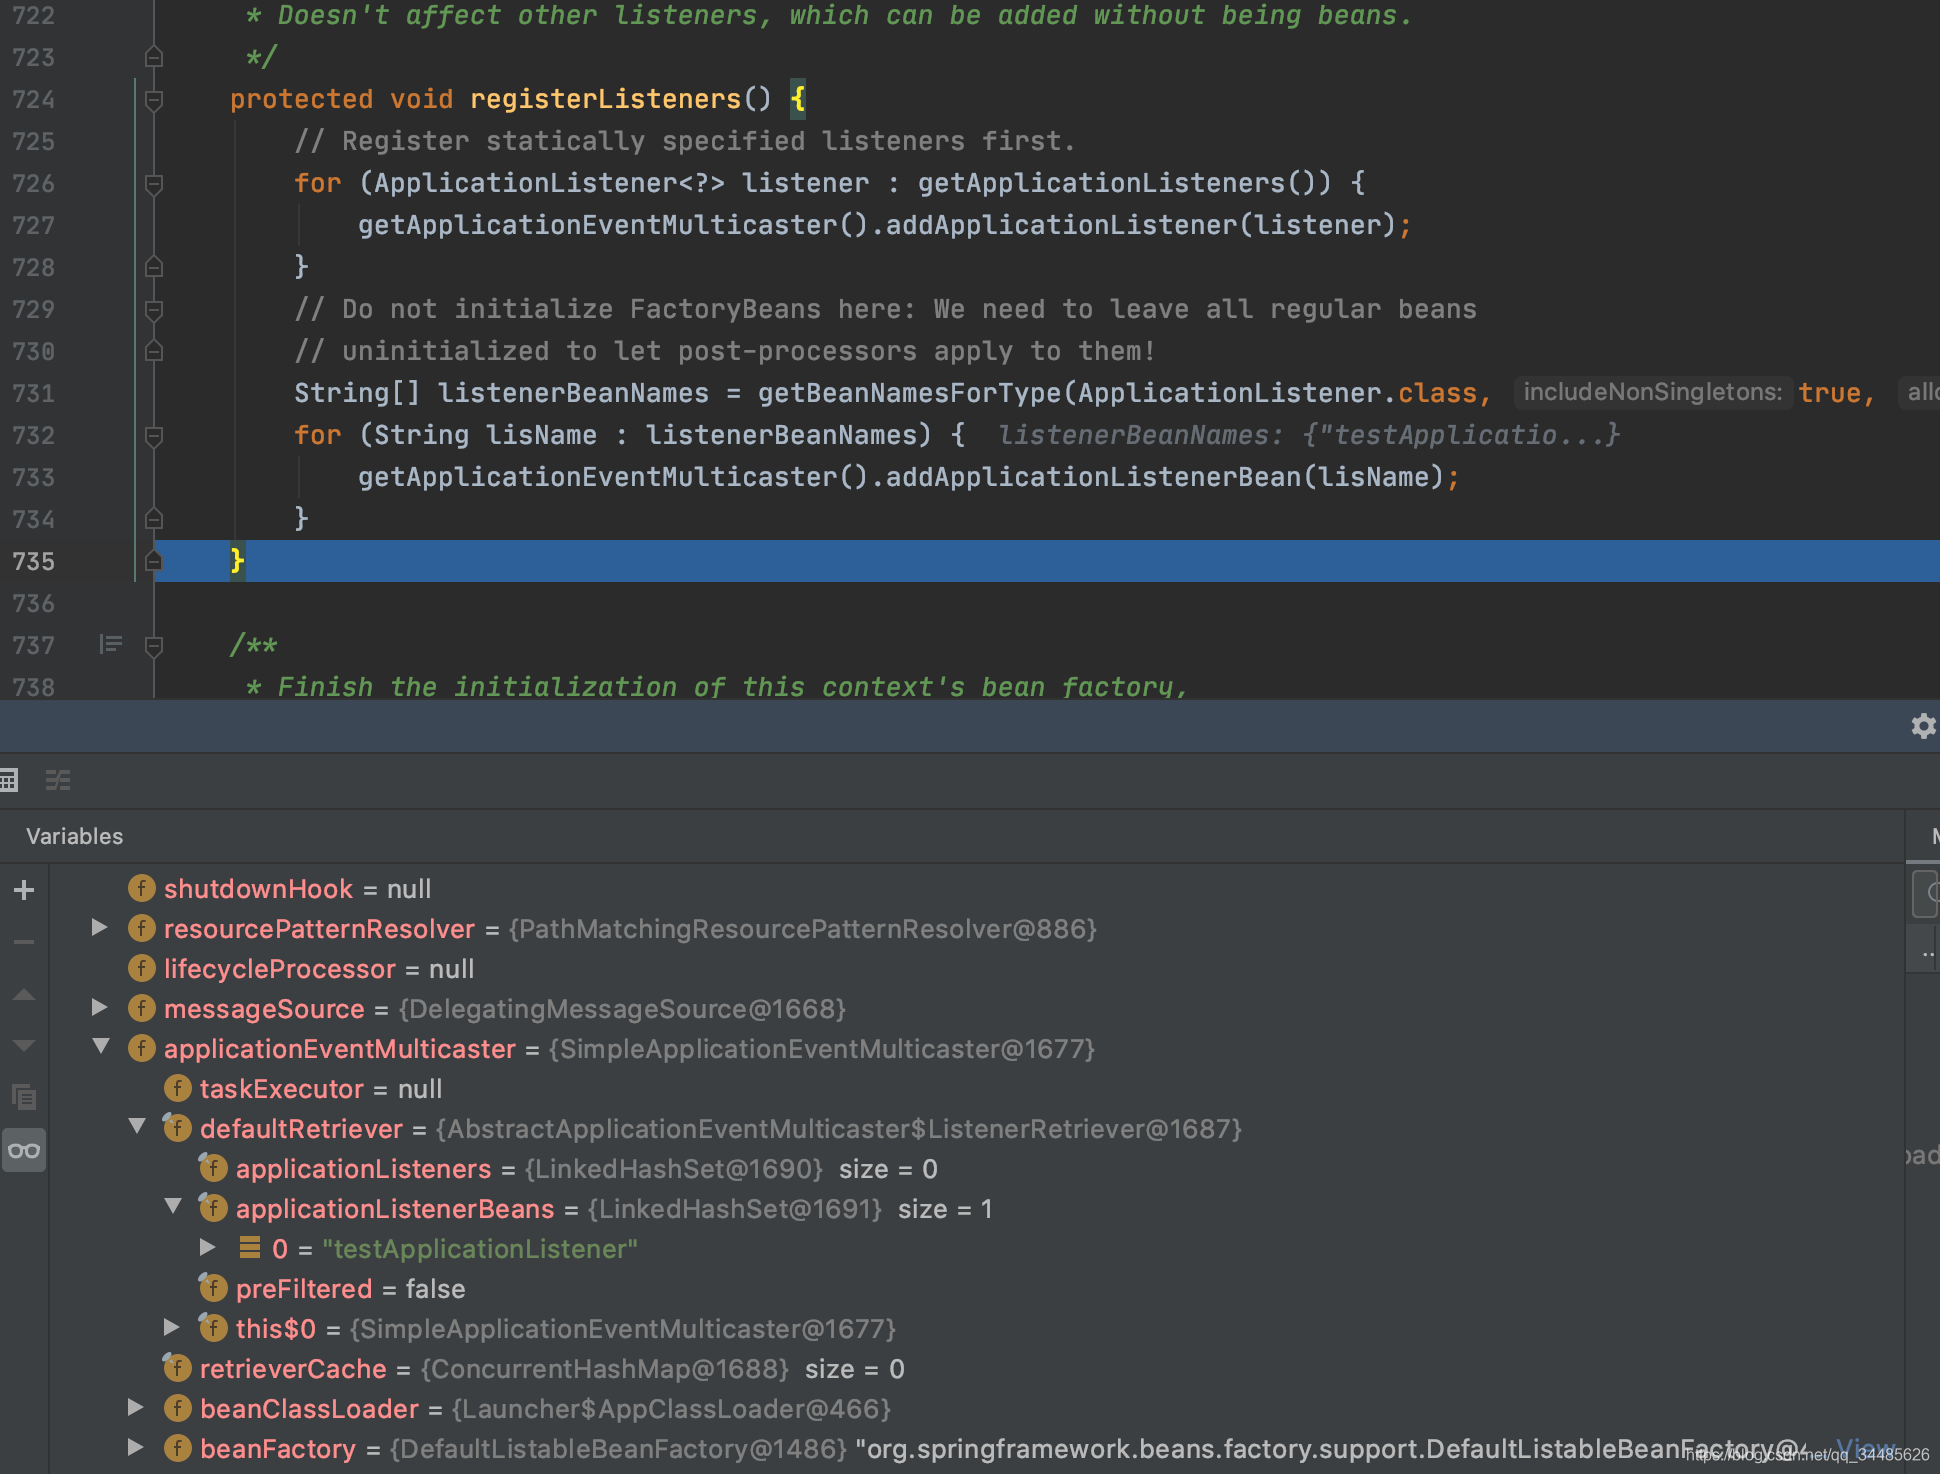
3.10、注册事件监听器,将实现了ApplicationListener的Listener监听器加到第八步生成的事件广播器applicationEventMulticaster的监听器集合中。先注册静态具体的事件监听器,也就是如果目前spring上下文中存在的事件监听器,需要把它们加到事件广播器中。然后注入常规的的,这里并不会去实例化这些常规的事件监听器,监听器的实例化是在后面的步骤中,跟常规定义的对象一起实例化,这样是为了让后置处理器能够应用于它们(后置处理器是在后续的实例化bean的时候生效),没有实例化的情况下是把事件监听器的名称放入了事件广播器的事件监听器集合中。如下所示,定义了一个实现ApplicationListener接口的监听器TestApplicationListener,在完成事件监听器注册之后,可以看到在事件广播器applicationEventMulticaster的监听器集合中维护了自定义的事件监听器testApplicationListener(是一个char数组表示的名称,并不是一个监听器对象)。
@Component
public class TestApplicationListener implements ApplicationListener {
    @Override
    public void onApplicationEvent(ApplicationEvent event) {
        System.out.println("接收到一个事件:" + JSON.toJSONString(event));
    }
}
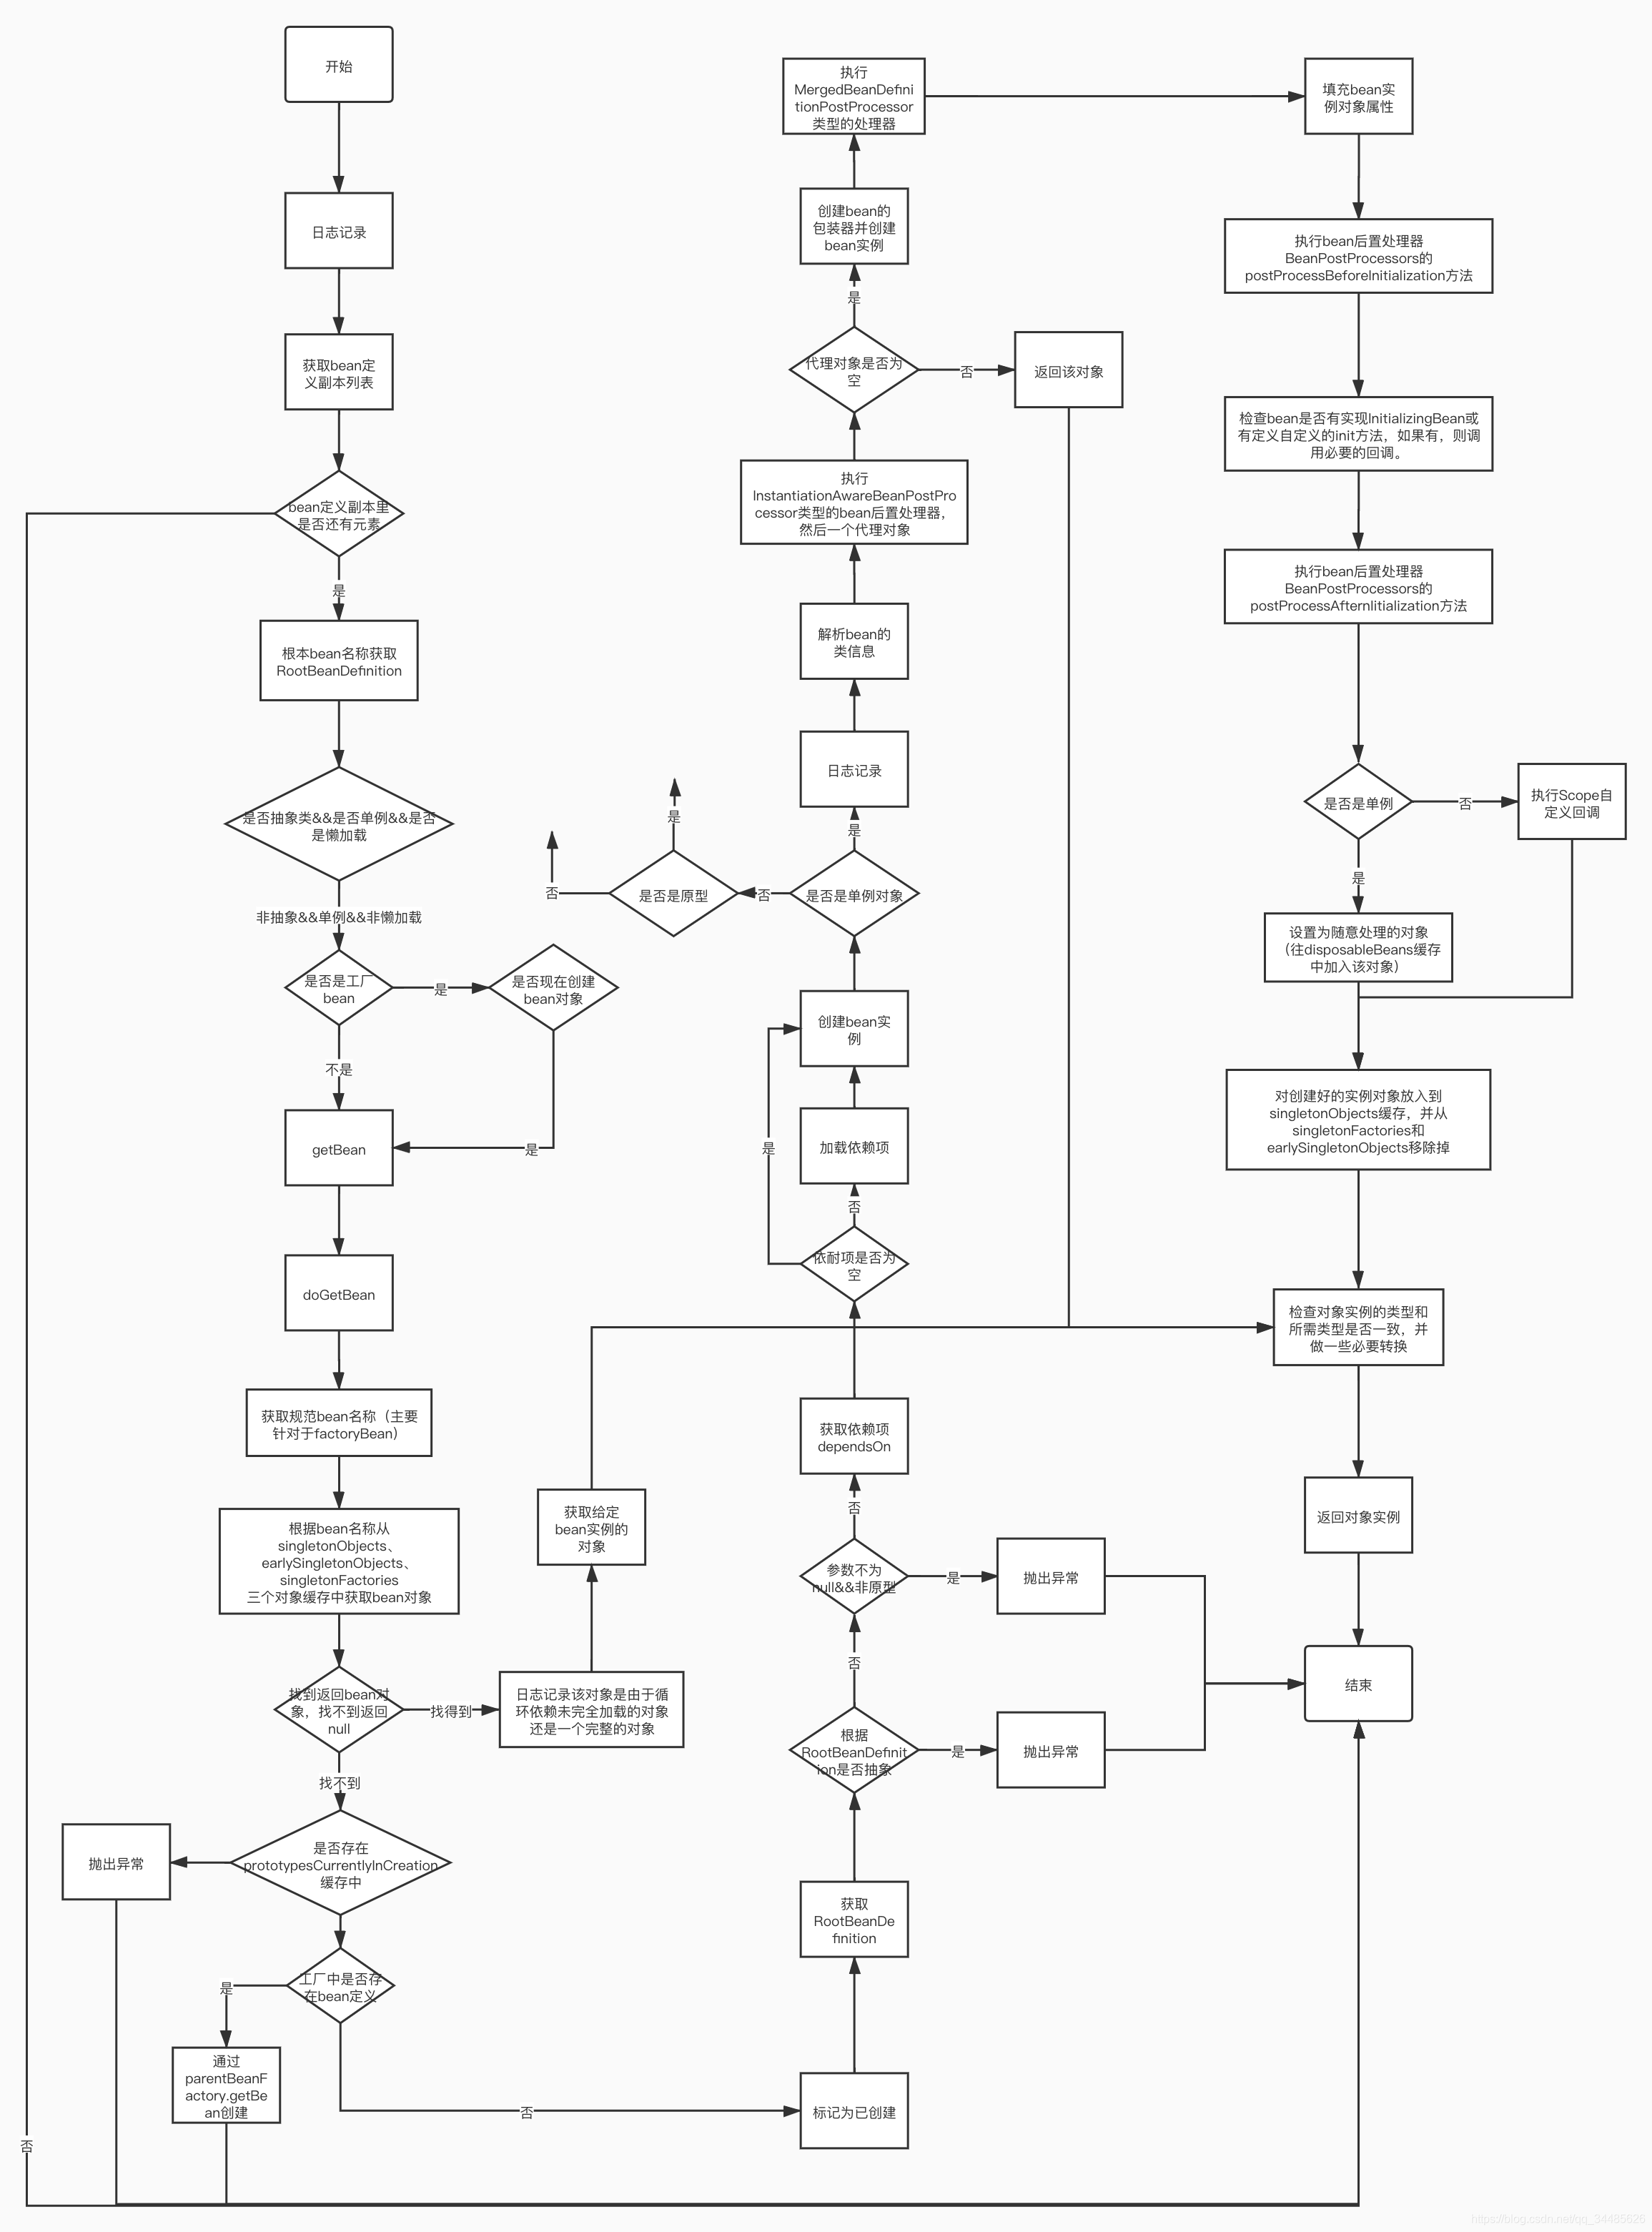
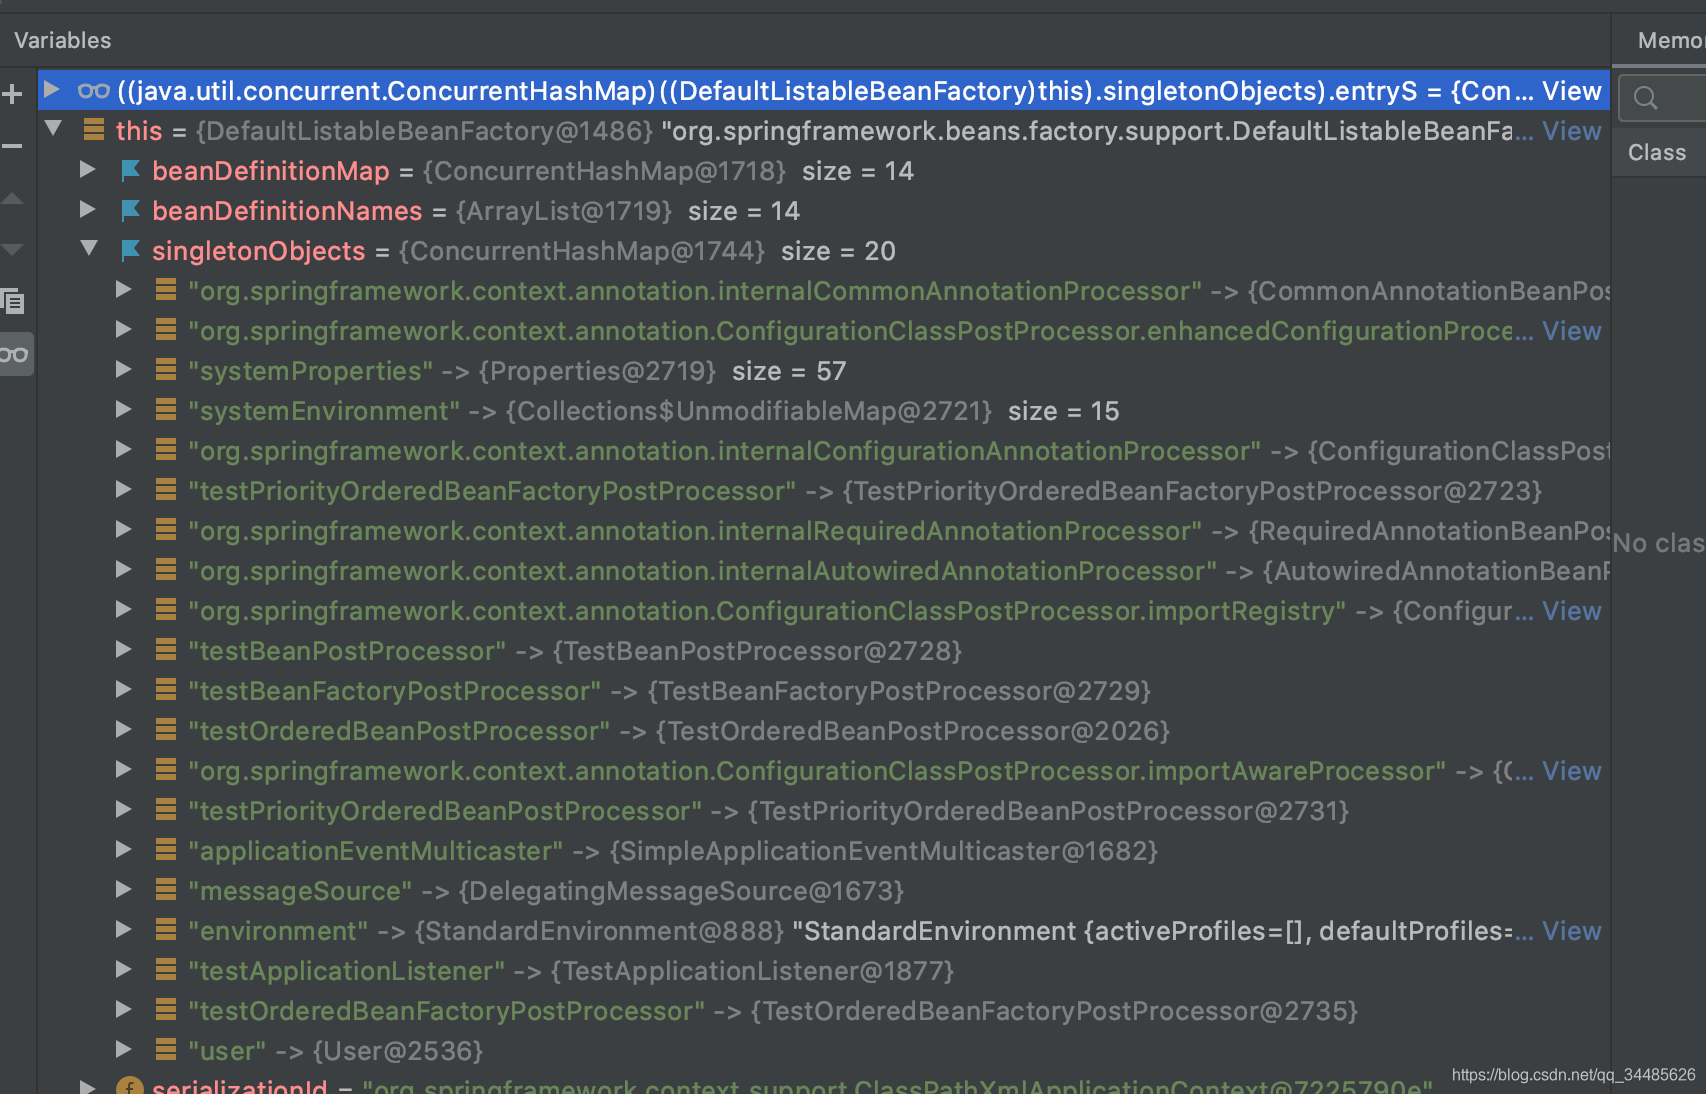
3.11、初始化所有剩余的非懒加载单例对象(懒加载的初次使用的时候才会加载)。完成此上下文的bean工厂的初始化,初始化所有剩余的单例对象,为什么说是剩余的,因为上面的步骤中会实例化一些必须的对象,比如后置处理器、事件广播器以及一些注解相关对象等在前面的步骤已经实例化好了。主要流程如下图所示。
完成bean对象的实例化之后,可以看到User实例对象、自定义的bean后置处理器,监听器、beanFactory后置处理器都被缓存到了singletonObjects中。
bean后置处理器应用于user对象的实例化过程。
在bean:user对象实例化之前执行了实现了PriorityOrdered接口的bean后置处理器
在bean:user对象实例化之前执行了实现了Ordered接口的bean后置处理器
在bean:user对象实例化之前执行了bean后置处理器
在bean:user对象实例化之后执行了实现了PriorityOrdered接口的bean后置处理器
在bean:user对象实例化之后执行了实现了Ordered接口的bean后置处理器
在bean:user对象实例化之后执行了bean后置处理器
3.12、结束spring上下文的刷新,执行LifecycleProcessor的onRefresh方法以及把该上下文作为事件发布出去
a、初始化LifecycleProcessor,如果自定义了则加载自定义的,否则使用默认的DefaultLifecycleProcessor。
b、执行执行LifecycleProcessor的onRefresh方法,将刷新传播到生命周期处理器。找出单例对象中实现了Lifecycle的类对象,如果这些对象在上下文刷新之后需要自动启动的话,那么会执行实例对象start方法。
c、将spring上下文作为ContextRefreshedEvent事件发布出去。事件给到到事件广播器ApplicationEventMulticaster,事件广播器将事件通知到事件监听器。
d、注册 LiveBeansView MBean。
	protected void finishRefresh() {
		// Initialize lifecycle processor for this context.
		initLifecycleProcessor();

		// Propagate refresh to lifecycle processor first.
		getLifecycleProcessor().onRefresh();

		// Publish the final event.
		publishEvent(new ContextRefreshedEvent(this));

		// Participate in LiveBeansView MBean, if active.
		LiveBeansView.registerApplicationContext(this);
	}
定义一个实现SmartLifecycle的类,定义为需要自启动,并向spring容器中注入 该类 的 非懒加载单例对象。
import org.springframework.context.SmartLifecycle;

public class TestLifecycle implements SmartLifecycle {

    @Override
    public boolean isAutoStartup() {
        // 需要自启动
        return true;
    }

    @Override
    public void start() {
        System.out.println("Lifecycle start");
    }

    @Override
    public void stop() {
        System.out.println("Lifecycle stop");
    }

    @Override
    public boolean isRunning() {
        return false;
    }

    @Override
    public void stop(Runnable callback) {

    }

    @Override
    public int getPhase() {
        return 0;
    }
}
<bean name="testLifecycle" class="spring.entity.TestLifecycle" ></bean>可以看到TestLifecycle的start方法在这里被执行,如期输出"Lifecycle start"。

发布事件之后,自定义的TestApplicationListener也是如期接收到发布的事件,打印如下。

如果程序正常运行,没有发生错误,那么spring的加载过程就结束。如果发生BeansException异常,会销毁已经创建好的单例对象,这样做是为了避免悬挂资源。将上下文的active = false活跃标志设为false。
3.13、销毁已创建的单例对象。将正在销毁标志设为true,先销毁能够被随意使用的单例对象,最后清除缓存。
public void destroySingletons() {
if (logger.isDebugEnabled()) {
logger.debug("Destroying singletons in " + this);
}
synchronized (this.singletonObjects) {
this.singletonsCurrentlyInDestruction = true;
}
String[] disposableBeanNames;
synchronized (this.disposableBeans) {
disposableBeanNames = StringUtils.toStringArray(this.disposableBeans.keySet());
}
for (int i = disposableBeanNames.length - 1; i >= 0; i--) {
destroySingleton(disposableBeanNames[i]);
}
this.containedBeanMap.clear();
this.dependentBeanMap.clear();
this.dependenciesForBeanMap.clear();
synchronized (this.singletonObjects) {
this.singletonObjects.clear();
this.singletonFactories.clear();
this.earlySingletonObjects.clear();
this.registeredSingletons.clear();
this.singletonsCurrentlyInDestruction = false;
}
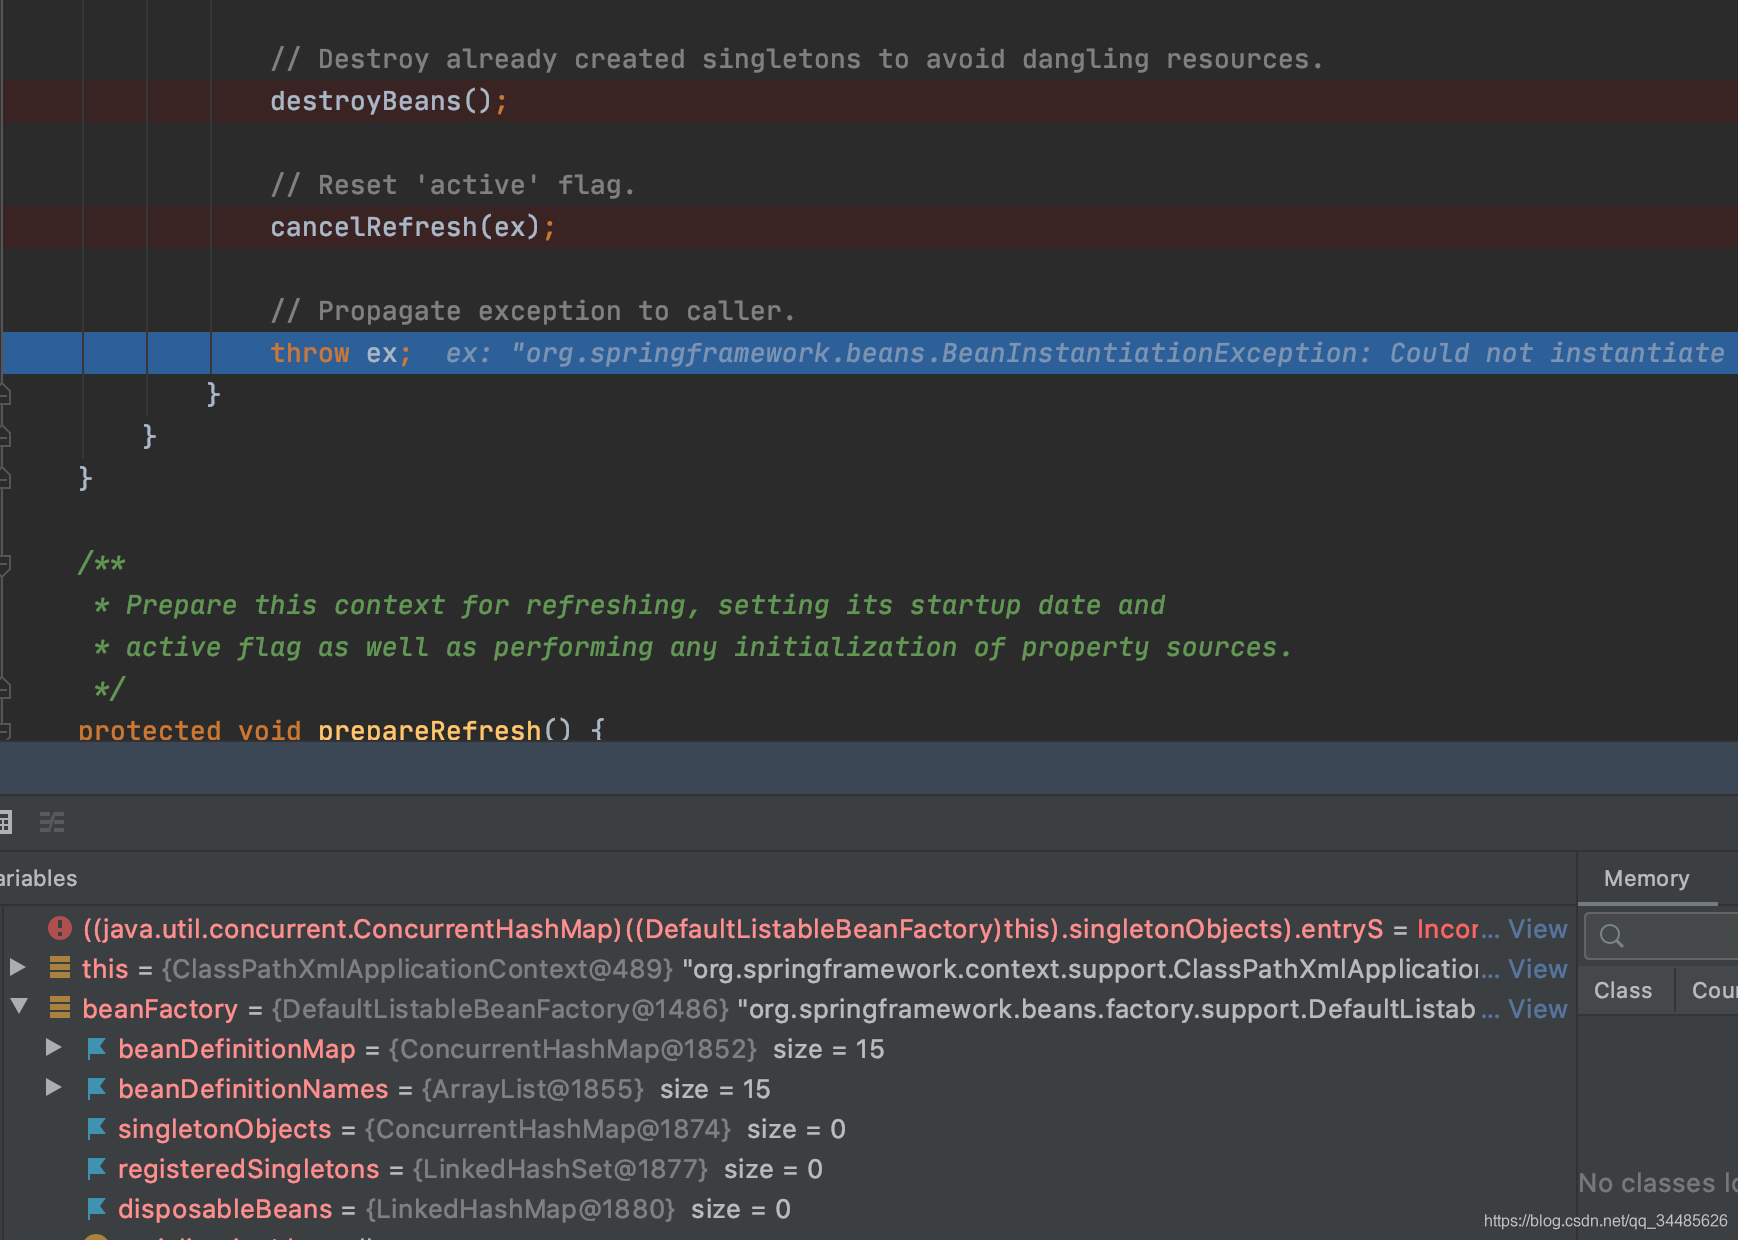
}在事件监听器TestApplicationListener中抛出一个BeanInstantiationException,模拟异常情况。那么在所有的单例对象创建好了,事件发布出去之后,监听器TestApplicationListener的onApplicationEvent方法会被执行,如下面的代码throw new BeanInstantiationException(this.getClass(), "模拟BeansException");,抛出Bean异常,接着会进行对象的销毁工作。
@Component
public class TestApplicationListener implements ApplicationListener {
    @Override
    public void onApplicationEvent(ApplicationEvent event) {
        System.out.println("接收到一个事件:" + JSON.toJSONString(event));
        throw new BeanInstantiationException(this.getClass(), "模拟BeansException");
    }
}
如下图所示,销毁工作完成后对象缓存容器被清理干净,大小为0。
整个过程其实说简单点就是:解析配置文件中或者注解表示的bean定义,根据bean的定义,实例化bean对象,可能进行一些修饰,然后放入缓存容器中,最后让spring去管理。


 2万+
2万+

 被折叠的 条评论
为什么被折叠?
被折叠的 条评论
为什么被折叠?
 到【灌水乐园】发言


