


spring-bean的解析
spring-bean解析
spring-ioc原理
ioc就是控制反转,也可以理解为依赖注入。即将一些底层的实现放入到spring-bean容器中。我们使用的话,就不需要太关心具体实现,用的时候,通过构造器注入,setter注入,和注解注入,就可以使用了。
通过xml配置实现bean
通过set注入。和构造器注入
首先建一个bean.xml包,下面建一个student
public class Student {
	private String name;
	private String age;
	private List<String> list;
	//省略get set方法
	public Student(String name, String age) {
		this.name = name;
		this.age = age;
	}

	@Override
	public String toString() {
		return "Student{" + "name='" + name + '\'' + ", age='" + age + '\'' + ", list=" + list + '}';
	}
}
xml配置文件:beanConfig.xml
<?xml version="1.0" encoding="UTF-8"?>
<beans xmlns="http://www.springframework.org/schema/beans"
       xmlns:xsi="http://www.w3.org/2001/XMLSchema-instance"
       xsi:schemaLocation="http://www.springframework.org/schema/beans http://www.springframework.org/schema/beans/spring-beans.xsd">

    <bean id="student" class="com.example.springbootlearn.bean.xml.Student" >
        <constructor-arg index="0" value="zhangsan"></constructor-arg>
        <constructor-arg index="1" value="13"></constructor-arg>
        <property name="name" value="zhangsan"></property>
        <property name="age" value="19"></property>
        <property name="list">
            <list>
                <value>t1</value>
                <value>t2</value>
            </list>
        </property>
    </bean>
    <bean id="helloService" class="com.example.springbootlearn.bean.xml.HelloService">
        <property name="student" ref="student"></property>
    </bean>
</beans>
在建一个实现类
public class HelloService {
	private Student student;

	public Student getStudent(){
		return student;
	}
	public void setStudent(Student student){
		this.student = student;
	}
	public String gethello(){
		return student.toString();
	}
}
测试方法:
@RunWith(SpringRunner.class)
@SpringBootTest
@ContextConfiguration(locations = "classpath:beanConfig.xml")
public class HelloServiceTest extends TestCase {
	@Resource
	private HelloService helloService;

	@Test
	public void testGethello() {
		System.out.println("helloService.gethello() = " + helloService.gethello());
	}
}
通过静态工厂注入:
xml配置新增
    <bean id="factoryStudent" class="com.example.springbootlearn.bean.xml.FactoryStudent" factory-method="getStudent">
        <constructor-arg value="2"></constructor-arg>
    </bean>
工厂类:
public class FactoryStudent {
	private static Map<Integer,Student> map = new HashMap<>();

	static {
		map.put(1,new Student("lisi","18"));
		map.put(2,new Student("wangwu","19"));
		map.put(3,new Student("zhaoliu","20"));
	}

	public static Student getStudent(int id){
		return map.get(id);
	}
}
测试使用:
	@Test
	public void testGethello() {
		ApplicationContext context = new ClassPathXmlApplicationContext("beanConfig.xml");
		Student factoryStudent = context.getBean("factoryStudent", Student.class);
		System.out.println(factoryStudent);
	}
打印出来Student{name=‘wangwu’, age=‘19’, list=null}。
通过注解实现bean的注入
@Configuration
public class Animal {

	@Bean("dog")
	public Dog getDog(){
		return new Dog();
	}
}
@Component
public class Cat {
	private String name;
}
使用的话,通过 @Autowired (ByType注入) @Resource(Byname注入)
核心方法refresh(刷新)

以上也涵盖了bean的生命周期。
prepareRefresh
初始化准备工作,设置启动时间,是否激活标志,初始化属性源配置(property source)。
obtainFreshBeanFactory
给beanFactory设置序列号id,并返回beanFactory(bean工厂)
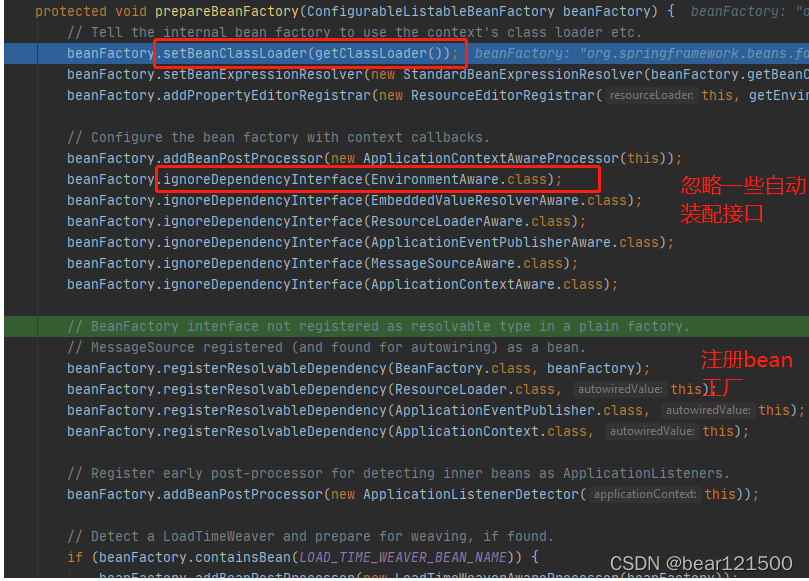
prepareBeanFactory(beanFactory);
配置bean工厂的上下文属性:比如添加类加载器,后置处理器,并忽略一些自动装配的接口,注册一些属性。
invokeBeanFactoryPostProcessors
-
它的作用是:实例化,并调用所有已注册的 bean工厂后置处理器。
-
调用BeanDefinitionRegistryPostProcessor实现向容器中添加bean的定义。
-
调用BeanFactoryPostProcessor向bean中添加属性。
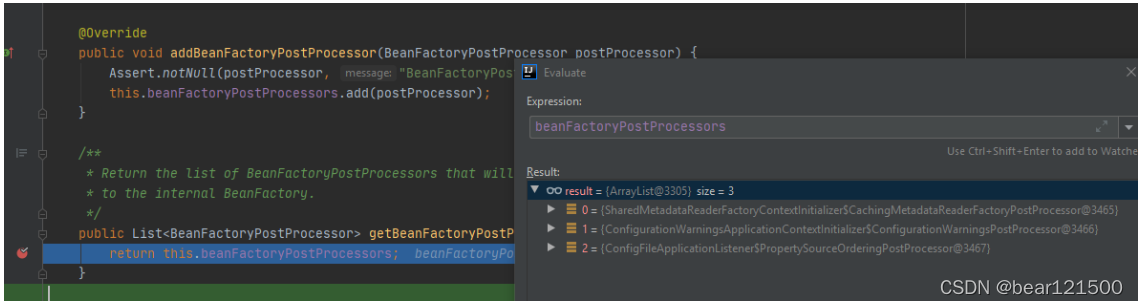
protected void invokeBeanFactoryPostProcessors(ConfigurableListableBeanFactory beanFactory) {
   PostProcessorRegistrationDelegate.invokeBeanFactoryPostProcessors(beanFactory, getBeanFactoryPostProcessors());
}
getBeanFactoryPostProcessors:获取所有bean工厂后置处理器。
BeanFactoryPostProcessor可以向容器中注入属性?
如何注入呢?
@Component
public class Teacher {
   private String name;

   public String getName() {
      return name;
   }

   public void setName(String name) {
      this.name = name;
   }
}
@Component
public class MyPostProcessor implements BeanFactoryPostProcessor {

   @Override
   public void postProcessBeanFactory(ConfigurableListableBeanFactory beanFactory) throws BeansException {
      BeanDefinition teacher = beanFactory.getBeanDefinition("teacher");
      MutablePropertyValues propertyValues = teacher.getPropertyValues();
      propertyValues.addPropertyValue("name","wangwu");
   }
}
那么teacher这个类已经添加name=wangwu了。
registerBeanPostProcessors
找到BeanPostProcessor的实现,排序后注册进容器中。
initMessageSource
初始化国际化文件。(通用语言,比如国际化语言为英语)
initApplicationEventMulticaster
初始化应用广播器,如果没有就使用SimpleApplicationEventMulticaster。
onRefresh
创建web容器。
registerListeners
添加容器内事件监听器至事件广播器中
finishRefresh
完成此上下文的刷新,调用 LifecycleProcessor(生命周期处理器) 的 onRefresh() 方法,发布ContextRefreshedEvent事件。
finishBeanFactoryInitialization
完成单例bean的初始化
resetCommonCaches
清除缓存。
finishBeanFactoryInitialization
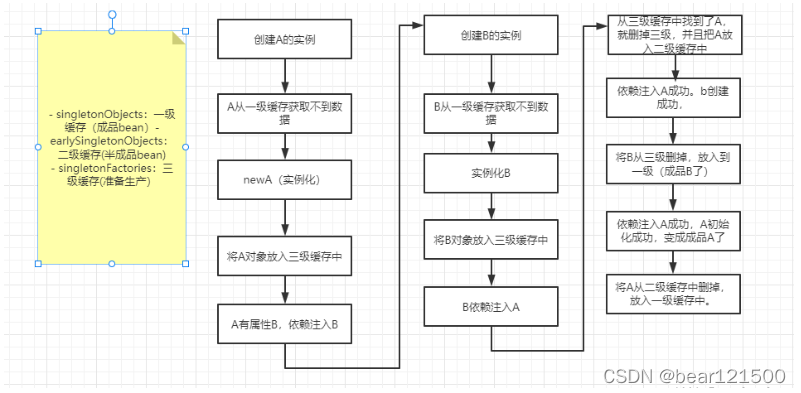
重点解析:解决循环依赖。
三级缓存可以解决循环依赖。
- singletonObjects:一级缓存(单例池:存放经历了完整生命周期的bean对象)
- earlySingletonObjects:二级缓存(存放早期暴露出来的bean对象,bean生命周期尚未结束)
- singletonFactories:三级缓存----单例工厂(存放可以生成bean工厂–准备生产)
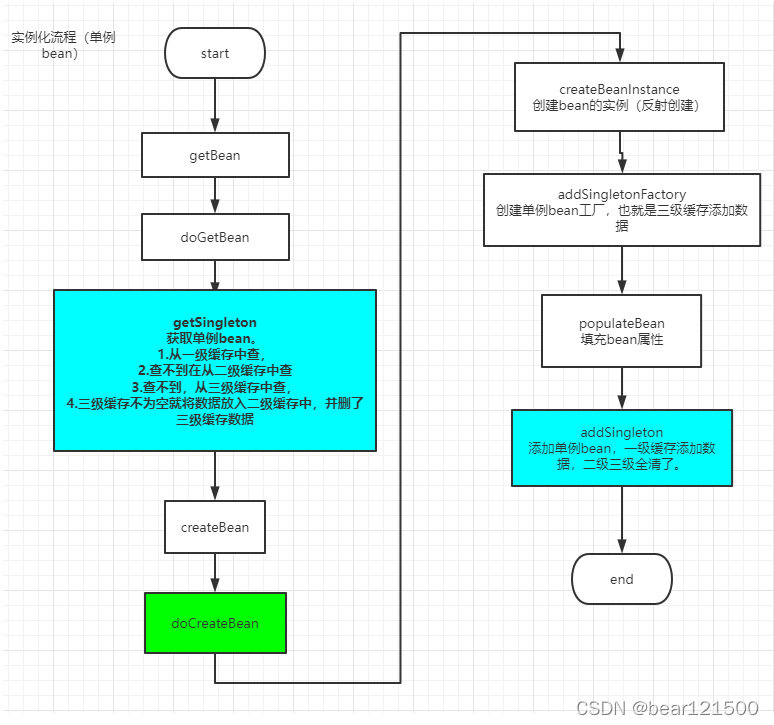
3个map+四个方法(解决循环依赖)
-
getSingleton
-
doCreateBean:添加bean
-
populateBean:属性填充
-
addSingleton:将bean设置到一级缓存,且删除二级和三级
单例bean的创建流程
启动类加载器
一共有两个ApplicationRunner,CommandLineRunner(如果两个order值一样,那么app先执行)。
他们的作用是springboot启动时,需要在启动后执行某些逻辑,那么就需要用启动类加载器了。
定义两个加载器:
@Component
@Order(1)
public class SecondRunner implements ApplicationRunner {

   @Override
   public void run(ApplicationArguments args) throws Exception {
      System.out.println("执行app类加载器");
   }
}
@Component
@Order(1)
public class FirstRunner implements CommandLineRunner {

   @Override
   public void run(String... args) throws Exception {
      System.out.println("\u0018[32m >>> startup first CommandRunner");
   }
}
先执行SecondRunner。
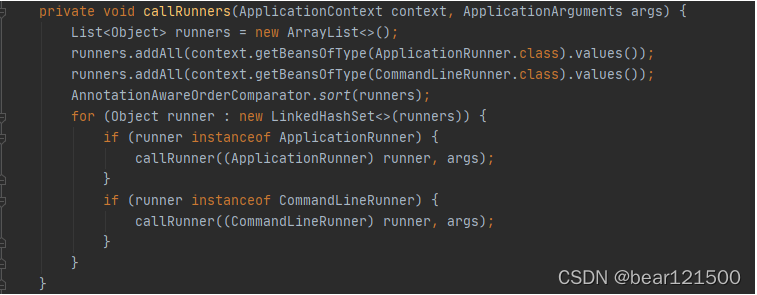
实现原理
从应用上下文中获取SecondRunner和FirstRunner加载器,然后放入到runners数组集合中。排序,最后循环执行run方法。
StopWatch
计时器(用来记录启动时间和当前任务名称)源码中使用了start,和stop方法,可以使用此计时器用于统计时长。
Aware实现原理
debug断点发现是在doCreateBean—>initializeBean—>applyBeanPostProcessorsBeforeInitialization—>invokeAwareInterfaces
所以核心方法就是invokeAwareInterfaces
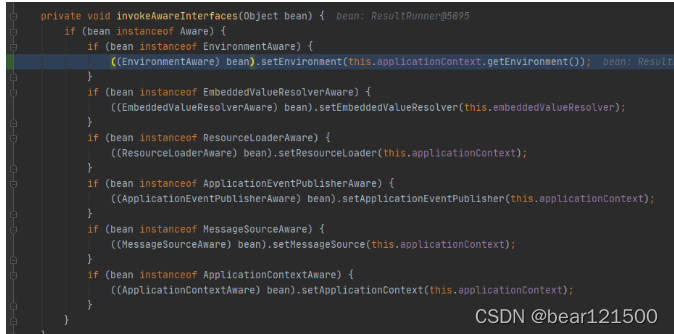
文字描述:aware的实现原理,会先调用bean的初始化之前的后置处理器,也就是一定执行aware接口,也就是实现set方法,并返回当前bean。
自定义myAware
根据原理自己写一个aware。
public interface MyAware extends Aware {
   void setFlag(Flag flag);
}
@Component
public class Flag {
   private boolean isBoolean = true;
   //省略get set方法。
}
@Component
public class MyAwareProcessor implements BeanPostProcessor {

   private final ConfigurableApplicationContext applicationContext;

   public MyAwareProcessor(ConfigurableApplicationContext applicationContext) {
      this.applicationContext = applicationContext;
   }

//为了实现bean的初始化之前的后置处理器方法
   @Override
   public Object postProcessBeforeInitialization(Object bean, String beanName) throws BeansException {
      if (bean instanceof Aware) {
         if (bean instanceof MyAware) {
            ((MyAware)bean).setFlag((Flag)applicationContext.getBean("flag"));
         }

      }
      return bean;
   }
}
测试:
springboot启动打印true。@Component
// @Order(1)
public class ResultRunner implements ApplicationRunner , MyAware  {

   private Flag fla;
   @Override
   public void run(ApplicationArguments args) throws Exception {
      System.out.println(fla.isBoolean());
   }
   @Override
   public void setFlag(Flag flag) {
      fla = flag;
   }
}
springboot启动打印true。


 421
421

 被折叠的 条评论
为什么被折叠?
被折叠的 条评论
为什么被折叠?
 到【灌水乐园】发言


