


一、各种数据类型的定义和使用
1、整形和浮点型
a = 3 # 整形和浮点型可直接定义
b = 3.0
print(a)
print(a, b) # 变量可同时打印
输出结果:
3
3 3.0
2、字符串
基本定义
#字符串
s = "python learning"
print(s)
print(s[4])
print(s[1:4]) # 1:4代表[1, 4),注意右边是开区间
print(s[3:-1]) # -1代表最后一个字符
s2 = "123456789"
print(s2[::-1]) # 逆序输出
输出结果:
python learning
o
yth
hon learnin987654321
字符串基本操作
def address_string():
    # 字符串是不可变类型,相同的赋值指向同一块地址
    str1 = "hello"
    str2 = "hello"
    print(id(str1))
    print(id(str2))
    print("-" * 100)


def check_type():
    """
    判断字符串类型
    :return:
    """
    str1 = "abcdg1234"
    print(str1.isalnum())  # 如果都是字符和数字,返回True
    str2 = "1234"
    print(str2.isdecimal())  # 如果都是数字返回True
    print("-" * 100)


def find_string():
    """
    字符串查找与替换
    :return:
    """
    str1 = "1234567890abcdefg1234567"
    print(str1.find("67"))  # 返回找到字符串的起始下标
    print(str1.find("67", 10))  # 从下标为10的位置开始往后找
    print("-" * 100)


def split_string():
    """
    分割字符串
    :return:
    """
    str1 = "12 34 56 78 90"
    print(str1.split())  # 默认是按照空格分割
    str2 = "zhangsan,18,1.85"
    print(str2.split())  # 默认是空格,所以不会分割
    print(str2.split(","))
    str3 = "lisi\n22\n1.66"
    print(str3.splitlines())  # 默认按换行分割
    str4 = "wangwu\r\n100\r\n1111"
    # 如果传入True则会按照换行符分割,但是得到的列表为["wangwu\r\n", "100\r\n", "1111"]
    print(str4.splitlines(True))
    print("-" * 100)


def join_string():
    """
    连接字符串
    :return:
    """
    str1 = ['a', 'b', 'c', 'd']
    print(','.join(str1))
    str1 = "12 34 56 78 90"
    print(','.join(str1.split()))
    print("-" * 100)


def index_count_string():
    """
    找子串和计算子串数量
    :return:
    """
    str1 = "abcdefg12345abd1234ab"
    print(str1.count("ab"))
    print(str1.index("1234"))
    print(str1.index("1234", 10))


if __name__ == '__main__':
    address_string()
    check_type()
    find_string()
    split_string()
    join_string()
    index_count_string()
输出结果:
2505139440624
2505139440624
----------------------------------------------------------------------------------------------------
True
True
----------------------------------------------------------------------------------------------------
5
22
----------------------------------------------------------------------------------------------------
['12', '34', '56', '78', '90']
['zhangsan,18,1.85']
['zhangsan', '18', '1.85']
['lisi', '22', '1.66']
['wangwu\r\n', '100\r\n', '1111']
----------------------------------------------------------------------------------------------------
a,b,c,d
12,34,56,78,90
----------------------------------------------------------------------------------------------------
3
7
15
3、列表
基本定义
# list 列表
# 列表的内容非常自由,可以同时包含多种类型数据
list1 = [1, 2, 3, 4, 5]
print(list1)
print(list1[2])
print(list1[-1])
print(list1[0:-1])

list2 = ["hello world", 22, 'c']
print(list2)
print(list2[0])
输出结果:
[1, 2, 3, 4, 5]
3
5
[1, 2, 3, 4]
['hello world', 22, 'c']
hello world
列表常用函数
name_list = ["zhangsan", "lisi", "wangwu"]

# 取值
print(name_list[1])
# 查找元素
print(name_list.index("lisi"))
# 修改
name_list[1] = "wifi"
print(name_list)
# 添加
name_list.append("wuliu")
print(name_list)
name_list.insert(1, "熊大")
print(name_list)

# extend 可以一次性添加一个列表进去
temp_list = ["熊大", "熊二", "光头强"]
name_list.extend(temp_list)
print(name_list)

# 统计数据
print(name_list.count("熊大"))
print(len(name_list))

# 删除
del name_list[1]
print(name_list)
name_list.remove("zhangsan")  # 删除指定数据
print(name_list)
print(name_list.pop(2))  # 删除指定位置的数据,并返回被删除的数据
print(name_list)
name_list.clear()  # 清空列表 还可以用 del name_list
print(name_list)
输出结果:
lisi
1
['zhangsan', 'wifi', 'wangwu']
['zhangsan', 'wifi', 'wangwu', 'wuliu']
['zhangsan', '熊大', 'wifi', 'wangwu', 'wuliu']
['zhangsan', '熊大', 'wifi', 'wangwu', 'wuliu', '熊大', '熊二', '光头强']
2
8
['zhangsan', 'wifi', 'wangwu', 'wuliu', '熊大', '熊二', '光头强']
['wifi', 'wangwu', 'wuliu', '熊大', '熊二', '光头强']
wuliu
['wifi', 'wangwu', '熊大', '熊二', '光头强']
[]
列表排序
nums = [2, 1, 9, 8, 4, 5, 7]
names = ["zhangsan", "lisi", "wangwu", "huangliu"]
nums.sort()  # 列表按升序排序
names.sort()
print(nums)
print(names)
print("-" * 100)
nums.sort(reverse=True) # 列表按逆序排序
names.sort(reverse=True)
print(nums)
print(names)
print("-" * 100)
nums.reverse()  # 列表反转
print(nums)
names.reverse()
print(names)
输出结果:
[1, 2, 4, 5, 7, 8, 9]
['huangliu', 'lisi', 'wangwu', 'zhangsan']
----------------------------------------------------------------------------------------------------
[9, 8, 7, 5, 4, 2, 1]
['zhangsan', 'wangwu', 'lisi', 'huangliu']
----------------------------------------------------------------------------------------------------
[1, 2, 4, 5, 7, 8, 9]
['huangliu', 'lisi', 'wangwu', 'zhangsan']
列表生成式
ls1 = [i for i in range(10)]
print(ls1)

# 两个for
ls2 = [j for i in range(10) for j in range(i)]
print(ls2)

# 二维列表
ls3 = [[col * row for col in range(5)] for row in range(5)]
print(ls3)

# 二维转一维
ls4 = [data for i in ls3 for data in i]
print(ls4)

# 使用if
ls5 = [i for i in range(20) if i % 2 == 0]  # 只有if时将if放在for后面
print(ls5)

# 使用if else
ls6 = [i if i % 2 == 0 else i ** 2 for i in range(20)]  # if else放在for前面
print(ls6)
[0, 1, 2, 3, 4, 5, 6, 7, 8, 9]
[0, 0, 1, 0, 1, 2, 0, 1, 2, 3, 0, 1, 2, 3, 4, 0, 1, 2, 3, 4, 5, 0, 1, 2, 3, 4, 5, 6, 0, 1, 2, 3, 4, 5, 6, 7, 0, 1, 2, 3, 4, 5, 6, 7, 8]
[[0, 0, 0, 0, 0], [0, 1, 2, 3, 4], [0, 2, 4, 6, 8], [0, 3, 6, 9, 12], [0, 4, 8, 12, 16]]
[0, 0, 0, 0, 0, 0, 1, 2, 3, 4, 0, 2, 4, 6, 8, 0, 3, 6, 9, 12, 0, 4, 8, 12, 16]
[0, 2, 4, 6, 8, 10, 12, 14, 16, 18]
[0, 1, 2, 9, 4, 25, 6, 49, 8, 81, 10, 121, 12, 169, 14, 225, 16, 289, 18, 361]
4、字典
基本定义
# 字典 哈希表 dict {}
# key : value
# key可以是很多类型,但不能是列表
dict1 = {"name": "python", "age": 22, 20 : 80, "my list": [1, 2, 3, 4, 5, 6]}
print(dict1["name"])
print(dict1[20])
print(dict1["my list"])
输出结果:
python
80
[1, 2, 3, 4, 5, 6]
字典基本操作
def use_dict_base():
    """
    字典基本操作
    :return:
    """
    # 1、取值
    temp_dict = {"name": "zhangsan", "age": 22, "height": 1.85}
    print(id(temp_dict))
    print(temp_dict["name"])
    print(temp_dict)
    print("-" * 100)
    # 2、增加,修改
    temp_dict["age"] = 24
    temp_dict["add"] = "hello python"
    print(id(temp_dict))
    print(temp_dict)
    print("-" * 100)
    # 3、删除
    del temp_dict["add"]
    print(temp_dict)
    temp_dict.pop("age")
    print(temp_dict)
    print("-" * 100)
    # 4、统计键值对数量
    print(len(temp_dict))
    print("-" * 100)
    # 5、合并字典
    temp2 = {"name": "lisi", "age": 99}
    # temp_dict += temp2 # 错误写法,字典没有重载 + +=
    # 如果temp2中的键值跟temp_dict中有重复,则temp2会更新temp_dict中对应键的值
    temp_dict.update(temp2)
    print(temp_dict)
    print("-" * 100)
    temp_dict.clear()
    print(temp_dict)
    print(id(temp_dict))  # 由于字典是可变类型,就算清空地址也不会发生改变
    print("-" * 100)
    # 字典,列表是可变类型,跟不可变类型不同,进行赋值操作都会重新分配地址
    temp3 = {"name": "lisi", "age": 99}
    # 但如果直接这样赋值,temp4的地址还是会等于temp2的
    temp4 = temp2
    print(id(temp2))
    print(id(temp3))
    print(id(temp4))
    temp4["name"] = "python"
    print(temp2)
    print(temp3)
    print(temp4)
    # setdefault(key, value) 会进行判断,如果已存在key,则不会添加或修改,如果不存在key则会设置新的键值对
    # dict.setdefault("name", "zhangsan")


use_dict_base()
输出结果:
1749887155648
zhangsan
{'name': 'zhangsan', 'age': 22, 'height': 1.85}
----------------------------------------------------------------------------------------------------
1749887155648
{'name': 'zhangsan', 'age': 24, 'height': 1.85, 'add': 'hello python'}
----------------------------------------------------------------------------------------------------
{'name': 'zhangsan', 'age': 24, 'height': 1.85}
{'name': 'zhangsan', 'height': 1.85}
----------------------------------------------------------------------------------------------------
2
----------------------------------------------------------------------------------------------------
{'name': 'lisi', 'height': 1.85, 'age': 99}
----------------------------------------------------------------------------------------------------
{}
1749887155648
----------------------------------------------------------------------------------------------------
1749887155712
1749888513216
1749887155712
{'name': 'python', 'age': 99}
{'name': 'lisi', 'age': 99}
{'name': 'python', 'age': 99}
字典常用函数
def use_dict_iter():
    """
    字典遍历
    :return:
    """
    temp_dict = {"name": "zhangsan", "age": 22, "height": 1.85}

    # 直接对字典遍历,得到的是键值
    for i in temp_dict:
        print(i)

    print("-" * 100)
    # 对 字典.items()遍历得到的是键值对的元组
    print(temp_dict.items())
    print("-" * 100)
    for i, j in temp_dict.items():
        print(f"key:{i}  value:{j}")
    print("-" * 100)
    # 字典.keys()得到的是键值
    print(temp_dict.keys())
    # 字典.values()得到的是值
    print(temp_dict.values())
    print("-" * 100)
    for i in temp_dict.keys():
        print(i)
    print("-" * 100)
    for i in temp_dict.values():
        print(i)


use_dict_iter()
输出结果:
name
age
height
----------------------------------------------------------------------------------------------------
dict_items([('name', 'zhangsan'), ('age', 22), ('height', 1.85)])
----------------------------------------------------------------------------------------------------
key:name value:zhangsan
key:age value:22
key:height value:1.85
----------------------------------------------------------------------------------------------------
dict_keys(['name', 'age', 'height'])
dict_values(['zhangsan', 22, 1.85])
----------------------------------------------------------------------------------------------------
name
age
height
----------------------------------------------------------------------------------------------------
zhangsan
22
1.85
5、元组
基本定义
a = (1, 2, 3, 4)
b = (1, 2, 3, "haha", [1, 2, 3, 4, "hello world"], {"name": "zhangsan", "age": 19})
print(a)
print(b)
print(b[4])
print(b[4][2:])
print(b[5]["name"])
输出结果:
(1, 2, 3, 4)
(1, 2, 3, 'haha', [1, 2, 3, 4, 'hello world'], {'name': 'zhangsan', 'age': 19})
[1, 2, 3, 4, 'hello world']
[3, 4, 'hello world']
zhangsan
元组函数使用和定义问题
# 定义元组 t = (参数1, 参数2)
def use_tuple():
    info_tuple = ("zhangsan", 18, 1.75, "zhangsan")
    for i in info_tuple:
        print(i)
    print('-' * 50)
    print(info_tuple.index("zhangsan"))

    print(info_tuple.count("zhangsan"))
    print(len(info_tuple))


def use_tuple_error():
    a = (1) # 如果只有一个数据,且格式为(参数1),则不会被定义为元组
    print(type(a))
    b = (1,)
    print(type(b))
    for i in b:
        print(i)


use_tuple()
use_tuple_error()
输出结果:
zhangsan
18
1.75
zhangsan
--------------------------------------------------
0
2
4
<class 'int'>
<class 'tuple'>
1
6、集合
基本定义
set1 = set()
set2 = {1, 2, 3, 4, "zhangsan"}
print(set1)
print(set2)
# print(set2[2])  # 集合不支持随机访问,所以集合内不存在列表,字典
输出结果:
set()
{1, 2, 3, 4, 'zhangsan'}
集合基本操作和常用函数
def use_set():
    set1 = set()
    print(type(set1))
    print("-" * 100)
    set2 = {1, 2, 3, 4, 5}
    # print(set2[2])  # 集合不支持随机访问

    # 对集合添加元素
    set3 = {"zhangsan", "lisi"}
    print(set3)
    set3.add("wangwu")
    print(set3)
    print("-" * 100)

    # 集合的赋值
    set4 = set3
    set5 = set3.copy()
    print(id(set3))
    print(id(set4))
    print(id(set5))
    print("-" * 100)

    fruits1 = {"apple", "banana", "cherry"}
    fruits2 = {"apple", "orange", "watermelon"}
    diff = fruits1.difference(fruits2)
    print(f"差集:{diff}")
    print("-" * 100)

    # 求出fruits1中对fruits2的差集,并更新到fruits1
    print(id(fruits1))
    fruits1.difference_update(fruits2)
    print(id(fruits1))
    print(fruits1)
    print("-" * 100)

    fruits1 = {"apple", "banana", "cherry"}
    print(fruits1)
    fruits1.discard("banana")
    print(fruits1)
    print("-" * 100)

    fruits1 = {"apple", "banana", "cherry"}
    fruits2 = {"apple", "orange", "watermelon"}
    # 把fruits1和fruits2中不相交的集合赋值给sym
    sym = fruits1.symmetric_difference(fruits2)
    print(sym)
    print("-" * 100)

    # 合并集合
    un = fruits1.union(fruits2)
    print(un)
    print("-" * 100)

    fruits1 = {"apple", "banana", "cherry"}
    fruits2 = {"apple", "orange", "watermelon"}
    print("apple" in fruits1)
    print(fruits1 - fruits2)
    print(fruits1 | fruits2)
    print(fruits1 & fruits2)
    print(fruits1 ^ fruits2)


if __name__ == '__main__':
    use_set()
输出结果:
<class 'set'>
----------------------------------------------------------------------------------------------------
{'lisi', 'zhangsan'}
{'lisi', 'zhangsan', 'wangwu'}
----------------------------------------------------------------------------------------------------
1808285850080
1808285850080
1808295644512
----------------------------------------------------------------------------------------------------
差集:{'banana', 'cherry'}
----------------------------------------------------------------------------------------------------
1808295624256
1808295624256
{'banana', 'cherry'}
----------------------------------------------------------------------------------------------------
{'banana', 'cherry', 'apple'}
{'cherry', 'apple'}
----------------------------------------------------------------------------------------------------
{'orange', 'watermelon', 'cherry', 'banana'}
----------------------------------------------------------------------------------------------------
{'banana', 'orange', 'watermelon', 'cherry', 'apple'}
----------------------------------------------------------------------------------------------------
True
{'banana', 'cherry'}
{'banana', 'orange', 'watermelon', 'cherry', 'apple'}
{'apple'}
{'orange', 'watermelon', 'cherry', 'banana'}
7、容器其他公共操作
def list_slice():
    ls = [1, 2, 3, 4, 5, 6, 7, 8]
    print(ls)
    ls[3:3] = ['x', 'y', 'z']
    print(ls)
    ls[0:6] = ['zhangsan', "lisi"]
    print(ls)
    print("-" * 100)


def list_compare():
    a = [1, 2, 3]
    b = [1, 2, 3]
    print(a is b)  # 判断a和b的地址是否一致
    print(a == b)  # 判断a和b的内容是否一致


def use_method():
    seasons = ['Spring', 'Summer', 'Fall', 'Winter']
    nums = [1, 2, 3, 4]
    dic = dict(zip(seasons, nums))  # 转换成字典
    print(dic)
    list1 = list(enumerate(seasons))
    print(list1)
    dict1 = dict(enumerate(seasons))
    print(dict1)


if __name__ == "__main__":
    list_slice()
    list_compare()
    use_method()
输出结果:
[1, 2, 3, 4, 5, 6, 7, 8]
[1, 2, 3, 'x', 'y', 'z', 4, 5, 6, 7, 8]
['zhangsan', 'lisi', 4, 5, 6, 7, 8]
----------------------------------------------------------------------------------------------------
False
True
{'Spring': 1, 'Summer': 2, 'Fall': 3, 'Winter': 4}
[(0, 'Spring'), (1, 'Summer'), (2, 'Fall'), (3, 'Winter')]
{0: 'Spring', 1: 'Summer', 2: 'Fall', 3: 'Winter'}
二、判断逻辑
1、if-else嵌套
# 用缩进来代替C/C++中的{}

a = 3

if a == 3:
    print("correct")
else:
    print("error")

b = 4
if a < b:
    if a == 3:
        if b == 4:
            print(a, b)
        else:
            print("a = 3 b != 4")
    else:
        print("a != 3")
else:
    print("a >= b")
输出结果:
correct
3 4
三、循环
1、循环基本操作
# ls1 = [1, 2, 3, 4, 5]
#
# for i in ls1:
#     print(i)


# for i in range(10): # 默认[0, 10)
#     print(i)
#
# for i in range(1, 10): # 表示[1, 10)
#     print(i)

# for i in range(0, 10, 2): # 表示[0, 10), 步长为2
#     print(i) # 输出0, 2, 4, 6, 8
#
# dict1 = {"name": "python", "age": 22, 20 : 80, "my list": [1, 2, 3, 4, 5, 6]}
# for i in dict1:
#     print(i, dict1[i])    # i输出的是键值,dict1[i]得到的就是键值对应的值

x = 0
while x < 5:
    x += 1
    print(x)
输出结果:
1
2
3
4
5
四、列表的其他操作
1、切片
# 切片 插入 删除

list1 = [1, 2, 3, 4, 5, 6, 7, 8, 9]

#切片
print(list1[1:4])
print(list1[0:4])
print(list1[0:-1])
print(list1[:])
for i in list1[0:4]:
    print(i)
输出结果:
[2, 3, 4]
[1, 2, 3, 4]
[1, 2, 3, 4, 5, 6, 7, 8]
[1, 2, 3, 4, 5, 6, 7, 8, 9]
1
2
3
4
2、删除和插入
list1 = [1, 2, 3, 4, 10, 6, 7, 8, 9, 10]

# 删除
print(list1)
list1.remove(10) # 删除某个确定值的元素,只删除第一个找到的,没有找到就会报错
print(list1)
del list1[2] # 删除某个确定位置的元素
print(list1)

# 插入(一般只有在结尾插入,没有直接在中间插入的方式)
list1.append(11)
print(list1)

list1.extend([1, 2, 100]) # 直接插入一个列表在结尾
print(list1)
输出结果:
[1, 2, 3, 4, 10, 6, 7, 8, 9, 10]
[1, 2, 3, 4, 6, 7, 8, 9, 10]
[1, 2, 4, 6, 7, 8, 9, 10]
[1, 2, 4, 6, 7, 8, 9, 10, 11][1, 2, 4, 6, 7, 8, 9, 10, 11, 1, 2, 100]
3、循环后置定义列表
list1 = [i for i in range(10)]
print(list1)

list2 = [i for i in range(0, 10, 2)]
print(list2)

# 相当于
list3 = []
for i in range(10):
    list3.append(i)
print(list3)
输出结果:
[0, 1, 2, 3, 4, 5, 6, 7, 8, 9]
[0, 2, 4, 6, 8]
[0, 1, 2, 3, 4, 5, 6, 7, 8, 9]
五、函数定义
1、函数的基本格式和调用
def my_fun(A, B):
    return A**B


print(my_fun(3, 4))

def my_fun2(A, B = 2):  # 设置初值的参数要放在未设初值参数的后面,不可定义为my_fun2(B = 2, A)
    return A**B

print(my_fun2(10))
81
100
2、函数的传参特殊性
python中的传参有点类似C++的引用&,但是不完全相同,对于整形,浮点型,字符串可看成是局部变量,但是对于列表,字典可以看成是引用&
# 如果传入的参数是 整形,浮点型,字符串,则在函数内部修改数据不会影响到外部的数据
def addSelf(x):
    x += 1


x = 10
print(x)
addSelf(x)
print(x)


# 如果是 列表,字典 则在函数内部修改会影响到外部数据
def modify_dict(dict):
    dict["key"] = "hello c++"


dic = {"key": "hello python"}
print(dic)
modify_dict(dic)
print(dic) 输出的结果发现,在函数中对dict做的修改影响到了外部的dic
输出结果:
10
10
{'key': 'hello python'}
{'key': 'hello c++'}
3、多值参数
def fun1(*args, **kwargs):
    print(f"fun1 {args}")
    print(f"fun1{kwargs}")


def fun2(para, *args, **kwargs):
    print(para)
    print(f"fun2 {args}")
    print(f"fun2{kwargs}")


def fun3(*args, **kwargs):
    print(f"fun3 {args}")
    print(f"fun3{kwargs}")
    print(*args)
    print(*kwargs)
    # print(**kwargs) # **kwargs不可用于打印,**kwargs作为参数传入,会自动转换为key=value形式
    fun1(*args, **kwargs)  # 通过*args,**kwargs可以解包传入对应参数


fun1(1, 2, 3, 4, 5, 6, name="zhangsan", age=18)
print("-" * 100)
fun2(1, 2, 3, 4, 5, 6, name="zhangsan", age=18)
print("-" * 100)
fun3('a', 'b', 'c', skill="computer", job="programmer")
输出结果:
fun1 (1, 2, 3, 4, 5, 6)
fun1{'name': 'zhangsan', 'age': 18}
----------------------------------------------------------------------------------------------------
1
fun2 (2, 3, 4, 5, 6)
fun2{'name': 'zhangsan', 'age': 18}
----------------------------------------------------------------------------------------------------
fun3 ('a', 'b', 'c')
fun3{'skill': 'computer', 'job': 'programmer'}
a b c
skill job
fun1 ('a', 'b', 'c')
fun1{'skill': 'computer', 'job': 'programmer'}
4、张量作为传参的特殊性
import torch

# 张量tensor传入函数也相当于是引用方式传入,但是一定要使用“原地操作”(参数 += 某个值   参数 -= 某个值)
def modify_tensor(tensor_a):
    tensor_a += 100 # 执行原地操作会修改tensor_a,如果直接执行tensor_a = tensor_a + 100相当于创建了新的局部变量tensor_a不会影响到外部的变量


aa = torch.tensor(1.1)
print(aa)
modify_tensor(aa)
print(aa)
输出结果:
tensor(1.1000)
tensor(101.1000)
六、输入和格式化输出
def use_str():
    """
    格式化字符串
    :return:
    """
    info_tuple = ("xiaoming", 19, 1.85)
    print("%s 年龄是 %d 身高是 %.2f" % info_tuple) # 元组中的数据要与格式化的一一对应
    info_str = "%s 年龄是 %d 身高是 %.2f" % info_tuple # 对字符串也可采用格式化
    print(info_str)
    print(f"使用{info_tuple}")
    print(f"{info_tuple[0]} 年龄是 {info_tuple[1]} 身高是 {info_tuple[2]:.2f}")


a = input("请输入:")
print(type(a))
use_str()
输出结果:
请输入:100
<class 'str'>
xiaoming 年龄是 19 身高是 1.85
xiaoming 年龄是 19 身高是 1.85
使用('xiaoming', 19, 1.85)
xiaoming 年龄是 19 身高是 1.85
七、类的定义和使用
1、类的基本定义
# 类的定义
class person():
    def __init__(self, name, age): # self指的是类本身
        self._name = name;
        self._age = age;

    def print_name(self):
        print(self._name)

    def print_age(self):
        print(self._age)


dage = person("dage", 21) # 实例化
print(dage._name)
print(dage._age)

dage.print_name()
dage.print_age()
print(dage.print_name())


# 继承
class superman(person):
    def __init__(self, name, age):
        super(superman, self).__init__(name, age)
        self._fly = True

    def fly(self):
        if self._fly == True:
            print("I CAN FLY")


laoli = superman("laoli", 28)
laoli.print_name()
laoli.print_age()
laoli.fly()
输出结果:
dage
21
dage
21
dage
None
laoli
28
I CAN FLY
2、类的内置方法
# 类的常用四个内置方法 __init__  __del__  __str__  __new__
# self代表是的实例化对象本身,而cls代表的是该类
class Cat:
    # def __new__(cls, *args, **kwargs):
    #     """
    #     对象创建时执行的函数,一般默认使用系统内置的,如果要实现“单例模式”等一些特殊模式,则需要重写__new__
    #     :param args:
    #     :param kwargs:
    #     """

    def __init__(self, name):
        """
        对象初始化时执行的函数
        :param name:
        """
        print("这是一个初始化方法")
        self.name = name

    def __del__(self):
        """
        对象被销毁时执行的内置函数
        :return:
        """
        print(f"{self.name} 对象被销毁")

    def __str__(self):
        """
        对象描述信息,通过print(对象)可得到该函数返回值
        :return:
        """
        return f"对象 {self.name}"

    def eat(self):
        print(f"{self.name}吃鱼")

    def drink(self):
        print(f"{self.name}喝水")


if __name__ == '__main__':
    kitty = Cat("kitty")
    print("-" * 100)
    kitty.eat()
    print("-" * 100)
    kitty.drink()
    print("-" * 100)
    print(kitty)
    print("-" * 100)
    # kitty.name = "hello kitty" # 不规范的编程,不可在类外给对象修改属性
输出结果:
这是一个初始化方法
----------------------------------------------------------------------------------------------------
kitty吃鱼
----------------------------------------------------------------------------------------------------
kitty喝水
----------------------------------------------------------------------------------------------------
对象 kitty
----------------------------------------------------------------------------------------------------
kitty 对象被销毁
3、类的封装
class HouseItem:
    def __init__(self, name, area):
        self.name = name
        self.area = area

    def __str__(self):
        return f"[{self.name}] 占地面积 {self.area} 平方"


class House:
    def __init__(self, house_type, area):
        """
        房子初始化方法
        :param house_type: 房子的类型(字符串)
        :param area: 房子的占地面积
        """
        self.house_type = house_type
        self.area = area
        self.free_area = area
        self.items_list = []

    def __str__(self):
        return f"户型:{self.house_type}\n" \
               f"总面积:{self.area}\n" \
               f"剩余面积:{self.free_area}\n" \
               f"家居:{self.items_list}"

    def add_item(self, item: HouseItem):  # “变量名:类名”的格式是暗示变量是某个特定类
        if self.free_area < item.area:
            print("房间已经没有空位置了")
            return
        self.free_area -= item.area
        self.items_list.append(item.name)


if __name__ == '__main__':
    bed = HouseItem("席梦思", 6)
    sofa = HouseItem("沙发", 6)
    table = HouseItem("桌子", 4)

    print(bed)
    print(sofa)
    print(table)
    print("-" * 100)
    house = House("一室一厅", 20)
    house.add_item(bed)
    print(house)
    print("-" * 100)
    house.add_item(sofa)
    print(house)
    print("-" * 100)
    house.add_item(table)
    print(house)
    print("-" * 100)
    wardrode = HouseItem("衣柜", 10)
    house.add_item(wardrode)
[席梦思] 占地面积 6 平方
[沙发] 占地面积 6 平方
[桌子] 占地面积 4 平方
----------------------------------------------------------------------------------------------------
户型:一室一厅
总面积:20
剩余面积:14
家居:['席梦思']
----------------------------------------------------------------------------------------------------
户型:一室一厅
总面积:20
剩余面积:8
家居:['席梦思', '沙发']
----------------------------------------------------------------------------------------------------
户型:一室一厅
总面积:20
剩余面积:4
家居:['席梦思', '沙发', '桌子']
----------------------------------------------------------------------------------------------------
房间已经没有空位置了
4、私有属性和私有方法
class PersonalInformation:
    """
    私有属性和私有方法:__ + 变量名/方法名
    私有属性和私有方法只能在类中的函数调用,不能在类外被调用
    """

    def __init__(self, name, age, ID):
        self.name = name
        self.age = age
        self.__ID = ID

    def __private_method(self):
        print("这是一个私有方法")

    def call_private_method(self):
        self.__private_method()
        print(f"ID是{self.__ID}")


class Person(PersonalInformation):
    def get_ID(self):
        print(self.__ID)  # 继承父类,但是无法使用父类的私有属性和私有方法


if __name__ == '__main__':
    pi = PersonalInformation("zhangsan", 19, "88888888")
    print(pi.name)
    print(pi.age)
    # print(pi.__ID)  # 打印私有变量会报错
    # print(pi.__private_method)  # 打印私有方法同样会报错
    pi.call_private_method()
    print("-" * 100)
    p = Person("lisi", 22, "99999999")
    # p.get_ID()  # 会报错
输出结果:
zhangsan
19
这是一个私有方法
ID是88888888
5、单继承
class Animal:
    def __init__(self, name):
        self.name = name

    def eat(self):
        print(f"{self.name}在吃东西")

    def drink(self):
        print(f"{self.name}在喝水")

    def run(self):
        print(f"{self.name}在跑")

    def sleep(self):
        print(f"{self.name}在睡觉")


class Dog(Animal):  # 通过在类名后加上(父类),代表继承父类
    def __init__(self, name, gender):
        super(Dog, self).__init__(name)
        self.gender = gender

    def bark(self):
        print(f"{self.name}在汪汪叫")

    def run(self):
        super(Dog, self).run()
        print(f"{self.name}不断在加速")


class RoaringDog(Dog):
    def __init__(self, name, gender, age):
        super(RoaringDog, self).__init__(name, gender)
        self.age = age

    def fly(self):
        print(f"{self.name}会飞")


if __name__ == '__main__':
    wangcai = Dog("旺财", "雄性")
    wangcai.bark()
    wangcai.run()
    print("-" * 100)
    xiaotianquan = RoaringDog("哮天犬", "雄性", 100)
    xiaotianquan.eat()
    xiaotianquan.bark()
    xiaotianquan.run()
    xiaotianquan.fly()
输出结果:
旺财在汪汪叫
旺财在跑
旺财不断在加速
----------------------------------------------------------------------------------------------------
哮天犬在吃东西
哮天犬在汪汪叫
哮天犬在跑
哮天犬不断在加速
哮天犬会飞
6、多继承
class A:
    def __init__(self):
        print("A类的init")

    def test(self):
        print("A的test")


class B:
    def __init__(self):
        print("B类的init")

    def test(self):
        print("B的test")

    def haha(self):
        print("B类的haha")


class C(A, B):
    def __init__(self):
        print("C类的init")
        super(C, self).__init__()

    def test1(self):
        print("C的test")


if __name__ == '__main__':
    c_object = C()
    c_object.test()
    c_object.test1()
    c_object.haha()
    # (<class '__main__.C'>, <class '__main__.A'>, <class '__main__.B'>, <class 'object'>)
    # 输出结果A类在C类的后面,故C类的super()会先找A类,如果A类没有则会找B类
    print(C.__mro__)
输出结果:
C类的init
A类的init
A的test
C的test
B类的haha
(<class '__main__.C'>, <class '__main__.A'>, <class '__main__.B'>, <class 'object'>)
7、多态
class Dog(object):  # 默认就继承object类
    def __init__(self, name):
        self.name = name

    def game(self):
        print(f"{self.name}在快乐的玩耍")


class RoaringDog(Dog):
    def __init__(self, name, owner):
        super(RoaringDog, self).__init__(name)
        self.owner = owner


class Person:
    def __init__(self, name):
        self.name = name

    def game_with_dog(self, dog: Dog):
        print(f"{self.name} 与狗狗 {dog.name} 一起快乐的玩耍")
        dog.game()


if __name__ == '__main__':
    wangcai = Dog("旺财")
    xiaotianquan = RoaringDog("哮天犬", "二郎神")
    zhangsan = Person("zhangsan")
    # 不同的类可被同一个函数调用
    zhangsan.game_with_dog(wangcai)
    zhangsan.game_with_dog(xiaotianquan)
输出结果:
zhangsan 与狗狗 旺财 一起快乐的玩耍
旺财在快乐的玩耍
zhangsan 与狗狗 哮天犬 一起快乐的玩耍
哮天犬在快乐的玩耍
8、类属性和类方法
class Tool:
    count = 0

    def __init__(self, name):
        self.name = name
        Tool.count += 1

    def func(self):
        print(f"{self.name}可以做很多事情")

    @classmethod
    def show_tool_count(cls):
        """
        classmethod不使用对象属性,只使用类属性和类方法
        :return:
        """
        print(cls.count)

    @staticmethod
    def help():
        """
        staticmethod不使用对象属性和方法,也不使用类属性和方法
        :return:
        """
        print("这是一个工具类")


if __name__ == '__main__':
    tool1 = Tool("充电器")
    print(tool1.count)
    tool2 = Tool("插头")
    print(tool2.count)
    print(Tool.count)
    print("-" * 100)
    Tool.show_tool_count()
    print("-" * 100)
    Tool.help()
输出结果:
1
2
2
----------------------------------------------------------------------------------------------------
2
----------------------------------------------------------------------------------------------------
这是一个工具类
9、单例模式
class MusicPlayer:
    instance = None

    def __new__(cls, *args, **kwargs):
        if cls.instance == None:
            cls.instance = super().__new__(cls)
        return cls.instance

    def __init__(self, name):
        self.name = name


if __name__ == '__main__':
    player1 = MusicPlayer("QQ音乐")
    print(id(player1))
    print(player1.name)
    print("-" * 100)
    player2 = MusicPlayer("网易云")
    print(id(player1))
    print(player1.name)
    print(id(player2))
    print(player2.name)
输出结果:
3202054034624
QQ音乐
----------------------------------------------------------------------------------------------------
3202054034624
网易云
3202054034624
网易云
八、异常
1、异常捕获
def use_exception1():
    try:
        num = int(input("请输入一个整数:"))
        print(num)
    except:
        print("输入的必须是整数")


def use_exception2():
    """
    掌握不同的异常类型,可以跳转到不同的分支上
    :return:
    """
    try:
        num = int(input("请输入一个整数:"))
        result = 8 / num
        print(result)
    except ValueError:
        print("请输入一个整数")
    except ZeroDivisionError:
        print("除 0 错误")


def use_exception3():
    """
    掌握不同的异常类型,可以跳转到不同的分支上
    :return:
    """
    try:
        num = int(input("请输入一个整数:"))
        result = 8 / num
        print(result)
    except ValueError:
        print("请输入一个整数")
    except Exception as e:
        print(e)


def use_exception4():
    """
    学习else 和 finally
    :return:
    """
    try:
        num = int(input("请输入一个整数:"))
        result = 8 / num
        print(result)
        return
    except ValueError:
        print("请输入正确的整数")
    except ZeroDivisionError:
        print("除 0 错误")
    except Exception as e:
        print(e)
    else:
        print("正常执行")  # 如果正常执行时有return,则不会执行else
    finally:
        print("执行完成,但是不保证正确")  # 不受到return的影响


def test():
    num = 1 / 0


def use_exception5():
    """
    如何捕获异常发生的文件(模块)和具体行数
    :return:
    """
    try:
        test()
    except Exception as e:
        print(e)
        print("异常发生的文件(模块):", e.__traceback__.tb_frame.f_globals["__file__"])
        print("异常发生的行数:", e.__traceback__.tb_lineno)


def use_exception6():
    try:
        test()
    except Exception as e:
        import traceback
        # 打印异常信息
        print("异常信息:", e)

        # 获取完整的回溯信息
        tb = e.__traceback__
        while tb.tb_next:  # 循环到异常发生的最后一层,即 test 函数内部
            tb = tb.tb_next

        # 输出异常发生的文件、行号和代码内容
        filename = tb.tb_frame.f_code.co_filename
        lineno = tb.tb_lineno
        func_name = tb.tb_frame.f_code.co_name

        print(f"异常发生的文件:{filename}")
        print(f"异常发生的函数:{func_name}")
        print(f"异常发生的行数:{lineno}")

        # 如果需要打印具体行内容,可以用 open 读取
        with open(filename, "r", encoding="utf-8") as f:
            lines = f.readlines()
            print(f"发生异常的代码:{lines[lineno - 1].strip()}")


if __name__ == '__main__':
    # use_exception1()
    # use_exception2()
    # use_exception3()
    # use_exception4()
    # use_exception5()
    use_exception6()
输出结果:
异常信息: division by zero
异常发生的文件:D:/pythonProject/WD/day6/9-异常捕获.py
异常发生的函数:test
异常发生的行数:62
发生异常的代码:num = 1 / 0
2、异常的传递
def demo1():
    num = int(input("输入整数:"))
    print("I am demo1")
    return num


def demo2():
    num2 = demo1()
    print("I am demo2")
    return num2


try:
    print(demo2()) # 发生错误后,从发生错误的那一条语句开始回传,不会执行接下来的语句
except Exception as e:
    print(f"未知错误:{e}")
输出结果:
输入整数:ab
未知错误:invalid literal for int() with base 10: 'ab'
3、主动抛出异常
def input_password():
    pwd = input("请输入不少于八位的密码:")

    if len(pwd) >= 8:
        return pwd
    raise Exception("密码长度必须大于等于8位")


if __name__ == '__main__':
    try:
        print(input_password())
    except Exception as result:
        print(result)

    print("-" * 100)
    # 断言式 抛出异常写法
    try:
        assert 1 == 0, "你的程序出现了些许异常"
    except Exception as e:
        print(e)
输出结果:
请输入不少于八位的密码:11
密码长度必须大于等于8位
----------------------------------------------------------------------------------------------------
你的程序出现了些许异常
九、包(package)的使用
1、包的创建和基本使用
package与普通的目录的差别在于有无__init__.py文件
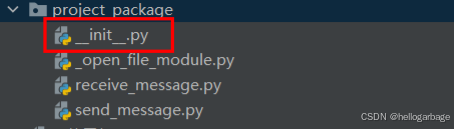
__init__.py的文件内容:
# 只有在__init__.py文件中import的文件才能被其他调用此包的程序使用
from . import send_message
from . import receive_message
_open_file_module.py文件内容:
# 下划线_ + 文件名 表示这个是私有模块,不建议在包的外部使用
def open_file():
    print("打开了一个文件")


def close_file():
    print("关闭了一个文件")
receive_message.py文件内容:
from . import _open_file_module


def receive_hello():
    _open_file_module.open_file()
    print("接收消息hello")
    _open_file_module.close_file()
send_message.py文件内容:
from . import _open_file_module


def send_hello():
    _open_file_module.open_file()
    print("发送消息hello")
    _open_file_module.close_file()
接下来导入包和使用:
import project_package

project_package.send_message.send_hello()
print("-" * 100)
project_package.receive_message.receive_hello()
# 虽然_open_file_module会被间接导入,但是由于是私有模块,所以不建议使用
# project_package._open_file_module.open_file()
输出结果:
打开了一个文件
发送消息hello
关闭了一个文件
----------------------------------------------------------------------------------------------------
打开了一个文件
接收消息hello
关闭了一个文件
十、文件的基本操作
1、文件基本操作
def open_r():
    """
    读取文件
    文件如果不存在 ,则会报错
    :return:
    """
    file = open('file1', mode='r', encoding='utf-8')
    text = file.read()  # read没有参数默认读到最后
    print(text)
    file.close()


def open_rw():
    """
    读写方式打开文件
    文件如果不存在,则会报错
    :return:
    """
    file = open("file2.txt", mode="r+", encoding="utf-8")
    text = file.read()
    print(text)
    file.write("hello garbage")
    file.close()


def open_w():
    """
    写模式打开文件,文件存在则清空文件,文件不存在则创建文件
    :return:
    """
    file = open("file3", mode="w", encoding="utf-8")
    file.write("快跑,千万别学编程!")
    file.close()


def open_a():
    """
    追加模式打开,如果文件存在,打开后光标会自动落在文件末尾,
    如果文件不存在也会创建文件
    :return:
    """
    file = open("file4", mode="a", encoding="utf-8")
    file.write("快跑!!!!")
    file.close()


def use_readline():
    file = open("file2.txt", encoding="utf-8")
    while True:
        text = file.readline()
        if not text:
            break

        print(text, end="")
    file.close()


if __name__ == '__main__':
    # open_r()
    # open_rw()
    # open_w()
    # open_a()
    use_readline()
2、seek函数的使用
import os


def seek_start():
    """
    相对于开头(文件起始位置)进行偏移
    :return:
    """
    file = open("file1", mode="r+", encoding='utf-8')
    file.seek(2, os.SEEK_SET)  # 相对于开头偏移两个字节
    text = file.read()
    print(text)
    file.close()


def seek_end():
    """
    相对于文件尾部进行偏移
    :return:
    """
    file = open("file1", mode="r+", encoding='utf-8')
    file.seek(0, os.SEEK_END)  # 采用非字节流方式打开文件,如果是按尾部偏移,则偏移量只能写0
    text = file.read()
    print(text)  # 读不到字符串,因为光标在文件结尾
    file.close()


def seek_cur():
    """
    相当于当前位置进行偏移
    :return:
    """
    file = open('file1', mode='r+', encoding='utf8')
    file.seek(0, os.SEEK_CUR)  # 采用非字节流方式打开文件,如果是按当前位置偏移,则偏移量只能写0
    text = file.read(5)
    print(text)  # 读不到内容,是空字符串
    file.close()


def seek_b_cur_end():
    """
    在b模式(字节流模式)下打开,常用与读取图片,音视频
    采用字节流模式进行偏移没有特殊限制
    :return:
    """
    file = open("file1", mode='rb+')
    file.seek(5, os.SEEK_CUR)
    file.seek(-3, os.SEEK_END)
    bits = file.read()
    print(bits)
    file.close()


if __name__ == '__main__':
    # seek_start()
    # seek_end()
    # seek_cur()
    seek_b_cur_end()
输出结果:
b'rld' # 这个b''代表的是字节流
3、对目录的操作
import os


def use_rename():
    """
    理解相对路径,绝对路径
    :return:
    """
    os.rename("./dir1/file1", "./dir1/file2")
    os.remove('./dir1/file2')  # 移除文件


def use_dir_func():
    file_list = os.listdir('.')
    print(file_list)
    print("-" * 100)
    os.mkdir('dir_temp')  # 创建一个目录
    print(os.getcwd())
    print("-" * 100)
    file_list = os.listdir('.')
    print(file_list)
    os.rmdir('dir_temp')  # 只能移除空目录


def change_dir():
    """
    改变当前路径
    :return:
    """
    print(os.getcwd())
    os.chdir('dir1')
    print(os.getcwd())


def scan_dir(current_path, width):
    """
    深度优先遍历
    :param current_path:
    :param width:
    :return:
    """
    file_list = os.listdir(current_path)
    for file in file_list:
        print(' ' * width, file)  # 打印文件名,width代表多少个空格
        new_path = current_path + '/' + file
        if os.path.isdir(new_path):
            scan_dir(new_path, width + 4)


def use_stat(file_path):
    """
    获取文件相关属性
    :return:
    """
    file_info = os.stat(file_path)
    print(f'size:{file_info.st_size}, uid:{file_info.st_uid},'
          f' mode:{file_info.st_mode:x}, mtime:{file_info.st_mtime}')
    from time import strftime
    from time import gmtime
    gm_time = gmtime(file_info.st_mtime)
    print(strftime("%Y-%m-%d %H:%M:%S", gm_time))


if __name__ == '__main__':
    # use_rename()
    # use_dir_func()
    # change_dir()
    # scan_dir('.', 0)
    use_stat("file4")
输出结果:
size:64, uid:0, mode:81b6, mtime:1736750851.376857
2025-01-13 06:47:31
4、eval的使用
def read_conf():
    """
    读取配置
    :return:
    """
    file = open("file4", mode="r+", encoding='utf-8')
    text = file.read()
    print(text)
    my_dict = eval(text)
    print(type(my_dict))
    print(my_dict)
    file.close()


if __name__ == '__main__':
    read_conf()
file4的内容:
{
    'name':'zhangsan',
    'age':18,
    'ID':'88888888'
}
输出结果:
{
'name':'zhangsan',
'age':18,
'ID':'88888888'
}
<class 'dict'>
{'name': 'zhangsan', 'age': 18, 'ID': '88888888'}
十一、sort和sorted函数的使用
my_list = "This is a test string for testing Sort And sorted".split()
print(my_list)


def change_lower(para_str: str):
    return para_str.lower()


my_list.sort()
print(my_list)
print("-" * 100)
# key是传入的一个函数,相当于改变比较的规则
my_list.sort(key=change_lower)
print(my_list)

print('-' * 100)
student_tuples = [
    ('jane', 'B', 12),
    ('john', 'A', 15),
    ('dave', 'B', 10),
]
# sort函数会直接改变原列表的元素顺序,sorted会返回一个新的排好序的列表
# lambda是一个匿名函数,lambda的语法:lambda 参数1, 参数2, ... : 返回值1, 返回值2, ...
# lambda用法举例:lambda a, b : a + b
print(sorted(student_tuples, key=lambda x: x[2]))
print("-" * 100)


class Student:
    def __init__(self, name, grade, age):
        self.name = name
        self.grade = grade
        self.age = age

    def __repr__(self):
        """
        跟__str__一样都是通过print(对象)后执行的内置函数,但是比起__str__更加方便,可以返回非字符串类型
        如果同时有__str__和__repr__则通过print(对象)会优先执行__str__
        :return:
        """
        return repr((self.name, self.grade, self.age))


student = Student("zhangsan", 'A', 19)
print(student)
print("-" * 100)
student_objects = [
    Student('john', 'A', 15),
    Student('jane', 'B', 12),
    Student('dave', 'B', 10),
]
print(sorted(student_objects, key=lambda stu: stu.age))  # 此处的stu相当于列表中的元素
print("-" * 100)

from operator import itemgetter, attrgetter

print("使用operator系列")
# itemgetter:用于从 可迭代对象(如列表、元组、字典) 中提取元素。
# attrgetter:用于从 对象 中提取属性。
print(sorted(student_tuples, key=itemgetter(0)))
print(sorted(student_objects, key=attrgetter('age')))
print("使用operator系列进行多列排序")
print(sorted(student_tuples, key=itemgetter(0, 1)))
print(sorted(student_objects, key=attrgetter('grade', 'age'), reverse=True))
print("-" * 100)
print("lambda进行多列排序")
print(sorted(student_tuples, key=lambda s: (s[1], s[2])))
print(sorted(student_tuples, key=lambda s: (s[1], -s[2])))  # 第一列升序,第二列降序
print("-" * 100)

print("查看排序稳定性")
data = [('red', 1), ('blue', 1), ('red', 2), ('blue', 2)]
print(sorted(data, key=itemgetter(0)))
mydict = {'Li': ['M', 7],
          'Zhang': ['E', 2],
          'Wang': ['P', 3],
          'Du': ['C', 2],
          'Ma': ['C', 9],
          'Zhe': ['H', 7]}
print(sorted(mydict.items(), key=lambda x: x[1][1]))
print("-" * 100)

gameresult = [
    {"name": "Bob", "wins": 10, "losses": 3, "rating": 75.00},
    {"name": "David", "wins": 3, "losses": 5, "rating": 57.00},
    {"name": "Carol", "wins": 4, "losses": 5, "rating": 57.00},
    {"name": "Patty", "wins": 9, "losses": 3, "rating": 71.48}]

print(sorted(gameresult, key=lambda x: x['rating']))
print(sorted(gameresult, key=itemgetter("rating", "name")))
输出结果:
['This', 'is', 'a', 'test', 'string', 'for', 'testing', 'Sort', 'And', 'sorted']
['And', 'Sort', 'This', 'a', 'for', 'is', 'sorted', 'string', 'test', 'testing']
----------------------------------------------------------------------------------------------------
['a', 'And', 'for', 'is', 'Sort', 'sorted', 'string', 'test', 'testing', 'This']
----------------------------------------------------------------------------------------------------
[('dave', 'B', 10), ('jane', 'B', 12), ('john', 'A', 15)]
----------------------------------------------------------------------------------------------------
('zhangsan', 'A', 19)
----------------------------------------------------------------------------------------------------
[('dave', 'B', 10), ('jane', 'B', 12), ('john', 'A', 15)]
----------------------------------------------------------------------------------------------------
使用operator系列
[('dave', 'B', 10), ('jane', 'B', 12), ('john', 'A', 15)]
[('dave', 'B', 10), ('jane', 'B', 12), ('john', 'A', 15)]
使用operator系列进行多列排序
[('dave', 'B', 10), ('jane', 'B', 12), ('john', 'A', 15)]
[('jane', 'B', 12), ('dave', 'B', 10), ('john', 'A', 15)]
----------------------------------------------------------------------------------------------------
lambda进行多列排序
[('john', 'A', 15), ('dave', 'B', 10), ('jane', 'B', 12)]
[('john', 'A', 15), ('jane', 'B', 12), ('dave', 'B', 10)]
----------------------------------------------------------------------------------------------------
查看排序稳定性
[('blue', 1), ('blue', 2), ('red', 1), ('red', 2)]
[('Zhang', ['E', 2]), ('Du', ['C', 2]), ('Wang', ['P', 3]), ('Li', ['M', 7]), ('Zhe', ['H', 7]), ('Ma', ['C', 9])]
----------------------------------------------------------------------------------------------------
[{'name': 'David', 'wins': 3, 'losses': 5, 'rating': 57.0}, {'name': 'Carol', 'wins': 4, 'losses': 5, 'rating': 57.0}, {'name': 'Patty', 'wins': 9, 'losses': 3, 'rating': 71.48}, {'name': 'Bob', 'wins': 10, 'losses': 3, 'rating': 75.0}]
[{'name': 'Carol', 'wins': 4, 'losses': 5, 'rating': 57.0}, {'name': 'David', 'wins': 3, 'losses': 5, 'rating': 57.0}, {'name': 'Patty', 'wins': 9, 'losses': 3, 'rating': 71.48}, {'name': 'Bob', 'wins': 10, 'losses': 3, 'rating': 75.0}]
十二、numpy的使用
1、将列表转换为矩阵
import numpy as np
import torch

# tensor 张量,用于计算

list1 = [
    [1, 2, 3, 4, 5],
    [6, 7, 8, 9, 10],
    [11, 12, 13, 14, 15]
]
print(list1)

array = np.array(list1) # 把list1转化为矩阵
print(array)

array2 = np.array(list1)
print(array2)

array3 = np.concatenate((array, array2)) # 合并两个矩阵,默认是行扩张axis=0
print(array3)

array4 = np.concatenate((array, array2), axis=1) # 合并两个矩阵,横向合并(列扩张)
print(array4)
输出结果:
list1:
[[1, 2, 3, 4, 5], [6, 7, 8, 9, 10], [11, 12, 13, 14, 15]]
array:
[[ 1 2 3 4 5]
[ 6 7 8 9 10]
[11 12 13 14 15]]array2:
[[ 1 2 3 4 5]
[ 6 7 8 9 10]
[11 12 13 14 15]]array3:
[[ 1 2 3 4 5]
[ 6 7 8 9 10]
[11 12 13 14 15]
[ 1 2 3 4 5]
[ 6 7 8 9 10]
[11 12 13 14 15]]array4:
[[ 1 2 3 4 5 1 2 3 4 5]
[ 6 7 8 9 10 6 7 8 9 10]
[11 12 13 14 15 11 12 13 14 15]]
2、对矩阵进行切片
import numpy as np
import torch
list1 = [
    [1, 2, 3, 4, 5],
    [6, 7, 8, 9, 10],
    [11, 12, 13, 14, 15]
]
array = np.array(list1) # 把list1转化为矩阵
print(array)
#切片
print(array[1:3, 2:4]) # 对矩阵进行切片
print(array[:, 2:5])
# 跳着切
idx = [1, 3]
print(array[:, idx])
输出结果:
print(array)
[[ 1  2  3  4  5]
 [ 6  7  8  9 10]
 [11 12 13 14 15]]

print(array[1:3, 2:4])
[[ 8  9]
 [13 14]]

print(array[:, 2:5])
[[ 3  4  5]
 [ 8  9 10]
 [13 14 15]]

print(array[:, idx])
[[ 2  4]
 [ 7  9]
 [12 14]]
十三、torch中的tensor的相关使用(深度学习)
1、将矩阵转换为张量(tensor)
import torch
import numpy as np

list1 = [
    [1, 2, 3, 4, 5],
    [6, 7, 8, 9, 10],
    [11, 12, 13, 14, 15]
]

print(list1)
array = np.array(list1)
tensor1 = torch.tensor(array) # 只有变为张量tensor后才能计算梯度
print(array)
print(tensor1)
输出结果:
[[1, 2, 3, 4, 5], [6, 7, 8, 9, 10], [11, 12, 13, 14, 15]]
[[ 1 2 3 4 5]
[ 6 7 8 9 10]
[11 12 13 14 15]]
tensor([[ 1, 2, 3, 4, 5],
[ 6, 7, 8, 9, 10],
[11, 12, 13, 14, 15]], dtype=torch.int32)
2、对张量求梯度
import torch
import numpy as np

list1 = [
    [1, 2, 3, 4, 5],
    [6, 7, 8, 9, 10],
    [11, 12, 13, 14, 15]
]

x = torch.tensor(3.0)
x.requires_grad_(True) # 表示需要计算梯度,不写这个执行梯度计算会报错
y = x**2
y.backward() # 求梯度,实际上就是对y中的x求导

print(y)
print(x.grad) # 2x = 6 (x = 3.0)
tensor(9., grad_fn=<PowBackward0>)
tensor(6.)
3、对同一个变量的不同式子求梯度
import torch
import numpy as np

list1 = [
    [1, 2, 3, 4, 5],
    [6, 7, 8, 9, 10],
    [11, 12, 13, 14, 15]
]

x = torch.tensor(3.0)
x.requires_grad_(True) # 表示需要计算梯度,不写这个执行梯度计算会报错
y = x**2
y.backward() # 求梯度,实际上就是对y中的x求导

print(y)
print(x.grad) # 2x = 6 (x = 3.0)

y2 = x**2
y2.backward()
print(y2)
print(x.grad) #此时的x的梯度值是y和y2的梯度值之和,所以结果是 6+6 = 12
输出结果:
tensor(9., grad_fn=<PowBackward0>)
tensor(6.)
tensor(9., grad_fn=<PowBackward0>)
tensor(12.)
如果要得到y2真实的梯度值需要先把x的梯度值设置为0
import torch
import numpy as np

list1 = [
    [1, 2, 3, 4, 5],
    [6, 7, 8, 9, 10],
    [11, 12, 13, 14, 15]
]


x = torch.tensor(3.0)
x.requires_grad_(True) # 表示需要计算梯度,不写这个执行梯度计算会报错
y = x**2
y.backward() # 求梯度,实际上就是对y中的x求导

print(y)
print(x.grad) # 2x = 6 (x = 3.0)

x.grad = torch.tensor(0.0) # 将x的梯度值清零
y2 = x**2
y2.backward()
print(y2)
print(x.grad) #此时得到的就是y2正确的梯度值
输出结果:
tensor(9., grad_fn=<PowBackward0>)
tensor(6.)
tensor(9., grad_fn=<PowBackward0>)
tensor(6.)
4、detach()函数
执行x.detach()函数是将x从张量网中取下来,之后x无法进行梯度计算,如果不执行此操作,x无法用于绘图等其他操作。
import torch
import numpy as np

list1 = [
    [1, 2, 3, 4, 5],
    [6, 7, 8, 9, 10],
    [11, 12, 13, 14, 15]
]

x = torch.tensor(3.0)
x.requires_grad_(True) # 表示需要计算梯度,不写这个执行梯度计算会报错
y = x**2
y.backward() # 求梯度,实际上就是对y中的x求导

print(y)
print(x.grad) # 2x = 6 (x = 3.0)

x = x.detach() # 执行完这个语句后,执行接下来的y2.backward()会产生报错
y2 = x**2
y2.backward()
5、创建张量的其他函数
import torch

row = 3 # 行
col = 4 # 列
tensor1 = torch.ones(row, col) # 生成row行,col列 全1张量
print(tensor1)
tensor2 = torch.zeros(row, col) # 生成row行,col列,全0张量
print(tensor2)

ave = 0 # 均值
var = 0.1 # 方差
tensor3 = torch.normal(ave, var, (row, col)) # 按正态分布生成
tensor4 = torch.normal(ave, var, (row, col, 4)) # 按正态分布生成,创建三维的(x, y, z)
print(tensor3)
print(tensor4)
输出结果:
tensor([[1., 1., 1., 1.],
[1., 1., 1., 1.],
[1., 1., 1., 1.]])
tensor([[0., 0., 0., 0.],
[0., 0., 0., 0.],
[0., 0., 0., 0.]])
tensor([[-0.1909, -0.0285, 0.0845, 0.0033],
[-0.0566, 0.0229, 0.0732, 0.1983],
[-0.1186, 0.0337, 0.0153, -0.1372]])
tensor([[[ 0.1302, 0.0777, -0.1321, -0.1932],
[ 0.0916, 0.1353, 0.0360, 0.1453],
[-0.0508, 0.0560, -0.0836, -0.0703],
[-0.1564, -0.0565, -0.2370, -0.0269]],[[-0.0317, -0.0098, 0.0624, 0.0393],
[-0.1694, -0.1136, 0.0329, -0.0315],
[ 0.1643, -0.0092, -0.0856, -0.0574],
[-0.1772, -0.0179, 0.1084, 0.1040]],[[-0.0892, 0.1603, -0.0104, -0.0812],
[ 0.0287, 0.1221, -0.0134, -0.0344],
[ 0.0964, 0.0869, -0.0043, 0.2014],
[-0.2373, 0.0195, -0.0032, -0.0048]]])
6、张量之和
import torch

row = 3 # 行
col = 4 # 列
tensor1 = torch.ones(row, col) # 生成row行,col列 全1张量
print(tensor1)
sum1 = torch.sum(tensor1, dim = 0) # 列和
print(sum1)
sum2 = torch.sum(tensor1, dim=1) # 行和
print(sum2)
sum3 = torch.sum(tensor1, dim=1, keepdim=True) # keepdim设置是否保持之前行数/列数(keepdim = True, dim=1时,每行之和,最后保持原来的行数)
print(sum3)
输出结果:
tensor([[1., 1., 1., 1.],
[1., 1., 1., 1.],
[1., 1., 1., 1.]])
tensor([3., 3., 3., 3.])
tensor([4., 4., 4.])
tensor([[4.],
[4.],
[4.]])


 被折叠的 条评论
为什么被折叠?
被折叠的 条评论
为什么被折叠?
 到【灌水乐园】发言


