


1. huggingface下载慢
# 安装依赖
pip install -U huggingface_hub
#设置环境变量
export HF_ENDPOINT=https://hf-mirror.com
# 登录,token校验
huggingface-cli login --token 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

#下载模型:
huggingface-cli download --resume-download  THUDM/CogVideoX-2b --local-dir /userhome/huggingface_diff/models/ac3d/CogVideoX-2b
huggingface-cli download --resume-download  THUDM/CogVideoX-5b --local-dir /userhome/huggingface_diff/models/ac3d/CogVideoX-5b
huggingface-cli download --resume-download  TheDenk/cogvideox-5b-controlnet-hed-v1 --local-dir /userhome/huggingface_diff/models/ac3d/cogvideox-5b-controlnet-hed-v1
#下载数据集
huggingface-cli download --repo-type dataset --resume-download wikitext --local-dir wikitext
可以本地下载,然后拷贝到地址
# 如果遇到hub下载慢,可以本地下载,然后拷贝到地址/root/.cache/torch/hub
dinov2_model = torch.hub.load('/root/.cache/torch/hub/facebookresearch_dinov2_main', name, trust_repo=True, source='local')
#解决run.sh脚本win下载导致编码报错:出现$‘\r‘: command not found …

vim start.sh
:set ff=unix
:wq
2. 设置pip镜像源,加快下载速度
#设置pip 源

pip config set global.index-url https://pypi.tuna.tsinghua.edu.cn/simple #下载贼快

# 常见的镜像源
pip config set global.index-url https://mirrors.aliyun.com/pypi/simple/ #阿里云
pip config set global.index-url https://pypi.mirrors.ustc.edu.cn/simple/ #中国科技大学
pip config set global.index-url https://pypi.douban.com/simple/ #豆瓣
pip config set global.index-url https://pypi.tuna.tsinghua.edu.cn/simple/ #清华大学
pip config set global.index-url http://pypi.mirrors.ustc.edu.cn/simple/ #中国科学技术大学
3. pip下载torch比较慢
#可以先执行,然后web 页面下载whl,然后再执行命令,这样会快很多
pip install torch==2.1.1 torchvision==0.16.1 torchaudio==2.1.1 --index-url https://download.pytorch.org/whl/cu118


pip install torch-2.1.1+cu118-cp310-cp310-linux_x86_64.whl


pip install torch==2.1.1 torchvision==0.16.1 torchaudio==2.1.1 --index-url https://download.pytorch.org/whl/cu118


pip install -r requirments.txt
# 如果执行由于网络时好时坏,一直卡住了,那就在另一个命令终端执行
pip install mesh2sdf==1.1.0
4. pip安装requiements.txt跳过错误包继续安装
使用 --ignore-installed 和 --no-deps 选项
pip install --ignore-installed --no-deps -r requirements.txt
--ignore-installed:忽略已安装包。
--no-deps:不安装依赖包,减少冲突。
增加重试次数和超时时间
pip install --retries 5 --timeout 60 -r requirements.txt5. conda 添加国内镜像源,下载torch
# 如果命令失败,则需要添加国内源

conda config --add channels https://mirrors.tuna.tsinghua.edu.cn/anaconda/pkgs/free/
conda config --add channels https://mirrors.tuna.tsinghua.edu.cn/anaconda/pkgs/main/
conda config --add channels https://mirrors.tuna.tsinghua.edu.cn/anaconda/cloud/conda-forge/
#设置搜索时显示通道地址
conda config --set show_channel_urls yes


conda install pytorch torchvision torchaudio pytorch-cuda=11.8 -c pytorch -c nvidia
6. Anaconda常用命令
# 创建虚拟环境:
conda create -n 虚拟环境名称 python=版本号
# 查看所有虚拟环境:
conda env list
# 使用虚拟环境:
conda activate 虚拟环境名称
# 退出当前虚拟环境:
conda deactivate
# 删除虚拟环境: (必须先退出虚拟环境内部才能删除当前虚拟环境):
conda remove -n 虚拟环境名称 --all
# 在当前虚拟环境安装模块:
conda install -c conda-forge 包名==版本号
# 在当前虚拟环境移除模块:
conda remove 包名
# 查看虚拟环境中安装的包:
pip freeze 或者 pip list
# 收集当前环境中安装的包及其版本:
pip freeze > requirements.txt
# 在部署项目的服务器中安装项目使用的模块:
pip install -r requirements.txt
# 如果conda下载速度很慢,手动下载安装
https://mirrors.tuna.tsinghua.edu.cn/anaconda/cloud/pytorch/linux-64/
conda install pytorch-2.4.0-py3.10_cuda12.4_cudnn9.1.0_0.tar.bz2
Linux 端快速迁移 conda 环境到另一台服务器上
# 1. 打包环境
#  此操作在需要打包 conda 环境的那台服务器上完成。先后在 shell 中执行以下命令:
pip install conda-pack
conda pack -n env_name    # emv_name 是需要打包的环境名
#操作完成后,会在当前目录下生成一个名为env_name.tar.gz的文件。
然后将env_name.tar.gz文件复制到另一台目标服务器上,可手动复制,也可使用以下命令:

# 以下命令中:xxx 改为端口号,username 改为用户名,192.168.0.0 改为目标服务器的 ip 地址
# /home/username/ 改为目标服务器上放文件的地址
scp -r -P xxx env_name.tar.gz username@192.168.0.0:/home/username/

#2. 解压缩文件
#目标服务器上,在env_name.tar.gz文件同目录下创建.py文件,并复制以下内容
# 获取环境的 tar.gz 文件,env_name 是要打包的环境名

import os
import tarfile

name = ''
file_name = '/home/username/env_name.tar.gz'

new_env_path = f'/home/username/anaconda3/envs/{name}'    # ananconda 存放环境的路径
if not os.path.exists(new_env_path):
    os.mkdir(new_env_path)

def untar(file_name, dir):
    t_file = tarfile.open(file_name)
    t_file.extractall(new_env_path)

untar(file_name, new_env_path)

#以上文件中需要改 3 个地方(目标服务器上需要已经安装好 Anaconda):

name = ''    # 给环境赋一个新的名字
file_name = '/home/username/env_name.tar.gz'    # file_name 改成自己.tar.gz 文件的绝对路径
new_env_path = f'/home/username/anaconda3/envs/{name}'  # 此路径中username 改为自己的用户名

# 改好后执行脚本文件即可。
# 此处提供一个.tar.gz文件,配置为:
# torch==1.12.1+cu113 torchvision==0.13.1+cu113 torchaudio==0.12.1
7. 如何根据github跑代码
# 先git clone到本地

# 先读readme代码,然后用vscode读代码

# 然后进行跑代码,安装环境依赖install.sh

# 下载对应的模型,数据集
8. PyTorch中torch、cuda、xformers版本对应关系
# 最新xformers/CUDA/pytorch版本关系对照表
https://nuowa.net/487| xformers | pytorch | CUDA |
| v0.0.29.post2 | torch==2.6.0 | cu118,cu124,cu126 |
| 0.0.29.post1,0.0.29,0.0.28.post3 | torch==2.5.1 | cu118,cu121,cu124 |
| 0.0.28.post2 | torch==2.5.0 | cu118,cu121,cu124 |
| 0.0.28.post1 | torch==2.4.1 | cu118,cu121,cu124 |
| 0.0.27.post1,0.0.27.post2 | torch==2.4.0 | cu118,cu121 |
| 0.0.27 | torch==2.3.1 | cu118,cu121 |
| 0.0.26 | torch==2.2.0 | cu118,cu121 |
| 0.0.25 | torch==2.2.0 | cu118,cu121 |
| 0.0.24 | torch==2.2.0 | cu118,cu121 |
| 0.0.23 | torch==2.1.1 | cu118,cu121 |
| 0.0.22.post7 | torch==2.1.0 | cu118,cu121 |
| 0.0.22 | torch==2.0.1 | |
| 0.0.21 | torch==2.0.1 | |
| 0.0.20 | torch==2.0.1 | |
| 0.0.19 | torch==2.0.0 | |
| 0.0.18 | torch==2.0.0 | |
| 0.0.17 | torch==1.13.1 |
9.PyTorch中torch、torchvision、torchaudio版本对应关系
torch | torchvision | torchaudio | Python |
|---|---|---|---|
main / nightly | main / nightly | main / nightly | >=3.9, <=3.12 |
2.5 | 0.20 | 2.5 | >=3.9, <=3.12 |
2.4 | 0.19 | 2.4 | >=3.8, <=3.12 |
2.3 | 0.18 | 2.3 | >=3.8, <=3.12 |
2.2 | 0.17 | 2.2 | >=3.8, <=3.11 |
2.1 | 0.16 | 2.1 | >=3.8, <=3.11 |
2.0 | 0.15 | 2.0 | >=3.8, <=3.11 |
从源码安装:
pip install -v -U git+https://github.com/facebookresearch/xformers.git@v0.0.28#egg=xformers报错:
fatal: unable to access 'https://github.com/microsoft/GLIP.git/': Failed to connect to github.com port 443: Connection refused尝试了修改代理等方法,还是无法解决,最终找到了一个解决方案:
修改/etc/hosts文件,hosts文件是Linux系统中一个负责IP地址与域名快速解析的文件
步骤:
vi /etc/hosts- 将行加入即可:
140.82.114.3 github.com
10.无法通过vscode的Remote-SSH 扩展CentOS7服务器
无法通过vscode连接到远程服务器,错误原因:The remote host does not meet the prerequisites for running VS Code Server.
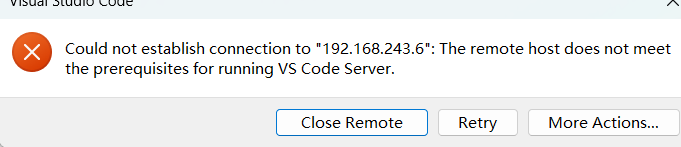
1. 报错原因
因为一直是可以用的,今天重启了电脑,就不可以用了。
最开始怀疑是 Remote-SSH扩展出问题了,卸载后重装,问题未解决。
怀疑是服务器环境被更改了,但是尝试了几台服务器,都无法连接(这里巧合的是,尝试的几台服务器都是centos7系统)。
怀疑本地vscode 出现了未知问题,卸载重装,果然可以用了,然而仅仅是重启了一遍vscode就不行了。
为了避免干扰,使用vmware虚拟机继续测试,偶然发现vscode远程连接ubuntu系统的服务器是正常的。
再加上报错内容,猜测是vscode会自动更新,所以vscode刚刚安装后是正常的,重启过一次后,因为自动更新了,就会发生问题。后来查看vscode的版本,果然和我的安装包不是一个版本,问题排查成功。
2. 深度思考
VSCode 最新版本对服务器端的glibc和libstdc++依赖要求提高,导致旧版Linux系统(如CentOS 7等)因依赖版本过低而无法兼容
三、解决方案
1. 方案一:适用已经是最新版本的情况下
先禁用VSCode 自动更新,可以参考如下链接:https://blog.youkuaiyun.com/qq_37200100/article/details/147078692?spm=1011.2415.3001.5331
如果链接无法打开,可以在本文章所属专栏下寻找,博客名称:《关闭VSCode 自动更新》
然后再安装下载VSCode1.85版本安装包(亲测),进行覆盖式安装。
安装包下载链接:https://code.visualstudio.com/updates/v1_85
覆盖式安装注意点:
(1) 需要退出正在运行的VSCode软件。
(2) 本人在安装时,没有让选择安装目录,点了几个下一步自动就覆盖安装了。
如果出现需要选择安装目录的情况,一定要选择当前VSCode 软件的安装目录。
安装完成后,VSCode的自动更新是禁用状态,覆盖安装会继承设置。
2. 方案二:适用还没有安装或已经卸载的情况下
下载VSCode1.85版本安装包(亲测)
安装包下载链接:https://code.visualstudio.com/updates/v1_85
下载完成后,断网。如果环境不允许断开网线,可以禁用网络。
禁用网络后再安装VSCode1.85版本。
最后,禁用VSCode自动更新,参考链接:https://blog.youkuaiyun.com/qq_37200100/article/details/147078692?spm=1011.2415.3001.5331
如果链接无法打开,可以在本文章所属专栏下寻找,博客名称:《关闭VSCode 自动更新》
完成方案二操作后,不要忘记恢复网络!!
四、可能用到的指令
查看服务器glibc版本:ldd --version


 6300
6300

 被折叠的 条评论
为什么被折叠?
被折叠的 条评论
为什么被折叠?
 到【灌水乐园】发言


