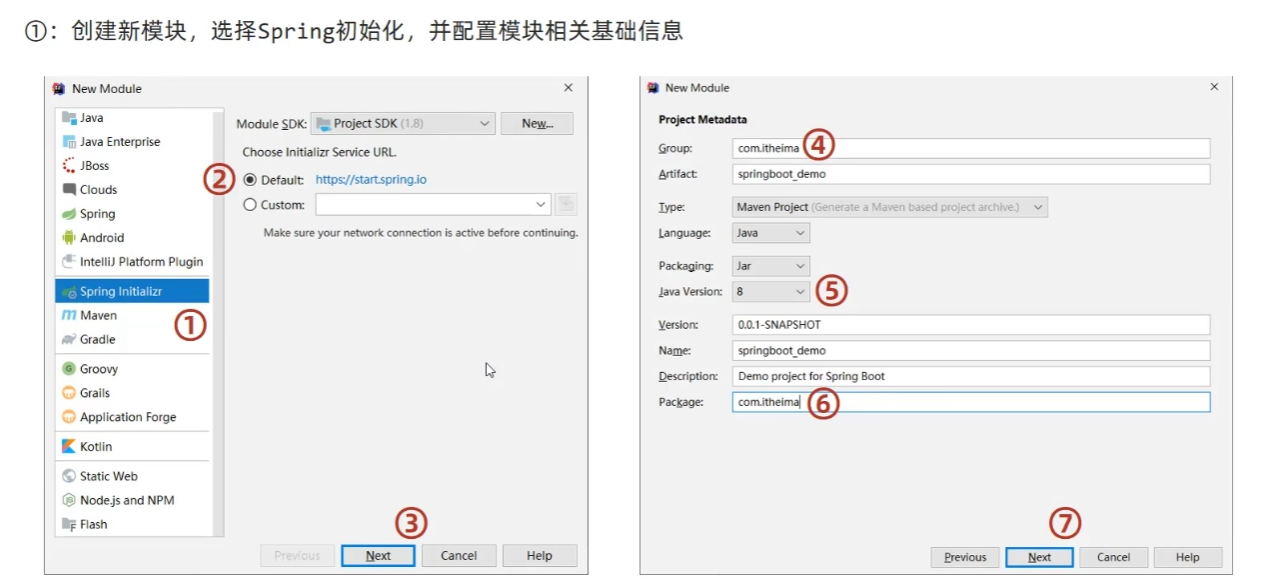
 SpringBoot核心技术整合指南


一. 实用小技巧
1.隐藏指定文件/文件夹

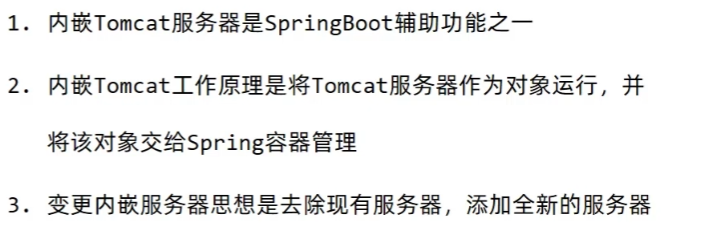
2.修改Spring内嵌服务器

3. 配置文件自动提示功能消失

二. 基础篇
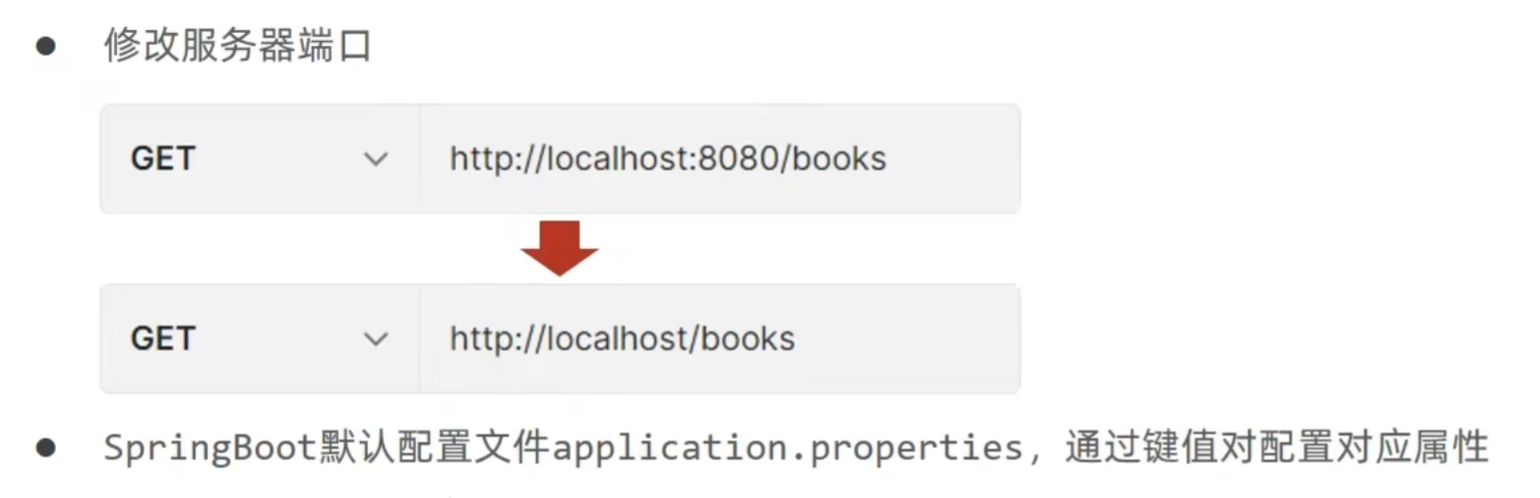
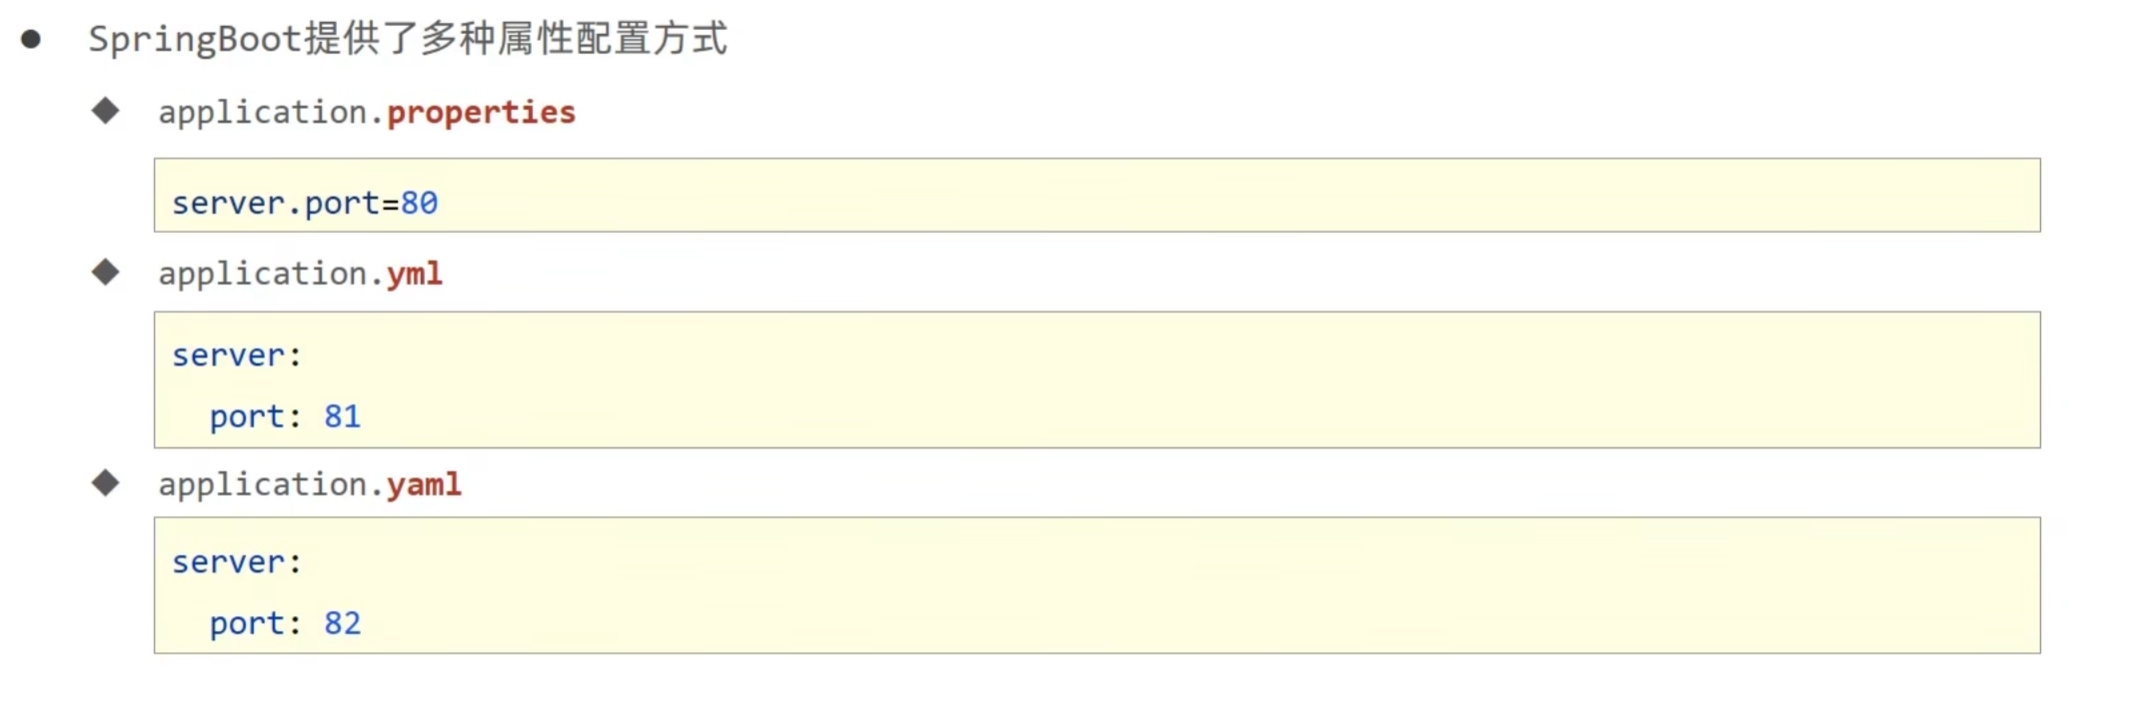
1. 属性配置
1.1 属性配置方式
1.2 三种配置方式
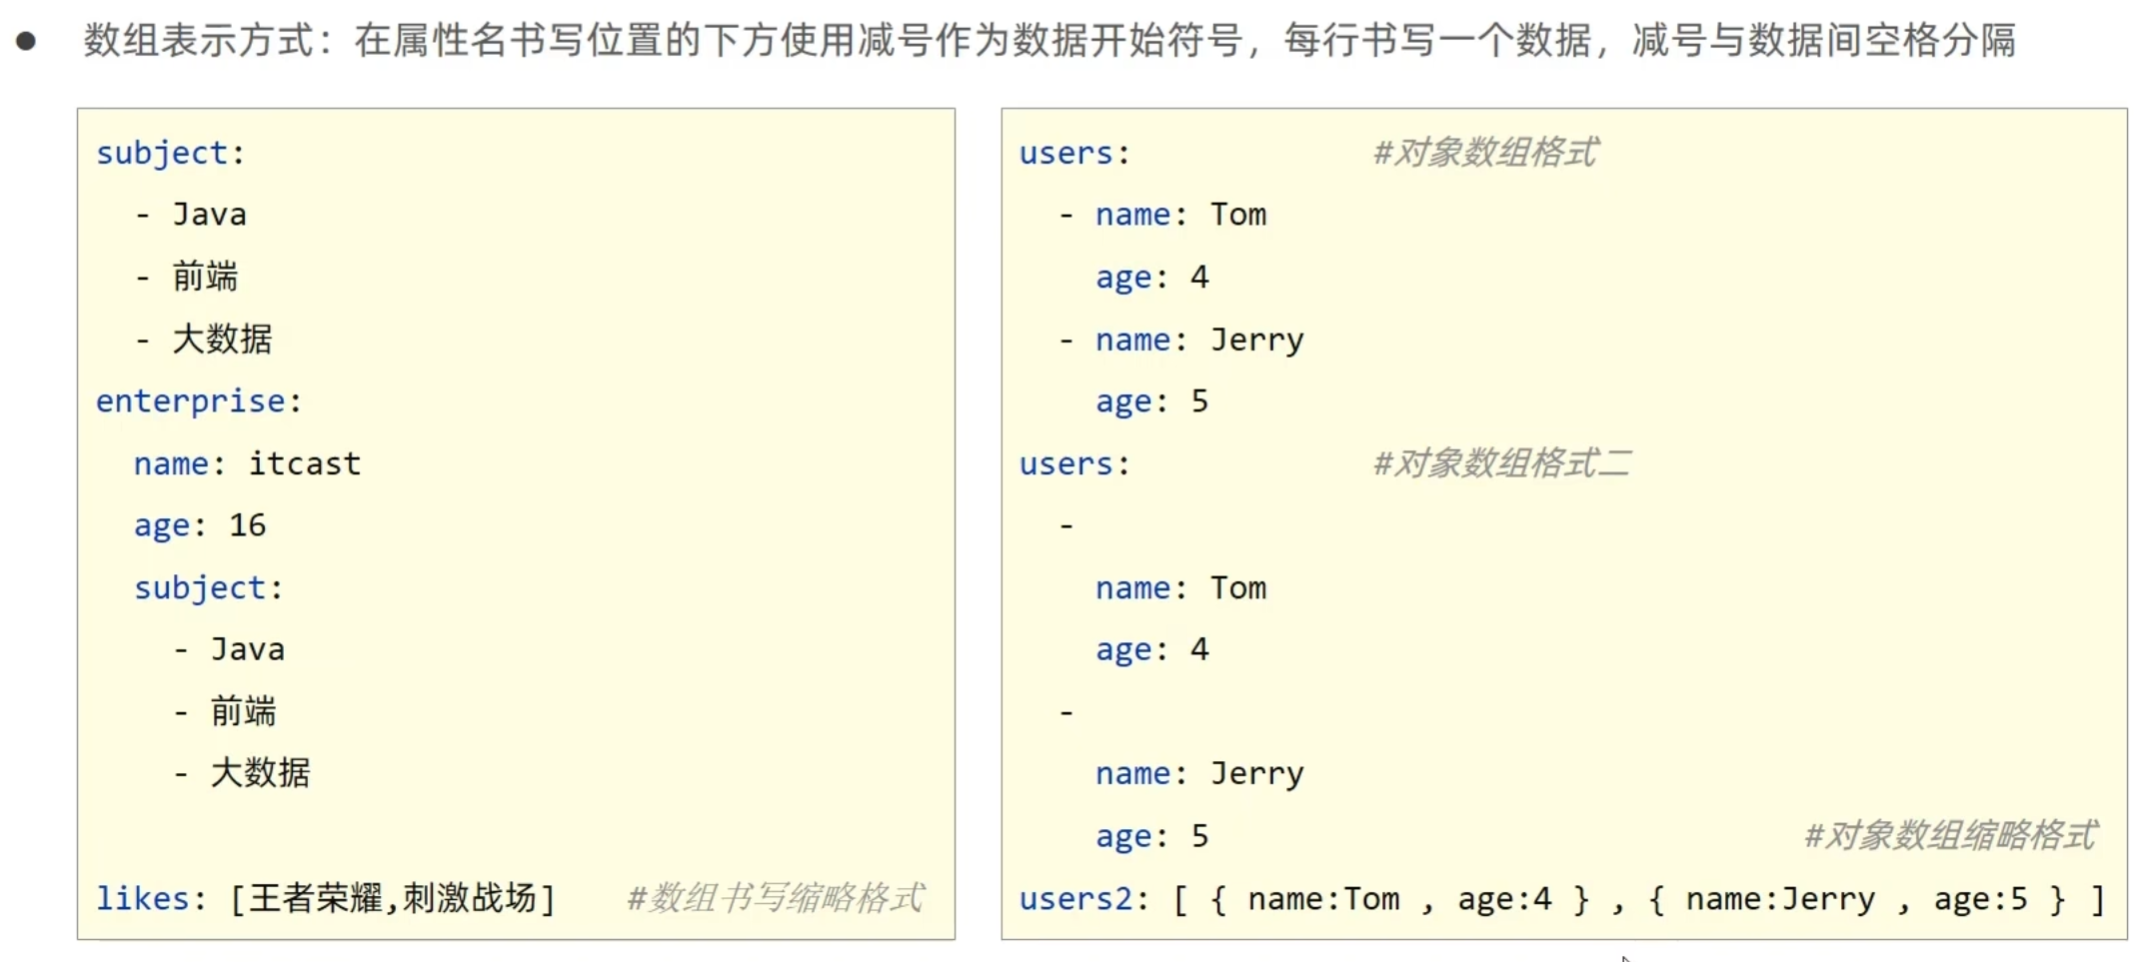
1.3 yaml语法规则
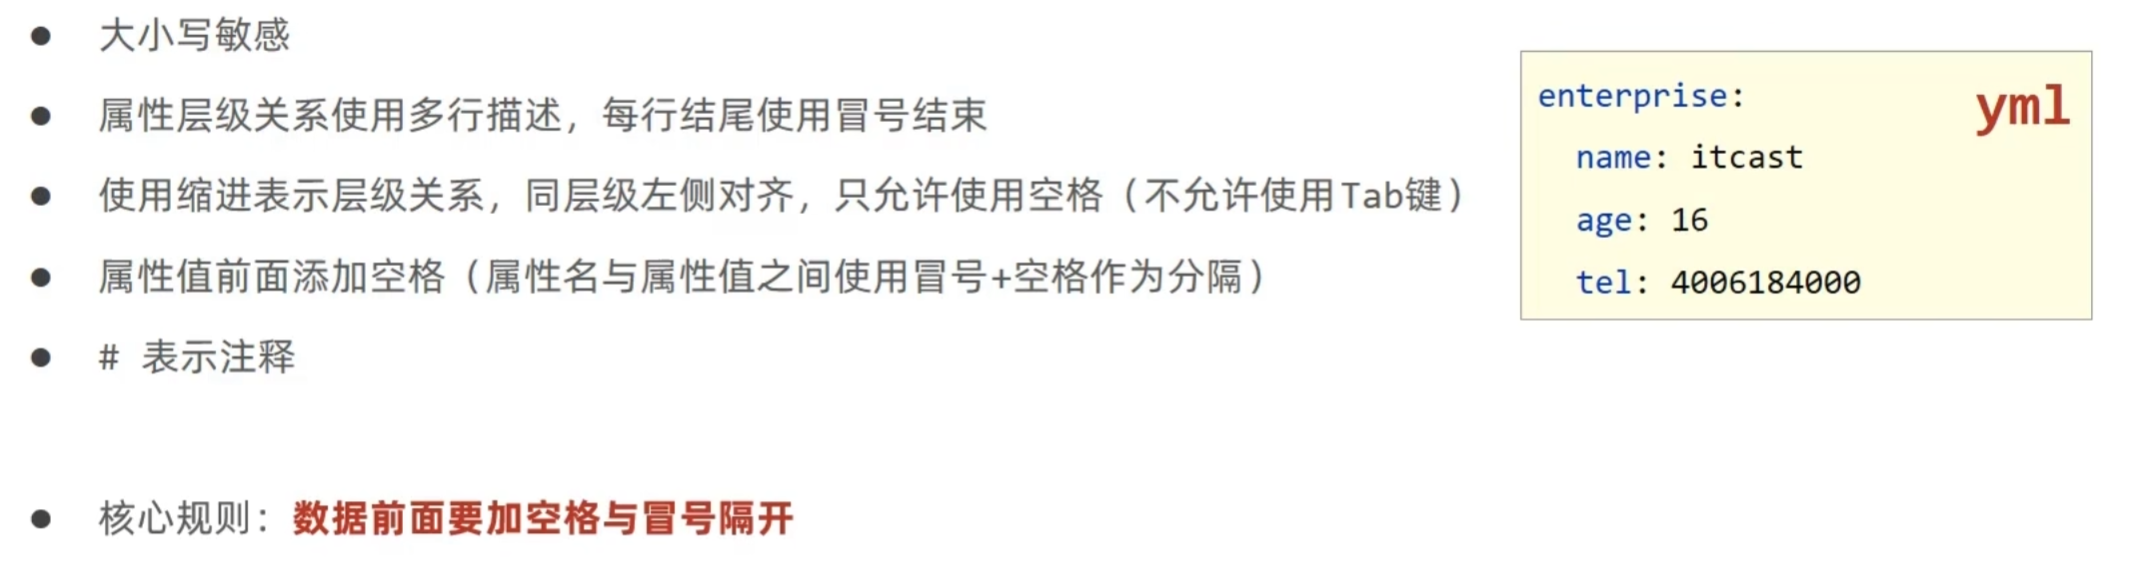
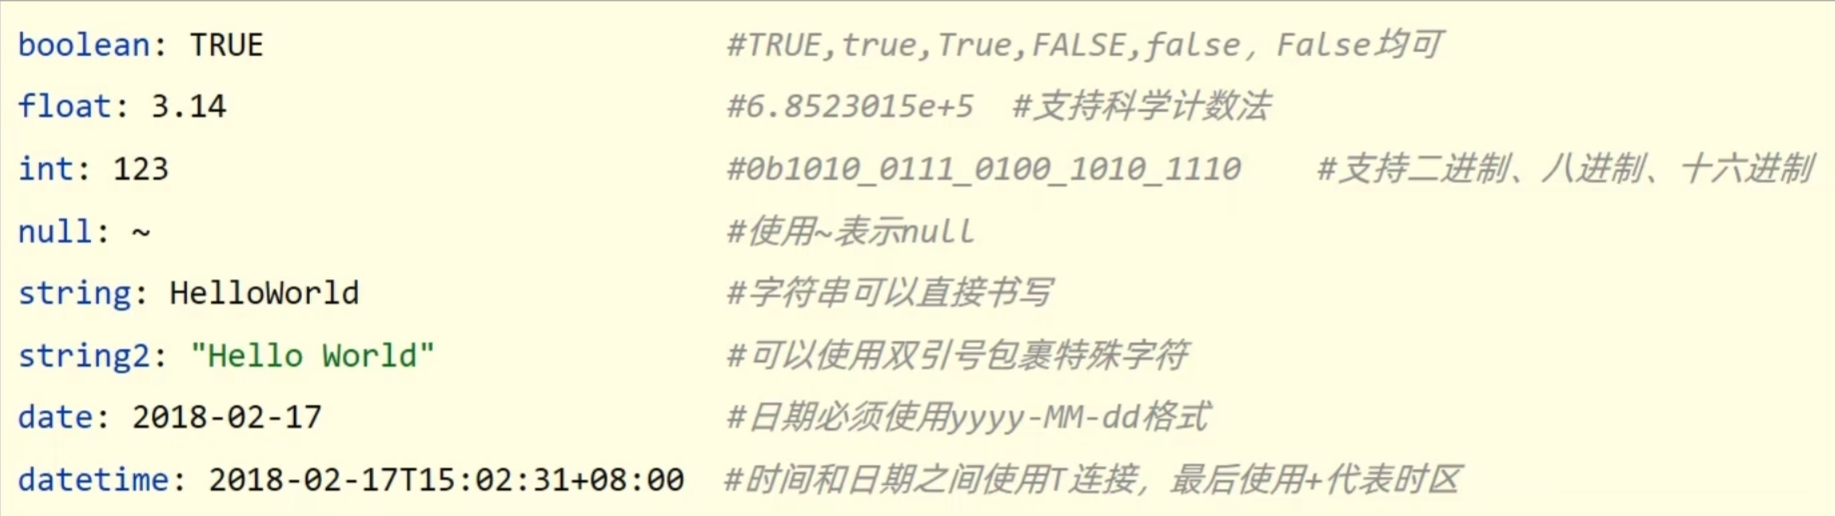
字面值表示方式:
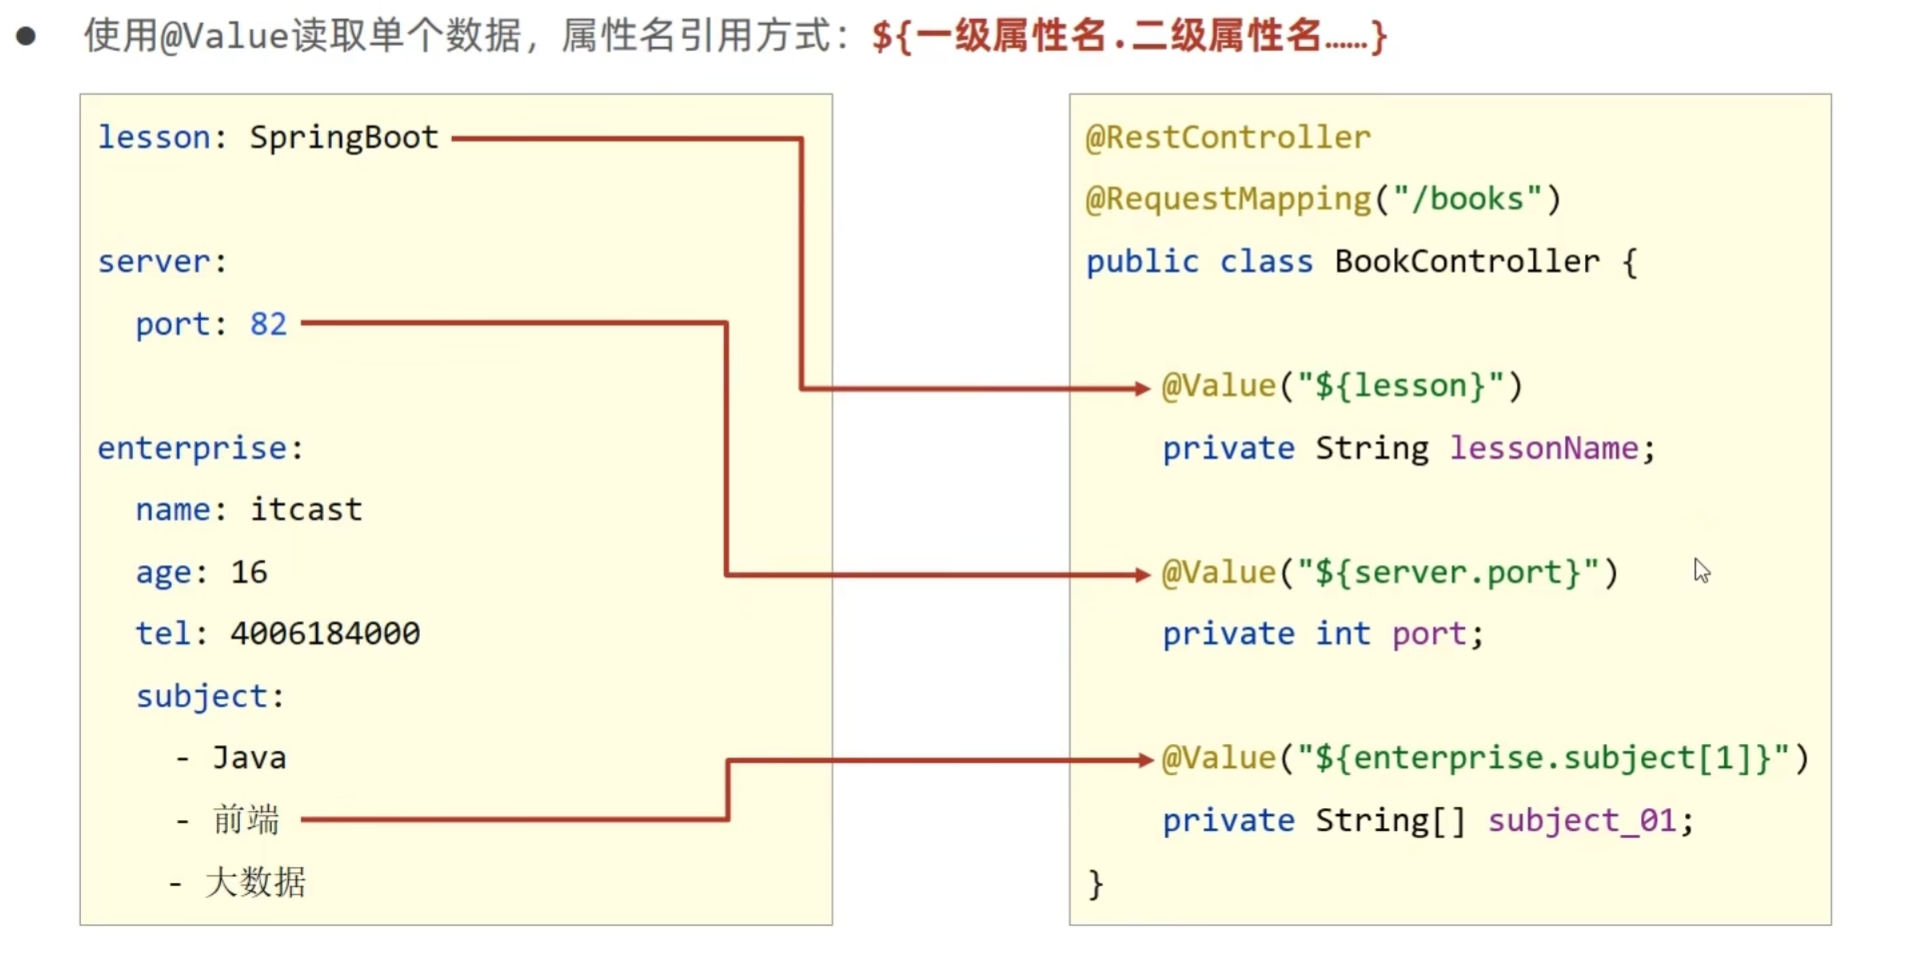
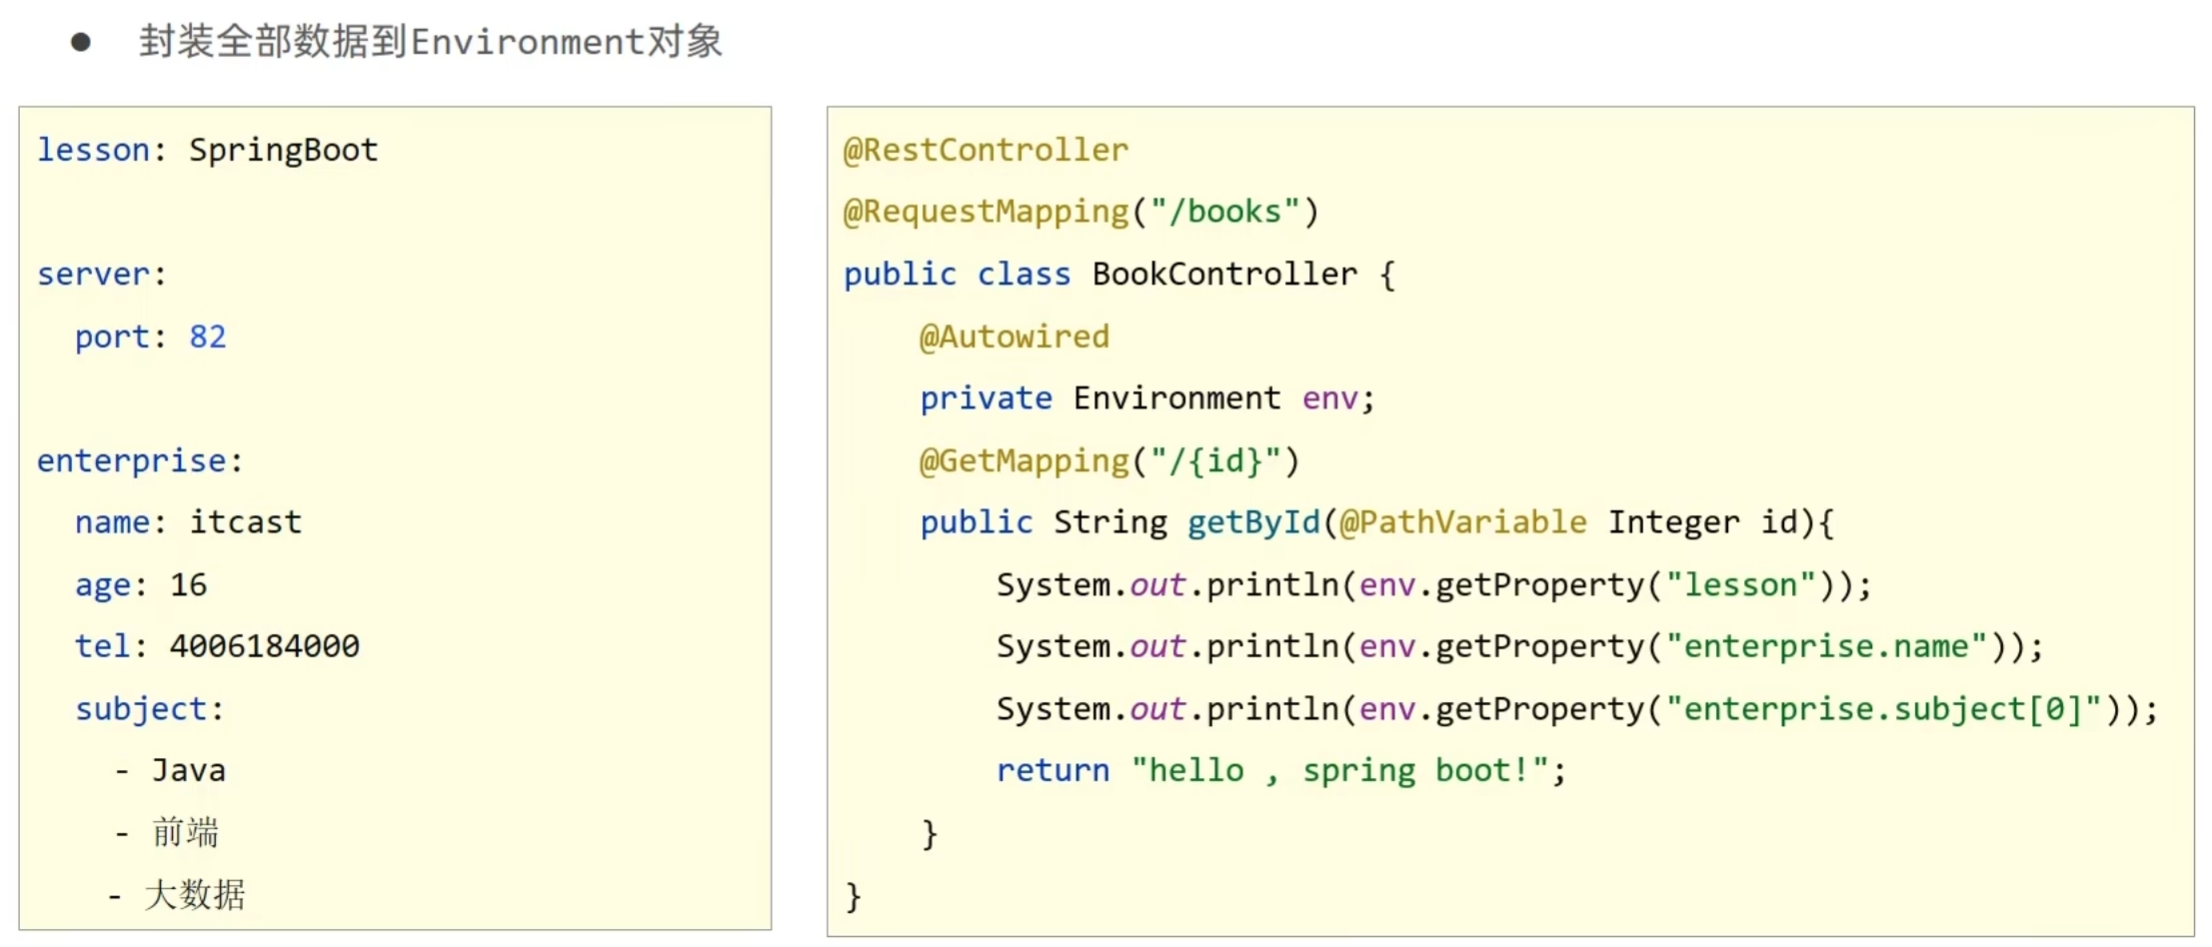
1.4 读取yaml属性数据

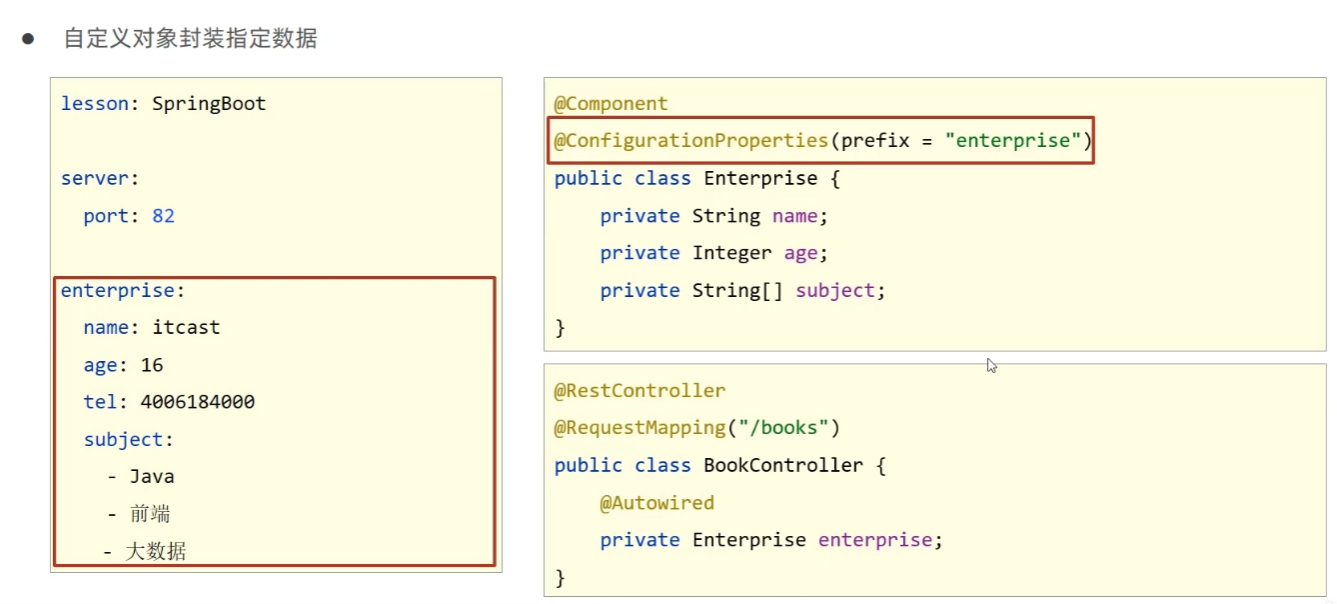
1.5 读取yaml引用类型属性数据
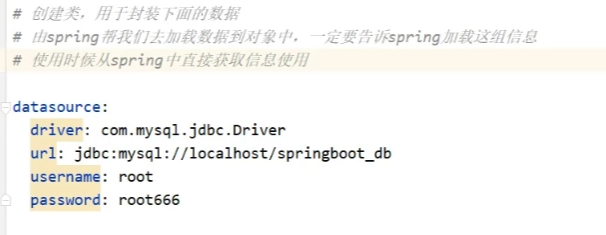
封装类:
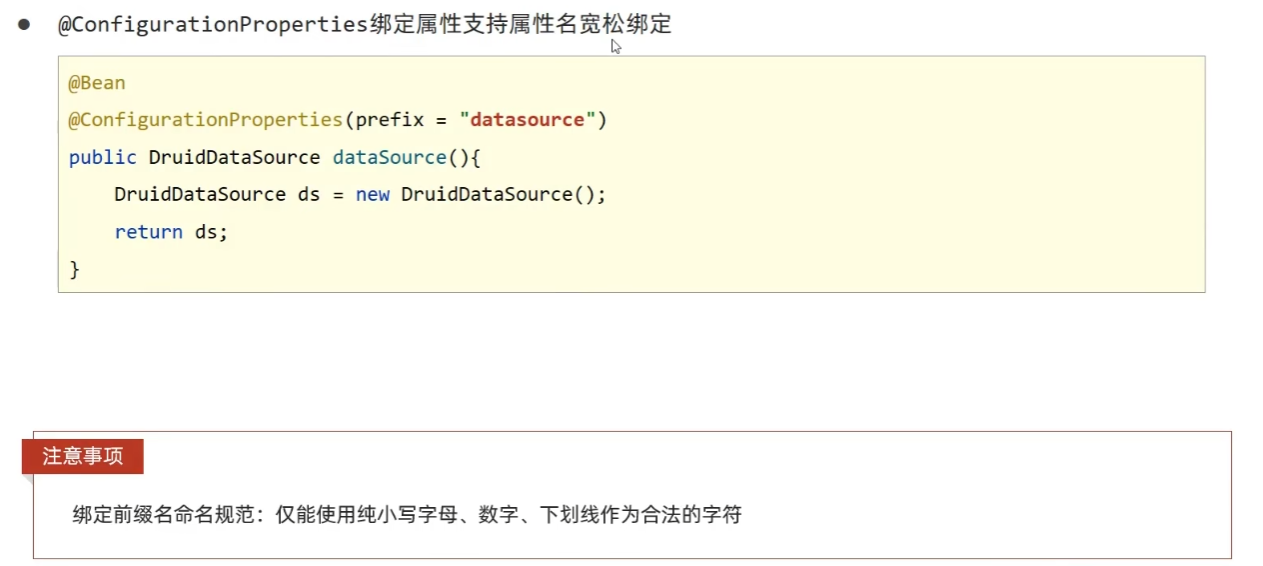
- 使用 @ConfigurationProperties 注解绑定配置信息到封装类中
- 封装类需要定义为 Spring 管理的 bean,否则无法进行属性注入
//1. 定义数据模型封装yaml文件中对应的数据
//2. 定义为spring管控的bean
@Component
//3. 指定加载的数据
@ConfigurationProperties(prefix = "datasource")
@Data
public class MyDataSource {
    private String driver;
    private String url;
    private String username;
    private String password;
}
2. 整合第三方技术
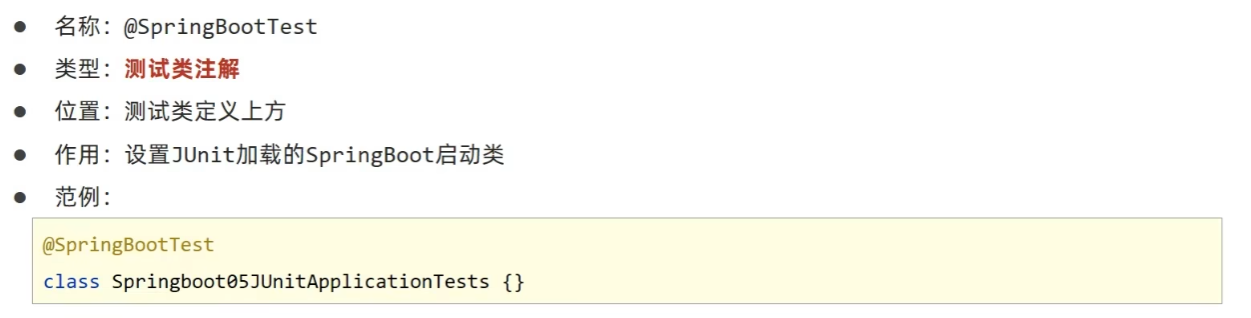
2.1 整合JUnit
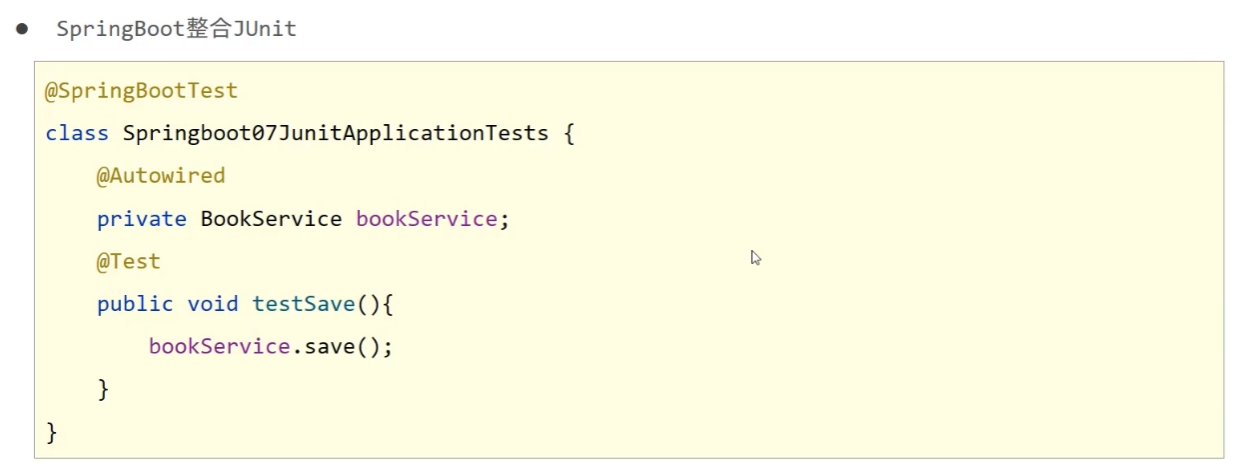
classes属性:
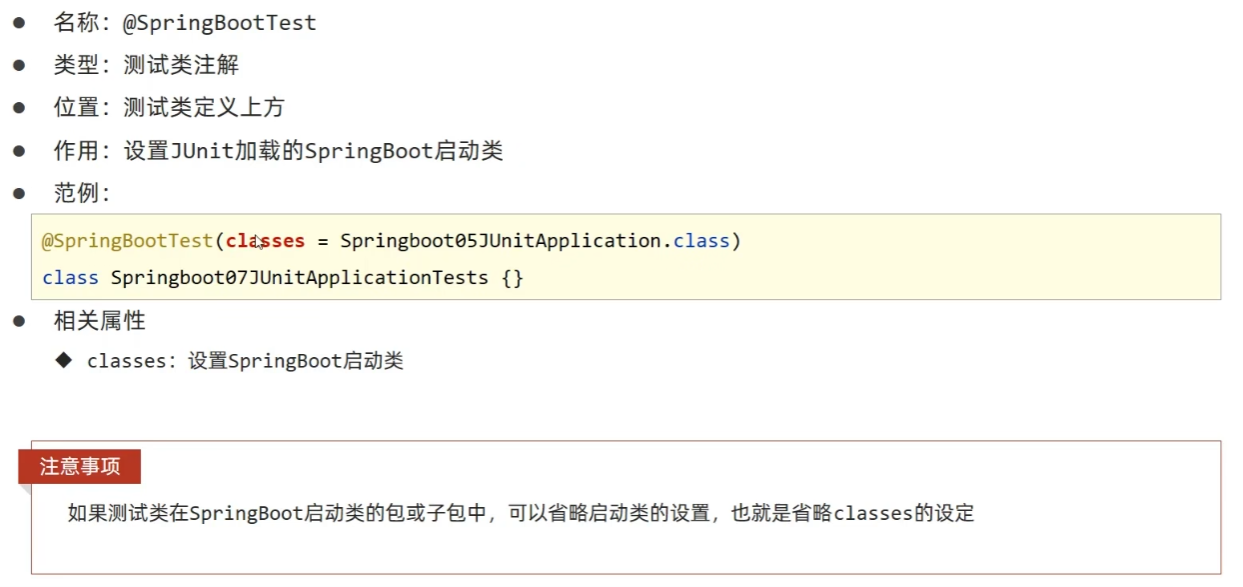
1. 测试类如果存在于引导类所在包或子包中无需指定引导类
2. 测试类如果不存在于引导类所在的包或子包中需要通过classes属性指定引导类
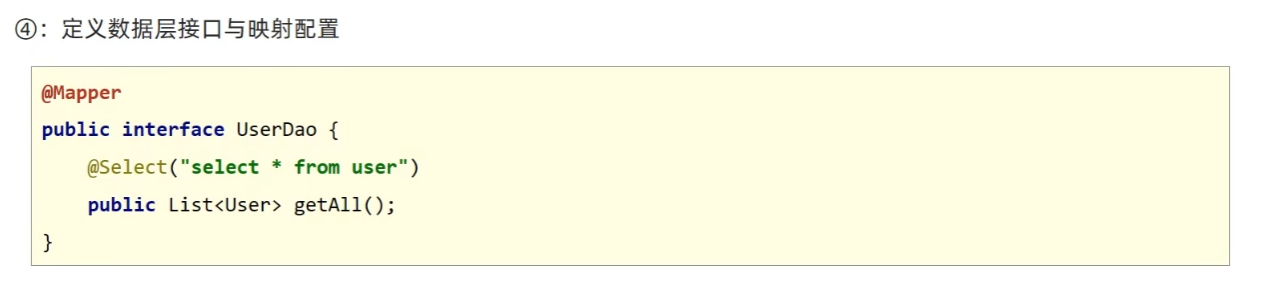
2.2 整合MyBatis
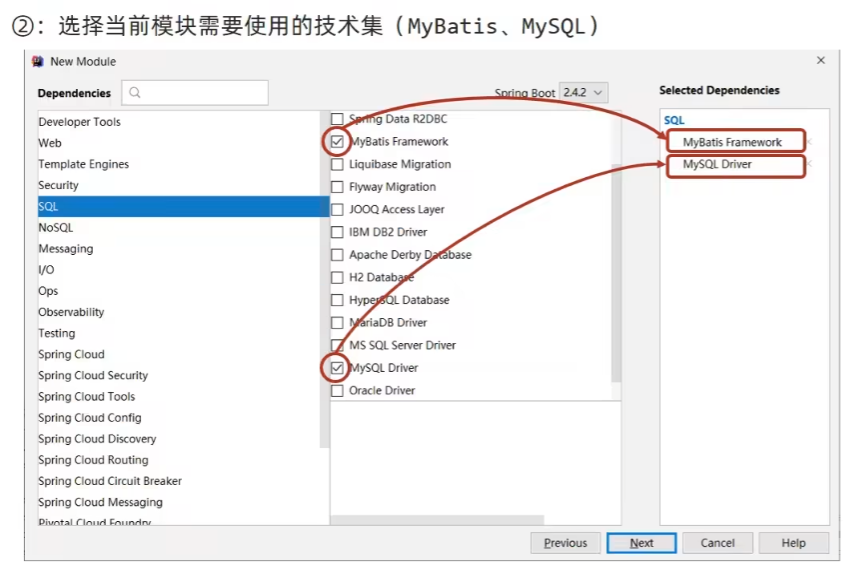
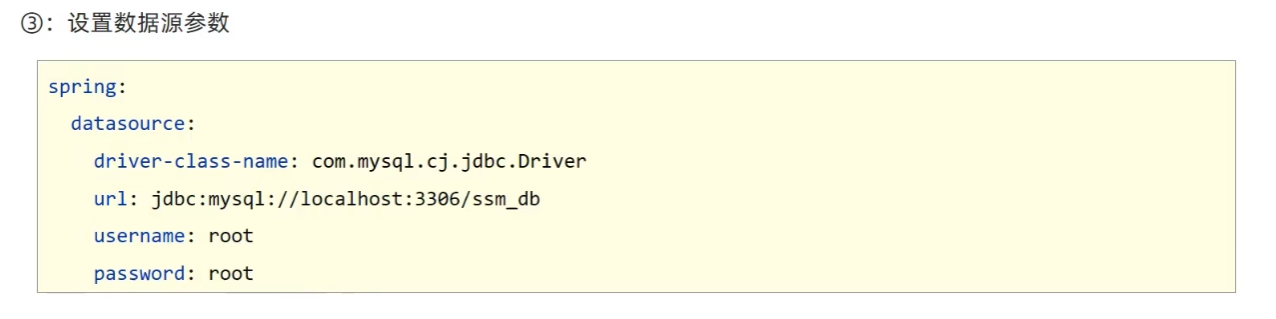
1. MySQL 8.X驱动强制要求设置时区:
- 修改url,添加serverTimezone设定
- 修改MySQL数据库配置(略)
2. 驱动类过时,提醒更换为com.mysql.cj.jdbc.Driver
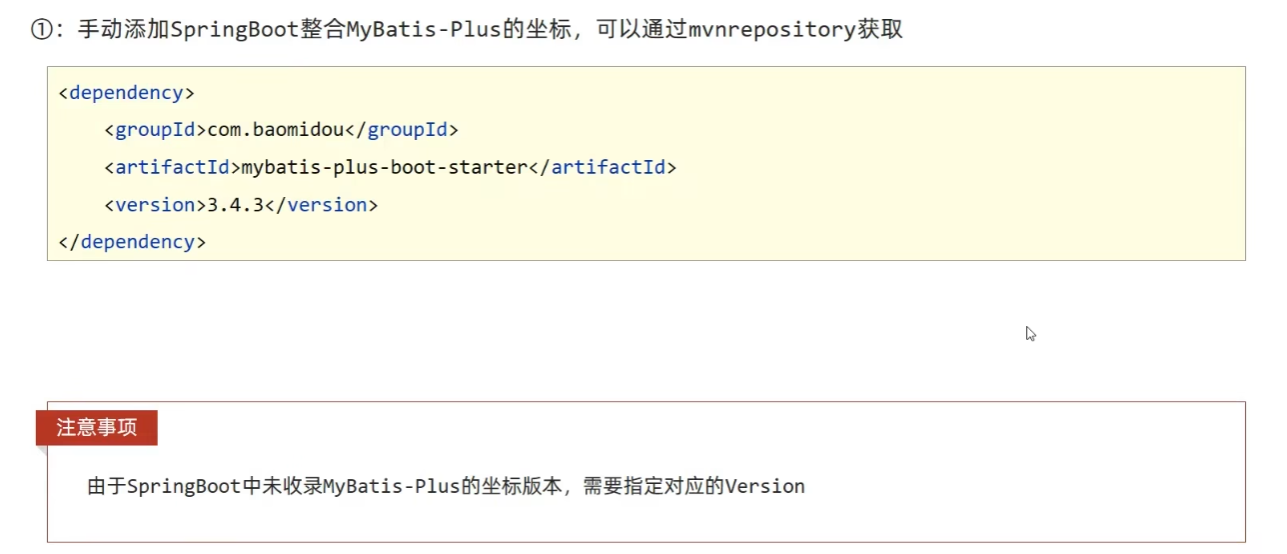
2.3 整合MyBatisPlus

其他和MyBatis相同。
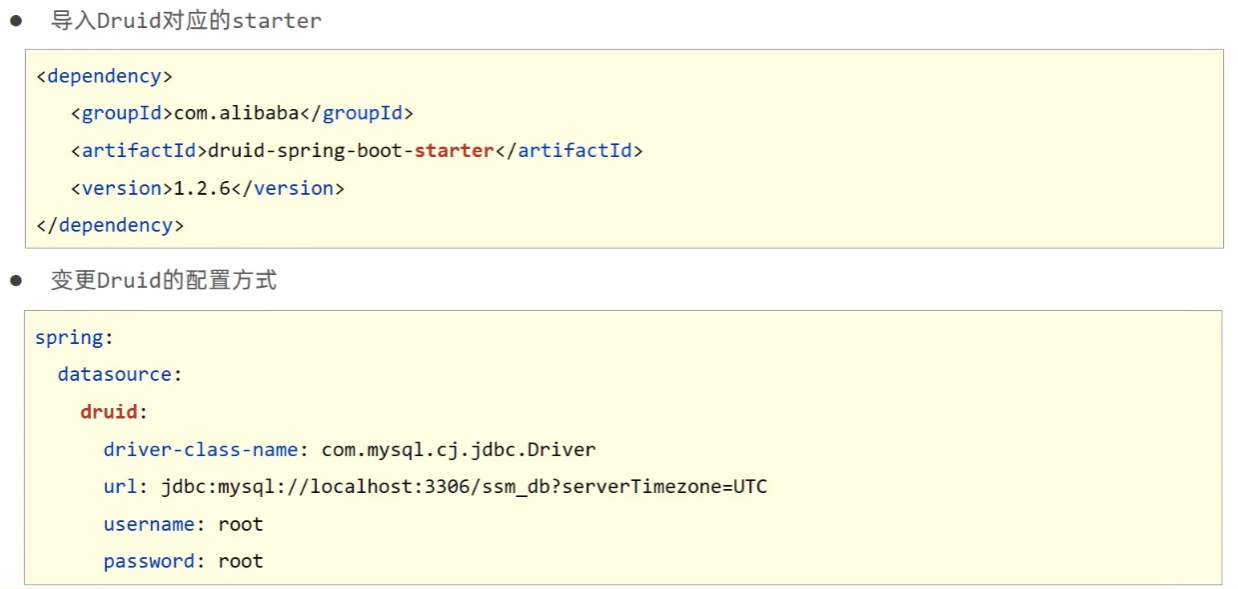
2.4 整合Druid

3. SSMP整合案例制作分析
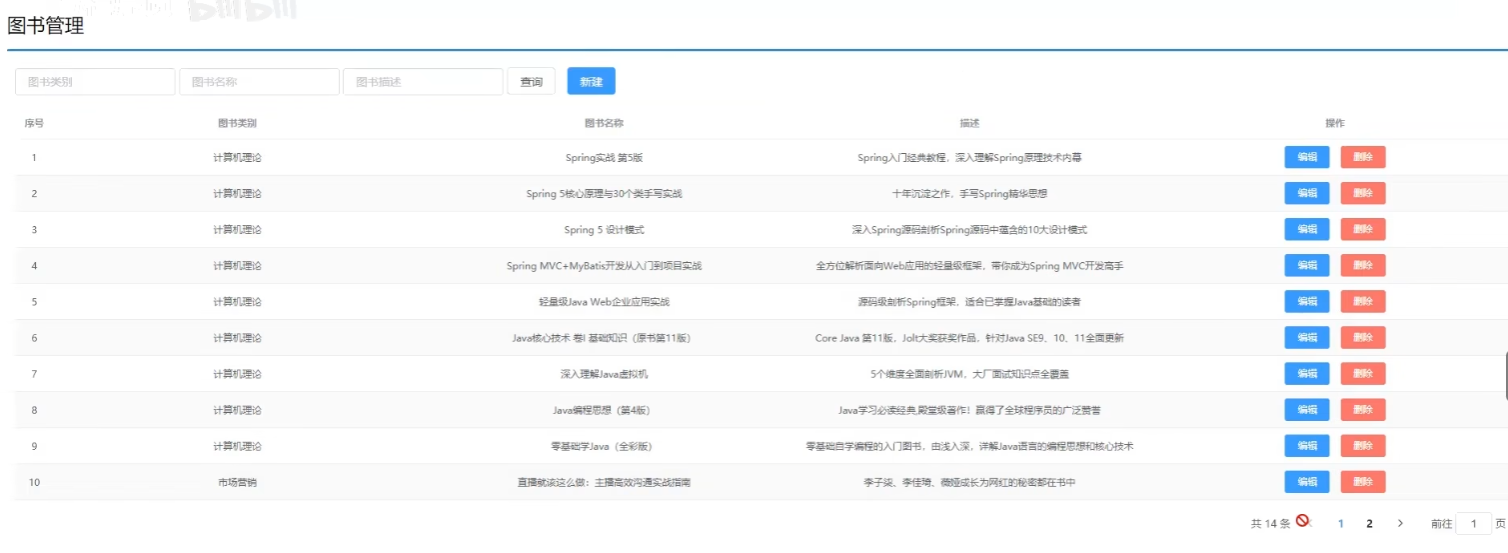
一个图书管理系统:
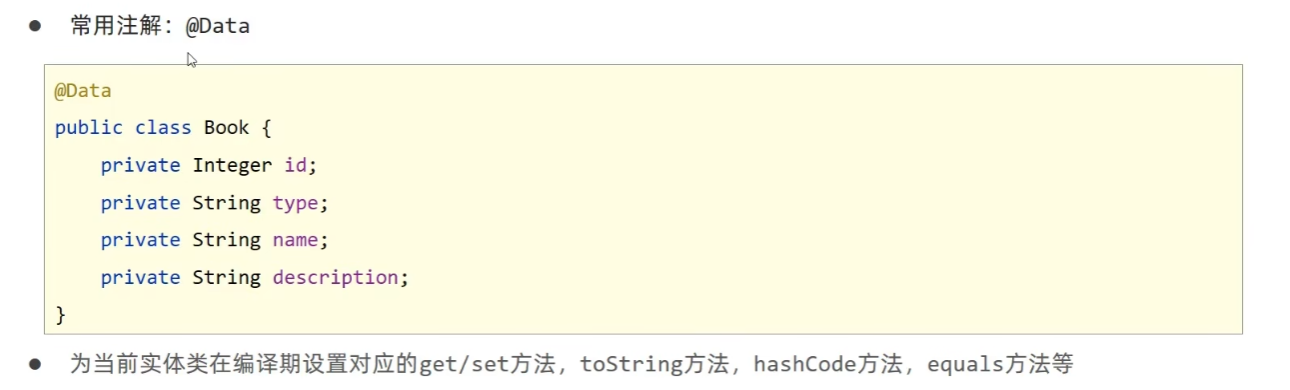
3.1 实体类快速开发(lombok)
lombok坐标:
<!--Lombok-->
<dependency>
    <groupId>org.projectlombok</groupId>
    <artifactId>lombok</artifactId>
</dependency>
lombok版本由SpringBoot提供,无需指定版本。
3.2 数据层开发
导入 MyBatisPlus 与 Druid 对应的 starter:
<dependency>
<groupId>com.baomidou</groupId>
<artifactId>mybatis-plus-boot-starter</artifactId>
<version>3.4.3</version>
</dependency>
<dependency>
<groupId>com.alibaba</groupId>
<artifactId>druid-spring-boot-starter</artifactId>
<version>1.2.6</version>
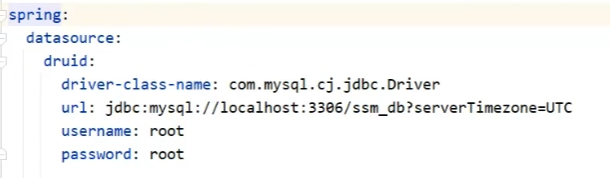
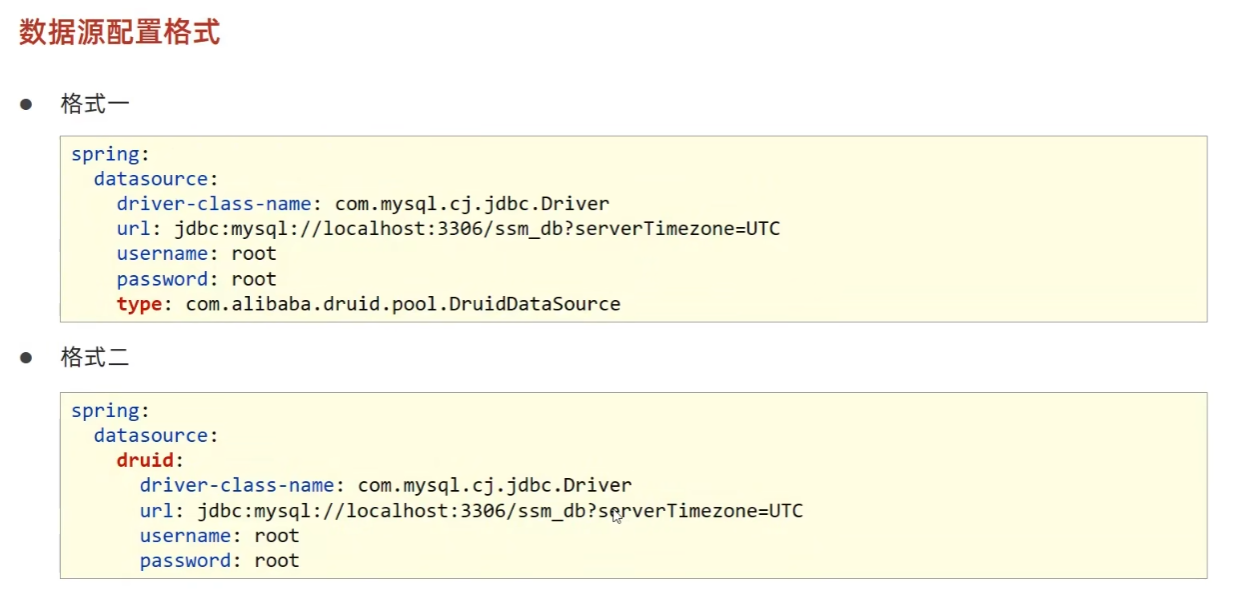
</dependency>填写配置:
spring:
  datasource:
    druid:
      driver-class-name: com.mysql.cj.jdbc.Driver
      url: jdbc:mysql://localhost:3306/ssm_db?serverTimezone=UTC
      username: root
      password: root

mybatis-plus:
  global-config:
    db-config:
      table-prefix: tbl_ //表前缀
      id-type: auto
3.3 开启MP运行日志
mybatis-plus:
  configuration:
    log-impl: org.apache.ibatis.logging.stdout.StdOutImpl //标准输出
3.4 分页
MyBatis-Plus 的配置类,核心作用是注册分页拦截器:
- @Configuration:标记该类为 Spring 配置类,会被自动扫描并加载;
- @Bean:将方法返回的
MybatisPlusInterceptor对象注册为 Spring 容器中的 Bean; - 分页功能支持:通过
addInnerInterceptor(new PaginationInnerInterceptor())添加分页拦截器,使 MyBatis-Plus 具备分页查询的能力。
@Configuration
public class MPConfig {
    @Bean
    public MybatisPlusInterceptor mybatisPlusInterceptor() {
        //1. 定义Mp拦截器
        MybatisPlusInterceptor interceptor = new MybatisPlusInterceptor();
        //2. 添加具体的拦截器
        interceptor.addInnerInterceptor(new PaginationInnerInterceptor());
        return interceptor;
    }
}
测试:
@Test
void testGetPage(){
IPage page = new Page(current:2, size:5);
bookDao.selectPage(page, queryWrapper:null);
System.out.println(page.getCurrent()); //当前页
System.out.println(page.getSize()); //每页条数
System.out.println(page.getTotal()); //总记录数
System.out.println(page.getPages()); //总页数
System.out.println(page.getRecords()); //当前页数据列表
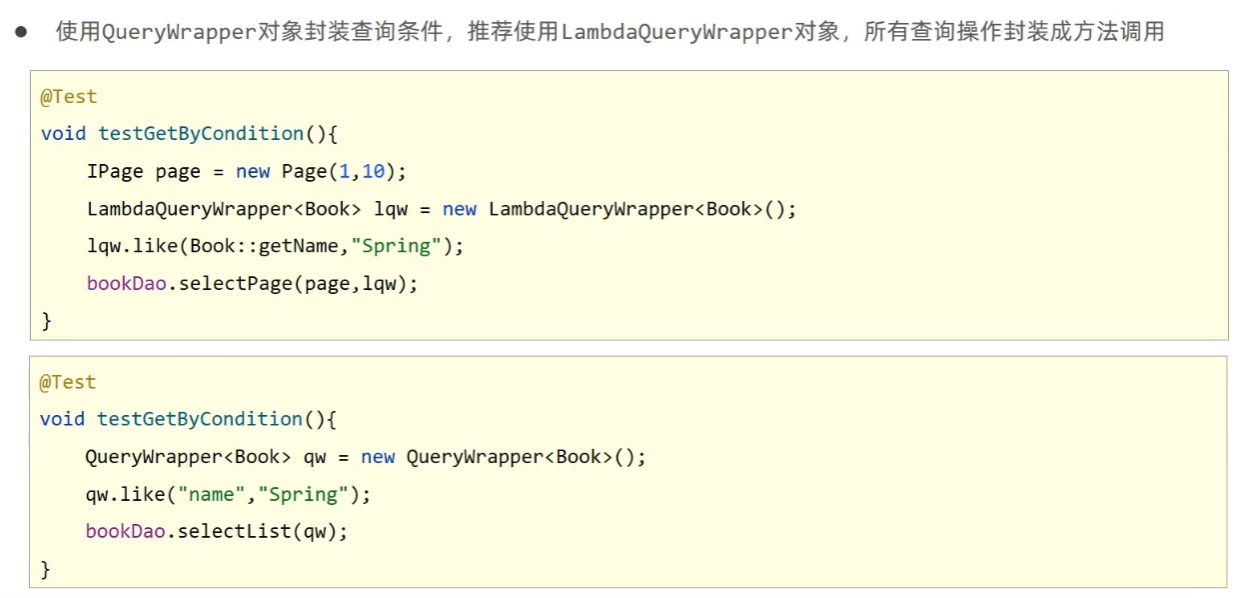
}3.5 条件查询

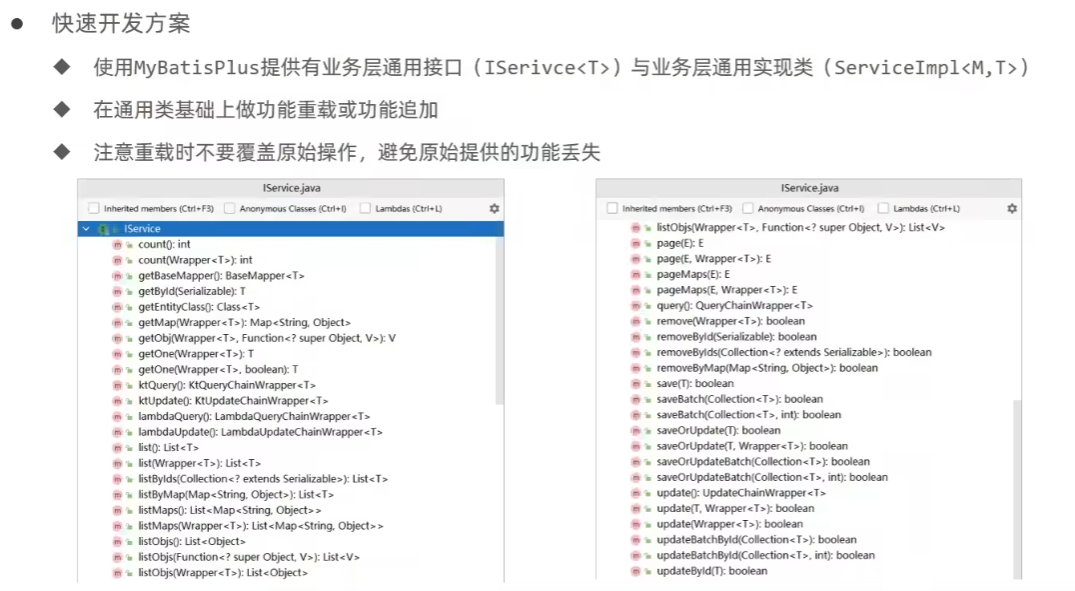
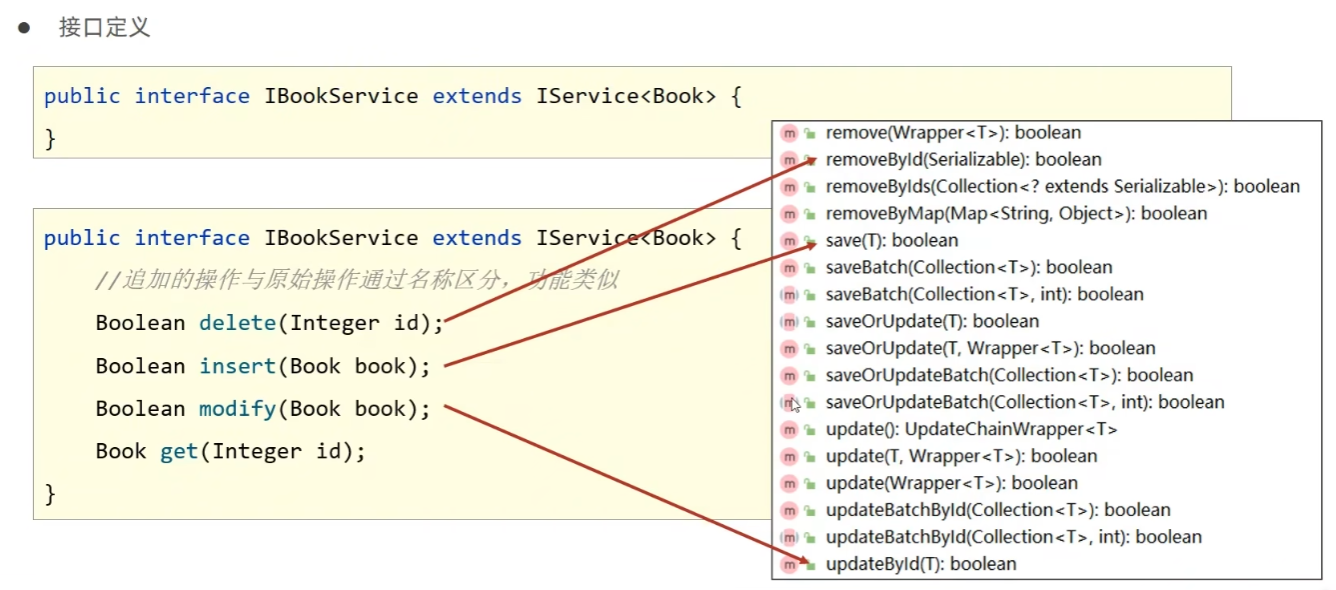
3.6 业务层快速开发

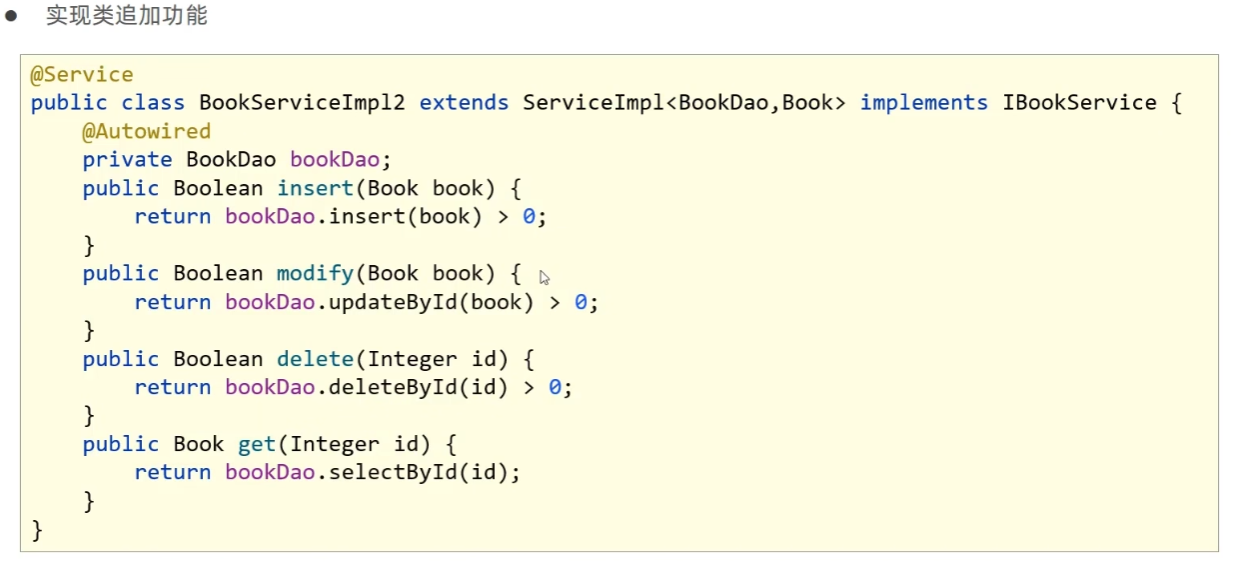
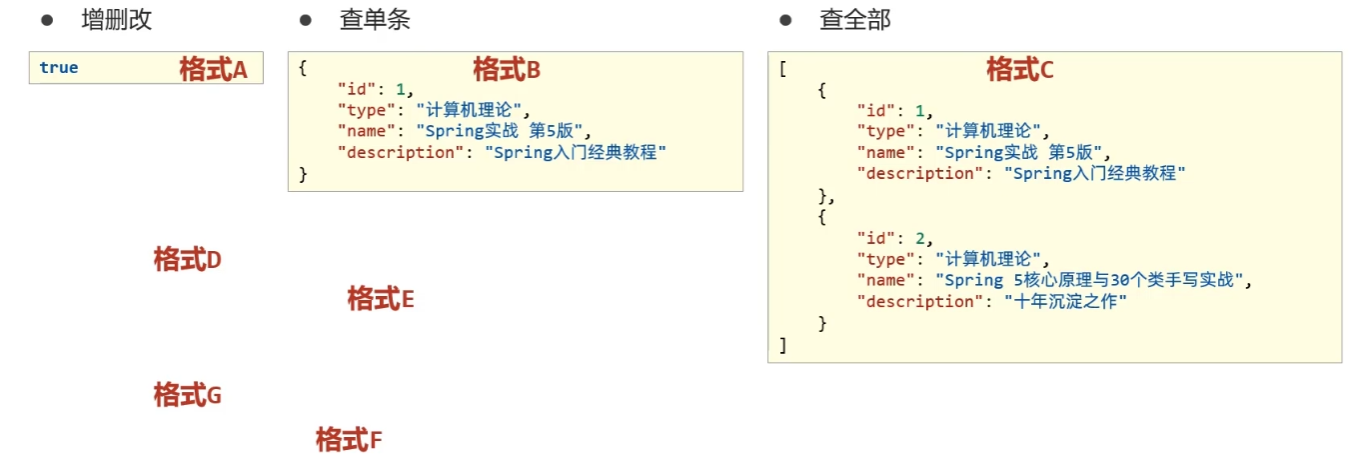
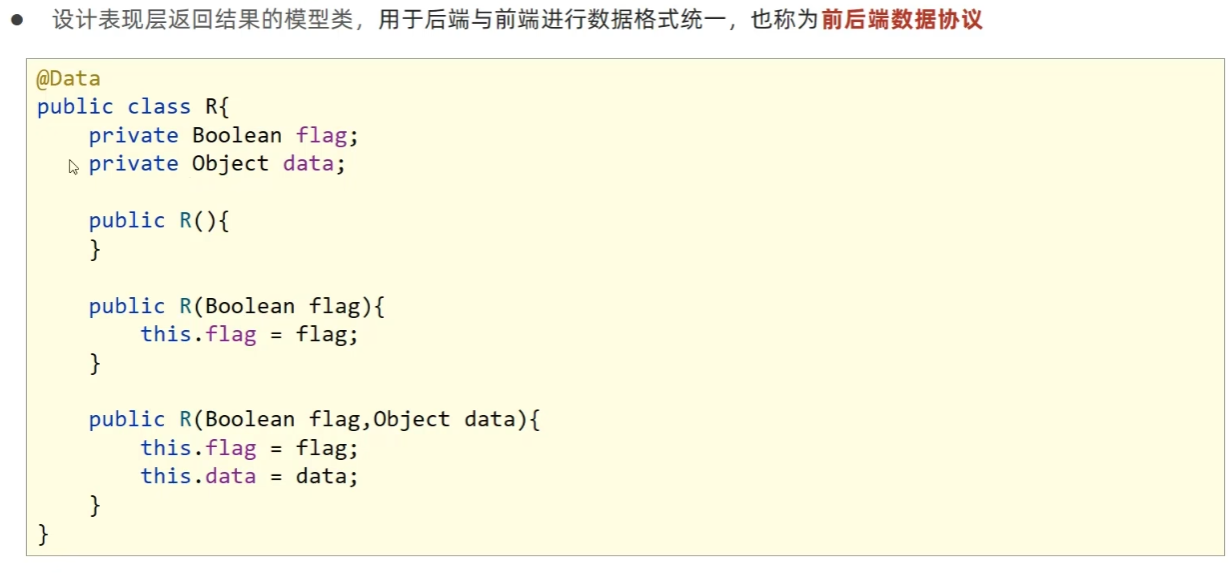
3.7 表现层数据一致性处理
三. 运维实用篇
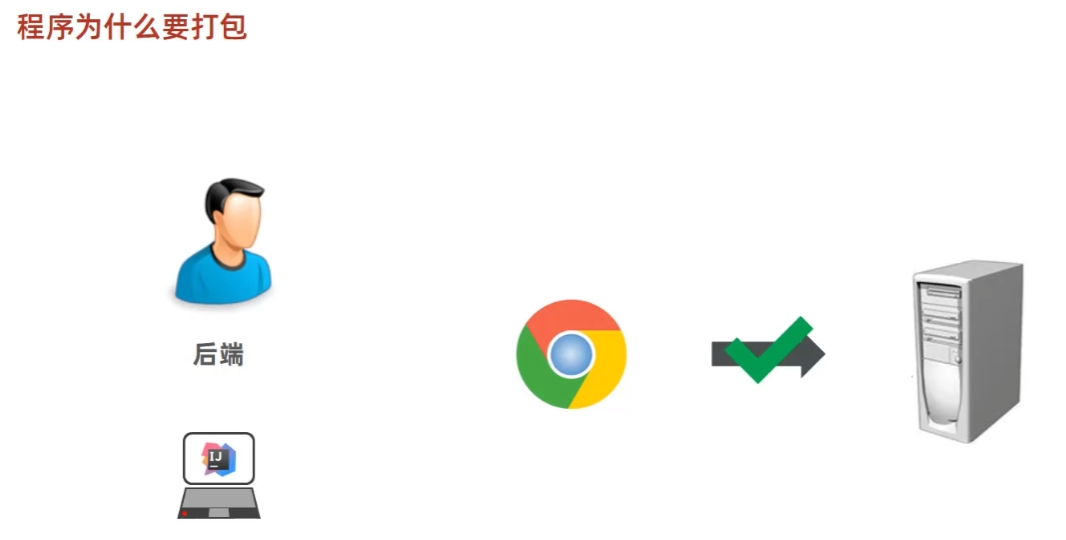
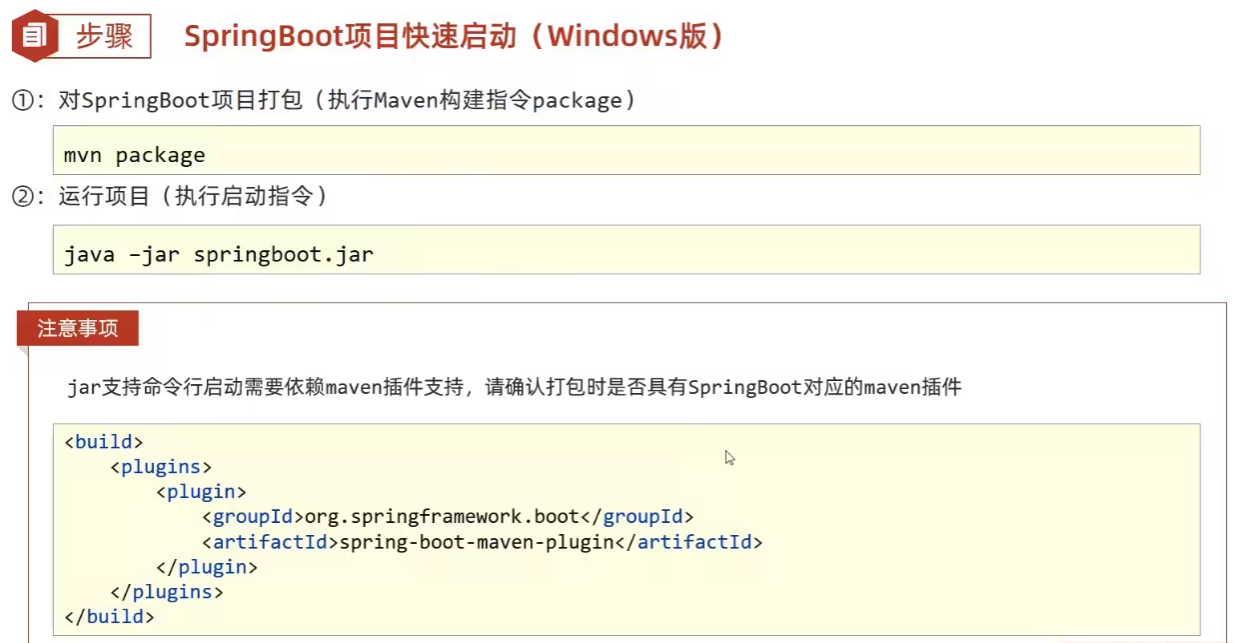
1. 打包与运行
2. 配置高级
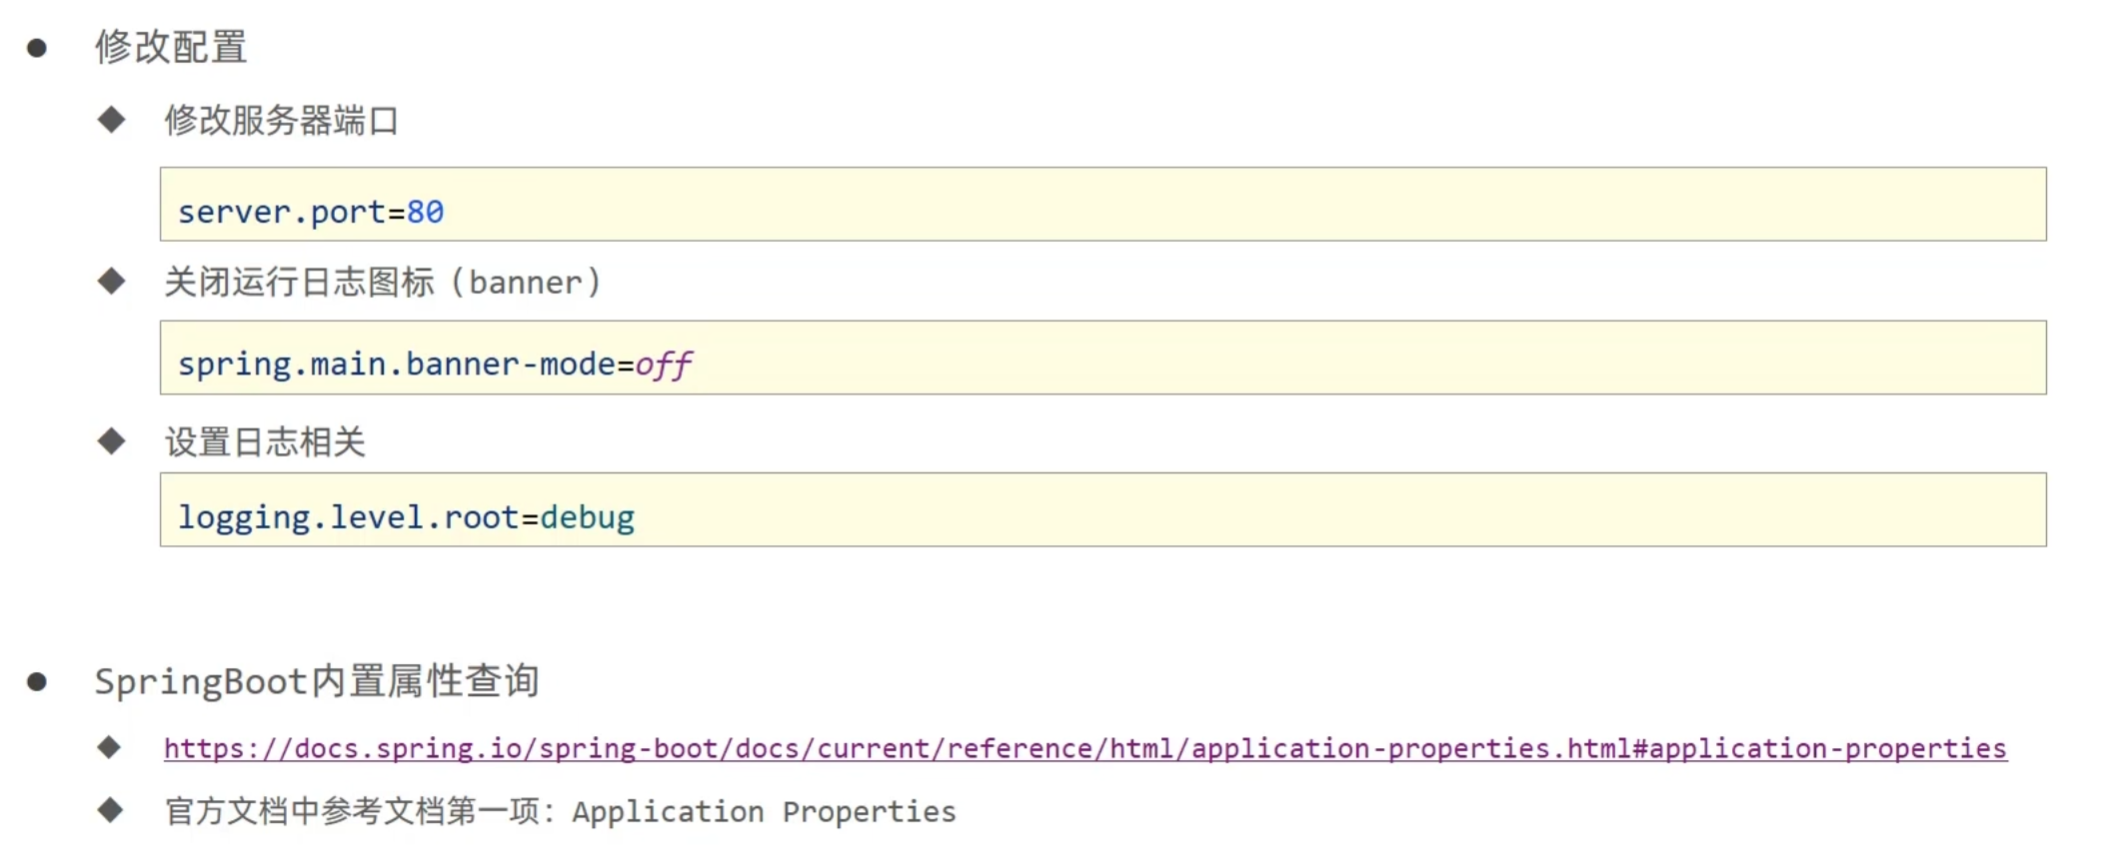
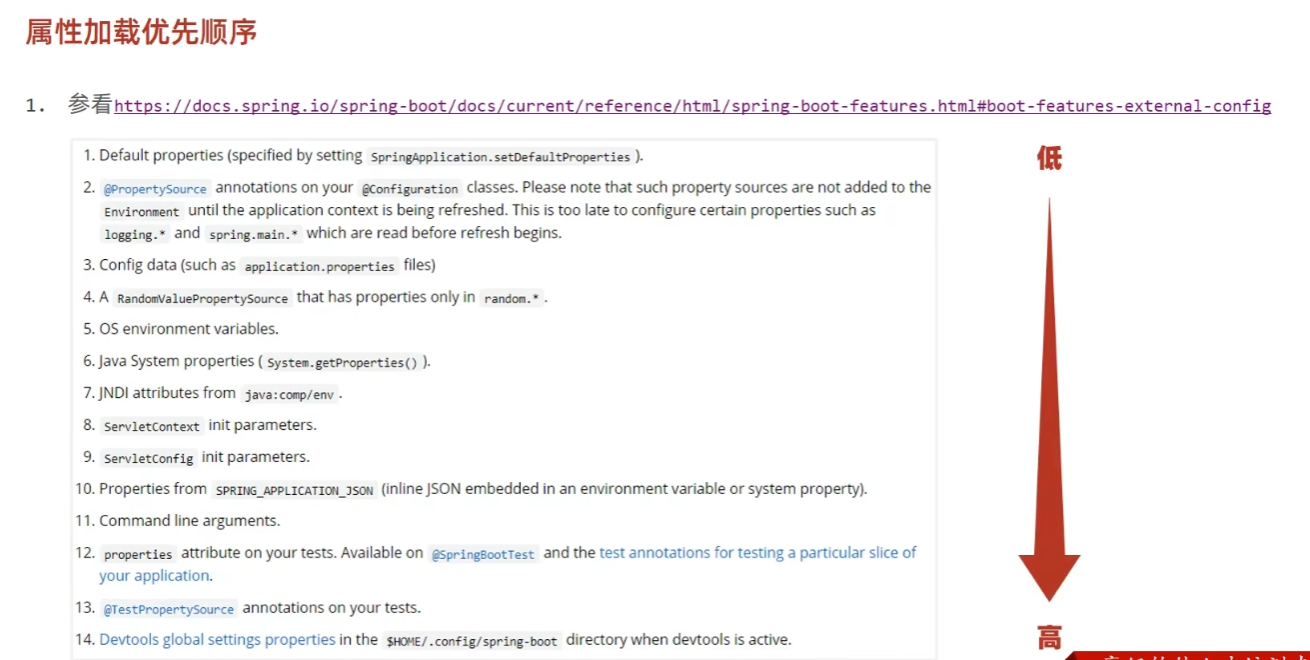
2.1 临时属性

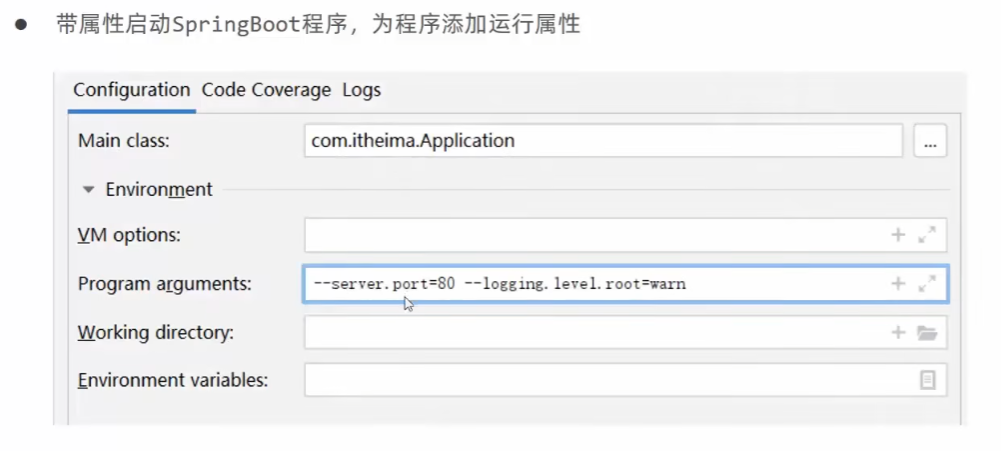
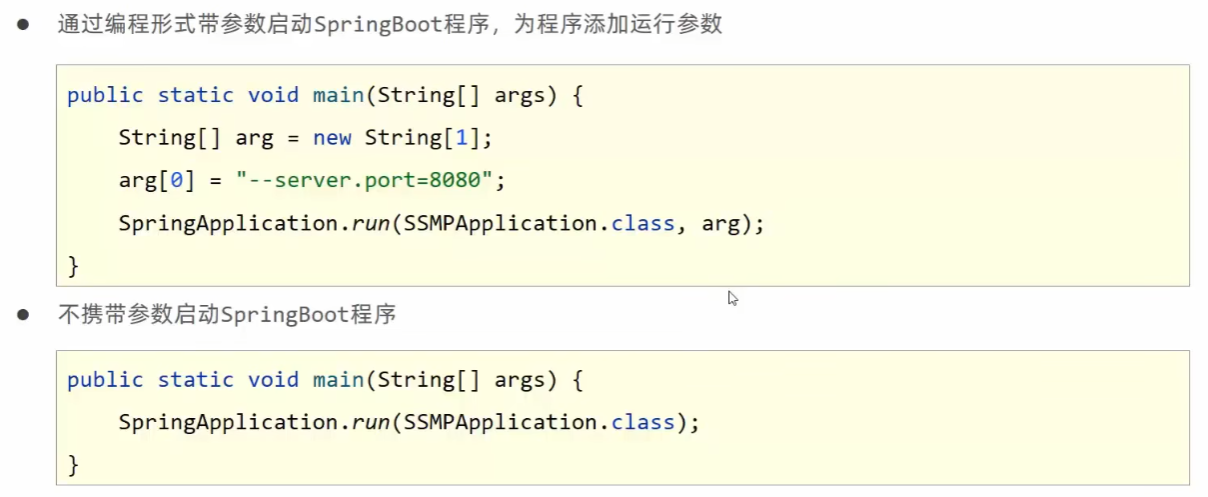
开发环境:
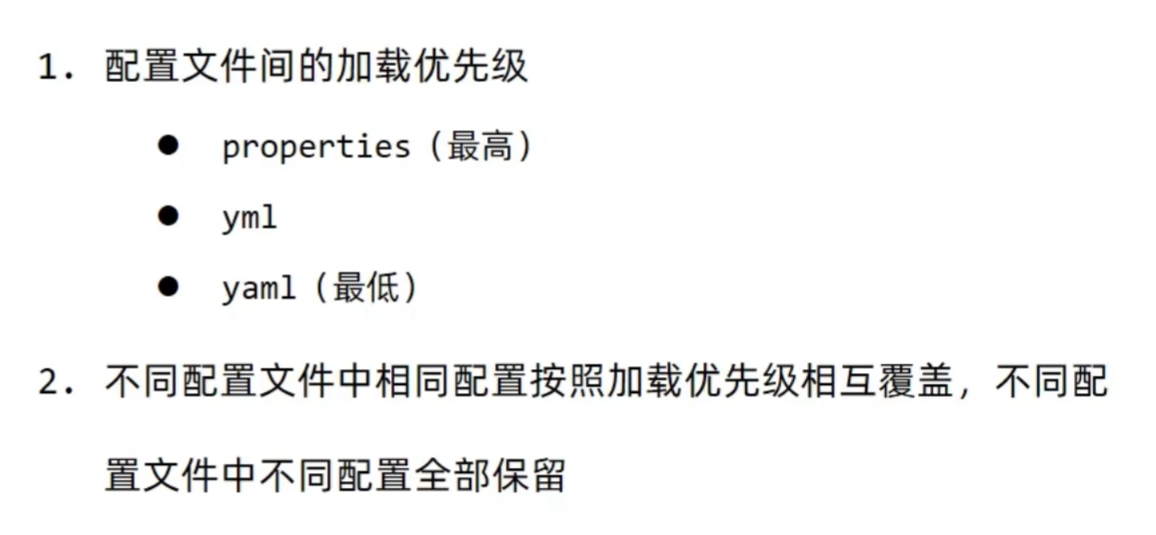
2.2 配置文件4级分类
- 配置文件分为 4 种:
- 项目类路径配置文件:服务于开发人员本机开发与测试
- 项目类路径 config 目录中配置文件:服务于项目经理整体调控
- 工程路径配置文件:服务于运维人员配置涉密线上环境
- 工程路径 config 目录中配置文件:服务于运维经理整体调控
- 多层级配置文件间的属性采用叠加并覆盖的形式作用于程序
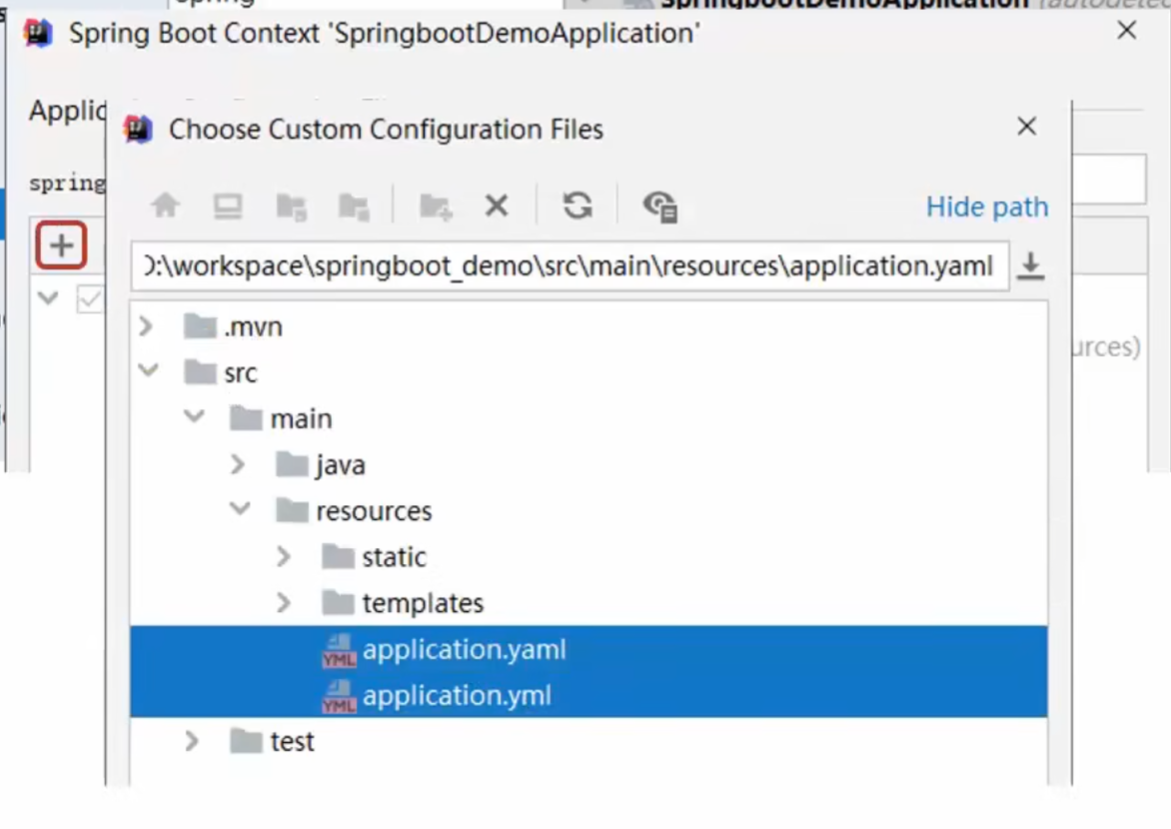
2.3 自定义配置文件

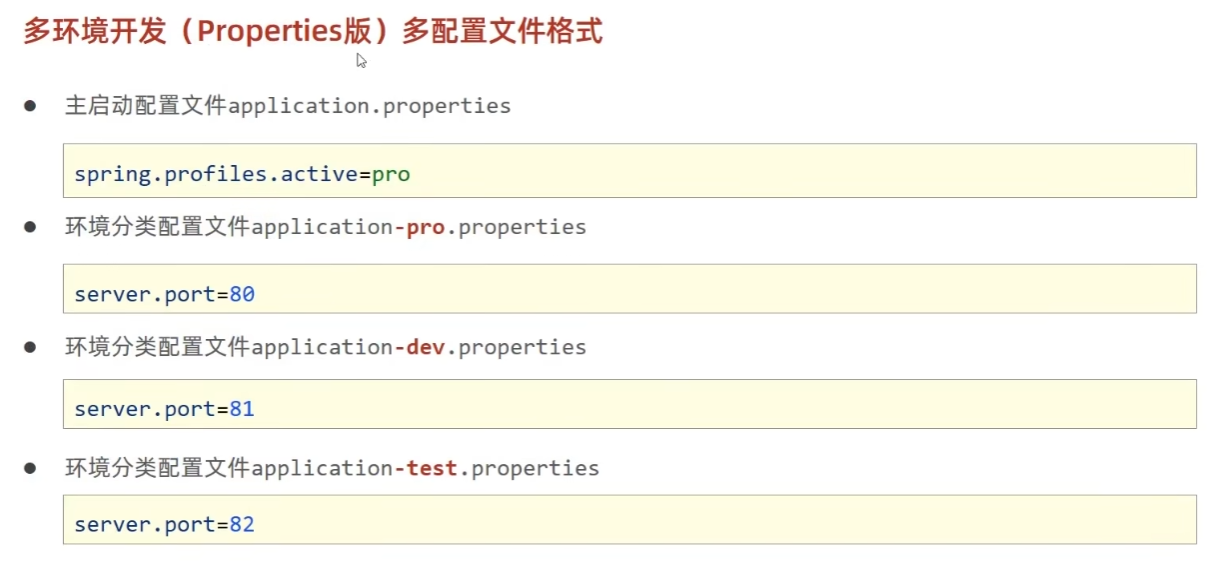
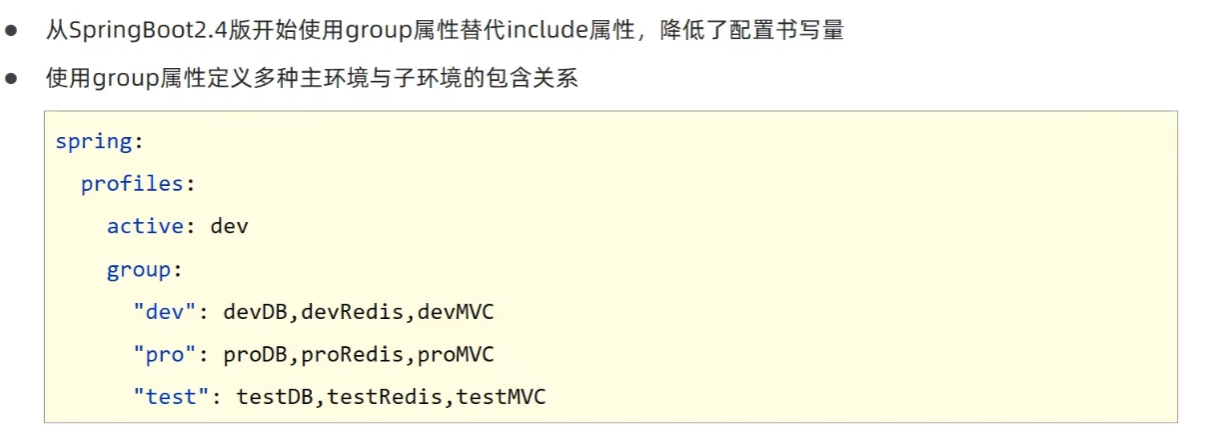
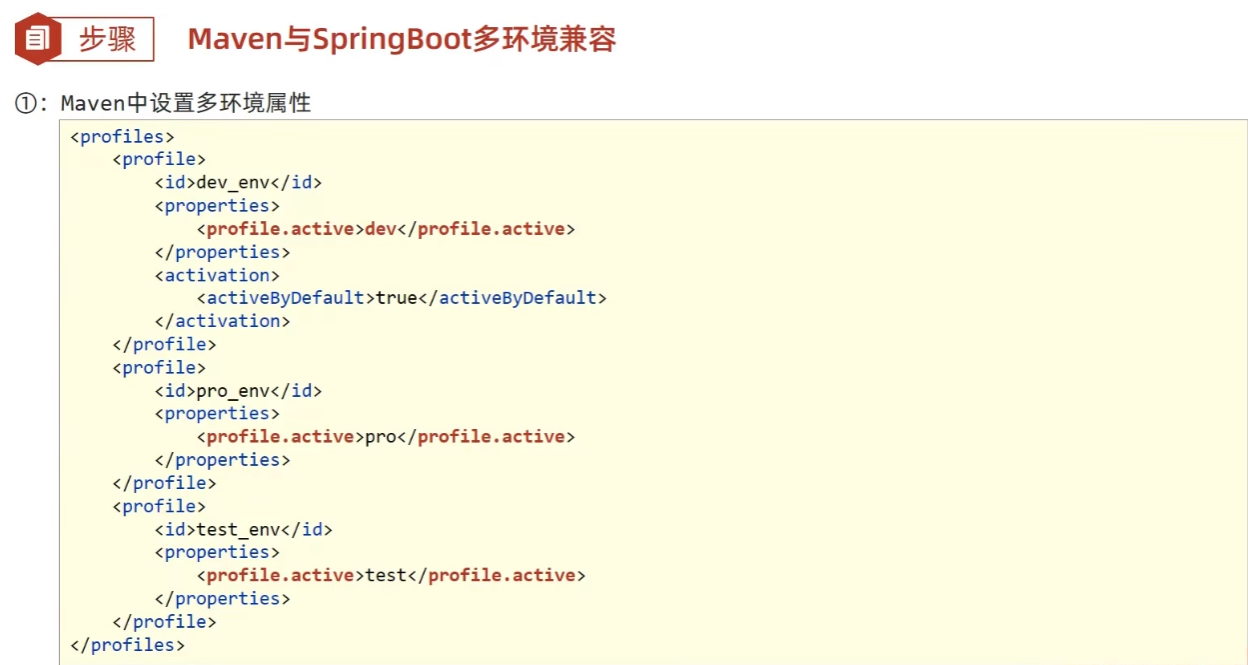
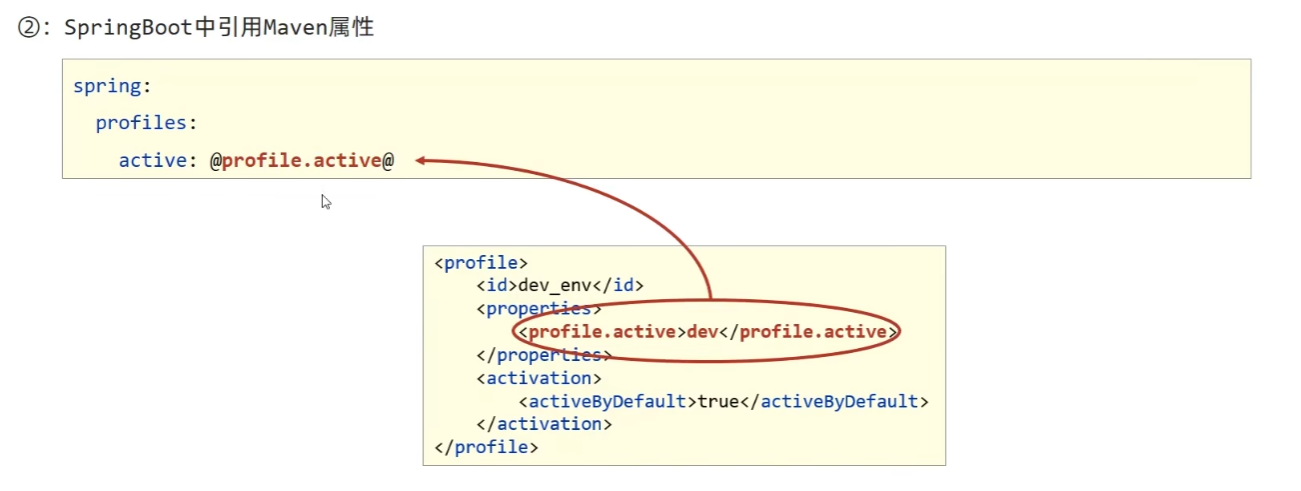
3. 多环境
3.1 配置文件
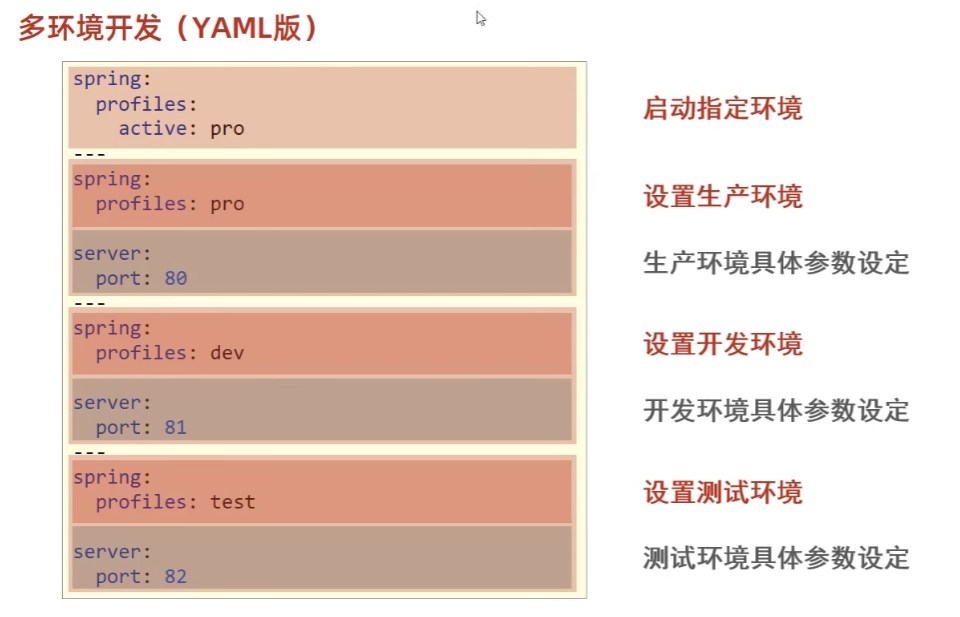
文件版:
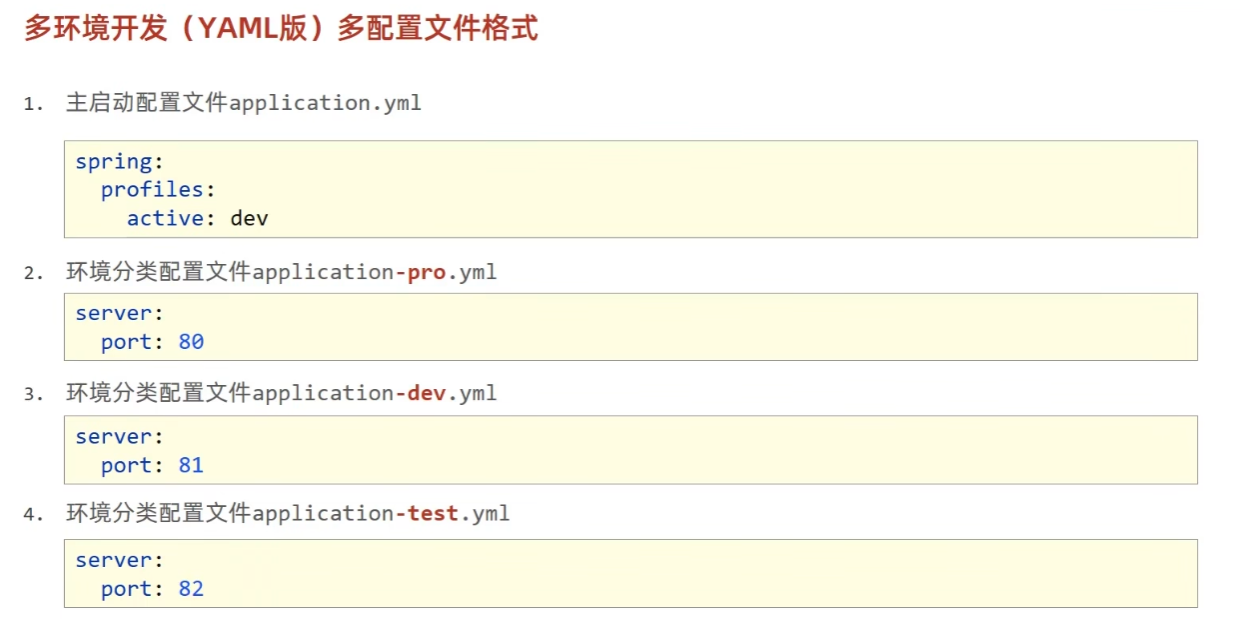
主配置文件中设置公共配置(全局),环境分类配置文件中常用于设置冲突属性(局部)。
3.2 分组管理
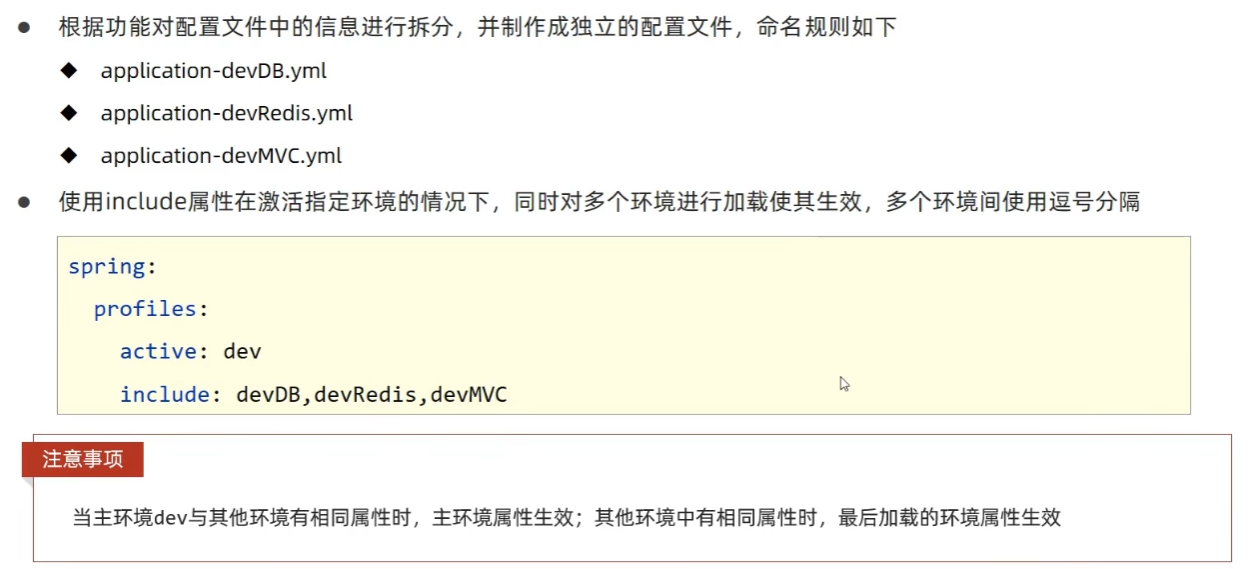
3.3 开发控制
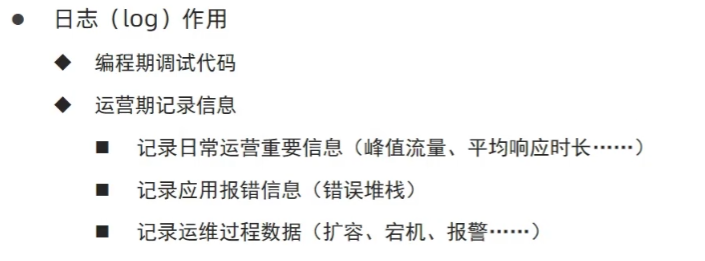
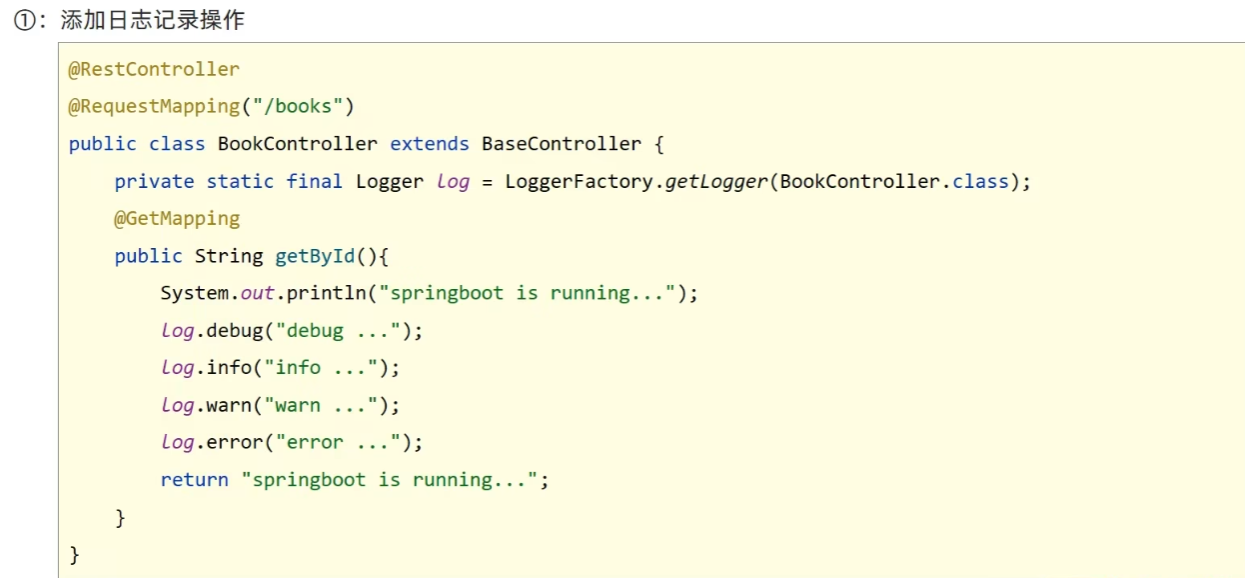
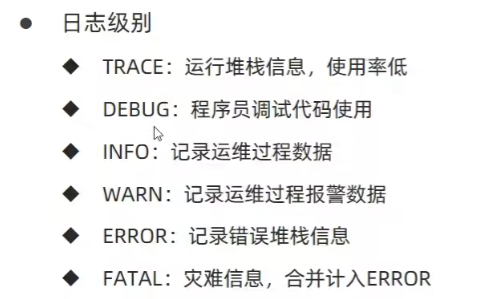
4. 日志
4.1 日志基础
代码中使用日志工具记录日志:
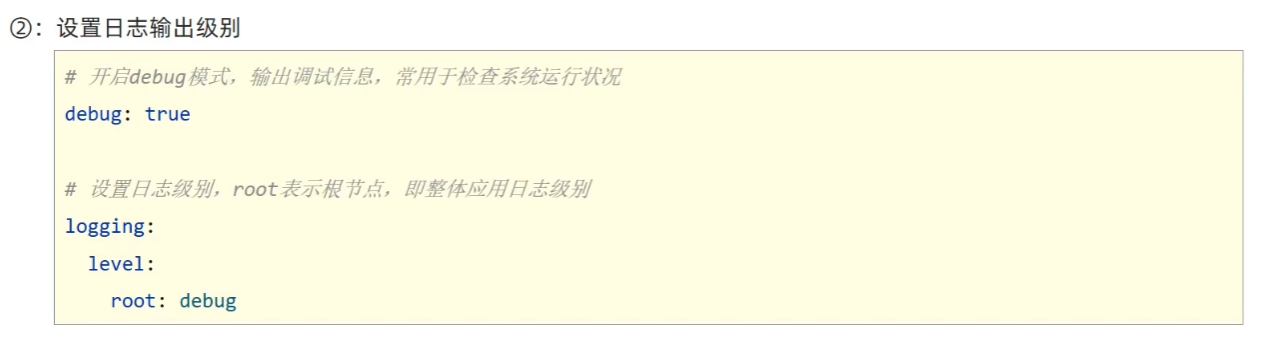

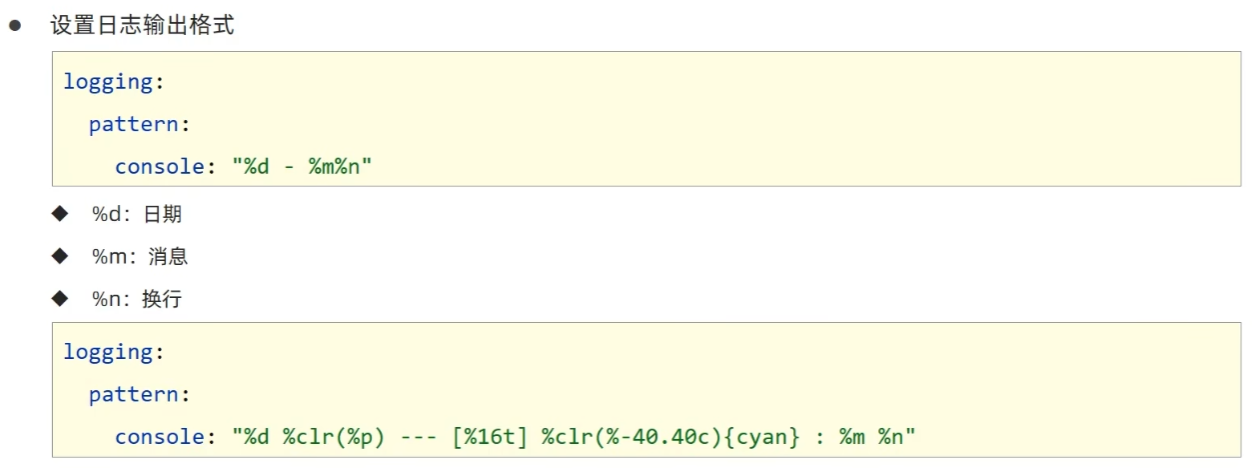
4.2 日志输出格式控制
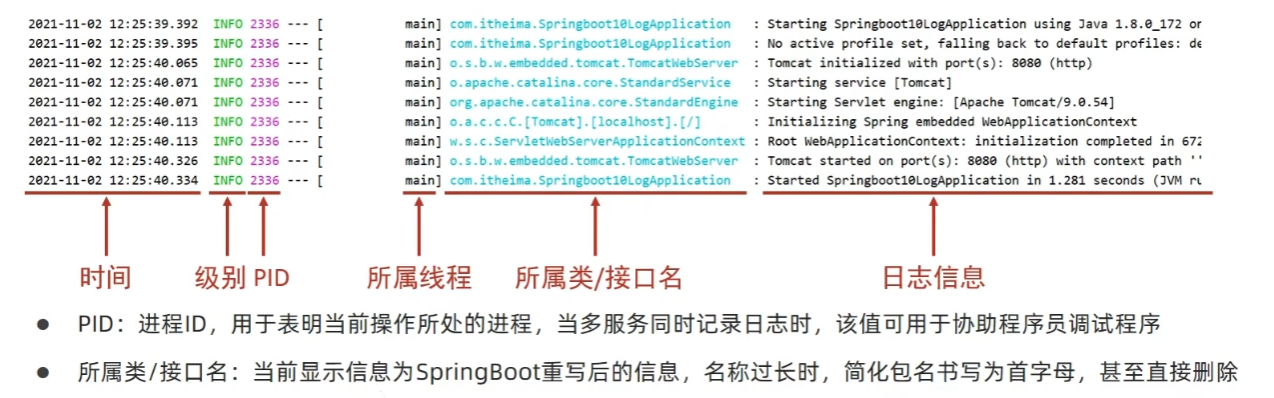
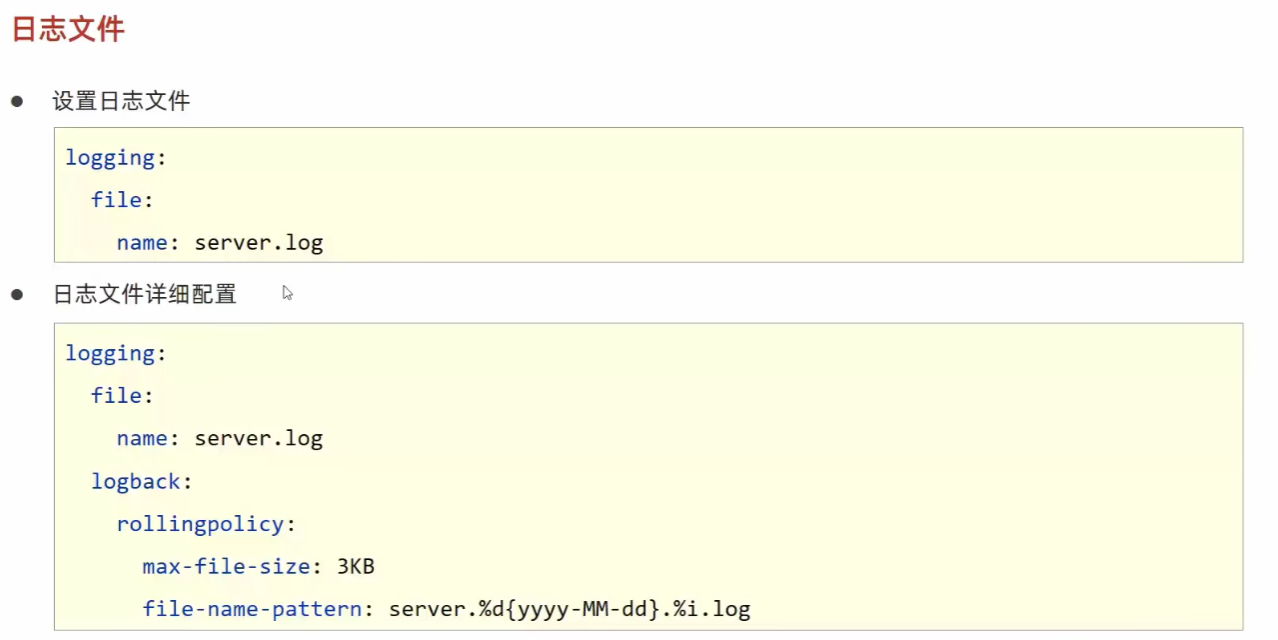
4.3 文件记录日志
四. 开发实用篇
1. 热部署
1.1 手工启动热部署
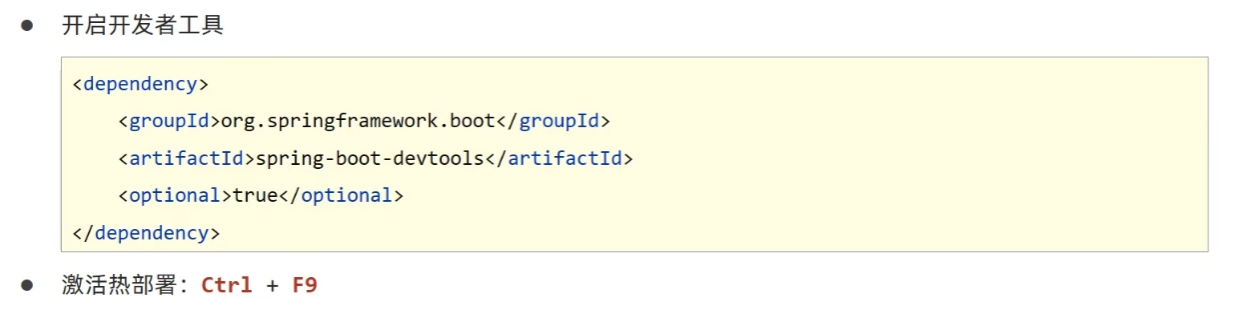
关于热部署:
重启(Restart):自定义开发代码,包含类、页面、配置文件等,加载位置restart类加载器
重载(ReLoad):jar包,加载位置base类加载器
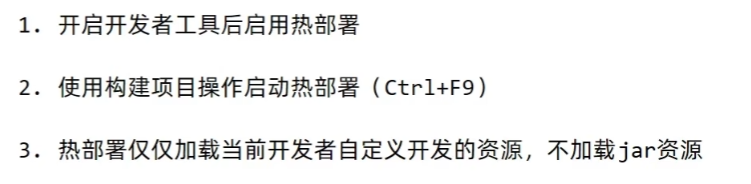
1.2 自动启动热部署

快捷键:Ctrl + Shift + Alt 激活菜单:
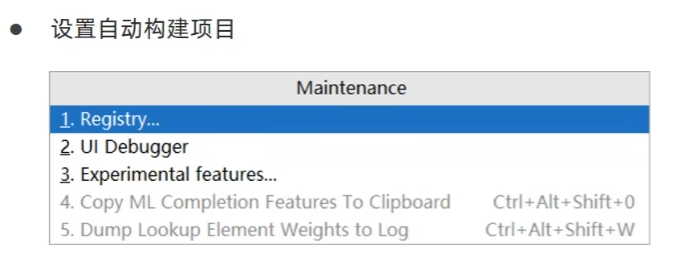
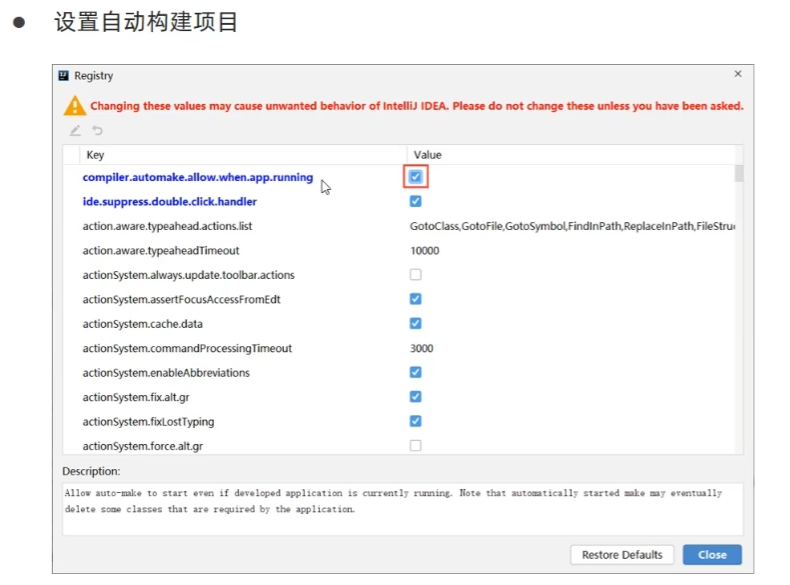
激活方式:Idea失去焦点5秒后启动热部署。
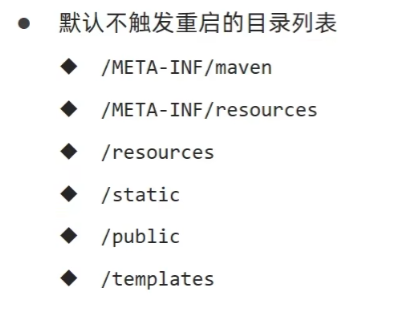
1.3 热部署范围配置

1.4 关闭热部署功能
热部署功能只在开发环境有效。
在配置文件中关闭:
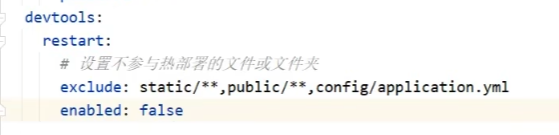
如果害怕配置文件中关闭的设置被其他属性配置覆盖:

2. 配置高级
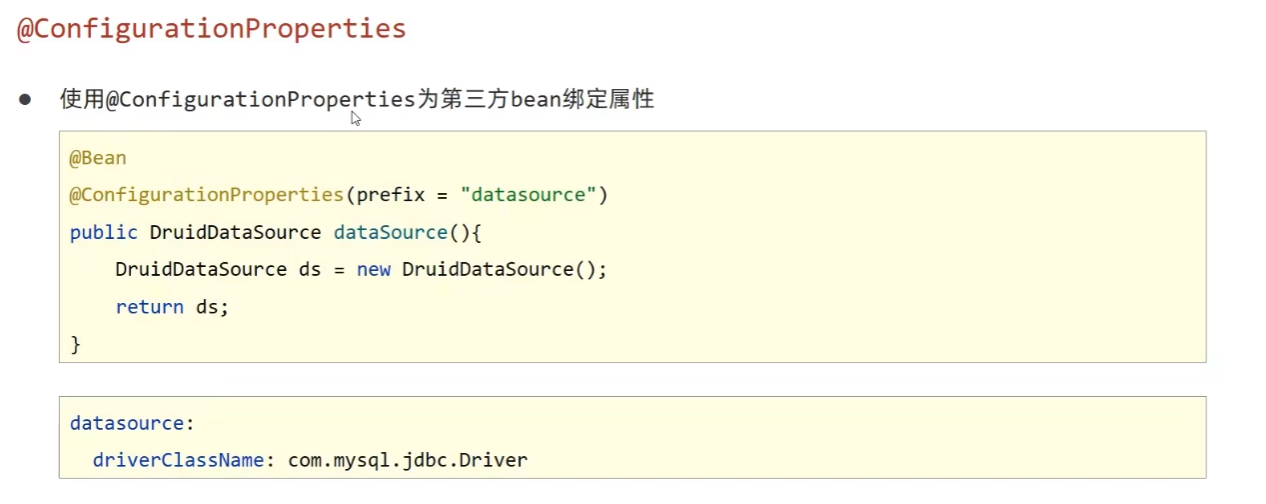
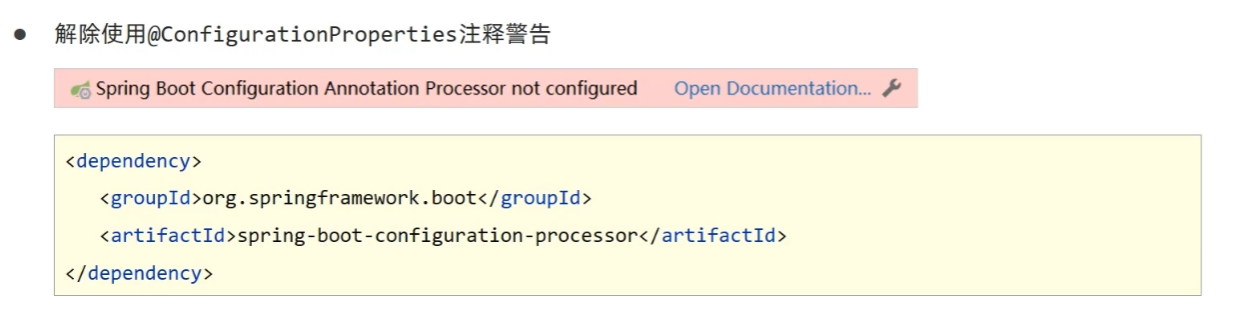
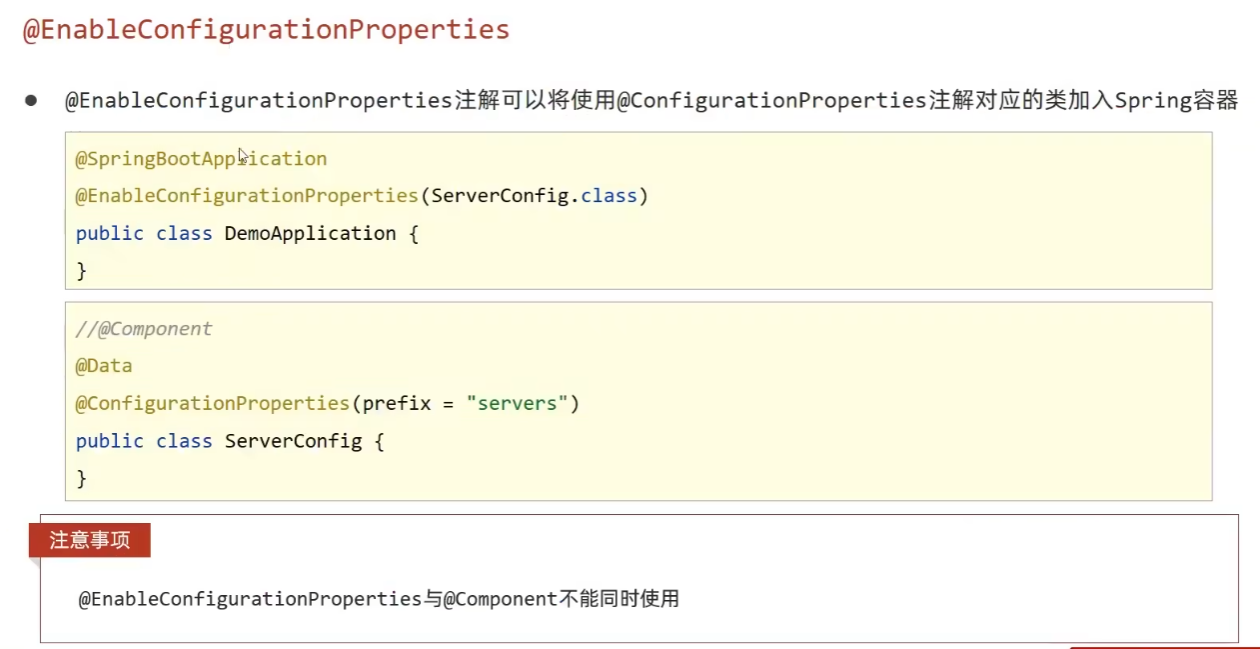
2.1 第三方bean属性绑定
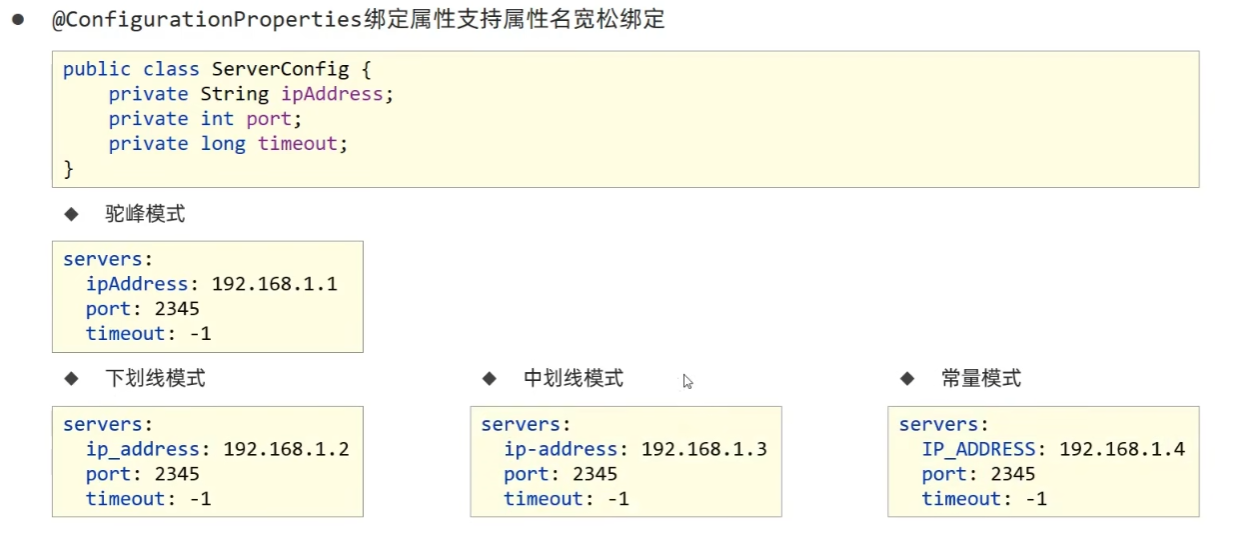
2.2 松散绑定

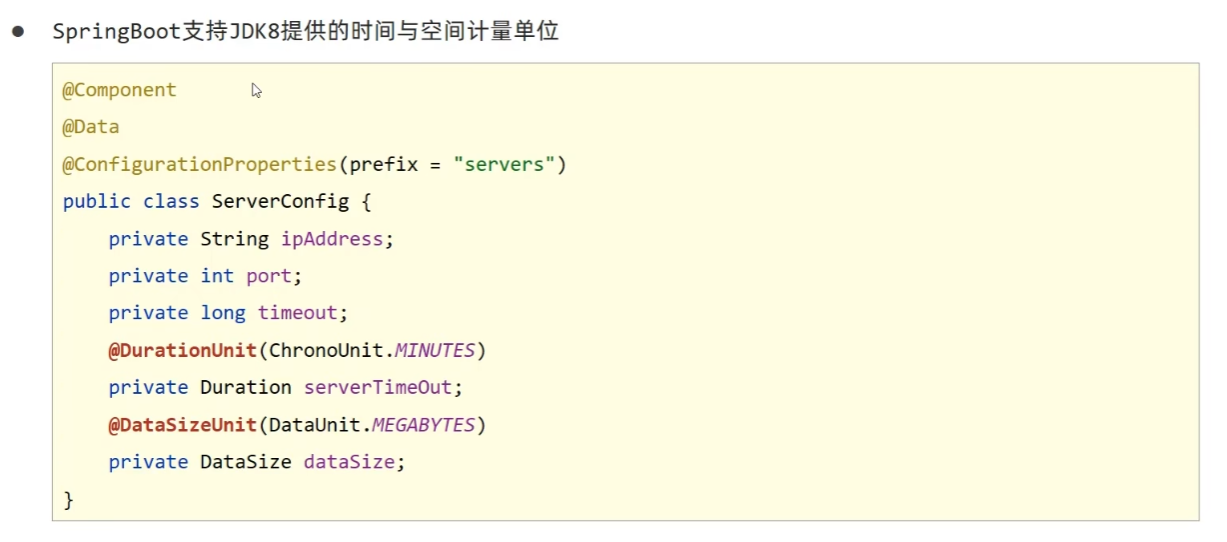
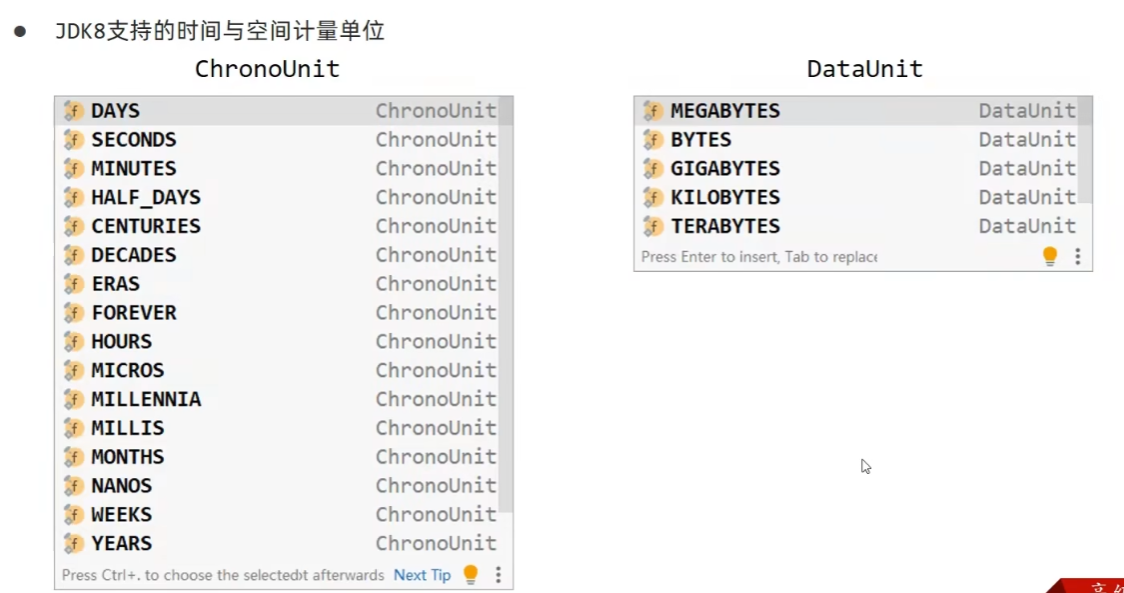
2.3 常用计量单位应用
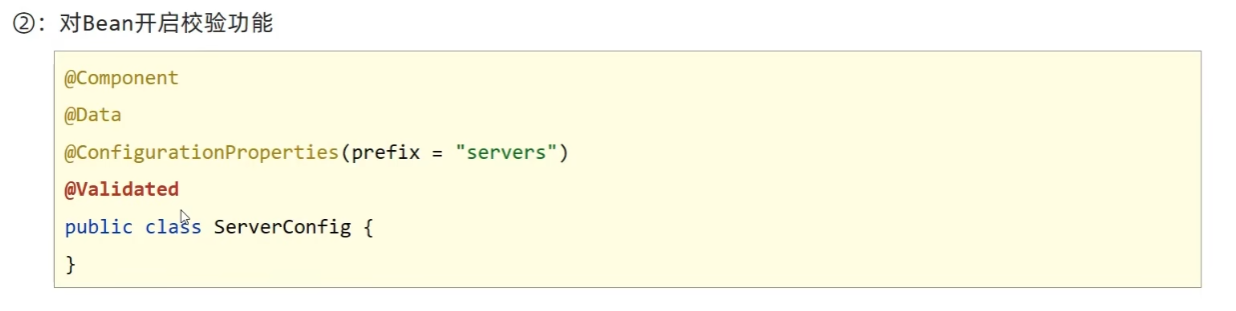
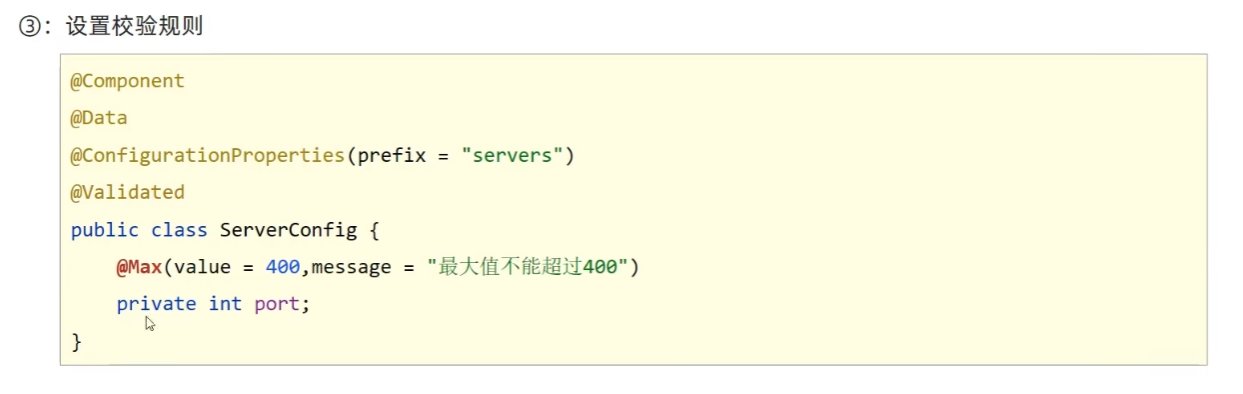
2.4 bean属性校验

2.5 进制数据转换规则
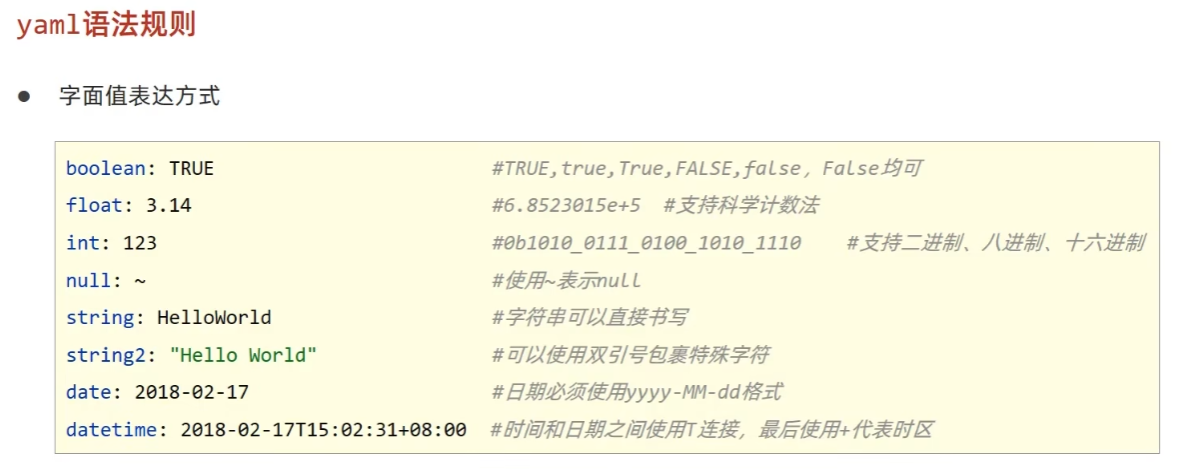
注意yaml文件中对于数字的定义支持进制书写格式,如需使用字符串请使用引号明确标注。
3. 测试
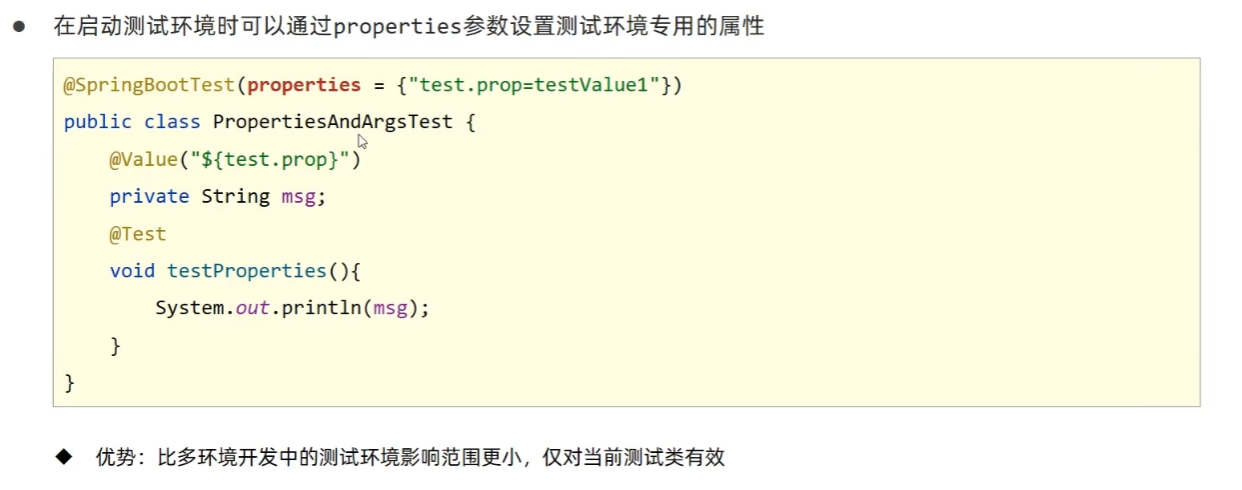
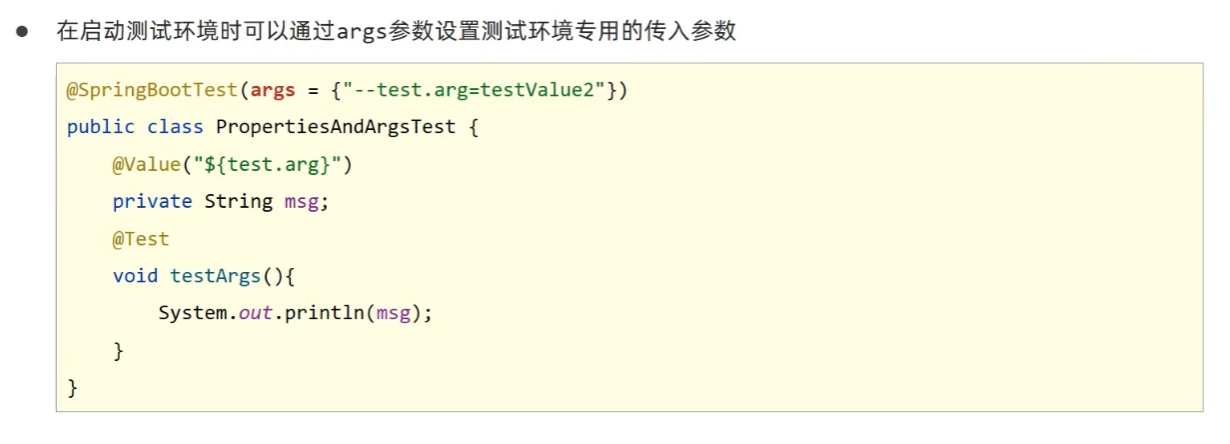
3.1 加载测试专用属性
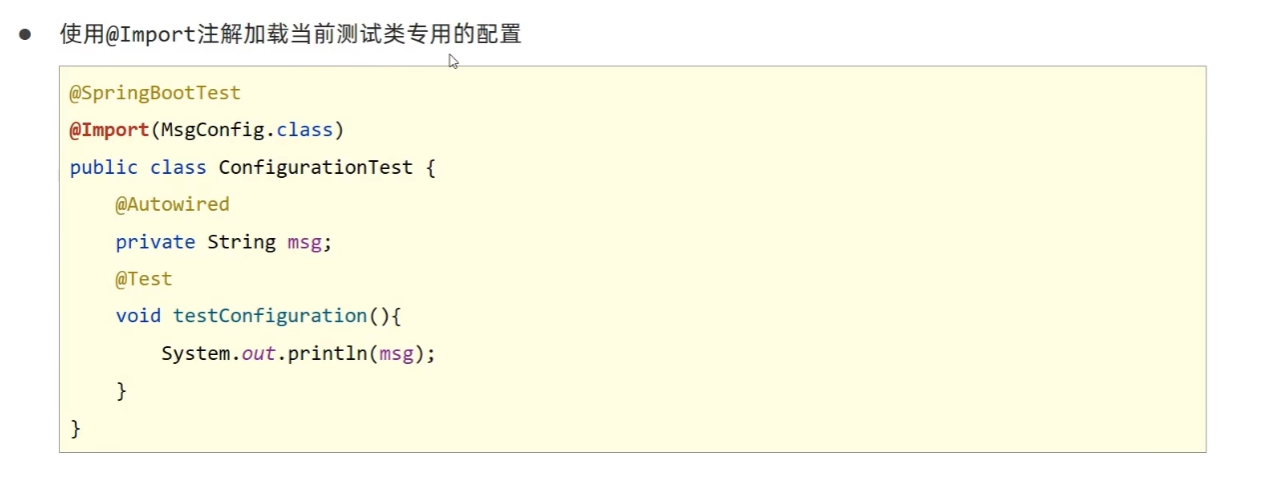
3.2 加载测试专用配置
这个配置类在test包下:
@Configuration
public class MsgConfig {

    @Bean
    public String msg(){
        return "bean msg";
    }
}
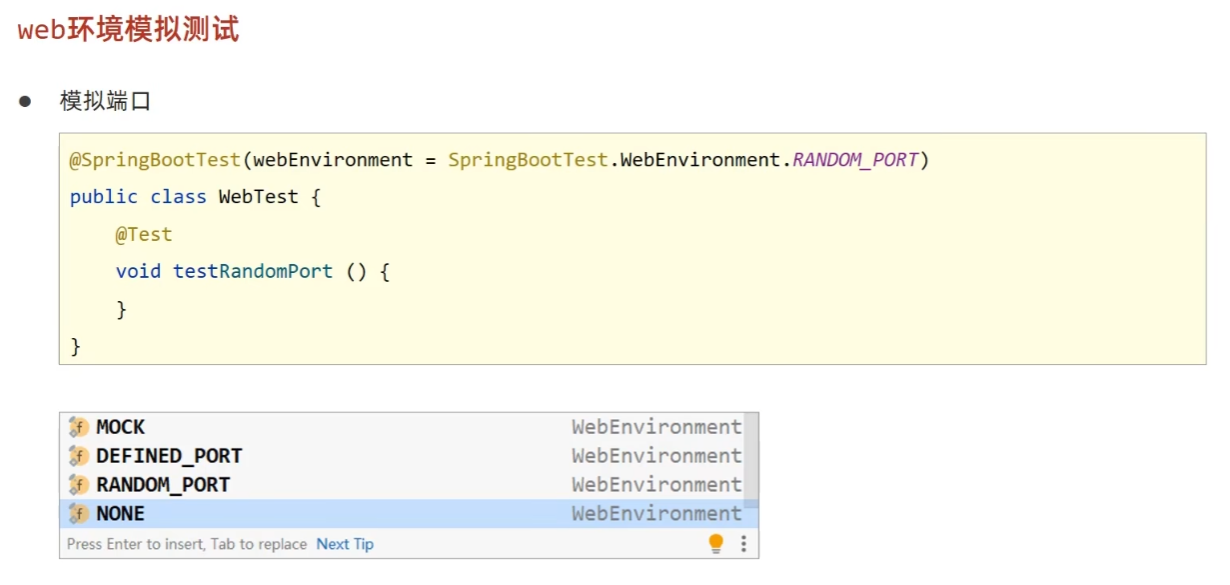
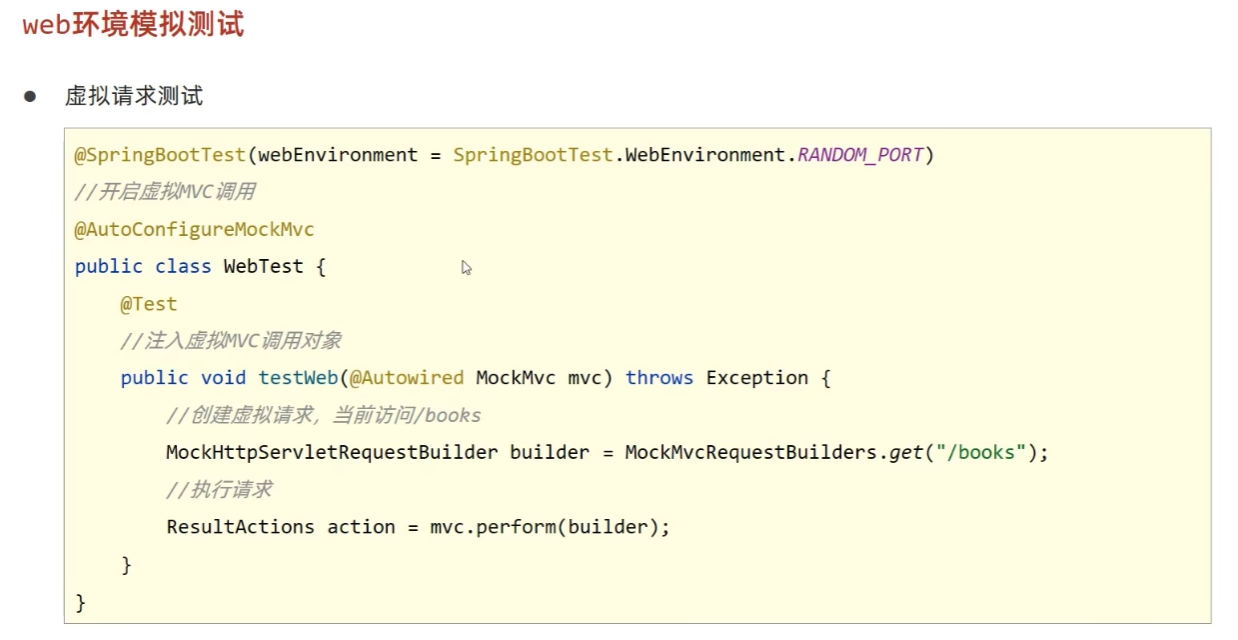
3.3 测试类中启动web环境
3.4 发送虚拟请求
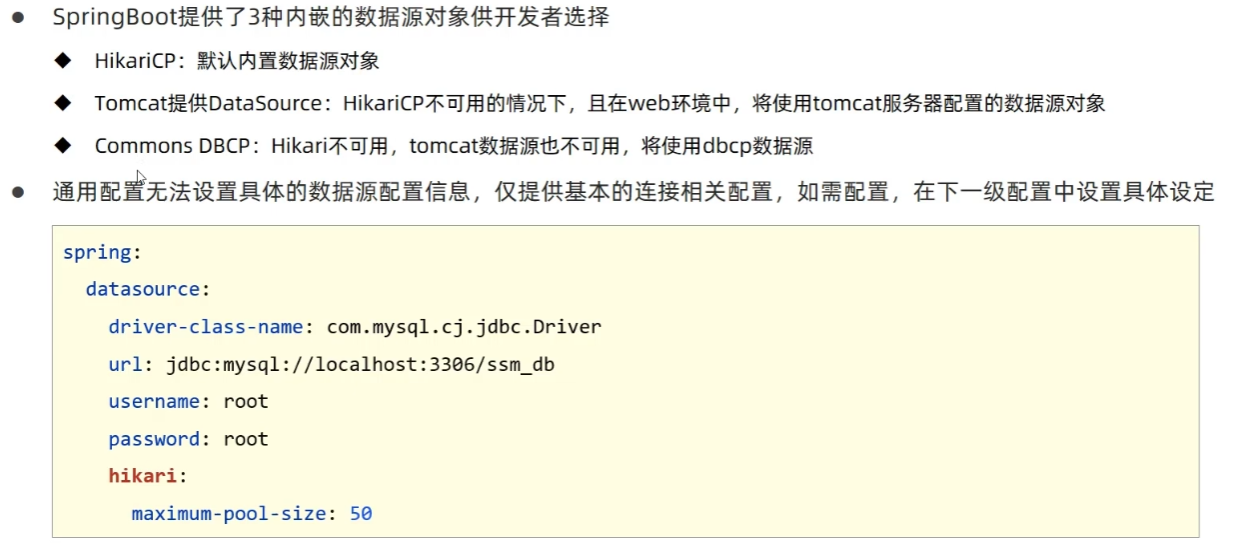
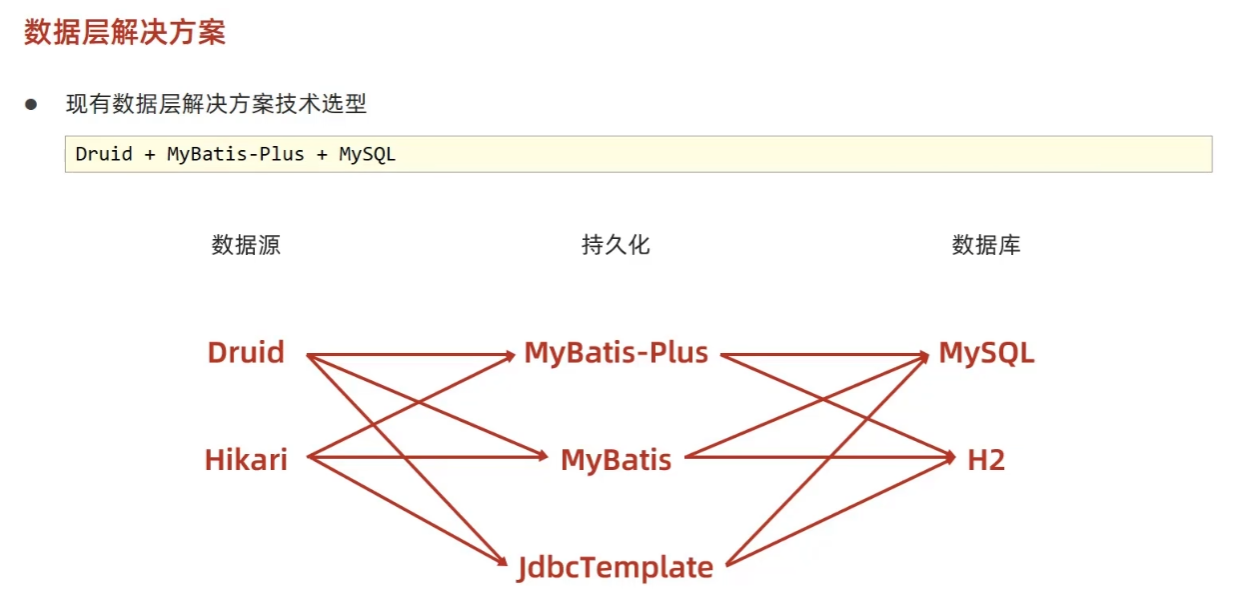
4.数据层解决方案
4.1 SQL

1)内置数据源
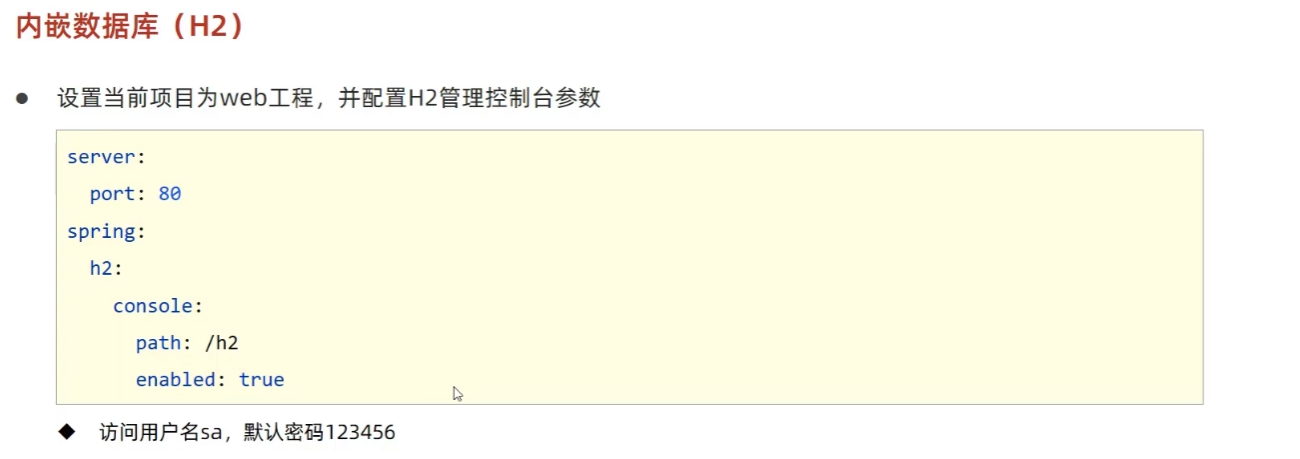
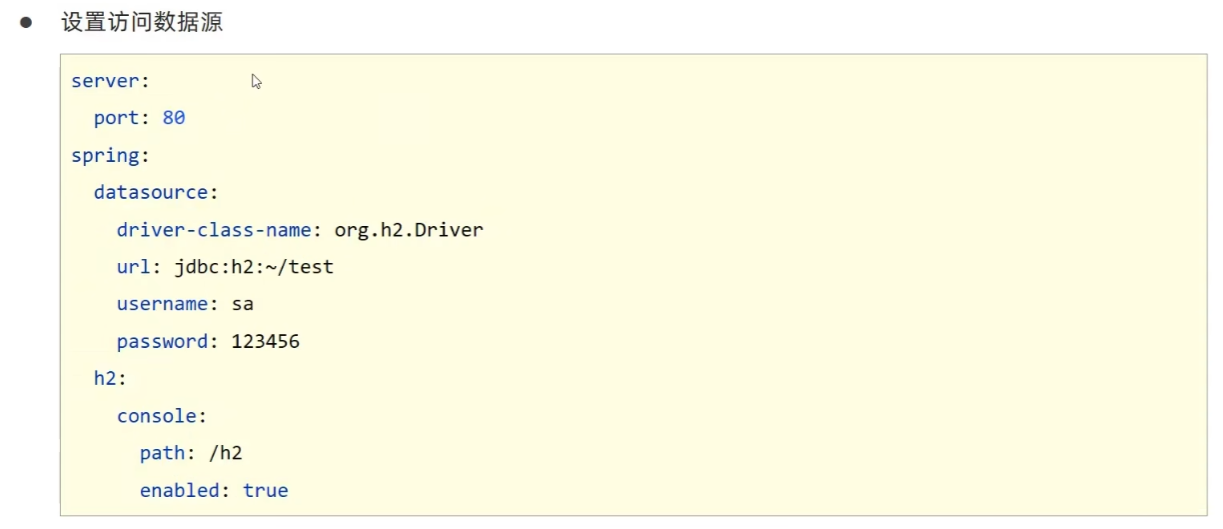
2)内嵌数据库


5. Mongodb
5.1 简介
MongoDB 是一个开源、高性能、无模式的文档型数据库。NoSQL 数据库产品中的一种,是最像关系型数据库的非关系型数据库。
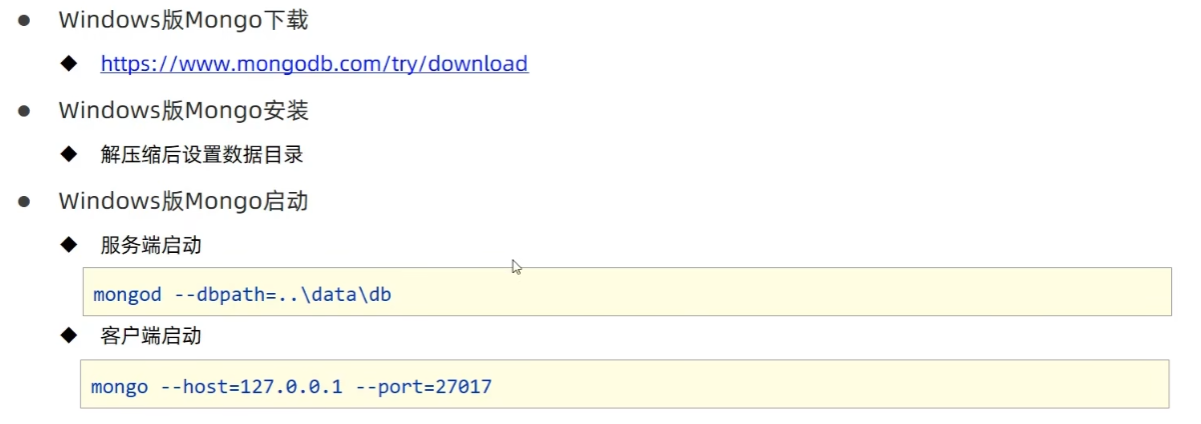
5.2 下载与安装

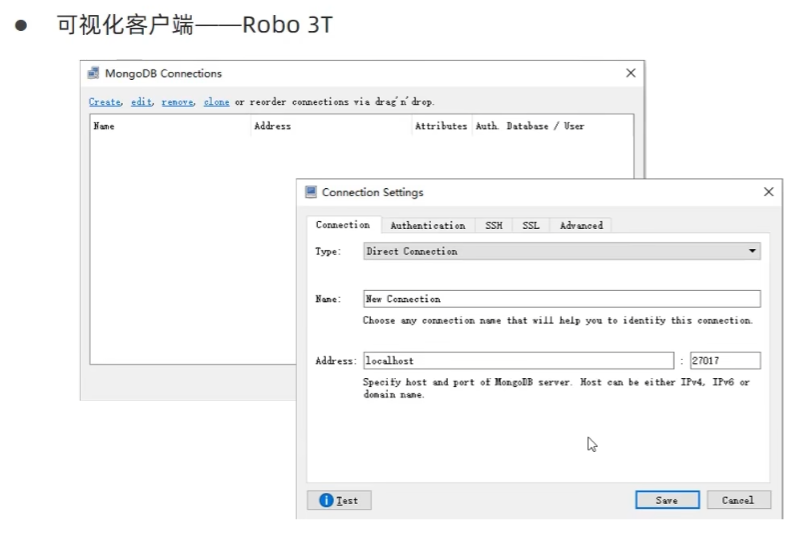
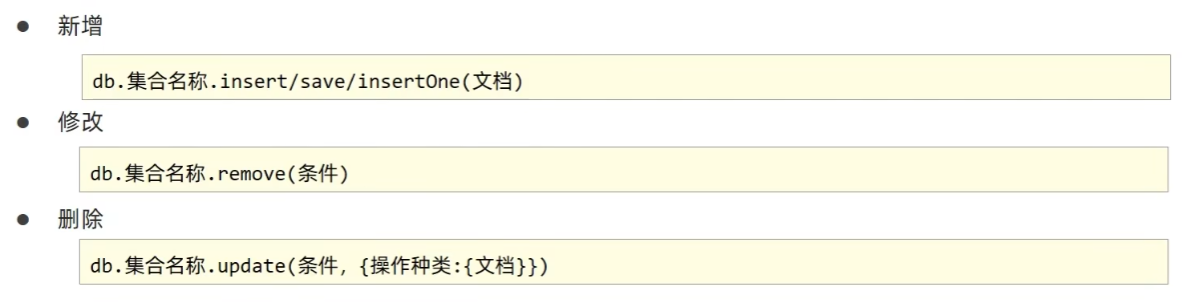
5.3 基础操作
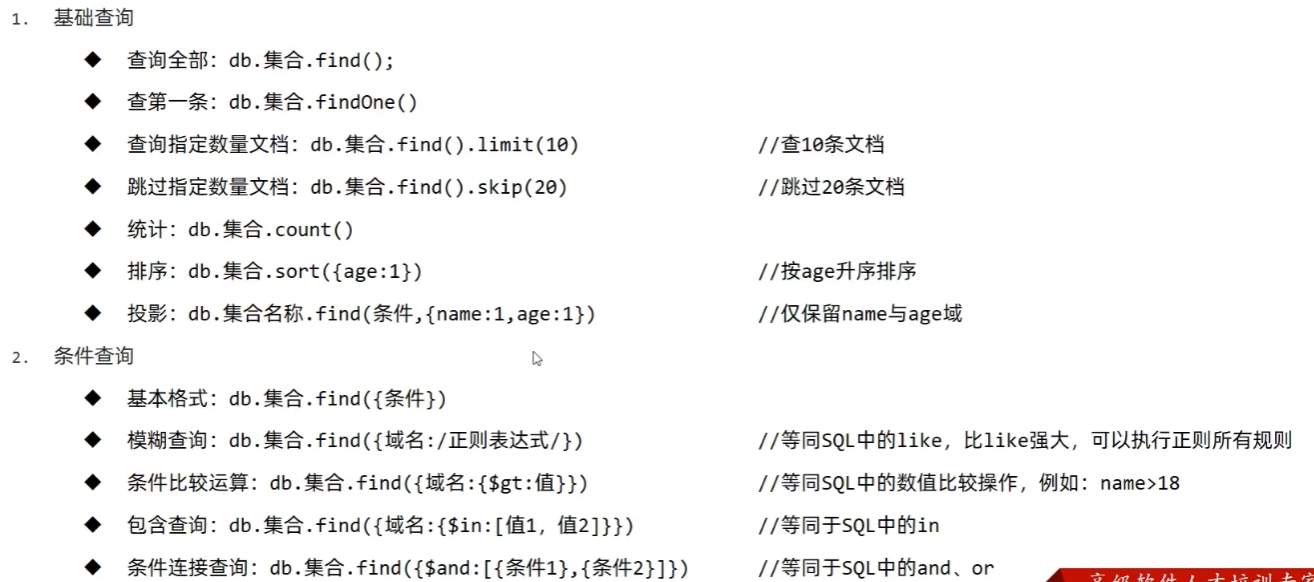
5.4 springboot整合mongodb
导入Mongodb驱动:
<dependency>
    <groupId>org.springframework.boot</groupId>
    <artifactId>spring-boot-starter-data-mongodb</artifactId>
</dependency>
配置客户端:
spring:
  data:
    mongodb:
      uri: mongodb://localhost/itheima
客户端读写Mongodb:
@Test
void testSave(@Autowired MongoTemplate mongoTemplate){
    Book book = new Book();
    book.setId(1);
    book.setType("springboot");
    book.setName("springboot");
    book.setDescription("springboot");
    mongoTemplate.save(book);
}

@Test
void testFind(@Autowired MongoTemplate mongoTemplate){
    List<Book> all = mongoTemplate.findAll(Book.class);
    System.out.println(all);
}
6. 整合第三方技术
6.1 Spring缓存使用方式
缓存是一种介于数据永久存储介质(数据库)与数据应用(程序)之间的数据临时存储介质。
启用缓存:
<!--cache-->
<dependency>
    <groupId>org.springframework.boot</groupId>
    <artifactId>spring-boot-starter-cache</artifactId>
</dependency>
在启动类上添加 EnableCaching 注解开启缓存功能:
@SpringBootApplication
//开启缓存功能
@EnableCaching
public class Springboot19CacheApplication {

    public static void main(String[] args) { SpringApplication.run(Springboot19CacheApplication.class, args); }
}
设置当前操作的结果进入缓存:
@Cacheable(value="cacheSpace",key="#id")
public Book getById(Integer id) {
    return bookDao.selectById(id);
}
6.2 手机验证码案例
根据手机号生成和获取验证码的工具类:
@Component
public class CodeUtils {

    private String [] patch = {"00000","0000","000","00","0",""};

    public String generator(String tele){
        int hash = tele.hashCode();
        int encryption = 20206666;
        long result = hash ^ encryption;
        long nowTime = System.currentTimeMillis();
        result = result ^ nowTime;
        long code = result % 1000000;
        code = code < 0 ? -code : code;
        String codeStr = code + "";
        int len = codeStr.length();
        return patch[len - 1] + codeStr;
    }

    @Cacheable(value = "smsCode",key="#tele")
    public String get(String tele){
        return null;
    }
}
业务层具体实现:
@Service
public class SMSCodeServiceImpl implements SMSCodeService {

    @Autowired
    private CodeUtils codeUtils;

    //生成验证码
    @Override
    @CachePut(value = "smsCode",key="#tele")
    public String sendCodeToSMS(String tele) {
        String code = codeUtils.generator(tele);
        return code;
    }

    //校验验证码
    @Override
    public boolean checkCode(SMSCode smsCode) {
        //取出内存中的验证码与传递过来的验证码比对,如果相同,返回true
        String code = smsCode.getCode();
        String cacheCode = codeUtils.get(smsCode.getTele());
        return code.equals(cacheCode);
    }
}
6.3 变更缓存供应商Ehcache
导入Ehcache坐标:
<dependency>
    <groupId>net.sf.ehcache</groupId>
    <artifactId>ehcache</artifactId>
</dependency>
配置文件中配置缓存类型为Ehcache
spring:
  cache:
    type: ehcache
    ehcache:
      config: encache.xml --配置文件的名字
ehcache是spring体系外的技术,它有自己的配置文件(不添加这个配置就会报错):
在resources目录下新建一个 ehcache.xml 文件
<?xml version="1.0" encoding="UTF-8"?>
<ehcache xmlns:xsi="http://www.w3.org/2001/XMLSchema-instance"
         xsi:noNamespaceSchemaLocation="http://ehcache.org/ehcache.xsd"
         updateCheck="false">

    <diskStore path="D:\ehcache" />

    <!-- 默认缓存策略 -->
    <!-- eternal:是否永久存在,设置为true则不会被清除,此时与timeout冲突,通常设置为false-->
    <!-- diskPersistent:是否启用磁盘持久化-->
    <!-- maxElementsInMemory:最大缓存数量-->
    <!-- overflowToDisk:超过最大缓存数量是否持久化到磁盘-->
    <!-- timeToIdleSeconds:最大不活动间隔,设置过长缓存容易溢出,设置过短无效果,可用于记录时效性数据,例如验证码-->
    <!-- timeToLiveSeconds:最大存活时间-->
    <!-- memoryStoreEvictionPolicy:缓存清除策略-->
    <defaultCache
            eternal="false"
            diskPersistent="false"
            maxElementsInMemory="1000"
            overflowToDisk="false"
            timeToIdleSeconds="60"
            timeToLiveSeconds="60"
            memoryStoreEvictionPolicy="LRU" />

    <cache
            name="smsCode"
            eternal="false"
            diskPersistent="false"
            maxElementsInMemory="100"
            overflowToDisk="false"
            timeToIdleSeconds="60"
            timeToLiveSeconds="60"
            memoryStoreEvictionPolicy="LRU" />

</ehcache>
文件中的name对应 @CachePut 注解的value属性,可以针对不同的命名空间进行不同的缓存配置,没有value属性就使用 defaultCache。
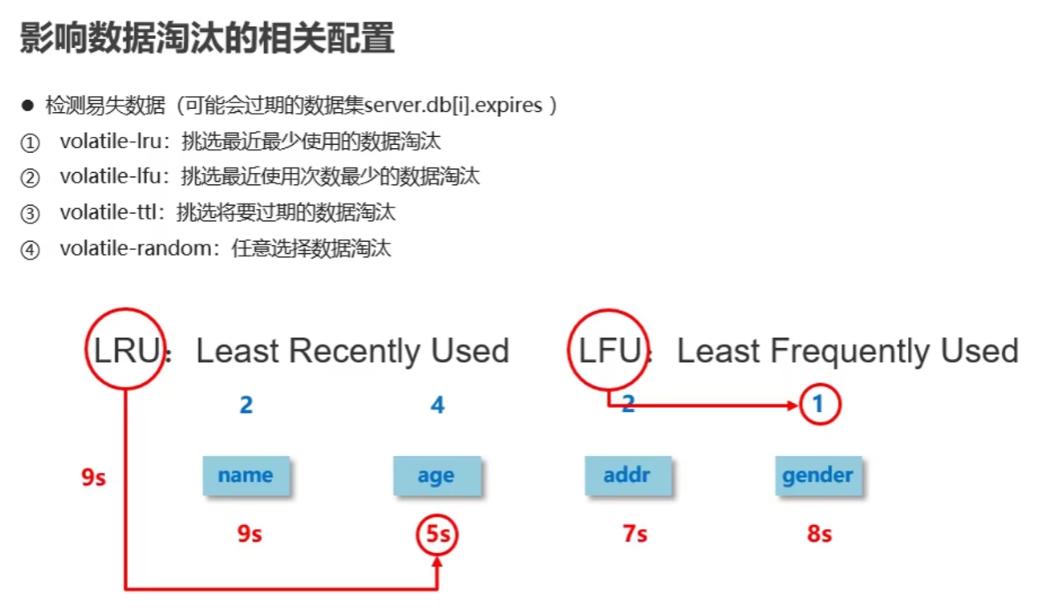
数据淘汰策略:
6.4 变更缓存供应商Redis
加入Redis坐标:
<dependency>
    <groupId>org.springframework.boot</groupId>
    <artifactId>spring-boot-starter-data-redis</artifactId>
</dependency>
配置Redis服务器,缓存设定为使用Redis:
spring:
  cache:
    type: redis
  redis:
    use-key-prefix: true --是否使用前缀(false则只有key没有value)
    cache-null-values: false --是否缓存空值
    key-prefix: aa --缓存前缀名,在命名空间之前
    time-to-live: 10 --缓存过期时间
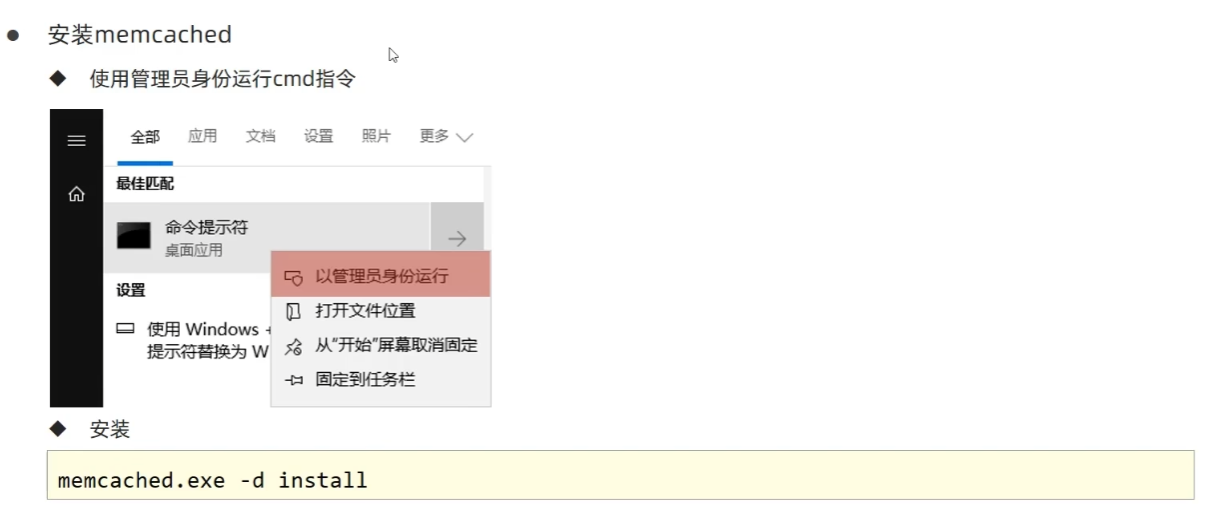
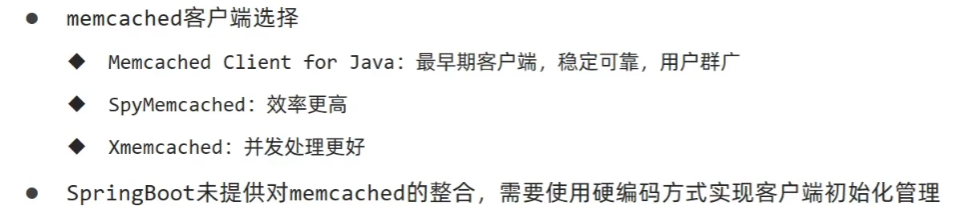
6.5 变更缓存供应商 memcached
下载地址:https://www.runoob.com/memcached/window-install-memcached.html

导入坐标:
<dependency>
    <groupId>com.googlecode.xmemcached</groupId>
    <artifactId>xmemcached</artifactId>
    <version>2.4.7</version>
</dependency>
自定义配置 Memcached 属性:
在application.yml文件中配置memcached服务器必要属性
memcached:
  # memcached服务器地址
  servers: localhost:11211
  # 连接池的数量
  poolSize: 10
  # 设置默认操作超时
  opTimeout: 3000
读取配置文件:
@Component
@ConfigurationProperties(prefix = "memcached")
@Data
public class XMemcachedProperties {
    private String servers;
    private int poolSize;
    private long optimeout;
}
创建配置类 XMemcachedConfig:
@Configuration
public class XMemcachedConfig {

    @Autowired
    private XMemcachedProperties xMemcachedProperties;

    @Bean
    public MemcachedClient getMemcachedClient() throws IOException {
        MemcachedClientBuilder builder = new XMemcachedClientBuilder(xMemcachedProperties.getServers());
        memcachedClientBuilder.setConnectionPoolSize(memcachedProperties.getPoolSize());
        memcachedClientBuilder.setOpTimeout(memcachedProperties.getOpTimeout());
        MemcachedClient memcachedClient = builder.build();
        return memcachedClient;
    }
}
6.6 jetcache缓存方案
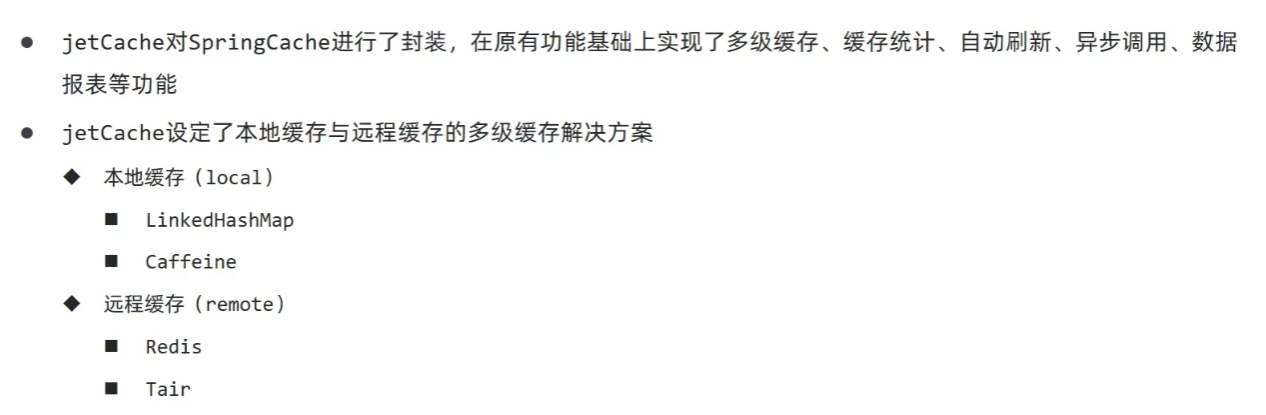
1)远程缓存方案
导入坐标:
<dependency>
<groupId>com.alicp.jetcache</groupId>
<artifactId>jetcache-starter-redis</artifactId>
<version>2.6.2</version>
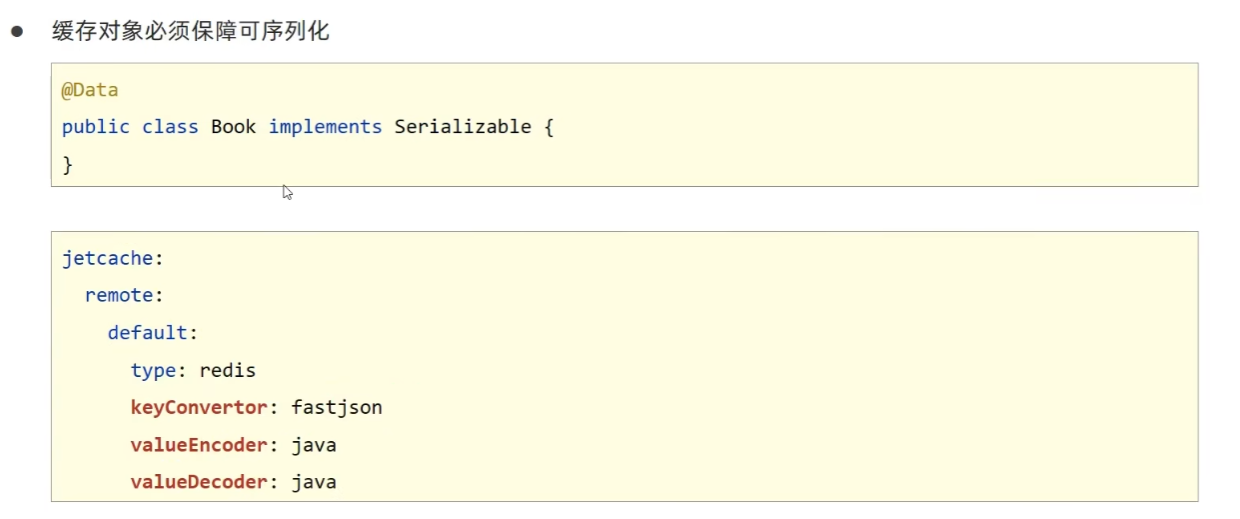
</dependency>配置属性:
jetcache:
  remote:
    default: --命名空间
      type: redis --远程连接类型
      host: localhost
      port: 6379
      poolConfig: --必须得有,没有就报错
        maxTotal: 50 -- 最大连接数
    sms:
      type: redis
      host: localhost
      port: 6379
      poolConfig:
        maxTotal: 50
在启动类中开启使用注解的形式创建缓存:
@SpringBootApplication
// jetcache启用缓存的主开关
@EnableCreateCacheAnnotation
public class Springboot20JetCacheApplication {

    public static void main(String[] args) {
        SpringApplication.run(Springboot20JetCacheApplication.class, args);
    }
}
业务实现类:
@Service
public class SMSCodeServiceImpl implements SMSCodeService {

    @Autowired
    private CodeUtils codeUtils;

    // 声明JetCache缓存,area指使用配置文件中的相对应的配置,默认为default,jetCache是命名空,缓存过期时间10秒
    @CreateCache(area = "sms", name = "jetCache", expire = 10, timeUnit = TimeUnit.SECONDS)
    private Cache<String, String> jetCache;

    @Override
    public String sendCodeToSMS(String tele) {
        // 生成验证码并放入缓存
        String code = codeUtils.generator(tele);
        jetCache.put(tele, code);
        return code;
    }

    @Override
    public boolean checkCode(SMSCode smsCode) {
        // 从缓存获取验证码并校验
        String code = jetCache.get(smsCode.getTele());
        return smsCode.getCode().equals(code);
    }
}
2)本地缓存方案
配置属性:
jetcache:
  # 统计信息的打印间隔(分钟)
  statIntervalMinutes: 15
  # 缓存名称中是否包含area(区域)信息
  areaInCacheName: false
  # 本地缓存配置
  local:
    default:
      # 本地缓存类型
      type: linkedhashmap
      # 键转换器
      keyConvertor: fastjson --key的类型转换器,必配,key为对象时将其转换成json
      # 本地缓存最大容量
      limit: 100
  # 远程缓存配置
  remote:
    default:
      # Redis服务器地址
      host: localhost
      # Redis端口
      port: 6379
      # 远程缓存类型(Redis)
      type: redis
      # 键转换器(FastJSON)
      keyConvertor: fastjson
      # 值编码器(Java序列化)将对象存入redis的类型
      valueEncoder: java
      # 值解码器(Java序列化)从redis读数据的类型
      valueDecoder: java
      # 连接池配置
      poolConfig:
        # 最小空闲连接数
        minIdle: 5
        # 最大空闲连接数
        maxIdle: 20
        # 最大连接总数
        maxTotal: 50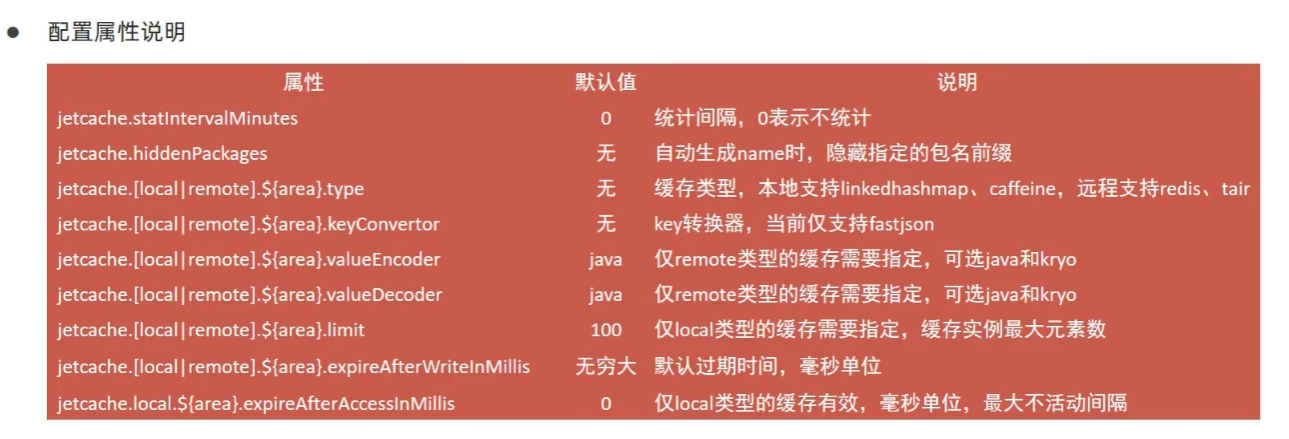
生成JetCache缓存对象:
//cacheType指定使用远程缓存还是本地缓存,默认是远程。如果配置文件中没有配置远程属性也会自动使用本地缓存
@CreateCache(name="jetCache",expire = 1000,timeUnit = TimeUnit.SECONDS,cacheType = CacheType.LOCAL)
private Cache<String ,String> jetCache;
3)jetCache方法缓存
开启方法注解缓存:
@SpringBootApplication
// jetcache启用缓存的主开关
@EnableCreateCacheAnnotation
// 开启方法注解缓存
@EnableMethodCache(basePackages = "com.itheima")
public class Springboot20JetCacheApplication {

    public static void main(String[] args) {
        SpringApplication.run(Springboot20JetCacheApplication.class, args);
    }
}
业务层方法中使用方法注解操作缓存:
@Override
@Cached(name="book_", key="#id", expire = 3600, cacheType = CacheType.REMOTE)
public Book getById(Integer id) {
    return bookDao.selectById(id);
}

@Override
@CacheUpdate(name="book_", key="#book.id", value="#book")
public boolean update(Book book) {
    return bookDao.updateById(book) > 0;
}

@Override
@CacheInvalidate(name="book_", key = "#id")
public boolean delete(Integer id) {
    return bookDao.deleteById(id) > 0;
}
6.7 缓存供应商变更: j2cache
j2cache 是一个缓存整合框架,可以提供缓存的整合方案,使各种缓存搭配使用,自身不提供缓存功能。
这里的案例基于 ehcache + redis 进行整合。
1)基本操作
导入坐标:
<dependency>
    <groupId>net.oschina.j2cache</groupId>
    <artifactId>j2cache-core</artifactId>
    <version>2.8.4-release</version>
</dependency>

<dependency>
    <groupId>net.oschina.j2cache</groupId>
    <artifactId>j2cache-spring-boot2-starter</artifactId>
    <version>2.8.0-release</version>
</dependency>

<dependency>
    <groupId>net.sf.ehcache</groupId>
    <artifactId>ehcache</artifactId>
</dependency>
在application.yml中配置 j2cache 的配置文件名:
j2cache:
  config-location: j2cache.properties
在 resource 目录下创建 j2cache.properties配置文件:
# 1级缓存
j2cache.L1.provider_class = ehcache --一级缓存的供应商
ehcache.configXml = ehcache.xml --encache的配置文件名

# 2级缓存
j2cache.L2.provider_class = net.oschina.j2cache.cache.support.redis.SpringRedisProvider --二级缓存的供应商
j2cache.L2.config_section = redis1 --以下所有以redis1为前缀的值都是为j2cache的二级缓存作配置
redis1.hosts = localhost:6379

# 1级缓存中的数据如何到达2级缓存
# 一二级缓存之间的数据交换使用的广播模式是SpringRedis中提供的消息的发布与订阅模式
j2cache.broadcast = net.oschina.j2cache.cache.support.redis.SpringRedisPubSubPolicy
在 resource 目录下创建 encache.xml 配置文件:
<?xml version="1.0" encoding="UTF-8"?>
<ehcache xmlns:xsi="http://www.w3.org/2001/XMLSchema-instance"
         xsi:noNamespaceSchemaLocation="http://ehcache.org/ehcache.xsd"
         updateCheck="false">

    <diskStore path="D:\ehcache" />

    <!-- 默认缓存策略 -->
    <!-- eternal:是否永久存在,设置为true则不会被清除,此时与timeout冲突,通常设置为false-->
    <!-- diskPersistent:是否启用磁盘持久化-->
    <!-- maxElementsInMemory:最大缓存数量-->
    <!-- overflowToDisk:超过最大缓存数量是否持久化到磁盘-->
    <!-- timeToIdleSeconds:最大不活动间隔,设置过长缓存容易溢出,设置过短无效果,可用于记录时效性数据,例如验证码-->
    <!-- timeToLiveSeconds:最大存活时间-->
    <!-- memoryStoreEvictionPolicy:缓存清除策略-->
    <defaultCache
            eternal="false"
            diskPersistent="false"
            maxElementsInMemory="1000"
            overflowToDisk="false"
            timeToIdleSeconds="60"
            timeToLiveSeconds="60"
            memoryStoreEvictionPolicy="LRU" />

    <cache
            name="smsCode"
            eternal="false"
            diskPersistent="false"
            maxElementsInMemory="100"
            overflowToDisk="false"
            timeToIdleSeconds="60"
            timeToLiveSeconds="60"
            memoryStoreEvictionPolicy="LRU" />

</ehcache>
操作缓存:
@Autowired
private CacheChannel cacheChannel;

@Override
public String sendCodeToSMS(String tele) {
    String code = codeUtils.generator(tele);
    cacheChannel.set(region: "sms", tele, code);
    return code;
}

@Override
public boolean checkCode(SMSCode smsCode) {
    String code = cacheChannel.get(region: "sms", smsCode.getTele()).asString();
    return smsCode.getCode().equals(code);
}
2)j2cache相关配置
# 设置是否启用二级缓存
j2cache.L2-cache-open = false

# Redis部署模式:单机模式(适用于开发/测试环境,生产环境可配置为cluster/sentinel等)
# 可选值:single(单机)、cluster(集群)、sentinel(哨兵)
redis.mode = single

# Redis缓存命名空间:为j2cache的缓存key添加统一前缀,避免与其他应用的key冲突
# 作用:隔离不同应用/模块的缓存数据,防止key重复导致数据覆盖
redis.namespace = j2cache
7. 发送邮件功能
7.1 发送简单邮件
导入坐标:
<!-- Spring Boot邮件发送 starter,用于快速集成邮件发送功能(支持SMTP协议) -->
<dependency>
    <groupId>org.springframework.boot</groupId>
    <artifactId>spring-boot-starter-mail</artifactId>
</dependency>
配置属性:
spring:
  mail:
    # QQ邮箱的SMTP服务器地址(不同邮箱的SMTP地址不同,如163邮箱是smtp.163.com)
    host: smtp.qq.com
    # 发送邮件的QQ邮箱账号
    username: 10xxxxxx@qq.com
    # QQ邮箱的授权码(不是登录密码,需在QQ邮箱设置中开启SMTP并生成)
    password: ewlrengdrxfxhjde
服务类实现:
@Service
public class SendMailServiceImpl implements SendMailService {

    @Autowired
    private JavaMailSender javaMailSender;

    @Override
    public void sendMail() {
        // 实例化SimpleMailMessage(用于发送简单文本邮件)
        SimpleMailMessage message = new SimpleMailMessage();
        // 配置邮件核心信息
        message.setFrom("发送方邮箱@qq.com"); // 对应配置文件中的spring.mail.username
        message.setTo("接收方邮箱@xxx.com"); // 收件人邮箱
        message.setSubject("邮件主题"); // 邮件标题
        message.setText("邮件正文内容"); // 邮件文本内容

        // 发送邮件
        javaMailSender.send(message);
    }
}
7.2 发送多部件邮件
发送 html 正文:
@Autowired
private JavaMailSender javaMailSender;

//标题
private String subject = "测试邮件";
//正文
private String context = "<a href='https://www.itcast.cn'>点开有惊喜</a>";

@Override
public void sendMail() {
    try {
        MimeMessage message = javaMailSender.createMimeMessage();
        MimeMessageHelper helper = new MimeMessageHelper(message);
        helper.setFrom(from+"(小甜甜)");
        helper.setTo(to);
        helper.setSubject(subject);
        helper.setText(context, true);//true表示允许发送html格式正文
        javaMailSender.send(message);
    } catch (Exception e) {
        e.printStackTrace();
    }
}
添加附件:
@Autowired
private JavaMailSender javaMailSender;

//标题
private String subject = "测试邮件";
//正文
private String context = "<a href='https://www.itcast.cn'>点开有惊喜</a>";

@Override
public void sendMail() {
    try {
        MimeMessage message = javaMailSender.createMimeMessage();
        MimeMessageHelper helper = new MimeMessageHelper(message, true);//true代表可以发送附件
        helper.setFrom(from+"(小甜甜)");
        helper.setTo(to);
        helper.setSubject(subject);
        helper.setText(context, true);//true表示允许发送html格式正文
         // 添加附件
        File f1 = new File(pathname: "D:\\workspace\\springboot\\springboot_23_mail\\target\\springboot_23_mail-0.");
        File f2 = new File(pathname: "D:\\workspace\\springboot\\springboot_23_mail\\src\\main\\resources\\logo.png");

        helper.addAttachment(f1.getName(),f1);
        helper.addAttachment(attachmentFilename: "最靠谱的培训机构.png",f2);

        javaMailSender.send(message);
    } catch (Exception e) {
        e.printStackTrace();
    }
}


 690
690

 被折叠的 条评论
为什么被折叠?
被折叠的 条评论
为什么被折叠?
 到【灌水乐园】发言


