


 本文介绍了OpenCV中Mat类的基本用法,包括如何存储灰度图像和彩色图像,以及如何将图像数据从数组转换到Mat类,并实现图像的显示输出。
在开始之前,我们先介绍一下mat类的用法:
1、mat类存储图像
Mat类是OpenCV里使用广泛的一个类,其中最重要的一个作用就是作为存储图像的数据结构。那么Mat类如何存储的图像呢?
我们都知道图像分为彩色图像和灰度图像,这里我有一个误区,一直认为彩色图像是一种三维矩阵,就是立方体的那种结构,一个图像分为三层。但是这种理解是错误的,其实在存储的图像不管是彩色的还是灰度图像,都是二维的矩阵,具体的存储格式如下:(1)灰度图像的格式:
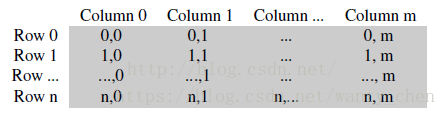
(2)彩色图像的格式:

虽然彩色图像由BGR三个通道,但是是存储在同一个平面内的,只不过OpenCV在这里把三列才当作一列,因此有img.cols等于图像的列数。
一般我们用Opencv读取的灰度图像的数据类型为uchar类型的,而彩色图像的一个像素的数据类型为<Vec3b>类型的,灰度图一个像素占用1个字节,而彩色图像一个像素3个字节。
2、将数组转化为mat类,并显示输出
这个程序承接上一个C++读图程序,在上一个程序中,已经实现了将bmp图像数据读取出来并存入矩阵,在这里要实现的就是把三通道的图像数据存入mat矩阵中,显示输出。代码如下:
rgb2opencvshow.cpp
- #include<cstdlib>
- #include<cstdio>
- #include<cmath>
- #include<iomanip>
- #include <opencv2/opencv.hpp>
- #include "opencv2/highgui/highgui.hpp"
- #include "opencv2/core/core.hpp"
- #include"readbmp.h"
- #include"savebmp.h"
-
- using namespace std;
- using namespace cv;
-
- unsigned int **out_r;
- unsigned int **out_g;
- unsigned int **out_b;
-
- void doIt()
- {
-
- char readPath[] = "D:\\C++_file\\image_deal_C++\\read_BMP\\lunpan.bmp";
- readBmp(readPath);
- // 输出整体图像信息
- cout << "\nwidth=" << bmpWidth << "\nheight=" << bmpHeight << "\nbiBitCount=" << biBitCount << endl;
- // 图像的字节数
- int linebyte1 = (bmpWidth*biBitCount / 8 + 3) / 4 * 4;
- int n = 0, m = 0, count_xiang_su = 0;
-
- out_r = new unsigned int *[bmpHeight]; //开辟指针数组
- for (int i = 0; i<bmpHeight; i++)
- out_r[i] = new unsigned int[bmpWidth];
-
- out_g = new unsigned int *[bmpHeight]; //开辟指针数组
- for (int i = 0; i<bmpHeight; i++)
- out_g[i] = new unsigned int[bmpWidth];
-
- out_b = new unsigned int *[bmpHeight]; //开辟指针数组
- for (int i = 0; i<bmpHeight; i++)
- out_b[i] = new unsigned int[bmpWidth];
-
- //初始化原始像素的数组。
-
- if (biBitCount == 8)
- {
- for (int i = 0; i<bmpHeight / 2; i++)
- {
- for (int j = 0; j<bmpWidth / 2; i++)
- *(pBmpBuf + i*linebyte1 + j) = 0;
- }
- }
-
- if (biBitCount == 24)
- {
- for (int i = 0; i<bmpHeight; i++)
- {
- for (int j = 0; j<bmpWidth; j++)
- {
- for (int k = 0; k<3; k++)//每像素RGB三个分量分别置0才变成黑色
- {
- m = *(pBmpBuf + i*linebyte1 + j * 3 + k);
- count_xiang_su++;
- }
- n++;
- }
- }
- cout << "总的像素个素为:" << n << endl;
- cout << "----------------------------------------------------" << endl;
- }
-
-
- if (biBitCount == 24)
- {
- for (int i = 0; i<bmpHeight; i++)
- {
- for (int j = 0; j<bmpWidth; j++)
- {
- out_r[bmpHeight - 1 - i][j] = pBmpBuf[j * 3 + 2 + bmpWidth*i * 3];
- out_g[bmpHeight - 1 - i][j] = pBmpBuf[j * 3 + 1 + bmpWidth *i * 3];
- out_b[bmpHeight - 1 - i][j] = pBmpBuf[j * 3 + bmpWidth *i * 3];
- }
- }
- Mat img_data(bmpHeight, bmpWidth, CV_8UC3);
- for (int i = 0; i<bmpHeight; i++){
- for (int j = 0; j<bmpWidth; j++){
- img_data.at<Vec3b>(i, j)[0] = out_b[i][j];
- img_data.at<Vec3b>(i, j) [1]= out_g[i][j];
- img_data.at<Vec3b>(i, j) [2]= out_r[i][j];
- }
- }
-
- namedWindow("lunpan");
- imshow("lunpan",img_data);
- waitKey(0);
- imwrite("D:\\C++_file\\image_deal_C++\\11.bmp",img_data);
-
- }
-
- //清除缓冲区,pBmpBuf和pColorTable是全局变量,在文件读入时申请的空间
- delete[]pBmpBuf;
- if (biBitCount == 8)
- delete[]pColorTable;
-
- }
-
-
- int main()
- {
- doIt();
- system("pause");
- return 0;
- }


 1152
1152

 被折叠的 条评论
为什么被折叠?
被折叠的 条评论
为什么被折叠?
 到【灌水乐园】发言


