


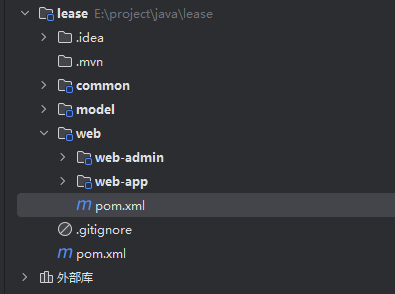
项目结构如下:
lease
├── common(公共模块——工具类、公用配置等)
│ ├── pom.xml
│ └── src
├── model(数据模型——与数据库相对应地实体类)
│ ├── pom.xml
│ └── src
├── web(Web模块)
│ ├── pom.xml
│ ├── web-admin(后台管理系统Web模块——包含mapper、service、controller)
│ │ ├── pom.xml
│ │ └── src
│ └── web-app(移动端Web模块——包含mapper、service、controller)
│ ├── pom.xml
│ └── src
└── pom.xml
SpringBoot配置
1. pom文件配置
在父工程的 pom.xml 文件中添加以下配置:
<!-- 继承Spring Boot父项目 -->
    <parent>
        <groupId>org.springframework.boot</groupId>
        <artifactId>spring-boot-starter-parent</artifactId>
        <version>3.0.5</version>
    </parent>

    <!-- 注意:直接替换pom文件中原有的properties -->
    <properties>
        <maven.compiler.source>17</maven.compiler.source>
        <maven.compiler.target>17</maven.compiler.target>
        <project.build.sourceEncoding>UTF-8</project.build.sourceEncoding>
        <mybatis-plus.version>3.5.3.1</mybatis-plus.version>
        <swagger.version>2.9.2</swagger.version>
        <jwt.version>0.11.2</jwt.version>
        <easycaptcha.version>1.6.2</easycaptcha.version>
        <minio.version>8.2.0</minio.version>
        <knife4j.version>4.1.0</knife4j.version>
        <aliyun.sms.version>2.0.23</aliyun.sms.version>
    </properties>

    <!--配置dependencyManagement统一管理依赖版本-->
    <dependencyManagement>
        <dependencies>
            <!--mybatis-plus-->
            <!--官方文档:https://baomidou.com/pages/bab2db/ -->
            <dependency>
                <groupId>com.baomidou</groupId>
                <artifactId>mybatis-plus-boot-starter</artifactId>
                <version>${mybatis-plus.version}</version>
            </dependency>

            <!--knife4j文档-->
            <!--官方文档:https://doc.xiaominfo.com/docs/quick-start -->
            <dependency>
                <groupId>com.github.xiaoymin</groupId>
                <artifactId>knife4j-openapi3-jakarta-spring-boot-starter</artifactId>
                <version>${knife4j.version}</version>
            </dependency>

            <!--JWT登录认证相关-->
            <!--官方文档:https://github.com/jwtk/jjwt#install-jdk-maven -->
            <dependency>
                <groupId>io.jsonwebtoken</groupId>
                <artifactId>jjwt-api</artifactId>
                <version>${jwt.version}</version>
            </dependency>
            <dependency>
                <groupId>io.jsonwebtoken</groupId>
                <artifactId>jjwt-impl</artifactId>
                <scope>runtime</scope>
                <version>${jwt.version}</version>
            </dependency>
            <dependency>
                <groupId>io.jsonwebtoken</groupId>
                <artifactId>jjwt-jackson</artifactId>
                <scope>runtime</scope>
                <version>${jwt.version}</version>
            </dependency>

            <!--图形验证码-->
            <!--官方文档:https://gitee.com/ele-admin/EasyCaptcha -->
            <dependency>
                <groupId>com.github.whvcse</groupId>
                <artifactId>easy-captcha</artifactId>
                <version>${easycaptcha.version}</version>
            </dependency>

            <!--对象存储,用于存储图像等非结构化数据-->
            <!--官方文档:https://min.io/docs/minio/linux/developers/minio-drivers.html?ref=docs#java-sdk -->
            <dependency>
                <groupId>io.minio</groupId>
                <artifactId>minio</artifactId>
                <version>${minio.version}</version>
            </dependency>

            <!--阿里云短信客户端,用于发送短信验证码-->
            <!--官方文档:https://help.aliyun.com/document_detail/215759.html?spm=a2c4g.215759.0.0.49f32807f4Yc0y -->
            <dependency>
                <groupId>com.aliyun</groupId>
                <artifactId>dysmsapi20170525</artifactId>
                <version>${aliyun.sms.version}</version>
            </dependency>
        </dependencies>
    </dependencyManagement>
此处仅声明依赖项,后续导入时若未指定版本将自动下载。
在 web 模块的 pom.xml 文件中添加以下配置:
<!--包含spring web相关依赖-->
<dependency>
    <groupId>org.springframework.boot</groupId>
    <artifactId>spring-boot-starter-web</artifactId>
</dependency>

<!--包含spring test相关依赖-->
<dependency>
    <groupId>org.springframework.boot</groupId>
    <artifactId>spring-boot-starter-test</artifactId>
    <scope>test</scope>
</dependency>
插件
<!-- Spring Boot Maven插件,用于打包可执行的JAR文件 -->
<build>
    <plugins>
        <plugin>
            <groupId>org.springframework.boot</groupId>
            <artifactId>spring-boot-maven-plugin</artifactId>
        </plugin>
    </plugins>
</build>
2. 创建application.yml配置文件
在 web-admin 模块的 src/main/resources 目录下创建 application.yml 配置文件,文件内容如下:
server:
  port: 8080
3. 创建SpringBoot启动类
在 web-admin 模块中创建 AdminWebApplication 类,具体实现如下:
@SpringBootApplication
public class AdminWebApplication {
    public static void main(String[] args) {
        SpringApplication.run(AdminWebApplication.class, args);
    }
}
Mybatis-Plus配置
Mybatis-Plus作为公共工具组件,应配置在common模块中。具体配置方法请参照官方文档说明。
1. pom文件配置
在 common 模块的 pom.xml 文件中添加以下配置:
<!--mybatis-plus-->
<dependency>
    <groupId>com.baomidou</groupId>
    <artifactId>mybatis-plus-boot-starter</artifactId>
</dependency>

<!--mysql驱动-->
<dependency>
    <groupId>com.mysql</groupId>
    <artifactId>mysql-connector-j</artifactId>
</dependency>
将以下内容添加到model模块的pom.xml文件中:
因model模块中的实体类需使用Mybatis-Plus注解,因此需引入相关依赖。
<!--mybatis-plus-->
<dependency>
    <groupId>com.baomidou</groupId>
    <artifactId>mybatis-plus-boot-starter</artifactId>
</dependency>
2. application.yml配置
请在web-admin模块的application.yml文件中添加以下配置:
spring:
  datasource:
    type: com.zaxxer.hikari.HikariDataSource
    url: jdbc:mysql://192.168.200.128:3306/lease?useUnicode=true&characterEncoding=utf-8&useSSL=false&allowPublicKeyRetrieval=true&serverTimezone=GMT%2b8
    username: root
    password: Server@123
    hikari:
      connection-test-query: SELECT 1 # 自动检测连接
      connection-timeout: 60000 #数据库连接超时时间,默认30秒
      idle-timeout: 500000 #空闲连接存活最大时间,默认600000(10分钟)
      max-lifetime: 540000 #此属性控制池中连接的最长生命周期,值0表示无限生命周期,默认1800000即30分钟
      maximum-pool-size: 12 #连接池最大连接数,默认是10
      minimum-idle: 10 #最小空闲连接数量
      pool-name: SPHHikariPool # 连接池名称

#用于打印框架生成的sql语句,便于调试
mybatis-plus:
  configuration:
log-impl: org.apache.ibatis.logging.stdout.StdOutImpl请注意:请根据实际情况修改以下配置项:hostname、port、database、username 和 password。
3. 配置类
在 common 模块下创建 com.yuhuan.lease.common.mybatisplus.MybatisPlusConfiguration 类,代码如下:
@Configuration
@MapperScan("com.yuhuan.lease.web.*.mapper")
public class MybatisPlusConfiguration {

}
重要提示:请根据实际项目结构调整@MapperScan()注解中的包路径设置。
Knife4j配置
1. pom文件配置
在 web 模块的 pom.xml 文件中添加以下配置:
由于web-app模块也需要Knife4j依赖,只需在父工程中统一引入即可。
<dependency>
    <groupId>com.github.xiaoymin</groupId>
    <artifactId>knife4j-openapi3-jakarta-spring-boot-starter</artifactId>
</dependency>
请在 model 模块的 pom.xml 文件中添加上述内容
由于model模块中的实体类需配置Knife4j注解,因此也需要引入Knife4j依赖。
<dependency>
    <groupId>com.github.xiaoymin</groupId>
    <artifactId>knife4j-openapi3-jakarta-spring-boot-starter</artifactId>
</dependency>
2. 配置类
后台管理系统与移动端接口配置存在差异,需要编写独立的配置类。在web-admin模块中创建com.yuhuan.lease.web.admin.custom.config.Knife4jConfiguration类,具体实现如下:
@Configuration
public class Knife4jConfiguration {

    @Bean
    public OpenAPI customOpenAPI() {

        return new OpenAPI().info(
                new Info()
                        .title("后台管理系统API")
                        .version("1.0")
                        .description("后台管理系统API"));
    }

    @Bean
    public GroupedOpenApi systemAPI() {

        return GroupedOpenApi.builder().group("系统信息管理").
                pathsToMatch(
                        "/admin/system/**"
                ).
                build();
    }

    @Bean
    public GroupedOpenApi loginAPI() {

        return GroupedOpenApi.builder().group("后台登录管理").
                pathsToMatch(
                        "/admin/login/**",
                        "/admin/info"
                ).
                build();
    }

    @Bean
    public GroupedOpenApi apartmentAPI() {

        return GroupedOpenApi.builder().group("公寓信息管理").
                pathsToMatch(
                        "/admin/apartment/**",
                        "/admin/room/**",
                        "/admin/label/**",
                        "/admin/facility/**",
                        "/admin/fee/**",
                        "/admin/attr/**",
                        "/admin/payment/**",
                        "/admin/region/**",
                        "/admin/term/**",
                        "/admin/file/**"
                ).build();
    }
    @Bean
    public GroupedOpenApi leaseAPI() {
        return GroupedOpenApi.builder().group("租赁信息管理").
                pathsToMatch(
                        "/admin/appointment/**",
                        "/admin/agreement/**"
                ).build();
    }
    @Bean
    public GroupedOpenApi userAPI() {
        return GroupedOpenApi.builder().group("平台用户管理").
                pathsToMatch(
                        "/admin/user/**"
                ).build();
    }
}
请注意:pathsToMatch参数需根据具体需求进行配置。
批量代码生成插件
在 IntelliJ IDEA 中使用 MyBatisX 插件快速生成实体类、Mapper 接口及 Service 层代码
-
建议将公共字段(如id、create_time、update_time、is_deleted)抽离到基础实体类中统一维护,各业务实体类通过继承该基类即可复用这些通用字段。
@Data
public class BaseEntity implements Serializable {

    @Schema(description = "主键")
    @TableId(value = "id", type = IdType.AUTO)
    private Long id;

    @Schema(description = "创建时间")
    @TableField(value = "create_time")
    private Date createTime;

    @Schema(description = "更新时间")
    @TableField(value = "update_time")
    private Date updateTime;

    @Schema(description = "逻辑删除")
    @TableField("is_deleted")
    private Byte isDeleted;

}
所有 entity 都继承自 BaseEntity 类,具体实现如下:
@Schema(description = "城市信息表")
@TableName(value = "city_info")
@Data
public class CityInfo extends BaseEntity {

    private static final long serialVersionUID = 1L;

    @Schema(description = "城市名称")
    @TableField(value = "name")
    private String name;

    @Schema(description = "所属省份id")
    @TableField(value = "province_id")
    private Integer provinceId;

}-
推荐将实体类中的状态字段(如status)和类型字段(如type)统一改用枚举类型进行定义。
在数据库设计中,状态/类型字段常用数字代码表示,例如订单状态(1:待支付,2:待发货,3:待收货,4:已收货,5:已完成)。如果在实体类中直接使用基本数字类型(如int)来定义这些字段,会导致代码中出现大量重复的状态判断逻辑。
order.setStatus(1);

if (order.getStatus() == 1) {
 order.setStatus(2);
}
考虑到代码的可维护性,本项目中的所有相关字段均采用枚举类型。以订单状态为例,其枚举定义如下:
public enum Status {

 CANCEL(0, "已取消"),
 WAIT_PAY(1, "待支付"),
 WAIT_TRANSFER(2, "待发货"),
 WAIT_RECEIPT(3, "待收货"),
 RECEIVE(4, "已收货"),
 COMPLETE(5, "已完结");

 private final Integer value;
 private final String desc;

 public Integer value() {
     return value;
 }
 public String desc() {
     return desc;
 }
}
订单实体类中使用Status类型定义状态字段:
@Data
public class Order{
    private Integer id;
    private Integer userId;
    private Status status;
    ...
}
优化后的代码提升了可维护性,主要调整如下:
order.setStatus(Status.WAIT_PAY);
- 实体类均实现了Serializable接口,以便支持对象缓存功能。
- 所有Mapper接口均未直接标注@Mapper注解,而是通过@MapperScan注解实现统一扫描管理。
全局统一返回结果类
规范接口返回数据结构:统一数据格式有助于提升前端开发的效率,让数据处理更加便捷高效。
所有接口均采用以下统一返回数据结构
{
    "code": 200,
    "message": "正常",
    "data": {
        "id": "1",
        "name": "zhangsan",
        "age": 10
    }
}
以下是与之对应的Java类实现
-
Result
/**
 * 全局统一返回结果类
 */
@Data
public class Result<T> {

    //返回码
    private Integer code;

    //返回消息
    private String message;

    //返回数据
    private T data;

    public Result() {
    }

    private static <T> Result<T> build(T data) {
        Result<T> result = new Result<>();
        if (data != null)
            result.setData(data);
        return result;
    }

    public static <T> Result<T> build(T body, ResultCodeEnum resultCodeEnum) {
        Result<T> result = build(body);
        result.setCode(resultCodeEnum.getCode());
        result.setMessage(resultCodeEnum.getMessage());
        return result;
    }


    public static <T> Result<T> ok(T data) {
        return build(data, ResultCodeEnum.SUCCESS);
    }

    public static <T> Result<T> ok() {
        return Result.ok(null);
    }

    public static <T> Result<T> fail() {
        return build(null, ResultCodeEnum.FAIL);
    }
}-
解释说明
private static <T> Result<T> build(T data) {
//               ↑↑↑    ↑↑↑       ↑↑↑
//               1      2         3
}- 1 号
<T>:我声明了一个 “通用类型 T”(比如 T 可以是 User、List<Order>、String); - 2 号
Result<T>:我承诺,这个方法返回的Result对象,里面的data字段必须是 T 类型(和 1 号 T 是同一个类型); - 3 号
T data(参数):进一步强化 —— 传入的data也必须是 T 类型(和 1、2 号 T 保持一致)
Result和ResultCodeEnum类使用了@Data和@Getter注解,因此需要在common模块中添加lombok依赖。
<dependency>
    <groupId>org.projectlombok</groupId>
    <artifactId>lombok</artifactId>
</dependency>-
ResultCodeEnum
为方便管理,可将返回码code和返回消息message封装到枚举类。
@Getter
public enum ResultCodeEnum {

    SUCCESS(200, "成功"),
    FAIL(201, "失败"),
    PARAM_ERROR(202, "参数不正确"),
    SERVICE_ERROR(203, "服务异常"),
    DATA_ERROR(204, "数据异常"),
    ILLEGAL_REQUEST(205, "非法请求"),
    REPEAT_SUBMIT(206, "重复提交"),
    DELETE_ERROR(207, "请先删除子集"),

    ADMIN_ACCOUNT_EXIST_ERROR(301, "账号已存在"),
    ADMIN_CAPTCHA_CODE_ERROR(302, "验证码错误"),
    ADMIN_CAPTCHA_CODE_EXPIRED(303, "验证码已过期"),
    ADMIN_CAPTCHA_CODE_NOT_FOUND(304, "未输入验证码"),


    ADMIN_LOGIN_AUTH(305, "未登陆"),
    ADMIN_ACCOUNT_NOT_EXIST_ERROR(306, "账号不存在"),
    ADMIN_ACCOUNT_ERROR(307, "用户名或密码错误"),
    ADMIN_ACCOUNT_DISABLED_ERROR(308, "该用户已被禁用"),
    ADMIN_ACCESS_FORBIDDEN(309, "无访问权限"),

    APP_LOGIN_AUTH(501, "未登陆"),
    APP_LOGIN_PHONE_EMPTY(502, "手机号码为空"),
    APP_LOGIN_CODE_EMPTY(503, "验证码为空"),
    APP_SEND_SMS_TOO_OFTEN(504, "验证法发送过于频繁"),
    APP_LOGIN_CODE_EXPIRED(505, "验证码已过期"),
    APP_LOGIN_CODE_ERROR(506, "验证码错误"),
    APP_ACCOUNT_DISABLED_ERROR(507, "该用户已被禁用"),


    TOKEN_EXPIRED(601, "token过期"),
    TOKEN_INVALID(602, "token非法");


    private final Integer code;

    private final String message;

    ResultCodeEnum(Integer code, String message) {
        this.code = code;
        this.message = message;
    }
}
注意:
为确保Result和ResultCodeEnum类中的@Data和@Getter注解生效,需在common模块中添加lombok依赖。
<dependency>
    <groupId>org.projectlombok</groupId>
    <artifactId>lombok</artifactId>
</dependency>
上面的各种操作后,应该可以启动项目后,运行knife4j的api界面了
http://localhost:8080/doc.html
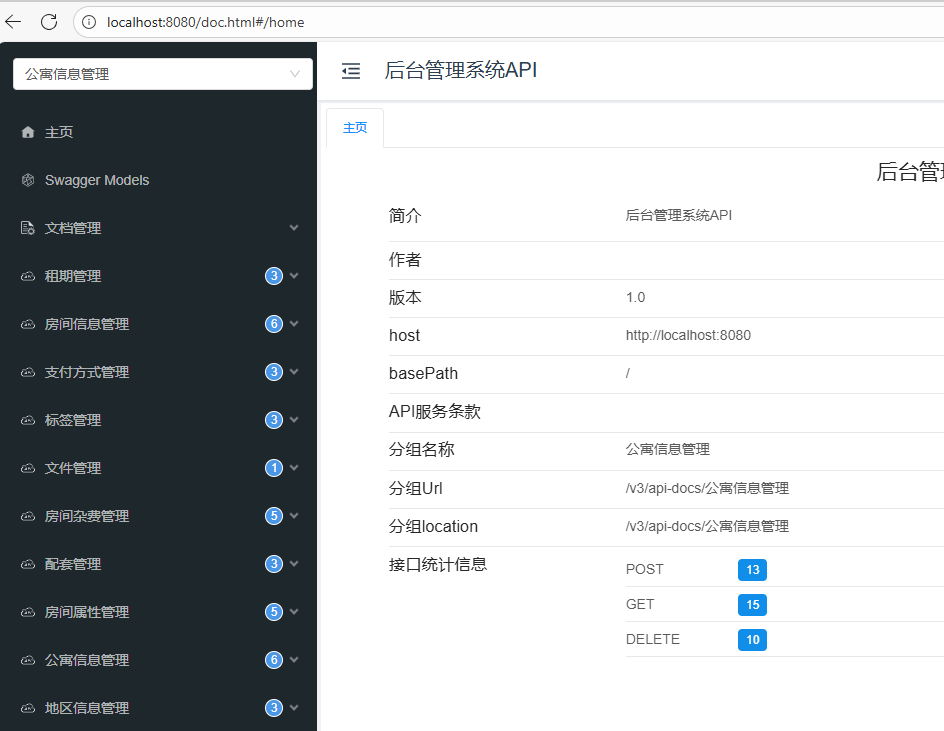
公寓信息管理
房间支付方式管理
支付方式管理提供三个核心接口,分别是:
- 查询所有支付方式列表
- 保存/更新支付方式
- 按ID删除支付方式
在PaymentTypeController中注入PaymentTypeService依赖,具体实现如下:
@Tag(name = "支付方式管理")
@RequestMapping("/admin/payment")
@RestController
public class PaymentTypeController {

    @Autowired
    private PaymentTypeService service;
}
1. 查询全部支付方式列表
在PaymentTypeController中添加以下内容
@Operation(summary = "查询全部支付方式列表")
@GetMapping("list")
public Result<List<PaymentType>> listPaymentType() {
    List<PaymentType> list = service.list();
    return Result.ok(list);
}-
逻辑删除功能
知识点:
由于数据库中的所有表都采用逻辑删除机制,在查询数据时都需要添加is_deleted=0的过滤条件。
虽然这个操作并不复杂,但每个查询接口都需要单独处理,显得比较繁琐。通过使用Mybatis-Plus提供的逻辑删除功能,可以自动为查询添加is_deleted=0条件,并将删除操作转换为更新语句。具体配置方法如下(详情可参考官方文档):
- 方式一(全局配置):在 application.yml 文件中添加以下配置
mybatis-plus:
  global-config:
    db-config:
      logic-delete-field: isDeleted # 全局逻辑删除的实体字段名
      logic-delete-value: 1 # 逻辑已删除值(默认为 1)
logic-not-delete-value: 0 # 逻辑未删除值(默认为 0)- 方式二(增加注解):为实体类的删除标识字段添加@TableLogic注解
@Data
public class BaseEntity implements Serializable {

    @Schema(description = "主键")
    @TableId(value = "id", type = IdType.AUTO)
    private Long id;

    @Schema(description = "创建时间")
    @TableField(value = "create_time")
    private Date createTime;

    @Schema(description = "更新时间")
    @TableField(value = "update_time")
    private Date updateTime;

    @Schema(description = "逻辑删除")
    @TableLogic
    @TableField("is_deleted")
    private Byte isDeleted;

}注意:逻辑删除功能仅适用于Mybatis-Plus自动生成的SQL语句,对于Mapper.xml文件中手动编写的SQL查询不生效,需要自行处理。
-
忽略特定字段
接口返回的JSON数据中通常不需要包含create_time、update_time和is_deleted等字段。可以通过在实体类的对应字段上添加@JsonIgnore注解,这些字段在序列化时就会被自动忽略。
具体配置如下(完整用法请参考Jackson官方文档):
@Data
public class BaseEntity implements Serializable {
@Schema(description = "主键")
@TableId(value = "id", type = IdType.AUTO)
private Long id;
@Schema(description = "创建时间")
@TableField(value = "create_time")
@JsonIgnore
private Date createTime;
@Schema(description = "更新时间")
@TableField(value = "update_time")
@JsonIgnore
private Date updateTime;
@Schema(description = "逻辑删除")
@TableLogic
@TableField("is_deleted")
private Byte isDeleted;
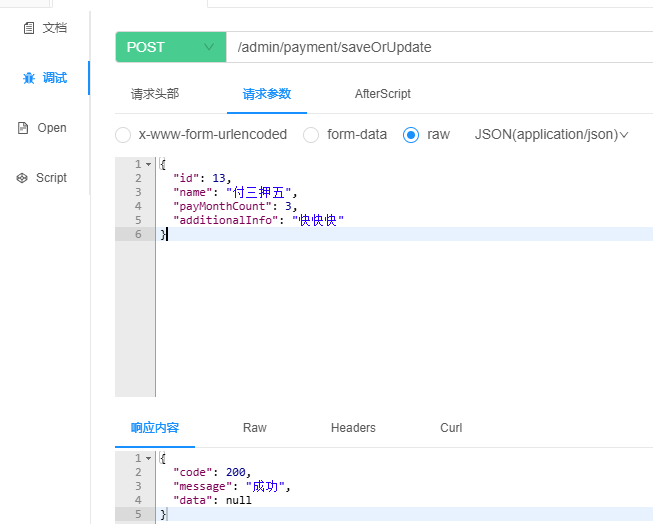
}2. 添加或更新付款方式
在PaymentTypeController中新增以下代码:
@Operation(summary = "保存或更新支付方式")
@PostMapping("saveOrUpdate")
public Result saveOrUpdatePaymentType(@RequestBody PaymentType paymentType) {
    service.saveOrUpdate(paymentType);
    return Result.ok();
}
知识点:
在数据保存或更新时,前端通常不会传递isDeleted、createTime、updateTime这三个字段,需要后端手动赋值。考虑到这些字段存在于大多数数据库表中,手动处理会带来重复劳动。我们可以通过以下方式优化这一流程:
- 建议将数据库中的
is_deleted字段默认值设为0。 -
create_time和update_time字段:通过MyBatis-Plus的自动填充功能实现动态赋值。该功能会在数据插入或更新时,自动为指定字段设置值。具体配置方法如下(详见官方文档):-
设置字段自动填充的触发时机:例如
create_time应在数据插入时填充,update_time则在数据更新时填充。配置方式如下,注意查看@TableField注解中的fill属性设置。
-
@Data
public class BaseEntity implements Serializable {

    @Schema(description = "主键")
    @TableId(value = "id", type = IdType.AUTO)
    private Long id;

    @Schema(description = "创建时间")
    @TableField(value = "create_time",fill = FieldFill.INSERT)
    @JsonIgnore
    private Date createTime;

    @Schema(description = "更新时间")
    //fill = FieldFill.INSERT_UPDATE 新增和修改都填充
    //fill = FieldFill.UPDATE 修改才填充
    @TableField(value = "update_time",fill = FieldFill.INSERT_UPDATE)
    @JsonIgnore
    private Date updateTime;

    @Schema(description = "逻辑删除")
    @TableLogic
    @TableField("is_deleted")
    private Byte isDeleted;
}
fill = FieldFill.INSERT/UPDATE是 “触发条件”,我们还要增加填充逻辑,实现它
自动填充功能配置如下
在 common 模块下创建 com.yuhuan.lease.common.mybatisplus.MybatisMetaObjectHandler 类,具体实现如下:
/**
 * MyBatis-Plus 字段自动填充处理器(必须@Component 交给 Spring 管理)
 */
@Component // 关键:让 Spring 扫描到这个处理器,否则不生效
public class MyMetaObjectHandler implements MetaObjectHandler {

    // 新增时填充(对应 FieldFill.INSERT)
    @Override
    public void insertFill(MetaObject metaObject) {
        // 给 "createTime" 字段填充当前时间(字段名要和实体类属性名一致!)
        this.strictInsertFill(
            metaObject,        // MyBatis-Plus 提供的元数据对象
            "createTime",      // 实体类中需要填充的属性名(必须和 private Date createTime; 一致)
            Date.class,        // 字段类型(和实体类字段类型一致)
            new Date()         // 填充的值(这里填当前系统时间)
        );

        // 可选:新增时也填充 updateTime(让创建时间和更新时间一致)
        this.strictInsertFill(
            metaObject,
            "updateTime",
            Date.class,
            new Date()
        );
    }

    // 修改时填充(对应 FieldFill.UPDATE)
    @Override
    public void updateFill(MetaObject metaObject) {
        // 给 "updateTime" 字段填充当前时间
        this.strictUpdateFill(
            metaObject,
            "updateTime",
            Date.class,
            new Date()
        );
    }
}
![]()
3. 根据ID删除支付方式
在 PaymentTypeController 中新增以下代码:
@Operation(summary = "根据ID删除支付方式")
@DeleteMapping("deleteById")
public Result deletePaymentById(@RequestParam Long id) {
    service.removeById(id);
    return Result.ok();
}
房间租期管理
房间租期管理提供三个核心接口:查询全部租期列表、保存/更新租期信息、以及根据ID删除租期。具体实现位于LeaseTermController中,代码如下所示:
@Tag(name = "租期管理")
@RequestMapping("/admin/term")
@RestController
public class LeaseTermController {
    @Autowired
    private LeaseTermService service;
    @GetMapping("list")
    @Operation(summary = "查询全部租期列表")
    public Result<List<LeaseTerm>> listLeaseTerm() {
        List<LeaseTerm> list = service.list();
        return Result.ok(list);
    }

    @PostMapping("saveOrUpdate")
    @Operation(summary = "保存或更新租期信息")
    public Result saveOrUpdate(@RequestBody LeaseTerm leaseTerm) {
        service.saveOrUpdate(leaseTerm);
        return Result.ok();
    }

    @DeleteMapping("deleteById")
    @Operation(summary = "根据ID删除租期")
    public Result deleteLeaseTermById(@RequestParam Long id) {
        service.removeById(id);
        return Result.ok();
    }
}
标签管理
标签管理提供三个接口:[根据类型]查询标签列表、保存/更新标签信息、根据ID删除标签。下面我们逐步实现这些功能。
首先,在LabelController中注入LabelInfoService依赖,代码如下:
@Tag(name = "标签管理")
@RestController
@RequestMapping("/admin/label")
public class LabelController {

    @Autowired
    private LabelInfoService service;
}
1. [根据类型]查询标签列表
在LabelController中添加以下内容
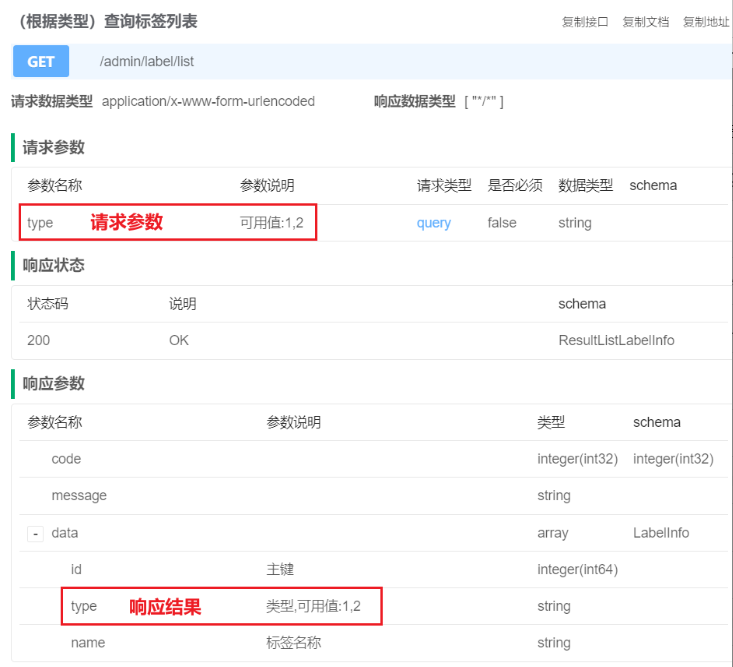
    @Operation(summary = "(根据类型)查询标签列表")
    @GetMapping("list")
    public Result<List<LabelInfo>> labelList(@RequestParam(required = false) ItemType type) {
        LambdaQueryWrapper<LabelInfo> labelInfoLambdaQueryWrapper = new LambdaQueryWrapper<>();
        //这里的type 不是必传的,如果存在就查询,反之就不查询
        labelInfoLambdaQueryWrapper.eq(type!=null,LabelInfo::getType,type);
        List<LabelInfo> list = service.list(labelInfoLambdaQueryWrapper);
        return Result.ok(list);
    }
测试改接口发现在传递type的时候,执行后报错了
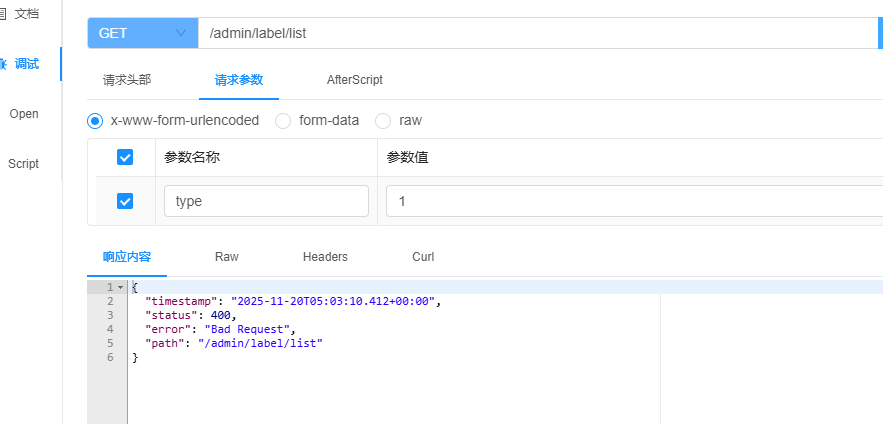
查看日志发现如下报错信息:
DefaultHandlerExceptionResolver : Resolved [org.springframework.web.method.annotation.MethodArgumentTypeMismatchException: Failed to convert value of type 'java.lang.String' to required type 'com.yuhuan.lease.model.enums.ItemType'; Failed to convert from type [java.lang.String] to type [@org.springframework.web.bind.annotation.RequestParam com.yuhuan.lease.model.enums.ItemType] for value '1']
根据上面的信息,我们可以得到是类型转换的时候出现了问题
报错原因很明确:前端传入的参数是字符串类型(比如 "1"),但后端接口接收的是枚举类型 ItemType,Spring 无法自动将 String 转成枚举。
该接口功能是根据房产类型(公寓/房间)查询对应的标签列表。由于type字段在数据库存储、实体类定义及前后端交互中采用不同的数据类型格式,因此在接口请求和响应过程中会进行多次数据类型转换处理。
以下是type字段的各种形式:
- 数据库中
数据库中的type字段采用tinyint类型
+-------------+--------------+
| Field       | Type         |
+-------------+--------------+
| id          | bigint       |
| type        | tinyint      |
| name        | varchar(255) |
| create_time | timestamp    |
| update_time | timestamp    |
| is_deleted  | tinyint      |
+-------------+--------------+- 实体类
实体类中的 type 字段为 ItemType 枚举类型。
LabelInfo 实体类定义如下:
@Schema(description = "标签信息表")
@TableName(value = "label_info")
@Data
public class LabelInfo extends BaseEntity {

    private static final long serialVersionUID = 1L;

    @Schema(description = "类型")
    @TableField(value = "type")
    private ItemType type;

    @Schema(description = "标签名称")
    @TableField(value = "name")
    private String name;
}ItemType枚举类如下
public enum ItemType {

    APARTMENT(1, "公寓"),
    ROOM(2, "房间");

    private Integer code;
    private String name;

    ItemType(Integer code, String name) {
        this.code = code;
        this.name = name;
    }
}- 前后端交互中
前后端交互所传递的数据中type字段为数字(1/2)。
-
请求流程

说明
- SpringMVC的WebDataBinder组件负责将HTTP请求参数绑定到Controller方法参数,并实现参数类型转换。
- Mybatis的TypeHandler则用于处理Java对象与数据库之间的数据类型转换。
-
响应流程

说明
-
SpringMVC的HTTPMessageConverter组件负责处理Java对象与HTTP请求/响应之间的数据转换。它能够:
- 将Controller方法的返回值(Java对象)转换为HTTP响应体中的JSON格式数据
- 将请求体中的JSON数据转换为Controller方法的参数对象
-
例如,在处理标签信息的保存或更新接口时,该组件会自动完成对象与JSON数据之间的相互转换。

-
处理方案:
方案一 :枚举类实现 Converter 接口
让枚举类自己实现类型转换逻辑,Spring 会自动识别,无需额外配置,所有接口接收该枚举都能生效。
步骤 1:增加自定义转换器
@Component
public class StringToItemTypeConverter implements Converter<String, ItemType> {
    @Override
    public ItemType convert(String code) {

        for (ItemType value : ItemType.values()) {
            if (value.getCode().equals(Integer.valueOf(code))) {
                return value;
            }
        }
        throw new IllegalArgumentException("code非法");
    }
}
不需要手动注册到
WebMvcConfigurer.addFormatters()中也能正常工作,是因为它加了@Component注解,被 Spring 自动检测并注册到了全局的ConversionService中 —— 这是 Spring Boot 的默认行为。
方案二:ConverterFactory
然而,当多个枚举类型都需要处理类型转换时,若为每个枚举单独定义Converter会导致大量重复代码。此时采用ConverterFactory接口更为高效,它能将统一转换逻辑应用于所有相关枚举类。为此,我们可定义一个BaseEnum接口,让所有枚举类实现该接口,再通过自定义ConverterFactory集中处理枚举类的转换逻辑。具体实现方案如下:
- 定义在
com.yuhuan.lease.model.enums包中的BaseEnum接口
public interface BaseEnum {

    Integer getCode();

    String getName();
}- com.yuhuan.lease.model.enums包下的所有枚举类需实现BaseEnum接口
-
在 web-admin 模块中自定义的转换器工厂类:
com.yuhuan.lease.web.admin.custom.converter.StringToBaseEnumConverterFactory
// 使用 @Component 注解,将此类声明为 Spring 管理的 Bean。
// Spring Boot 启动时会自动扫描并注册该工厂到 ConversionService 中,
// 从而实现对所有 BaseEnum 子类枚举的字符串 → 枚举类型自动转换(如 @RequestParam 参数绑定)。
@Component
public class StringToBaseEnumConverterFactory implements ConverterFactory<String, BaseEnum> {

    // 实现 ConverterFactory 接口的核心方法:根据目标枚举类型动态生成对应的转换器。
    // 当 Spring MVC 需要将字符串转换为某个具体的 BaseEnum 实现类(如 ItemType)时,
    // 会调用此方法,并传入目标类型(例如 ItemType.class),由工厂返回一个专用的 Converter。
    @Override
    public <T extends BaseEnum> Converter<String, T> getConverter(Class<T> targetType) {
        // 返回一个匿名内部类形式的 Converter<String, T>,
        // 它负责将字符串 source 转换为指定枚举类型 T 的实例。
        return new Converter<String, T>() {
            @Override
            public T convert(String source) {
                // 【健壮性增强建议】应首先处理 null 或空白字符串的情况
                // if (source == null || source.trim().isEmpty()) {
                //     return null; // 兼容 required = false 的请求参数
                // }

                try {
                    // 将输入的字符串去除首尾空格后解析为 Integer 对象
                    // 假设前端传递的是数字编码(如 "1"),对应枚举中的 getCode() 值
                    Integer targetCode = Integer.valueOf(source.trim());

                    // 获取该枚举类的所有枚举常量数组(如 ItemType.values())
                    for (T enumConstant : targetType.getEnumConstants()) {
                        // 比较当前枚举项的 getCode() 是否与传入的 code 相等
                        if (enumConstant.getCode().equals(targetCode)) {
                            // 匹配成功,返回对应的枚举实例
                            return enumConstant;
                        }
                    }
                    // 若遍历完仍未找到匹配项,说明传入的值无效
                } catch (NumberFormatException e) {
                    // 如果字符串无法转成数字(如传了 "abc"),也属于非法输入
                    throw new IllegalArgumentException("无法解析枚举值: '" + source + "',必须为有效整数。", e);
                }

                // 找不到对应枚举时抛出明确错误信息
                throw new IllegalArgumentException("非法的枚举值: " + source);
            }
        };
    }
}
在web-admin模块中创建com.yuhuan.lease.web.admin.custom.config.WebMvcConfiguration类,用于注册ConverterFactory,具体内容如下:
@Configuration
public class WebMvcConfiguration implements WebMvcConfigurer {

    @Autowired
    private StringToBaseEnumConverterFactory stringToBaseEnumConverterFactory;

    @Override
    public void addFormatters(FormatterRegistry registry) {
        registry.addConverterFactory(this.stringToBaseEnumConverterFactory);
    }
}
总结:
核心结论:两种方式的「转换器类型不同」,导致 Spring Boot 3 的自动注册逻辑不一样—— 方式一是「固定类型 Converter」(String→ItemType),Spring 能直接识别;方式二是「泛型 ConverterFactory」(String→BaseEnum),Spring 自动匹配时存在泛型歧义,必须手动注册到 WebMvcConfigurer 强制生效。
根本原因:Spring 对两种转换器的自动识别逻辑不同
1. 方式一(StringToItemTypeConverter):固定类型 Converter,自动注册无压力
- 你的代码明确实现
Converter<String, ItemType>:源类型String、目标类型ItemType都是「具体类型」,无任何泛型模糊; - Spring Boot 3 扫描到
@Component注解的Converter时,能直接确定:“这个转换器是用来把 String 转 ItemType 的”,无需额外配置,直接纳入转换体系; - 哪怕项目有其他
WebMvcConfigurer,只要没覆盖addFormatters或调用了super.addFormatters(registry),自动注册都能生效。
2. 方式二(StringToBaseEnumConverterFactory):泛型 ConverterFactory,自动注册易失效
- 你的代码是
ConverterFactory<String, BaseEnum>:目标类型是「接口 BaseEnum」,而非具体枚举(如 ItemType); - Spring 自动注册时,需要推导:“这个工厂能把 String 转哪些具体枚举?”(所有实现 BaseEnum 的枚举),但 Spring 3.x 对「泛型接口→具体实现类」的自动匹配逻辑较严格,容易因以下原因失效:
- 泛型推导歧义:BaseEnum 可能有多个实现类(ItemType、OrderType 等),Spring 无法提前预判 “当前请求需要转哪个枚举”,导致自动注册后不触发;
- Spring 版本兼容问题:Spring Boot 3.0.x~3.1.x 对泛型 ConverterFactory 的自动扫描存在小缺陷,3.2.x 后修复,但实际项目中仍建议手动注册保稳;
- 转换优先级问题:Spring 自带的枚举转换器(按枚举名匹配)优先级高于你的自定义工厂,自动注册时可能被默认转换器覆盖,导致你的工厂不执行。
@EnumValue @JsonValue在枚举转换中起到的作用
✅ 总结一句话
| 注解 | 来源 | 作用 |
|---|---|---|
@EnumValue | MyBatis-Plus | 控制数据库查出的字段值 → Java 枚举对象(用于反向映射) |
@JsonValue | Jackson | 控制 Java 枚举对象 → JSON 字符串的输出格式(用于序列化) |
🔁 简单说:
@EnumValue:从数据库值 → 枚举实例@JsonValue:从枚举实例 → 输出 JSON 值
🔁 完整流程图(理想闭环)
前端请求参数:      "type=1"
                     ↓
Spring MVC 使用 Converter/ConverterFactory
                     ↓
Java 枚举:         ItemType.APARTMENT   ← @EnumValue 支持数据库映射
                     ↓
Controller 返回 JSON
                     ↓
Jackson 序列化     {"type": 1}          ← @JsonValue 控制输出格式
2.保存或更新标签信息
    @Operation(summary = "新增或修改标签信息")
    @PostMapping("saveOrUpdate")
    public Result saveOrUpdateLabel(@RequestBody LabelInfo labelInfo) {
        service.saveOrUpdate(labelInfo);
        return Result.ok();
    }
3. 根据ID删除标签
    @Operation(summary = "根据id删除标签信息")
    @DeleteMapping("deleteById")
    public Result deleteLabelById(@RequestParam Long id) {
        service.removeById(id);
        return Result.ok();
    }


 1475
1475

 被折叠的 条评论
为什么被折叠?
被折叠的 条评论
为什么被折叠?
 到【灌水乐园】发言


